![For Zesty Lemon Garlic Shrimp Tacos, you will need: - 1 pound large shrimp, peeled and deveined - 3 tablespoons olive oil - 4 cloves garlic, minced - Zest and juice of 2 lemons - 1 teaspoon smoked paprika - 1 teaspoon cumin - Salt and black pepper to taste - 8 small corn tortillas - 1 cup cabbage, finely shredded - ½ cup cherry tomatoes, halved - 1 avocado, sliced - Fresh cilantro, for garnish - Lime wedges, for serving Start with fresh shrimp for the best taste. Peel and devein them before cooking. Mince the garlic finely; this helps it mix well with the shrimp. Grate the lemon zest lightly. Zesting too hard can give a bitter flavor. Use fresh lemons for juice, as they give the best flavor. Slice the avocado just before serving to keep it fresh. You can add a few extra ingredients for more flavor. Try diced jalapeños for some heat. Add a splash of lime juice for extra tang. You can also sprinkle some queso fresco for a creamy touch. Fresh radishes can give a nice crunch, too. If you like herbs, try adding some fresh dill or mint. These options can make your tacos even tastier! For the full recipe, check the details provided above. To make these zesty lemon garlic shrimp tacos, start by mixing the shrimp and marinade. In a bowl, combine: - 1 pound large shrimp, peeled and deveined - 3 tablespoons olive oil - 4 cloves garlic, minced - Zest and juice of 2 lemons - 1 teaspoon smoked paprika - 1 teaspoon cumin - Salt and black pepper to taste Mix well so the shrimp gets coated. Next, heat a large skillet over medium-high heat. Add the shrimp in a single layer. Cook for 2-3 minutes on each side. You want them to turn opaque. Once done, take them off the heat. While the shrimp cooks, warm the tortillas. You can do this in a separate skillet or over an open flame. Just heat them until they are soft and warm. To assemble your tacos, take a tortilla and place a few pieces of shrimp inside. Add shredded cabbage, halved cherry tomatoes, and sliced avocado on top. To cook shrimp perfectly, avoid overcrowding the skillet. Give each piece space to cook evenly. Use medium-high heat for a nice sear. Make sure the shrimp turn pink and opaque. This shows they are done. Cooking shrimp too long makes them chewy. Warming tortillas is simple but key. You can use a skillet or an open flame. For a skillet, heat it on medium for a minute. Place the tortilla in for a few seconds on each side. If using the flame, hold the tortilla with tongs for a few seconds. Both methods make them soft and warm. Enjoy your tacos with fresh lime wedges and zesty flavors. For the full recipe, check the above section. To make the best Zesty Lemon Garlic Shrimp Tacos, use fresh shrimp. Fresh shrimp gives a better taste than frozen. When cooking, don’t overcrowd the pan. This helps the shrimp cook evenly. Use high heat to get a nice sear on them. It adds flavor and keeps them juicy. One common mistake is overcooking shrimp. Cook them just until they turn opaque. This usually takes 2-3 minutes per side. Another mistake is not seasoning enough. Make sure to add salt and pepper to taste. Don't skip the lemon juice; it brightens all the flavors. Start with a good marinade. Combine olive oil, garlic, lemon zest, lemon juice, smoked paprika, and cumin. Let the shrimp sit in this mix for at least 15 minutes. This allows the flavors to soak in. When cooking, taste a piece. Adjust seasoning as needed; you want it vibrant and zesty. For the full recipe, check out the Zesty Lemon Garlic Shrimp Tacos. {{image_2}} You can add heat easily. Just mix in some sliced jalapeños or red pepper flakes. This makes your tacos pop with flavor. The spice balances well with the lemon and garlic. You will love the kick! Adjust the heat to your taste. Not a fan of shrimp? No problem! Swap shrimp for grilled veggies like zucchini or bell peppers. You can also use hearty mushrooms. They absorb the lemon and garlic flavors nicely. This change keeps the dish zesty and fun. It's an easy way to enjoy the same great taste without seafood. Toppings can change your taco game. Try adding fresh mango salsa for sweetness. It pairs well with the zesty shrimp. You can also use a spicy chipotle sauce for an extra punch. Don't forget about sour cream or Greek yogurt for creaminess. Each topping adds a new layer of flavor. Feel free to mix and match until you find your favorite combo. Enjoy exploring! To keep your leftover tacos, wrap them tightly in foil or plastic wrap. This keeps them fresh and tasty. Store them in the fridge for up to two days. If you have extra shrimp, store them in an airtight container. They will last for three days. When you're ready to eat the tacos, remove them from the fridge. Heat a skillet over medium heat. Place the tacos in the skillet for about 2-3 minutes. This warms them nicely. If you only have shrimp, heat them in the skillet until they are warm. You can also use the microwave, but this may make the tortillas soft. You can freeze the shrimp for later use. Place the cooked shrimp in a freezer bag. Make sure to remove as much air as possible. They can stay in the freezer for up to three months. When you're ready to use them, thaw in the fridge overnight. Then, reheat as mentioned above. For the full recipe, check out Zesty Lemon Garlic Shrimp Tacos. To make Zesty Lemon Garlic Shrimp Tacos from scratch, start with fresh shrimp. You’ll need to mix shrimp with olive oil, minced garlic, lemon zest, lemon juice, smoked paprika, cumin, salt, and black pepper. Let the shrimp marinate for at least 10 minutes. Cook the shrimp in a hot skillet for 2-3 minutes per side. Warm corn tortillas until soft. Finally, fill the tortillas with shrimp, cabbage, cherry tomatoes, and avocado. You can find the [Full Recipe] for detailed steps. You can serve many sides with these tacos. I like to pair them with fresh salsa. A simple corn salad adds a nice crunch too. Chips and guacamole are a fun option as well. For a drink, try a limeade or a light beer. These sides balance the flavors and make your meal special. Yes, you can use frozen shrimp for this recipe. Just make sure to thaw them first. Place frozen shrimp in the fridge overnight or run them under cold water for quick thawing. Once thawed, pat them dry before marinating. This helps the flavors stick better, giving you tasty tacos. To stop shrimp from turning rubbery, avoid overcooking them. Cook shrimp until they turn opaque and curl slightly. This usually takes 2-3 minutes per side. Also, marinating shrimp helps keep them tender. Use fresh shrimp whenever you can, as they cook better than older ones. We covered everything you need to make Zesty Lemon Garlic Shrimp Tacos. I shared a list of ingredients, cooking tips, and special touches to elevate your dish. You'll also know how to store leftovers and reheat them perfectly. As you cook, remember to avoid common mistakes. Enjoy trying different flavors and toppings too. With these steps, you'll be ready to impress anyone with your cooking skills!](https://southerndishes.com/wp-content/uploads/2025/05/0984f291-e008-4c54-ad9d-17cb2519aed2.webp)
Zesty Lemon Garlic Shrimp Tacos Flavorful and Easy
Are you ready to elevate your taco night with a burst of flavor? These Zesty Lemon Garlic Shrimp Tacos are
Are you ready to elevate your taco night with a burst of flavor? These Zesty Lemon Garlic Shrimp Tacos are
![- 1 cup frozen spinach, thawed and drained - 1 cup canned artichoke hearts, drained and chopped - 1 cup cream cheese, softened - ½ cup sour cream - ½ cup mayonnaise - 1 cup shredded mozzarella cheese - ½ cup grated Parmesan cheese - 2 cloves garlic, minced - 1 teaspoon garlic powder - Salt and pepper to taste - ½ teaspoon red pepper flakes (optional) For cream cheese, you can use Greek yogurt or cashew cream. These will give you a nice creamy texture. If you want to swap out sour cream, try using plain yogurt or silken tofu. Both options work well and keep it smooth. For a vegan dip, use vegan cream cheese and yogurt. You can easily make this dip fit your needs! I love using these substitutions to keep my dip tasty for everyone. You can still enjoy the rich flavors without missing out. Don't forget to check the [Full Recipe] for all the details! First, you need to preheat your oven to 375°F (190°C). This step is key for a nice bake. While the oven heats up, grab a baking dish. A 9-inch dish works best. Grease it lightly with oil or butter to prevent sticking. It helps the dip come out easily. In a large mixing bowl, combine the cream cheese, sour cream, and mayonnaise. Use a hand mixer or a spatula to mix until smooth and creamy. This is where the magic starts. Next, add the chopped artichoke hearts and the spinach. Make sure it’s well-drained to avoid a watery dip. Then, toss in the minced garlic, shredded mozzarella, and grated Parmesan. These cheeses add a rich flavor. Finally, season the mixture with garlic powder, salt, pepper, and red pepper flakes if you want some heat. Stir everything until well mixed. Now, it's time to transfer your mixture into the prepared baking dish. Spread it out evenly with a spatula. Place the dish in your oven and bake for 25 to 30 minutes. Watch for the top to turn golden brown and bubbly. This means your dip is ready. Once done, take it out of the oven and let it cool for a few minutes. This gives the dip time to set and makes it safer to eat. Enjoy your Easy Spinach Artichoke Dip with chips or veggies! For the complete instructions, check the Full Recipe. To make your spinach artichoke dip truly creamy, start with softened cream cheese. This helps mix easily and gives a smooth texture. Use a hand mixer or a sturdy spoon to blend your ingredients well. When measuring, be precise. Too much or too little can change the dip's taste. Use dry measuring cups for solids and liquid measuring cups for liquids to ensure accuracy. This dip shines when served warm. Pair it with tortilla chips, sliced baguette, or fresh veggies. Arrange the chips around the dip for a nice look. You can also serve it in a bread bowl. This adds flair and gives your guests an extra treat. Want to boost the taste? Add spices like cumin or smoked paprika. Fresh herbs like parsley or basil can add brightness too. For some heat, sprinkle in red pepper flakes. Start with a little and taste as you go. This way, you control the spice level and keep your dip enjoyable for everyone. {{image_2}} You can add fun flavors to your spinach artichoke dip. One great option is to mix in a variety of cheeses. The creaminess from the mozzarella and the punch from Parmesan makes a perfect match. You might also want to try adding sun-dried tomatoes for a burst of tangy flavor. If you like a bit of spice, jalapeños can add some heat. Just chop them up and stir them in! If you need gluten-free options, most ingredients work well! Just make sure your mayonnaise and other products are labeled gluten-free. For those who want a dairy-free or vegan dip, you can swap cream cheese with cashew cream or a store-bought vegan cream cheese. Use plant-based sour cream and vegan cheese too. The flavors stay rich and tasty! You can serve this dip in many fun ways. For a cold dip, mix all the ingredients, chill it, and serve with chips. It’s fresh and bright! Another tasty idea is to use a bread bowl. Hollow out a loaf of bread, fill it with the dip, and bake it. The bread absorbs the flavors, making every bite special! After you enjoy this dip, store any leftovers in an airtight container. This keeps it fresh. You can put it in the fridge right away. It will last for about 3 to 5 days. Make sure it cools down before sealing it. If you plan to keep it longer, consider freezing it. When you're ready to eat the dip again, reheating is key. The best method is to use an oven or toaster oven. Preheat to 350°F (175°C). Place the dip in an oven-safe dish. Heat it for about 15 minutes, or until warm. This method keeps the dip creamy and tasty. You can also microwave it, but be careful. Heat it in short bursts, stirring in between. This helps keep the texture nice. Yes, you can freeze spinach artichoke dip! Just place it in a freezer-safe container. It can last for about 2 months in the freezer. When you want to eat it, thaw it overnight in the fridge. After thawing, reheat using the oven or microwave as mentioned before. This way, you maintain its great flavor and texture. For the best results, do not refreeze it after reheating. Enjoy your dip anytime! Yes, you can make this dip ahead of time. Here are some key points: - Prepare the dip and place it in a baking dish. - Cover it tightly with plastic wrap or foil. - Store it in the fridge for up to 24 hours. - When ready to bake, remove the cover and bake as directed. To check if your dip is done, look for these signs: - The top should be golden brown and bubbly. - You can also insert a fork in the center. - If it’s hot all the way through, it’s ready! Yes, fresh spinach is a great option! Here are some tips: - Use about 2 cups of fresh spinach for this recipe. - Rinse and chop the spinach before cooking. - Sauté it in a pan until wilted, then drain excess water. You can easily spice up your dip with these options: - Add more red pepper flakes to the mix. - Stir in some diced jalapeños for extra heat. - Consider using spicy cheeses or hot sauce for flavor. For the complete recipe, check out the Full Recipe link. This blog post covered ingredients, instructions, and tips for making Easy Spinach Artichoke Dip. You learned about what to use and how to mix and bake the dip. I shared ways to change up the recipe based on your taste and diet. Remember, this dip is fun and easy to make. Enjoy it with chips, veggies, or bread. Whether you are hosting a party or having a snack, this dip will impress everyone. Now, get cooking and share this tasty treat with friends!](https://southerndishes.com/wp-content/uploads/2025/05/d7e08ec6-a76f-44f5-a047-7638c80b6ef8.webp)
Craving a delicious dip that’s simple to make? Look no further! This Easy Spinach Artichoke Dip hits the spot with
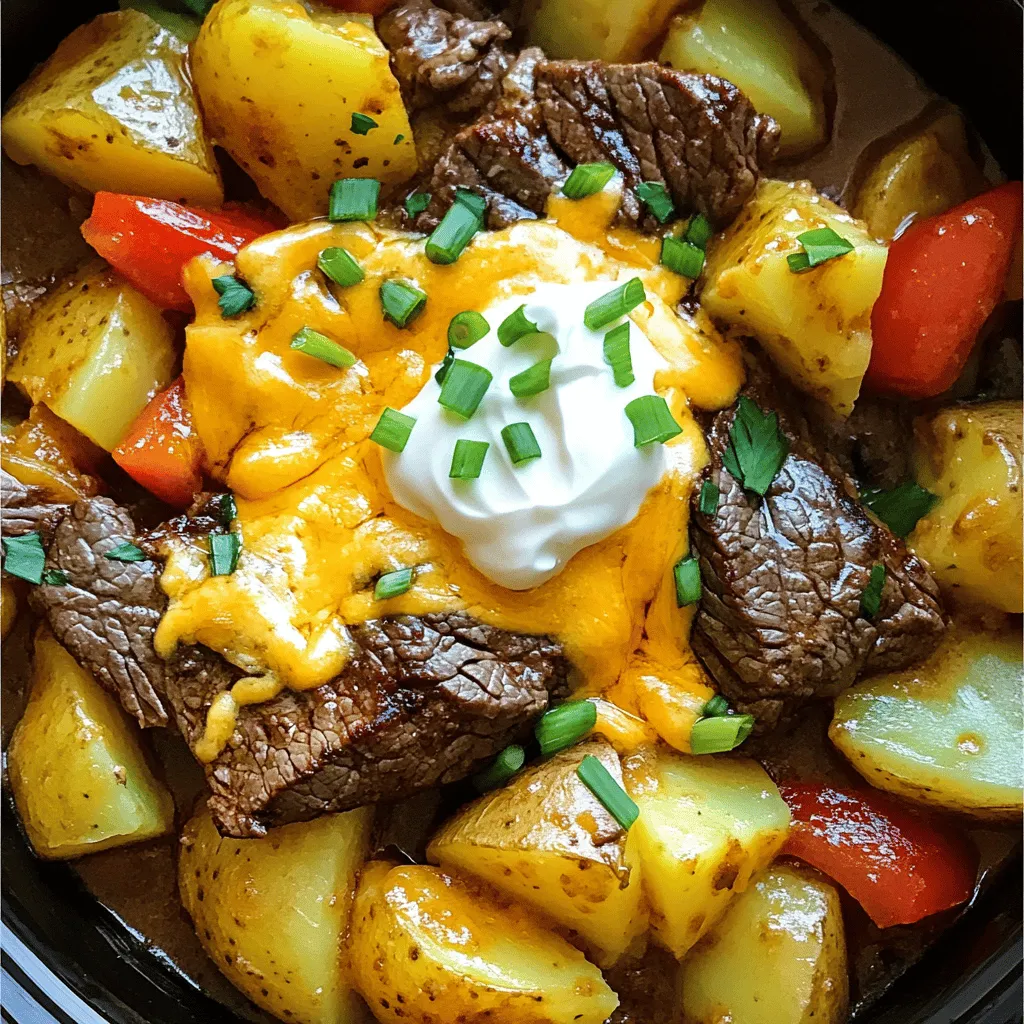
![- 1 pound ground beef - 1 cup mashed potatoes (prepared and cooled) - 1 cup shredded cheddar cheese - 1/2 cup diced green onions For this dish, I love using ground beef. It gives the meatloaf a rich and hearty flavor. Mashed potatoes add a creamy texture that makes each bite delightful. Shredded cheddar cheese melts beautifully throughout, adding a gooey, cheesy goodness. Diced green onions bring a fresh crunch and a pop of color. - 1/2 cup cooked and crumbled turkey bacon - Seasonings to taste If you want a little extra flavor, try adding turkey bacon. It gives a nice smoky taste. You can also add your favorite seasonings to make it your own. Garlic powder and onion powder are great choices. - Mixing bowl - Loaf pan - Oven You will need a mixing bowl to combine all your ingredients. A loaf pan is key for shaping your meatloaf perfectly. Finally, an oven is essential for baking the meatloaf to golden perfection. For the complete recipe, check the Full Recipe. Combine Key Ingredients Start by gathering your ingredients for the meatloaf. You will need: - 1 pound ground beef - 1 cup mashed potatoes (prepared and cooled) - 1 cup shredded cheddar cheese - 1/2 cup diced green onions - 1/2 cup breadcrumbs - 1 large egg - 2 tablespoons Worcestershire sauce - 1 teaspoon garlic powder - 1 teaspoon onion powder - Salt and pepper to taste - Optional: 1/2 cup cooked and crumbled turkey bacon for added flavor In a large mixing bowl, combine the ground beef, mashed potatoes, shredded cheddar cheese, diced green onions, breadcrumbs, egg, Worcestershire sauce, garlic powder, onion powder, and turkey bacon if you choose to use it. Mixing with your hands really helps to blend everything well. Seasoning the Mixture Season your mixture with salt and pepper. This step is key to getting the right flavor. Use your hands to mix the ingredients gently. You want everything combined, but don’t overmix. Overmixing can make your meatloaf tough. Just mix until you see that all the ingredients are distributed evenly. Transferring to the Loaf Pan Once your meatloaf mixture is ready, transfer it into a lightly greased loaf pan. Shape it into a loaf that fits snugly in the pan. Make sure the top is smooth. This helps it cook evenly and look nice when you slice it. Baking Time and Temperature Preheat your oven to 350°F (175°C). Bake the meatloaf for about 1 hour. The meatloaf is ready when it reaches an internal temperature of 160°F (70°C) and has a nice brown top. Use a meat thermometer to check the temperature for accuracy. Importance of Resting After baking, remove the meatloaf from the oven. Let it rest for about 10 minutes before slicing. Resting is crucial because it allows the juices to redistribute. This means your meatloaf will be juicy and not dry. Tips for Slicing Use a sharp knife to slice the meatloaf. This helps keep your slices clean and neat. Try to cut even pieces for better presentation. Serve it warm on a plate, and don’t forget to add some fresh green onions or extra cheese on top for a beautiful touch. For a side, steamed broccoli or a fresh salad pair nicely with this dish. For the full recipe, check out the instructions above. Enjoy your cooking! To make the best meatloaf, do not overmix your ingredients. This keeps the meatloaf light and tender. Mix just until everything is combined. If you overmix, the meatloaf can turn out tough. If you want to try a different binding agent, use oatmeal or crushed crackers. Both options work well and add unique flavors. These ingredients help hold the meatloaf together while keeping it moist. For extra flavor, consider adding spices like smoked paprika or Italian seasoning. These can give your meatloaf a nice kick. You can also try a dash of hot sauce for a spicy twist. Cheese variations can make your meatloaf even tastier. Instead of cheddar, try using mozzarella or pepper jack. Each cheese adds its unique flavor and creaminess. When serving, slice the meatloaf and place it on a warm plate. Garnish it with extra green onions and a sprinkle of cheese on top. This makes it look nice and inviting. Pair your meatloaf with sides like steamed broccoli or a fresh garden salad. These options balance the rich flavors of the meatloaf. For a comforting meal, serve with mashed potatoes or garlic bread. {{image_2}} You can switch up the meat in Loaded Potato Meatloaf. Ground turkey or chicken makes a great choice. These lean meats keep your dish light but still tasty. They also soak up flavors well, just like beef. If you want a vegetarian option, try lentils or mushrooms. Both can give you a hearty texture. Mixing in black beans can also add more protein. Adding vegetables is a fun way to boost flavor and nutrition. Diced bell peppers or grated carrots work nicely. You can sneak in some spinach for extra greens. If you love heat, add crushed red pepper flakes or jalapeños. This gives your meatloaf a spicy kick. You can also try adding BBQ sauce for a smoky flavor. Cheese can really change the taste of your meatloaf. While cheddar is classic, you might enjoy mozzarella or pepper jack. Both can melt beautifully and add a new taste. If you want a dairy-free option, try vegan cheese. It melts well and still gives that cheesy goodness. You can also skip cheese entirely and use nutritional yeast for a cheesy flavor without dairy. For the full recipe, check out [Full Recipe]. Refrigeration Tips To keep your leftover meatloaf fresh, wrap it tightly in plastic wrap or foil. Place it in an airtight container. Store it in the fridge. It can last up to four days. Always let it cool down before storing. This helps prevent moisture buildup. Freezing Instructions For longer storage, freeze your meatloaf. Wrap it tightly in plastic wrap and then in foil. Label it with the date. It can stay in the freezer for up to three months. When you want to eat it, thaw it in the fridge overnight before reheating. Oven vs Microwave The oven is the best way to reheat meatloaf. Preheat it to 350°F (175°C) and place the meatloaf in a baking dish. Cover it with foil to keep it moist. Heat for about 20 minutes or until warm. If you use the microwave, place slices on a plate. Heat for 1-2 minutes, but it may dry out a bit. Best Practices for Retaining Flavor To keep your meatloaf juicy, add a little broth or water when reheating. This helps it stay moist. Always cover it to trap the steam. This keeps the flavor and texture intact. Batch Cooking Tips Making extra meatloaf can save you time. You can double the recipe and freeze half. This way, you always have a meal ready. Just follow the freezing instructions mentioned earlier. Pairing with Sides for Easy Meals Loaded potato meatloaf goes well with many sides. Try mashed potatoes, steamed veggies, or a fresh salad. These pairings make for quick and easy meals. You can mix and match sides throughout the week to keep things interesting. For a full recipe, check out the earlier section. To keep your meatloaf moist, follow these tips: - Use fresh ground beef with some fat content. - Add mashed potatoes for moisture. - Do not overmix the ingredients. - Allow resting time after baking. Overmixing can make the meatloaf dense. It’s crucial to mix just enough to combine all the ingredients. This keeps the meatloaf tender. Also, letting it rest allows the juices to settle, making each slice juicy and flavorful. Yes, you can make Loaded Potato Meatloaf ahead of time. Here are some meal prep tips: - Prepare the mixture a day before and store it in the fridge. - Shape the meatloaf and cover it with plastic wrap. - Bake it just before serving. This method saves time and lets flavors blend. You can even freeze the uncooked meatloaf for up to three months. Just thaw it in the fridge overnight before baking. Loaded Potato Meatloaf pairs well with these side dishes: - Steamed broccoli - Mashed cauliflower - Garden salad - Roasted vegetables - Garlic bread These sides add color and texture to your meal. They also provide a nice balance to the hearty meatloaf. For a complete meal experience, serve the meatloaf with a drizzle of gravy and a sprinkle of fresh herbs. Don't forget to check out the Full Recipe for more ideas! Loaded potato meatloaf combines comfort food favorites into one tasty dish. We explored essential ingredients like ground beef, mashed potatoes, and cheddar cheese. I shared tips for mixing and baking, plus ideas for enhancing flavors. Don't forget to follow storage tips for leftovers and reheating methods that keep it delicious. Experiment with variations to find your favorite twist. Enjoy making this dish that suits your needs and warms your table.](https://southerndishes.com/wp-content/uploads/2025/05/92d24e35-ce41-4c94-a8a9-105cc0e9d0bb.webp)
If you’re craving a hearty and flavorful dinner, Loaded Potato Meatloaf is your answer! This dish combines tender ground beef,

Do you love creamy, delicious mac & cheese? If so, you’re in for a treat! In this article, I’ll share
![- 1 pound gnocchi (store-bought or homemade) - 2 cups cherry tomatoes, halved - 3 cloves garlic, minced - 8 ounces burrata cheese - 1 cup fresh basil, torn Gnocchi is a fun and light pasta. You can buy it at the store or make it from scratch. Cherry tomatoes give the dish a sweet burst of flavor. The garlic adds depth, while burrata brings creaminess. Finally, fresh basil adds a lovely aroma and color. - 1 teaspoon red pepper flakes (optional) - 2 tablespoons balsamic glaze (optional) Red pepper flakes bring a little heat if you like spice. Balsamic glaze adds a sweet and tangy finish. You can use both or skip them based on your taste! - Salt and pepper to taste - 2 tablespoons olive oil for sautéing Salt and pepper are key for flavor. Olive oil helps cook the garlic and tomatoes. It gives everything a nice, smooth finish. Using good-quality olive oil can enhance the dish even more. This combination of ingredients makes a simple yet rich meal. For the full recipe, check out the details above! To start, bring a large pot of salted water to a boil. Use enough salt to make the water taste like the sea. Once boiling, add the gnocchi. Cook it until the gnocchi floats, usually around 2-3 minutes. This means it is ready! Drain the gnocchi and set it aside. Next, heat 2 tablespoons of olive oil in a large skillet over medium heat. Add 3 minced garlic cloves and, if you like spice, 1 teaspoon of red pepper flakes. Sauté for about 30 seconds until you smell the garlic. Now, add 2 cups of halved cherry tomatoes to the skillet. Season with salt and pepper. Cook for about 5-7 minutes. Stir often until the tomatoes soften and juice flows out. Now it’s time to mix everything. Take the cooked gnocchi and gently toss it into the skillet with the tomato mixture. Stir it all together so the gnocchi gets coated in the sauce. Heat everything through for another 2 minutes. Finally, remove the skillet from the heat. Fold in 1 cup of torn fresh basil. Serve the dish onto plates and top each serving with 8 ounces of burrata cheese. This cheese will melt into the gnocchi, adding a creamy touch. Enjoy this simple delight! For the full recipe, check out [Full Recipe]. To cook gnocchi, boil salted water in a large pot. Once boiling, add the gnocchi. They are done when they float to the top, usually in 2-3 minutes. Drain them well before adding to the sauce. To enhance tomato flavors, use fresh, ripe cherry tomatoes. Sauté them until they burst and release their juices. Add salt and pepper while cooking for more depth. A splash of balsamic glaze at the end adds sweetness. Serve the gnocchi in shallow bowls. This lets the creamy burrata shine on top. Add torn basil leaves for a pop of color. A drizzle of balsamic glaze completes the dish beautifully. For sides, pair this dish with a light salad. A crisp green salad with lemon dressing works well. A chilled glass of white wine also complements the flavors. For added flavor, sprinkle in some fresh herbs. Basil and oregano work well with tomatoes. A pinch of crushed red pepper adds heat; adjust it to taste based on your preference. If you want to switch up the cheese, try using fresh mozzarella or ricotta instead of burrata. Both bring a lovely creaminess that pairs nicely with the gnocchi. For the full recipe, see the 30 Minute Tomato Gnocchi with Burrata. {{image_2}} You can easily swap gnocchi for other pasta types like penne or fusilli. Each shape will give a new twist to your dish. Try using cheese like ricotta or feta instead of burrata. These cheeses add unique flavors and textures to your meal. Use seasonal vegetables to change the taste. In spring, add asparagus or peas. In fall, consider roasted squash or kale. Adjust the recipe for summer by using fresh corn or zucchini. These changes keep the dish fresh and exciting all year. For a vegan option, replace burrata with cashew cheese or a tofu mix. This keeps the dish creamy and satisfying. If you need gluten-free gnocchi, look for brands made from potato or rice flour. These options make this tasty dish accessible to everyone. For the full recipe, check out the details above. Store any leftovers in an airtight container. This keeps out air and moisture. Let the gnocchi cool before sealing the container. This helps maintain freshness. Keep it in the fridge for up to three days. Reheat it in a pan with a splash of water. This brings back its soft texture. Yes, you can freeze tomato gnocchi. First, let it cool completely. Then, place it in a freezer-safe container. Be sure to label it with the date. It can last for up to three months. To thaw, move it to the fridge overnight. Reheat it in a skillet to warm it up. In the fridge, the dish lasts about three days. If you notice any off smells, it’s best to toss it. Look for changes in texture or color. These signs mean it has gone bad. Always trust your senses when it comes to food safety. Enjoy your delicious meal without worry! What is gnocchi traditionally made from? Gnocchi is usually made from potatoes, flour, and eggs. This mix gives it a soft, fluffy texture. Some recipes use ricotta or different flours, but the classic version is potato-based. This adds great flavor and makes it filling. Can I use store-bought gnocchi? Yes, you can use store-bought gnocchi. It saves time and is convenient. Just follow the package instructions for cooking. Fresh or frozen gnocchi will work well in this recipe. Both options will taste great and make your meal easy to prepare. How do I know when gnocchi is done cooking? Gnocchi is done when it floats in the boiling water. This usually takes about 2-3 minutes. When it rises, it is light and airy, ready to drain. Don’t overcook, as it can get mushy. Can I add more vegetables to the dish? Absolutely! You can add veggies like spinach, zucchini, or bell peppers. Just sauté them with the garlic before adding tomatoes. This will add color and nutrition to your meal. Feel free to mix and match based on your favorites. What wine goes well with this dish? A light white wine pairs well, like Pinot Grigio or Sauvignon Blanc. These wines enhance the flavors without overpowering them. If you prefer red, try a light Chianti. These options will complement the tomato and burrata nicely. How can I make it more filling? To make it heartier, add a protein like grilled chicken or shrimp. You can also serve it with a side salad or crusty bread. This adds more texture and balance to your meal. For a veggie boost, consider a side of roasted seasonal veggies. For the full recipe, check out the complete instructions and tips! In this blog post, we explored how to make a delicious gnocchi dish with fresh cherry tomatoes and creamy burrata cheese. We covered the main ingredients, optional add-ons, and tips for cooking and serving. Remember, you can customize this recipe with seasonal veggies or different cheeses. Enjoy making this easy, flavorful meal. It’s perfect for any occasion and will impress anyone who tastes it. Happy cooking!](https://southerndishes.com/wp-content/uploads/2025/05/7c9e99b7-a56f-4210-95e9-ce8d32958f41.webp)
If you crave a quick and tasty meal, this 30 Minute Tomato Gnocchi with Burrata is for you! This dish
If you crave comfort food, the Crockpot Loaded Steak and Potato Bake is for you! This dish combines tender steak,
. 1. Preheat your oven to 375°F (190°C). This step helps cook the peppers just right. 2. Carefully slice the tops off the bell peppers. Remove the seeds and ribs. Stand them up in a baking dish. 3. In a large skillet, add a splash of olive oil. Heat it over medium heat. 4. Add the chopped onion to the skillet. Sauté it until it turns soft and clear, about 3-4 minutes. 5. Next, stir in the minced garlic and cook for one more minute. This adds great flavor. 1. Now, add the ground turkey to the skillet. Use a spatula to break it apart. 2. Cook the turkey until it turns brown and is no longer pink, about 5-7 minutes. Stir often to cook evenly. 1. Mix in the cooked quinoa, diced tomatoes, corn, cumin, paprika, salt, and pepper. 2. Stir well to combine everything. Heat the mixture for 2-3 minutes. 3. Remove the skillet from heat. Stir in half of the shredded cheese until melted. 4. Take a bell pepper and stuff it generously with the turkey mixture. Pack it tightly. 5. Top each stuffed pepper with the rest of the shredded cheese. 1. Cover the baking dish with foil. Bake in the preheated oven for 25 minutes. 2. After 25 minutes, remove the foil. Bake for another 10 minutes until the peppers are soft. The cheese should be bubbly and golden. 3. Once done, take them out of the oven. Let them cool a bit before serving. Garnish with fresh cilantro for a pop of color. For the complete recipe, refer to the [Full Recipe]. When you cook, start by heating your skillet on medium heat. Add a splash of olive oil. This helps to make the onion sweet and soft. Sauté the chopped onion until it looks clear. This takes about 3-4 minutes. Then, add minced garlic for extra flavor. Cook it for just one minute. For the ground turkey, break it apart with a spatula. Cook it until it turns brown, which takes about 5-7 minutes. Season your mix with salt and pepper to taste. To make your stuffed peppers look great, choose colorful bell peppers. A mix of red, yellow, and green adds fun to the dish. Once baked, sprinkle fresh cilantro on top. This adds a bright touch. You can also use a drizzle of sour cream for creaminess. Place the stuffed peppers on a nice plate and serve them upright. This makes them look appealing. To spice things up, try adding different herbs or spices. A pinch of chili powder gives heat. You can also use oregano or thyme for a fresh taste. If you want more creaminess, top with avocado or guacamole. You can even switch the cheese. Try feta or pepper jack for a unique flavor. For an extra crunch, add crushed tortilla chips on top before baking. These small changes make a big difference! For the complete recipe, check the Full Recipe. {{image_2}} You can easily make a vegetarian version of stuffed bell peppers. Instead of ground turkey, use plant-based meat. Options like lentils or black beans work great too. They add protein and fiber. You can also mix in extra veggies, like mushrooms or zucchini, for more texture and flavor. If you need a gluten-free dish, skip the breadcrumbs. The recipe is already gluten-free without them. You can use cooked rice or quinoa as a filling base. Make sure all canned ingredients, like tomatoes and corn, are labeled gluten-free. This keeps your meal safe and tasty. Stuffed bell peppers pair well with many sides. A fresh salad adds a nice crunch. You can also serve them with rice or a light soup. Consider drizzling some salsa or avocado sauce on top for extra flavor. These additions make the dish even more enjoyable. To keep your stuffed peppers fresh, cool them first. Place them in an airtight container. You can keep them in the fridge for up to four days. Make sure to separate layers with parchment paper if stacking. This helps avoid mushiness. When you want to enjoy your leftovers, the best way to reheat is in the oven. Preheat your oven to 350°F (175°C). Cover the peppers with foil to keep them from drying out. Heat them for about 15-20 minutes or until warm. You can also use a microwave. Heat on medium power for 2-3 minutes. Check to make sure they are warm all the way through. If you want to freeze stuffed peppers, it's best to do it before baking. Wrap each pepper tightly in plastic wrap. Then, place them in a freezer bag. They can last up to three months in the freezer. To cook from frozen, bake them straight from the freezer. Just add about 10 minutes to the cooking time. This way, you always have a tasty meal ready! For the full recipe of stuffed bell peppers, check the earlier section. Yes, you can swap ground turkey for many options. Here are some alternatives: - Ground beef - Ground chicken - Ground pork - Ground lamb Each meat brings a unique taste. Choose what you like best or what you have. Just remember to adjust cooking times if needed. Baking time depends on your method. For the oven, preheat to 375°F (190°C) and bake: - Covered with foil: 25 minutes - Uncovered: 10 more minutes If you use an air fryer, bake at 360°F (182°C) for about 15-20 minutes. Always check if peppers are tender. You can get creative with fillings! Here are some fun ideas: - Black beans for a protein boost - Rice or couscous for texture - Spinach or kale for greens - Feta cheese for a tangy flavor Mix and match to find your favorite combo. These options can add new tastes and nutrients. You learned how to make stuffed bell peppers, from ingredients to cooking tips. You can customize with different meats or veggies. Remember to store leftovers properly to keep them fresh. Feel free to experiment with flavors and toppings. Stuffed peppers are versatile, tasty, and easy to make. Now it’s your turn to bring these delicious meals to your table! Enjoy cooking!](https://southerndishes.com/wp-content/uploads/2025/05/1174ba40-b34f-404d-9dd9-635d5558f8a7.webp)
Are you ready to impress your family with a colorful and tasty dish? These stuffed bell peppers with ground turkey
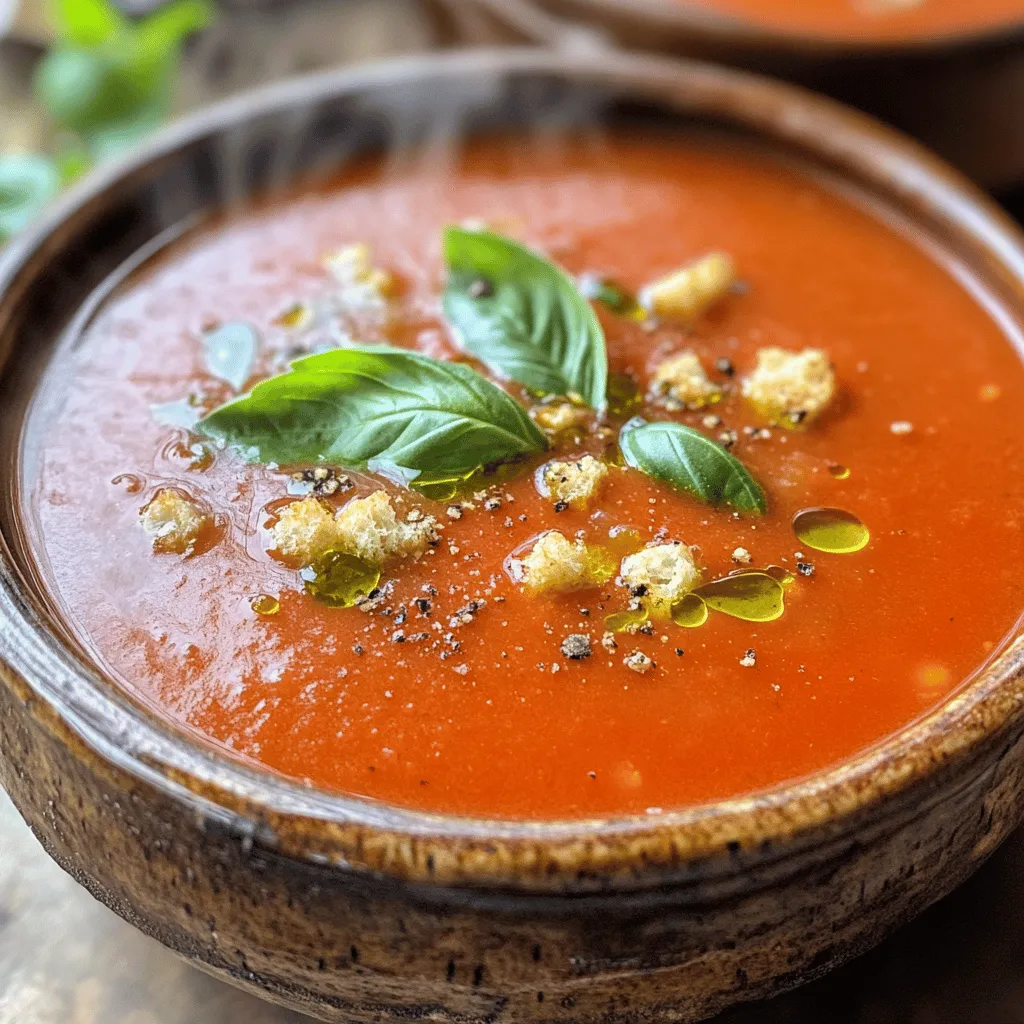
Craving a warm bowl of comfort food? My creamy tomato basil soup is the perfect treat! With fresh ingredients and
![- 2 ripe bananas, frozen - 1 tablespoon cocoa powder - 1 cup almond milk (or any milk of your choice) - 1 tablespoon almond butter - 1 teaspoon honey or maple syrup (optional) - 1/2 teaspoon vanilla extract - A pinch of cinnamon - Ice cubes (optional, for added thickness) Gather these ingredients to create a tasty chocolate banana smoothie. Each one plays a key role in making this drink both yummy and healthy. Frozen bananas give your smoothie a nice creamy texture. They also add natural sweetness. Cocoa powder brings that rich chocolate flavor without added sugar. Almond milk keeps it light and refreshing. Almond butter adds healthy fat and protein, making you feel full. You can sweeten it with honey or maple syrup, but it's not always needed. Vanilla extract gives depth, while cinnamon adds a warm, cozy touch. If you want a thicker smoothie, ice cubes are a great choice. This list covers everything you need for the Full Recipe of this delightful drink. Get ready to blend a delicious and energizing treat! Start by peeling the frozen bananas. Break them into small chunks. This makes blending easier. If your bananas are not frozen, freeze them for a few hours before use. Frozen bananas give the smoothie a creamy texture. Now, it's time to blend! In your blender, add the banana chunks. Then, add the cocoa powder, almond milk, and almond butter. If you like, add honey or maple syrup. Next, put in the vanilla extract and a pinch of cinnamon. Blend all ingredients on high speed. Keep blending until the mixture is smooth and creamy. After blending, check the texture. If you want it thicker, add a few ice cubes. Blend again until mixed smoothly. Taste your smoothie. If you want it sweeter, add more honey or syrup. Blend once more to mix in the sweetness. Your smoothie is ready to pour into glasses. Enjoy this delicious and healthy drink! For the full recipe, check the details above. To get the right texture, you can adjust the thickness of your smoothie. If you want a thicker smoothie, use frozen bananas. They add creaminess and chill. You can also add ice cubes. Blend well to mix them in. If your smoothie is too thick, add more almond milk. Pour in small amounts until you reach your desired thickness. Blend again to mix everything evenly. Presentation is key when serving your smoothie. Use chilled glasses to keep it cool. For a fun look, sprinkle cocoa powder on top. You can also slice fresh bananas and place them on the smoothie. A drizzle of almond butter adds flavor and beauty. This makes your drink look gourmet and inviting. Enjoy it as a quick breakfast or a snack! This smoothie is not just tasty; it is also healthy. Bananas are rich in potassium. They help with heart health and keep you energized. They also provide fiber for good digestion. Cocoa powder is packed with antioxidants. It can boost your mood and improve heart health. Together, these ingredients make a great snack that is both delicious and nutritious. You can find the full recipe [here]. {{image_2}} You can boost your smoothie with fun add-ins. Protein powder adds a healthy kick. It can help you feel full longer. Spinach is another great choice. It blends well, and you won’t taste it. Nutmeg brings a warm spice that pairs nicely with chocolate. Try one or all of these options to play with flavors. You don’t have to stick with almond milk. Soy milk is a great option too. It has a rich taste and adds protein. Oat milk is creamy and sweet, perfect for this smoothie. Coconut milk can add a tropical twist. Each milk brings its own flavor, so choose what you like best. If you want to switch up sweeteners, there are many choices. Agave nectar is a nice swap for honey. It has a light taste and is vegan-friendly. Stevia is another option. This natural sweetener has no calories and is very sweet. Try different sweeteners to find your favorite balance in this drink. For the complete recipe, check out the [Full Recipe]. If you have leftover smoothie, store it in the fridge. Pour it into a clean jar or a sealed container. This helps keep it fresh and tasty. Make sure to consume it within one day. Stir it well before drinking, as some ingredients might separate. You can freeze your smoothie for later. Pour the mixture into ice cube trays or freezer-safe containers. Leave some space at the top, as the smoothie will expand when frozen. Use within one month for the best taste. When you want to enjoy it again, just blend the frozen cubes with a little milk. In the fridge, your smoothie lasts about 24 hours. In the freezer, it can stay fresh for up to one month. After that, it might lose some flavor and texture. Always check for any odd smells or changes before consuming. Having the Full Recipe on hand makes it easy to whip up another batch! To make a dairy-free Chocolate Banana Smoothie, use almond milk or coconut milk. These options keep the taste creamy without dairy. You can also try oat milk or soy milk for a different flavor. For added richness, use nut butter, like almond or peanut butter. Yes, you can use fresh bananas. However, the texture will be different. Fresh bananas make the smoothie thinner and less creamy. Frozen bananas give you a thicker, frostier drink. If you use fresh bananas, add ice cubes for thickness. This smoothie can work as a meal replacement. It contains healthy carbs from bananas, fats from nut butter, and protein from milk. However, check your hunger needs. If you find the smoothie lacks fullness, consider adding oats or protein powder for extra nutrition. To make the smoothie more filling, add protein and fiber. Here are some ideas: - 1 scoop protein powder - 1/4 cup rolled oats - 1 tablespoon chia seeds - A handful of spinach These additions increase the smoothie’s nutritional value and keep you satisfied longer. For the full recipe, refer to the [Full Recipe]. This blog post shared a simple recipe for a delicious chocolate banana smoothie. I covered the ingredients and easy steps to blend a creamy drink. You learned tips for the perfect texture, serving ideas, and the health benefits of each ingredient. I also suggested fun variations and storage tips for leftovers. In conclusion, this smoothie is tasty, healthy, and quick to make. You can enjoy it any time. Personalize it with extra flavors or alternate ingredients. Happy blending!](https://southerndishes.com/wp-content/uploads/2025/05/240e12ac-a001-4ec9-b6a6-53ec2fc8e13d.webp)
Looking for a quick, tasty boost? This Chocolate Banana Smoothie is your answer! Packed with ripe bananas, rich cocoa, and
![To whip up a delightful Zucchini Noodle Pad Thai, you will need the following ingredients: - 3 medium zucchinis, spiralized - 1 cup bean sprouts - 1 red bell pepper, thinly sliced - 1 large carrot, julienned - 3 green onions, chopped - 1/4 cup roasted peanuts, roughly chopped - 2 tablespoons vegetable oil - 3 cloves garlic, minced - 2 eggs, lightly beaten - 4 tablespoons soy sauce (or tamari) - 1 tablespoon lime juice - 1 teaspoon brown sugar - 1/2 teaspoon red chili flakes - Fresh cilantro leaves for garnish Each ingredient plays a role in creating a tasty and colorful dish. Zucchinis serve as the base, replacing traditional noodles. They add a fresh crunch and a lovely green color. The bean sprouts contribute a crisp texture, while the bell pepper and carrot bring sweetness and color. The peanuts add a satisfying crunch and nutty flavor. Oil and garlic form the flavor foundation, enhancing all other ingredients. The eggs add protein, making this meal balanced. Finally, the sauce, made from soy sauce, lime juice, brown sugar, and chili flakes, ties everything together with a sweet and tangy kick. For a complete guide on preparing this dish, check out the Full Recipe. To start, you need to spiralize the zucchinis. Use a spiralizer, which is a handy tool for this. Place a zucchini in the spiralizer and turn it. Keep going until you reach the core. You should end up with long noodles. After spiralizing, place the noodles on a paper towel. This step is key. Zucchinis have a lot of water. The paper towel helps soak up the extra moisture. This way, your dish won’t be soggy. Now it’s time to make the sauce. Gather these ingredients: - 4 tablespoons soy sauce (or tamari) - 1 tablespoon lime juice - 1 teaspoon brown sugar - 1/2 teaspoon red chili flakes In a small bowl, whisk all these together. Mix until the sugar dissolves. This sauce adds a great flavor to your dish. Set it aside for later. Next, heat the vegetable oil in a skillet over medium heat. Add 3 cloves of minced garlic and stir-fry for about 30 seconds. You want it fragrant but not burnt. Then, add the sliced red bell pepper and julienned carrot. Stir-fry these for about 3-4 minutes. You want them tender-crisp, which means they should still have a bit of crunch. This brings a nice texture to your meal. Push the veggies to one side of the skillet. Pour the 2 beaten eggs into the cleared area. Scramble them for about 1 minute until just set. Then mix the eggs into the veggies. Now, add the zucchini noodles to the skillet. Pour the sauce over everything. Toss well to combine. Cook for 3-4 minutes until the noodles soften a bit but still have some crunch. Finally, stir in the cup of bean sprouts and chopped green onions. Cook for another minute to warm them through. Your Zucchini Noodle Pad Thai is almost ready! Enjoy this flavorful and healthy meal. For the full recipe, check the earlier section. Pick medium zucchinis for the best taste. They should feel firm and heavy. Look for bright colors with no soft spots. Fresh zucchinis have a sweet, mild flavor. For spiralizing, use a good spiralizer. I suggest a handheld model or a countertop style for ease. Both work well to create long, thin noodles. For a gluten-free option, use tamari instead of soy sauce. This swap keeps the flavor while making it safe for gluten-sensitive diets. You can also adjust the spice level. Add more red chili flakes for heat or skip them for a milder dish. Taste the sauce before adding it to the noodles. This way, you can find your perfect balance. Stir-frying is key to a great Pad Thai. Use high heat to cook the veggies quickly. This helps them stay crunchy and bright. Start with garlic, as it adds a lovely aroma. Keep the veggies moving in the pan to avoid burning. Don’t overcrowd the pan; this can trap steam and make them soggy. Follow these tips, and you'll create a delicious Zucchini Noodle Pad Thai! For the complete recipe, check out the [Full Recipe]. {{image_2}} For a vegan version of zucchini noodle Pad Thai, you can skip the eggs. Instead of eggs, use tofu or chickpea flour. Tofu adds protein and a nice texture. You can scramble it just like the eggs. For chickpea flour, mix it with water to create a batter and cook it in the pan. Protein alternatives can include tempeh or seitan. Both give a hearty bite. They soak up flavors well, making your dish rich and filling. You can also add edamame for extra protein. To make this dish low-carb, you can swap out the sugar. Use a sugar substitute like stevia or erythritol. This keeps it sweet without the carbs. You can also reduce the amount of soy sauce. Use a low-sodium version to keep the salt level in check. For keto followers, focus on adding more fats. You can add avocado slices or a sprinkle of sesame seeds. They boost flavors and give healthy fats. Adding more veggies can enhance the dish's flavor and health benefits. Try adding bell peppers, snap peas, or mushrooms. Each adds a different texture and taste. You can also balance flavors by adding fresh herbs. Fresh basil or mint can brighten the dish. They add a refreshing taste that pairs well with the noodles. For the full recipe, check out the details above. To store your Zucchini Noodle Pad Thai, let it cool first. Place it in an airtight container. This helps keep the dish fresh. You can refrigerate it for up to three days. For longer storage, consider freezing it. However, note that texture may change when thawed. To reheat, you have two good options: microwave or stove. If you use the microwave, heat in short bursts. This helps keep the zucchini noodles from getting mushy. Stir in between to ensure even heating. If you choose the stove, warm it on low heat. Add a splash of water if needed to maintain moisture. This way, you keep the texture nice and tasty. For the best flavor, enjoy it warm! Yes, you can prepare Zucchini Noodle Pad Thai ahead of time. To store it, follow these steps: - Cook the dish but leave out the zucchini noodles. - Store the noodles separately in an airtight container. - Store the cooked sauce and veggies in another container. Keep both in the fridge for up to three days. When ready to eat, sauté the noodles briefly with the veggies and sauce. This keeps the noodles fresh and prevents them from becoming mushy. Making zucchini noodles is easy and fun. You can use a spiralizer or a vegetable peeler. Here’s how: - Spiralizing: Cut off both ends of the zucchini. Secure it in the spiralizer and twist to create noodles. - Peeler Method: Using a vegetable peeler, shave long strips off the zucchini. Continue until you reach the core. After making the noodles, place them on a paper towel to absorb excess moisture. This step is key to avoid sogginess in your dish. Zucchini Noodle Pad Thai can stand alone, but pairing it can enhance your meal. Here are some ideas: - Complete Meal Ideas: Serve with grilled chicken or shrimp for extra protein. Tofu is a great plant-based option, too. - Side Dish Recommendations: Consider a light salad or fresh spring rolls. These add crunch and freshness to your meal. For a fun twist, serve it with lime wedges and extra peanuts on the side. This adds a burst of flavor and texture. For the full recipe of Zucchini Noodle Pad Thai, check out the Full Recipe section. You now have a tasty and healthy Zucchini Noodle Pad Thai recipe. We covered the key ingredients, step-by-step cooking methods, and helpful tips. Remember, you can customize this dish with different sauces and veggies to fit your taste. Storing and reheating leftovers is simple, making this meal convenient. Enjoy your cooking journey and create delicious options for you and your family!](https://southerndishes.com/wp-content/uploads/2025/05/78e7a995-1680-4ce3-926e-f047a69768f9.webp)
If you’re looking for a healthy, flavorful twist on a classic favorite, you’ve come to the right place! Zucchini Noodle
