Skip to content
DisclaimerTerms Of UseGDPR PolicyCookie Policy

Southern Dishes

  • Home
  • Drinks
  • Appetizers
  • Dinner
  • Dessert
  • About
  • Contact
  • Privacy Policy
DisclaimerTerms Of UseGDPR PolicyCookie Policy

Isabella

- 1 cup shredded carrots - 1 cup cabbage, finely sliced - 1 bell pepper (any color), thinly sliced - 1 cup bean sprouts - 2 green onions, chopped The main veggies bring color and crunch to your spring rolls. Shredded carrots add a sweet taste. Finely sliced cabbage gives a nice texture. Bell peppers add a pop of flavor. Bean sprouts add freshness, while green onions give a little zing. - 2 cloves garlic, minced - 1 teaspoon fresh ginger, grated - 2 tablespoons soy sauce - 1 tablespoon sesame oil - ¼ teaspoon black pepper These flavor enhancers lift your veggie mix. Minced garlic adds depth. Fresh ginger gives a warm kick. Soy sauce brings umami, and sesame oil adds a nutty taste. Black pepper rounds out the flavors nicely. - 1 package spring roll wrappers - Cooking spray The spring roll wrappers hold everything together. They become crispy in the air fryer. Cooking spray helps them brown evenly. Using these ingredients ensures you have a tasty and satisfying snack. For the full recipe, check out the details above. First, grab a big bowl. In this bowl, mix together all your veggies. You will need: - 1 cup shredded carrots - 1 cup finely sliced cabbage - 1 thinly sliced bell pepper - 1 cup bean sprouts - 2 chopped green onions - 2 minced garlic cloves - 1 teaspoon grated ginger Once your veggies are in the bowl, add some flavor. Drizzle in 2 tablespoons of soy sauce and 1 tablespoon of sesame oil. Don’t forget to sprinkle in ¼ teaspoon of black pepper. Now, toss everything well. You want all the veggies to be coated in the tasty sauce. Now that your veggie mix is ready, it’s time to roll! Lay a spring roll wrapper flat on a clean surface. Make sure one corner points toward you. Spoon about two tablespoons of the veggie mix just above the bottom corner. Fold the bottom corner over the filling. Next, fold in the sides. Roll it up tightly to enclose the filling. To seal it, moisten the top corner with a little water. This helps keep everything inside. Repeat this step for the rest of your wrappers. Let’s cook these crispy treats! First, preheat your air fryer to 375°F (190°C). This will help the rolls cook evenly. Lightly spray your spring rolls with cooking spray. This step is key for that crispy texture. Now, arrange the rolls in a single layer in the air fryer basket. Make sure they don’t touch each other. If you have a lot, you may need to cook in batches. Air fry your spring rolls for 10-12 minutes. Flip them halfway through cooking for even crispiness. When they turn golden brown and crispy, they are done! Let the spring rolls cool for a few minutes before serving. Enjoy your crispy snack! For the full recipe, check out the instructions above. To make great spring rolls, you need a tight seal. Start by using a clean, flat surface. Place the wrapper so a corner points toward you. Spoon your filling close to the bottom corner. Fold that corner over the filling first. Then, fold in the sides and roll it up tightly. Moisten the top corner with a bit of water to seal it well. This helps avoid leaks while cooking. To get that perfect crunch, use cooking spray. Lightly coat the spring rolls before cooking. This ensures they crisp up nicely in the air fryer. Every air fryer is different, so adjust the cooking time as needed. Start with 10-12 minutes at 375°F (190°C) and check for golden brown color. If your air fryer is smaller, you might need to cook in batches. These spring rolls taste great with dips. Try sweet chili sauce or soy sauce for a tasty kick. You can also pair them with side dishes like a fresh salad or steamed veggies. This adds more color and nutrition to your meal. Enjoy your crispy air fryer veggie spring rolls with these easy ideas! For the full recipe, check out the detailed instructions above. {{image_2}} You can change the veggies in your spring rolls. Broccoli, zucchini, and mushrooms work well. Each adds a new taste and texture. You can also add spinach for more greens. If you want protein, try adding cooked chicken or tofu. Both give you a heartier snack. Mix and match to find your favorite combo! If you need gluten-free options, use gluten-free wrappers. They are easy to find in stores. You can also use rice paper. Rice paper gives a light and chewy texture. Just soak it in warm water for a few seconds before using. It makes rolling easier and adds a fun twist. Want some spice? Add chopped jalapeños or sriracha to your veggie mix. This gives your spring rolls a nice kick. You can also add fresh herbs like cilantro or basil. These herbs brighten up the flavor. Experiment with different spices too, like cumin or paprika. Each choice makes your spring rolls unique. For the full recipe, check out the cooking instructions above. Let your spring rolls cool down first. Place them on a plate or cutting board. Wrap them in plastic wrap or put them in an airtight container. This keeps them fresh for longer. For best results, store them in the fridge. Use a container that is snug but not too tight. This prevents them from getting soggy. To reheat, use the air fryer for the best crispiness. Set the air fryer to 350°F (175°C). Heat the rolls for about 5-7 minutes. This method keeps the outside crunchy. You can also use a regular oven. Preheat it to the same temperature and bake for 8-10 minutes. Just be sure to check them often. You can freeze spring rolls before cooking them. Wrap each roll in plastic wrap. Then, place them in a freezer-safe bag. They stay good for up to 3 months. When you're ready to cook, no need to thaw. Just place them in the air fryer. Cook at 375°F (190°C) for about 15-18 minutes. They will turn out crispy and delicious. For the full recipe, check out the earlier section. Yes, you can use frozen vegetables. They save time and are easy to find. To make them work, thaw the veggies first. Drain any excess water to prevent sogginess. You may need to cook them slightly longer since they hold more moisture. This will keep your spring rolls crispy. To boost flavor, try adding spices. A pinch of red pepper flakes gives heat. Fresh herbs like cilantro or basil add freshness. You can also use a splash of lime juice for zest. For more depth, consider marinating your veggies in soy sauce for an hour. This simple step enhances the overall taste. If you make more spring rolls, the cooking time may change. For a larger batch, keep them in a single layer. Cook in batches if needed. You might need to add 2-3 extra minutes to the cooking time. Just keep an eye on them. They should be golden brown and crispy. In this blog post, we explored making delicious spring rolls with fresh veggies and flavor boosters. We covered the essential ingredients, detailed step-by-step instructions, and shared tips for perfecting the rolls. Variations allow for creativity in fillings and wraps, while storage info ensures your leftovers stay fresh. Remember, these spring rolls are easy to adapt, tasty, and fun to make. Enjoy trying out different flavors and serving ideas. Now go ahead and uncover your unique spin on this classic snack!

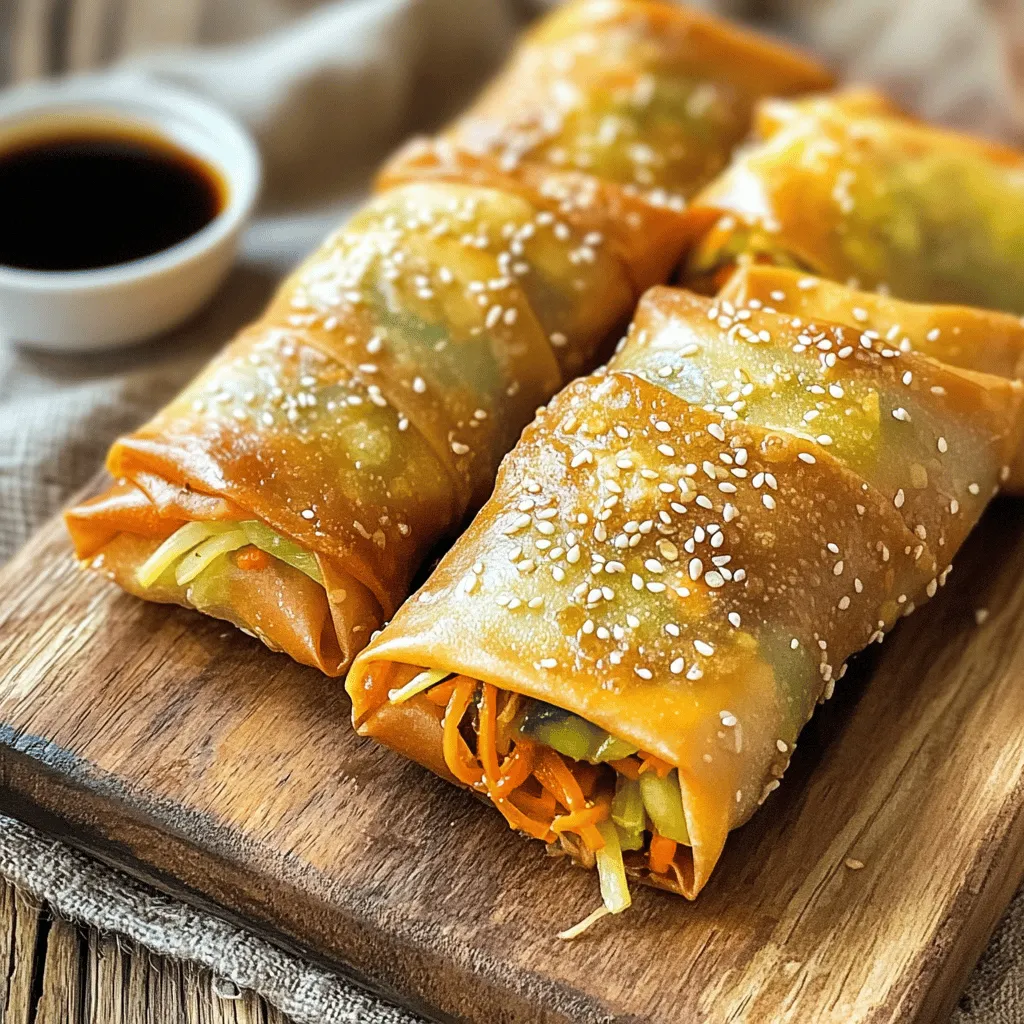
Air Fryer Veggie Spring Rolls Crispy and Delicious Snack

Are you craving a crunchy, flavorful snack that’s simple to make? Look no further! In this guide, I’ll show you

For a tasty vegan mushroom stroganoff, you need fresh, vegan-friendly ingredients. Here is what you will need: - 12 oz wide egg-free pasta (like fettuccine or tagliatelle) - 2 tablespoons olive oil - 1 medium onion, diced - 3 cloves garlic, minced - 16 oz mixed mushrooms, sliced (cremini, shiitake, and button) - 1 teaspoon dried thyme - 1 teaspoon smoked paprika - Salt and pepper to taste - 2 tablespoons soy sauce or tamari - 1 cup vegetable broth - 1 cup coconut milk (or unsweetened almond milk) - 2 tablespoons nutritional yeast (optional) - Fresh parsley, chopped for garnish These ingredients come together to create a rich and creamy dish that is purely plant-based. Some ingredients in this recipe add unique flavors. Coconut milk gives a creamy texture and rich taste. It is a great substitute for dairy. You can also use unsweetened almond milk if you prefer. Nutritional yeast is another special ingredient. It adds a cheesy flavor to the dish. You can leave it out if you want a simpler taste. Mushrooms are the star here. Using a mix of mushrooms gives depth to the flavor. Cremini mushrooms are earthy, while shiitake adds a slight smokiness. Button mushrooms are mild and blend well. Choosing the right mix enhances the dish’s overall taste. For the full recipe, check the [Full Recipe]. To start, you need to boil the pasta. Fill a large pot with water and add a pinch of salt. Bring the water to a rolling boil. Then, add 12 oz of wide egg-free pasta. Cook it according to the package instructions until it is al dente. This usually takes about 8 to 10 minutes. Stir the pasta occasionally to keep it from sticking. Once done, drain the pasta in a colander. Be sure to reserve about ½ cup of the pasta water. This water can help thicken your sauce later. Next, it’s time to sauté the aromatics. In a large skillet, heat 2 tablespoons of olive oil over medium heat. Add 1 medium diced onion and a pinch of salt. Cook the onion until it turns translucent, which should take about 4 to 5 minutes. Then, stir in 3 minced garlic cloves and cook for 30 seconds. This step is key for building flavor. Now add 16 oz of mixed mushrooms, sliced. Increase the heat to medium-high and sauté for about 6 to 8 minutes. You want the mushrooms to turn golden brown and release their juices. This enhances the dish's taste. Now, let’s create that creamy sauce. Stir in 1 teaspoon of dried thyme, 1 teaspoon of smoked paprika, and 2 tablespoons of soy sauce. Season with salt and pepper to taste. Next, pour in 1 cup of vegetable broth and bring the mixture to a simmer. Let it cook for about 5 minutes to reduce slightly. After this, lower the heat and add 1 cup of coconut milk. If you want a cheesy flavor, also add 2 tablespoons of nutritional yeast. Stir everything until well combined and heated through. If the sauce seems too thick, add a bit of that reserved pasta water until you reach your desired consistency. With these steps, your Vegan Mushroom Stroganoff will be rich and creamy, bursting with flavor. Don't forget to check the seasoning as you go! To adjust the thickness of your sauce, add a little pasta water. This helps make it creamy. If it's too thick, mix in more water until it feels just right. For creaminess, use coconut milk or almond milk. These options add richness without dairy. Seasoning balance is key. Taste as you cook. Add salt slowly, and use fresh herbs for flavor. Smoked paprika and thyme bring warmth. Nutritional yeast can add a cheesy taste. It’s optional but highly recommended. You can cook your pasta and sauce together. Start boiling the pasta while you sauté the onions. This saves time. When the pasta is almost done, add it to the sauce. Cook it all together for a few minutes to blend flavors. Multi-tasking is your friend in the kitchen. While the pasta cooks, chop the onions and garlic. This keeps everything moving smoothly. Keeping an eye on both pots helps the meal come together faster. For herbs, fresh parsley is great. It adds a pop of color and taste. You can also try chives or dill for a twist. Consider adding some crushed red pepper for a kick. For a beautiful presentation, serve the stroganoff in a large bowl. Drizzle olive oil on top for shine. You can pair this dish with a simple side salad. It makes the meal feel complete and fresh. {{image_2}} You can easily make this dish gluten-free. Just swap the pasta for gluten-free options, like rice noodles or chickpea pasta. These choices taste great and keep the same creamy texture. Adding extra vegetables boosts nutrition and flavor. Try spinach, bell peppers, or zucchini in your stroganoff. Sauté them with the onions and garlic for a tasty mix. To change the flavor profile, use different spices or herbs. For a more earthy taste, add rosemary or sage. If you want a bit of heat, sprinkle in some red pepper flakes. If you aren't strictly vegan, top your stroganoff with cooked lentils, chickpeas, or even some grilled chicken. These additions give you extra protein and make the dish heartier. On a budget? Use frozen mushrooms or canned coconut milk. These options are cost-effective and still delicious. For a lower-calorie version, try using less coconut milk and more vegetable broth. You can also add more veggies to fill you up while keeping calories down. If you need more protein, mix in some tofu or tempeh. These ingredients are great plant-based options and will keep you satisfied. Check out the Full Recipe for more ideas and tips on how to make this dish your own! To keep your Vegan Mushroom Stroganoff fresh, store leftovers in an airtight container. Let the dish cool to room temperature before sealing. Place the container in the fridge. This way, it stays good for about 3 to 5 days. For best results, use glass or BPA-free plastic containers. These materials help keep flavors intact. For reheating, the microwave is quick, but the stovetop is best. On the stove, add a splash of water or vegetable broth to keep the dish moist. Cook on low heat, stirring often. This helps the sauce stay creamy and prevents burning. If using a microwave, cover the dish with a microwave-safe lid to trap steam. You can freeze Vegan Mushroom Stroganoff, but some textures may change. To freeze, let it cool completely. Then, place it in a freezer-safe container or bag. Be sure to remove excess air. This dish can be frozen for up to 3 months. To thaw, move it to the fridge overnight. Reheat gently on the stove or in the microwave, adding a bit of liquid to restore creaminess. To make this dish gluten-free, swap the pasta for gluten-free options. Look for pasta made from brown rice or chickpeas. These options cook well and taste great. For the soy sauce, use tamari, which is gluten-free. Most other ingredients in this recipe are naturally gluten-free, so you’re in good shape! Yes, you can make this dish without nuts. Instead of coconut milk, try unsweetened almond milk or oat milk. Both add creaminess without nut flavors. You can skip nutritional yeast if you prefer. Instead, add a pinch of garlic powder or onion powder for depth. Vegan Mushroom Stroganoff lasts about 3-5 days in the fridge. Store it in an airtight container to keep it fresh. When you reheat, add a splash of vegetable broth or water to keep it creamy. For vegan stroganoff, use wide egg-free pasta like fettuccine or tagliatelle. These shapes hold the sauce well. You can also choose gluten-free pasta for a different texture. Other options include whole wheat pasta or even spiralized veggies for a fun twist! Yes, you can prepare Vegan Mushroom Stroganoff ahead of time. Cook the pasta and sauce separately. Store them in the fridge, and combine them when ready to serve. This helps keep the pasta from getting mushy. Reheat gently on the stove with a bit of broth or water. Serve this dish with a fresh side salad or steamed veggies for balance. Crusty bread makes a great addition too! If you want something hearty, try roasted potatoes or quinoa. These sides make your meal complete and satisfying. For the full recipe, check out the details above! This guide covers vegan mushroom stroganoff, from ingredients to storage tips. You learned about vegan-friendly items, unique flavors, and how to make a creamy sauce. I shared cooking techniques, garnishing ideas, and ways to customize your dish. With these insights, you can make delicious meals for any occasion. Remember, cooking is fun and gives you room to be creative. Enjoy exploring and making this dish your own!

Vegan Mushroom Stroganoff Flavorful and Simple Recipe

Are you craving a rich, creamy dish without dairy? This Vegan Mushroom Stroganoff recipe is both tasty and easy! I’ll

For the best chicken fajitas, you need a few key items: - 1 pound boneless, skinless chicken breasts, sliced into thin strips - 1 large bell pepper (red, yellow, or green), sliced - 1 medium onion, sliced - 2 tablespoons olive oil - 8 small flour or corn tortillas These ingredients make a tasty base for your fajitas. The chicken provides protein, while the bell pepper and onion add great crunch and flavor. To bring out the flavors, you will need some spices: - 2 teaspoons chili powder - 1 teaspoon cumin - 1 teaspoon garlic powder - ½ teaspoon smoked paprika - Salt and pepper to taste These spices give your fajitas a nice kick. Chili powder and cumin are key for that authentic Mexican taste. The smoked paprika adds depth to the flavor. You can make your fajitas even better with some garnishes: - Fresh cilantro, chopped - Lime wedges (for serving) Chopped cilantro adds freshness. A squeeze of lime juice brightens the dish and enhances the flavors. For the full recipe, you can refer to the instructions provided above. Enjoy your cooking! Start by slicing the chicken into thin strips. In a medium bowl, add the chicken, olive oil, chili powder, cumin, garlic powder, smoked paprika, salt, and pepper. Mix well to coat the chicken evenly. Marinate it for at least 15 minutes. If you have more time, let it sit in the fridge for up to 2 hours for deeper flavor. Heat a large skillet over medium-high heat. Add the marinated chicken to the skillet. Cook for 5 to 7 minutes. Stir occasionally, so it cooks evenly. The chicken is done when it is no longer pink inside and has a nice sear on the outside. Once cooked, remove it from the skillet and set it aside. In the same skillet, add the sliced bell pepper and onion. Sauté them for about 5 minutes. You want them tender and slightly charred. Stir occasionally to avoid burning. - Combining Ingredients Return the cooked chicken to the skillet with the sautéed vegetables. Toss everything together. Cook for an additional 2 to 3 minutes to heat through. - Warm the Tortillas While the chicken and vegetables cook, warm the tortillas. You can do this in a separate pan or microwave. Warm them until they are soft and pliable. - Assembling the Fajitas Take the warm tortillas and fill them with the chicken and vegetable mixture. Top with chopped cilantro and a squeeze of fresh lime juice. This adds a zesty kick! Enjoy your easy chicken fajitas! For the full recipe, check out Sizzling Chicken Fajitas. To keep your chicken juicy, marinate it well. Use olive oil and spices for flavor. Let it soak for at least 15 minutes. If you have time, go for 2 hours. This helps the chicken absorb more flavor. When cooking, heat the skillet to medium-high. Cook the chicken for 5-7 minutes until it’s golden brown. Avoid overcooking, as it can make the chicken dry. To boost flavor, try adding fresh herbs. Chopped cilantro is a great choice. You can also squeeze lime juice over the chicken before serving. If you like heat, add fresh jalapeños to the mix. For a smoky taste, use smoked paprika or chipotle powder. Experimenting with spices can make your fajitas stand out. Let your taste guide you to new flavors. Serve your fajitas on a large platter. This way, everyone can build their own. Place warm tortillas next to the chicken and veggies. Offer lime wedges and salsa as sides. For a fun touch, add guacamole or sour cream. You can also serve with rice or beans for a complete meal. Enjoy the process of sharing and eating together! {{image_2}} If you want a meat-free meal, try veggie fajitas! Use a mix of colorful bell peppers, onions, and mushrooms. You can also add zucchini, corn, or black beans for extra texture. To boost flavor, season with the same spices as in the chicken recipe. Cook the veggies until they are tender and slightly charred. This option is just as tasty and healthy! Want to mix things up? You can use different proteins for your fajitas! Shrimp, beef, or pork work great. Simply substitute the chicken with your choice of protein. Adjust the cooking time as needed. Shrimp cooks quickly, while beef may take longer. This lets you enjoy a new flavor with the same easy steps. Toppings can make your fajitas shine! Consider adding fresh salsa, guacamole, or sour cream. You could also add sliced jalapeños for heat or cheese for creaminess. For sides, serve with rice, beans, or a simple salad. These choices add variety and make your meal feel special. For the full recipe, check out the detailed instructions above! After you enjoy your easy chicken fajitas, store the leftovers in an airtight container. Keep them in the fridge for up to three days. Make sure the chicken and veggies cool down first. This helps keep them fresh. If you want to keep them longer, freezing is a great option. To reheat, use a microwave or a skillet. For the microwave, place the fajitas on a plate. Heat for about one to two minutes. Check that they are hot all the way through. If using a skillet, add a splash of water to keep them moist. Heat over medium for about five minutes, stirring occasionally. If you want to freeze your chicken fajitas, it's best to keep the chicken and veggies separate from the tortillas. Place the chicken and veggies in a freezer bag. Remove as much air as possible. They can last up to three months in the freezer. When you're ready to eat, thaw the fajitas in the fridge overnight. Warm them in a skillet or microwave to enjoy again. Remember, freezing keeps the flavor intact! For the full recipe, check out the steps above. To spice up your chicken fajitas, add more chili powder. You can also use jalapeños. Fresh chopped peppers will boost heat. Try adding hot sauce for extra kick. Adjust the spice level to fit your taste. If you like it hot, don't hold back! Yes, you can use other meats like beef or shrimp. Thinly slice the beef for quick cooking. Shrimp cooks fast, so keep an eye on it. You can even use tofu for a vegetarian version. Just follow the same marinating steps. Fajitas pair well with rice or beans. You can serve them with a fresh salad. Guacamole and salsa are great dips. Sour cream adds creaminess too. Consider chips for crunch and fun. Each side enhances the meal's flavor. - How long can I store cooked chicken fajitas? You can store cooked chicken fajitas in the fridge for 3-4 days. Keep them in an airtight container. To reheat, use the microwave or stovetop. Make sure they reach a safe temperature. Enjoy your leftovers without losing flavor! In this blog post, I shared how to make easy chicken fajitas. We covered the key ingredients, spices, and optional garnishes to enhance the dish. I explained how to marinate and cook the chicken, sauté the vegetables, and assemble everything. I also offered tips for juicy chicken, serving ideas, and variations for vegetarian options. Lastly, I detailed storage and reheating tips. Enjoy making delicious fajitas, knowing you have options to customize and store them for later! Happy cooking!

Easy Chicken Fajitas Flavorful and Quick Meal Recipe

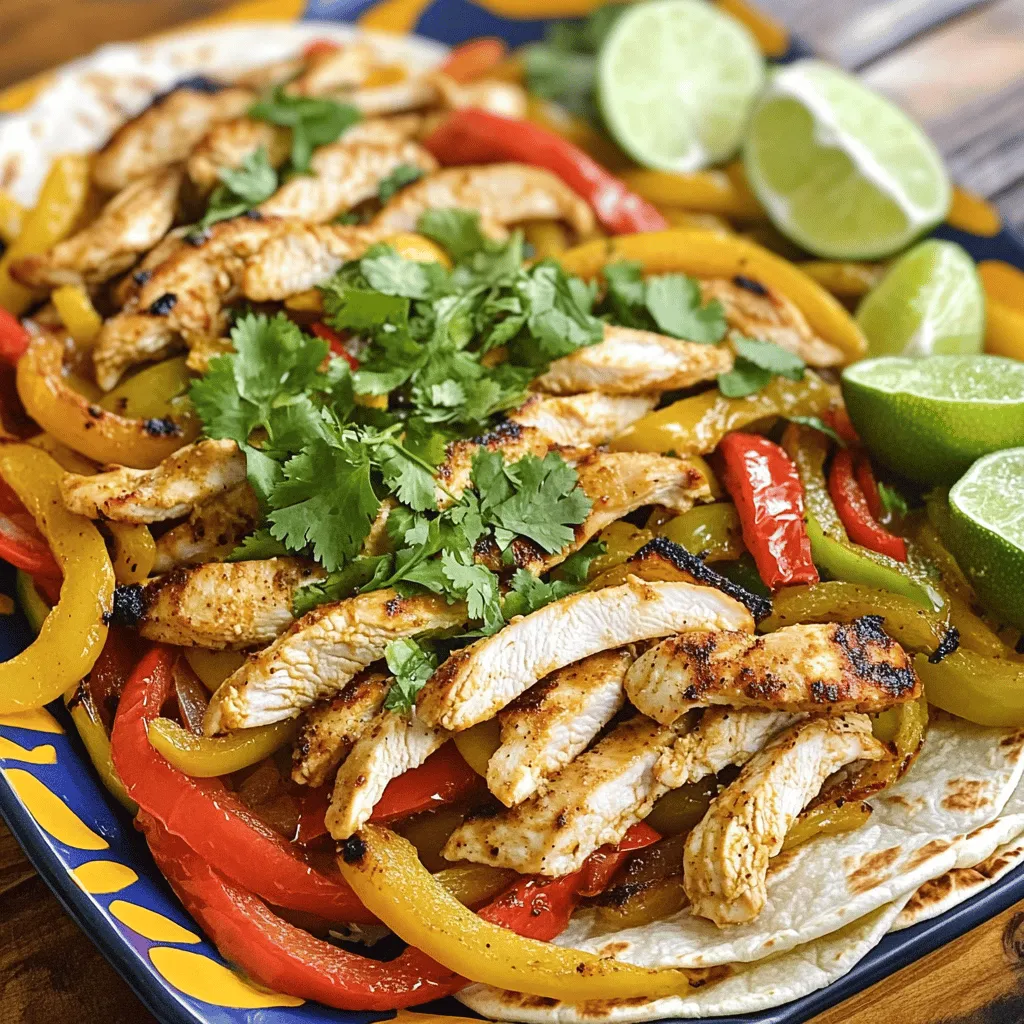
Looking for a fast and tasty dinner? Try my Easy Chicken Fajitas! This simple recipe is packed with flavor and

To make delicious Maple Pecan Granola Bars, you need these key ingredients: - 2 cups rolled oats - 1 cup pecans, chopped - 1/2 cup almond butter (or any nut butter of your choice) - 1/2 cup maple syrup - 1/2 cup honey (or agave syrup for a vegan option) - 1/4 cup unsweetened shredded coconut - 1/2 teaspoon vanilla extract - 1/4 teaspoon sea salt - Optional: 1/2 cup dried cranberries or chocolate chips If you have dietary needs, you can swap some ingredients. For nut butter, try sunflower seed butter if you have nut allergies. You can also use peanut butter or cashew butter. For sweeteners, use agave syrup instead of honey for a vegan option. You can also use brown rice syrup or date syrup if you prefer. Maple syrup is more than just sweet. It has antioxidants that help fight inflammation. It also contains minerals like manganese and zinc, which are good for your health. Pecans are full of healthy fats and protein. They help keep you full and satisfied. Pecans also have fiber, which is great for digestion. Together, these ingredients make a tasty and nutritious snack. Start by preheating your oven to 350°F (175°C). This step is key to getting those delicious, crunchy edges. Next, take an 8x8 inch baking dish and line it with parchment paper. This makes it super easy to lift out your bars once they are baked. In a large mixing bowl, combine the following ingredients: - 2 cups rolled oats - 1 cup pecans, chopped - 1/4 cup unsweetened shredded coconut - 1/4 teaspoon sea salt Mix these dry ingredients together until they are evenly combined. This ensures that each bite of your granola bar is packed with flavor. In another bowl, whisk together these ingredients: - 1/2 cup almond butter - 1/2 cup maple syrup - 1/2 cup honey - 1/2 teaspoon vanilla extract Make sure the mixture is smooth. This mix will help bind all your dry ingredients together, creating a tasty, chewy texture in every bar. Now, pour the wet mixture over the dry ingredients. Stir until everything is well coated. If you want, add in 1/2 cup of dried cranberries or chocolate chips for extra flavor. Transfer your mixture into the prepared baking dish. Press it down firmly with a spatula or your hands. This helps the bars hold their shape. Bake in your preheated oven for 20-25 minutes. Look for golden brown edges as your sign that they are ready. Once done, take them out and let them cool in the pan for 10 minutes. Lift the bars out using the parchment paper and move them to a cutting board. Allow the granola bars to cool completely before slicing into pieces. You can store these tasty snacks in an airtight container for up to a week. For the complete process, check out the Full Recipe. To get the right texture in your maple pecan granola bars, focus on the baking time. Bake them until the edges turn golden brown. For chewy bars, press the mixture less firmly in the pan. If you want them crunchy, pack the mixture tightly. Cooling is also key. Let the bars cool completely before cutting. This helps them set well and keeps them from crumbling. After cooling, it’s time to cut your bars. Use a sharp knife to slice them evenly. Start by cutting down the center, then cut each half into smaller bars. To avoid sticking, run the knife under warm water before each cut. This method keeps your bars looking neat and tidy. Want to mix things up? Try adding spices! A teaspoon of cinnamon can add warmth and depth. You can also consider mixing in some dried fruits or seeds. Dried cranberries add tartness, while chocolate chips bring sweetness. Just be sure to keep the total mix-ins to about a cup so the bars hold together well. For a special twist, add a pinch of nutmeg or ginger. For the full recipe, check out the complete guide. {{image_2}} You can swap pecans for other nuts. Almonds, walnuts, or cashews work great. Each nut brings its unique flavor. If you like a mix, try combining different nuts. This adds texture and taste to your bars. Just make sure to chop them well for even mixing. Want to spice things up? Add a pinch of cinnamon for warmth. You can also try coconut extract for a tropical twist. If you love chocolate, mix in dark chocolate chips. Dried fruits like apricots or raisins can also enhance the flavor. Each addition personalizes your granola bars. For a vegan version, you can replace honey with agave syrup. This keeps the sweetness without animal products. Use certified gluten-free oats if you need a gluten-free option. This way, everyone can enjoy these tasty bars. You can also use nut butters that are free from gluten. Check labels for any hidden gluten sources. To keep your Maple Pecan Granola Bars fresh, store them in an airtight container. Place a sheet of wax paper between layers to prevent sticking. Keep the container in a cool, dry area. This method helps maintain their flavor and texture. At room temperature, these bars last about a week. If you refrigerate them, they can stay fresh for up to two weeks. The cool air helps preserve their crunchiness while keeping them tasty. For longer storage, freezing is a great option. First, cut the bars into pieces. Wrap each piece in plastic wrap tightly. Then, place the wrapped bars in a freezer-safe bag. They can stay frozen for up to three months. When you want to enjoy them, take out a bar and let it thaw at room temperature. This way, you always have a healthy snack ready to go! For the full recipe, check the instructions above. Homemade granola bars stay fresh for about a week. Store them in an airtight container. If you want to keep them longer, you can freeze them. They freeze well for up to three months. Just thaw them in the fridge before eating. Yes, you can replace maple syrup. Honey works great as a substitute. You can also use agave syrup for a vegan option. Just keep in mind that each syrup has a different sweetness level. Adjust the amount to your taste. Yes, these granola bars are healthy! They are full of whole grains and nuts. Rolled oats provide fiber, which helps digestion. Pecans add healthy fats and protein. Almond butter brings in more nutrients, too. This snack can fuel your day with energy. For more details, check the Full Recipe for the nutrition breakdown. In this blog post, we explored how to make tasty Maple Pecan Granola Bars. You learned about all the key ingredients and their healthy benefits. We offered swaps for dietary needs and shared tips for texture and flavor. You now know how to store these bars for freshness too. I hope this recipe inspires you to create your own delicious bars at home. Enjoy making them!

Maple Pecan Granola Bars Nutritious and Tasty Snack

Looking for a quick, satisfying snack? These Maple Pecan Granola Bars are not just tasty—they’re also packed with nutrition! With

To make a tasty strawberry banana smoothie bowl, gather these main items: - 1 cup frozen strawberries - 1 ripe banana - 1/2 cup Greek yogurt - 1/2 cup almond milk (or any milk of choice) These ingredients bring a sweet and creamy flavor. Frozen strawberries give it a chill, while the banana adds natural sweetness. Greek yogurt makes it smooth and thick, and almond milk helps blend everything well. You can add a few extras to boost the taste: - 1 tablespoon honey or maple syrup - 1/4 teaspoon vanilla extract These add-ins can sweeten the bowl more, and vanilla gives a nice touch. You can skip them if you prefer a lighter taste. Now for the fun part! Here are some great toppings: - Fresh strawberries - Banana slices - Granola - Chia seeds - Shredded coconut - Mint leaves These toppings add crunch, color, and extra flavors. You can mix and match to your liking. I often use fresh fruit for brightness and granola for a nice crunch. Check out the Full Recipe to see how to blend everything into a delicious smoothie bowl! - Combine ingredients in a blender. - Use 1 cup frozen strawberries, 1 ripe banana, 1/2 cup Greek yogurt, and 1/2 cup almond milk. - If you like, add 1 tablespoon honey and 1/4 teaspoon vanilla extract. - Blend until smooth and creamy. - Pour the mixture into a bowl. - The thick texture will support your toppings. - Add fresh strawberries, banana slices, granola, chia seeds, and shredded coconut. - Finish with mint leaves for a touch of color. - Ensure ingredients are frozen for the perfect texture. - Scrape down sides of the blender for even blending. - This helps mix all ingredients well. For the complete recipe, check out the Full Recipe. - Start slowly and gradually increase speed. This helps blend all the ingredients well. - Use a tamper or spatula as needed. This ensures no bits are left unblended. To thicken your smoothie bowl, add more frozen fruit or yogurt. This gives you a rich texture. If it’s too thick, add a splash of almond milk. Blend again until smooth. The right texture should be creamy but not runny. Aim for a mix that holds your toppings well. To add depth, sprinkle in some spices like cinnamon or nutmeg. You can also try a splash of orange juice for a citrus kick. For sweetness, experiment with honey, maple syrup, or agave. Each option brings a unique taste to your bowl. Enjoy creating different flavors! {{image_2}} You can easily make a vegan strawberry banana smoothie bowl. Just swap Greek yogurt for coconut yogurt. Use plant-based milk, like almond or oat milk. This keeps all the flavors while ensuring it fits a vegan diet. If you're following a keto diet, you can make some simple changes. Use full-fat coconut milk instead of almond milk. Swap out honey for a low-carb sweetener. You can also reduce the banana amount. This keeps the carbs low while still tasting great. Want to boost nutrition? Add a handful of spinach. It blends well and adds vitamins without changing the taste much. You can also mix in other fruits like mango or kiwi. These fruits give a fun twist and add more color. For added protein, try nut butters like almond or peanut. Just drizzle some on top of your bowl. You can also sprinkle seeds like chia or hemp for extra crunch. If you want something crunchy and sweet, add granola. It adds a nice texture and makes your bowl more filling. Fresh fruits, like extra strawberry slices or banana rounds, make it look beautiful too. Yes, you can prepare your smoothie bowl ahead of time. Here are some best practices: - Batch prep: Make a larger batch and store it in the fridge. - Use airtight containers: This keeps the smoothie fresh and tasty. - Store leftovers: If you have extra, pour it into a container with a tight lid. Freezing is a great way to save your smoothie mixture. Here’s how: - Freeze in portions: Pour the smoothie into ice cube trays or freezer bags. - Label the bags: Write the date so you remember when you made it. - Thawing tips: To serve, thaw in the fridge overnight or blend frozen cubes with a little milk. How long can you store the ingredients? - Fresh fruit: Use within 2-3 days for the best taste. - Greek yogurt: Check the expiration date on the container. - Almond milk: Unopened, it lasts for months. Once opened, use it within a week. Signs of spoilage to look out for: - Foul smell: If it smells off, it’s time to toss it. - Color change: If the fruit looks brown or mushy, it’s not good anymore. - Separation: If your yogurt separates and looks watery, it may be spoiled. By following these tips, you can enjoy your strawberry banana smoothie bowl fresh and tasty every time! For the complete recipe, check the Full Recipe section above. A strawberry banana smoothie bowl has about 300 calories. This may vary based on your toppings and ingredients. Here's a quick breakdown: - 1 cup frozen strawberries: 50 calories - 1 ripe banana: 105 calories - 1/2 cup Greek yogurt: 100 calories - 1/2 cup almond milk: 15 calories - Optional honey: 60 calories These values add up to a tasty, nutritious meal. Yes, you can make this smoothie bowl without yogurt. Here are some great dairy-free options: - Use coconut yogurt for a creamy texture. - Substitute with silken tofu for added protein. - Try blended avocado for a rich, smooth base. These swaps ensure you still get a delicious flavor and texture. Absolutely! Here are tips to make it fun for kids: - Let them pick their favorite toppings. - Use fun bowls or colorful spoons. - Add a straw for easier sipping. These small changes can make it more appealing to little ones. This smoothie bowl is packed with health benefits: - Strawberries: High in vitamin C and antioxidants. - Bananas: Full of potassium and good for energy. - Greek yogurt: Offers protein and probiotics for gut health. These ingredients combine to create a nutritious and yummy meal. This blog post covered how to make a delicious strawberry banana smoothie bowl. We explored key ingredients, optional add-ins, and the best toppings to use. I shared tips for blending, adjusting texture, and enhancing flavor. You learned about variations to suit different diets, plus how to store and enjoy this dish later. In the end, making this smoothie bowl is both easy and fun. You can customize it to fit your taste and needs. Enjoy being creative in the kitchen!

Strawberry Banana Smoothie Bowl Fresh and Tasty Recipe

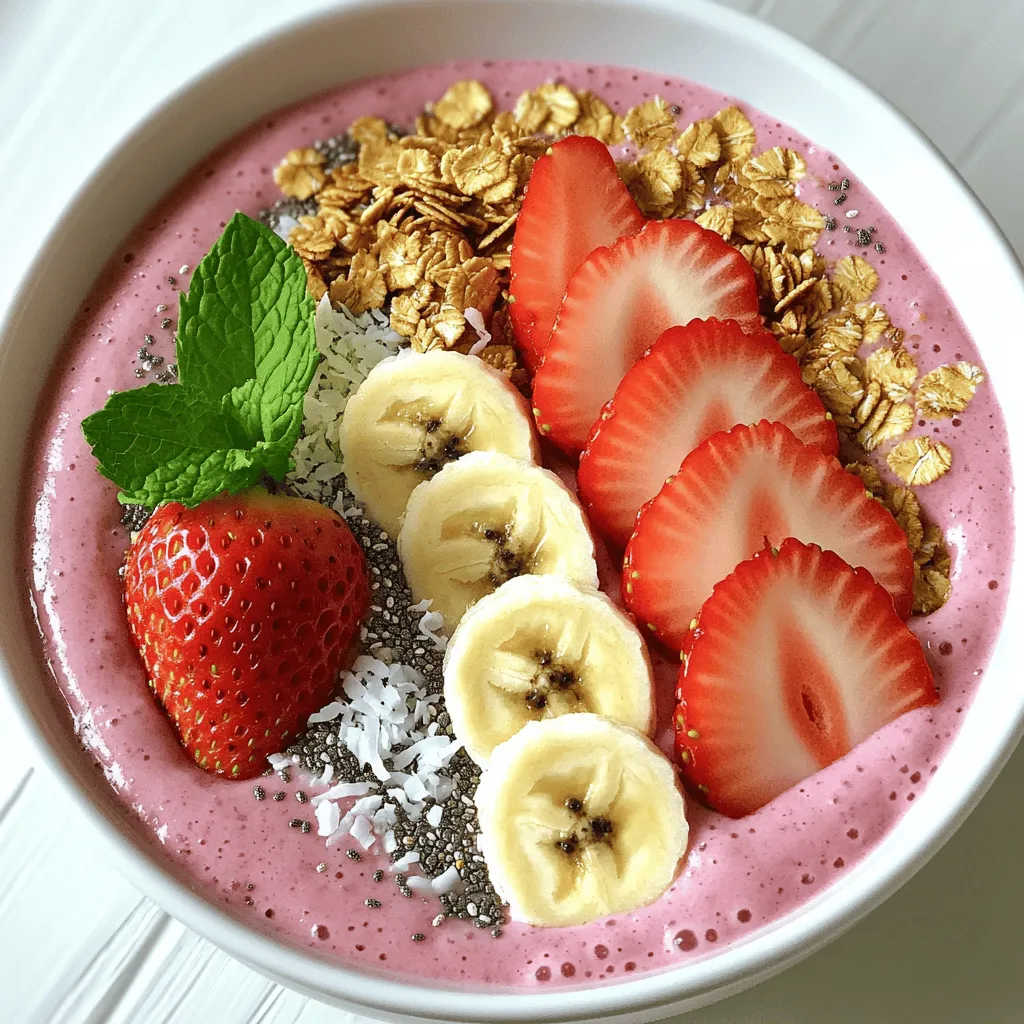
Are you craving a fresh and tasty treat? Look no further! My Strawberry Banana Smoothie Bowl is a perfect mix

- 4 bone-in, skin-on chicken thighs - 1/4 cup honey - 1/4 cup soy sauce - 3 cloves garlic, minced - 1 tablespoon grated fresh ginger - 1 tablespoon apple cider vinegar - 1 teaspoon sesame oil - 1/2 teaspoon red pepper flakes (optional) - Salt and pepper to taste - Chopped green onions - Sesame seeds For this recipe, I focus on fresh and simple ingredients. The chicken thighs have a rich flavor. They stay juicy and tender when cooked. Honey adds a natural sweetness. Soy sauce gives a nice salty touch. Garlic brings the dish to life. Fresh ginger adds a warm spice. The apple cider vinegar gives a slight tang. You can add red pepper flakes for heat if you want. Season with salt and pepper to taste. Don’t forget the garnishes! Chopped green onions and sesame seeds make the dish look great. They add a fresh crunch, too. For the full recipe, check the details above. First, grab a bowl. In it, whisk together the following ingredients: - 1/4 cup honey - 1/4 cup soy sauce - 3 cloves garlic, minced - 1 tablespoon grated fresh ginger - 1 tablespoon apple cider vinegar - 1 teaspoon sesame oil - 1/2 teaspoon red pepper flakes (optional) Mix until everything is well combined. This mixture is your marinade. It gives the chicken a sweet and savory flavor. You can taste it, but be careful; it’s strong! Now it's time to cook. Take your chicken thighs and season them with salt and pepper on both sides. This step adds a nice touch of flavor. Heat a drizzle of oil in a large skillet over medium-high heat. Once hot, add the chicken thighs skin-side down. Sear them until the skin is golden and crispy, about 5-7 minutes. This will make the skin tasty and crunchy. After searing, flip the thighs over. Pour the marinade over the top, coating them well. Cover the skillet and let the chicken simmer for 20-25 minutes. Make sure the chicken reaches an internal temperature of 165°F or 75°C. Once cooked, remove the chicken from the skillet. Let it rest for a few minutes. While it rests, increase the heat to high. Cook the sauce for another 2-3 minutes until it thickens slightly. This will make the sauce rich and flavorful. Finally, return the chicken to the skillet. Coat it in the thick sauce before serving. The chicken will soak up all that delicious flavor! For the complete recipe, check the [Full Recipe]. Preheating the skillet is key. It helps the chicken get a nice sear. A hot pan means the skin crisps up well. This step makes your dish look and taste better. Place the chicken skin-side down when the pan is hot. Let it cook for 5-7 minutes without moving it. This way, you'll get that perfect crispy skin. You can adjust the sauce's sweetness. Try using brown sugar or maple syrup. Both will add a rich flavor. If you want a fresh twist, add some citrus. Lemon or lime juice can brighten up the taste. Just a little will make a big difference. Always use a meat thermometer for best results. The chicken should reach 165°F or 75°C. This ensures it is fully cooked and safe to eat. If you use different cuts, cooking time may change. For chicken breasts, check at 20 minutes. Drumsticks may need a bit longer. Adjust the heat as needed to keep everything juicy and tender. {{image_2}} If you want to use chicken breasts, simply swap them for the thighs. Start by seasoning the breasts with salt and pepper. Sear them skin-side down in a hot skillet for about 6-8 minutes. Once golden, flip them over and pour the honey garlic sauce on top. Cover and simmer for 15-20 minutes until the chicken reaches 165°F. This swap keeps the dish tasty and juicy. For drumsticks, the method is similar. Season them well and sear for 8-10 minutes, skin-side down. Flip and add the sauce, just like before. Drumsticks may need a bit longer to cook through, so simmer them for about 25-30 minutes. Always check that the internal temperature hits 165°F for safety. If you want a vegetarian twist, use tofu or tempeh. Start with firm tofu or tempeh, cut into chunks. Marinate them in the honey garlic sauce for 30 minutes. Then, sauté them in a skillet over medium heat until golden. Cook for about 10-12 minutes, turning to brown all sides. This gives you a delicious and plant-based option that still packs flavor. Check out the Full Recipe for a complete guide! After you enjoy your honey garlic chicken thighs, store leftovers in airtight containers. This helps keep them fresh. Place the chicken in the fridge within two hours of cooking. I recommend eating the leftovers within three days for the best taste and safety. To freeze your honey garlic chicken, let it cool first. Then, wrap each thigh tightly in plastic wrap. Place them in freezer-safe bags or containers. This way, you can enjoy them later. They will stay good in the freezer for up to three months. When you’re ready to eat, thaw them in the fridge overnight before reheating. To reheat honey garlic chicken thighs, use the oven for the best results. Preheat your oven to 350°F (175°C). Place the thighs on a baking sheet. Cover with foil to keep them moist. Heat for about 20-25 minutes, or until warmed through. You can also use a microwave, but it may not keep the skin crisp. Enjoy your meal with a drizzle of that sticky sauce from the Full Recipe. Yes, you can use boneless chicken thighs. They cook faster than bone-in thighs. Cook them for about 15-20 minutes. Make sure the internal temperature reaches 165°F (75°C). To keep them juicy, don’t overcook. You can pair honey garlic chicken thighs with many sides. Here are some ideas: - Steamed rice - Stir-fried vegetables - Mashed potatoes - Roasted sweet potatoes - Green salad These dishes balance the sweet and savory flavors of the chicken. To make the sauce thicker, you can try a few techniques: - Cook it longer on high heat to reduce its volume. - Add a cornstarch slurry. Mix 1 tablespoon of cornstarch with 2 tablespoons of water. Stir it into the sauce while it simmers. - Use a bit of butter to enrich the sauce and help it coat the chicken better. These methods give you a luscious sauce that clings perfectly to the chicken. For the full recipe, check out the complete guide above. This blog post explored a delicious honey garlic chicken recipe. We covered the key ingredients, step-by-step instructions, and handy tips. You learned how to achieve crispy skin and thick sauce. I shared variations for chicken breasts, drumsticks, and even a vegetarian option. Storing and reheating tips ensure you enjoy leftovers too. Using this guide, you can create a tasty meal and impress others. Remember, cooking is fun and creative. Try new ideas and make this recipe your own!

Honey Garlic Chicken Thighs Flavorful and Easy Recipe

If you’re looking for a dinner recipe that’s simple yet packed with flavor, you’ve found it! My Honey Garlic Chicken

To make a tasty cauliflower fried rice, you will need the following main ingredients: - 1 medium head of cauliflower, grated or processed into rice-sized pieces - 1 cup of mixed vegetables (peas, carrots, corn) - 1 cup fresh spinach, roughly chopped - 2 eggs, lightly beaten (or 1/4 cup tofu for a vegan option) - 3 green onions, sliced - 2 cloves garlic, minced - 1 tablespoon fresh ginger, grated - 3 tablespoons soy sauce or tamari (for gluten-free) - 1 tablespoon sesame oil - 1 tablespoon olive oil - Salt and pepper to taste These ingredients come together to create a colorful and nutritious dish. The cauliflower acts as the base, giving you a satisfying texture. The mixed vegetables add color and nutrients, while the eggs or tofu provide protein. You can enhance the taste of your cauliflower fried rice with a few optional ingredients: - Sesame seeds for garnish - Red pepper flakes for heat - Bell peppers for sweetness - Mushrooms for umami - Peanuts for crunch Adding these optional items can make your dish more exciting. Don’t hesitate to get creative! If you have specific dietary needs, here are some substitutions: - Use quinoa or brown rice instead of cauliflower for a grain option. - Swap soy sauce for coconut aminos if avoiding soy. - Replace eggs with chickpea flour to maintain a vegan dish. - Use any veggies you like, such as zucchini or broccoli. These substitutions allow everyone to enjoy delicious cauliflower fried rice. Feel free to mix and match ingredients based on what you have at home or your dietary restrictions. For the full recipe, refer to the cooking instructions above! To start, grab a medium head of cauliflower. Remove the leaves and core. Cut the cauliflower into small florets. Next, use a food processor to pulse the florets until they look like rice grains. If you do not have a food processor, you can also use a box grater. This step is key for a great texture in your dish. Heat one tablespoon of olive oil in a large skillet over medium heat. Add two cloves of minced garlic and one tablespoon of grated ginger. Sauté for about one minute until they smell good. Next, toss in one cup of mixed vegetables. Stir-fry these for about three to four minutes until they soften. Now, push the veggies to one side of the pan. Pour in two beaten eggs, or you can use tofu for a vegan option. Scramble the eggs until they are fully cooked, then mix them with the veggies. Add the processed cauliflower rice and three tablespoons of soy sauce. Stir everything well to coat it evenly. Cook for another five to seven minutes. Keep stirring until the cauliflower gets tender but stays firm. In the last minute, add one cup of roughly chopped spinach, stirring until it wilts. Season with salt and pepper to taste. Drizzle one tablespoon of sesame oil before you finish cooking. To get the best texture, do not overcook the cauliflower. It should be tender yet not mushy. Using fresh ingredients gives more flavor. You can also add sesame seeds as a nice touch for garnish. Enjoy your delicious cauliflower fried rice! For the complete recipe, check out the Full Recipe section. To prepare cauliflower for fried rice, you can grate or process it. If you have a food processor, this task becomes quick. Cut the cauliflower into small florets. Place them in the processor and pulse until it resembles rice. If you lack a food processor, grab a box grater. Hold the cauliflower steady and grate it until it looks like rice. Both methods work well, so choose what you have on hand. For perfect cauliflower fried rice, the right tools matter. A large non-stick skillet or wok helps prevent sticking. A spatula is great for mixing and flipping the ingredients. If you want even cooking, a lid can trap steam. Using a lid can also help the cauliflower cook through without becoming mushy. This setup leads to a tasty and well-cooked meal. Making cauliflower fried rice is easy, but some mistakes can ruin it. Here are a few to watch out for: - Overcooking the Cauliflower: This can lead to mushy rice. Cook it just until tender. - Using Too Much Sauce: Adding too much soy sauce can make the dish salty. Start with a small amount and adjust to taste. - Not Prepping Ingredients First: Cut and prepare all your ingredients before cooking. This makes cooking smoother and quicker. - Skipping the Seasoning: Don’t forget salt and pepper! They enhance the flavor of the dish. Following these tips ensures your cauliflower fried rice is simple and tasty. For the full recipe, see above. {{image_2}} You can change up the veggies in your cauliflower fried rice. Try using bell peppers, broccoli, or snap peas. Each adds a unique taste and crunch. You can even toss in some zucchini or mushrooms for a savory kick. Be creative! Use any vegetables you like or have on hand. This dish is a great way to use up leftovers. Cauliflower fried rice fits well into many diets. For a vegan option, swap the eggs for tofu. Just crumble it and let it cook with the veggies. If you avoid animal products, this dish remains hearty and filling. You can also add more plant-based protein, like chickpeas or edamame. To boost flavor, consider adding different sauces or spices. You can use hoisin sauce or sriracha for some heat. Fresh herbs like cilantro or basil can brighten each bite. A squeeze of lime juice adds a zesty touch. Don't forget sesame seeds for a nice crunch! These enhancements make every bite exciting and unique. For the full recipe, check the main section above! Store leftover cauliflower fried rice in an airtight container. Keep it in the fridge for up to three days. Make sure it cools down before sealing. This will help it stay fresh longer. To reheat, use a skillet on medium heat. Add a splash of water or oil to prevent sticking. Stir it often for even heating. You can also use a microwave. Heat in short bursts, stirring in between. This keeps the rice from getting soggy. Yes, you can freeze cauliflower fried rice! Place it in a freezer-safe bag or container. Remove as much air as possible to prevent freezer burn. It will stay good for up to three months. To enjoy, simply thaw in the fridge overnight and reheat as mentioned above. Yes, cauliflower fried rice is naturally gluten-free. You can use gluten-free soy sauce or tamari for flavor. This option makes it safe for those with gluten allergies. Many people enjoy this dish without any gluten-related issues. Absolutely! Frozen cauliflower works well in this recipe. Just remember to thaw and drain it first. This step ensures that your dish does not become too watery. It saves time and still gives you a tasty meal. You can boost the flavor of cauliflower fried rice easily. Here are some tips: - Add more spices like chili flakes or black pepper. - Include a splash of rice vinegar for tang. - Mix in fresh herbs like cilantro or basil. - Experiment with different sauces, such as sriracha or hoisin. These additions help you create a dish that excites your taste buds. For the full recipe, check out the [Full Recipe]. Cauliflower fried rice is simple yet versatile. We discussed key ingredients, step-by-step cooking, and tips for the best outcome. You can use different veggies and flavor boosts to suit your taste. Lastly, proper storage is vital for freshness. With these insights, you can create a delicious and healthy dish that fits your needs. Enjoy your cooking, and remember, practice makes perfect!

Cauliflower Fried Rice Simple and Tasty Meal Option

Looking for a quick and healthy meal? Cauliflower fried rice is your answer! This dish is simple to make and

- 4 boneless skinless chicken breasts - 2 cups fresh spinach, chopped - 1 cup feta cheese, crumbled - 1/4 cup cream cheese, softened - 2 cloves garlic, minced - 1 tablespoon olive oil - 1 teaspoon dried oregano - Salt and pepper to taste - Toothpicks or kitchen twine Cooking this dish is easy and fun. First, gather your ingredients. You need boneless skinless chicken breasts to hold the tasty filling. Fresh spinach adds a vibrant color and good nutrients. Feta cheese gives a nice tangy flavor, while cream cheese adds creaminess. Garlic is a must for that aromatic kick. Olive oil helps with cooking and adds richness. Dried oregano brings in a lovely herb note. Don’t forget salt and pepper to enhance all the flavors. Finally, use toothpicks or kitchen twine to secure the chicken. - Sharp knife - Mixing bowl - Skillet (oven-safe) - Measuring cups and spoons Having the right tools makes cooking smooth. A sharp knife is key to making pockets in the chicken. A mixing bowl helps you combine the filling ingredients well. An oven-safe skillet is perfect for browning the chicken and then baking it. Measuring cups and spoons ensure you add just the right amounts for the best taste. For the full recipe, check out Spinach & Feta Delight Chicken Breasts 🥗. First, I preheat the oven to 375°F (190°C). This step is crucial as it ensures even cooking. Next, I prepare the stuffing mix. In a mixing bowl, I combine: - 2 cups fresh spinach, chopped - 1 cup feta cheese, crumbled - 1/4 cup cream cheese, softened - 2 cloves garlic, minced - 1 teaspoon dried oregano - Salt and pepper to taste I mix these ingredients well until they form a creamy blend. Now, I grab the chicken breasts. I place them on a clean cutting board. Using a sharp knife, I carefully create pockets in each breast. I slice horizontally, making sure not to cut all the way through. Once I have the pockets ready, I generously fill them with the spinach and feta mix. I use toothpicks or kitchen twine to secure the openings. This keeps the yummy filling inside while cooking. Next, I heat olive oil in a large oven-safe skillet over medium-high heat. Once hot, I add the stuffed chicken breasts. I sear them for about 3-5 minutes on each side until they turn a nice golden brown. After that, I transfer the skillet to the oven. I bake the chicken for 20-25 minutes. I check that the internal temperature reaches 165°F (75°C) to ensure it's fully cooked. Remember, if you want the full recipe, check out the complete instructions. To make your spinach feta stuffed chicken truly shine, focus on key temperatures and cooking times. Start by preheating your oven to 375°F (190°C). This temperature allows the chicken to cook evenly while keeping the filling warm and tasty. Cook the chicken for 20-25 minutes or until its internal temperature hits 165°F (75°C). To avoid dry chicken, do not overcook it. Keep an eye on the time, and use a meat thermometer. This tool ensures you get juicy chicken every time. When you let the chicken rest for five minutes after cooking, it allows the juices to settle. This step makes every bite tender and moist. Adding herbs and spices can elevate your dish to new heights. Try adding fresh basil, thyme, or even a touch of red pepper flakes for a hint of heat. Each herb brings its unique flavor, making your chicken even more delicious. Consider using alternative cheese options if you want to mix things up. Goat cheese offers a tangy flavor that pairs well with spinach. Mozzarella can add a creamy texture while still melting beautifully. The key is to find flavors you love and experiment! For the full recipe, check out the Spinach & Feta Delight Chicken Breasts. {{image_2}} If you want a meat-free meal, use portobello mushrooms. These large mushrooms have a nice texture. They soak up flavors well and provide a hearty base. Simply remove the stems and gills, then stuff the mushroom caps with the same spinach and feta mix. Bake them until soft and joyful. This option is tasty and colorful! You can always add extra flavors to your stuffed chicken. Sun-dried tomatoes bring a sweet and tangy burst. Roasted red peppers add a smoky touch. You can also mix in nuts like pine nuts or walnuts for a nice crunch. These additions create exciting layers of flavor and texture. Feel free to experiment! You can cook your spinach feta stuffed chicken in different ways. Grilling gives the chicken a smoky flavor and nice grill marks. Just be sure to keep an eye on the temp. Baking is a great way to cook the chicken evenly. For a hands-off approach, use a slow cooker. Cook on low for 4-6 hours and enjoy a tender, juicy meal. Each method offers a unique taste and texture! For the full recipe, check out the Spinach & Feta Delight Chicken Breasts. To keep your spinach feta stuffed chicken fresh, store it in the fridge. Place leftovers in an airtight container. This keeps moisture in and prevents the chicken from drying out. Make sure to consume them within three days for the best taste and safety. You can freeze cooked stuffed chicken for later use. First, let it cool completely. Wrap each piece tightly in plastic wrap. Then, place the wrapped chicken in a freezer bag. Remember to label it with the date. This method helps preserve flavor and texture for up to three months. When it's time to enjoy your leftovers, reheat them carefully. Preheat your oven to 350°F (175°C). Place the chicken in an oven-safe dish and cover it with foil. This keeps it moist. Heat for about 20-25 minutes or until warm. For the best flavor, avoid using the microwave. It can make the chicken rubbery. Enjoy your delicious spinach feta stuffed chicken again! You can find the full recipe linked above. Can I prepare the filling in advance? Yes, you can make the filling ahead of time. Just mix the spinach, feta, cream cheese, garlic, and spices. Store it in the fridge for up to a day. This saves time on cooking day. How do I know when the chicken is fully cooked? Use a meat thermometer to check the chicken's center. It should read 165°F (75°C) for safety. If you don’t have a thermometer, cut into the thickest part. The meat should be white, not pink. What sides pair well with stuffed chicken? Serve your stuffed chicken with a simple salad, rice, or roasted veggies. Mashed potatoes also work well. These sides add balance to the meal and complement the flavors nicely. Chicken not browning If your chicken isn’t browning, make sure your skillet is hot enough. Sear on medium-high heat for a good crust. Avoid overcrowding the pan; cook in batches if needed. Filling leaking out during cooking To prevent the filling from leaking, make sure you secure the chicken well. Use toothpicks or kitchen twine to hold the pockets closed. Also, don’t overstuff the chicken; a little filling goes a long way. How many calories are in Spinach Feta Stuffed Chicken Breasts? Each stuffed chicken breast contains about 350 calories. This makes it a hearty yet healthy meal option. What are the protein and fat contents? Each serving has roughly 35 grams of protein and 20 grams of fat. This high protein content helps keep you full and satisfied. For a complete guide on making this dish, check out the Full Recipe. In this blog post, we explored how to make Spinach Feta Stuffed Chicken Breasts. We covered the key ingredients, useful tools, and clear steps for cooking. I shared tips to keep the chicken juicy and flavorful. You can also try vegetarian options or extra fillings for variety. Lastly, I gave you the best ways to store and reheat your dish. With this guide, you’re ready to create a delicious meal that will impress everyone. Enjoy your cooking adventure!

Spinach Feta Stuffed Chicken Breasts Flavorful Delight

Looking for a tasty and healthy dinner option? You’re in the right place! In this post, I’ll show you how

- Quinoa: This tiny seed packs a big punch. It's rich in protein and fiber. Quinoa is gluten-free and works well in salads. - Fresh Vegetables: Use bright cherry tomatoes, crisp cucumbers, and sweet bell peppers. These add color and crunch. Red onion brings a nice bite to the mix. Kalamata olives add a briny flavor, making the salad even tastier. - Herbs: Fresh parsley and mint are key. They add a burst of flavor. These herbs brighten up the dish and give it a fresh taste. - Olive Oil: A must-have for any salad. It adds richness and helps blend the flavors. Use a high-quality extra virgin olive oil for the best taste. - Lemon Juice: This adds acidity and brightness. Fresh lemon juice balances the flavors and makes the salad refreshing. - Seasoning: Don’t forget salt and pepper! They enhance the taste of all the ingredients. Adjust to your liking for the best flavor. For the full recipe, check out the Mediterranean Quinoa Salad 🥗. To start, rinse the quinoa in cold water. This step removes the bitter coating called saponin. Use a fine-mesh sieve to make this easy. Next, add 1 cup of rinsed quinoa and 2 cups of vegetable broth or water to a medium pot. Bring the pot to a boil over high heat. Once it boils, reduce the heat to low. Cover the pot and let it simmer for about 15 minutes. The quinoa will absorb all the liquid. After 15 minutes, take the pot off the heat and let it sit covered for 5 more minutes. Now, fluff the quinoa with a fork. This helps separate the grains. Spread it out on a plate to cool. While the quinoa cools, it’s time to chop your veggies. Use a sharp knife for safety and ease. Start by halving the cherry tomatoes. Then, dice the cucumber and bell pepper into small pieces. Next, finely chop the red onion. Finally, halve the Kalamata olives. In a large mixing bowl, add all the chopped vegetables. This bowl will hold the quinoa later, so make sure it’s big enough. In a small bowl, whisk together the dressing. Combine 2 tablespoons of olive oil, 2 tablespoons of lemon juice, and a pinch of salt and pepper. Whisk until it’s well mixed. Now, add the cooled quinoa to the bowl with the veggies. Toss gently to mix everything. Then, pour the dressing over the top. Toss again to coat all the ingredients evenly. If you want, sprinkle crumbled feta cheese, fresh parsley, and mint into the salad. Toss once more, and it's ready to serve. For the full recipe, check out the instructions above. Enjoy! To make a great quinoa salad, focus on two key parts: texture and flavor. - Achieving the right texture Start by rinsing the quinoa well. This removes the bitter coating called saponin. Use a ratio of 1 cup quinoa to 2 cups broth or water. Cook it until all the liquid absorbs. After cooking, let it rest for 5 minutes. Fluff it with a fork to keep it light and airy, not mushy. - Balancing flavors with herbs and spices Fresh herbs bring life to the salad. I love using parsley and mint. They add bright notes. A splash of lemon juice brightens the dish. Salt and pepper enhance the overall taste. Adjust these to your liking for a personal touch. Presentation matters. A well-presented dish makes the meal more inviting. - Presentation ideas Serve the salad in a big bowl. Top it with extra feta and mint leaves. This adds color and a fresh look. You can also layer it in clear cups for a fun twist. - Pairing with proteins for a complete meal To make the salad a full meal, add protein. Grilled chicken, shrimp, or chickpeas work well. These options complement the flavors and make the dish filling. Pairing it with a protein makes it a perfect main course. For more details on preparing this tasty dish, check the Full Recipe. {{image_2}} You can easily make this salad vegan. To do this, skip the feta cheese. Instead, you can use avocado for a creamy touch. It adds healthy fats and a nice flavor. Another option is to add nutritional yeast for a cheesy taste without dairy. For protein, consider chickpeas or black beans. They boost the protein level and make the dish more filling. Just rinse and drain them before adding. You can also add roasted tofu. It brings a chewy texture that complements the salad well. You can swap in seasonal veggies to keep things fresh. In summer, use zucchini or bell peppers for crunch. In winter, consider roasted sweet potatoes or beets for warmth. They add color and flavor. Try different dressings to keep it interesting. A balsamic vinaigrette can add sweetness. A tahini dressing gives a creamy texture and nutty flavor. You can also use a spicy harissa dressing for a kick. This keeps your Mediterranean quinoa salad exciting and new every time. For the full recipe, check out the [Full Recipe]. To keep your Mediterranean quinoa salad fresh, store it in an airtight container. Make sure it cools to room temperature before sealing. This helps prevent moisture buildup. Place the container in the fridge. Your salad will stay fresh for about three to five days. If you want to keep the flavors bright and tasty, store the dressing separately. Add it just before serving. This keeps the veggies crisp and prevents sogginess. Can you reheat quinoa salad? Yes, but it’s best served cold. If you prefer it warm, gently heat it in a pan. Add a splash of water or olive oil for moisture. Stir until heated through, but don’t cook it too long. For leftovers, enjoy the salad as a quick snack or lunch. You can also add it to wraps or bowls. Mixing it with grilled chicken or shrimp makes a great meal. Try adding a bit more lemon juice to brighten the flavors again. A Mediterranean quinoa salad is a fresh dish that mixes quinoa with veggies and herbs. This salad comes from the Mediterranean region, known for its vibrant flavors and healthy ingredients. It is colorful, tasty, and packed with nutrients. The main ingredients include cherry tomatoes, cucumbers, bell peppers, olives, and feta cheese. This salad is perfect for lunch, dinner, or a side dish. To enhance the flavor of your quinoa salad, start by using vegetable broth instead of water. This small change adds depth to the quinoa. Add fresh herbs like parsley and mint to bring a burst of freshness. Try different spices like cumin or paprika for a unique twist. A splash of red wine vinegar can brighten the salad too. Lastly, don’t forget to taste as you go. Adjust the salt and pepper to your liking. Yes, you can make this salad ahead of time. To prep, cook the quinoa and chop the vegetables. Store them separately in the fridge until ready to serve. You can mix everything together just before serving. This way, the veggies stay crisp, and the flavors stay fresh. The salad will last up to three days in the fridge, but it tastes best within the first two days. This salad pairs well with many dishes. For protein, try grilled chicken, fish, or chickpeas. A side of hummus or tzatziki adds creaminess. If you want more crunch, serve it with pita chips or fresh bread. This salad can also complement a light soup or a roasted vegetable platter. It’s a versatile dish that can fit any meal! In this blog post, we explored the essentials of a Mediterranean quinoa salad. We covered the main ingredients, including quinoa, fresh vegetables, and herbs. You learned how to cook quinoa, prep veggies, and combine everything for a tasty dish. Offering tips for perfecting flavors and presenting your salad enhanced the appeal. Lastly, we discussed storage and variations, ensuring you can customize your salad. Enjoy making this delicious, healthy choice that fits many diets and preferences!

Mediterranean Quinoa Salad Fresh and Flavorful Boost

Looking for a fresh and tasty dish? This Mediterranean Quinoa Salad is just what you need! Packed with bright veggies,

To make delicious coconut macaroon cookies, gather these simple ingredients: - 3 cups sweetened shredded coconut - 1 cup sweetened condensed milk - 1 teaspoon vanilla extract - 1/4 teaspoon almond extract (optional) - 2 large egg whites - 1/4 teaspoon salt - 1/2 cup semi-sweet chocolate chips (for drizzling, optional) These ingredients blend together to create a chewy and sweet treat. The sweetened shredded coconut gives these cookies their signature texture and flavor. Sweetened condensed milk adds moisture and sweetness, making each bite delightful. Vanilla extract enhances the overall flavor, while almond extract can add a nice twist if you choose to use it. Egg whites are key for a light, airy macaroon. They help the cookies puff up and stay soft inside. A pinch of salt balances the sweetness perfectly. If you want to add a touch of chocolate, the semi-sweet chocolate chips make a nice drizzle on top. This list makes it easy to see what you need. You can find most of these ingredients at your local grocery store. If you want to dive deeper, check out the Full Recipe for exact amounts and instructions. First, you need to get your oven ready. Preheat it to 325°F (160°C). This step helps your cookies bake evenly. While the oven warms up, line two baking sheets with parchment paper. This keeps the cookies from sticking and makes for easy cleanup. Next, grab a large mixing bowl. In this bowl, combine the following ingredients: - 3 cups sweetened shredded coconut - 1 cup sweetened condensed milk - 1 teaspoon vanilla extract - 1/4 teaspoon almond extract (optional) Stir these ingredients together well. Make sure the coconut is fully coated with the sweetened condensed milk. This mix gives your cookies their chewy texture and sweet taste. Now, let’s whip up the egg whites. Take two large egg whites and add 1/4 teaspoon of salt to a clean bowl. Use a hand mixer or whisk to beat the egg whites. You want to whip them until soft peaks form. This should take about 2-3 minutes. Soft peaks mean the egg whites hold their shape but still appear fluffy. Once you achieve this, gently fold the whipped egg whites into your coconut mixture. Be careful not to deflate the egg whites. You want your cookies to be light and airy. Mix until just combined, and then you’re ready to scoop the batter onto your prepared baking sheets. For the complete instructions, check the Full Recipe. To get the right texture in your coconut macaroons, focus on mixing. When you mix the coconut and condensed milk, ensure every shred gets coated. This step is key. Whipping the egg whites is also crucial. Whip until soft peaks form. This keeps the cookies light and airy. Finally, gently fold the egg whites into the coconut mix. Be careful not to deflate them. This tip makes all the difference. One big mistake is overbaking. Keep an eye on your cookies as they bake. You'll want them golden on the edges but soft in the center. Also, make sure to use parchment paper. This helps prevent sticking and keeps the bottoms from browning too much. Lastly, avoid crowding the baking sheets. Give each cookie space to expand. This keeps them from merging into one big blob. Drizzling chocolate can add flair to your cookies. First, melt the chocolate chips in short bursts in the microwave. Stir in between to avoid burning. Once smooth, use a fork to drizzle. Hold the fork above the cookies and move it side to side. This creates a nice pattern. If you want more control, use a piping bag. Cut a tiny hole in the corner and squeeze gently. Your cookies will look professional and taste amazing. For more tips, check out the Full Recipe. {{image_2}} Add a fun twist with chocolate! After baking your coconut macaroons, melt semi-sweet chocolate chips in the microwave. Use short bursts of heat to avoid burning. Once melted, drizzle the chocolate over the cooled cookies using a spoon or a piping bag. This adds a rich flavor and makes your treats look fancy. The sweet coconut pairs perfectly with the chocolate. For a nutty flavor, try adding almond extract. Just swap in a bit more almond extract instead of the vanilla. You can also mix in chopped almonds for extra crunch. These almond coconut macaroons are a great way to change things up. They taste amazing and have a lovely texture. Want a bright flavor? Add lemon zest to your coconut mixture. Just mix in a tablespoon of fresh lemon zest before baking. This gives the cookies a refreshing twist. The tangy lemon balances the sweetness of the coconut. It’s a delightful surprise in every bite. Explore these variations to make your coconut macaroons even more special. Each option brings a new taste and fun to your baking. Try them out and see which one you like best! For the complete process, check the Full Recipe. To keep your coconut macaroons fresh, use an airtight container. This helps keep moisture in and air out. Store them at room temperature for up to a week. If you want to enjoy them later, consider freezing them. Freezing is a great way to save coconut macaroons. Place your cooled cookies in a single layer on a baking sheet. Once frozen, transfer them to a freezer-safe bag. They can last for up to three months in the freezer. When you are ready to eat, just take them out. To reheat coconut macaroons, you can use your oven or microwave. For the oven, set it to 300°F (150°C). Place the cookies on a baking sheet for about 5 to 8 minutes. If you use the microwave, heat them for about 10 to 15 seconds. This softens them without drying them out. Enjoy them warm for the best taste! Yes, you can use unsweetened coconut. However, the cookies will taste less sweet. I suggest adding more sugar or a little honey to balance the flavor. It’s all about your taste. If you like it sweet, stick with sweetened coconut. It gives the best results in flavor and texture. Coconut macaroons can last up to a week. Store them in an airtight container at room temperature. If you want them to stay fresh longer, keep them in the fridge for about two weeks. Just remember to let them come to room temperature before serving. This will help regain their soft texture. If you need a substitute, try using coconut cream mixed with sugar. You can also use evaporated milk with added sugar. Another option is a mixture of milk and cream with sugar. These choices work well in recipes. They help keep the cookies moist and sweet. For the best results, I recommend using sweetened condensed milk for that perfect flavor. Check out the Full Recipe for more details on making these tasty treats. Coconut macaroons are easy to make and fun to eat. We covered key ingredients, step-by-step instructions, and helpful tips. You now know how to achieve the right texture and avoid common mistakes. We also explored tasty variations and storage methods. You can enjoy coconut macaroons fresh or save them for later. Experiment with flavors and share them with friends. Baking can bring joy, so dive in and enjoy the process!

Coconut Macaroon Cookies Delicious and Simple Treat

Are you ready to whip up a sweet treat that’s easy and delicious? Coconut macaroon cookies combine simple ingredients to

Older posts
Newer posts
← Previous Page1 … Page9 Page10 Page11 … Page29 Next →

dsad

© 2025 Southern Dishes • Built with GeneratePress

Our Policies

  • Copyright Policy
  • Cookie Policy
  • GDPR Policy
  • Privacy Policy
  • Disclaimer
  • Terms Of Use

More Information

  • Home
  • About
  • Contact
  • Appetizers
  • Dessert
  • Dinner
  • Drinks
©2025, Southern Dishes About Back To Top