![- 1 lb chicken breast - Fresh Thai basil leaves - Vegetable oil - Garlic and Thai bird's eye chilies - Soy sauce - Oyster sauce - Fish sauce - Sugar, salt, and pepper - Cooked jasmine rice - Optional garnishes Spicy Thai Basil Chicken is a delight to make. You need simple, fresh ingredients. Start with tender chicken breast, about 1 pound. Cut it into thin slices. Next, fresh Thai basil leaves add a fragrant twist. You will want to use a good amount, so grab a couple of cups. The more, the better! Garlic and Thai bird's eye chilies bring heat and bold flavor. Use about three cloves of garlic, minced. For the chilies, two to three will do. Adjust these based on your spice level. For cooking, use vegetable oil. It helps the chicken brown nicely. Next, gather your sauces and seasonings. You'll need soy sauce and oyster sauce for depth. Fish sauce adds a unique umami punch. A tablespoon of sugar balances the flavors, along with a sprinkle of salt and pepper. To serve, you will want cooked jasmine rice. It makes a perfect base for the savory chicken. You can also add some garnishes like lime wedges or extra basil leaves for color. For the full recipe, check out the [Full Recipe]. - Slice the chicken breast into thin strips. - Mince the garlic and chop the chilies finely. Getting these ready makes cooking quick and easy. The chicken should be thin so it cooks fast. The garlic and chilies add great flavor and spice. - Heat oil in a large skillet over medium-high heat. - Sauté the minced garlic and chopped chilies for about 30 seconds. - Stir-fry the sliced chicken until cooked through, about 5-7 minutes. - Add the sliced red bell pepper and cook for 2-3 minutes. This process is key for a delicious meal. The oil helps the garlic and chilies release their oils and aroma. Next, cook the chicken until it turns white and is no longer pink. The bell peppers add color and crunch. - Pour a mix of soy sauce, oyster sauce, fish sauce, and sugar over the chicken. - Stir well and let it cook for another 2 minutes. - Remove from heat and gently fold in the fresh Thai basil until it wilts. - Season with salt and pepper to taste. These final touches bring everything together. The sauces create a tasty glaze that coats the chicken. Adding basil at the end keeps its fresh flavor. You can serve this over jasmine rice for a complete meal. For the full recipe, check out the main article. To make tender chicken, start with thin slices. This helps the meat cook evenly. Cook it fast over high heat. This keeps the chicken juicy and soft. For spice levels, taste as you go. If you want it hot, add more chilies. If you prefer mild, use fewer. You can always add more later. Adding lime juice brightens the dish. Squeeze some over the chicken before serving. Fresh herbs like cilantro or mint can also boost flavor. Balancing sweetness and heat is key. The sugar in the sauce helps. Adjust it based on your taste. If it's too sweet, add a bit more soy sauce. For eye appeal, serve Spicy Thai Basil Chicken over fluffy jasmine rice. The white rice contrasts nicely with the colorful dish. Use garnishes like fresh basil leaves. They add color and freshness. Slices of chili can spice up the look. Lime wedges on the side add a zesty touch. For the full recipe, check out the link. {{image_2}} You can switch out chicken for tofu or beef. Tofu absorbs flavors well. It's a great choice for a vegetarian meal. If you like beef, use thin slices of flank steak. Both options keep the dish tasty and satisfying. You can also try shrimp for a seafood twist. Shrimp cooks fast and adds a nice flavor. Just toss them in after the garlic and chilies. Add more veggies for extra nutrition. Good options are snap peas, broccoli, or carrots. These veggies add color and crunch. You can also use seasonal ingredients. In summer, zucchini or bell peppers work great. In winter, try bok choy or spinach. Mixing in these veggies makes the dish even better. You can play with different sauces for new flavors. Try adding hoisin sauce for a sweet touch. Or, use sriracha for more heat. If gluten is a concern, make it gluten-free. Just switch soy sauce for tamari or coconut aminos. These small changes can make a big difference in taste. To store leftover Spicy Thai Basil Chicken, place it in an airtight container. Make sure it cools down before sealing. You can keep it in the fridge for up to three days. The chicken stays tasty, but you may notice the basil wilts a bit. When reheating, use a skillet on medium heat. Add a splash of water to keep it moist. Stir often to ensure it heats evenly. This method helps keep the flavors bright and the chicken tender. Avoid using the microwave, as it may make the chicken tough. Yes, you can freeze Spicy Thai Basil Chicken! Just make sure it cools down. Place it in a freezer-safe container or bag. It lasts up to three months in the freezer. To thaw, move it to the fridge overnight. Reheat it in a skillet, adding a bit of water for moisture. This keeps the dish flavorful and delicious. For the complete cooking process, check out the Full Recipe. This dish takes about 25 minutes to make. You will spend about 15 minutes prepping the ingredients. Cooking takes around 10 minutes. You can have dinner ready quickly! Yes, you can make this dish in advance. Cook the chicken and sauces, then store them in the fridge. Reheat when you are ready to eat. To keep it fresh, store it for only 2-3 days. This dish pairs well with jasmine rice. You can also serve it with fresh vegetables like cucumber or a simple salad. For extra flavor, add lime wedges on the side. Enjoy the mix of tastes and textures! For the full recipe, you can refer to the detailed steps above. In this blog post, we covered how to make Spicy Thai Basil Chicken. I shared the main ingredients, sauces, and serving ideas. You learned step-by-step instructions to prepare and cook the dish. Tips on cooking techniques and variations helped you get creative. Finally, I explained storage methods for leftovers and answered common questions. Now, you have everything you need to enjoy this tasty meal. Dive in and start cooking!](https://southerndishes.com/wp-content/uploads/2025/05/a5d0289a-3022-488d-ab7b-53552126e8b7.webp)
Spicy Thai Basil Chicken Flavorful and Simple Delight
Are you ready to bring the flavors of Thailand into your kitchen? In this blog post, I’ll show you how
Are you ready to bring the flavors of Thailand into your kitchen? In this blog post, I’ll show you how

Looking for a simple and tasty breakfast treat? Cinnamon Roll Casserole is the answer! This dish combines warm, gooey cinnamon
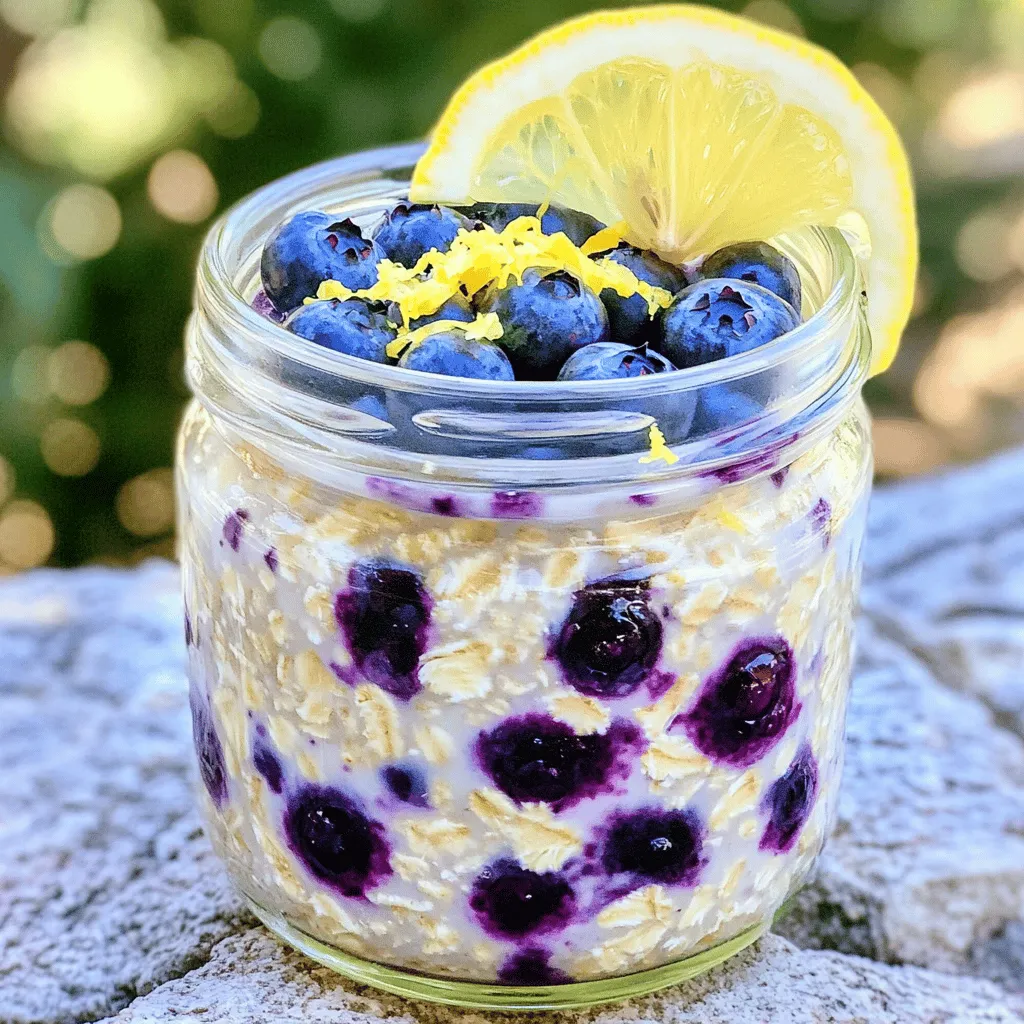
If you’re looking for a simple, tasty breakfast, Lemon Blueberry Overnight Oats are it! These oats are easy to make

Looking for a side dish that adds bold flavor to any meal? Garlic Herb Roasted Potatoes are your answer! With
![To make savory breakfast quinoa, gather these key ingredients: - 1 cup quinoa, rinsed - 2 cups vegetable broth or water - 1 tablespoon olive oil - 1 small onion, finely chopped - 1 bell pepper (red or green), diced - 1 cup spinach, roughly chopped - 1 teaspoon garlic powder - 1 teaspoon paprika - Salt and pepper to taste - 2 large eggs (or egg substitutes) - 1 avocado, sliced - Fresh herbs (like cilantro or parsley) for garnish These ingredients create a rich and tasty base. Quinoa serves as a healthy grain. It cooks fluffy and fills you up. The vegetables add color and flavor to your dish. You can mix in different ingredients for added flavor. Try these options: - Cherry tomatoes, halved - Zucchini, diced - Mushrooms, sliced - Feta cheese, crumbled - Hot sauce for some spice These extras let you personalize your breakfast. Feel free to switch up the veggies or add cheese. The goal is to make it your own. Here’s why each ingredient is good for you: - Quinoa: High in protein and fiber. It helps keep you full longer. - Vegetable broth: Low in calories and adds flavor without fat. - Olive oil: Contains healthy fats that support heart health. - Onion: Rich in vitamins and helps add depth to dishes. - Bell pepper: Full of vitamins A and C, boosting your immune system. - Spinach: Packed with iron and antioxidants, great for your body. - Garlic powder: May help reduce blood pressure and has many health perks. - Eggs: Provide protein and essential nutrients for energy. - Avocado: Loaded with healthy fats and fiber, good for digestion. - Fresh herbs: Add flavor and are often rich in vitamins. Using these ingredients not only makes a tasty breakfast but also fuels your body with nutrients. Each bite supports your health and energy for the day. For the full recipe, check out the details shared above. First, rinse one cup of quinoa under cold water. This step removes any bitter taste. Next, combine the rinsed quinoa with two cups of vegetable broth or water in a medium saucepan. Bring this mixture to a boil over high heat. Once boiling, reduce the heat to low, cover the pot, and let it simmer for about 15 minutes. You will know it is done when the quinoa is fluffy and all the liquid is absorbed. While the quinoa cooks, grab a large skillet and heat one tablespoon of olive oil over medium heat. Add in one small chopped onion and one diced bell pepper. Cook these for about five minutes until they soften. Next, stir in one cup of roughly chopped spinach, one teaspoon of garlic powder, and one teaspoon of paprika. Cook this mixture for about two minutes until the spinach wilts. Season it with salt and pepper to your taste. Once your quinoa is ready, add it to the skillet with the cooked vegetables. Stir everything together to combine well. In a separate small skillet, cook two large eggs to your liking—fried, scrambled, or poached. To serve, dish out the quinoa and vegetable mix into bowls. Top each bowl with a cooked egg, sliced avocado, and some fresh herbs like cilantro or parsley for garnish. Enjoy your savory breakfast quinoa for a healthy morning boost! For the full recipe, check out the detailed steps above. To make fluffy quinoa, rinse it well. This removes the bitter coating called saponin. After rinsing, cook it in vegetable broth or water. Use a 2:1 liquid-to-quinoa ratio. Bring it to a boil, then lower the heat and cover. Let it simmer for about 15 minutes. Once done, let it sit for 5 minutes off heat. Fluff it with a fork before serving. This will give your quinoa that perfect light texture. To boost flavor, sauté your veggies first. Cooking onions and bell peppers adds sweetness. Add garlic powder and paprika for depth. A splash of lemon juice can brighten the dish. You can also mix in fresh herbs at the end. They add freshness and color. Experiment with spices like cumin or chili powder for a twist. For this dish, I recommend frying or poaching the eggs. Fried eggs add a crispy edge. Poached eggs provide a soft, creamy yolk. You can also scramble the eggs with spices for a twist. Cook them to your liking and place them on top of the quinoa. This adds a nice visual and textural contrast. For a vegan option, try using scrambled tofu instead. For the full recipe, follow the directions above to create your savory breakfast quinoa. {{image_2}} You can easily make Savory Breakfast Quinoa vegan or vegetarian. To do this, skip the eggs. Instead, use a plant-based egg substitute or just enjoy it as is. Add more veggies like mushrooms or zucchini for extra flavor. You can also sprinkle nutritional yeast on top for a cheesy taste. Feel free to mix different veggies into your quinoa. Try using cherry tomatoes, kale, or broccoli. Each vegetable brings its own taste and texture. For a spicy kick, add jalapeños or red pepper flakes. The more colors you add, the more appealing your dish will look. Want extra protein? You can add cooked chicken, tofu, or even beans. For chicken, use rotisserie chicken for quick prep. If you like tofu, cube it and sauté until golden. Beans like black beans or chickpeas add fiber and taste. This makes your breakfast filling and healthy. For the complete recipe, check out the [Full Recipe]. To store leftover savory breakfast quinoa, let it cool first. Then, place it in an airtight container. This keeps the quinoa fresh for up to three days in the fridge. Make sure to label the container with the date. When you're ready to eat the leftovers, you can reheat them easily. Use the microwave or a stove. For the microwave, place quinoa in a bowl and cover it with a damp paper towel. Heat for 1-2 minutes, stirring halfway through. On the stove, add a splash of water in a pan and heat over low. Stir until it's warm. If you want to make a big batch, freezing is a great option. After cooling, spoon the quinoa into freezer-safe bags. Flatten the bags to save space. It will keep well for up to three months. When you want to eat it, thaw it in the fridge overnight before reheating. For the full recipe, check out the details above! Quinoa is a super food. It is a complete protein. This means it has all nine essential amino acids. Quinoa is also high in fiber. This helps with digestion and keeps you full. It has vitamins and minerals, like magnesium and iron. These nutrients support your energy and health. Quinoa is low in calories. It can help you manage your weight. Yes, this recipe is gluten-free! Quinoa itself is a gluten-free grain. Just make sure to check the vegetable broth. Some broths may have gluten. You can also use water instead. This way, you keep it safe for those with gluten allergies. You can prep this dish in advance. Cook the quinoa and veggies as directed. Let them cool, then store in containers. Place them in the fridge for up to four days. When ready to eat, just reheat in a pan or microwave. Cook the eggs fresh for the best taste. This makes breakfast quick and easy! Absolutely! You can add any veggies you like. Some great options are zucchini, mushrooms, or kale. Just cook them with the onions and peppers. This boosts the flavor and adds more nutrients. To enhance flavor, try different spices. Adding cumin or chili powder can give it a kick. You could also mix in some cheese for creaminess. Fresh herbs like basil or dill can brighten the dish. Experiment to find your favorite blend! If you want a vegan option, replace eggs with tofu. Scramble firm tofu with some spices. You can also use chickpea flour to make a vegan egg batter. This keeps the protein while keeping it plant-based. The total time to prepare savory breakfast quinoa is about 30 minutes. It takes around 10 minutes to prep and 20 minutes to cook. This makes it a quick and healthy breakfast option on busy days. For the full recipe, check the earlier section! In summary, you learned about the key ingredients for savory breakfast quinoa. We explored essential and optional items, plus their nutritional benefits. I shared step-by-step instructions to prepare, cook, and serve this dish. You got useful tips for fluffy quinoa and flavor boosts. Variations cater to different diets, adding proteins or veggies you'd like. Lastly, I outlined how to store, reheat, and freeze leftovers. Savory breakfast quinoa is easy to make, healthy, and customizable for your taste. Enjoy a nourishing start to your day!](https://southerndishes.com/wp-content/uploads/2025/05/4afaa1ac-32c4-42c2-84a8-f8e073301232.webp)
Are you tired of the same old breakfast? Try my Savory Breakfast Quinoa for a healthy morning boost! This dish
![For this creamy avocado pasta, you need a few key items. Here are the main ingredients: - 2 ripe avocados - 3 cups cooked pasta (spaghetti or fettuccine work well) - 2 cloves garlic, minced - 2 tablespoons olive oil - 1 tablespoon lemon juice - 1/4 cup fresh basil leaves, chopped - 1/4 cup grated parmesan cheese (or nutritional yeast for a vegan option) - Salt and pepper to taste - Cherry tomatoes, halved (for garnish) - Extra basil leaves for garnish These items create a rich and creamy sauce that coats the pasta perfectly. If you want to change things up, you can add optional ingredients. Some great options include: - Red pepper flakes for heat - Spinach or arugula for extra greens - Pine nuts or walnuts for crunch - Lemon zest for extra brightness These additions can make your dish unique and fun! Choosing the right avocados is key for this dish. Here are some simple tips: - Look for avocados that are slightly soft when you press them. - The skin should be dark green or almost black. - Avoid any avocados with large dark spots or cracks. Ripe avocados will blend smoothly and create that creamy texture you want in your pasta. First, boil water in a large pot. Add a pinch of salt to the water. Once boiling, add your pasta. I like spaghetti or fettuccine for this dish. Cook the pasta until it is al dente, following package instructions. This usually takes about 8 to 10 minutes. When done, reserve about 1 cup of the pasta water. Drain the pasta in a colander and set it aside. While the pasta cooks, grab a food processor. Cut the ripe avocados in half and remove the pit. Scoop the avocado flesh into the processor. Add minced garlic, olive oil, and lemon juice to the mix. Toss in the chopped basil and parmesan cheese. Blend everything until it is smooth and creamy. Taste the sauce and add salt and pepper to your liking. If it feels too thick, slowly add some reserved pasta water to get the right texture. In a large mixing bowl, add the drained pasta. Pour the creamy avocado sauce over the pasta. Toss gently to coat the pasta evenly with the sauce. If you want to make it look pretty, add halved cherry tomatoes and extra basil leaves on top. Enjoy your meal right away for the best flavor. For the full recipe, refer to the above instructions. To make your avocado sauce even creamier, start with ripe avocados. The softer the fruit, the smoother the blend. You can also add a splash of pasta water when mixing. This helps thin out the sauce while keeping it rich. Adding more olive oil can also boost creaminess. Finally, blend it well until it looks silky. Creamy avocado pasta pairs well with many foods. Try grilled chicken or shrimp for protein. Roasted veggies like zucchini or bell peppers add color and taste. For a fresh twist, serve it with a simple salad. A sprinkle of extra parmesan or fresh basil on top makes it pretty. You can also add cherry tomatoes for a burst of flavor. One common mistake is using unripe avocados. They won’t blend well and taste bitter. Make sure to reserve enough pasta water; it helps adjust the sauce. Also, don't over-blend the sauce. You want a creamy texture, not a puree. Finally, season your sauce to taste. A little salt and pepper can make a big difference. For the full recipe, check out the detailed instructions. {{image_2}} You can boost this dish by adding protein. Grilled chicken adds a nice flavor. Shrimp brings a sweet, briny taste. If you prefer vegetarian options, tofu works well too. Cook your protein before mixing it with the pasta and sauce. This adds heartiness to your creamy avocado pasta. Try marinating chicken or shrimp with lemon juice and garlic for extra zest. Want to add more veggies? Spinach is a great choice. It wilts down quickly and blends well. Peas add a pop of color and sweetness. Zucchini can be spiralized or diced. Add these before you mix in the avocado sauce. They not only enhance taste but also add nutrition. You can even sauté the veggies first for a deeper flavor. If you want a fully vegan dish, swap out the parmesan cheese for nutritional yeast. This gives a cheesy flavor without dairy. Instead of chicken or shrimp, use chickpeas for protein. They add great texture and are packed with nutrients. You can also load up on any veggies you love. The creamy avocado sauce remains the star of the dish. This adds variety without losing flavor. For the full recipe, check out the detailed instructions above. To store your creamy avocado pasta, place it in an airtight container. Make sure the lid seals tightly. The pasta will stay fresh in the fridge for up to two days. If you want to keep it longer, consider freezing. Just remember, avocado can brown when exposed to air. To help, add a bit more lemon juice before storing. This keeps the color bright and fresh. When you're ready to eat the leftovers, reheating is easy. I recommend using a pan over low heat. Add a splash of water or olive oil to help revive the creaminess. Stir often to prevent sticking. If you prefer the microwave, use a microwave-safe bowl. Cover it loosely with a paper towel to keep moisture in. Heat in short bursts, stirring in between, until warm. To freeze creamy avocado pasta, first let it cool completely. Then, scoop the pasta into freezer-safe bags or containers. Remove as much air as possible before sealing. The pasta can last up to three months in the freezer. When you're ready to eat, thaw it overnight in the fridge. Reheat as mentioned before, adding a bit of liquid to help with the creaminess. For the full recipe, check out the section above. Yes, you can use frozen avocados. Just thaw them before use. They may be softer but still tasty. They blend well into a creamy sauce. Creamy avocado pasta lasts about 2 to 3 days in the fridge. Store it in an airtight container. The sauce may darken slightly, but it’s still good to eat. You can make the pasta ahead of time. However, I suggest making the sauce fresh. The avocado sauce can brown quickly, but you can add lemon juice to slow it down. If you want to prepare it in advance, store the sauce and pasta separately. For the full recipe, check the [Full Recipe]. This blog post covered the key steps to making creamy avocado pasta. We explored main and optional ingredients to enhance flavor. I shared tips for choosing ripe avocados and provided step-by-step cooking instructions. We also discussed how to make the sauce creamier and pairing suggestions. Lastly, I included storage tips and answered common questions. Now, you can enjoy a delicious dish that fits your taste. Experiment with variations to make it your own, and savor every bite!](https://southerndishes.com/wp-content/uploads/2025/05/c79988b9-1235-4fd9-8c08-9a004af30903.webp)
Looking for a quick and tasty meal? You’ll love this Creamy Avocado Pasta! It’s easy to whip up and packed

Looking to make the perfect homemade pizza dough? You’re in the right place! This simple and flavorful recipe guides you
![To make savory oatmeal with egg, you need simple and fresh ingredients. Each item adds flavor and nutrition. Here’s the list: - Oats and Broth - 1 cup rolled oats - 2 cups vegetable broth (or water) - Vegetables - 1 teaspoon olive oil - 1 small onion, finely chopped - 2 cloves garlic, minced - 1 cup spinach, chopped - 1 medium tomato, diced - Seasonings - 1/2 teaspoon smoked paprika - Salt and pepper to taste - Eggs and Garnish - 2 large eggs - Fresh herbs for garnish (e.g., parsley or chives) These ingredients make a wholesome and filling meal. The oats provide fiber, and the eggs add protein. I love how the spices and fresh herbs brighten the dish. You can find the full recipe above, which guides you through each step to create this tasty meal. 1. Bringing Broth to a Simmer Start by pouring the vegetable broth into a medium saucepan. Heat it over medium heat. Wait until it starts to simmer, which means small bubbles will form on the surface. 2. Adding Oats Once the broth is simmering, stir in the rolled oats. Make sure they are well mixed in the broth. 3. Cooking Time and Consistency Cook the oats for about 5 to 7 minutes. Stir them occasionally. You want them to be creamy and tender. The oats should soak up the broth and become soft. 1. Sautéing Onions and Garlic In a separate pan, heat the olive oil over medium heat. Add the finely chopped onion. Cook for about 3 to 4 minutes until the onion is soft. Then add the minced garlic. Sauté for one more minute until it smells amazing. 2. Adding Spinach and Tomato Next, stir in the chopped spinach and diced tomato. Cook for 2 to 3 minutes. The spinach will wilt and the tomato will soften. 1. Preparing the Poaching Water In another small pan, fill it with water and bring it to a light simmer. The water should not boil. It should be hot enough to cook the eggs gently. 2. Tips for Perfectly Poached Eggs Crack each egg into a small bowl. Gently slide the egg into the simmering water. Cook the eggs for about 3 to 4 minutes. The whites should be set, but the yolks should still be runny. Spoon the savory oatmeal into bowls, top each with a poached egg, and enjoy! This dish is wholesome and filling, perfect for any meal. For the full recipe, check out the earlier section. Achieving Creamy Oatmeal To get creamy oatmeal, use rolled oats instead of instant oats. This choice gives a nice texture. Cook the oats in vegetable broth for added flavor. Stir occasionally during cooking. This helps release the starch and makes the oats silky smooth. If you want it even creamier, add a splash of milk or a dollop of yogurt just before serving. Adjusting Seasoning Levels Start with a pinch of salt and pepper. Taste your oatmeal after mixing in the sautéed veggies. You can always add more seasoning. Smoked paprika adds a nice depth, but feel free to swap it. Try chili flakes for heat or Italian herbs for a different flavor. Just remember to adjust slowly, so it doesn’t overpower the dish. Garnishing Options A simple garnish can elevate your dish. Fresh herbs like parsley or chives add color and flavor. You can also sprinkle some red pepper flakes for a spicy kick. A drizzle of olive oil on top gives a nice shine and richness. Be creative and add toppings you love! Serving Suggestions Serve your savory oatmeal in bowls. Top each bowl with a perfectly poached egg. The runny yolk adds a creamy texture. Pair it with crusty bread or a fresh salad for a complete meal. Enjoy it for breakfast, lunch, or dinner! For the full recipe, check out the details above. {{image_2}} Different Vegetables You can change the veggies in your savory oatmeal. Try using kale instead of spinach. Zucchini adds a nice crunch. Bell peppers bring sweetness. You can even toss in some mushrooms for earthiness. Each choice adds its own unique flavor. Alternative Proteins If you want a different protein, consider using tofu or tempeh. Cook them until they are golden and crispy. You can also add beans or lentils for a hearty boost. These swaps make your meal filling and nutritious. Spices and Herbs Spices can change your dish completely. Try adding cumin for warmth or turmeric for color. Fresh herbs like basil or cilantro can brighten the dish. Experiment to find your favorite combinations. Cheese Options Cheese can add creaminess and depth. Feta brings a tangy flavor, while cheddar gives a sharp kick. You can even use goat cheese for a rich texture. Sprinkle your choice on top just before serving for a delightful finish. To keep your savory oatmeal fresh, you should store it properly. First, let it cool down to room temperature. Then, place the oatmeal in an airtight container. You can store it in the fridge for up to three days. For freezing, use freezer-safe bags or containers. This allows you to keep it for up to three months. Just make sure to label them with the date. When you want to enjoy your oatmeal again, the best method is the stove. Pour the oatmeal into a pan and add a splash of water or broth. Heat it over medium-low heat, stirring gently. This will help bring it back to a creamy texture. You can also use the microwave. Place the oatmeal in a microwave-safe bowl. Add some water, cover it, and heat it in short bursts. Stir between intervals to avoid hot spots. Avoid overcooking, as it can make the oatmeal dry. Just heat it until warm, and it’s ready to serve. If you’ve stored poached eggs, reheat them gently in warm water for a minute. This will keep them soft and tasty. You can replace eggs with other protein sources. Try adding cooked beans, lentils, or tofu. They add great taste and texture. You can also mix in some nuts or seeds for crunch. This makes your meal hearty and satisfying. Yes, you can easily make this dish vegan. For eggs, use silken tofu or a flax egg. To replace vegetable broth, use water or a homemade vegetable stock. These swaps keep your savory oatmeal tasty and plant-based. You can customize savory oatmeal in many ways. Add different vegetables like bell peppers, mushrooms, or carrots. Experiment with spices such as cumin or chili powder. You could also mix in cheese or avocado for creaminess. The options are endless! Savory oatmeal lasts about three to five days in the fridge. Store it in an airtight container to keep it fresh. Reheat it gently on the stove or in the microwave before eating. This way, you can enjoy your meal later! For the full recipe, check out [Full Recipe]. Savory oatmeal is a simple, tasty meal that offers many options. We covered the key ingredients, cooking methods, and tips for creamy texture. You can also find ways to mix up the flavors and customize this dish to fit your tastes. Remember to store leftovers properly for future meals. Enjoy the journey of creating your perfect savory oatmeal bowl, and don’t hesitate to experiment. Each bite can be a new favorite!](https://southerndishes.com/wp-content/uploads/2025/05/ee2e990e-947f-4535-adb7-cae26e6c0ef2.webp)
Are you tired of the same old breakfast? Try savory oatmeal with egg! This dish packs a punch while keeping

If you think dessert can’t be healthy, think again! This Chocolate Avocado Mousse is a creamy, rich treat you can
![- Zucchini, sliced into thick rounds - Bell pepper (any color), cut into chunks - Red onion, cut into wedges - Cherry tomatoes, whole - Mushrooms, whole or halved if large - Olive oil - Balsamic vinegar - Garlic powder - Dried oregano - Salt - Pepper - Skewers (wooden or metal) - Fresh basil for garnish To make these grilled vegetable skewers shine, you need fresh and vibrant ingredients. Start with zucchini, bell peppers, red onion, cherry tomatoes, and mushrooms. Each veggie brings a unique taste and texture. For the marinade, gather olive oil, balsamic vinegar, garlic powder, dried oregano, salt, and pepper. This mix of flavors helps the veggies soak up deliciousness. Ensure you have skewers, either wooden or metal. If you use wooden ones, soak them in water for at least 30 minutes. This step helps prevent them from burning on the grill. Finally, fresh basil leaves add a lovely touch before serving. For the complete recipe, check out the [Full Recipe]. Start by soaking wooden skewers in water for 30 minutes. This step keeps them from burning on the grill. Next, slice and cut all your vegetables. For this dish, I use: - 1 zucchini, sliced into thick rounds - 1 bell pepper, cut into chunks - 1 red onion, cut into wedges - 1 cup cherry tomatoes - 1 cup mushrooms, whole or halved if large These colorful veggies will add great taste and texture to your skewers. In a small bowl, whisk together the marinade ingredients. You will need: - 2 tablespoons olive oil - 2 teaspoons balsamic vinegar - 1 teaspoon garlic powder - 1 teaspoon dried oregano - Salt and pepper to taste Mix until combined. This marinade adds flavor and helps the veggies shine. Thread the marinated vegetables onto the skewers. Alternate the types of veggies for a colorful look. After threading, let them sit in the marinade for about 15-20 minutes. This extra time allows the flavors to soak in. Now, you're ready to grill your beautiful vegetable skewers! For the full recipe, refer to the earlier section. To get those perfect grill marks, start with a hot grill. Heat it to medium-high. Place the skewers on the grill and let them sit. Don’t move them too soon. After a few minutes, turn them for even cooking. This helps the veggies get tender and juicy. Aim for about 10-12 minutes of cooking. Check them often to avoid burning. Seasoning can change the taste of your skewers. Try different herbs and spices! Instead of garlic powder, use fresh garlic for a stronger taste. You can add a pinch of smoked paprika for a nice twist. Lemon zest adds freshness too. Consider using different oils like avocado for a new flavor. Marinades can also help. Let the veggies soak longer for more flavor. Make your skewers pop with color! Use a mix of bright veggies like red bell peppers and yellow zucchini. Arrange the skewers in a rainbow style on a platter. Drizzle some balsamic glaze on top for a shiny finish. Fresh basil leaves add a nice touch. They also give a lovely aroma. This makes your skewers look gourmet and inviting. For the full recipe, check the detailed instructions above. {{image_2}} Grilled vegetable skewers fit many diets. They are vegan and gluten-free, making them great for everyone. You can enjoy them without meat or gluten. Just use the ingredients from the recipe. You can feel good about serving them to guests with dietary needs. Using seasonal produce makes these skewers even better. Try fresh corn in summer or butternut squash in fall. You can swap out bell peppers for asparagus in spring. Always choose what is fresh at your market. This way, you get the best flavors and nutrition. You can grill or roast your skewers. Grilling adds nice char and smoky taste. Oven roasting gives a softer texture and even cooking. If you cannot grill, roasting is a great choice. Just place the skewers on a baking sheet at 400°F (200°C) for 20-25 minutes. Both methods bring out the vegetables' natural sweetness. You can enjoy grilled vegetable skewers any way you like! For the full recipe, check the recipe section above. After enjoying your grilled vegetable skewers, store any leftovers right away. Place them in an airtight container. This keeps the veggies fresh and tasty. Store them in the fridge for up to three days. If you leave them out, they may spoil quickly. When you’re ready to eat the leftovers, reheating is easy. You can use a microwave or an oven. If using a microwave, heat them for 30 seconds at a time. Check often to avoid sogginess. For the oven, set it to 350°F (175°C). Place the skewers on a baking sheet for about 10 minutes. This method keeps the texture nice and firm. If you want to save skewers for later, freezing is a great option. First, let the skewers cool completely. Then, wrap them tightly in plastic wrap or foil. Place them in a freezer bag and remove as much air as possible. They will stay good for up to three months. To use, thaw them overnight in the fridge. Reheat them as described above for the best taste. Grill vegetable skewers for about 10 to 12 minutes. Turn them occasionally for even cooking. You want the veggies to be tender and have nice grill marks. Keep an eye on them, as cooking time can change based on your grill's heat. Using a timer helps you avoid overcooking. The best vegetables for grilling include: - Zucchini - Bell peppers - Red onions - Cherry tomatoes - Mushrooms These veggies hold up well on the grill and develop great flavor. You can mix and match as you like. Just remember to cut them into similar sizes for even cooking. Yes, you can marinate the vegetables overnight. This helps enhance their flavors. Just make sure to cover them well in the fridge. However, if you marinate too long, some veggies may get too soft. A few hours is often enough for a great taste. Absolutely! Feel free to use other vegetables like asparagus, eggplant, or even corn. Just remember that cooking times may vary for different veggies. Always cut them to similar sizes to ensure they cook evenly. Yes, if you use wooden skewers, soak them in water for at least 30 minutes. This step helps prevent them from burning on the grill. Metal skewers do not need soaking. You can tell when the skewers are done when the vegetables are tender and have nice grill marks. A fork should easily pierce the veggies. If they start to char, they may be overcooked. Yes, you can prepare the skewers ahead of time. Assemble them and store them in the fridge until you're ready to grill. Just don’t marinate them too long, as mentioned earlier. Grilled vegetable skewers pair well with many dishes. You can serve them alongside grilled meats, pasta, or salads. They also work great as a stand-alone dish with a tasty dip. For the full recipe, check out the detailed instructions above! In this blog post, I shared how to make delicious vegetable skewers. We covered the required ingredients like zucchini and bell pepper. I showed you how to prepare, marinate, and assemble your skewers. We also discussed tips for grilling and making your dish look great. Remember, you can adjust for dietary needs or seasonal veggies. Don't forget how to store and reheat leftovers. Now you can enjoy tasty skewers anytime!](https://southerndishes.com/wp-content/uploads/2025/05/e076370f-6c00-491e-8dcb-28991b9e6b77.webp)
Welcome to a flavorful adventure! Grilled vegetable skewers are a bright and tasty treat perfect for any meal. In this
