Skip to content
DisclaimerTerms Of UseGDPR PolicyCookie Policy

Southern Dishes

  • Home
  • Drinks
  • Appetizers
  • Dinner
  • Dessert
  • About
  • Contact
  • Privacy Policy
DisclaimerTerms Of UseGDPR PolicyCookie Policy

Isabella

To make Pumpkin Spice Overnight Oats, gather these simple ingredients: - 1 cup rolled oats - 1 cup almond milk (or any milk of choice) - ½ cup canned pumpkin puree - 1 tablespoon chia seeds - 2 tablespoons maple syrup (or honey) - 1 teaspoon pumpkin pie spice - ½ teaspoon vanilla extract - A pinch of salt - ¼ cup Greek yogurt (optional for creaminess) - Crushed nuts or granola for topping (optional) These ingredients bring together the warm flavors of fall. The oats serve as the base, while pumpkin adds creaminess. Chia seeds help the oats thicken. Maple syrup gives it sweetness. Pumpkin pie spice brings that cozy taste. You can change the milk type to fit your diet. Greek yogurt adds a creamy texture, but it's not a must. Toppings like nuts or granola add crunch and flavor. You can also try different toppings based on your taste. For the full recipe, click here: [Full Recipe]. To make pumpkin spice overnight oats, start by mixing your dry ingredients in a large bowl. Here’s what you need: rolled oats, chia seeds, pumpkin puree, maple syrup, pumpkin pie spice, vanilla extract, and a pinch of salt. Stir them well to blend the flavors. Next, slowly pour in the almond milk. If you want a creamier texture, add Greek yogurt at this stage. Mix everything until the oats are well coated. After that, divide the mixture evenly into two jars or airtight containers. Once you have your jars ready, seal them tightly. Place them in the refrigerator overnight. This step is key! It allows the oats to soak up the liquid and soften. If you’re short on time, let them chill for at least four hours. In the morning, take your jars out and give them a good stir. If you like your oats thinner, add a splash of milk. Now it’s time to get creative with toppings! I love adding crushed nuts or granola for a nice crunch. A sprinkle of extra pumpkin pie spice can add a lovely touch, too. Enjoy your delicious pumpkin spice overnight oats! To make great pumpkin spice overnight oats, start with a whisk. Using a whisk helps mix all the ingredients smoothly. This avoids clumps and makes your mixture creamy. I suggest letting the oats sit longer. If you let them sit for more than four hours, they become creamier and more flavorful. You can easily adjust the sweetness to fit your taste. Add more or less maple syrup based on your preference. If you have dietary needs, feel free to swap out ingredients. For example, use coconut milk instead of almond milk. You can also leave out the yogurt for a dairy-free option. When serving your oats, think about adding fresh fruit. Slices of banana or berries make a nice touch. You could also add a dollop of nut butter. This adds protein and richness. For a crunchy finish, sprinkle crushed nuts or granola on top. It makes every bite exciting! For the complete recipe, check out [Full Recipe]. {{image_2}} You can switch up the taste of your pumpkin spice overnight oats. Here are two great ideas: - Chocolate pumpkin spice oats: Just add two tablespoons of cocoa powder to the mix. This gives a rich chocolate flavor. It pairs well with pumpkin spice. You can also top it with chocolate chips for a treat. - Apple cinnamon version: Replace the pumpkin puree with ½ cup of applesauce. Add a teaspoon of cinnamon for warmth. This adds a fresh and fruity taste to your oats. You can easily adjust this recipe to fit your diet. Here are some options: - Vegan options: Use almond milk and skip the Greek yogurt. You can add a little more chia seeds for creaminess. This keeps it plant-based and delicious. - Gluten-free modifications: Use gluten-free oats instead of regular oats. This makes your breakfast safe for those who need it. You can still enjoy all the flavors without worry. Toppings can make your oats even better. Here are some fun ideas: - Fresh cranberries for a fall twist: Add a handful of fresh cranberries on top. Their tartness pairs well with the sweet oats. This adds a nice pop of color too. - Coconut flakes for added texture: Sprinkle some coconut flakes on your oats. This adds a crunchy texture and a hint of tropical flavor. It's a simple way to make your breakfast even more special. Feel free to explore these variations and make your pumpkin spice overnight oats your own! You can find the full recipe to get started. To keep your pumpkin spice overnight oats fresh, use airtight containers. This step prevents air from spoiling your oats. Store the jars in your fridge. Avoid leaving them out at room temperature. You can store your pumpkin spice overnight oats in the fridge for up to five days. After that, they may lose flavor and texture. If you notice any odd smells or colors, it’s best to toss them out. You can freeze overnight oats for up to three months. To freeze, pour the mixture into a freezer-safe container. Leave some space at the top, as it will expand when frozen. When you're ready to eat, move it to the fridge overnight to thaw. Stir well before serving. For a quick option, you can microwave it straight from the freezer, but add a splash of milk for moisture. Enjoy your pumpkin spice creation! Check out the Full Recipe for more details. Pumpkin Spice Overnight Oats are not just delicious; they are also nutritious. Here’s a quick breakdown: - Calories: About 350 per serving - Carbohydrates: 55 grams - Protein: 10 grams - Fat: 10 grams - Fiber: 8 grams These oats provide a good mix of carbs, protein, and healthy fats. The pumpkin adds vitamins A and C, making it a healthy meal choice. Yes! You can prepare these oats in bulk. Here are my tips: - Make a batch for the week. Store in airtight jars. - Layer the ingredients in jars. This keeps flavors fresh. - You can also freeze portions. Just thaw in the fridge overnight. This method saves time on busy mornings while keeping your breakfast healthy and tasty. Toppings can take your oats to the next level. Here are my favorite suggestions: - Crushed nuts: They add a nice crunch and healthy fats. - Granola: For added texture and sweetness. - Fresh fruit: Sliced bananas or apples pair well with pumpkin. - Yogurt: A dollop of Greek yogurt boosts creaminess and protein. Feel free to mix and match your toppings for fun and flavor! For the full recipe, check out the instructions above. Pumpkin Spice Overnight Oats are easy to make and fun to customize. You mix simple ingredients, let them chill overnight, and enjoy a tasty breakfast. Remember, you can tweak the flavors and add your favorite toppings. Try different nuts, fruits, or spices to make the recipe your own. These oats store well, so you can prepare meals in advance. With a little prep, you’ll have a delicious and nourishing start to your day. Enjoy your pumpkin spice mornings!

Pumpkin Spice Overnight Oats Simple and Easy Recipe

Are you ready to enjoy fall flavors any time of year? Let’s dive into my simple and easy recipe for

To make Balsamic Glazed Brussels Sprouts, you need a few key items. Here’s what you will need: - 1 pound Brussels sprouts, trimmed and halved - 3 tablespoons balsamic vinegar - 2 tablespoons honey - 2 tablespoons olive oil - 1 teaspoon garlic powder - Salt and pepper to taste These ingredients create a tasty blend of flavors that really shines. You can add extra items for more taste. Here are some options: - 1/4 cup grated Parmesan cheese - Fresh parsley, chopped for garnish Adding Parmesan gives a nice salty touch. The fresh parsley adds color and freshness. If you don’t have some ingredients, don’t worry. You can swap them out. Here are some common substitutions: - Use maple syrup instead of honey for a vegan option. - Try lemon juice in place of balsamic vinegar for a zesty twist. - Use garlic cloves instead of garlic powder for a stronger flavor. These swaps can help you personalize your dish while keeping it tasty. For the full recipe, check out the earlier section. First, gather your Brussels sprouts. You need one pound, trimmed and halved. Rinse them under cold water. This helps remove dirt. After rinsing, dry them well with a clean towel. Dry sprouts get crispy when roasted. Next, place them in a large bowl. Add two tablespoons of olive oil, one teaspoon of garlic powder, salt, and pepper. Toss until each sprout is coated. This step adds flavor and helps the glaze stick later. While the sprouts roast, make the balsamic glaze. In a small saucepan, combine three tablespoons of balsamic vinegar and two tablespoons of honey. Heat over medium heat, stirring often. Watch for it to simmer. This usually takes a few minutes. Once it simmers, let it cook until it thickens. This should take about five to seven minutes. A thicker glaze clings better to the sprouts. Set aside once done. Now it’s time to roast the Brussels sprouts. Preheat your oven to 400°F (200°C). Spread the seasoned Brussels sprouts on a baking sheet. Make sure they are in a single layer. This helps them roast evenly. Roast for 20-25 minutes. Stir them halfway through so they cook evenly. Look for a nice golden color and crisp edges. Once they are done, remove them from the oven. Drizzle the balsamic glaze over the hot sprouts. Toss them gently to coat. If you want, add some grated Parmesan cheese on top. Finish with freshly chopped parsley for a pop of color. Enjoy your delicious side dish! For the full recipe, check out the details. To get crispy Brussels sprouts, start with dry sprouts. After washing, pat them dry with a towel. This helps them roast better. Make sure to cut them in half to expose more surface area. Toss them in olive oil and season well. Spread them out on the baking sheet. Avoid crowding, which can cause steaming instead of roasting. Stir them halfway through cooking. This ensures they crisp evenly. Balsamic glaze adds a sweet touch. It's key to balance that sweetness. Use just the right amount of honey in your glaze. Too much honey can make it overly sweet. I like to start with two tablespoons. Taste the glaze as it simmers. Adjust by adding more vinegar if it gets too sweet. This keeps the flavor bright and tangy. Want to add more flavor? Try garlic powder; it pairs well with Brussels sprouts. You can also add red pepper flakes for a bit of heat. If you love cheese, sprinkle some Parmesan on top when they’re hot. Fresh parsley adds a pop of color and freshness. You can even mix in other roasted veggies like carrots or sweet potatoes for more taste. For the full recipe, check out the instructions above. {{image_2}} You can easily make balsamic glazed Brussels sprouts vegan. Simply swap honey for maple syrup or agave nectar. Both options give a sweet touch. They blend well with balsamic vinegar. This small change keeps the taste rich and delicious. Brussels sprouts mix well with many other veggies. Try adding carrots, sweet potatoes, or red onions. Cut them into similar sizes as the Brussels sprouts. This way, they cook evenly. Roasting these veggies adds different flavors and colors. It makes your dish more fun and vibrant. If you want to change the sweet flavor, try other sweeteners. Brown sugar or coconut sugar work great as well. They add a warm, caramel-like taste. You can even use fruit purees, like apple or pear, for a fresh twist. Adjust the amount based on your taste. For the full recipe, check out Balsamic Glazed Brussels Sprouts. After enjoying your Balsamic Glazed Brussels Sprouts, let them cool. Then, put them in an airtight container. Store them in the fridge for up to three days. This keeps them fresh and tasty for another meal. To reheat, use the oven for best results. Preheat the oven to 350°F (175°C). Spread the Brussels sprouts on a baking sheet. Heat them for about 10-15 minutes. This helps them stay crispy. You can also microwave them for 1-2 minutes. Just remember, they might lose some crunch. You can freeze leftovers, but they may change texture. First, cool them completely. Then, place them in a freezer-safe bag. Squeeze out as much air as possible. You can freeze them for up to two months. When ready to eat, thaw in the fridge overnight. Reheat them in the oven for the best taste. For the full recipe and more ideas, check out the Full Recipe section. Yes, you can use frozen Brussels sprouts. They will work well in this dish. However, fresh Brussels sprouts taste better. They have more texture and flavor. If you use frozen, thaw them first. Pat them dry to avoid extra moisture. This helps them roast well and stay crispy. To make the glaze thicker, cook it longer. After you mix balsamic vinegar and honey, simmer it on low heat. Stir it often. The longer you cook it, the thicker it will get. You can also add a cornstarch slurry. Mix one tablespoon of cornstarch with two tablespoons of water. Add this to the glaze, and stir until it thickens. Balsamic glazed Brussels sprouts pair well with many dishes. Serve them with grilled chicken or pork chops for a tasty meal. You can also add them to a salad for extra flavor. They go great with rice or quinoa, too. For a vegetarian option, try them with pasta or polenta. In this blog post, we explored how to make balsamic glazed Brussels sprouts. We covered essential ingredients, prep steps, and roasting methods. I shared tips for achieving that perfect crisp and balancing sweetness. We also looked at tasty variations and how to store leftovers properly. These Brussels sprouts can elevate any meal while being simple to make. Enjoy experimenting with flavors and spices to make them your own. Happy cooking!

Balsamic Glazed Brussels Sprouts Flavorful Side Dish

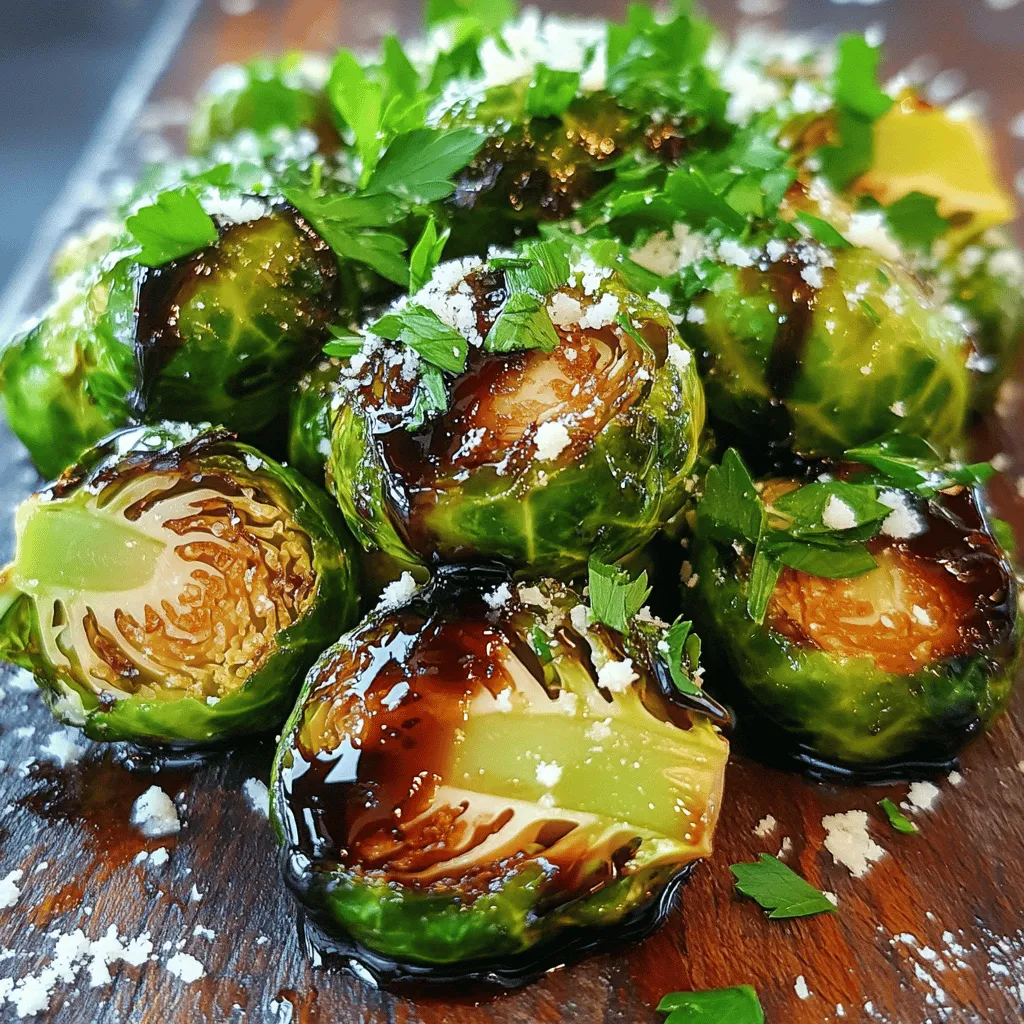
Looking for a tasty side dish that impresses every time? Balsamic Glazed Brussels Sprouts are your answer! With a sweet

For a tasty chicken tikka masala, gather these key ingredients: - 2 pounds boneless, skinless chicken thighs, cut into bite-sized pieces - 1 large onion, finely chopped - 4 cloves garlic, minced - 1 tablespoon fresh ginger, grated - 1 can (14 oz) crushed tomatoes - 1 cup coconut milk - 2 tablespoons garam masala - 2 tablespoons curry powder - 1 teaspoon ground cumin - 1 teaspoon paprika - 1 teaspoon turmeric - 1 teaspoon chili powder (adjust for heat preference) - 1 tablespoon olive oil - Salt and pepper to taste - Fresh cilantro, for garnish - Steamed basmati rice, for serving These ingredients create a rich and creamy dish. The chicken thighs add tenderness. The onion, garlic, and ginger build a strong flavor base. Tomatoes and coconut milk provide a luscious sauce. The spices give the dish its signature taste. You can adjust seasoning to fit your taste: - Use salt and pepper to enhance all flavors. - Control heat by changing the chili powder amount. Add less for mild or more for spicy. These small changes let you make the dish your own. Taste and adjust as you go for the best results. For a beautiful presentation, use fresh cilantro as a garnish. It adds color and freshness. Serve the chicken tikka masala over steamed basmati rice. The rice soaks up the sauce well. You can create a lovely plate by placing rice on one side and the tikka masala next to it. A lime wedge adds a pop of color and a zesty touch. This simple garnish makes your dish stand out. For the full recipe, check out the detailed steps to get your chicken tikka masala just right! - Seasoning the chicken Start by cutting your chicken thighs into bite-sized pieces. Place the chicken in a large bowl. Add salt, pepper, garam masala, curry powder, ground cumin, paprika, turmeric, and chili powder. Mix everything well. This step builds layers of flavor that make your dish special. - Sautéing onions, garlic, and ginger Heat olive oil in a skillet over medium heat. Add the chopped onion and cook until it turns translucent, about 5-7 minutes. Then, add the minced garlic and grated ginger. Cook for one more minute until you smell that wonderful aroma. This combination forms a tasty base for your chicken tikka masala. - Transferring ingredients to the slow cooker Transfer the sautéed onion mixture to the slow cooker. Add your seasoned chicken pieces alongside crushed tomatoes and coconut milk. Stir everything together gently. Make sure all the chicken pieces are well coated with the sauce. - Cooking times on low and high settings Cover the slow cooker with its lid. Cook on low for 6-8 hours or on high for 3-4 hours. The chicken should be tender and cooked through. The slow cooker does all the work for you, allowing the flavors to meld beautifully. - Adjusting seasoning Once your cooking time is up, taste the dish. Adjust the seasoning if needed. You may want a little more salt or spice, depending on your taste. - Thickening the sauce option If you like a thicker sauce, remove the lid. Cook on high for another 30 minutes, stirring occasionally. This step helps the sauce reach that perfect consistency. Enjoy serving your Slow Cooker Chicken Tikka Masala over steamed basmati rice, and don't forget to garnish it with fresh cilantro. For the full recipe, check out [Full Recipe]. Marinating chicken is key. It makes the chicken tender and full of flavor. I recommend marinating for at least one hour, but overnight is best. This helps the spices soak in deep. Using fresh spices is also important. Fresh spices can greatly enhance the taste. Always check your spice jars. If they smell weak, it's time to replace them. Whole spices are ideal. You can grind them just before use for the best taste. Different slow cooker brands can have varying cooking times. Always check your model's manual for guidance. In general, cooking on low takes about 6-8 hours. High settings usually take 3-4 hours. To avoid overcooking chicken, check it early. If it feels tender and pulls apart easily, it's done. Overcooked chicken can become dry, which we want to avoid. Presentation makes a big difference. For plating, try placing the rice in a small mound on one side. Spoon the chicken tikka masala next to it, and sprinkle fresh cilantro on top. For a fun twist, add a lime wedge for color and zest. Pairing is also essential. Steamed basmati rice works great with chicken tikka masala. You might also enjoy a light cucumber salad or naan on the side. For drinks, try a refreshing mango lassi or a chilled glass of white wine. For the complete recipe, check out the Full Recipe. {{image_2}} You can make a tasty vegetarian version of this dish. Just swap the chicken for chickpeas or tofu. Chickpeas add protein and a nice nutty flavor. Tofu will soak up the sauce and become very flavorful. To use chickpeas, use two cans, drained and rinsed. For tofu, press it to remove water and cut it into cubes. Season them just like chicken. Then, follow the same steps in the Full Recipe. If you want a dairy-free meal, use alternative creams instead of coconut milk. Options like cashew cream or almond milk can work well. Cashew cream gives a rich and creamy texture. Almond milk is lighter but still tasty. Just keep an eye on the thickness of your sauce. You might need to adjust the cooking time to get it just right. You can easily change the heat level in your chicken tikka masala. Use different types of chili to switch up the spice. For mild heat, you can use sweet paprika. For more heat, try cayenne pepper or serrano chilies. Start with a small amount, then taste and adjust as needed. This way, everyone can enjoy the dish at their own heat level. To keep chicken tikka masala fresh, store it in an airtight container. Let the dish cool first. This helps prevent steam from building up inside the container. Place it in the fridge. It will stay good for about 3 to 4 days. Make sure to label the container with the date. This way, you won't forget how long it's been in there. If you want to save some for later, freezing is a great option. First, let the dish cool completely. Then, transfer it to a freezer-safe container. You can also use freezer bags. Remove as much air as you can before sealing. Chicken tikka masala can last in the freezer for about 3 months. When you're ready to eat it, thaw it overnight in the fridge. This keeps the flavors intact. To reheat chicken tikka masala without losing texture, use the stovetop. Place the dish in a pot over low heat. Stir it often to heat evenly. You can also add a splash of water or coconut milk if it seems thick. Another option is the microwave. Use a microwave-safe dish, cover it loosely, and heat in short bursts. Stir in between to ensure even warming. Enjoy your delicious meal just like it was fresh! Yes, you can prepare chicken tikka masala ahead of time. Just cook it as normal and let it cool. After that, store it in an airtight container. It will keep in the fridge for about three days. For longer storage, freeze it for up to three months. Thaw it in the fridge overnight before reheating. This makes quick meals during busy days easy and tasty. To thicken the sauce, remove the lid and let it cook for another 30 minutes on high. This will help reduce some liquid. You can also mix in a cornstarch slurry. To make a slurry, mix one tablespoon of cornstarch with two tablespoons of water. Stir this into the sauce and let it cook for a few more minutes. This adds body and richness to your dish. Steamed basmati rice is a classic choice. It soaks up the sauce well. You can also serve warm naan bread for dipping. A simple side salad with cucumber and tomatoes can add freshness. For an extra kick, serve with yogurt or raita. These options balance the spices in the dish and make it a complete meal. This article covered how to make delicious Chicken Tikka Masala. We looked at the key ingredients, seasoning tips, and the slow cooking process. You learned how to adjust flavors and presentation to enhance your dish. Don't forget that options exist for vegetarian and dairy-free versions. Proper storage and reheating can keep leftovers enjoyable. With these steps, you can master Chicken Tikka Masala. Enjoy cooking it, and impress your friends and family with your skills.

Slow Cooker Chicken Tikka Masala Flavorful Delight

Welcome to the flavorful world of Slow Cooker Chicken Tikka Masala! This dish combines tender chicken, rich spices, and creamy

To make Spicy Thai Peanut Noodles, you need some key ingredients. Here’s what you will use: - 8 oz rice noodles - 1 tablespoon sesame oil - 1 red bell pepper, sliced - 1 carrot, julienned - 1 cup sugar snap peas, trimmed - 3 green onions, chopped - 1/4 cup cilantro, chopped - 1/4 cup peanuts, crushed (plus extra for garnish) These ingredients create a vibrant dish full of flavor and texture. The peanut sauce is what makes this dish shine. Here are the ingredients you'll need: - 1/2 cup peanut butter - 1 tablespoon soy sauce - 2 tablespoons lime juice - 2 tablespoons honey or maple syrup - 1 tablespoon sriracha (adjust for spice level) - 1 clove garlic, minced - 1/4 cup warm water (for thinning) This sauce is creamy, tangy, and spicy, perfect for coating the noodles. Garnishes add a nice touch to the dish. Consider these options: - Extra crushed peanuts for crunch - More chopped green onions for freshness - Lime wedges for extra zing - Sliced chili peppers for heat These garnishes enhance the look and flavor of your dish. For the full recipe, check out the details in the [Full Recipe]. Start by boiling a big pot of water. Once it bubbles, add the rice noodles. Cook them based on the package instructions until they are al dente. This usually takes about 4 to 6 minutes. After cooking, drain the noodles. Rinse them under cold water to stop the cooking process. Set them aside for later. In a medium bowl, mix the peanut butter, soy sauce, lime juice, honey or maple syrup, sriracha, and minced garlic. Use a whisk to blend it well until it's smooth and creamy. If the sauce is too thick, add warm water a little at a time. Keep mixing until you reach your desired consistency. Grab a large skillet and heat the sesame oil over medium heat. Once hot, add the sliced red bell pepper, julienned carrot, and sugar snap peas. Stir-fry these veggies for about 3 to 4 minutes. You want them to be tender but still a bit crisp. This keeps them vibrant and full of flavor. Add the cooked rice noodles to your skillet with the veggies. Pour the peanut sauce over everything. Toss the noodles, veggies, and sauce together. Make sure all the noodles are well coated and mixed evenly. This step brings all the flavors together! Once everything is combined, remove the skillet from heat. Stir in the chopped green onions and cilantro for freshness. Serve the noodles in bowls. For a nice touch, sprinkle crushed peanuts on top for added crunch. Enjoy your meal with friends or family! To make your peanut sauce just right, start with creamy peanut butter. I like to use natural peanut butter, as it gives a rich flavor. Mix the peanut butter with soy sauce, lime juice, honey, sriracha, and minced garlic. Then, add warm water slowly. This helps you control the thickness. If your sauce is too thick, add more water a little at a time. If it’s too thin, add more peanut butter. The perfect sauce should be smooth and pourable, but not runny. Spice can change everything in this dish! If you like it mild, use less sriracha. Start with one teaspoon and taste as you go. You can always add more for heat. If you want it spicier, try adding chili flakes or a splash of hot sauce. Balance is key. You can also add sweet ingredients like honey to tone down the heat. Everyone’s taste is different, so feel free to adjust until it’s just how you like it. Cooking rice noodles is simple, but some tips help. First, always boil water before adding the noodles. This keeps them from sticking. Cook according to the package instructions, usually about 4-6 minutes. Test them for doneness; they should be tender but firm. After cooking, drain and rinse them under cold water. This stops the cooking process and prevents clumping. Toss them with a little sesame oil if you like, to keep them separate. Follow these tips, and your noodles will turn out perfectly every time! {{image_2}} You can make Spicy Thai Peanut Noodles heartier by adding protein. Chicken, shrimp, or tofu work well. For chicken, cook thin strips in the skillet until no longer pink. For shrimp, add them just before the noodles, cooking until they turn pink. If you prefer tofu, use firm or extra-firm tofu. Cube it and sauté until golden. This adds flavor and texture. For a vegetarian or vegan dish, use tofu or mushrooms as your protein. Replace honey with maple syrup to keep it vegan. You can also add more vegetables. Broccoli, bok choy, or zucchini are great choices. They add crunch and nutrients while keeping the dish vibrant and fresh. You can swap in various vegetables based on your taste. Here are some options: - Broccoli: Adds fiber and vitamins C and K. - Bell Peppers: Boosts vitamin A and antioxidants. - Spinach: Rich in iron and helps with muscle function. - Carrots: Provides beta-carotene for eye health. These alternatives not only improve nutrition but also make your dish colorful and exciting. For the full recipe, check out the instructions above to create a dish that’s perfect for any occasion. Store your Spicy Thai Peanut Noodles in an airtight container. Make sure to cool them to room temperature before sealing. Keep them in the fridge for up to three days. This way, the noodles stay fresh and tasty. If you want to keep them longer, consider freezing them. To reheat, simply take your noodles out of the fridge. Place them in a microwave-safe bowl. Add a splash of water to keep them moist. Cover the bowl and heat for 1-2 minutes. Stir halfway to ensure even heating. You can also reheat them on the stove. Just warm them in a pan over low heat until hot. If you freeze your Spicy Thai Peanut Noodles, they can last up to three months. Use a freezer-safe container or bag. Make sure to remove as much air as possible. When you’re ready to eat, thaw them overnight in the fridge. Reheat as mentioned before. The flavors will still be great, but the texture may change slightly. Enjoy your meal anytime! You can use almond butter or sunflower seed butter. Both options taste great. They give a similar creamy texture. If you want a nut-free option, go for sunflower seed butter. It adds a nice flavor and works well with the sauce. Yes, you can prep the noodles and sauce ahead. Store them separately in the fridge. This way, they stay fresh. When ready to eat, just combine and heat them. This saves time for busy days and still tastes delicious. For a gluten-free version, swap soy sauce for tamari. Tamari has a similar taste but is gluten-free. Also, ensure your rice noodles are certified gluten-free. This way, you enjoy the flavors without worry. You can add fresh lime juice for brightness. Chopped peanuts give a nice crunch. Sliced jalapeños can add heat, if you like spice. Fresh herbs like basil or mint can also give a refreshing kick. Feel free to get creative! Spicy Thai Peanut Noodles combine great flavors and easy steps. You learned about essential ingredients, like the rich peanut sauce and tasty garnishes. I shared tips for perfecting sauce and noodle texture, plus ways to customize heat. You can add protein or go vegan too. Don't forget about storing and reheating for future meals. Experiment to find your ideal mix and enjoy every bite! These noodles are not just a meal, but a chance to get creative. Happy cooking!

Spicy Thai Peanut Noodles Flavorful and Easy Recipe

Are you ready to dive into a bowl of flavor? My Spicy Thai Peanut Noodles are quick to make and

To make Herbed Garlic Butter Mushrooms, gather these simple ingredients. They bring great flavor and aroma to the dish. - Fresh mushrooms (cremini or button) - Unsalted butter - Garlic (minced) - Fresh herbs (thyme, parsley, rosemary) - Lemon (zest and juice) - Salt and pepper Each ingredient adds a unique touch. The mushrooms soak up the garlic butter. The herbs give it a fresh taste. The lemon adds brightness and zing. It’s a perfect side dish for any meal. For the full recipe, check out the details. You’ll enjoy making this tasty dish! Melting the butter Start by placing a large skillet on medium heat. Add 4 tablespoons of unsalted butter. Let it melt until it bubbles and smells great. This will help create a rich base for your dish. Sautéing garlic Next, add 4 cloves of minced garlic to the skillet. Stir it for 1-2 minutes. You want it golden and fragrant but be careful not to burn it. This step fills the dish with flavor. Cooking the mushrooms Now, add 500g of cleaned and halved mushrooms to the skillet. Stir well so the mushrooms get coated in the garlic butter. Season with salt and pepper to taste. Cook them for about 5-7 minutes. Stir occasionally until they are tender and browned. This brings out their natural taste. Adding herbs After the mushrooms are cooked, stir in 1 tablespoon each of fresh thyme, parsley, and rosemary. Cook for another 2-3 minutes. The herbs add freshness and depth to the dish. Finishing touches with lemon Squeeze the juice of half a lemon over the mushrooms. Sprinkle the zest of one lemon on top. Give everything a good toss to mix. This brightens the flavors and makes the dish pop. For more detailed steps, check out the Full Recipe. Choosing the right mushrooms I love using cremini or button mushrooms for this dish. They have a nice texture and flavor. Look for firm mushrooms with no dark spots. Fresh mushrooms really make a difference in taste. Enhancing flavor with additional herbs Feel free to mix in other herbs you enjoy. Basil or oregano can bring a new twist. Adding herbs at the end keeps their flavor bright and fresh. Just chop them finely before adding. Preventing soggy mushrooms To avoid soggy mushrooms, don’t overcrowd the pan. Cook them in batches if needed. This helps to get that nice brown color. Also, make sure to use medium heat. High heat can burn the garlic instead of cooking the mushrooms. Pairing with proteins These mushrooms are great with grilled chicken or steak. Their rich flavor complements many proteins. You can also serve them with fish for a lighter meal. Best side dishes Try serving Herbed Garlic Butter Mushrooms with a salad or rice. They also go well with mashed potatoes. Their buttery taste adds a nice contrast to other sides. Creative serving ideas You can serve these mushrooms on toasted bread as a bruschetta. Another fun idea is to mix them into pasta. They can also be a topping for baked potatoes, adding flavor and fun! {{image_2}} You can change up the herbs in this dish. If you want a different taste, try using basil or oregano. They pair well with mushrooms too. You can also add other vegetables. Baby spinach or zucchini can give your dish more color and flavor. Just chop them small and cook them with the mushrooms. If you need a vegan option, swap the butter for olive oil or vegan butter. The flavor will still be rich and tasty. You can even use vegetable broth for added depth. To spice things up, add red pepper flakes. Just a pinch can give your mushrooms a nice kick. If you want a creamy touch, try adding cheese or cream. Parmesan cheese melts well and adds a salty taste. You can also mix in a splash of heavy cream for a rich sauce. For the full recipe, check out the Herbed Garlic Butter Mushrooms. To keep your herbed garlic butter mushrooms fresh, start by placing them in an airtight container. Refrigerate them within two hours of cooking. They will stay good for about three to four days. If you want to keep them longer, consider freezing. Place the mushrooms in a freezer-safe bag, remove as much air as possible, and seal it. They can last up to three months in the freezer. When it’s time to enjoy the leftovers, reheating them right is key. The best method is to use a skillet. Heat the skillet over medium heat and add a bit of butter. Toss the mushrooms in the skillet for about five minutes. This will help them regain their crispy texture. You can also microwave them, but this might make them a bit soggy. If you choose this method, heat in short bursts, stirring in between, to keep the flavor intact. For Herbed Garlic Butter Mushrooms, I love using cremini or button mushrooms. These types have a nice texture and flavor. They soak up the garlic butter well, making each bite tasty. You can also try shiitake or portobello if you want a richer flavor. Yes, you can make this dish ahead of time. Cook the mushrooms, then cool them down and store them in the fridge. When you're ready, just reheat them in a skillet. This makes for a quick side dish when you need it. To change the serving size, you can easily scale the recipe. If you need more, double the ingredients. For fewer servings, cut the amounts in half. Just keep the cooking times the same. This way, you can enjoy the dish no matter how many people you serve. This blog post covers how to make Herbed Garlic Butter Mushrooms. It starts with key ingredients like fresh mushrooms, garlic, and herbs. Then it guides you through preparation steps to achieve the best flavor. I also shared tips for cooking and serving to enhance your dish. In the end, remember that creativity is key. Feel free to experiment with variations that suit your taste. Enjoy your mushroom cooking journey!

Herbed Garlic Butter Mushrooms Flavorful Side Dish

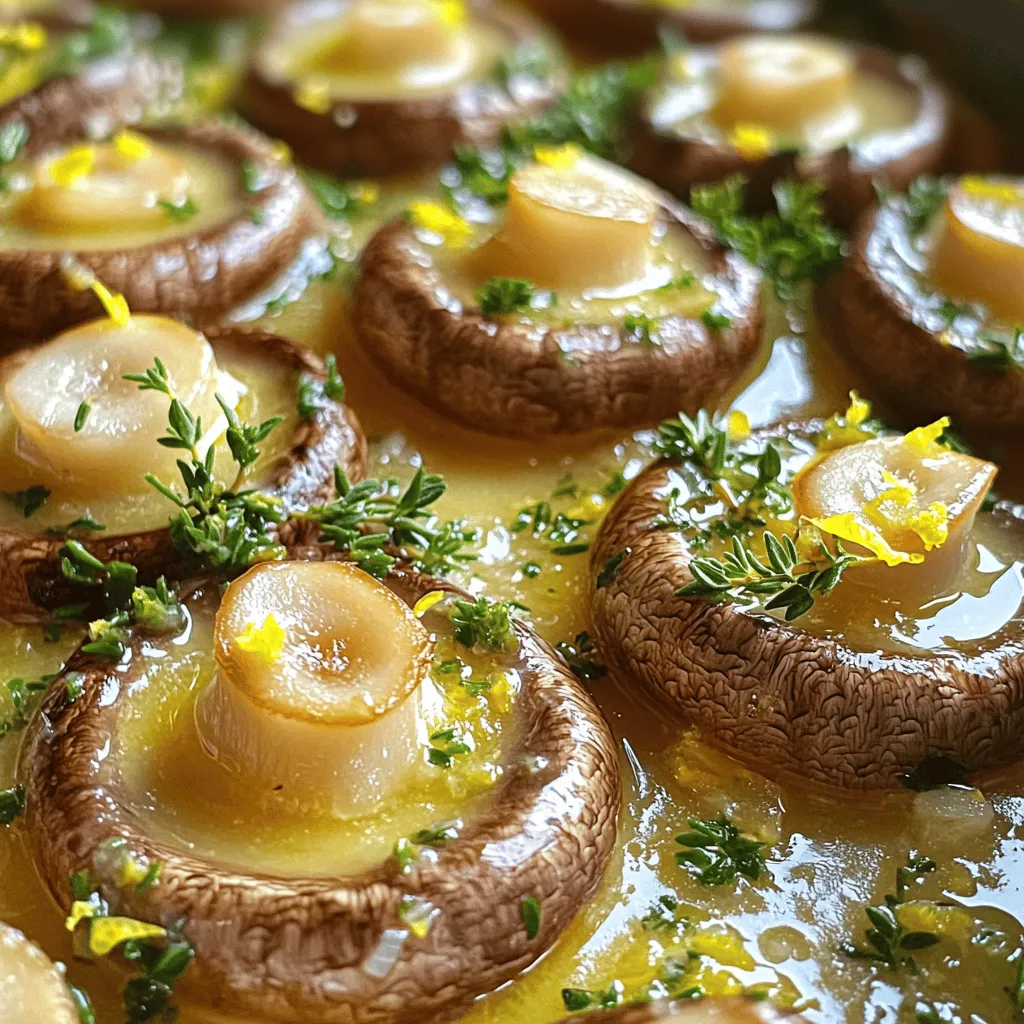
If you’re searching for a side dish that bursts with flavor, you’re in the right place! Herbed Garlic Butter Mushrooms

- 1 lb (450g) boneless chicken thighs - 1 cup plain yogurt - 2 tablespoons lemon juice - 3 cloves garlic, minced - 1 tablespoon fresh ginger, grated - 2 tablespoons tandoori spice mix - 1 bell pepper, cut into pieces - 1 red onion, cut into wedges - Fresh cilantro and lemon wedges for serving Tandoori chicken skewers start with juicy chicken thighs. I love to use boneless thighs. They stay moist and have great flavor. The marinade is key. It includes yogurt, lemon juice, garlic, ginger, and tandoori spices. First, get your chicken ready. Cut it into 1-inch cubes. Next, in a bowl, mix yogurt, lemon juice, minced garlic, grated ginger, and tandoori spice. The spices give the chicken that classic, bold taste. You want to let the chicken soak in this mix for at least two hours. If you can, let it marinate overnight. This deepens the flavor. While the chicken marinates, prepare your veggies. I like to add bell peppers and red onions. They add color and crunch. Cut them into bite-sized pieces. When you grill, fresh cilantro and lemon wedges make a great finish. They brighten the dish and add a fresh touch. For the full recipe, check the details above. Enjoy your cooking! To start, gather your ingredients. In a large bowl, combine the following: - 1 cup plain yogurt - 2 tablespoons lemon juice - 3 cloves garlic, minced - 1 tablespoon fresh ginger, grated - 2 tablespoons tandoori spice mix - 1 tablespoon vegetable oil - 1 teaspoon salt - 1 teaspoon cayenne pepper Mix these until they blend well. The yogurt adds creaminess, while the spices give a bold flavor. This marinade tenderizes the chicken and infuses it with taste. Next, add your chicken cubes to the bowl. Make sure each piece gets a good coating of the marinade. Cover the bowl with plastic wrap. Place it in the fridge for at least 2 hours. For the best flavor, let it sit overnight. This step is key for deep, rich flavor. When you’re ready to cook, preheat your grill to medium-high heat. If you use wooden skewers, soak them in water for about 30 minutes to stop them from burning. Now, it’s time to assemble your skewers. Thread the marinated chicken onto the skewers. You can also add bell pepper and red onion pieces for color and crunch. Alternate between chicken and veggies for a vibrant look. Place the skewers on the hot grill. Cook them for 12 to 15 minutes. Turn them often to ensure they cook evenly. The chicken should have nice grill marks and reach an internal temperature of 165°F (75°C). Once done, take the skewers off the grill and let them rest for a few minutes. This helps retain juices. Serve hot, garnished with fresh cilantro and lemon wedges. For full details, check the Full Recipe. Enjoy your new favorite dish! For the best flavor, marinate your chicken overnight. The yogurt tenderizes the meat and adds depth. If you’re short on time, aim for at least two hours. This helps the spices soak in and enhances the taste. To ensure even cooking, turn the skewers regularly on the grill. This helps all sides get those lovely grill marks. You want the chicken to cook through and stay juicy. Use a meat thermometer to check the internal temperature. It should reach 165°F (75°C) for safe eating. Pair the skewers with naan or rice for a complete meal. The soft naan or fluffy rice balances the spice. You can also add a fresh salad or yogurt sauce for extra flavor. Enjoy your feast with friends or family! {{image_2}} You can switch up the protein in your tandoori skewers. If you want a seafood twist, use shrimp. Shrimp cooks quickly and absorbs flavors well. For a hearty option, try beef. It adds a rich taste that pairs nicely with spices. If you prefer plant-based meals, tofu is a great choice. It soaks up the marinade and becomes delightfully flavorful. You can easily adjust the heat in your tandoori chicken skewers. The cayenne pepper is the key ingredient for spice. If you want a milder taste, reduce the cayenne. For those who love heat, feel free to add more. You can even mix in a dash of chili powder for an extra kick. Tailor the spice to fit your taste buds! Don't be afraid to get creative with your flavors. Adding fresh herbs like mint or cilantro can brighten the dish. You can also include citrus zest, such as lemon or lime, for a refreshing zing. These small changes can make a big difference. Experimenting with flavors can lead to exciting new tastes in your skewers. To keep leftover skewers fresh, refrigerate them in an airtight container. This helps prevent the chicken from drying out. Make sure to eat them within three days for the best taste. You can also add a bit of yogurt or lemon juice to keep the flavor strong. If you want to save time, freeze the marinated chicken for future grilling. Place the marinated chicken in a freezer-safe bag. Remove as much air as possible before sealing. You can freeze it for up to three months. When you’re ready to cook, just thaw it overnight in the fridge. To reheat your skewers, use an oven or grill. Preheat the oven to 350°F (175°C) and place the skewers on a baking sheet. Heat them for about 10-15 minutes. If using a grill, warm them on low heat for a few minutes, turning often. This keeps the chicken juicy and tasty. Avoid the microwave, as it can dry out the meat. Tandoori chicken is a dish from India. It gets its name from the tandoor, a clay oven. People have made tandoori chicken for centuries. The dish is famous for its smoky flavor and bright color. The marinade includes yogurt and spices. This makes the chicken juicy and tender. Tandoori chicken is a favorite at many gatherings. It represents the rich culinary culture of India. Yes, you can use chicken breasts instead of thighs. Thighs are juicy, but breasts work too. They cook faster and have less fat. Just remember to adjust cooking time. Keep an eye on them to avoid dryness. Cut them into the same size pieces. This helps them cook evenly. You can still enjoy great flavor with chicken breasts. To check if the chicken is done, use a meat thermometer. The internal temperature should reach 165°F (75°C). You can also cut a piece to check. The meat should be white, not pink. Juices should run clear. If the chicken is not done, grill it a bit longer. Checking these signs ensures safe eating. Tandoori chicken skewers pair well with many sides. Here are some great options: - Naan bread - Basmati rice - Cucumber salad - Raita (yogurt sauce) - Grilled vegetables These sides complement the flavors of the chicken. They add freshness and balance to your meal. Yes, you can easily make this recipe vegetarian. Use paneer, tofu, or mushrooms as substitutes. These options soak up the marinade well. You can also use vegetables like zucchini and bell peppers. Adjust the cooking time for different ingredients. This way, everyone can enjoy tandoori flavors! For the full recipe, check the details above. This guide showed you how to make tasty tandoori chicken skewers. You learned about the right ingredients, marination tips, and grilling steps for juicy chicken. Remember, marinate overnight for the best flavor. You can also switch proteins or spice levels to suit your taste. Use our storage tips to save leftovers. With this recipe, you can wow your family and friends. Enjoy your cooking and have fun experimenting!

Tandoori Chicken Skewers Flavorful and Easy Recipe

Are you ready to enjoy a burst of flavor with Tandoori Chicken Skewers? This easy recipe combines tender chicken, yogurt,

To make creamy avocado pasta, you will need a few simple items. Here’s the list of ingredients: - 3 ripe avocados - 2 cloves garlic - 2 tablespoons lemon juice - 1/4 cup fresh basil leaves - 1/2 teaspoon chili flakes (optional) - 1/4 cup olive oil - Salt and pepper - 12 oz spaghetti - Cherry tomatoes for garnish - Grated Parmesan cheese for garnish Gather these ingredients before you start. Ripe avocados are key for a smooth sauce. Use fresh garlic for the best flavor. The lemon juice adds a nice zing. If you like a little heat, add chili flakes. Olive oil will help blend everything well. Finally, don’t forget the salt and pepper for seasoning. This creamy avocado pasta is quick and tasty, perfect for any meal. For the full recipe, check the details above. - Bring salted water to a boil. - Cook spaghetti according to package instructions. - Reserve 1 cup of pasta cooking water. Cooking pasta is easy! Start by boiling water in a large pot. Make sure to add salt to the water. This step adds flavor to your pasta. Once the water is boiling, add your spaghetti. Stir it well to keep it from sticking. Follow the time on the package. You want it to be al dente, which means it should be firm but not hard. When done, save some of the water you cooked the pasta in. You will use it later for the sauce. - Combine ingredients in a food processor. - Blend until smooth and creamy. - Adjust consistency with reserved pasta water. Now, let’s make the avocado sauce! Grab a food processor and add the ripe avocados, minced garlic, lemon juice, basil leaves, and olive oil. If you like heat, add chili flakes too. Blend all the ingredients until they are smooth and creamy. If the sauce is too thick, add some of the reserved pasta water a little at a time. This will help you get the right texture you want. Season with salt and pepper to taste. - Mix drained pasta with avocado sauce. - Toss to evenly coat. Once your pasta is done and drained, it’s time to combine everything. In a large bowl, add the drained pasta and pour in the avocado sauce. Toss it well until all the pasta is coated in that creamy goodness. This will make every bite delicious. Serve it right away for the best flavor and texture. Enjoy! To get the best creamy texture, you must add pasta water gradually. This water has starch that helps bind the sauce. If you pour it all at once, you may end up with a runny sauce. Start with a small amount and mix until you reach your desired creaminess. Using ripe avocados is also key. They should feel soft but not mushy. Ripe avocados blend smoothly and give the sauce that rich texture. If they are too hard, your sauce will be chunky. You can take the flavor up a notch by adding herbs or spices. Try fresh parsley or cilantro for a different twist. A pinch of salt and pepper can make a big difference too. For extra protein, grilled chicken or shrimp are great additions. They pair well with the creamy sauce and add a satisfying bite. For a beautiful presentation, consider garnishing your dish with cherry tomatoes or fresh basil leaves. The bright colors will make your dish pop. A sprinkle of grated Parmesan cheese on top adds a lovely touch and extra flavor. Serve your creamy avocado pasta in a large bowl or on individual plates for a nice touch. For the complete recipe, check the Full Recipe section. {{image_2}} You can change the noodles for a fun twist. Try using zucchini noodles, often called zoodles. They are low in carbs and offer a fresh taste. Just spiralize your zucchini and cook it lightly. You can also use gluten-free pasta. Many brands make great options. Look for rice or chickpea pasta. They taste great with the creamy avocado sauce. Want to boost the dish? Add some veggies! Spinach or peas work well. They add color and nutrients. You can also include proteins like grilled chicken or chickpeas. This makes the meal heartier. Just toss your choice in with the pasta and sauce for a filling dish. Herbs can change the taste of your creamy avocado pasta. Try adding fresh cilantro or parsley for a new flavor. You can also mix in other sauces. Adding pesto gives a rich taste, while sun-dried tomatoes add a sweet and tangy kick. Experiment with these flavors to find your favorite combo. For the full recipe, check out the complete guide in the section above. To keep your creamy avocado pasta fresh, store leftovers in an airtight container. This helps prevent air from getting in and causing browning. Make sure the lid is on tight. To further protect the sauce, you can add a thin layer of olive oil on top. This barrier keeps the sauce vibrant and green. When reheating, aim to keep the sauce creamy. The microwave works well. Heat it in short bursts, stirring in between. This way, you avoid overheating and drying it out. You can also serve it cold. A chilled pasta salad with fresh herbs and tomatoes is a great option. In the fridge, your creamy avocado pasta lasts about three days. Always check for signs of spoilage. If the sauce turns brown or develops a sour smell, it’s best to toss it. Fresh ingredients are key, so when in doubt, throw it out! For the full recipe, refer back to the beginning. Yes, you can make creamy avocado pasta ahead of time. Cook the pasta and prepare the sauce. Store them separately in airtight containers. This helps keep the pasta and sauce fresh. Mix them together when you're ready to serve. If you want to save time, you can make the sauce a day in advance. To keep avocados from browning, use fresh lemon juice. The acid in the lemon juice slows down oxidation. You can also cover the sauce tightly with plastic wrap. Make sure the wrap touches the sauce to limit air exposure. If you have any leftover sauce, add a bit more lemon juice before storing. Yes, creamy avocado pasta is already vegan! The main ingredients are ripe avocados, garlic, and lemon juice. They create a rich and creamy sauce without any animal products. Just skip the Parmesan cheese or use a plant-based alternative if you want a cheesy flavor. Creamy avocado pasta pairs well with many dishes. You can serve it with a simple green salad for some crunch. Garlic bread or a crusty baguette makes a great side too. For protein, consider grilled chicken or shrimp. You can also add some roasted vegetables for extra flavor. Yes, you can use frozen avocados for creamy avocado pasta. Thaw them before blending. Just make sure to drain any excess water. Frozen avocados work well in smoothies and sauces. They might be a bit softer, but they blend nicely into a creamy texture. In this blog post, I shared how to make creamy avocado pasta. You learned the ingredients, step-by-step cooking, and tips for perfect texture. I also shared some fun variations and storage tips. This dish is easy, tasty, and versatile. You can customize it to fit your diet. Whether you want to use zoodles or add proteins, the choices are endless. Enjoy your cooking adventure and savor the fresh flavors of this dish!

Creamy Avocado Pasta Quick and Tasty Dish

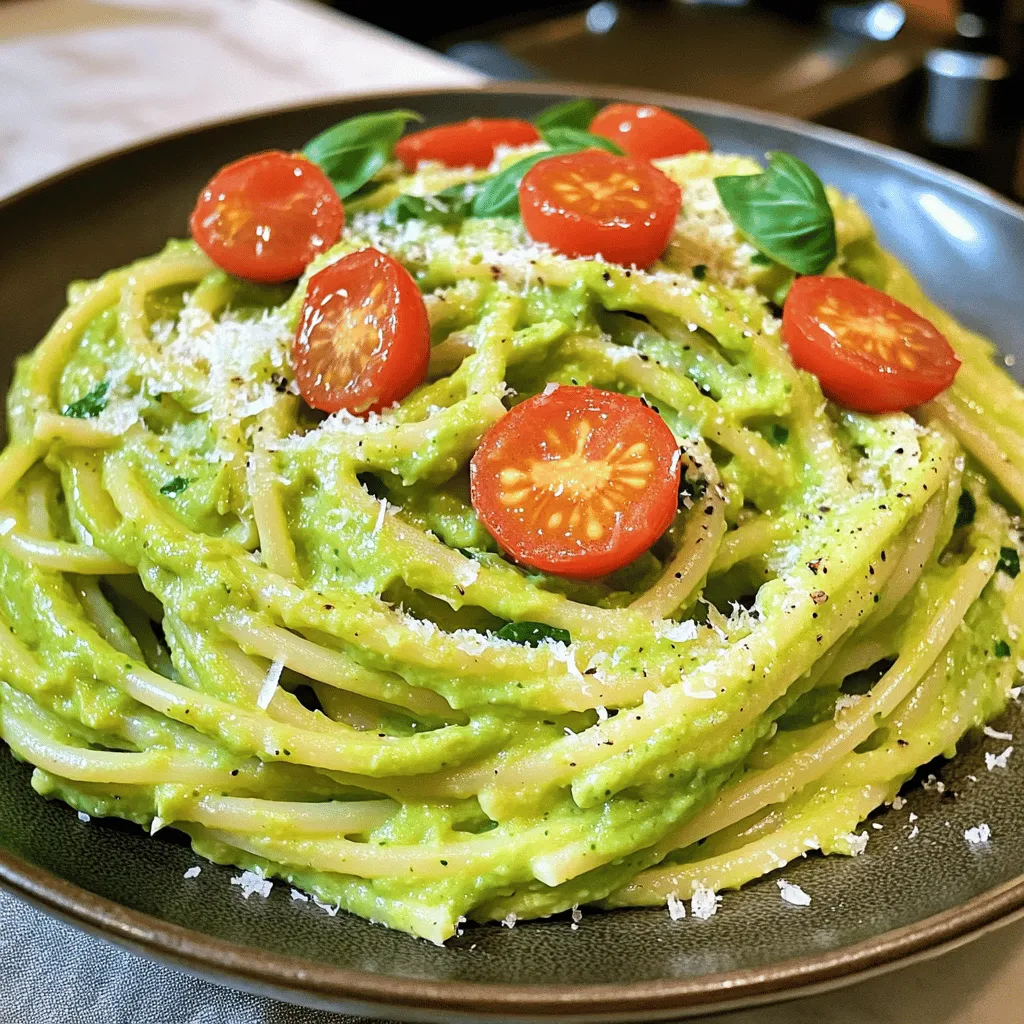
Looking for a quick and tasty meal? Try my creamy avocado pasta! This dish blends ripe avocados, fresh garlic, and

To make these tasty pancakes, gather these main ingredients: - 1 cup rolled oats - 1 ripe banana, mashed - 1 cup milk (or non-dairy milk) - 1 tablespoon honey or maple syrup - 1 teaspoon baking powder - 1/2 teaspoon cinnamon - 1/4 teaspoon salt - 1 large egg - 1 tablespoon vanilla extract These ingredients work together to create a fluffy and flavorful pancake. The oats add texture, while the banana gives a natural sweetness. You can customize your pancakes with these optional ingredients and toppings: - Sliced bananas - Fresh berries - Nut butter These toppings add color and extra flavor. You can mix and match to find your favorite combination. Banana oatmeal pancakes are not just delicious; they are also good for you. Here are some benefits: - Rolled oats: High in fiber, they help keep you full longer. - Banana: Packed with potassium, bananas support heart health. - Milk: Provides calcium, which is vital for strong bones. - Egg: A great source of protein, eggs help in muscle repair. These ingredients make this meal a healthy choice for breakfast or brunch. You can find the full recipe above to start making these pancakes today! To start, you need oat flour for these pancakes. You can make it easily. Take 1 cup of rolled oats and place them in a blender or food processor. Blend until the oats turn into a fine flour. This step is key for a smooth pancake texture. Next, let's mix the ingredients. In a large bowl, combine the oat flour, 1 teaspoon of baking powder, 1/2 teaspoon of cinnamon, and 1/4 teaspoon of salt. Whisk it all together until blended. In another bowl, mash 1 ripe banana. Add 1 cup of milk, 1 tablespoon of honey or maple syrup, 1 large egg, and 1 tablespoon of vanilla extract. Mix this until it’s smooth. Pour the wet mix into the dry mix and stir gently. Let the batter sit for 5-10 minutes. This helps the pancakes rise better. Cooking pancakes can be tricky, but I have some tips. Heat a non-stick skillet over medium heat. Lightly grease it with a bit of oil or cooking spray. Pour 1/4 cup of batter onto the skillet. Cook until bubbles form on top, about 2-3 minutes. Flip the pancake and cook for another 2 minutes until it's golden brown. Repeat with the rest of the batter. You can find the full recipe at the end of this article. Enjoy your pancakes warm with tasty toppings! To get the best texture, use rolled oats. Blend them until they are fine. This oat flour gives the pancakes a nice base. Let the batter rest for 5-10 minutes. This helps it thicken and makes the pancakes fluffier. Make sure your skillet is at medium heat. A hot skillet helps create a golden crust. One common mistake is overmixing the batter. This can make the pancakes tough. Mix just until the wet and dry ingredients blend. Another mistake is not letting the batter rest. Skipping this step can lead to thin pancakes. Lastly, don’t flip the pancakes too soon. Wait for bubbles to form on the top first. You can easily enhance the flavor of your pancakes. Add a pinch of nutmeg for warmth. Try mixing in chocolate chips for a sweet twist. You can also add chopped nuts for crunch. If you want a fruity taste, mix in blueberries or strawberries. Experiment with different spices to find your favorite! For the full recipe, check out the provided link. {{image_2}} You can easily make these pancakes gluten-free. Just use certified gluten-free oats. Blend them into flour like in the full recipe. This change keeps the taste and texture great. Plus, it allows everyone to enjoy them without worry. To make vegan banana oatmeal pancakes, swap the egg for flaxseed meal. Mix 1 tablespoon of flaxseed meal with 2.5 tablespoons of water. Let it sit for a few minutes to thicken. Use plant-based milk instead of regular milk. This makes your pancakes fluffy and tasty, just like the original. Add fun flavors to your pancakes! You can mix in chocolate chips, nuts, or dried fruits. For a tropical twist, add shredded coconut. You might even try spices like nutmeg or ginger for extra warmth. Experiment with fresh berries for a burst of flavor. These additions make each bite exciting and different. To keep your banana oatmeal pancakes fresh, store them in an airtight container. Make sure to let the pancakes cool completely before placing them in the container. This step stops moisture from building up and keeps them from getting soggy. You can store them in the fridge for up to three days. When you're ready to enjoy your leftovers, reheating is simple. You can use a microwave or a skillet. For the microwave, heat them on a plate for about 30 seconds. If you prefer a skillet, heat it on medium and warm the pancakes for about one minute on each side. This keeps them soft and tasty. Freezing banana oatmeal pancakes is easy and great for meal prep. First, let them cool. Then, place a piece of parchment paper between each pancake to prevent sticking. Store them in a freezer-safe bag or container. You can freeze them for up to two months. When you're ready to eat, just thaw them in the fridge overnight, then reheat as mentioned. Enjoy these tasty pancakes any time! For the full recipe, check out the section above. Yes, you can make banana oatmeal pancakes without eggs. Use 1/4 cup of unsweetened applesauce instead. This will help bind the ingredients together. Another option is to use a mashed flaxseed. Mix 1 tablespoon of flaxseed with 2.5 tablespoons of water. Let it sit for a few minutes until it thickens. Both options work well and keep the pancakes tasty. To make your pancakes fluffier, you can add a little extra baking powder. Use 1.5 teaspoons instead of 1 teaspoon. Also, let your batter rest for 5-10 minutes. This resting time allows the oats to absorb some moisture, making the pancakes lighter. If you like, you can also separate your egg and beat the egg white until fluffy. Fold it into the batter at the end. If you want to skip honey or maple syrup, you have other choices. You can use agave syrup or brown rice syrup as substitutes. Both will add sweetness without changing the flavor too much. For a lower-calorie option, try mashed dates or a sugar substitute like stevia. Each of these options will work well in the pancake recipe. For more details, check out the Full Recipe. Banana oatmeal pancakes are simple and healthy. We covered the best ingredients and their benefits. I shared steps to make them perfectly fluffy. You now know tips to avoid common mistakes and enhance flavors. We explored your options for gluten-free and vegan pancakes too. Finally, you learned how to store leftovers properly. Enjoy making these tasty pancakes for your next breakfast! You will love how easy and rewarding they are to prepare.

Savory Banana Oatmeal Pancakes Easy and Healthy Meal

Are you ready to whip up a delicious and healthy breakfast? In this guide, I’ll show you how to make

- 2 ripe avocados - 1 cup cherry tomatoes, halved - 1 cup fresh mozzarella balls (bocconcini), halved - 1/4 cup fresh basil leaves, chopped - 2 tablespoons balsamic glaze - 1 tablespoon olive oil - Salt and pepper to taste - Knife - Spoon - Medium bowl To make Caprese stuffed avocados, you need a few fresh ingredients. Start with ripe avocados. The ripeness is key for a creamy texture. Next, grab some cherry tomatoes. They add sweetness and a nice pop of color. Fresh mozzarella balls give a rich flavor and soft bite. You will also need fresh basil leaves for that aromatic touch. Balsamic glaze adds a sweet tang, while olive oil brings depth. Don’t forget salt and pepper for seasoning. For tools, you need a sharp knife to cut the avocados. A spoon helps scoop out the flesh. Lastly, a medium bowl lets you mix all the yummy ingredients together. This simple setup makes the dish easy to prepare. You can find the full recipe in the article. Enjoy cooking! - Cut the avocados in half and remove the pits. - Scoop out small portions of the flesh from each half. Start by cutting the ripe avocados in half. Use a sharp knife for this. Be careful not to cut too deep! Once you cut them, twist to separate the halves. Remove the pit with a spoon or knife. Next, scoop out a small amount of the flesh. This creates space for the tasty filling. Set the scooped avocado aside. - Combine tomatoes, mozzarella, and basil in a bowl. - Drizzle with olive oil and season. In a medium bowl, mix the halved cherry tomatoes, mozzarella balls, and chopped basil. Stir gently to combine. This mix will bring fresh flavors. Next, drizzle olive oil over the mixture. Add salt and pepper to taste. Toss everything together until well coated. - Generously spoon the filling into avocado halves. - Drizzle balsamic glaze over the stuffed avocados. Now, take your delicious filling and spoon it into the avocado halves. Fill them generously to create a colorful dish. Finally, drizzle balsamic glaze over the stuffed avocados. This adds a sweet and tangy touch. Enjoy your fresh and tasty Caprese stuffed avocados! You can find the full recipe in the article above. To pick the best avocados, gently squeeze them. They should feel firm but yield slightly. Look for a dark green color. It shows ripeness. A ripe avocado has a slight give when pressed. Avoid avocados that feel mushy or have large dark spots. These signs mean they are overripe. Overripe avocados can taste bitter and may have brown flesh. Make your Caprese stuffed avocados pop! Use a colorful plate to show off the bright ingredients. You can cut the avocados in half for a fun display. Add extra basil leaves on top for a fresh look. These stuffed avocados pair well with grilled chicken or toasted bread. They also go great with a light salad. For a fun twist, serve them with garlic bread or a simple pasta dish. Looking for more ideas? Check out the Full Recipe for tips on how to take this dish to the next level! {{image_2}} You can easily change the cheese in this recipe. If you want a stronger taste, try using feta cheese. Goat cheese also works well for a tangy twist. Both options add a nice flavor without losing the essence of a Caprese dish. You can also switch up the vegetables. Add bell peppers, cucumbers, or even spinach. In summer, fresh corn or zucchini can give your dish a refreshing touch. In winter, roasted red peppers or artichoke hearts can add warmth. Be creative with what you have! To make this dish vegan, skip the cheese. Instead, try using avocado or a plant-based cheese alternative. You can also add nuts like pine nuts or walnuts for extra texture. These changes keep it fresh and tasty! If you need gluten-free options, rest easy. All the ingredients in this recipe are gluten-free. Just pair your stuffed avocados with gluten-free crackers or bread for a complete meal. Enjoy the flavors without any worries! For the full recipe, check out the details above. To keep leftover Caprese stuffed avocados fresh, cover them with plastic wrap. This helps keep air away from the avocado flesh. You can store them in the fridge for up to three hours. If you want to enjoy them later, try to eat them as soon as you can for the best taste. You should not freeze stuffed avocados. Freezing changes their texture and taste. Instead, store the filling ingredients separately. You can freeze cherry tomatoes and mozzarella balls for later use. Just make sure to thaw them before mixing. This way, you can enjoy your Caprese flavors anytime! You can serve Caprese stuffed avocados with a variety of dishes. Here are some great options: - Grilled chicken or fish for a protein boost. - A fresh green salad with lemon vinaigrette. - Crusty bread or garlic bread for a delightful crunch. - Pasta salad for added flavor and texture. These pairings enhance the meal and bring out the flavors of the avocados. To keep avocados fresh, use these easy tips: - Apply lemon or lime juice to the flesh. The acid slows browning. - Store them in an airtight container. - Cover with plastic wrap, pressing it against the avocado's surface. These methods help maintain that vibrant green color, so your dish looks great longer. Yes, you can prepare stuffed avocados in advance! Here’s how: - Make the filling ahead of time and store it in the fridge. - Cut and scoop avocados just before serving. - If you need to prepare them earlier, use lemon juice to slow browning. This way, you can enjoy the fresh taste without stress! This Caprese stuffed avocados recipe makes four servings. Each avocado half is a perfect portion. You can easily adjust the recipe to serve more by using more avocados. Enjoy this tasty and fresh delight with family or friends! For the full recipe, check back to the ingredient list above. Caprese stuffed avocados combine fresh ingredients for a tasty treat. We covered the key steps, from prepping avocados to mixing the filling. I shared tips on choosing ripe avocados and creative presentation ideas. You can also adjust the recipe to fit your diet or make swaps for ingredients. Enjoy this simple, healthy dish any time! With these tips, you’re set to impress friends and family. Happy cooking!

Caprese Stuffed Avocados Tasty and Fresh Delight

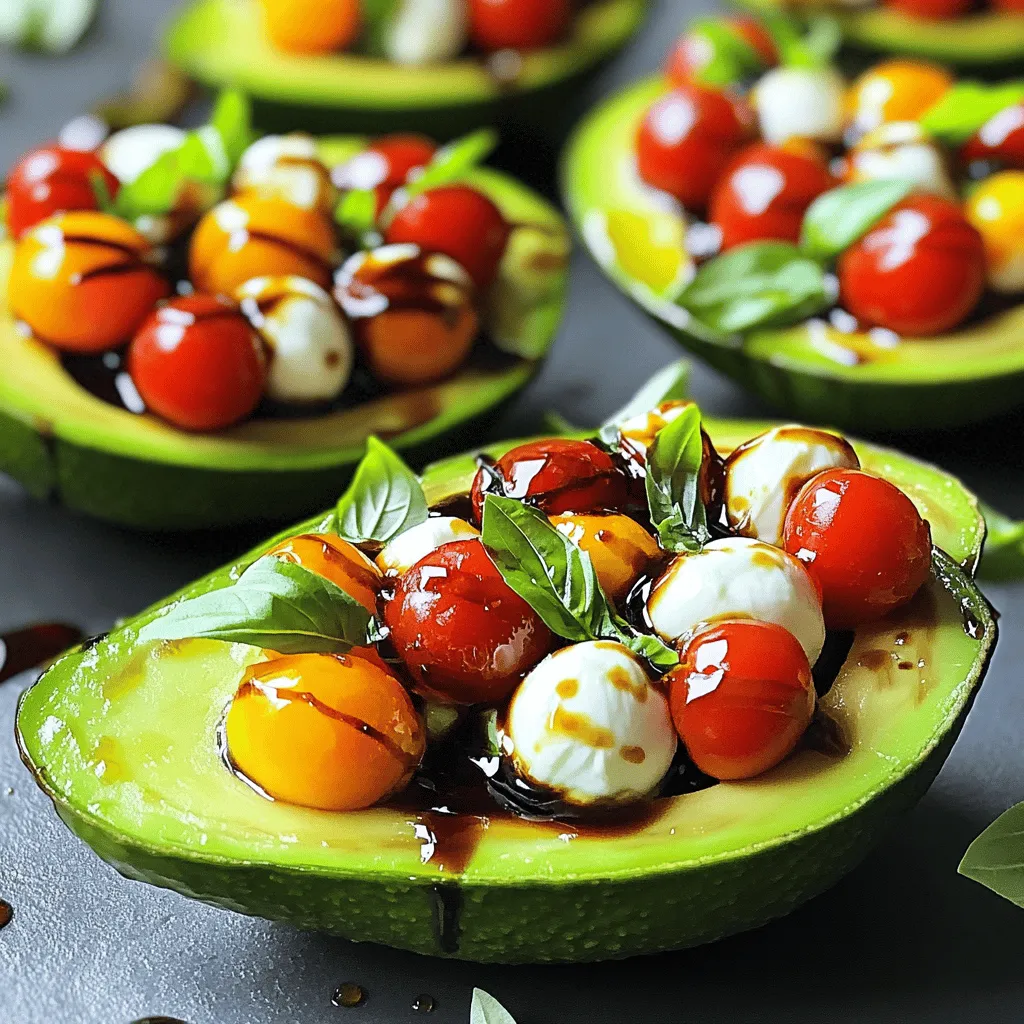
If you love fresh flavors and simple recipes, you’re in for a treat! In this blog post, I’ll show you

To make a Lemon Basil Pasta Salad, you need fresh and simple ingredients. Here’s my complete list of ingredients: - 8 oz. fusilli pasta - 1 cup cherry tomatoes, halved - 1 cucumber, diced - 1/2 red onion, finely chopped - 1/2 cup fresh basil leaves, torn - 1/4 cup extra virgin olive oil - 3 tablespoons lemon juice - 1 teaspoon lemon zest - Salt and pepper to taste - 1/4 cup feta cheese, crumbled (optional) - 1/4 cup walnuts, chopped (optional) Each ingredient brings a unique flavor to the dish. Fusilli pasta serves as the perfect base. It holds onto the dressing and veggies well. Cherry tomatoes add a sweet, juicy burst. Cucumbers bring a nice crunch. Red onion gives a slight bite, while fresh basil adds a fragrant note. The dressing combines olive oil, lemon juice, and zest. This mix creates a bright and tangy flavor. Adjust the salt and pepper to match your taste. If you love cheese, feta adds creaminess. Walnuts give a satisfying crunch. You can leave them out if you prefer. Gather these ingredients for a fresh and flavorful delight. For the full recipe, check out the instructions to bring this dish to life! Start by boiling water in a large pot. Make sure to add a generous amount of salt. This step enhances the pasta's flavor. Once the water is boiling, add 8 oz. of fusilli pasta. Cook it for about 8 to 10 minutes until it's al dente. This means it should still have a little bite to it. After cooking, drain the pasta and rinse it under cold water. This stops the cooking process and cools it down. While the pasta cooks, you can prepare your vegetables. Take 1 cup of cherry tomatoes and cut them in half. Dice 1 cucumber into small pieces. Finely chop 1/2 red onion. Use a sharp knife for clean cuts. Place all the chopped vegetables into a large mixing bowl. This bowl will hold everything together. In a small bowl, whisk together your dressing ingredients. Combine 1/4 cup of extra virgin olive oil, 3 tablespoons of lemon juice, and 1 teaspoon of lemon zest. Don't forget to add salt and pepper to taste. Seasoning is key. It brings out the flavors in your salad. Once the pasta is cool, it’s time to combine everything. Add the cooled pasta to the bowl with the chopped vegetables. Pour the dressing over the pasta and mix gently. This helps all the flavors coat the pasta. Next, fold in 1/2 cup of fresh basil leaves. If you want, add crumbled feta cheese or chopped walnuts for extra flavor and texture. After everything is mixed, cover the salad with plastic wrap. Let it chill in the fridge for at least 30 minutes. This chilling time allows the flavors to blend well. When you're ready to serve, the salad should be cold or at room temperature. Enjoy this fresh and flavorful delight! For the full recipe, check out the details above. To make the lemon basil pasta salad shine, adjust the acidity with lemon juice. Start with three tablespoons, then taste. If you want more zing, add a little more lemon juice. This brightens the dish and lifts the flavors. You can also try some extra seasonings. Fresh cracked pepper adds warmth. A pinch of red pepper flakes brings heat. For a unique twist, add some garlic powder. These small tweaks can transform the flavor profile. When serving, think about how to catch the eye. Use a large serving bowl to show off the bright colors. You can layer the ingredients, creating a beautiful display. Garnish with extra basil leaves for a fresh touch. A sprinkle of feta on top adds a pop of white. Drizzling a little olive oil before serving gives it a nice sheen. These simple steps make your salad look as good as it tastes. To save time, prepare your ingredients ahead of time. Chop the vegetables a day before. Store them in airtight containers in the fridge. This way, you can mix everything quickly when you're ready to eat. Another great tip is to use store-bought pasta options. You can find cooked pasta in many shops. It cuts down your cooking time. Just rinse and mix it with your salad ingredients. For the full recipe, check out the Lemon Basil Pasta Salad section above. {{image_2}} You can add seasonal veggies to your Lemon Basil Pasta Salad for extra flavor. Try using bell peppers, zucchini, or asparagus. These veggies are colorful and full of nutrients. If you want to change things up based on your diet, swap the cucumber for roasted veggies. You can also use spinach instead of fresh basil for a different twist. Adding protein makes the salad more filling. Grilled chicken or shrimp are great choices. They add a nice texture and flavor. If you prefer vegetarian options, try chickpeas or black beans. These give the salad heartiness without meat. Tofu is another good option if you want something plant-based. Experiment with different oils or vinegars for your dressing. A splash of balsamic vinegar can give a sweet note. You can also try using avocado oil for a rich flavor. Adding fresh herbs like dill or parsley can boost the taste even more. They bring freshness and can make your salad unique. For the full recipe, check the link above! To keep your lemon basil pasta salad fresh, store it in the fridge. Use an airtight container to prevent air from drying it out. Make sure to cover it well. This helps keep the flavors locked in. It's best to eat it within three days for the freshest taste. If you notice any extra liquid, just give it a gentle stir before serving. Can you freeze pasta salad? Yes, but it changes the texture. The pasta may become mushy once thawed. If you still want to freeze it, place it in a freezer-safe container. Leave space at the top as it will expand. When you are ready to eat it, thaw it in the fridge overnight. Serve it cold for the best taste. How long does the salad stay fresh? In the fridge, it lasts about three days. If you see any signs of spoilage, it’s best to toss it. Signs to watch for include a sour smell or any mold. Always trust your senses. If it doesn’t look or smell right, don’t eat it. Yes, you can make this salad ahead of time. Meal prep saves time and effort. Prepare the salad up to a day in advance. Just cover it and chill it in the fridge. This lets the flavors mix well. If you want a gluten-free option, use rice noodles or quinoa. Zoodles, made from zucchini, are also a fun choice. These options keep the salad light and fresh. Absolutely! This salad is great for meal prep. To keep it fresh, store the dressing separately. Mix it in just before serving. This helps prevent sogginess and keeps flavors bright. To make this salad vegan, skip the feta cheese. Use a dairy-free cheese or leave it out completely. For the dressing, swap the honey with maple syrup. This keeps the salad tasty and plant-based. For the Full Recipe, click [here](#). This pasta salad brings fresh tastes and easy steps together. We covered the ingredients, cooking tips, and fun variations. You learned how to mix flavors, chill the salad, and store leftovers. Try adding different veggies or proteins for a unique twist. With these steps, you can create a delicious, vibrant dish every time. Enjoy impressing your friends and family with your tasty creation!

Lemon Basil Pasta Salad Fresh and Flavorful Delight

Are you ready to elevate your side dish game? This Lemon Basil Pasta Salad is a refreshing blend of vibrant

Older posts
Newer posts
← Previous Page1 … Page94 Page95 Page96 … Page122 Next →

dsad

© 2025 Southern Dishes • Built with GeneratePress

Our Policies

  • Copyright Policy
  • Cookie Policy
  • GDPR Policy
  • Privacy Policy
  • Disclaimer
  • Terms Of Use

More Information

  • Home
  • About
  • Contact
  • Appetizers
  • Dessert
  • Dinner
  • Drinks
©2025, Southern Dishes About Back To Top