Skip to content
DisclaimerTerms Of UseGDPR PolicyCookie Policy

Southern Dishes

  • Home
  • Drinks
  • Appetizers
  • Dinner
  • Dessert
  • About
  • Contact
  • Privacy Policy
DisclaimerTerms Of UseGDPR PolicyCookie Policy

Isabella

For this recipe, you need four ears of fresh corn. Choose corn that feels firm. The husk should be bright green and tightly wrapped. Fresh corn has a sweet taste that shines when grilled. The magic happens with the spices. You will need: - 3 tablespoons butter, melted - 1 teaspoon chili powder - 1 teaspoon garlic powder - 1 teaspoon ground cumin - Juice of 2 limes - Salt to taste These spices add bold flavors to the corn. The butter helps the spices stick and brings richness. Lime juice adds a fresh zing that perfectly balances the spices. For an extra touch, you can add garnishes. I recommend: - Crumbled cotija cheese (optional, for garnish) - Fresh cilantro, chopped (for garnish) Cotija cheese gives a savory bite. Chopped cilantro adds brightness and color. Use these garnishes to enhance your dish’s look and taste. You can find the full recipe for more details. First, get your grill ready. Preheat it to medium-high heat. This step helps the corn cook evenly. You want a nice sear on those kernels. Make sure the grates are clean. This way, your corn won’t stick. Give it a quick wipe if needed. Now, let’s make the chili lime butter. In a small bowl, combine these ingredients: - 3 tablespoons melted butter - 1 teaspoon chili powder - 1 teaspoon garlic powder - 1 teaspoon ground cumin - Juice of 2 limes - Salt to taste Mix them well. This butter packs a punch! It adds flavor and moisture to the corn. Set this bowl aside. You will use it soon. Next, prepare the corn. Husk the ears and remove the silk. Pat them dry with a paper towel. This helps the butter stick better. Brush each ear with the chili lime butter. Make sure to coat all sides. Now, place the corn on the grill. Close the lid and grill for about 10-12 minutes. Rotate the corn every few minutes. You want those kernels to be charred and tender. When they are done, take them off the grill. Let them cool for a bit. If you like, sprinkle some salt on top. You can also add crumbled cotija cheese. Garnish with fresh cilantro for a pop of color. For the full recipe, check out the details above. Enjoy your tasty chili lime grilled corn! To make the best chili lime grilled corn, start with fresh corn. Look for ears with bright green husks. The kernels should be plump and firm. Test them by pressing lightly. If they feel full, they are good. Sweet corn works best for this recipe. It gives a nice, natural sweetness to balance the chili flavor. You can find fresh corn at farmers' markets or grocery stores during the summer. Even cooking is key for great grilled corn. To achieve this, rotate the corn often on the grill. Every few minutes, turn each ear to get a nice char. This helps all sides cook evenly. If some spots get too dark, move the corn to a cooler spot on the grill. You can also soak the corn in water for 30 minutes before grilling. This helps keep it moist and prevents burning. If you don't have a grill, you can still enjoy this dish. Try using a stovetop grill pan. It works well and gives nice grill marks. Preheat the pan and follow the same steps as grilling. You can also roast the corn in the oven. Wrap the corn in foil and bake at 400°F for 20-25 minutes. Just remember to coat it with that tasty chili lime butter mix first. For a fun twist, you can even boil the corn and then brush it with the chili lime sauce. {{image_2}} You can change the spice mix to suit your taste. Try adding smoked paprika for a smoky flavor. If you love heat, mix in cayenne pepper. You can also add oregano for a nice herbal note. Each spice adds its own twist, making your corn unique. Instead of cotija cheese, use feta or Parmesan. Both give a salty bite. Try adding diced avocado for creaminess. A sprinkle of lime zest adds brightness and color. Fresh scallions or jalapeños can also bring an extra kick. Mix and match for fun flavors! Chili lime grilled corn pairs well with many dishes. Serve it alongside grilled chicken or steak for a hearty meal. It also complements fresh salads or tacos. For a light snack, enjoy it with a cool dip. The corn’s bold flavor makes it a crowd-pleaser at BBQs or picnics. Check out the Full Recipe for all the details! If you have leftover grilled corn, store it in an airtight container. This keeps it fresh. You can also wrap it tightly in plastic wrap. Store it in the fridge for up to three days. Make sure it is cool before you store it. To reheat grilled corn, use the microwave or grill. If using a microwave, place the corn on a plate. Heat it for about 1-2 minutes. Check if it’s hot enough. If you prefer the grill, heat it on medium for about five minutes. Turn it to heat evenly. You can freeze grilled corn for later use. First, let it cool completely. Then, wrap each ear tightly in plastic wrap. Place the wrapped corn in a freezer bag. It will last for up to three months. When you want to use it, thaw the corn in the refrigerator overnight. Grilling or microwaving can bring it back to life. For the full recipe, check out the details above. Yes, you can use frozen corn. However, fresh corn gives the best flavor and texture. If you use frozen corn, thaw it first. Drain any excess water. Grill the corn on a grill pan for even cooking. This method works well, but the taste may differ slightly. You can add more chili powder to the butter mix. A pinch of cayenne pepper will boost the heat too. You could also try adding diced jalapeños to the corn before grilling. This will give it a fresh and spicy kick. Adjust the spice level to fit your taste. Chili lime grilled corn goes great with many dishes. It pairs well with grilled chicken or fish. Tacos and burritos are also great options. You can serve it alongside a fresh salad for a light meal. This corn adds a zesty touch to any summer barbecue. For more ideas, check the Full Recipe. Grilling corn with chili lime butter creates a tasty dish anyone can enjoy. We covered fresh corn, key spices, and optional garnishes. I shared clear steps for prepping, grilling, and making chili lime butter. Remember, choose the best corn for the best flavor. Use the tips for even cooking and explore different spice mixes. Don’t forget about storage and reheating options. Now, you’re ready to make the best grilled corn! Enjoy the savory flavors at your next meal.

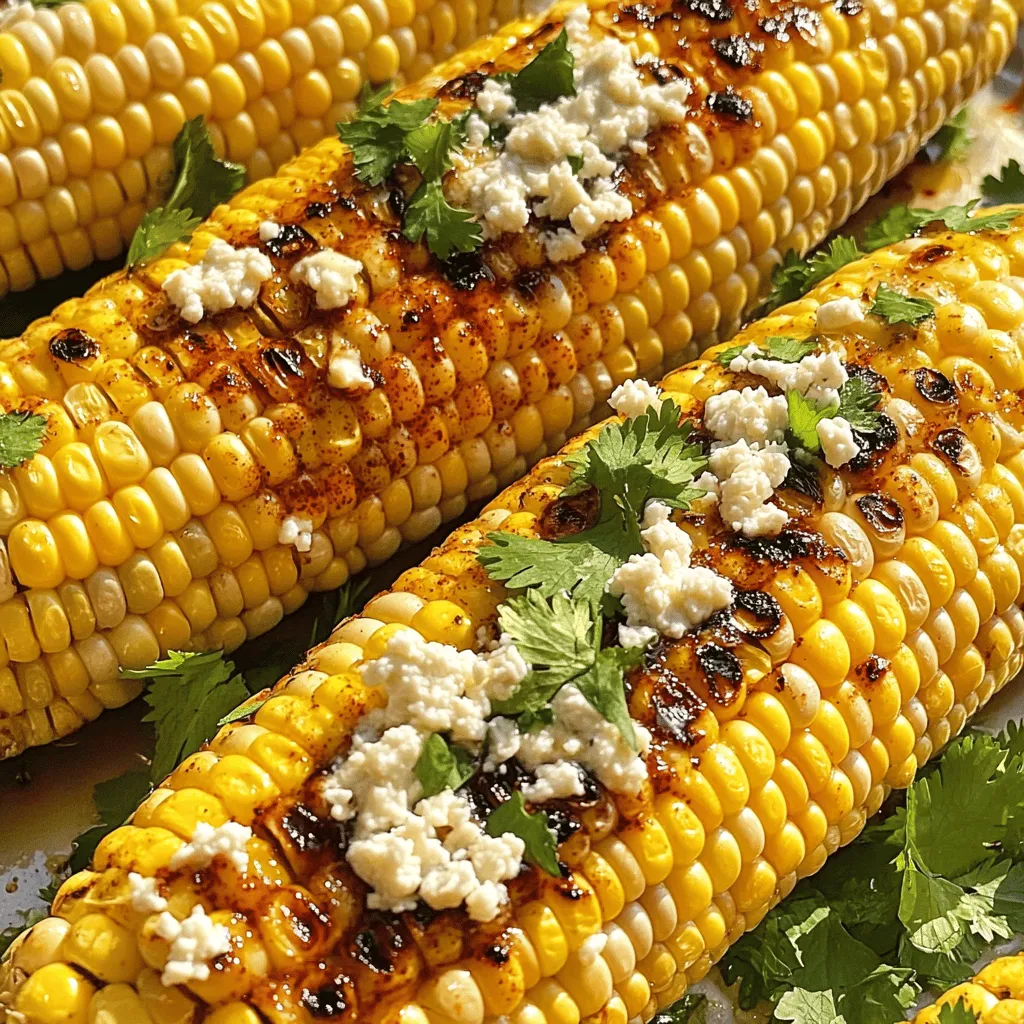
Chili Lime Grilled Corn Flavorful and Simple Recipe

Summer days call for delicious and easy recipes, and Chili Lime Grilled Corn is a must-try! This simple dish bursts

- 2 large flour tortillas - 1 cup marinara sauce - 1 ½ cups shredded mozzarella cheese To make a delicious Minute Tortilla Pizza, you need just a few key items. First, grab your tortillas. They act as the crust. Next, have your marinara sauce ready. This adds a rich flavor to your pizza. Lastly, mozzarella cheese is a must. It melts beautifully and gives that gooey texture we all love. - ½ cup cherry tomatoes, halved - ½ cup bell peppers, diced - ¼ cup black olives, sliced Now, let's talk toppings. You can add cherry tomatoes for a pop of color. They also bring a fresh taste. Bell peppers are great too. Dice them up and sprinkle on top. Black olives add a salty kick. Feel free to mix and match these toppings to suit your taste. - 1 teaspoon dried oregano - 1 teaspoon garlic powder - Fresh basil for garnish (optional) Seasoning makes your pizza special. Dried oregano brings a classic Italian flavor. Garlic powder adds depth and aroma. If you want to impress, fresh basil is a nice finish. It adds a burst of freshness. Just sprinkle it on after baking for a delightful touch. {{ingredient_image_1}} - Preheating to the Correct Temperature First, turn your oven to 400°F (200°C). This heat makes the tortillas crispy and the cheese gooey. - Lining with Parchment Paper Next, grab a baking sheet and line it with parchment paper. This step helps keep the pizzas from sticking. - Brushing Olive Oil for Crispiness Take a brush and dip it in olive oil. Lightly coat each tortilla. This makes them crisp and golden. - Spreading Marinara Sauce Use half of the marinara sauce on each tortilla. Spread it evenly, but leave a little space at the edges. - Layering Cheese and Toppings Now, sprinkle half of the mozzarella cheese on top of each tortilla. Then add your toppings: halved cherry tomatoes, diced bell peppers, and sliced black olives. - Cooking Time and Temperature Place the baking sheet in the oven. Bake for 10-12 minutes. Keep an eye on them as they cook. - How to Check for Doneness Look for melted cheese and golden brown edges. When you see that, they are ready to come out. - Best Practices for Seasoning Start with a good base. Use marinara sauce as your foundation. Add dried oregano and garlic powder for depth. These spices make your flavors pop. You can also try a sprinkle of chili flakes for heat. - Suggested Flavor Combinations Mix different toppings for variety. Try adding spinach and feta for a fresh twist. Or go classic with pepperoni and mushrooms. You can even experiment with barbecue sauce instead of marinara. - Techniques for Crispier Tortillas Brush a light layer of olive oil on your tortillas. This step helps them crisp up nicely. Bake them on parchment paper to avoid sticking. This ensures even cooking and easy cleanup. - Recommended Baking Tips Preheat your oven to 400°F (200°C) for best results. Bake until the edges are golden brown. Keep an eye on your pizzas to avoid burning. They should take about 10-12 minutes. - Ideal Pairings and Dips Serve your tortilla pizzas with a side of marinara for dipping. A simple salad can balance the meal. You might also enjoy a creamy ranch dressing as a dip. - Presentation Ideas Slice your pizzas into wedges for easy sharing. Garnish with fresh basil for a pop of color. Arrange them on a colorful plate to impress your guests. Pro Tips Use Corn Tortillas for a Gluten-Free Option: Swap out flour tortillas for corn tortillas to make this pizza gluten-free while still enjoying a deliciously crispy base. Experiment with Toppings: Feel free to customize your pizza with your favorite toppings, such as pepperoni, spinach, or artichokes for a personal touch. Pre-bake the Tortillas: For extra crunch, pre-bake the tortillas for 3-4 minutes before adding toppings to ensure they don't become soggy. Keep an Eye on the Oven: Ovens can vary in temperature, so watch the pizza closely in the last few minutes to prevent burning. {{image_2}} Adding More Veggies You can easily boost the veggie count on your pizza. Try adding mushrooms, zucchini, or spinach. These veggies bring great flavor and color. They also add nutrients. Just slice them thin and layer them on top of your cheese. Switching Cheeses If you want a different taste, switch the cheese. Try feta for a salty kick or goat cheese for creaminess. You can also mix different cheeses. Use cheddar or pepper jack for a fun twist. Pepperoni and Other Meats Meat lovers will enjoy adding pepperoni or sausage. These meats crisp up nicely when baked. Chop them into small pieces and scatter them on top. Customizing Protein Choices You can use any protein you like. Try grilled chicken, bacon, or even shrimp. This adds protein and makes your pizza more filling. Feel free to get creative with your meat choices. Using Corn Tortillas For a gluten-free option, use corn tortillas. They are sturdy and hold toppings well. They also give a nice flavor. Just bake them the same way as flour tortillas. Other Gluten-Free Bases You can also try using gluten-free pizza bases. They come in many varieties. Look for ones made from almond or chickpea flour. These bases can provide a unique taste. To keep your tortilla pizza fresh, store it in an airtight container. This helps prevent sogginess. Place a piece of parchment paper between layers if stacking. Leftovers can last up to three days in the fridge. After that, they may lose taste and texture. You can reheat your tortilla pizza in several ways: - Oven: Preheat to 350°F (175°C). Bake for 5-7 minutes until hot. - Microwave: Heat on high for 30 seconds to 1 minute, but it may get soggy. - Skillet: Heat on medium for about 3-4 minutes, which keeps it crispy. To keep that delightful crispiness, the oven or skillet method works best. You can freeze your tortilla pizzas for future meals. Here’s how: - Let the pizzas cool completely. - Wrap each pizza tightly in plastic wrap, then in foil. - Place them in a freezer bag for extra protection. When you're ready to eat, thaw in the fridge overnight. Reheat as mentioned above. This way, your pizza retains its taste and texture. Bake your tortilla pizza for about 10-12 minutes at 400°F (200°C). Keep an eye on it. The cheese should melt and bubble, and the edges of the tortillas should turn golden brown. This quick bake gives you a crispy crust and gooey cheese. Yes, you can use different types of tortillas for your pizza. Flour tortillas work great, but corn tortillas are a nice gluten-free option. You can also try whole wheat or spinach tortillas for added flavor and nutrition. Dipping sauces can enhance your tortilla pizza. Here are some ideas: - Marinara sauce for classic flavor - Ranch dressing for a creamy touch - Spicy salsa for a kick - Garlic aioli for something unique To create a healthier tortilla pizza, consider these tips: - Use whole wheat tortillas for added fiber. - Swap regular cheese for a lower-fat option. - Load up on veggies like spinach, mushrooms, and zucchini. - Use homemade marinara sauce to control sugar and salt. You can make a quick and tasty minute tortilla pizza using simple ingredients. Start with tortillas, add marinara sauce and mozzarella cheese. Don't forget optional toppings like cherry tomatoes or olives to boost flavor. Remember to bake for a crispy finish and try different seasoning blends. There are many ways to customize this dish, whether you prefer vegetarian or meaty options. With easy storage and reheating methods, you can enjoy these pizzas anytime. Now, get ready to create your perfect tortilla pizza!

Minute Tortilla Pizza Quick and Easy Recipe

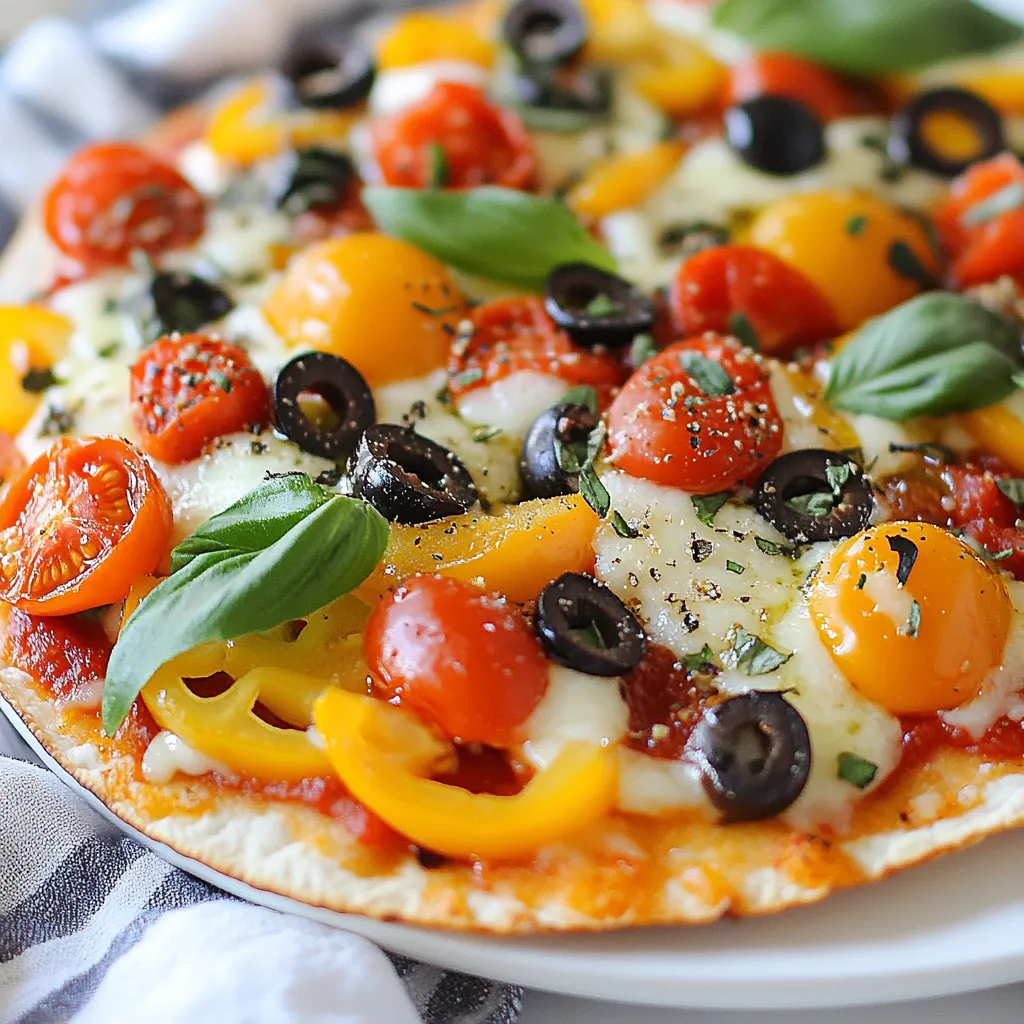
Craving a quick, tasty meal? You’ll love this Minute Tortilla Pizza recipe! It’s simple and ready in no time. Using

To make this dish, you need a few key items. Here’s what you’ll need: - 1 lb Brussels sprouts, trimmed and halved - 3 tablespoons pure maple syrup - 2 tablespoons olive oil - 1 teaspoon salt - ½ teaspoon black pepper - ½ teaspoon garlic powder - ¼ teaspoon chili flakes (optional for heat) These main ingredients combine to create a sweet and savory flavor that shines. You can also add some optional ingredients for extra taste. Consider these: - ¼ cup walnuts, roughly chopped (for crunch) - Fresh parsley for garnish Adding walnuts gives a nice texture. Fresh parsley adds color and freshness to the dish. Having the right tools makes cooking easier. Here’s what you should use: - A large mixing bowl - A baking sheet - Parchment paper - A spatula for stirring These tools help you mix and roast the Brussels sprouts perfectly. For the full recipe, check out the other sections! To start, wash your Brussels sprouts under cold water. Trim the ends and cut them in half. This helps them cook evenly. In a large mixing bowl, combine the halved sprouts with olive oil, salt, black pepper, garlic powder, and chili flakes. Toss everything together until the sprouts are well coated. This step is key for flavor. Next, preheat your oven to 400°F (200°C). Line a baking sheet with parchment paper for easy cleanup. Spread the coated Brussels sprouts in a single layer. This helps them roast well and become crispy. Drizzle the maple syrup over the sprouts. It adds a sweet touch that balances the savory flavors. Roast them for 20 to 25 minutes. Stir halfway through to ensure even cooking. If you want extra crunch, add chopped walnuts in the last 5 minutes. They add a nice texture and nutty flavor. Once they are golden brown and crispy, remove the Brussels sprouts from the oven. Let them cool slightly. Transfer them to a serving dish and garnish with fresh parsley. This adds color and freshness. You can serve these as a side dish at dinner or enjoy them as a tasty snack. For the full recipe, check the section above. Look for Brussels sprouts that are bright green and firm. Avoid any that are yellow or have brown spots. The smaller ones are sweeter, while larger sprouts may have a stronger taste. When you pick them, make sure they feel heavy for their size. This means they are fresh and full of moisture. Roasting at 400°F (200°C) works great for Brussels sprouts. This high heat gives them a nice crisp outside while keeping the inside tender. Roast for about 20-25 minutes. Halfway through, stir them to ensure even cooking. Keep an eye on them; you want a golden-brown color without burning. Maple syrup gives these sprouts a sweet touch. You can add garlic powder for depth and chili flakes for heat. Try adding nuts like walnuts for crunch. For a twist, sprinkle some lemon juice or zest after roasting. This adds a fresh note that brightens the dish. For the full recipe, check out the details above. {{image_2}} You can boost the texture of your Brussels sprouts by adding nuts. Walnuts add a nice flavor and crunch. Simply toss in roughly chopped walnuts during the last five minutes of roasting. You could also try pecans for a sweeter taste. Almonds work well too, giving a good crunch. Feel free to experiment with your favorite nuts. Each will add its unique twist to this dish. For a savory touch, add crispy bacon. Cook the bacon first until it’s crispy, then chop it into small pieces. Mix the bacon with the Brussels sprouts before roasting. The salty flavor of the bacon pairs well with the sweet maple glaze. This variation makes the dish even more hearty and satisfying. I often serve this version when I want a special treat. If you want a vegan version, skip the bacon. You can enhance the flavor by adding smoked paprika. This gives a nice depth without any meat. Another option is to use coconut aminos instead of maple syrup for a different taste. This keeps it sweet while making it soy-free. You can also add a splash of apple cider vinegar for extra tang. These tweaks make it easy to enjoy this dish while sticking to a vegan diet. To keep your maple glazed Brussels sprouts fresh, place them in an airtight container. Make sure the container seals well to lock in moisture. Store them in the fridge for up to three days. If you notice any signs of spoilage, it's best to toss them. When reheating, use the oven for the best results. Preheat your oven to 350°F (175°C). Spread the leftovers on a baking sheet. Heat for about 10-15 minutes or until warm. This method helps keep them crispy. You can also use a microwave, but they may lose some crunch. If you want to store them longer, freezing is a good option. First, cool the Brussels sprouts completely. Then, place them in a freezer-safe bag. Remove as much air as possible before sealing. They can last up to three months in the freezer. When you’re ready to eat, thaw in the fridge overnight, then reheat as mentioned above. For the best taste, enjoy them fresh! For the full recipe, check out the Maple Glazed Brussels Sprouts section. Yes, you can prepare Maple Glazed Brussels Sprouts ahead of time. I suggest roasting them first. After cooking, let them cool and store them in the fridge. You can keep them for up to three days. When ready to serve, reheat them in the oven. This helps to regain some crispiness. Maple Glazed Brussels Sprouts pair well with many dishes. You can serve them with roasted chicken or grilled salmon. They also go great with quinoa or rice. For a cozy meal, serve them with mashed potatoes. Feel free to add your favorite protein or grain. If you want to make Maple Glazed Brussels Sprouts without maple syrup, try honey or agave nectar. You can also use brown sugar mixed with a little water. This will give you a similar sweet flavor. Adjust the amounts to taste, and enjoy the dish without maple syrup. For the complete recipe, check out the Full Recipe section above. Maple glazed Brussels sprouts make a delicious dish. We covered key ingredients and tools. The step-by-step guide shows how to prepare and roast them right. Tips help you choose fresh sprouts and enhance flavor. You can also explore tasty variations and learn how to store leftovers. In closing, this dish is simple yet satisfying. Enjoy this recipe for a new twist on sprouts. Your taste buds will thank you!

Maple Glazed Brussels Sprouts Irresistible Side Dish

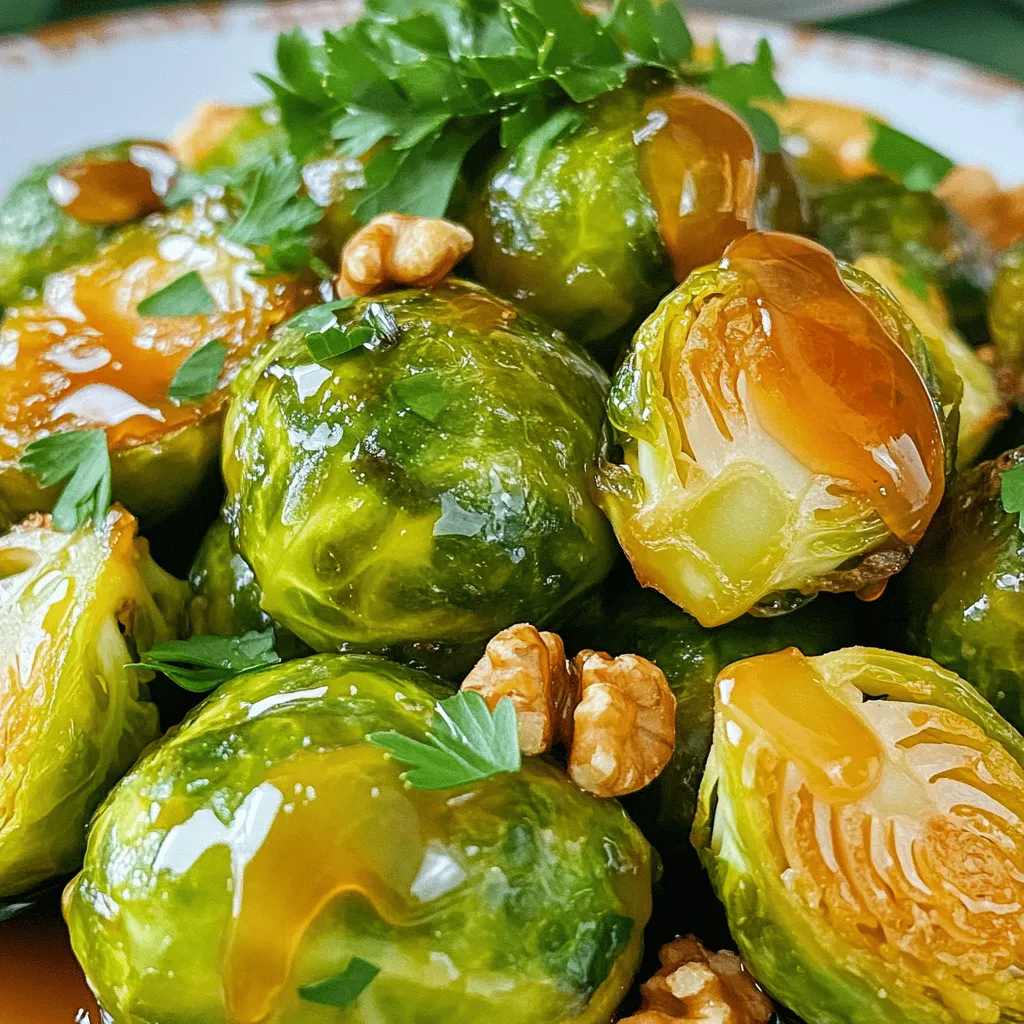
If you’re looking for the perfect side dish that balances sweet and savory, you’ve found it! Maple Glazed Brussels Sprouts

To make zesty shrimp and grits, gather these ingredients: - 1 cup grits (stone ground for best texture) - 4 cups water or chicken broth - 1 lb. medium shrimp, peeled and deveined - 1/2 cup yellow bell pepper, diced - 1/2 cup red bell pepper, diced - 1/4 cup green onion, sliced (reserve some for garnish) - 3 cloves garlic, minced - 1 teaspoon smoked paprika - 1/2 teaspoon cayenne pepper (adjust for spice preference) - 1/2 teaspoon black pepper - 1 tablespoon olive oil - 2 tablespoons butter - 1 tablespoon lemon juice - Salt to taste - 1/4 cup shredded cheddar cheese (optional) You can add a few tasty extras to enhance your dish: - Fresh herbs like parsley or cilantro for a bright finish - A dash of hot sauce for extra heat - Cream or half-and-half for creamier grits - Cooked bacon or sausage for added flavor If you can’t find some ingredients, here are some swaps: - Use instant grits instead of stone-ground grits, but adjust cooking time. - If you have frozen shrimp, you can use those too; just thaw them first. - Swap yellow and red bell peppers with any color bell pepper you like. - For a dairy-free option, replace butter with vegan butter or olive oil. By using these ingredients, you can create a dish that bursts with flavor and comfort. Remember, you can find the full recipe in the earlier section. To start, grab a medium pot. Pour in 4 cups of water or chicken broth. Bring it to a boil. Add a pinch of salt for taste. Gradually stir in 1 cup of grits. Lower the heat and let it simmer. Cook the grits for about 15-20 minutes. Stir occasionally to keep it creamy. If you like cheese, mix in 1/4 cup of shredded cheddar. This adds a nice richness. While the grits are cooking, take a large skillet. Heat 1 tablespoon of olive oil and 1 tablespoon of butter over medium-high heat. Add 3 cloves of minced garlic. Sauté it for about 30 seconds until it smells great. Next, toss in 1/2 cup each of diced yellow and red bell peppers. Cook these for about 3-4 minutes until they soften. Now, add 1 pound of peeled and deveined shrimp to the skillet. Sprinkle in 1 teaspoon of smoked paprika, 1/2 teaspoon of cayenne pepper, and 1/2 teaspoon of black pepper. Cook for 3-5 minutes. The shrimp will turn pink and opaque. Remove the skillet from heat. Stir in 1 tablespoon of butter and 1 tablespoon of lemon juice for flavor. To serve, scoop a generous portion of creamy grits onto a plate. Top it with the zesty shrimp mixture. For a fresh touch, garnish with sliced green onions. You can also add extra lemon wedges on the side for a bit more zing. For a rustic feel, serve in shallow bowls. Drizzle a little more lemon juice on top for brightness. You can also sprinkle some smoked paprika for color. Enjoy this flavorful comfort dish! You can find the full recipe above. To make your zesty shrimp and grits shine, focus on fresh ingredients. Use bright, ripe bell peppers for sweetness. Fresh garlic adds a punch. Smoked paprika gives a lovely depth. You can adjust cayenne pepper for your spice level. A splash of lemon juice brightens the dish. If you want, add a hint of Worcestershire sauce for a savory twist. One common mistake is overcooking the shrimp. Cook them just until they are pink and opaque. Do not rush the grits; let them cook low and slow. This builds creaminess. Also, avoid skipping the butter at the end. It adds richness that makes the dish special. Lastly, don't forget to taste and adjust salt. It can make a big difference. Pair your zesty shrimp and grits with a crisp salad for balance. A light green salad with a vinaigrette is great. You can also serve it with a side of roasted vegetables. For drinks, a chilled white wine works well. If you prefer non-alcoholic, try sparkling lemon water with fresh mint. Want to explore more? Check out the full recipe for ideas on garnishes and serving styles. {{image_2}} For those who love heat, spice it up! You can add more cayenne pepper or even diced jalapeños. Use hot sauce for a kick. Try mixing in diced serrano peppers for a fresh taste. You can also swap the smoked paprika for chipotle powder. This adds smoke and heat. Adjust the spice to your taste! To make the dish even creamier, add more cheese. Cream cheese or goat cheese works well. You can also stir in a bit of heavy cream. This gives the grits a rich texture. If you want a lighter option, use sour cream or Greek yogurt. They add creaminess without too many calories. You can easily make this dish vegetarian. Replace shrimp with sautéed mushrooms or zucchini. You can also use lentils for protein. To keep it zesty, add more lemon juice and spices. Use vegetable broth instead of chicken broth for the grits. This keeps the flavor bright and fresh. Feel free to explore these variations! They can make your meal unique and exciting. Check the Full Recipe for more details and enjoy! You can keep Zesty Shrimp and Grits in the fridge for up to three days. Store the shrimp and grits in separate airtight containers. This helps maintain their texture. Let the dish cool down before placing it in the fridge. If you want to save time on busy days, prepare a batch ahead of time. You can freeze the shrimp mixture for up to three months. However, I recommend not freezing the grits, as they can become grainy. To freeze, place the shrimp mixture in a freezer-safe container. Make sure to label the container with the date. When you're ready to eat, simply thaw in the fridge overnight. To reheat, warm the grits in a pot over low heat. Stir in a splash of water or broth to restore creaminess. For the shrimp, heat in a skillet over medium heat. Stir gently to avoid overcooking. You can add a little butter or olive oil for extra flavor. Enjoy your meal just as delicious as when you made it! It takes about 30 minutes to make Zesty Shrimp and Grits. You will spend 15 minutes prepping and 15 minutes cooking. This time includes cooking the creamy grits and the zesty shrimp. It is fast, tasty, and perfect for any meal. Yes, you can make parts of this dish ahead. Cook the grits and shrimp separately. Store each in the fridge for up to two days. When you’re ready to eat, just reheat them together. This makes it easy for busy days. Zesty Shrimp and Grits pairs well with many sides. Consider serving it with: - A fresh green salad - Sautéed greens like spinach or kale - Crusty bread or garlic bread - Lemon wedges for added brightness These sides add flavor and balance to your meal. Explore these options to find your favorite combination. For the full recipe, check out the recipe section above. In this blog post, we explored delicious Zesty Shrimp and Grits. We went over the key ingredients and helpful substitutions. You learned step-by-step cooking instructions and serving tips. We also shared ways to enhance flavors and avoid common mistakes. You can enjoy creative variations and proper storage methods too. Try making this dish to impress friends and family. With practice, you will perfect it. Enjoy!

Zesty Shrimp and Grits Flavorful Comfort Recipe

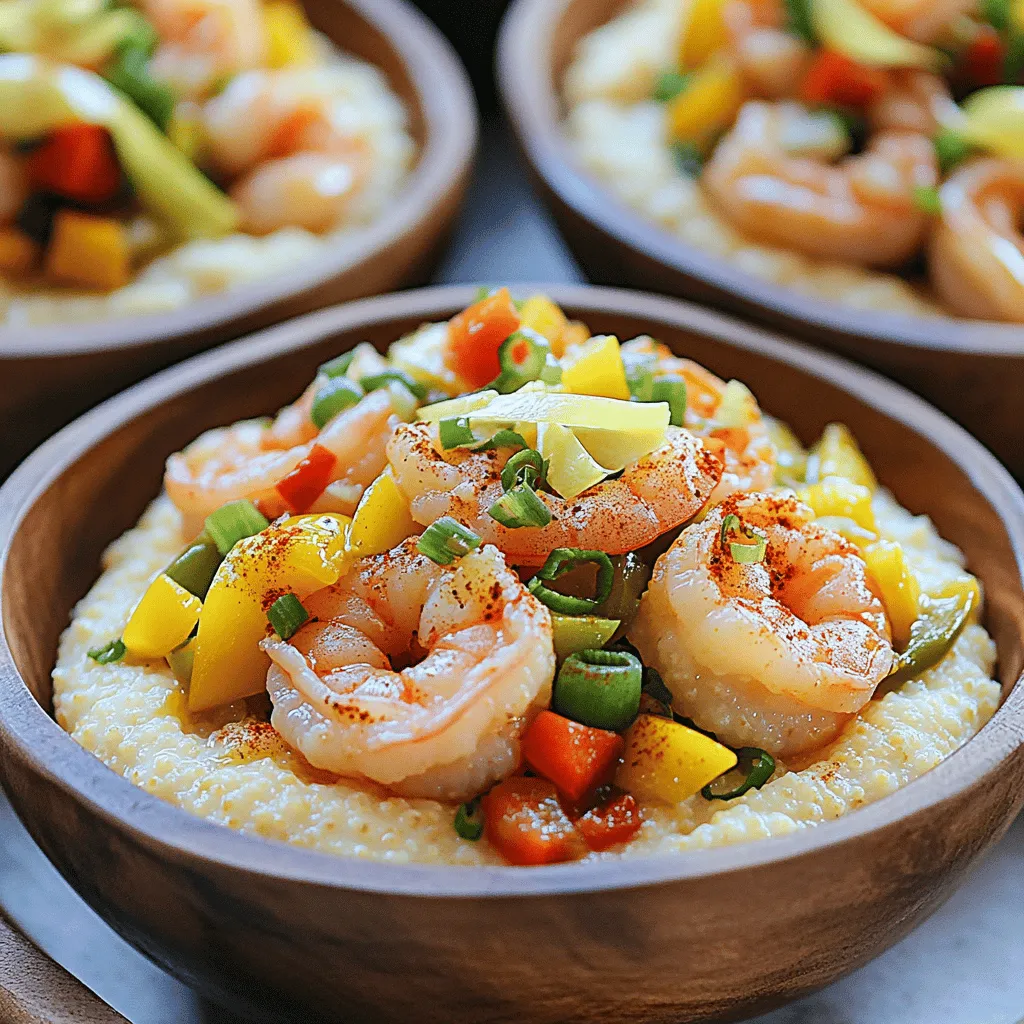
Are you ready to dive into a dish that perfectly blends comfort and flavor? My Zesty Shrimp and Grits recipe

- 1 block firm tofu, pressed and cubed - 1 cup cooked quinoa - 1 cup kale, chopped - 1 cup cherry tomatoes, halved - 1 avocado, sliced - 1/2 cucumber, thinly sliced - 1/4 cup shredded carrots For this Buddha bowl, firm tofu is key. It holds its shape and gets crispy. Quinoa serves as a great base. It adds protein and fiber. Fresh vegetables bring color and crunch. You can mix and match veggies based on what you like. - 1/4 cup tahini - 2 tablespoons lemon juice - 1 tablespoon maple syrup This dressing is creamy and tangy. Tahini adds richness, while lemon juice gives it a bright taste. A touch of maple syrup balances the flavors. You can adjust the lemon juice for more zing. - Salt and pepper to taste - Sesame seeds for garnish Salt and pepper enhance all the flavors. Sesame seeds add a nice crunch. They also look pretty on top of your bowl. These simple seasonings make a big difference. You can find the full recipe for this tasty dish below. First, you need to press the tofu. This removes extra moisture. Use a clean towel or paper towel. Place a heavy object on top for about 15 minutes. After pressing, cut the tofu into bite-sized cubes. Now, coat the tofu with cornstarch. Put the cubed tofu in a bowl. Sprinkle the cornstarch over it. Toss gently until all the pieces are coated. This helps to make the tofu crispy when cooked. Next, heat the oil in a skillet. Use medium heat for the oil. Once hot, add the tofu cubes to the pan. Cook them for about 5 to 7 minutes. Turn them occasionally. You want them to be golden brown on all sides. This step is key for that perfect crispy texture. Now, it's time to assemble your Buddha bowl. Start by adding a base of cooked quinoa in each bowl. Then, layer the sautéed kale, crispy tofu, cherry tomatoes, avocado slices, cucumber, and shredded carrots on top. Finally, drizzle the tahini dressing over the whole bowl. Sprinkle sesame seeds for a nice finish. Enjoy this delicious and healthy meal! You can find the Full Recipe to help guide you through every step. To make your tofu crispy, start by pressing it. This gets rid of extra water. More water means less crispiness. After pressing, cut the tofu into bite-sized cubes. Next, coat the cubes with cornstarch. This makes a crunchy outer layer when cooked. You can choose to cook your tofu on the stovetop or bake it. Stovetop cooking gives you quick results. Fry the tofu in a hot skillet with oil until golden. If you bake it, spread the cubes on a tray and roast them. This method uses less oil. You can also cook in batches. It helps each piece cook evenly and stay crispy. Spices can really enhance your tofu's taste. Try adding garlic powder, paprika, or cayenne for a kick. You can also season the tofu with salt and pepper. For the dressing, whisk in some dried herbs or a splash of hot sauce. This makes your tahini dressing more flavorful. For the full recipe, check out the Crispy Tofu Buddha Bowl details. {{image_2}} You can switch up the protein in your Buddha bowl. Instead of tofu, try chickpeas or tempeh. Both options add flavor and texture. If you want a heartier dish, shredded jackfruit works well too. For vegetables, you can mix and match. Use spinach, bell peppers, or roasted sweet potatoes. Get creative with your choices! Each vegetable adds unique taste and nutrition to your bowl. If you want something different, try making peanut sauce. Mix peanut butter, soy sauce, and a bit of lime juice. This sauce adds a rich, nutty flavor. Another option is a vegan yogurt dressing. Use plain vegan yogurt, garlic, and dill for a fresh taste. Both dressings pair well with the crispy tofu. Quinoa is great, but you can also use brown rice or farro. Both grains provide fiber and keep you full. Brown rice has a nutty taste, while farro offers a chewy texture. For gluten-free options, try millet or cauliflower rice. Both are healthy, light choices. They work well as a base for your Buddha bowl. Explore these variations to make your Crispy Tofu Buddha Bowl truly your own! For the full recipe, check out the detailed instructions above. Store leftovers in an airtight container. This keeps the tofu and veggies fresh. You can refrigerate them for up to three days. Make sure the bowl is sealed well to lock in moisture and flavor. You can freeze the tofu and veggies if you want to keep them longer. Cut the tofu into cubes before freezing. For vegetables, blanch them first to maintain their color and taste. When you're ready to eat, thaw the tofu and veggies overnight in the fridge. To keep the tofu crispy, reheat it in a skillet. This method helps it stay crunchy. You can also use an air fryer for extra crispiness. Avoid microwaving, as it can make the tofu soggy. Heat until warm, and enjoy your delicious Buddha bowl! For the [Full Recipe], check the complete instructions. Yes, this dish is already vegan! All the ingredients are plant-based. The main component is firm tofu, which is rich in protein. You also have fresh veggies like kale, cherry tomatoes, and avocado. The dressing uses tahini, lemon juice, and maple syrup, all vegan-friendly. If you want to add more flavor, try using herbs or spices that fit a vegan diet. To get crispy tofu, start by pressing it well. Remove as much water as you can. Cut the tofu into cubes, then toss it with cornstarch. This step is key! Heat oil in a skillet over medium heat. Add the coated tofu cubes and cook them for about 5-7 minutes. Turn them often to get an even golden color. This method locks in the crunch while keeping the inside soft. If you don’t have quinoa, there are great substitutes! Brown rice is a popular choice. It has a nutty flavor and good texture. Farro is another option; it adds a chewy bite. If you need something gluten-free, try using millet or even cauliflower rice for a lighter base. Each option still makes a tasty Buddha bowl. This blog post covered how to create a tasty Buddha bowl. You learned about key ingredients like firm tofu, quinoa, and fresh vegetables. I shared step-by-step instructions for preparing, cooking, and assembling your bowl. You also got tips for achieving extra crispy tofu and making tasty variations. Remember, storing leftovers is crucial for quality. Experiment with different ingredients and dressings to suit your taste. Now, it’s time to enjoy your creation and share your delicious meals with others!

Crispy Tofu Buddha Bowl Flavorful and Healthy Recipe

Looking to spice up your meals with something healthy and delicious? My Crispy Tofu Buddha Bowl is just what you

For a tasty Honey Garlic Chicken Stir-Fry, you will need: - 1 lb (450g) boneless chicken thighs, sliced into strips - 2 tablespoons corn starch - 2 tablespoons vegetable oil - 1 red bell pepper, sliced - 1 green bell pepper, sliced - 1 cup snap peas, trimmed - 3 cloves garlic, minced - 1/4 cup honey - 3 tablespoons soy sauce (low sodium preferred) - 1 tablespoon rice vinegar - 1 teaspoon fresh ginger, grated - Salt and pepper to taste - Sesame seeds (for garnish) - Chopped green onions (for garnish) Using the right measurements makes a big difference. For example: - Chicken thighs add flavor and tenderness. - Corn starch helps the chicken get crispy. - A mix of red and green peppers gives color and crunch. Honey is the star here, bringing sweetness to the dish. Be sure to measure accurately for the best taste. You can customize this dish easily. If you can’t find chicken thighs, use chicken breasts. They work well too but may be less juicy. For the vegetables, feel free to swap snap peas for broccoli or carrots. If you want a different flavor, try maple syrup instead of honey. You can also use tamari for a gluten-free option. This recipe is versatile, so get creative with what you have on hand! Check out the Full Recipe for more details. First, gather all your ingredients to make cooking easier. You need: - 1 lb (450g) boneless chicken thighs, sliced into strips - 2 tablespoons corn starch - 2 tablespoons vegetable oil - 1 red bell pepper, sliced - 1 green bell pepper, sliced - 1 cup snap peas, trimmed - 3 cloves garlic, minced - 1/4 cup honey - 3 tablespoons soy sauce - 1 tablespoon rice vinegar - 1 teaspoon fresh ginger, grated - Salt and pepper to taste - Sesame seeds (for garnish) - Chopped green onions (for garnish) Start by tossing the sliced chicken with corn starch in a bowl. This helps it get crispy when cooked. Heat 1 tablespoon of vegetable oil in a large pan or wok over medium-high heat. Once hot, add the coated chicken. Season it with salt and pepper. Cook for about 5-7 minutes. You want the chicken to be golden brown and cooked through. After that, take the chicken out of the pan and set it aside. In the same pan, add the rest of the vegetable oil. Sauté the minced garlic and grated ginger for about 30 seconds. You want it to smell great. Then, toss in the sliced red and green bell peppers, along with the snap peas. Stir-fry for about 3-4 minutes. The veggies should be tender yet still crisp. Next, mix honey, soy sauce, and rice vinegar in a small bowl. Pour this sauce over the chicken and veggies in the pan. Stir to combine everything. Cook for an extra 2-3 minutes until the sauce thickens. Taste it and adjust the seasoning if needed. Finally, garnish with sesame seeds and chopped green onions. Now you can enjoy a quick and tasty meal! For the complete recipe, check the Full Recipe. To make a great sauce, mix honey, soy sauce, and rice vinegar. This mix adds sweet and salty flavors. Taste your sauce before adding it to the pan. You want it to balance well with the chicken and veggies. If it’s too sweet, add a bit more soy sauce. If it’s too salty, add a little more honey. For crispy chicken, coat it in corn starch first. This helps create a crunchy outer layer. Cook the chicken in a hot pan with enough oil. Don’t crowd the pan, or the chicken will steam instead of fry. Cook in batches if needed. Let the chicken rest for a minute after cooking. This keeps it juicy inside. One mistake is not preheating your pan. Always heat your pan before adding oil. This helps sear the chicken quickly. Another mistake is overcooking the vegetables. Stir-fry them just until they are bright and slightly tender. Lastly, don’t skip the garnishes. Sesame seeds and green onions add flavor and make your dish look great. For the full recipe, check out the detailed instructions above. {{image_2}} You can easily add more veggies to this dish. Broccoli, carrots, and zucchini work great. They add color and crunch. Just cut them into small pieces for quick cooking. Add them after the garlic and ginger. Stir-fry for a few minutes. This way, they stay crisp and bright. If you like heat, add red pepper flakes or sriracha. Start with a small amount and taste as you go. You can also use sliced jalapeños for a fresh kick. Mix them in with the garlic and ginger. This will give your stir-fry a nice spicy flavor. You can switch the chicken for other proteins like shrimp or tofu. Shrimp cooks quickly and adds a nice taste. Tofu soaks up the sauce well. For tofu, press it first to remove extra water. Then, cut it into cubes and cook until golden. This way, you have a tasty meal that fits your diet. Don’t forget, you can find the full recipe above to get started! After enjoying your honey garlic chicken stir-fry, store leftovers in an airtight container. Let the dish cool to room temperature first. This keeps it fresh and tasty. Place the container in the fridge. It will stay good for about three to four days. To reheat, use a pan over medium heat. Add a splash of water or oil to keep it moist. Stir it often until heated through. You can also use a microwave. Place the stir-fry in a microwave-safe dish. Cover it loosely and heat for one to two minutes. Stir halfway through to ensure even heating. For long-term storage, you can freeze the stir-fry. Place cooled portions in freezer-safe bags or containers. Remove as much air as possible to prevent freezer burn. Label each bag with the date. It can last up to three months in the freezer. When ready to eat, thaw it in the fridge overnight before reheating. Enjoy your meal later with ease! For the full recipe, check out the details above. To make honey garlic chicken stir-fry low-carb, skip the corn starch. Use chicken thighs, which are low in carbs. Instead of rice, serve it over cauliflower rice. You can add more veggies like zucchini or broccoli to fill your plate. These changes keep the dish tasty and healthy. You can try different sauces for flavor. Teriyaki sauce works well. It adds a sweet and savory taste. You can also use hoisin sauce for a thicker texture. For a spicy kick, mix in some chili sauce or sriracha. Each option changes the dish, making it fun to explore! Yes, you can prepare honey garlic chicken stir-fry in advance. Cook the chicken and veggies, then let them cool. Store them in an airtight container in the fridge for up to three days. When ready to eat, reheat in a pan. Add fresh sauce if desired. This method saves time on busy nights. For the full recipe, check out the detailed instructions above. This blog post shared key steps to make a delicious chicken dish. I covered the ingredients, providing options for substitutions and measurements. You learned how to prepare and cook the chicken and vegetables effectively. Tips helped you avoid common mistakes and achieve that perfect sauce. I also detailed storage and reheating tips to enjoy leftovers later. Experiment with variations to suit your taste. Remember, cooking is fun and allows you to create dishes that reflect your style. Enjoy every bite!

Honey Garlic Chicken Stir-Fry Flavorful Quick Meal

If you’re craving a dish that bursts with flavor and comes together fast, you’re in for a treat! My Honey

- 2 cans (16 oz each) refrigerated biscuit dough - 3 medium apples, peeled and diced (preferably Granny Smith) - 1 cup caramel sauce (store-bought or homemade) - 1 cup brown sugar, packed - 1 teaspoon cinnamon - 1/2 cup unsalted butter, melted - 1 cup chopped pecans (optional) - 1/2 teaspoon vanilla extract You can swap apples for your favorite type. Honeycrisp or Fuji work well too. For the caramel sauce, you can use store-bought or make your own. If you prefer a vegan option, use coconut oil or a plant-based butter. You need a bundt pan for baking. Mixing bowls help combine your ingredients. Use cooking spray or butter to grease your bundt pan. This step helps your monkey bread come out easily. Remember, the right tools make cooking more fun! Enjoy making your caramel apple monkey bread! 1. Preheat your oven to 350°F (175°C). Grease your bundt pan with cooking spray or butter. This helps prevent sticking and makes serving easier. 2. In a large bowl, mix the diced apples, brown sugar, and cinnamon. Toss well until the apples are coated evenly. This mix adds a sweet and spicy flavor to the bread. 1. On a clean surface, open the cans of biscuit dough. Separate each biscuit and cut them into quarters. This gives you small pieces that are easy to handle. 2. Roll each quartered biscuit into a ball. Dip the balls into the melted butter to coat them. This step makes your monkey bread rich and delicious. 3. After buttering, roll the biscuit balls in the cinnamon-sugar mixture. Make sure they are fully covered. This adds sweetness and a nice crunch to the outer layer. 1. In the prepared bundt pan, layer the dough balls and apple mixture. Start with a layer of biscuit balls, then sprinkle some apple mix on top. Repeat this until you use all the ingredients. 2. Drizzle the caramel sauce over the top of the layers. If you like, sprinkle chopped pecans for a crunchy touch. 3. Bake in the preheated oven for about 30-35 minutes. Check for doneness by inserting a toothpick in the center. It should come out clean. 4. Let the monkey bread cool in the pan for 10 minutes. Then, invert it onto a serving platter. Drizzle more caramel sauce over the top for extra sweetness. For the full recipe, refer to the specific section above. Enjoy making this fun and tasty treat! To make homemade caramel sauce, start with simple ingredients. You need sugar, butter, and cream. Heat the sugar in a pan until it melts and turns golden. Stir constantly to avoid burning. Once melted, add butter and cream slowly. This creates a smooth and rich sauce. To avoid burning, use medium heat. If the sugar starts to smoke, remove it from the heat. Keep stirring until the color is right. If it burns, you must start over. Take your time; good caramel takes patience. For that perfect golden brown finish, preheat your oven to 350°F. Bake the monkey bread for 30-35 minutes. Keep an eye on it during the last few minutes. When it’s golden and a toothpick comes out clean, it’s done. Using a bundt pan helps create even baking. The shape allows heat to circulate well. If you want a crispier exterior, try a metal pan. For softer bread, use a glass pan. Both give great results, so choose what you like. To present Caramel Apple Monkey Bread, serve it warm. Place it on a large platter. Pull apart pieces for sharing. Drizzle extra caramel over the top for a sweet touch. Pair it with a scoop of vanilla ice cream or a dollop of whipped cream. The cold cream mixes well with the warm bread. It adds a nice texture and flavor contrast. Enjoy every bite! {{image_2}} You can easily make this dish your own with different flavors. Try adding spices like nutmeg or allspice for an extra kick. These spices blend well with apples and caramel. You can also mix in nuts or chocolate chips. Pecans work great, but walnuts or almonds are tasty too. Chocolate chips add a sweet touch that kids love. If you need gluten-free options, look for gluten-free biscuit dough. Many brands offer great alternatives that work perfectly here. For those who want to cut sugar, you can find low-sugar or sugar-free biscuit dough. You can also reduce the brown sugar in the recipe. This way, you can enjoy this treat without too much sweetness. This recipe is fun to adapt for holidays. In fall, add pumpkin spice for a cozy touch. For winter, think about adding cranberries for a pop of color and flavor. You can switch the apples with other fruits too. Pears add a soft, sweet flavor, while peaches bring a juicy twist. Each fruit gives this dish a new vibe and keeps it exciting. To keep your Caramel Apple Monkey Bread fresh, store leftovers in the fridge. Place it in an airtight container or wrap it tightly with plastic wrap. This helps keep moisture in and prevents it from drying out. If you want to keep it longer, freezing is a great option. Wrap the monkey bread in plastic wrap, then in aluminum foil. This prevents freezer burn and keeps the flavor intact. When it’s time to enjoy your leftovers, reheating is key. The best method is to use the oven. Preheat your oven to 350°F (175°C). Place the bread on a baking sheet and cover it with foil. Heat for about 10-15 minutes. This keeps the texture soft and warm. You can use the microwave if you're in a rush. Heat it for about 30 seconds, but this may make it a bit soggy. Caramel Apple Monkey Bread lasts about 3 to 5 days in the fridge. If frozen, it can last up to 3 months. Look for signs of spoilage, like a sour smell or mold. If it looks or smells off, it’s best to throw it away. Enjoy your treat while it's fresh for the best taste! Yes, you can prepare this dish in advance. You can mix the apples and sugar the day before. Store this mixture in the fridge. You can also cut the biscuit dough and roll it into balls ahead of time. Just keep them in an airtight container. When you are ready to bake, layer the dough and apple mixture in the bundt pan. Bake as directed. If you want to reheat it, warm it in the oven at 350°F for about 10 minutes. If your monkey bread turns out soggy, don’t worry! This can happen if there is too much caramel or if you did not bake it long enough. Make sure you use the right amount of caramel sauce. If you suspect it’s too wet, cut down on the sauce next time. To fix it, you can bake it longer. Check it every few minutes until it turns golden brown and a toothpick comes out clean. Yes, you can double the recipe. If you do, use a larger bundt pan to hold all the dough. You may need to bake it longer, about 40-45 minutes. Always check for doneness by inserting a toothpick in the center. If it comes out clean, your monkey bread is ready! For the complete Caramel Apple Monkey Bread recipe, check out the [Full Recipe](#). Caramel Apple Monkey Bread is a fun and tasty treat. We dove into the key ingredients, tools, and detailed steps to make this delightful dish. I shared tips to enhance your baking, and variations to keep things fresh. Remember, you can swap ingredients for dietary needs or seasonal flavors. Store your leftovers well and enjoy them later. Whether you serve it warm with ice cream or at holiday gatherings, this recipe is sure to please. Now, it’s time to get baking and make some delicious memories!

Caramel Apple Monkey Bread Irresistible and Easy Treat

Are you craving a sweet and sticky treat that’s as fun to make as it is to eat? Look no

For a tasty cauliflower rice stir-fry, gather these main ingredients: - 1 medium head of cauliflower, grated to make rice - 1 cup broccoli florets - 1 bell pepper, diced (either red or yellow for color) - 1 small carrot, julienned - 1 cup snap peas, trimmed - 2 cloves garlic, minced - 1 tablespoon ginger, minced These ingredients create a colorful and healthy base for your dish. Seasonings add depth and flavor. Use these: - 3 tablespoons soy sauce (or tamari for gluten-free) - 1 tablespoon sesame oil - 1 tablespoon olive oil - Salt and pepper to taste These choices will enhance the taste of your stir-fry. Garnishes make your dish look great. Try these: - 2 green onions, chopped - Sesame seeds for garnish These will add a nice crunch and a pop of color to your meal. For the complete recipe, check out the [Full Recipe]. To start, grab a medium head of cauliflower. Remove the leaves and stem. Cut the cauliflower into quarters. Use a grater or a food processor to turn it into rice-sized pieces. This is your base for the stir-fry. Set it aside while you prepare the other ingredients. Next, heat a large skillet or wok over medium-high heat. Add one tablespoon of olive oil. Once the oil is hot, toss in two cloves of minced garlic and one tablespoon of minced ginger. Cook them for about 30 seconds. You want them to be fragrant but not burnt. Now, add your veggies: one diced bell pepper, one small julienned carrot, one cup of broccoli florets, and one cup of trimmed snap peas. Stir-fry these for about 3 to 5 minutes. You want them tender but still crisp. It’s time to add the cauliflower rice to the skillet. Mix it thoroughly with the vegetables. Cook for an additional 4 to 5 minutes, stirring often. Then, drizzle in three tablespoons of soy sauce and one tablespoon of sesame oil. Toss everything to combine and cook for another 1 to 2 minutes. Before serving, taste your stir-fry. Add salt and pepper to your liking. Finally, mix in two chopped green onions. Transfer your stir-fry to a serving dish. A sprinkle of sesame seeds on top adds a nice touch. For the full recipe, check the earlier section. To make a great stir-fry, keep the heat high. This helps the veggies stay crisp. Cut all your ingredients small and even. This way, they cook at the same time. Start with garlic and ginger for flavor. Add them to the hot oil first. Then, add the veggies in stages. Put in the firmer ones like carrots and broccoli first. Add softer ones like bell peppers and snap peas later. This will keep everything tender but not mushy. You need a large skillet or a wok. A good wok heats fast and evenly. A sturdy spatula is key for tossing. If you have a grater or food processor, use it for the cauliflower. This makes the rice fast and easy. A sharp knife helps with cutting your veggies. Some folks like to use a lid to steam the veggies lightly. This can help keep them vibrant and fresh. Try adding spices to boost taste. A dash of red pepper flakes gives heat. You can add a splash of rice vinegar for tang. Want more umami? A bit of miso paste works wonders. Fresh herbs like cilantro or basil can brighten your dish. Lastly, don’t forget the sesame seeds! They add crunch and flavor. For a full recipe, check out the complete steps to make your stir-fry shine! {{image_2}} You can easily add protein to your stir-fry. Chicken works well here. Just cut it into small pieces and cook it before the vegetables. Tofu is another great choice. Use firm tofu, press it, and cut it into cubes. Cook the tofu until golden brown for added texture. Mix your chosen protein into the stir-fry during the last few minutes of cooking. This stir-fry is perfect for vegetarians and vegans. You can keep it plant-based by skipping any meat. Add chickpeas or edamame for extra protein. These options give you a good protein boost while keeping the dish vibrant and tasty. You can also include more veggies, like zucchini or spinach, to make it even heartier. Feel free to switch ingredients based on your taste. Instead of broccoli, try broccoli rabe or bok choy for a twist. Swap snap peas for green beans or asparagus if you like. You can also change the sauce. Use coconut aminos for a sweeter flavor or add a splash of lime juice for a zing. The choices are endless, so experiment and find your favorite mix! Check the Full Recipe for more ideas. Store leftover cauliflower rice stir-fry in an airtight container. Make sure it is cool before sealing. This helps keep the flavors fresh. Place it in the fridge if you plan to eat it within three days. To reheat, use a skillet over medium heat. Add a splash of water or oil to prevent sticking. Stir frequently for even heating. You can also use the microwave. Cover the dish and heat for 1-2 minutes. Stir halfway for best results. You can freeze cauliflower rice stir-fry for later. Pack it in a freezer-safe bag or container. Remove as much air as possible. It will last up to three months in the freezer. When you're ready to eat, thaw it overnight in the fridge before reheating. Check out the Full Recipe for more details. Cauliflower rice is made by grating cauliflower into small bits. It looks like rice but has fewer carbs. This makes it a great option for low-carb diets. It packs a lot of nutrients, too. You get vitamins C and K, plus fiber. Using cauliflower rice helps add more veggies to your meals. It cooks quickly and soaks up flavors well. Yes, you can prep cauliflower rice ahead of time. Grate the cauliflower and store it in an airtight container. Keep it in the fridge for up to four days. You can also freeze it for longer storage. Just make sure to spread it out on a baking sheet first. Once frozen, transfer it to a freezer bag. This way, you can use it whenever you want. Absolutely! This recipe is perfect for meal prep. You can cook a large batch and divide it into portions. Store the stir-fry in airtight containers in the fridge. It lasts up to four days. You can also freeze it for later. Just reheat it in a pan or microwave when you’re ready to eat. This makes a quick and healthy meal any day of the week. For the full recipe, check out the section above. Cauliflower rice stir-fry is easy and fun to make. We covered how to choose main ingredients, add flavors, and enjoy creative variations. Remember, cooking well means a great technique and the right tools. You can store leftovers or even freeze them for later. Experiment with proteins and veggies to suit your taste. This recipe can satisfy many dietary needs while being tasty. Embrace the world of cauliflower rice, and enjoy your cooking journey!

Cauliflower Rice Stir-Fry Flavorful and Quick Meal

Are you looking for a quick, tasty meal that won’t weigh you down? Cauliflower Rice Stir-Fry is your answer! This

To make cheesy spinach stuffed shells, gather these key ingredients: - 20 jumbo pasta shells - 2 cups ricotta cheese - 1 cup shredded mozzarella cheese - 1 cup grated Parmesan cheese - 2 cups fresh spinach, chopped - 1 egg - 2 cloves garlic, minced - 1 teaspoon Italian seasoning - Salt and pepper to taste - 2 cups marinara sauce - Fresh basil leaves for garnish (optional) These ingredients create a creamy and flavorful filling. The combination of cheeses brings richness, while fresh spinach adds a nice touch of color and nutrients. Feel free to customize your dish with these optional ingredients: - Additional seasonings like red pepper flakes for some heat - Veggie add-ins such as mushrooms, bell peppers, or zucchini for more texture - Protein options like cooked ground beef, chicken, or turkey for a heartier meal By mixing in these optional ingredients, you can tailor the dish to your taste. Each addition enhances the flavor and makes the stuffed shells even more delightful. If you want to try out this tasty dish, you can find the full recipe above. To start, I cook the jumbo pasta shells. Bring water to a boil in a large pot. Add the shells and cook until they are al dente. This usually takes about 10-12 minutes. Drain them carefully and set them aside on a clean towel to cool. Next, I sauté the spinach. I heat a bit of olive oil in a skillet over medium heat. I add minced garlic and chopped spinach. I stir it for about 3-4 minutes until the spinach wilts. Then, I take it off the heat and let it cool a bit. Now, I mix the filling. In a large bowl, I combine the ricotta cheese with half of the mozzarella and half of the Parmesan cheese. Then, I add the cooked spinach, an egg, Italian seasoning, salt, and pepper. I mix it all until it is well combined. This filling is rich and creamy, perfect for the shells. For assembly, I spread a thin layer of marinara sauce on the bottom of a 9x13 inch baking dish. I usually use about 1/2 cup of sauce. Then, I stuff each shell with the cheese and spinach mix. I place them seam-side up in the dish. Once all shells are stuffed, I pour the remaining marinara sauce over them. I finish by sprinkling the rest of the mozzarella and Parmesan cheese on top. For baking, I cover the dish with aluminum foil and bake it in a preheated oven at 375°F (190°C) for 25 minutes. After that, I remove the foil and bake for another 10 minutes. This step helps the cheese get bubbly and golden. Once done, I let it cool for a few minutes before serving. It looks and smells amazing! If you want, you can garnish it with fresh basil leaves for a touch of color. For the full recipe, check out the details above! - Cooking pasta shells al dente: Cook your pasta shells until they are slightly firm. This way, they won't fall apart when you stuff them. Follow the package directions for timing. Usually, it’s about 10-12 minutes. Rinse them with cold water after cooking. This stops the cooking process and helps keep them firm. - Ensuring even stuffing: Use a small spoon or a piping bag to fill each shell. This method helps you place the filling inside without making a mess. Stuff each shell generously, but don’t overfill. It’s okay if some filling spills out during baking. The melted cheese will cover it! - Dairy-free options: For a dairy-free version, swap the ricotta cheese with a plant-based alternative. You can use tofu blended with nutritional yeast for a creamy texture. Also, use dairy-free mozzarella for the topping. - Gluten-free pasta alternatives: If you need gluten-free pasta, look for jumbo shells made from rice or corn. They work well and taste great. Always check the package for cooking times, as they can differ from regular pasta. - Adding herbs and spices: Fresh or dried herbs can boost flavor. Try adding chopped parsley or basil to the filling. A pinch of red pepper flakes adds a nice kick. You can also mix in some lemon zest for a bright taste. - Serving suggestions: Serve your Cheesy Spinach Stuffed Shells with a simple salad. A light vinaigrette pairs well with the rich flavors. Garlic bread is also a great side. It helps soak up the extra marinara sauce. For the complete recipe, check the [Full Recipe]. {{image_2}} You can easily add meat to your cheesy spinach stuffed shells. Ground meat, like beef or pork, gives great flavor. Cook the meat in a skillet before mixing it into the cheese and spinach filling. This adds a hearty touch to the dish. Chicken or turkey also works well. You can shred cooked chicken or turkey and fold it into the cheese mix. This gives you a lighter option without losing taste. You can change up the veggies in this dish. Adding mushrooms or bell peppers adds texture and flavor. Chop them finely and sauté them with the spinach. This step helps soften the veggies and blend their flavors well. You can also use different greens. Kale or Swiss chard can replace spinach for a new taste. Just remember to chop them small and cook until wilted. This keeps the filling light and flavorful. Cheese is key to this recipe. You can explore different cheese types for unique flavors. Try using goat cheese for a tangy twist. Cream cheese can also add a rich texture to your filling. If you want a dairy-free option, vegan cheese alternatives work too. Look for brands that melt well. This way, you can enjoy the cheesy goodness without dairy. For the full recipe, please check the [Full Recipe]. To keep your cheesy spinach stuffed shells fresh, use an airtight container. This prevents moisture loss and keeps flavors intact. Glass or plastic containers work well. Make sure to let the dish cool down before sealing it. Store your leftovers in the fridge. They can last up to three days. You can also freeze your stuffed shells for later. First, let them cool completely. Then, place them in a single layer on a baking sheet. Freeze them for about one hour. This helps them hold their shape. After freezing, transfer the shells to a freezer-safe bag. Label the bag with the date. They can stay frozen for up to three months. When you're ready to eat, take them out of the freezer. Thaw them overnight in the fridge. To reheat, bake them in the oven at 375°F (190°C) for about 30 minutes. Cover them with foil to keep them moist. Enjoy your meal just like the first time! Can I use different pasta shapes? Yes, you can use other pasta shapes. Shells hold the filling well. You can try manicotti or even large rigatoni. Just ensure they are big enough to stuff. How do I make this recipe ahead of time? You can prepare the filling in advance. Store it in the fridge for up to two days. You can also assemble the dish ahead, cover it, and bake it when ready. Baking time may need adjustment. What to serve with Cheesy Spinach Stuffed Shells? These stuffed shells pair well with a fresh salad. A simple green salad with vinaigrette works great. Garlic bread or a side of steamed veggies also complements the dish nicely. Can I use homemade marinara sauce? Absolutely! Homemade marinara sauce adds a personal touch. Just ensure it has a good balance of flavors to enhance the shells. Caloric content and serving size Each serving of Cheesy Spinach Stuffed Shells has about 400 calories. This makes it a filling and satisfying meal without being too heavy. Health benefits of ingredients Spinach is rich in vitamins A and K. It also provides iron, which is great for your blood. The cheeses add protein and calcium, helping to build strong bones. This blog post covered everything you need for Cheesy Spinach Stuffed Shells. We started with the main ingredients and shared tips for making the best filling. The step-by-step guide helped you assemble and bake this delicious dish. Variations let you get creative, and storage advice keeps leftovers fresh. Now, you’re ready to enjoy a comforting meal. Remember, experimenting is part of cooking. Enjoy each bite and feel proud of your work!

Cheesy Spinach Stuffed Shells Delightful and Simple Dish

Welcome to a cheesy world of flavor with my Cheesy Spinach Stuffed Shells! This simple dish combines jumbo pasta shells,

To create a delicious Coconut Lime Shrimp, you need fresh ingredients that bring flavor. Here’s what you'll need: - 1 pound large shrimp, peeled and deveined - 1 can (13.5 oz) coconut milk - 1 lime, zested and juiced - 2 tablespoons fish sauce - 2 tablespoons honey - 2 cloves garlic, minced - 1 teaspoon fresh ginger, grated - 1 small red chili, finely chopped (optional, for heat) - 2 tablespoons fresh cilantro, chopped (for garnish) - Salt and pepper to taste - Cooked jasmine rice (for serving) Each ingredient plays a role in making this dish tasty. The shrimp brings a fresh ocean flavor. Coconut milk adds rich creaminess. Lime gives a bright, zesty kick. Fish sauce adds depth, while honey balances the flavors. Garlic and ginger create warmth. If you like heat, add the red chili. Fresh cilantro finishes the dish with a pop of color. Serve it over jasmine rice to soak up all that yummy sauce. For the full recipe, check out the detailed instructions! Whisking Ingredients Together To start, grab a medium bowl. Add the coconut milk, lime juice, lime zest, fish sauce, honey, minced garlic, grated ginger, and chopped red chili (if you like some heat). Use a whisk to mix everything well. This step builds a tasty marinade. Marinating the Shrimp Next, add the shrimp to the bowl. Make sure each shrimp gets covered in the marinade. Let it sit at room temperature for at least 15 minutes. If you have time, marinate for up to 1 hour in the refrigerator. This helps the shrimp soak up all that great flavor. Heating the Skillet Now, heat a large skillet over medium heat. Once it’s warm, pour in the marinated shrimp along with all the marinade. This adds even more taste to your dish. Cooking Time and Techniques Cook the shrimp for about 3-5 minutes. Stir occasionally to ensure even cooking. You want them to turn pink and opaque. Be careful not to overcook. Overcooked shrimp can become tough and chewy. Checking for Doneness To check if the shrimp are done, look for that nice pink color. They should also curl slightly. If they look good, remove them from heat. Seasoning Once cooked, season the shrimp with salt and pepper to your liking. This final touch enhances the flavors. Garnishing For a beautiful finish, sprinkle fresh cilantro on top. Serving the coconut lime shrimp over cooked jasmine rice makes it even better. You can drizzle some extra marinade over it for more flavor. For the complete steps, you can check the Full Recipe. - Marination Time Recommendations For the best flavor, marinate your shrimp for at least 15 minutes. If you have more time, marinate them for up to 1 hour in the fridge. This longer time allows the shrimp to soak up the coconut and lime flavors. - Avoiding Overcooking Shrimp Cook the shrimp just until they turn pink and opaque. This usually takes 3 to 5 minutes. If you cook them too long, they’ll get tough. Keep a close eye on them while they cook. - Serving in Bowls Serve your coconut lime shrimp in shallow bowls. This makes the dish look nice and allows the sauce to pool at the bottom. It’s a perfect way to show off the colors and textures. - Garnish Options Add a few lime wedges and fresh cilantro on top for color. You can also include extra chili slices if you like heat. This will make the dish even more appealing and tasty. - Refrigeration Tips Store any leftovers in an airtight container. Keep them in the fridge for up to 2 days. Make sure to let the shrimp cool down before sealing them in. - Reheating Methods To reheat, use a skillet over low heat. You can also use a microwave, but heat gently. This helps keep the shrimp tender and prevents overcooking. Enjoy your leftovers as a quick meal! {{image_2}} You can spice up your coconut lime shrimp easily. Here are some ideas: - Chili Flakes: Add a pinch for a burst of heat. - Sriracha Sauce: Drizzle some on during cooking for a kick. - Fresh Jalapeños: Slice and toss them in for a fresh, spicy taste. Adjust the heat to your liking. Start small, then add more if needed. This way, you keep the balance of flavors. If you want to switch things up, use other proteins. Here are some tasty options: - Chicken: Cut it into bite-sized pieces. Cook it just like the shrimp. - Scallops: These are a great choice for a fancy meal. Cook them for about 3-4 minutes. - Tofu: For a plant-based option, use firm tofu. Cube it and follow the same cooking steps. Each protein offers a unique flavor while keeping the dish fresh. For a vegetarian spin, you can replace shrimp with these substitutes: - Chickpeas: Drain and rinse a can. They add a nice texture. - Zucchini: Cut into half-moons and sauté. They soak up the flavors well. - Cauliflower: Cut into florets. Roast them for a tasty, hearty bite. These options keep the dish light and flavorful. You still get that yummy coconut lime taste. If you're curious about the full recipe, check the link above. - Calories per Serving: Each serving has about 300 calories. - Macro Nutrients: - Protein: 25 grams - Carbohydrates: 15 grams - Fats: 15 grams Knowing the calories helps you plan meals. This dish gives you a good balance of protein, healthy fats, and carbs. The key ingredients in Coconut Lime Shrimp offer several health benefits: - Shrimp: Low in calories and high in protein. Shrimp also contain omega-3 fatty acids, which are great for heart health. - Coconut Milk: Provides healthy fats and keeps you full. It also adds a creamy texture and rich flavor. - Lime: Packed with vitamin C, lime boosts your immune system. It also aids digestion and adds a refreshing taste. - Garlic: Known for its health benefits, garlic helps lower blood pressure and improve heart health. - Ginger: Great for digestion, ginger can also reduce inflammation. Together, these ingredients create a dish that is not only tasty but also healthy. This Coconut Lime Shrimp dish is gluten-free and dairy-free. - Gluten-Free: All the ingredients used are naturally gluten-free. This makes it safe for those with gluten sensitivities. - Dairy-Free: The recipe avoids dairy products entirely. Coconut milk serves as a creamy base without any lactose. Whether you're following a specific diet or just want a tasty meal, this dish fits the bill. You can enjoy it without worrying about gluten or dairy. For the full recipe, check the [Full Recipe]. Yes, you can prepare this dish in advance. You can marinate the shrimp up to one hour before cooking. This allows the shrimp to soak up all that tasty flavor. Just remember to store them in the fridge until you are ready to cook. Cooked shrimp can be stored in the fridge for a day or two. Reheat them gently to keep them tender. This dish pairs well with many sides. Here are a few great options: - Cooked jasmine rice - Quinoa salad - Steamed vegetables - Fresh green salad - Grilled corn These sides will complement the bright flavors of the shrimp. Yes, you can use other ingredients if you don't have coconut milk. Some good alternatives are: - Heavy cream - Almond milk - Soy milk These options may change the flavor a bit, but they will still be tasty. There are many ways to enhance the flavor of Coconut Lime Shrimp. Try adding: - More lime juice or zest - Fresh herbs like basil or mint - Spices like cumin or paprika - A dash of hot sauce These additions can give your dish a unique twist. You can find the full recipe [here](#). This link will take you to all the steps and ingredients you need to make Coconut Lime Shrimp. This blog post shared a simple yet delicious Coconut Lime Shrimp recipe. We covered essential ingredients, marination steps, and cooking techniques. I shared helpful tips to perfect your dish, along with presentation ideas and storage methods. You learned about variations, nutritional information, and common questions. Remember, the key is to enjoy the cooking process. With this recipe, you can impress anyone. Dive into your culinary adventure, and make this dish your own!

Coconut Lime Shrimp Tasty and Fresh Seafood Recipe

Looking for a quick and tasty seafood dish? This Coconut Lime Shrimp recipe is your answer! It packs bright flavors

Older posts
Newer posts
← Previous Page1 … Page93 Page94 Page95 … Page122 Next →

dsad

© 2025 Southern Dishes • Built with GeneratePress

Our Policies

  • Copyright Policy
  • Cookie Policy
  • GDPR Policy
  • Privacy Policy
  • Disclaimer
  • Terms Of Use

More Information

  • Home
  • About
  • Contact
  • Appetizers
  • Dessert
  • Dinner
  • Drinks
©2025, Southern Dishes About Back To Top