Skip to content
DisclaimerTerms Of UseGDPR PolicyCookie Policy

Southern Dishes

  • Home
  • Drinks
  • Appetizers
  • Dinner
  • Dessert
  • About
  • Contact
  • Privacy Policy
DisclaimerTerms Of UseGDPR PolicyCookie Policy

Isabella

- 1 ripe mango, peeled and diced - 2 ripe avocados, diced - 1 small red onion, finely chopped - 1 jalapeño, deseeded and minced - 1/4 cup fresh cilantro, chopped - Juice of 2 limes - Salt to taste - 1 tablespoon honey (optional for extra sweetness) When measuring ingredients, use a kitchen scale for accuracy. Fresh ingredients make a big difference. Choose ripe mangoes that are slightly soft. Avocados should yield gently when pressed. For onions, select firm ones without blemishes. Fresh cilantro should smell bright and earthy. Limes should feel heavy for their size, indicating juiciness. Fresh ingredients bring flavor and texture to the salsa. Ripe mangoes add a sweet burst. Creamy avocados provide a smooth base. The onion gives crunch and zing. Jalapeño adds heat, while lime brightens every bite. Using fresh herbs like cilantro enhances the taste. For the best salsa, always choose fresh. You can find the Full Recipe for more details on preparation. To make mango avocado salsa, start by gathering all your ingredients. You'll need a ripe mango, two ripe avocados, a small red onion, a jalapeño, fresh cilantro, lime juice, salt, and honey if you want extra sweetness. First, peel and dice the mango. Then, dice the avocados. Combine these fruits in a mixing bowl. Next, finely chop the red onion and mince the jalapeño. Add them to the bowl, followed by the chopped cilantro. Squeeze the juice of two limes over the mixture. If you like it sweeter, drizzle in some honey. Finally, season with salt and mix gently. Let it sit for 10-15 minutes to let the flavors blend. This recipe does not require cooking. It uses fresh ingredients to create a vibrant and tasty salsa. The key is in the chopping and mixing. Be careful not to mash the avocados. You want them to stay chunky for the best texture. Serve the salsa in a colorful bowl. Garnish it with whole cilantro leaves for a nice touch. This salsa pairs well with tortilla chips. You can also use it as a topping for grilled chicken or fish. Enjoy this fresh and flavorful dish! For the full recipe, check out the details above. To make the best mango avocado salsa, balance is key. You want sweet, spicy, and tangy flavors. The ripe mango adds sweetness, while the jalapeño gives heat. Lime juice brings brightness. Use fresh lime juice, not bottled, for the best taste. If you want more sweetness, add honey. This mix of flavors will make your salsa shine. When mixing, be gentle. You want to combine flavors without crushing the avocados. Start by adding the mango and avocado to a bowl. Then, add the red onion and jalapeño. Fold in the cilantro last. This keeps the herbs fresh, bright, and flavorful. Use a large spoon or spatula for mixing. To keep your avocados intact, follow some simple steps. First, use ripe but firm avocados. If they are too soft, they will mash easily. When you mix, stir gently. Don’t press down hard. Let the ingredients come together slowly. If needed, you can add lime juice right away. This helps to keep avocados from browning and makes mixing easier. For the complete method to prepare this delightful dish, check the Full Recipe. {{image_2}} You can spice up your mango avocado salsa easily. If you like heat, try adding more jalapeño or even a pinch of cayenne pepper. You can also use diced serrano peppers for a different flavor. Start small, taste, and add more until it’s just right for you. Feel free to change some ingredients in the salsa. Diced tomatoes give a fresh twist and add color. You can also include corn for a sweet crunch. Black beans can add protein, making the salsa more filling. Mix and match based on what you have at home. There are many ways to enjoy mango avocado salsa. Serve it with crunchy tortilla chips for a snack. You can also use it as a topping for grilled chicken or fish. For a light meal, add it to a taco or salad. The options are endless, so get creative with your serving ideas! For the full recipe, check out the details above. To keep your mango avocado salsa fresh, store it in an airtight container. Make sure to press plastic wrap directly onto the surface before sealing. This helps reduce air and keeps it from browning. Refrigerate your salsa right away to maintain its vibrant colors and flavors. Mango avocado salsa lasts about 1 to 2 days in the fridge. After that, the avocados can turn brown and mushy. For the best taste and texture, enjoy it within this time frame. I recommend checking for any off smells or changes in texture before eating. Always use clean utensils to avoid contamination. Freezing mango avocado salsa is not ideal, but you can do it. If you choose to freeze, use a freezer-safe container. Leave some space at the top for expansion. Note that the texture may change once thawed, so plan to use it in cooked dishes rather than fresh. For best results, freeze without the avocados. Add them fresh when you’re ready to serve. For the full recipe, check the details above. Yes, you can make this salsa ahead of time. However, I suggest you hold off on adding the avocados until right before serving. This keeps them from turning brown. You can mix the other ingredients and store them in the fridge. When you're ready to serve, just add the avocados for freshness. Mango avocado salsa is very versatile. It pairs well with grilled chicken or fish. You can also serve it with tortilla chips for a tasty snack. It makes a great topping for tacos or burritos too. I love it on a fresh salad, adding a burst of flavor. Yes, this salsa is packed with health benefits. Mango is full of vitamins A and C, which boost your immune system. Avocados provide healthy fats that are good for your heart. Cilantro is rich in antioxidants, while lime juice helps with digestion. Together, they make a nutritious and tasty dish. You can easily adjust the sweetness. If you want it sweeter, add more honey. Start with a small amount and taste as you go. If it’s too sweet, add a bit more lime juice to balance it out. The key is to find a flavor that you enjoy. If your avocados are not ripe, there are a few tricks. You can place them in a brown paper bag with an apple or banana. The gases from these fruits help avocados ripen faster. You can also leave them on the counter for a few days. Just check them daily to avoid overripening. In this article, we explored how to make Mango Avocado Salsa. We covered key ingredients, step-by-step instructions, and helpful tips. Remember to use fresh ingredients for the best taste. Mixing flavors and avoiding mushy avocados is key. Try different spices or veggies to enhance your salsa. Keep your leftovers stored right and know how to freeze them. With these tips, you can enjoy this delicious dish anytime. Happy cooking!

Mango Avocado Salsa Flavorful and Fresh Delight

Dive into the vibrant world of Mango Avocado Salsa—a dish bursting with flavor! You’ll discover how fresh, easy ingredients can

To make this tasty dip, gather these key ingredients: - 1 cup cream cheese, softened - 1/2 cup unsalted butter, softened - 3/4 cup brown sugar, packed - 1/4 cup granulated sugar - 1 teaspoon vanilla extract - 1 cup all-purpose flour (heat-treated for safety) - 1/2 cup mini chocolate chips These ingredients create a creamy, sweet base. The cream cheese and butter give it a rich texture. The sugars add sweetness, while the flour makes it thick. Heat-treating the flour ensures safety and enhances flavor. The mini chocolate chips provide delightful bursts of chocolate in each bite. You can customize your dip with these optional ingredients: - 1/4 cup chopped pecans or walnuts - Additional chocolate chips for garnish Adding nuts gives a nice crunch. You can also add more chocolate chips on top for extra sweetness. Feel free to get creative with your mix-ins. The dip is quite forgiving! For dippers, you have plenty of fun options: - Graham crackers - Apple slices - Pretzels - Vanilla wafers - Fresh strawberries These dippers offer a mix of flavors and textures. The sweetness of apples pairs well with the rich dip. Pretzels add a salty crunch, making each bite exciting. Arrange your dippers on a platter for a beautiful presentation. You can find the full recipe for Chocolate Chip Cookie Dough Dip above. Start by gathering all your ingredients. You need cream cheese, butter, sugars, flour, and chocolate chips. Make sure your cream cheese and butter are soft. This helps them mix well. In a medium bowl, beat the cream cheese and butter with an electric mixer. Mix until it feels fluffy and smooth. Gradually add the brown sugar and granulated sugar. Keep mixing until there are no lumps. Then, add in the vanilla extract and mix it in well. Next, mix in the heat-treated flour. This step is important for safety. If you haven’t heat-treated it yet, spread it on a baking sheet. Bake at 350°F for 5-7 minutes. Let it cool before adding. Finally, fold in the mini chocolate chips and nuts if you like them. Transfer your dip to a fun serving bowl. Smooth the top with a spatula. Now, chill it in the fridge for at least 30 minutes. This lets the flavors mix well and makes it firmer. After chilling, your dip is ready to enjoy! You can find the full recipe in the recipe section. To make the best Chocolate Chip Cookie Dough Dip, follow a few simple tips. First, use softened cream cheese and butter. This helps create a smooth texture. Next, heat-treat the flour for safety. Spread it on a baking sheet and bake it for 5-7 minutes at 350°F. Let it cool before mixing. When blending the ingredients, mix until there are no lumps. This ensures every bite is creamy and delicious. Lastly, chill the dip for at least 30 minutes. This step helps the flavors mix well and the dip firm up. Avoid some common mistakes to ensure your dip turns out great. Do not skip the heat treatment for the flour. Raw flour can make you sick. Another mistake is not mixing the sugar well. If you leave lumps, the dip won’t taste as good. Also, be careful not to overmix after adding the chocolate chips. This can break them apart. Finally, don't forget to chill the dip. If you serve it warm, it won't have the right taste or texture. Having the right tools makes making this dip easy. Here’s what you need: - Medium-sized mixing bowl - Electric mixer - Baking sheet - Spatula - Serving bowl - Plastic wrap for chilling These tools help you mix and serve your Chocolate Chip Cookie Dough Dip perfectly. For the full recipe, check the previous sections. Enjoy your tasty treat! {{image_2}} To make a gluten-free version, swap the all-purpose flour for gluten-free flour. This simple change makes it safe for those with gluten allergies. Use a blend that works well for baking. You can find many good options at the store. Just like the original, this version remains creamy and tasty. Want to mix it up? Try adding different flavors. For a nutty taste, add peanut butter. Just use half a cup and cut the butter in half. If you love chocolate, stir in Nutella. This adds a rich chocolate flavor and creaminess. You can also try adding coconut for a tropical twist. Each variation gives a new taste to your dip. Looking for a lighter option? Use Greek yogurt in place of cream cheese. This swap cuts fat and adds protein. Use the same amount of Greek yogurt as the cream cheese. The dip will still taste great and be a bit healthier. You can also cut down on sugar. Use honey or maple syrup instead. These swaps help keep the dip tasty while making it a bit better for you. For all these ideas, check the Full Recipe for the base ingredients and instructions. Enjoy exploring these variations! Once you finish enjoying your dip, store any leftovers in an airtight container. This keeps it fresh and prevents it from absorbing other odors in the fridge. Make sure to cover the top with plastic wrap before sealing the lid. This extra step helps keep the dip creamy. The dip lasts up to five days in the fridge. After that, the flavors may fade. If you want to keep it longer, you can freeze it. To freeze, spoon the dip into a freezer-safe container. Label it with the date. The dip can last up to three months in the freezer. To enjoy later, thaw it in the fridge overnight. You do not need to reheat this dip. It tastes best cold or at room temperature. If you freeze it, let it thaw completely before serving. You can mix it again if it seems too thick after thawing. This will help bring back the creamy texture. You should not eat raw flour. It can contain harmful bacteria. To keep it safe, heat-treat the flour. Spread it on a baking sheet and bake for 5-7 minutes at 350°F. This process kills any bad germs. The fun part of this dip is the dippers! You can use many things. My favorites are: - Graham crackers - Apple slices - Pretzels - Vanilla wafers - Strawberries These dippers add flavor and texture. You can mix and match them for variety! You can keep this dip in the fridge for up to five days. Make sure to store it in an airtight container. This keeps it fresh and safe to eat. If it starts to smell off or changes color, throw it away. You can find the full recipe for Chocolate Chip Cookie Dough Dip above. It has all the details you need to make this tasty treat. You now know how to make a delicious chocolate chip cookie dough dip. We covered key ingredients and fun ways to customize it. I shared tips to help you avoid common mistakes. You can even try health-conscious variations if you want. Storing leftovers is easy, and I answered your top questions. Enjoy making this treat for parties or snacks. With these steps, you’ll impress everyone with your dip!

Chocolate Chip Cookie Dough Dip Tasty and Simple Treat

Craving something sweet and fun? You’ve got to try my Chocolate Chip Cookie Dough Dip! It’s tasty, simple, and perfect

- 2 large sweet potatoes - 2 tablespoons olive oil - 1 teaspoon garlic powder - 1 teaspoon smoked paprika - ½ teaspoon cayenne pepper (optional) - Salt and pepper to taste - Fresh parsley for garnish Each serving of baked sweet potato fries has around 150 calories. They contain about 5 grams of fat, 30 grams of carbs, and 2 grams of protein. Sweet potatoes are great for your health. They are high in fiber, vitamins, and minerals. They can help with digestion and support your immune system. The bright orange color shows they are rich in beta-carotene, which is good for your eyes. Plus, they offer a tasty way to enjoy a healthy snack! First, wash the sweet potatoes under cool water. This removes dirt and makes them clean. Next, peel the skin off with a vegetable peeler. You want to get rid of the tough skin. After peeling, cut the sweet potatoes into thin fries. Aim for uniform size so they cook evenly. If they are all about the same width, they will bake perfectly. Now, take a large bowl and toss the sweet potato fries with olive oil. You want every fry to have a nice coat of oil. This helps them get crispy. Next, add garlic powder, smoked paprika, and optional cayenne pepper for heat. Sprinkle in salt and pepper to taste. Toss the fries again until they are fully coated in the spices. The flavor will be amazing! Preheat your oven to 425°F (220°C). This is the perfect temperature for crispiness. Line a baking sheet with parchment paper. Spread the fries in a single layer on the baking sheet. Make sure none of them overlap. This helps them get that great crunch. Bake for 25-30 minutes, flipping halfway through. Keep an eye on them. They should turn golden brown and crispy. When they are done, take them out and let them cool for a bit. Enjoy these tasty fries as a snack or side dish! To get crispy baked sweet potato fries, spacing is key. Place each fry apart on the baking sheet. This allows hot air to circulate around them. If they touch, they will steam instead of crisp. Another trick is to bake at a high temperature. Set your oven to 425°F (220°C). This heat helps them turn golden and crunchy. Flipping the fries halfway through baking also aids even browning. Use a spatula to flip them gently. A common mistake is overcrowding the baking sheet. If you pile up fries, they won't crisp up. They need space to cook well. Spread them out in a single layer for the best results. Another issue is not preheating the oven. Always preheat before baking. This ensures the fries start cooking at the right temperature. If the oven isn't hot, they may turn out soggy, not crispy. {{image_2}} You can change the flavor of your sweet potato fries with a few twists. Add chili powder for a spicy kick. You can also sprinkle cinnamon for a sweet twist. If you want to change the oil, try coconut oil for a tropical vibe. Avocado oil gives a rich flavor that pairs well with the sweet potatoes. These fries are tasty on their own, but you can make them even better. Serve them with dipping sauces like garlic aioli or spicy ketchup. They also work great in salads or bowls. Toss some fries on top of greens, beans, and your choice of protein for a filling meal. For the full recipe, check out the details above. To keep baked sweet potato fries fresh, store them in an airtight container. This prevents moisture from making them soggy. You can use glass containers or plastic ones with tight lids. Make sure to let the fries cool before sealing. They last for about three days in the fridge. If you want to keep them longer, consider freezing them. To reheat your fries, the oven is the best choice. Preheat it to 400°F (200°C). Spread the fries on a baking sheet and bake for about 10 minutes. This keeps them crispy. If you're short on time, you can use the microwave, but it may make them soft. If you choose the microwave, heat them for 30 seconds at a time until warm. For the best taste, stick to the oven. Enjoy your crispy fries again! To make sweet potato fries crispy, start with the right cut. Thin fries cook better and crisp up nicely. Toss them well in olive oil. This adds flavor and helps them brown. Use a hot oven, set to 425°F (220°C). Bake the fries in a single layer. This lets air circulate and keeps them from steaming. Flip them halfway for even cooking. Yes, you can freeze baked sweet potato fries. Cool them completely after cooking. Spread them on a baking sheet in a single layer. Freeze them for about an hour. Once frozen, transfer fries to a freezer bag. Remove as much air as possible. When ready to eat, bake them straight from the freezer. This keeps them crispy. Baked sweet potato fries go well with many dishes. Try them with grilled chicken or fish. They also pair nicely with burgers. For a fun twist, serve them with a salad. Dipping sauces are a great option too. Homemade garlic aioli or spicy ketchup add flavor and fun. For the full recipe, you will need: - 2 large sweet potatoes - 2 tablespoons olive oil - 1 teaspoon garlic powder - 1 teaspoon smoked paprika - ½ teaspoon cayenne pepper (optional) - Salt and pepper to taste - Fresh parsley for garnish Follow the steps to create crispy, flavorful fries perfect for snacking or serving alongside your favorite meals. You can make tasty baked sweet potato fries with just a few simple steps. Start with fresh ingredients, like sweet potatoes and olive oil, along with your favorite spices. Remember to space out your fries for the best crispiness. Avoid common mistakes like not preheating your oven. You can even get creative with flavors and pair them with different dishes. Store any leftovers properly to keep them crunchy. Enjoy experimenting with this easy recipe, and make your meals both healthy and fun!

Baked Sweet Potato Fries Crispy and Flavorful Snack

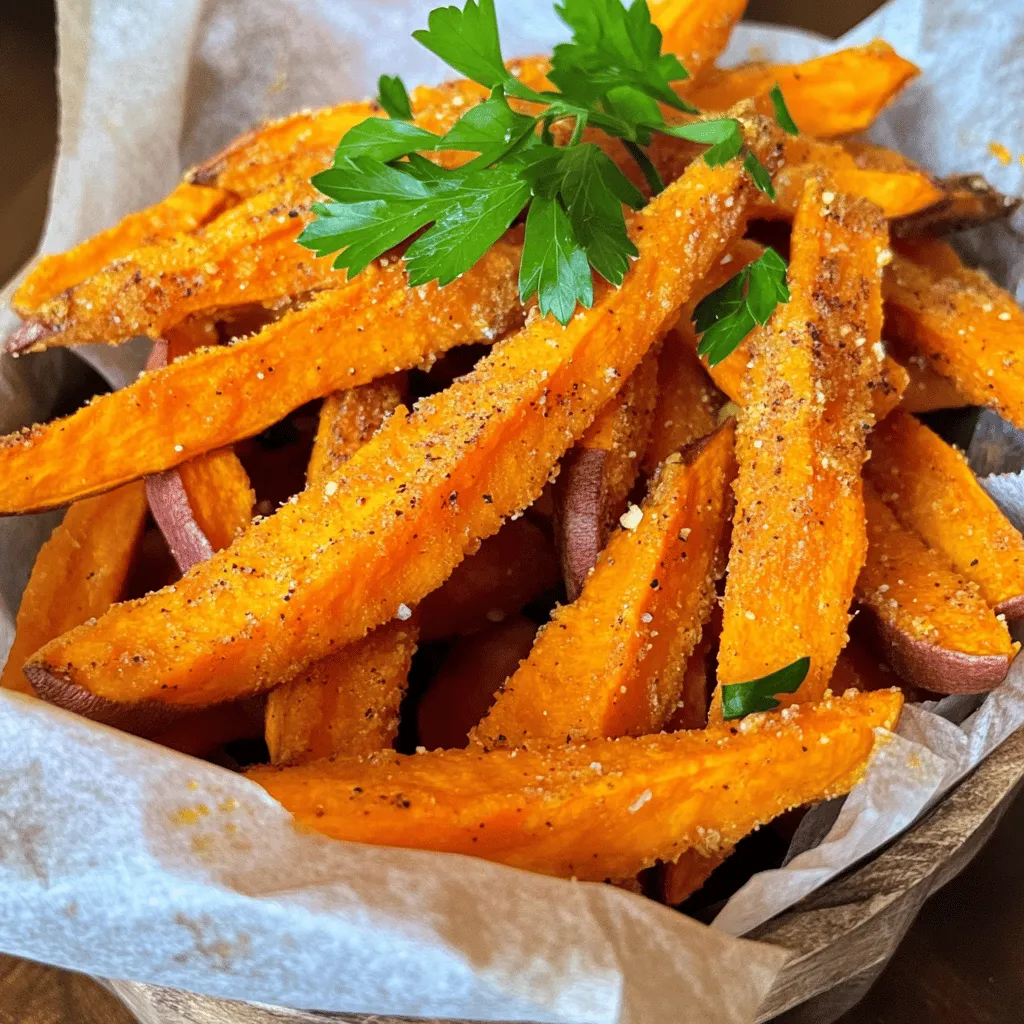
Who doesn’t love a crunchy, tasty snack? Baked sweet potato fries are not just delicious; they’re packed with nutrients too.

To prepare a tasty Savory Quinoa Salad with Avocado, you need fresh and simple ingredients. Here’s what you will need: - 1 cup quinoa, rinsed - 2 cups vegetable broth (or water) - 1 ripe avocado, diced - 1 cup cherry tomatoes, halved - 1 cucumber, diced - 1/2 red onion, finely chopped - 1/4 cup fresh cilantro, chopped - 1 lime, juiced - 2 tablespoons olive oil - 1 teaspoon ground cumin - Salt and pepper to taste Each ingredient plays a key role in making the salad vibrant and healthy. Quinoa serves as a protein base. Avocado adds creaminess. Cherry tomatoes bring sweetness. Cucumber adds crunch. Red onion provides a little bite. Fresh cilantro gives it a refreshing taste. Lime juice and olive oil create a delicious dressing that ties everything together. Using quality ingredients will enhance your salad’s flavor. If you want to know how to make it, check the Full Recipe. 1. First, grab a medium saucepan. 2. Pour in 2 cups of vegetable broth. 3. Bring the broth to a boil over medium heat. 4. Once boiling, add 1 cup of rinsed quinoa. 5. Lower the heat to a simmer. 6. Cover the pot and cook for about 15 minutes. 7. When the liquid is absorbed, fluff the quinoa with a fork. 8. Set it aside to cool. 1. While the quinoa cools, let’s prep the veggies. 2. Start by dicing the ripe avocado into small pieces. 3. Next, halve the cherry tomatoes. 4. Then, chop the cucumber into bite-sized pieces. 5. Finally, finely chop the red onion. 1. In a large mixing bowl, combine the cooled quinoa. 2. Add the diced avocado, halved tomatoes, cucumber, and red onion. 3. Sprinkle in 1/4 cup of chopped cilantro for fresh flavor. 4. In a small bowl, whisk together the dressing. 5. Mix the juice of 1 lime, 2 tablespoons of olive oil, 1 teaspoon of cumin, salt, and pepper. 6. Pour the dressing over the salad mixture. 7. Gently toss everything together until it’s well coated. 8. Taste the salad and adjust the seasoning if needed. 9. Let it sit for a few minutes to blend the flavors. For the full recipe, check out the details above! To make the best quinoa, start by rinsing it well. This step removes the bitter coating called saponin. Just place the quinoa in a fine-mesh sieve and run cold water over it until the water runs clear. Next, cook the quinoa for a fluffy texture. Use two cups of vegetable broth or water for every cup of quinoa. Bring the broth to a boil, add the rinsed quinoa, and cover the pot. Lower the heat and let it simmer for about 15 minutes. Once the liquid is absorbed, fluff the quinoa with a fork. Let it cool before mixing it with other ingredients. Seasoning makes your salad shine. Taste before serving and adjust the salt, pepper, or lime juice. If you prefer a stronger flavor, add more cumin or lime juice. Store the dressing separately until you are ready to eat. This keeps your salad fresh and crisp. Just drizzle the dressing over the salad right before serving. Use vibrant vegetables for a beautiful presentation. Cherry tomatoes, diced cucumber, and fresh cilantro add color. When serving, consider using a large bowl for gatherings. You can also layer the salad in small jars for a fun touch. This makes it easy for guests to grab their own serving. For a fresh meal, these tips will help you create a delightful Savory Quinoa Salad with Avocado. For the full recipe, check out the details above. {{image_2}} You can boost the protein in your savory quinoa salad easily. Adding chickpeas or black beans gives it a nice texture and makes it filling. These legumes are not only tasty but also packed with nutrients. If you prefer meat, grilled chicken or shrimp work great too. They add a lovely flavor and make the salad even heartier. To take the taste up a notch, try incorporating spices like paprika or chili powder. These spices add warmth and depth. Another fun option is to toss in some nuts or seeds for crunch. Think of almonds or sunflower seeds; they add a nice bite and extra nutrition to the mix. When making this salad, feel free to switch up the veggies based on what’s fresh and available. If you find bell peppers or zucchini at the market, chop them up and toss them in. You can also change the herbs for varied flavor. Fresh basil or parsley can add a new twist. This way, your salad stays exciting and seasonal. For the full recipe, check [Full Recipe]. After making the savory quinoa salad, let it cool before storing. Place the leftover salad in a sealed container. This keeps it fresh and helps avoid sogginess. The salad can stay fresh in the fridge for about 3 days. To enjoy it later, just give it a gentle stir before serving. You can freeze quinoa salad, but it may change texture. If you choose to freeze it, store it in an airtight container. When you’re ready to eat, thaw it in the fridge overnight. After thawing, mix in fresh avocado and other veggies for the best taste. To make meal planning easier, prepare the quinoa and veggies ahead of time. Store the quinoa and vegetables separately in the fridge. This keeps them fresh and crisp. When you're ready to eat, combine everything and add the dressing. Enjoy your fresh meal without the hassle! Your quinoa salad stays fresh for about 3 to 5 days in the fridge. Store it in an airtight container. This keeps it tasty and safe to eat. If you notice any changes in smell or texture, it's best to toss it. Yes, you can! If you want a change, try using brown rice or farro. These grains have a nice texture and flavor. They also make your salad filling. Just adjust the cooking time based on the grain you choose. If you want to skip the avocado, try using diced mango or cooked sweet potato. Both add creaminess and sweetness to your salad. You can also use hummus for a creamy texture without the avocado. Yes, this salad is gluten-free! Quinoa is a great choice for those avoiding gluten. Just make sure to check any additional ingredients, like broth, to ensure they are also gluten-free. Absolutely! This salad is already vegan-friendly. Just use vegetable broth instead of chicken broth. You can also add more veggies or nuts for extra flavor and texture. You can change the dressing to keep things exciting! Try a balsamic vinaigrette or a tahini dressing for a different taste. You can also add herbs like basil or dill for extra flavor. In this post, we covered a tasty quinoa salad recipe. You learned about the fresh ingredients, cooking steps, and how to add your twist. Keep in mind the tips for storage and meal prep. Quinoa salad is not just healthy; it’s also versatile. Use it as a main meal or a side dish. Enjoy the flavors and colors of your salad. This recipe will please your taste buds, whether you share it or savor it alone. Happy cooking!

Savory Quinoa Salad with Avocado for a Fresh Meal

Looking for a fresh, tasty meal? You’ve found it! This Savory Quinoa Salad with Avocado combines healthy ingredients into one

To make coconut milk rice pudding, you'll need some simple ingredients. Here’s what you should gather: - 1 cup jasmine rice - 2 cups coconut milk - 1 cup almond milk - 1/2 cup sugar (you can also use maple syrup) - 1/4 teaspoon salt - 1 teaspoon vanilla extract - 1/2 teaspoon ground cinnamon - 1/2 cup shredded coconut (sweetened or unsweetened) These ingredients create a creamy base. The jasmine rice adds a lovely texture. Coconut milk gives it that rich, tropical flavor. Almond milk adds a nice creaminess, too. If you want to change the sweetness, try using different sweeteners. Maple syrup is a great choice. It adds a nice flavor and is healthier. Honey can work too, but you should adjust the amount. Start with less and taste it. You want your pudding to be just right. Toppings make your pudding even more fun. Here are some tasty options: - Fresh mango slices - Mint leaves - Extra shredded coconut These toppings add color and flavor. The mango gives a sweet burst. Mint adds a fresh taste. You can mix and match to find your favorite combo. Enjoy your coconut milk rice pudding warm or chilled for a special treat. For the full recipe, check out the section above. Start by rinsing the jasmine rice. Use a fine mesh sieve and cold water. Rinse until the water runs clear. This step removes excess starch and helps the rice cook evenly. Next, combine the rinsed rice and liquids in a medium saucepan. Add coconut milk, almond milk, sugar, and salt. Stir the mix well. Bring it to a gentle boil over medium heat. Once it boils, reduce the heat to low. Cover the pot with a lid and let it simmer. Cook for about 20-25 minutes. Stir occasionally to prevent sticking. The rice should be tender, and the pudding thick. Remove the pot from heat. Stir in the vanilla extract and ground cinnamon. Now, fold in the shredded coconut. Reserve some for later if you want to garnish. Let the pudding cool for a few minutes. You can serve it warm or chilled. Spoon it into bowls and add fresh mango slices. Top with extra shredded coconut and a sprig of mint. This simple treat will surely impress! Check out the Full Recipe for more details. To make your rice pudding creamy, you need the right milk. I use coconut milk and almond milk for a nice blend. The coconut milk gives a rich flavor, while almond milk keeps it light. Stir the mixture often while it cooks. This helps the rice absorb the milk fully. You can also let it simmer for longer if you want a thicker texture. One common mistake is not rinsing the rice. Rinsing removes excess starch and keeps your pudding smooth. Another mistake is cooking at too high a heat. This can cause the milk to scorch. Make sure you keep it on low heat once it boils. Lastly, don’t skip the step of letting it cool before serving. This helps the flavors develop. You can make this pudding your own! Try adding different spices like nutmeg or cardamom. You can also mix in fruits, such as mango or banana, for a twist. If you like nuts, sprinkle some toasted almonds on top. For a fun texture, add some raisins or dried coconut. This recipe is so flexible, and you can find what you love best. For more ideas, check out the Full Recipe. {{image_2}} You can make this pudding even more fun by adding tropical flavors. Try mixing in mango, pineapple, or passion fruit. These fruits add a fresh, bright taste. Simply chop them up and stir them in after cooking. You can also top the pudding with a fruit slice for extra flair. A sprinkle of toasted nuts can add crunch too. This recipe is already vegan-friendly. You can use almond milk and coconut milk, which are both dairy-free. If you want to add more creaminess, mix in some cashew milk. You can also swap the sugar for maple syrup or agave syrup to keep it sweet and healthy. These changes keep your pudding rich while sticking to vegan standards. While jasmine rice is great, you can use other rice types too. Arborio rice gives a creamier texture. Short-grain rice works well too. Each type changes the pudding's flavor and texture. Experiment with what you have at home. You might find a new favorite! For the full recipe, check out the Coconut Bliss Rice Pudding. To keep your coconut milk rice pudding fresh, place it in an airtight container. Let it cool to room temperature first. After that, cover it tightly. Store it in the fridge for up to 4 days. If you want to enjoy it later, freezing is a good option. When you are ready to eat your pudding, you can reheat it. Use the microwave for quick warmth. Place a portion in a bowl and heat for 30 seconds at a time. Stir between each round. If it seems too thick, add a splash of coconut milk or water. You can also reheat it on the stove. Put it in a pot over low heat. Stir often to prevent sticking. Coconut milk rice pudding can last in the fridge for up to 4 days. If you freeze it, it stays good for about 2 months. To freeze, spoon the pudding into freezer-safe containers. Leave some space at the top for expansion. Thaw in the fridge overnight before reheating. This way, you get a creamy treat anytime you want! For more details, check the Full Recipe. The best rice for pudding is jasmine rice. Jasmine rice cooks up soft and sticky. It absorbs flavors well and gives a creamy texture. You want rice that holds moisture, and jasmine does just that. Other options include arborio rice, but jasmine is my go-to for this dish. Yes, you can make Coconut Milk Rice Pudding ahead of time. It stores well in the fridge for up to three days. Just let it cool completely first. When you are ready to eat, warm it gently on the stove or in the microwave. Add a splash of coconut milk to bring back the creaminess. Yes, Coconut Milk Rice Pudding is gluten-free. The main ingredients, rice and coconut milk, do not contain gluten. This makes it a great dessert for those who avoid gluten. Always check your other ingredients, like almond milk, to ensure they fit your needs. To make your pudding thicker, cook it longer. Stir it often to avoid sticking. If it gets too thick, add a bit more coconut or almond milk. For a thinner pudding, add more liquid while cooking. Adjust it to your taste, and enjoy your creamy treat! This blog post covered the key ingredients and steps needed to make coconut milk rice pudding. I shared tips for perfecting texture and avoiding common mistakes. Customizing flavors can make this dish even more exciting! Remember, you can store leftovers and reheat them easily. Enjoy the creamy delight and share your own variations with friends. This pudding is both tasty and versatile, making it a great treat for everyone.

Coconut Milk Rice Pudding Creamy and Simple Treat

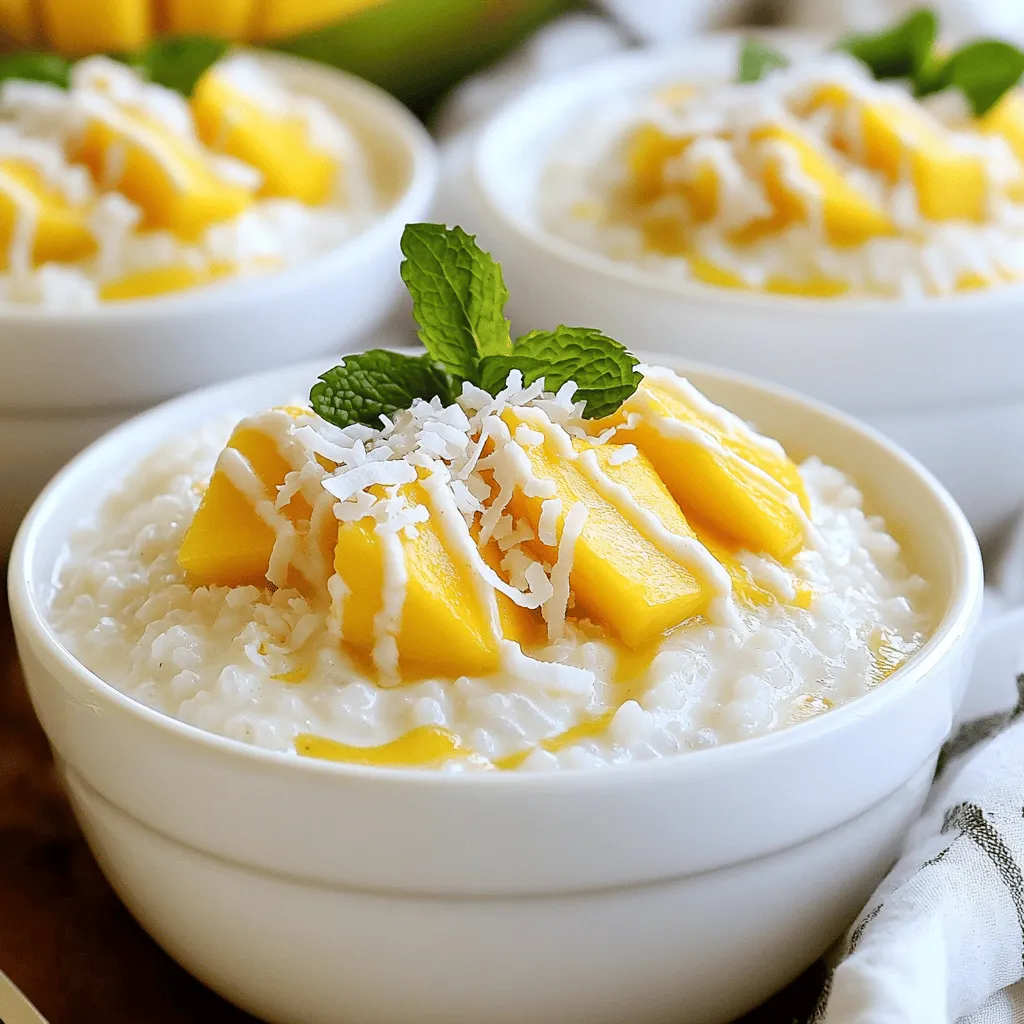
If you’re craving a sweet, creamy treat, coconut milk rice pudding is the perfect choice! This dish is simple to

To make zesty zucchini noodles with pesto, you need: - 2 large zucchinis, spiralized - 1 ripe avocado, pitted and peeled - 1 cup fresh basil leaves - 2 tablespoons lemon juice - 2 tablespoons olive oil - 1 small garlic clove, minced - Salt and pepper to taste For this recipe, you will want to have: - A spiralizer for the zucchini - A food processor for the pesto - A mixing bowl for combining - A knife and cutting board for prep You can enhance the dish with these: - Cherry tomatoes, halved (for garnish) - Toasted pine nuts (for garnish) Feel free to explore these extras to make your meal special. Each adds flavor and texture, making your dish even more delightful. For the complete recipe, check the Full Recipe section. To start, grab two large zucchinis. I find that thicker zucchinis work best. Use a spiralizer to turn them into noodles. It’s fun to watch them twist into shape! Place the spiralized noodles in a large mixing bowl. Set them aside for now. Next, let’s make the avocado pesto. Take one ripe avocado and remove the pit. Peel it and place it in a food processor. Add one cup of fresh basil leaves, two tablespoons of lemon juice, and two tablespoons of olive oil. Toss in one small minced garlic clove, plus salt and pepper to taste. Blend until smooth and creamy. If it’s too thick, add a splash of water. This pesto is rich and full of flavor! Now it’s time to combine everything. Pour the avocado pesto over the spiralized zucchini noodles. Gently toss the noodles until they are well coated. Make sure every noodle gets some pesto! Serve the noodles on plates, and top with halved cherry tomatoes and toasted pine nuts. A drizzle of olive oil adds a nice finish. Enjoy your fresh and flavorful meal! If you want the full recipe, check out the details above. To make great zucchini noodles, start with firm zucchinis. Look for ones that are bright and smooth. Spiralize them just before cooking. This helps keep them fresh. Avoid overcooking; just a few minutes will do. You want them tender but not mushy. A quick sauté can add warmth without losing crunch. A little zest can elevate your pesto. Add more lemon juice for brightness. You can also toss in a pinch of salt to bring out flavors. If you love cheese, try adding a bit of parmesan. This will make your pesto rich and creamy. Don't forget to taste! Adjust seasoning based on your preference. Serve your zucchini noodles in a shallow bowl for a nice look. Top with halved cherry tomatoes for color and flavor. A sprinkle of toasted pine nuts adds a great crunch. You can also drizzle more olive oil for richness. If you want more flavor, add a small dollop of pesto on the side. This makes it fun and interactive. For the full recipe, check out the Zesty Zucchini Noodles with Avocado Pesto. {{image_2}} You can switch up the pesto easily. Instead of avocado, try using nuts. Pine nuts, walnuts, or almonds all work well. You can also use different greens. Spinach or arugula can add a nice twist. For a spicy kick, add some chili flakes to your pesto. Each change can create a new flavor for your dish. Want to make your meal heartier? Add some protein! Grilled chicken or shrimp pairs great with zucchini noodles. You can also add beans for a plant-based option. If you want more veggies, consider adding bell peppers or carrots. They add color and crunch. Mix and match to find your favorite combo. This dish is naturally gluten-free. Zucchini noodles are a great swap for pasta. For a vegan option, ensure your pesto has no cheese. You can use nutritional yeast for a cheesy flavor without dairy. This way, everyone can enjoy a tasty and fresh meal. Try these variations to keep your zucchini noodles exciting! For the full recipe, check out the details above. To keep your leftover zucchini noodles fresh, place them in an airtight container. Make sure to remove as much air as possible. Store them in the fridge for up to two days. If you notice any moisture, pat the noodles dry with a paper towel. This helps prevent sogginess. For your leftover pesto, use a small jar or container. Pour a thin layer of olive oil on top to keep it fresh. Seal the container tightly and store it in the fridge. Use the pesto within five days for the best flavor. You can freeze pesto, too. Pour it into ice cube trays for easy portions. Once frozen, transfer the cubes to a freezer bag. When reheating zucchini noodles, avoid the microwave if possible. It can make them soggy. Instead, heat a non-stick pan over medium heat. Add a small amount of olive oil. Toss the noodles in the pan for just a minute or two. Heat until warm, but be careful not to overcook. Remember, zucchini noodles cook faster than regular pasta. Enjoy your meal fresh! For the full recipe, check out the Zesty Zucchini Noodles with Avocado Pesto. Yes, you can make this dish ahead of time. Make the pesto and store it in the fridge. Spiralize the zucchini and keep it in an airtight container. Mix them together just before serving. This helps keep the noodles fresh and crunchy. You can use other veggies if you don’t have zucchini. Some great options are carrots, sweet potatoes, or cucumbers. Just spiralize them like you do with zucchini. Each option gives a different taste and texture. To keep zucchini noodles from getting soggy, follow these steps: - Salt the Zucchini: Sprinkle salt on the noodles and let them sit for 10 minutes. This helps draw out extra moisture. - Pat Dry: Use a paper towel to gently pat the noodles dry after salting. - Quick Cooking: If you cook them, do it quickly. Sauté for just 2-3 minutes to keep them firm. For the full recipe, check out the Zesty Zucchini Noodles with Avocado Pesto. Enjoy your healthy meal! This blog post covered essential ingredients, step-by-step instructions, and handy tips for making zucchini noodles with avocado pesto. You learned how to spiralize zucchini, create a tasty pesto, and combine them perfectly. We shared fun variations and storage tips too. Remember, you can adapt this dish to fit your taste and needs. Enjoy experimenting with flavors and make it your own! It’s simple, healthy, and delicious. Dive into this dish and have fun!

Zucchini Noodles with Pesto Fresh and Flavorful Meal

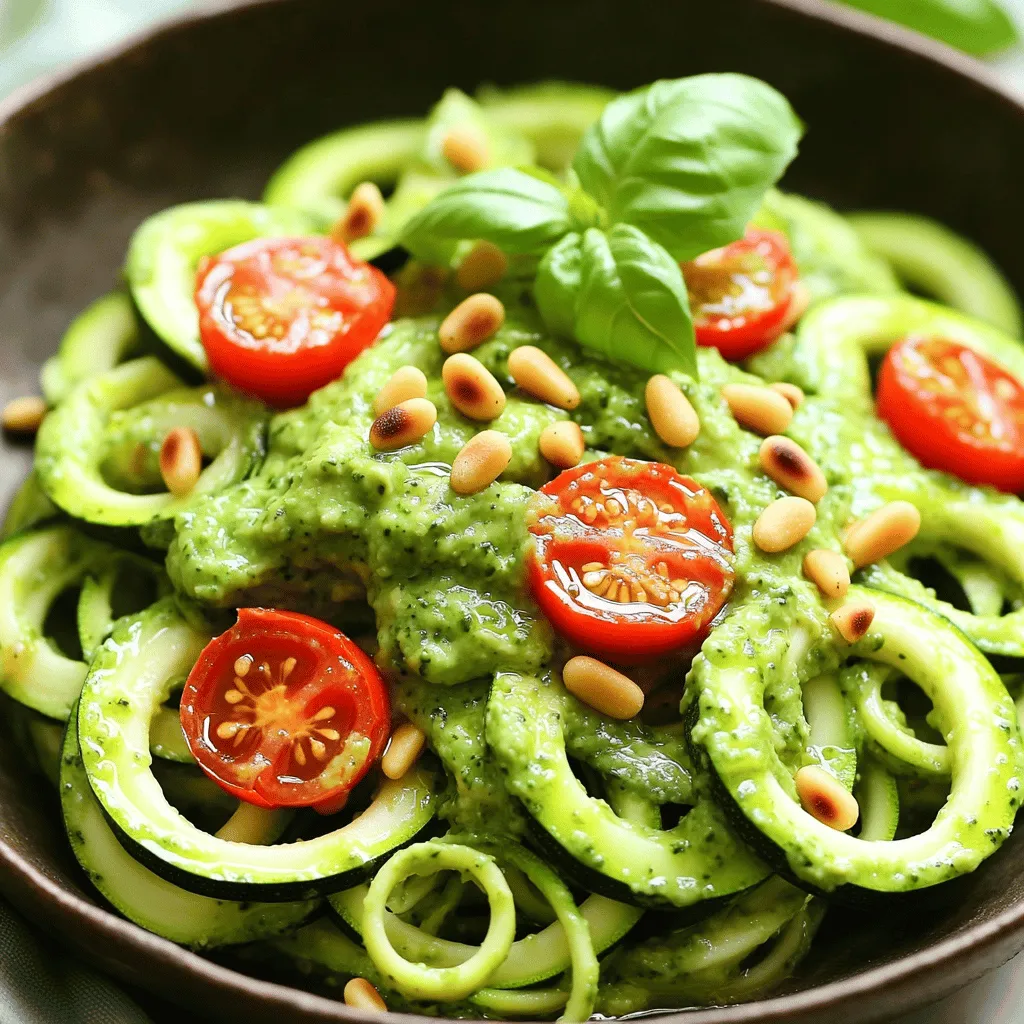
Looking for a light yet satisfying meal? Say hello to zucchini noodles with pesto! This dish is fresh, flavorful, and

To make these banana oatmeal cookies, gather the following items: - 2 ripe bananas, mashed - 1 cup rolled oats - 1/2 cup almond butter (or any nut butter) - 1/4 cup honey or maple syrup - 1/2 teaspoon vanilla extract - 1/2 teaspoon baking powder - 1/2 teaspoon cinnamon - 1/4 teaspoon salt - 1/3 cup dark chocolate chips (optional) - 1/3 cup chopped walnuts or pecans (optional) You can easily swap some ingredients based on what you have: - Nut butter: Use peanut butter or sunflower seed butter if preferred. - Sweetener: Maple syrup works well if you want to avoid honey. - Add-ins: Feel free to add dried fruits or seeds for extra flavor. These small changes still keep the cookies delicious and healthy. These cookies are not just tasty; they are also good for you. Each cookie has about: - Calories: 120 - Protein: 3g - Carbohydrates: 18g - Dietary Fiber: 2g - Sugars: 5g - Fat: 5g With wholesome ingredients, these cookies provide energy without added guilt. Enjoy these healthy bites as a snack or dessert! For the complete recipe, check the Full Recipe section. To start, gather all your ingredients. You need ripe bananas, rolled oats, almond butter, honey, vanilla, baking powder, cinnamon, salt, and optional dark chocolate chips or nuts. Preheat your oven to 350°F (175°C) and line a baking sheet with parchment paper. In a large bowl, mash the bananas until smooth. Then, add the almond butter and mix well. Next, pour in the honey or maple syrup. Stir in the vanilla extract, baking powder, cinnamon, and salt. Mix everything until it is well combined. Now, gently fold in the rolled oats. If you want more flavor, add the chocolate chips or nuts. This dough should feel thick but sticky. Once your dough is ready, use a tablespoon to scoop it onto the baking sheet. Space the dough balls about 2 inches apart. This gives them room to spread while baking. Bake your cookies for about 12 to 15 minutes. Keep an eye on them. You want the edges to turn lightly golden. The center will look soft, but that's okay! They will firm up as they cool. After baking, take the cookies out of the oven and let them cool for about 5 minutes on the sheet. Then, transfer them to a wire rack to cool completely. For serving, arrange the cookies on a wooden platter. Dust them with a sprinkle of cinnamon for a nice touch. Enjoy your cookies with a warm cup of tea or coffee. These banana oatmeal cookies are a simple and tasty treat! For the full recipe, check the earlier section. To get the best texture, use ripe bananas. They should be soft and sweet. Mash them well until smooth. This helps the cookies stay moist. The oats add chewiness. If you want softer cookies, add a bit more almond butter. For a crunchier cookie, bake them a minute longer. One common mistake is overmixing the dough. Mix just until combined. Overmixing can make cookies tough. Another mistake is not measuring ingredients correctly. Use measuring cups for accuracy. Too much or too little can change the result. Lastly, don't skip the cooling time. Letting cookies cool fully helps them set. To enhance flavors, try adding spices. A pinch of nutmeg or ginger can add warmth. You can also mix in vanilla extract for depth. If you love chocolate, dark chocolate chips are great. Nuts add crunch and flavor too. Try using walnuts or pecans for variety. For a fruity twist, add raisins or dried cranberries. These small changes can make your cookies stand out. Check the Full Recipe for all the details! {{image_2}} You can make these cookies vegan easily. Replace almond butter with sunflower seed butter. Use maple syrup instead of honey. This keeps the cookies sweet and healthy. You’ll still enjoy the same great taste. To make gluten-free banana oatmeal cookies, use certified gluten-free oats. Most oats contain gluten due to cross-contamination. Make sure to check the label. You can also try using almond flour. It adds a nice nutty flavor too. You can customize your cookies with fun flavors. Add nuts like walnuts or pecans for crunch. Dried fruits like raisins or cranberries add sweetness. Chocolate chips make them extra special. You can mix and match to find your favorite blend. Try the Full Recipe for all these tasty options! To keep your banana oatmeal cookies fresh, store them in an airtight container. This helps to lock in moisture and flavor. You can stack the cookies in layers, using parchment paper between them. This way, they won’t stick together. Place the container in a cool, dry place. Avoid direct sunlight. You can freeze these cookies to enjoy later. First, let the cookies cool completely. Then, wrap each cookie in plastic wrap. Place them in a freezer bag or a container. Label the bag or container with the date. You can freeze them for up to three months. When you’re ready to eat, simply thaw them at room temperature. These cookies stay fresh for about five days at room temperature. If you want them to last longer, freezing is best. To check for freshness, look for any signs of mold or an off smell. If they seem dry, they may still taste good, but the texture will change. Always trust your senses! Enjoy your cookies at their best with these storage tips. For the full recipe, check out the earlier sections. Yes, you can use ripe bananas. Ripe bananas add natural sweetness and moisture to your cookies. They also mash easily, making them perfect for mixing. Look for bananas with brown spots; this means they are sweet and ready to use. You can tell when the cookies are done by looking at the edges. They should be lightly golden. The center will still be soft, which is okay. Remember, they will firm up as they cool. Trust your eyes and your nose; you’ll smell that sweet aroma! Yes, you can make these without nut butter. Instead, try using applesauce or yogurt. This will keep the cookies moist and tasty. Just remember that the flavor will change slightly, but they will still be yummy. For the best results, keep the other ingredients the same. Check out the Full Recipe for more tips! This post covered all the key steps to make delicious banana oatmeal cookies. We discussed ingredients, measurements, and nutritional facts. Next, I shared the full process from prepping the dough to baking and cooling. Tips helped ensure your cookies turn out perfectly. We explored tasty variations, like vegan and gluten-free options. Finally, I provided storage tips to keep your cookies fresh. Now, you have everything you need to bake a great treat! Enjoy your cookies and have fun experimenting!

Savory Banana Oatmeal Cookies Simple and Tasty Treat

Looking for a simple, tasty treat that satisfies your sweet tooth? You’ve found it! These Banana Oatmeal Cookies combine healthy

- 1 cup all-purpose flour - 1/2 cup water - 2 tablespoons unsalted butter - 1 tablespoon sugar - 1/2 teaspoon salt - 1/2 teaspoon vanilla extract - 1/4 teaspoon baking powder - 1/4 cup granulated sugar (for coating) - 1 teaspoon ground cinnamon - Chocolate sauce - Caramel sauce Gathering the right ingredients is key to making crispy air fryer churro bites. You need basic items that you likely already have. First, grab one cup of all-purpose flour. This forms the base of your churro dough. Next, take half a cup of water. This will help combine your ingredients nicely. You’ll also need two tablespoons of unsalted butter. This adds richness to your churros. Don't forget one tablespoon of sugar to sweeten the dough. You also need half a teaspoon of salt for balance. Add half a teaspoon of vanilla extract for a lovely aroma. A quarter teaspoon of baking powder will give your churros a fluffy texture. Lastly, for coating, measure out a quarter cup of granulated sugar and one teaspoon of ground cinnamon. This mix creates the sweet, crunchy exterior we all love. If you want to dip your churro bites, consider chocolate or caramel sauce. They add a nice touch and enhance the experience. Enjoy these tasty treats! {{ingredient_image_1}} - Start by boiling a mix of water, butter, sugar, and salt in a saucepan. - Once it boils, remove it from the heat. Add flour, baking powder, and vanilla extract. Stir until it forms a ball. - Let the dough cool for about five minutes. Then, transfer it to a piping bag fitted with a star tip. - Preheat your air fryer to 375°F (190°C). - Pipe small strips of dough, about one inch long, onto parchment paper or directly into the air fryer basket. Make sure to leave space between each piece. - Lightly spray the churro bites with cooking spray for extra crispiness before frying. - While the churros cook, mix granulated sugar and cinnamon in a bowl. - After cooking, immediately toss the churro bites in the cinnamon-sugar mix until they are fully coated. - Serve them warm and enjoy with chocolate or caramel sauce for dipping! To get that perfect crispy texture, preheating your air fryer is key. Set it to 375°F (190°C) before you start piping. This helps the churro bites cook evenly and get nice and crunchy. Next, I recommend using cooking spray. Lightly spray the churro bites before frying. This adds a golden touch and extra crispiness that you’ll love. When it comes to piping, use a star tip for best results. This shape gives churro bites their signature ridges. Pipe small strips, about 1 inch long. Make sure to space them out well. Leave some room between each piece. This helps them cook evenly and keeps them from sticking together. You can personalize your cinnamon-sugar coating. If you like it sweeter, add more sugar to the mix. For a fun twist, try adding orange zest. It gives a bright flavor that pairs well with the cinnamon. Experiment and find what you enjoy most! Pro Tips Use Cold Water: Using cold water instead of hot can help prevent the dough from becoming too sticky, leading to a better texture for your churro bites. Piping Technique: Ensure that the piping bag is filled well and that you apply consistent pressure while piping to maintain even thickness in your churro bites. Experiment with Flavors: Feel free to add a pinch of nutmeg or lemon zest to the dough for an extra flavor twist that complements the cinnamon-sugar coating. Serve Immediately: For the best taste and texture, serve the churro bites right after coating them in the cinnamon-sugar mixture while they're still warm. {{image_2}} For those who need a gluten-free treat, you can swap out the all-purpose flour. Use a gluten-free flour blend instead. Make sure it has xanthan gum for the right texture. This will help your churro bites stay soft and crispy. Want to spice things up? You can infuse your churro bites with different flavors. Try adding cocoa powder for chocolate churros. Or mix in matcha powder for a green tea twist. You can even add orange or lemon zest for a fresh, citrusy kick. Just keep the total flour measurement the same. Serving your churro bites can be fun and creative. You can drizzle them with chocolate or caramel sauce. Top them with fresh fruit like strawberries or bananas for a sweet twist. For a creamy touch, serve with whipped cream on the side. Try different combinations to find your perfect pairing! To keep your churro bites fresh, use an air-tight container. This helps maintain their crispy texture and prevents them from getting soggy. You can store them at room temperature for up to two days. If you want to keep them longer, consider freezing. To reheat churro bites, the air fryer works best. Set it to 350°F (175°C) and cook for about 3 to 4 minutes. This method keeps them crispy. Alternatively, you can use an oven. Preheat to 350°F (175°C) and bake for about 5 minutes. If you want to freeze churro bites, first let them cool completely. Place them in a single layer on a baking sheet and freeze for about an hour. Once frozen, transfer them to a freezer bag or container. They can stay in the freezer for up to three months. When you're ready to enjoy them, just reheat straight from frozen. To get your churro bites crispy, preheat the air fryer fully. This step helps them cook evenly. Lightly spray the churro bites with cooking spray before frying. This adds a nice crunch. Remember to shake the basket halfway through cooking. This ensures all sides crisp up well. You can make the dough ahead of time. Store it in the fridge for up to a day. When ready to cook, pipe the dough directly into the air fryer. If you cook them first, they taste best fresh. Reheat them in the air fryer for a few minutes if needed. Churro bites shine with sweet dips. Chocolate sauce is a classic choice. Caramel sauce adds a rich flavor. You can also try vanilla icing or fruit sauces. Each adds a unique twist to your treat. Yes, you can use this dough to make different shapes. Try piping it into rings or stars. You can even make churro sticks. Just adjust the cooking time slightly based on the size. If your churro bites are too doughy, they might need extra cooking time. Check them after the initial cooking time. If they aren’t golden brown, air fry them for a few more minutes. Make sure they are fully cooked through before serving. To sum up, making churro bites is simple and fun. We explored the key ingredients, step-by-step instructions, and helpful tips for a crispy treat. Don’t forget to personalize your churros with flavors and dips that you love. Storing and reheating are easy too, so you can enjoy them later. With these ideas and methods, you can create a tasty snack for yourself or friends. Get ready to enjoy your delicious churro bites!

Crispy Air Fryer Churro Bites Easy and Delicious Treat

Looking for a quick and tasty treat? Try my Crispy Air Fryer Churro Bites! They are easy to make and

To make puff pastry bites, gather these key ingredients: - 1 sheet of puff pastry, thawed - 1 cup cooked, shredded chicken - ½ cup cream cheese, softened - ½ cup shredded cheddar cheese - 1 tablespoon fresh chives, chopped - 1 cup spinach, wilted and chopped - 1 egg, beaten (for egg wash) - Salt and pepper to taste These ingredients form the base for two tasty fillings. The chicken mix is rich and creamy, while the spinach mix is fresh and vibrant. You can customize your puff pastry bites with these extras: - Garlic powder for added depth - Red pepper flakes for a kick - Fresh herbs like parsley or basil for brightness - Different cheeses like feta or mozzarella for variety Feel free to mix and match to suit your taste! To prepare your puff pastry bites, you will need: - Baking sheet lined with parchment paper - Rolling pin for flattening the pastry - Mixing bowls for each filling - Fork for sealing the pastry edges - Pastry brush for the egg wash Having these tools ready makes the process smooth and fun! {{ingredient_image_1}} Start by preheating your oven to 400°F (200°C). This step is key for a crispy outer layer. While the oven heats, grab a baking sheet. Line it with parchment paper for easy cleanup. This helps prevent the bites from sticking and makes your life easier. In a medium bowl, mix one cup of cooked, shredded chicken with half a cup of softened cream cheese. Add in half a cup of shredded cheddar cheese for richness. Chop one tablespoon of fresh chives and toss them in too. Season with salt and pepper to taste. Stir until everything blends well. This filling is creamy and packed with flavor. For the spinach filling, take a new bowl. Combine one cup of wilted and chopped spinach with half a cup of cream cheese. Add a pinch of salt and pepper. Mix well until the spinach is evenly coated. This filling brings a nice green touch and a fresh taste. On a lightly floured surface, roll out your thawed puff pastry sheet. Cut it into 3-inch squares. Place a tablespoon of the chicken mixture in the center of half the squares. For the other half, use a tablespoon of the spinach mixture. Now, fold the squares over to form triangles. Press the edges with a fork to seal them well. This step makes sure the filling stays inside while baking. Place the filled pastries on your prepared baking sheet. Brush the tops with the beaten egg. This gives your pastries a beautiful golden color. Bake them in the oven for 15 to 18 minutes. Keep an eye on them; they should puff up and turn golden brown. Once done, let them cool for a few minutes before serving. These bites will be warm, flaky, and delicious! To get that nice golden color, start with a hot oven. Set your oven to 400°F (200°C). This heat helps puff pastry rise and crisp up. Brush the tops with a beaten egg. The egg wash gives a golden shine. One common mistake is not sealing the edges well. If they are not sealed, filling leaks out during baking. Another mistake is overcrowding the baking sheet. Leave space between each bite so they puff up nicely. Lastly, avoid working with warm pastry. Keep it cold for better results. Serve your puff pastry bites warm. Arrange them on a wooden board for a rustic look. Add a small bowl of marinara or garlic sauce in the center. This makes for a fun dipping option. Garnish with fresh herbs, like chives or parsley, to add color and flair. Pro Tips Use Cold Puff Pastry: Ensure your puff pastry is cold when you work with it. This helps it puff up nicely in the oven, creating that flaky texture we love. Experiment with Fillings: Don't hesitate to try different fillings! You can use leftover meats, various cheeses, or even sweet fillings like fruit preserves for dessert versions. Seal Properly: Make sure to seal the edges of the pastry well; otherwise, the filling may leak out during baking. Use a fork or your fingers to crimp the edges securely. Cool Before Serving: Let the puff pastry bites cool for a few minutes after baking. This allows the filling to set slightly, making them easier to handle and enhancing the flavors. {{image_2}} You can make tasty vegetarian bites with just a few changes. Swap the chicken for a mix of roasted veggies. Try bell peppers, zucchini, and mushrooms. Use the same cream cheese to bind it all. This gives you a rich flavor and a nice texture. Add herbs like basil or oregano for extra taste. If you love meat, you can amp up the flavor easily. Replace the chicken with cooked sausage or ground beef. Mix in the cream cheese, cheddar, and some spices. You can add cooked bacon for a smoky touch. These bites will pack a punch and satisfy any meat lover. Cheese can really change the game in puff pastry bites. Use a mix of cheeses for depth. Try mozzarella for stretch and gouda for a smoky flavor. Blend cream cheese with goat cheese for a tangy twist. Don’t forget to sprinkle in herbs like thyme or rosemary for added flair. These cheese combos can elevate your dish from simple to gourmet. To keep your puff pastry bites fresh, place them in an airtight container. Make sure they cool down before sealing them. You can store them in the fridge for up to three days. If they are soggy, place them on a paper towel to help absorb moisture. For the best taste, reheat your puff pastry bites in the oven. Preheat the oven to 350°F (175°C). Place the bites on a baking sheet. Heat them for about 10 minutes. This will help them regain their crispiness. You can also use a microwave, but the bites may become soft. If you choose the microwave, heat them for just 20-30 seconds. To freeze your puff pastry bites, let them cool completely. Arrange them in a single layer on a baking sheet and freeze for about an hour. Once frozen, transfer them to a freezer bag or container. You can store them in the freezer for up to three months. When you're ready to eat, bake them straight from the freezer at 400°F (200°C) for 20-25 minutes. Enjoy a quick and tasty treat! Yes, you can use store-bought puff pastry. It saves time and effort. Just make sure to thaw it properly before using. Store-bought options are often just as good as homemade. They can help you create tasty bites quickly. You will know the puff pastry bites are done when they are golden brown and puffed. Bake them for 15-18 minutes at 400°F (200°C). Keep an eye on them during baking. If they look brown and feel firm, they are ready. Many dipping sauces work well with puff pastry bites. Here are a few ideas: - Marinara sauce - Garlic aioli - Ranch dressing - Honey mustard - Spicy ketchup These sauces add fun flavors and make your bites even better. Yes, you can prepare the filling ahead of time. You can also assemble the bites and store them in the fridge for a few hours. Just remember to bake them right before serving. This way, they stay fresh and warm. Puff pastry bites are fun and easy to make. We covered the main and optional ingredients, tools needed, and step-by-step instructions. I shared tips to avoid mistakes and variations for everyone. You can store leftovers and even freeze them for later. Remember, these bites are flexible. Feel free to mix flavors to fit your taste. Enjoy the process and let your creativity shine in the kitchen. Happy baking!

Puff Pastry Bites Two Ways Easy and Flavorful Recipe

Are you ready to impress at your next gathering with Puff Pastry Bites? In this easy and flavorful recipe, I’ll

- 1 lb boneless, skinless chicken thighs - Spices for marinade: - 1 tablespoon chili powder - 1 teaspoon cumin - 1 teaspoon smoked paprika - 1/2 teaspoon garlic powder - 1/2 teaspoon onion powder - Toppings: - 1 cup fresh cilantro, chopped - 1/2 cup diced red onion - 1 lime, cut into wedges - 1 avocado, sliced - Optional: diced jalapeños for spice To make these tacos, start with the chicken thighs. I like thighs because they are juicy. They stay moist even when cooked. You can also use chicken breasts, but thighs work best for flavor. Next, gather your spices. The blend of chili powder, cumin, and smoked paprika brings warmth. Garlic powder and onion powder add depth. This mix makes the chicken taste amazing. For toppings, fresh cilantro adds brightness. Diced red onion gives a nice crunch. Lime juice adds zest, while avocado provides creaminess. If you like heat, add jalapeños for extra spice. These ingredients come together to create a tasty taco experience. You can adjust toppings to suit your taste. This recipe is quick and easy, perfect for any day! {{ingredient_image_1}} To start, prepare the marinade. In a bowl, mix together 2 tablespoons of olive oil, 1 tablespoon of chili powder, 1 teaspoon of cumin, 1 teaspoon of smoked paprika, 1/2 teaspoon of garlic powder, 1/2 teaspoon of onion powder, and salt and pepper to taste. This blend gives the chicken great flavor. Next, coat the chicken thighs with the marinade. Make sure each piece is well-covered. I like to let them soak for at least 30 minutes. For deeper flavor, you can marinate them overnight in the fridge. Now, preheat your grill or skillet over medium-high heat. This step is key for a good sear. Once hot, remove the chicken from the marinade. Place it on the grill or skillet. Cook the chicken for about 6-7 minutes on each side. You want it to reach an internal temperature of 165°F. Make sure it is no longer pink inside. After cooking, let the chicken rest for 5 minutes. Then, slice it into bite-sized pieces. While the chicken rests, warm the corn tortillas. You can do this in a separate pan for about 30 seconds on each side. This makes them soft and easy to fold. Now, assemble your tacos! Start with a portion of sliced chicken on each tortilla. Top it with chopped cilantro, diced red onion, and avocado slices. If you like heat, add diced jalapeños. Finally, squeeze fresh lime juice over the tacos before serving. This adds a zesty flavor that brightens everything up. Enjoy your delicious chicken street tacos! To bring out the best flavor in your chicken street tacos, marinating is key. Here are some best practices: - Use Enough Time: Marinate the chicken for at least 30 minutes. For richer taste, marinate overnight. - Even Coating: Make sure each piece of chicken is well-coated in the marinade. This helps every bite burst with flavor. For cooking techniques, you can choose between grilling and using a skillet: - Grilling: This method gives you a nice char and smoky flavor. Preheat your grill to medium-high. Grill each side for about 6-7 minutes. - Skillet: If you prefer indoor cooking, heat a skillet over medium-high heat. Cook the chicken the same way. Both methods work great! Now let’s talk about how to serve these tasty tacos. Pair them with fresh sides and drinks for a complete meal: - Sides: Try serving with rice, beans, or a fresh salad. These sides add color and taste. - Drinks: A cold drink, like agua fresca or a light beer, complements the tacos well. For a fun taco night presentation, consider these ideas: - Taco Bar: Set up a taco bar. Let guests build their own tacos with toppings like cilantro, red onion, and avocado. - Colorful Display: Arrange your ingredients in bowls. This makes it look festive and inviting. These tips will help you create delicious chicken street tacos that impress everyone at your table. Enjoy the process of cooking and serving! Pro Tips Marinate Longer for Flavor: For the best flavor, marinate the chicken thighs overnight. This allows the spices to penetrate deeper, resulting in a more flavorful taco filling. Temperature Check: Always use a meat thermometer to ensure your chicken reaches an internal temperature of 165°F (75°C). This guarantees that the chicken is safe to eat and perfectly cooked. Warm Your Tortillas: Warming corn tortillas on a skillet helps to make them more pliable and enhances their flavor. This step is key to preventing them from cracking when you assemble the tacos. Customize Your Toppings: Feel free to get creative with toppings! Add diced tomatoes, crumbled queso fresco, or a drizzle of sour cream for an extra layer of flavor and texture. {{image_2}} You can change how you cook your chicken for street tacos. Grilled chicken has a smoky taste and a nice char. It cooks quickly and adds flavor. Shredded chicken is soft and can soak up all the tasty sauce. You can cook it in a slow cooker or boil it for a simple option. You can also try different meats. Beef works well, especially if you use flank steak. Shrimp tacos are another fun choice. They cook fast and have a fresh taste. Just season them like the chicken and grill them for a few minutes. Toppings can make your tacos special. While cilantro and red onion are classic, you can get creative. Try adding chopped tomatoes, corn, or even pickled vegetables for a zing. For a spicy kick, use a hot salsa. Mango salsa adds sweetness and heat, which is great with chicken. You can also drizzle unique sauces like chipotle mayo or avocado crema. These toppings will take your street tacos to another level. To keep your chicken street tacos fresh, start by storing leftovers in an airtight container. This helps keep the flavors intact. Place the tacos in the fridge within two hours of cooking. They can stay good for up to three days. Reheating tacos requires care. I suggest using a skillet over medium heat. Heat each taco for about two minutes on each side. This warms them up nicely without making them soggy. You can also reheat the chicken in the microwave. Just make sure to cover it to keep moisture in. When it comes to marinated chicken, store it in a sealed bag or container in the fridge. Use marinated chicken within two days for the best flavor. If you think you won't cook it soon, freeze it. Just remember to label the bag with the date. Freezing cooked chicken is a great way to save time. Once the chicken cools, place it in a freezer-safe bag. Try to remove as much air as possible before sealing. This will prevent freezer burn. Cooked chicken can last for up to three months in the freezer. For tortillas, wrap them in foil or plastic wrap. Store them in a freezer-safe bag. This keeps them fresh for about six months. When you're ready to use them, thaw them in the fridge overnight. Toppings should be stored separately. Fresh cilantro, red onion, and avocado do not freeze well. Store them in the fridge and use them within a few days for the best taste and texture. For street tacos, I prefer using boneless, skinless chicken thighs. They stay juicy and tender during cooking. Chicken breasts can dry out, especially if overcooked. Thighs have more flavor, making them great for tacos. If you want a leaner option, you can use breasts, but thighs are the best choice. Yes, you can make chicken street tacos ahead of time. Cook the chicken and store it in the fridge for up to three days. You can also marinate the chicken the night before to save time. Just reheat the chicken in a skillet or microwave before serving. Warm the tortillas right before you serve for the best taste. To spice up your chicken street tacos, add diced jalapeños to the toppings. You can also mix in more chili powder or cayenne pepper in the marinade. Hot sauce is another great option. Adjust the spice level to your taste. Enjoy experimenting with different flavors! In this post, we explored how to make delicious chicken street tacos from scratch. We covered essential ingredients, marinating tips, and cooking methods. I shared ways to customize your tacos and serve them perfectly. Remember, you can use different meats and toppings for variety. Enjoy making these tacos for your next meal. They are easy and fun!

Savory Chicken Street Tacos Quick and Easy Recipe

Are you ready to spice up your next meal? In today’s post, I’ll share my quick and easy recipe for

Older posts
Newer posts
← Previous Page1 … Page89 Page90 Page91 … Page123 Next →

dsad

© 2025 Southern Dishes • Built with GeneratePress

Our Policies

  • Copyright Policy
  • Cookie Policy
  • GDPR Policy
  • Privacy Policy
  • Disclaimer
  • Terms Of Use

More Information

  • Home
  • About
  • Contact
  • Appetizers
  • Dessert
  • Dinner
  • Drinks
©2025, Southern Dishes About Back To Top