Skip to content
DisclaimerTerms Of UseGDPR PolicyCookie Policy

Southern Dishes

  • Home
  • Drinks
  • Appetizers
  • Dinner
  • Dessert
  • About
  • Contact
  • Privacy Policy
DisclaimerTerms Of UseGDPR PolicyCookie Policy

Isabella

To make a great spinach artichoke dip, you need the right ingredients. Here’s what to gather: - 1 cup fresh spinach, chopped - 1 cup artichoke hearts, drained and chopped - 1 cup cream cheese, softened - 1 cup Greek yogurt - 1 cup shredded mozzarella cheese - 1/2 cup grated Parmesan cheese - 2 cloves garlic, minced - 1/2 teaspoon onion powder - 1/2 teaspoon red pepper flakes (optional for heat) - Salt and pepper to taste - Fresh basil or parsley, for garnish - Tortilla chips or sliced baguette, for serving These ingredients work together to create a creamy and flavorful dip. Fresh spinach gives it a vibrant color and a healthy twist. The artichoke hearts add a unique taste that pairs well with the cheese. Cream cheese and Greek yogurt make the dip rich and smooth. The mozzarella and Parmesan bring in that cheesy goodness we all love. Garlic and spices, like onion powder and red pepper flakes, bring depth to the flavor. You can adjust the heat by adding or removing the red pepper flakes. For a nice finish, use fresh herbs like basil or parsley as a garnish. Serve this dip warm with tortilla chips or sliced baguette. It’s perfect for parties or family gatherings. For the full recipe, check out the complete instructions above. Enjoy your cooking! 1. Mixing the cream cheese and Greek yogurt: Start with a large bowl. Add the softened cream cheese and Greek yogurt. Use a fork or mixer to blend them until smooth and creamy. This mix gives the dip its rich texture. 2. Combining ingredients: Next, add the chopped spinach and artichoke hearts to the bowl. Then, toss in the mozzarella and Parmesan cheese. Don't forget the minced garlic, onion powder, and optional red pepper flakes for some heat. Stir everything together until well mixed. 3. Transfer to baking dish: Once your mixture is ready, scoop it into a baking dish. Spread it out evenly with a spatula. This step helps it bake evenly and become golden on top. 1. Preheating oven: Now, preheat your oven to 375°F (190°C). This step is crucial. A hot oven ensures your dip cooks properly and gets that bubbly top. 2. Baking time and temperature: Place your baking dish in the oven. Bake for about 25 to 30 minutes. Watch for the top to become golden and bubbly. This is when your dip is at its best. 3. Cooling and garnishing: After baking, take it out and let it cool for a few minutes. This cooling time helps prevent burns. Then, sprinkle fresh basil or parsley on top for a nice touch. This Spinach Artichoke Dip is simple yet flavorful. Enjoy it warm with your favorite chips or bread. For the full recipe, check out the main section above. To make your spinach artichoke dip creamy, ensure your cream cheese is softened. Cold cream cheese does not mix well. Leave it out for about 30 minutes before you start. This makes blending easier and your dip smoother. Preventing a watery dip is key. Use fresh spinach and drain the artichokes well. Squeeze out extra moisture from the spinach before mixing. This keeps your dip thick and rich. You want every bite to be packed with flavor, not liquid. When it comes to dippers, tortilla chips and sliced baguette are perfect. They add a nice crunch and flavor. You can also try fresh veggies like carrots or cucumber for a healthier option. For creative serving, consider a bread bowl. Hollow out a round loaf and fill it with the dip. Surround it with smaller pieces of bread for dipping. This not only looks great but also makes it easy to enjoy every last bit of your spinach artichoke dip. You can find the Full Recipe to guide you through this delightful dish. {{image_2}} You can easily change the cheese in this dip. Cheddar adds a sharp taste. Gouda gives a smoky flavor. These swaps keep the dip fresh and fun. You can also add more veggies. Bell peppers bring a sweet crunch. Mushrooms add an earthy taste that blends well. Want to kick up the flavor? Try adding spices like cumin or paprika. These spices add warmth and depth. If you like meat, consider adding chicken or bacon. Chicken makes the dip heartier, while bacon adds a crispy, salty bite. Mixing in these ingredients helps you create a dish that suits your taste. For the Full Recipe, check the main sections of the article. After you enjoy your creamy spinach artichoke dip, store any leftovers in the fridge. - Refrigeration tips: Let the dip cool completely before you store it. Place it in an airtight container to keep it fresh. This helps prevent drying out or absorbing odors from other foods. - Recommended storage containers: Glass or BPA-free plastic containers work well. Choose containers that fit the amount of dip you have. This keeps the dip packed tightly, maintaining its creamy texture. To enjoy your dip again, you need to reheat it properly. - Best methods for reheating without losing texture: The oven is the best way to reheat. Preheat your oven to 350°F (175°C). Place the dip in an oven-safe dish. Cover with foil to keep it from drying out. - Duration and temperature for reheating: Heat for about 15-20 minutes. Check it often to make sure it’s warm throughout but not overcooked. Stir halfway to ensure even heating. Enjoy your dip like it was fresh! Yes, you can make this dip ahead. Prepare it and store it in the fridge. Just cover the dish tightly. When you're ready to serve, bake it as directed in the Full Recipe. Spinach artichoke dip can last about 3 to 5 days in the fridge. Keep it in a sealed container to stay fresh. You can freeze this dip, but it may change texture. Store it in an airtight container. Thaw it in the fridge overnight before reheating. This dip pairs well with tortilla chips or sliced baguette. You can also serve it with fresh veggies like carrots and celery. Yes, you can make a lighter dip. Use low-fat cream cheese and Greek yogurt. Add more veggies like bell peppers or mushrooms for extra nutrition. The blog covered how to make a tasty spinach artichoke dip. We explored the best ingredients and shared easy step-by-step instructions. I offered helpful tips to improve flavor and serving ideas. You can get creative with variations and learn how to store leftovers effectively. In summary, this dip is fun to make and enjoy with friends. It adds flavor to any gathering and is easy to adapt. Don't hesitate to try it in your kitchen!

Spinach Artichoke Dip Simple and Flavorful Recipe

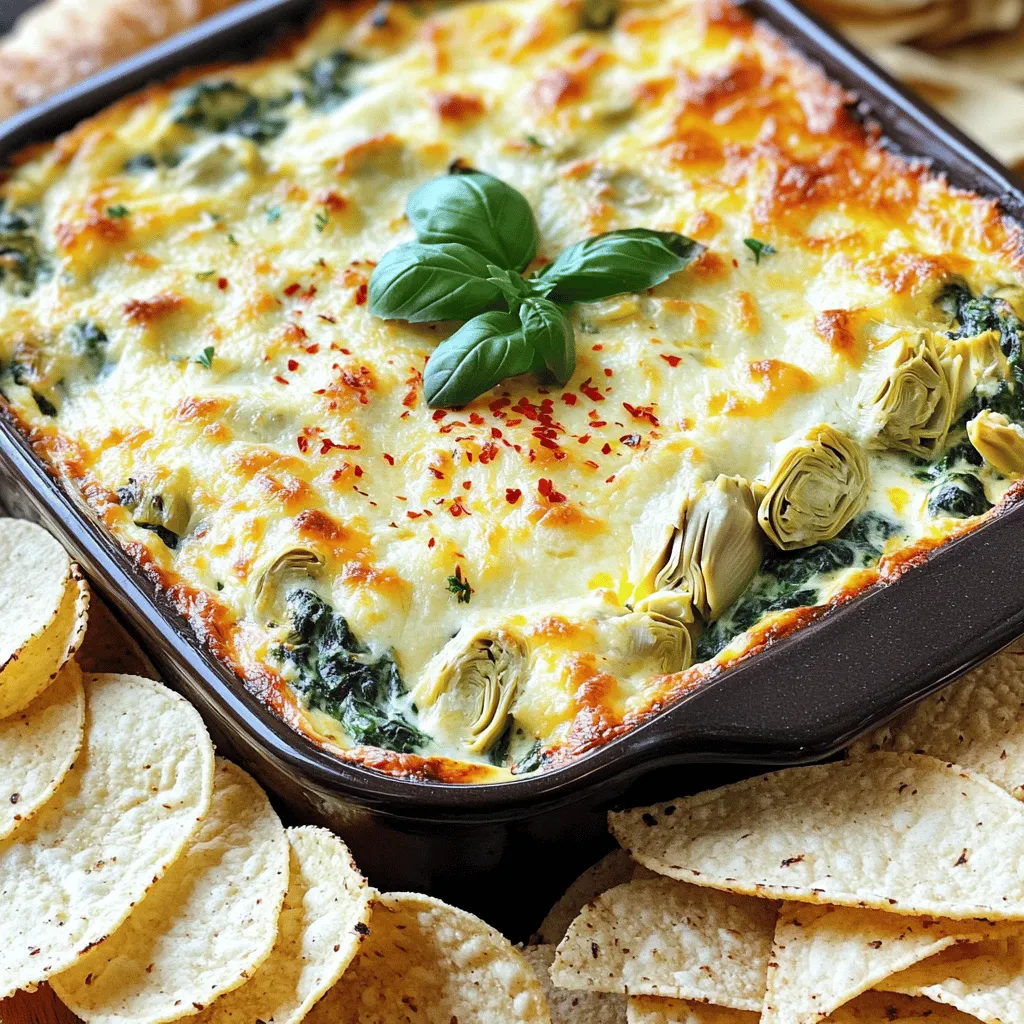
Are you ready to impress your friends with a homemade Spinach Artichoke Dip? This simple and flavorful recipe combines creamy

To make your peach cobbler dump cake, you will need: - 4 cups sliced fresh peaches (or canned peaches, drained) - 1 cup granulated sugar - 1 tablespoon lemon juice - 1 teaspoon cinnamon - 1 box (15.25 oz) yellow cake mix - 1 cup unsalted butter, melted - 1 cup chopped pecans (optional) - Vanilla ice cream or whipped cream (for serving) If you don’t have fresh peaches, canned ones work well. Just make sure to drain them first. You can swap granulated sugar for brown sugar for a richer flavor. If you want a twist, try adding a dash of nutmeg. For a dairy-free option, use a plant-based butter. Choose ripe peaches for the best taste. Look for peaches that feel slightly soft but not mushy. The color should be a warm yellow or orange. Smell the peach; it should have a sweet scent. If they are hard, let them sit at room temperature for a few days to ripen. This will enhance their natural sweetness and flavor. To start, wash and slice your peaches. You need about 4 cups. If you use canned peaches, drain them well. In a large bowl, mix the peaches with 1 cup of granulated sugar, 1 tablespoon of lemon juice, and 1 teaspoon of cinnamon. Toss everything together until the peaches are coated. This step brings out the sweet flavor. Once mixed, spread the peach mixture evenly in a greased 9x13-inch baking dish. Next, take the box of yellow cake mix. Open it and sprinkle it evenly over the peach layer. Do not mix it in. Just let it sit on top. Then, melt 1 cup of unsalted butter. Drizzle the melted butter over the cake mix. Make sure to cover all areas. If you like, sprinkle 1 cup of chopped pecans on top for some crunch. This adds a nice texture and flavor to your cake. Now, it’s time to bake! Preheat your oven to 350°F (175°C). Place the baking dish in the oven and bake for 40 to 45 minutes. Keep an eye on it. The top should turn golden brown and become bubbly. Once done, remove it from the oven. Let it cool for about 10 minutes before serving. This cake is best warm and can be served with vanilla ice cream or whipped cream. Enjoy your delicious peach cobbler dump cake! For the full recipe, check the section above. To get the best texture for your peach cobbler dump cake, follow these tips: - Use fresh peaches when they are in season. They give the best taste and texture. - If you use canned peaches, drain them well. You want to avoid a soggy cake. - Don't mix the dry cake mix with the peaches. This layer creates a lovely crust. - Pour the melted butter all over the cake mix. This step gives a golden top. - Bake until the top is golden brown. This means your cake is done just right. To boost the flavor of your dump cake, try these ideas: - Add a pinch of nutmeg with the cinnamon for warmth. - Use brown sugar instead of granulated sugar for a rich taste. - Consider adding almond extract. This small change adds a nice twist. - Toss in some berries or apples with the peaches for extra flavor. - Top your warm cake with vanilla ice cream or whipped cream. It makes the dish even better! Avoid these pitfalls to ensure your cake turns out great: - Don’t skip the lemon juice. It brightens the flavors and balances the sweetness. - Make sure your butter is fully melted. This ensures even baking. - Avoid overbaking. Keep an eye on the cake as it bakes. - Don't rush the cooling time. Let it rest for about 10 minutes before serving. - Always check the oven temperature. An oven that runs hot can burn your cake. These tips will help you make a peach cobbler dump cake that shines in both taste and texture. For the full recipe, check the details above! {{image_2}} You can switch out peaches for many other fruits. Try using fresh or canned cherries, apples, or blueberries. Each fruit brings its own unique flavor. For example, cherries give a tart bite, while blueberries add sweetness. You can even mix two or more fruits for extra fun. Just keep the same amount of fruit to ensure the cake bakes well. If you need a gluten-free version, you can use gluten-free cake mix. Many brands offer tasty options. Check the labels to find one you like. You can also use almond flour or coconut flour as a base. Just remember to adjust the amount of sugar, as these flours can change the sweetness. Serving your peach cobbler dump cake warm is the best way to enjoy it. I love adding a scoop of vanilla ice cream on top. It melts and mixes with the warm cake, creating a perfect treat. You can also try whipped cream if you prefer. For a nice touch, sprinkle some cinnamon or add a fresh peach slice on top. This makes your dessert extra special! To store leftovers, first let the cake cool. Then, cover it with plastic wrap or foil. You can also use an airtight container. This keeps the cake fresh for a few days. Store it in the fridge if you want it to last longer. It stays good for about 3 to 4 days. If you want to freeze the cake, wait until it cools completely. Cut it into slices for easy serving later. Wrap each piece tightly in plastic wrap. Then, place them in a freezer bag. Be sure to remove as much air as possible. This helps avoid freezer burn. The cake can last in the freezer for up to 3 months. To reheat the cake, take a slice from the fridge or freezer. If it's frozen, let it thaw in the fridge overnight. For a quick warm-up, use the microwave. Heat it for about 30 seconds or until warm. You can also reheat it in the oven. Preheat the oven to 350°F (175°C) and bake for about 10 minutes. Serve it warm with a scoop of vanilla ice cream or whipped cream for extra delight. A dump cake is a very simple dessert. You dump layers of ingredients into a pan. There is no mixing needed, which makes it quick. You can use fruits, cake mix, and butter. The result is a warm, gooey treat. It’s a favorite for many people. Peach Cobbler Dump Cake is a great example of this fun treat. Yes, you can use frozen peaches! Just make sure to thaw them first. Drain any extra liquid to keep your cake from being soggy. Frozen peaches work well and save time. They still taste great in your Peach Cobbler Dump Cake. Leftover Peach Cobbler Dump Cake can last about 3-4 days. Store it in an airtight container in the fridge. If you want it warm, just reheat a slice in the microwave. It tastes almost as good as fresh. Yes, you can make this cake ahead of time! Just prepare it and let it cool. Cover it well and keep it in the fridge. You can bake it the next day. This makes it easy for parties or family meals. If you're in a hurry, check out the Full Recipe for quick steps! This blog post covered the key elements of making a peach cobbler dump cake. You learned about the ingredients and how to choose the best peaches. The step-by-step instructions guided you through preparing and baking the cake. We also shared tips and tricks to enhance flavor and avoid mistakes. Plus, there are fun variations and storage tips. Remember, making this dessert is easy and enjoyable. With the right ingredients and steps, you can create something tasty. Happy baking!

Peach Cobbler Dump Cake Simple and Sweet Delight

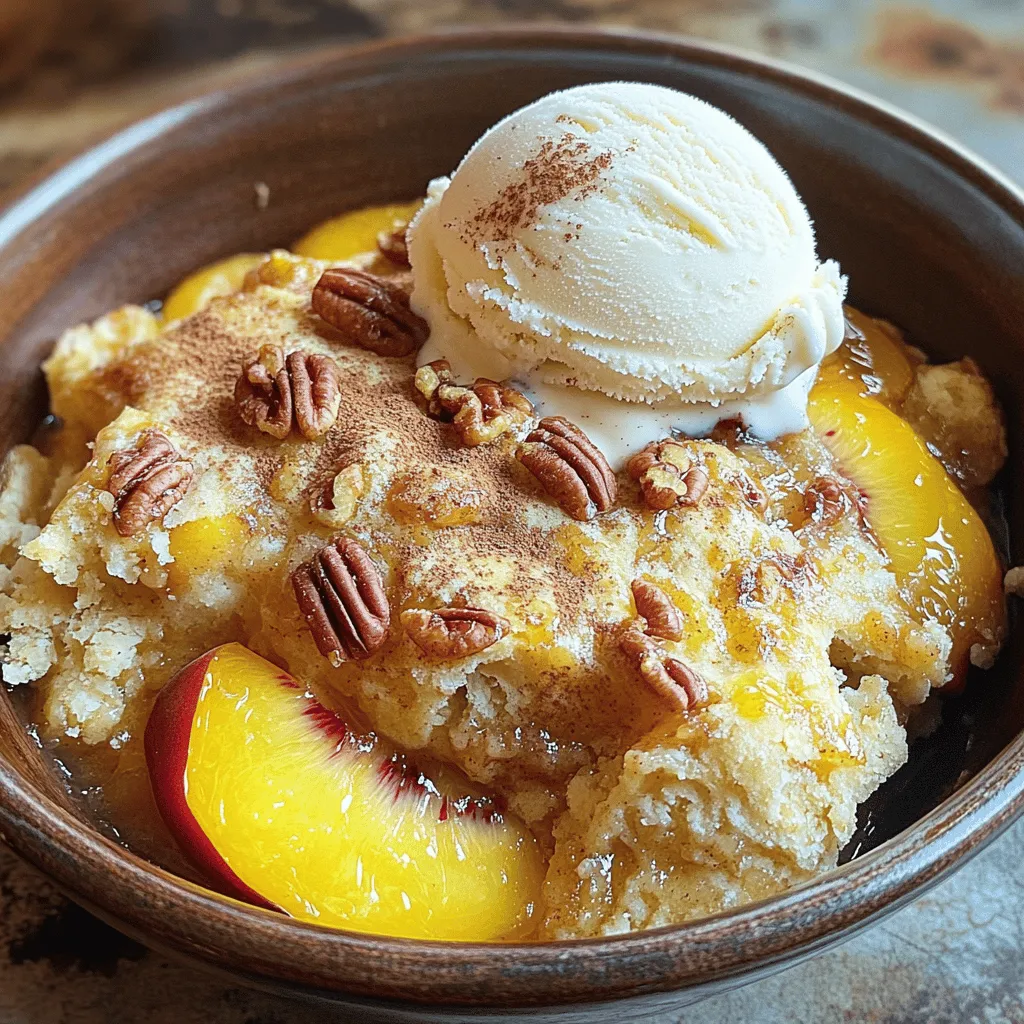
If you crave a sweet and easy dessert, you’ll love Peach Cobbler Dump Cake! This simple recipe combines juicy peaches

- 1 cup jasmine rice - 1 cup coconut milk - 1 cup water - 1 ½ tablespoons sugar - ½ teaspoon salt - 1 ripe mango, peeled and diced - 2 tablespoons shredded coconut (toasted for extra flavor) - Fresh mint leaves for garnish - Additional fruit toppings (e.g. pineapple, kiwi) - Different coconut types (coconut cream or coconut flakes) To make coconut rice with mango, gather your ingredients first. The main star is jasmine rice. It’s fragrant and soft, perfect for this dish. Coconut milk adds a rich creaminess and a hint of sweetness. Water helps cook the rice evenly. Sugar gives it a touch of sweetness, while salt balances the flavors. Don’t forget the ripe mango! It brings a fresh, juicy burst of flavor. You can also toast the shredded coconut for an extra crunch. Fresh mint leaves add a pop of color and refreshing taste. If you want to get creative, consider adding other fruits like pineapple or kiwi. You could swap coconut milk for coconut cream for a richer taste. Using coconut flakes instead of shredded coconut can change the texture, too. These ingredients come together to create a delightful tropical dish. For the full recipe, check the instructions laid out in the article. - Rinse jasmine rice. - Combine the rice, coconut milk, water, sugar, and salt in a saucepan. Rinsing the jasmine rice helps remove extra starch. This step ensures your rice turns out fluffy. After rinsing, drain the rice well. In a medium saucepan, combine the rinsed rice with coconut milk, water, sugar, and salt. Stir everything together until well mixed. This mix sets the stage for creamy, flavorful rice. - Bring to a boil and simmer. - Let rice rest before serving. Next, bring the mixture to a gentle boil over medium heat. Once it boils, reduce the heat to low and cover the pot. Let it simmer for about 15 to 18 minutes. You want the rice to soak up all the liquid and become tender. When the rice is cooked, remove it from the heat and let it rest for 5 minutes. This resting time helps the rice finish cooking. After resting, fluff it gently with a fork to separate the grains. - Prepare and add mango. - Garnish for presentation. While the rice rests, take a ripe mango. Peel and cut it into small cubes. Once the rice is ready, serve it warm. Top it with the diced mango for a sweet touch. For added flavor, sprinkle some toasted shredded coconut on top. Finally, add fresh mint leaves for a pop of color. This makes your dish look fresh and inviting. If you want to see the complete recipe, check out the Full Recipe. Enjoy this delightful tropical dish! To keep your rice from being mushy, rinse it well. Rinse the jasmine rice under cold water until the water runs clear. This step removes extra starch that can make the rice sticky. After rinsing, let it drain well. To get the right sweetness, adjust the sugar. Start with 1 ½ tablespoons, then taste. If you want more sweetness, add a little more sugar. The coconut milk also adds a natural sweetness. Coconut rice pairs well with many dishes. Serve it alongside grilled chicken or shrimp for a tasty mix. It also goes well with spicy curries or stir-fried veggies. For a beautiful presentation, layer the rice in a bowl. Top it with diced mango and sprinkle with toasted coconut. Add fresh mint leaves for a nice touch. This makes the dish look colorful and fresh. You can add spices to boost flavor. Try a pinch of cinnamon or cardamom. These spices add warmth and depth to the dish. To add crunch, mix in some nuts or seeds. Toasted almonds or cashews work well. They not only add texture but also enhance flavor. This gives your coconut rice a delightful twist. {{image_2}} You can play with the base of this dish. Try swapping jasmine rice for basmati or brown rice. Both types have their own charm. Basmati adds a nutty flavor, while brown rice gives a nice chew. You can also use other types of milk. Almond milk or soy milk work well. They bring a different twist to the creaminess of coconut. To elevate your coconut rice, think about adding fresh herbs. Basil or lemongrass can add a bright note. These herbs balance the sweetness of the coconut and mango. Spices also enhance the flavor. A touch of cardamom or cinnamon can warm up the dish. Just a pinch can make a big difference. Feel free to change up the fruit based on the season. If mango is not ripe, use pineapple or papaya. These fruits add their own sweetness and tang. You can also adapt the dish for holidays. For a festive touch, add pomegranate seeds or cranberries. They add color and a burst of flavor. After enjoying your coconut rice with mango, store any leftovers in an airtight container. This keeps the rice fresh and tasty. Place the container in the fridge. It will last about three to four days. To reheat, you can use either the microwave or the stovetop. If using the microwave, place the rice in a bowl and add a splash of water. Cover it loosely and heat for one minute. Stir and heat for another minute if needed. On the stovetop, add a little water to a pan. Heat over low until warm, stirring gently. This helps keep the rice fluffy. If you want to save some for later, you can freeze coconut rice. Use a freezer-safe container and portion out the rice. Make sure to leave some space for expansion. It can last for up to three months in the freezer. When ready to eat, thaw the rice overnight in the fridge. For best results, reheat it on the stovetop with a splash of water. This ensures you keep that nice, tender texture. To make coconut rice with mango, start with jasmine rice. Rinse it under cold water until the water is clear. This step helps remove excess starch. After rinsing, combine the rice with coconut milk, water, sugar, and salt in a saucepan. Stir the mixture well. Next, bring the mixture to a gentle boil on medium heat. Once it boils, lower the heat and cover the pot. Let it simmer for about 15 to 18 minutes. This allows the rice to absorb all the tasty coconut milk. When done, remove it from the heat and let it sit covered for five minutes. Finally, fluff the rice with a fork and add diced mango on top. You can finish it off with toasted coconut and mint leaves for a fresh touch. You can find the full recipe for more details. Yes, you can easily make coconut rice with mango vegan. Simply use plant-based milk instead of coconut milk. Almond or oat milk works well. You can also substitute sugar with maple syrup or agave nectar to keep it vegan. These swaps maintain the dish's flavor while making it suitable for a vegan diet. Coconut rice with mango pairs nicely with various dishes. Try it with spicy curries for a great balance of flavors. You can also serve it alongside grilled chicken or fish. It complements fresh salads or vegetable stir-fries as well. For breakfast, serve it with a side of yogurt and nuts for a delightful start to your day. You’ve learned how to create a delicious coconut rice with mango dish. We covered the main ingredients, step-by-step cooking instructions, and tips to enhance flavor. You also saw various alternatives and storage techniques. Remember, the key is in the balance of flavors. Feel free to experiment with fruits and spices. This dish is not just a treat; it’s also easy to make and share. Enjoy your cooking adventure!

Coconut Rice with Mango Delightful Tropical Dish

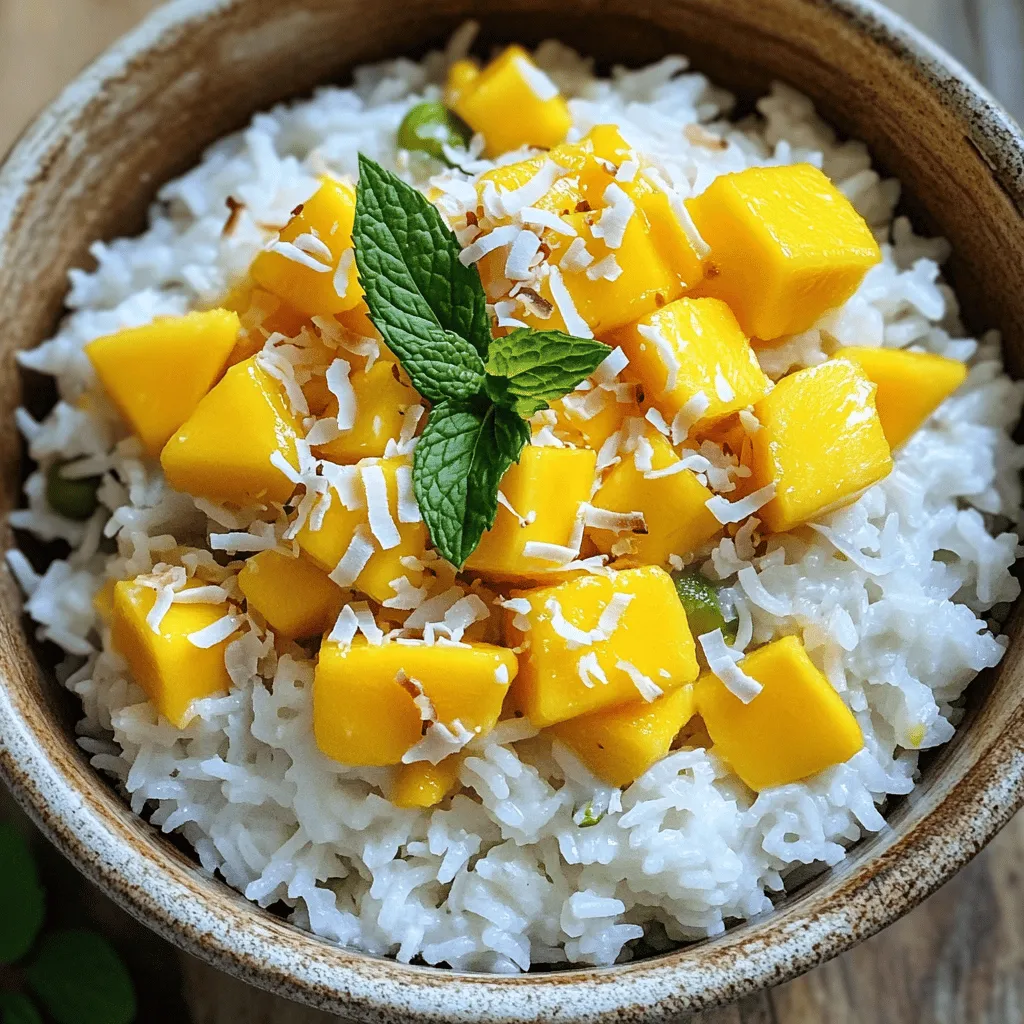
Are you ready to escape to paradise with a tropical treat? Coconut Rice with Mango brings the vibrant flavors of

To make stuffed bell peppers, gather these ingredients: - 4 large bell peppers (any color) - 1 cup quinoa, rinsed - 2 cups vegetable broth - 1 can (15 oz) black beans, drained and rinsed - 1 cup corn (frozen or fresh) - 1 cup diced tomatoes (canned or fresh) - 1 teaspoon cumin - 1 teaspoon smoked paprika - 1 avocado, diced - 1/2 cup fresh cilantro, chopped - Salt and pepper to taste - 1/2 cup shredded cheese (optional, for topping) - Olive oil for drizzling You can also add other ingredients like cooked ground turkey or spices to change the flavor. For this recipe, you will need: - A baking dish for the peppers - Mixing bowls to combine the filling - A medium saucepan for cooking the quinoa - A knife for cutting the peppers - A spoon for stuffing the peppers This simple setup will help you whip up these colorful, tasty stuffed peppers with ease. Start by rinsing the quinoa. This step removes bitterness. Use a fine mesh strainer for best results. Next, bring 2 cups of vegetable broth to a boil in a medium saucepan. Once boiling, add the rinsed quinoa. Reduce the heat to low and cover the pot. Let it simmer for about 15 minutes. The quinoa is done when it's fluffy and the liquid is absorbed. Fluff it with a fork and set it aside. Grab your large bell peppers and slice off the tops. Remove the seeds and membranes from inside. This makes room for the tasty filling. Lightly drizzle the outside of each pepper with olive oil. Place them upright in a baking dish. This helps them cook evenly. In a large mixing bowl, combine the cooked quinoa, black beans, corn, diced tomatoes, cumin, smoked paprika, salt, and pepper. Mix everything well until it’s all combined. Now, it’s time to stuff the peppers. Spoon the mixture into each pepper, pressing down gently to pack it in. If you like cheese, sprinkle some on top. Cover the baking dish with aluminum foil. Bake in the preheated oven at 375°F (190°C) for 25 minutes. After that, remove the foil and bake for another 10-15 minutes. The peppers should be tender and the tops golden. Once done, let them cool for a few minutes. Top with diced avocado and fresh cilantro before serving. You can find the complete recipe for this dish [Full Recipe]. To make sure your peppers are tender, follow a few important steps. First, choose large, firm bell peppers. They hold the filling well and cook evenly. Before stuffing, drizzle a bit of olive oil on the outside. This helps them roast nicely. The filling should be packed but not too tight. This way, it cooks well without the peppers bursting. Bake them covered with foil first. This keeps moisture in. Remove the foil for the last few minutes to get a nice golden top. Garnishing your stuffed peppers can make them pop! After baking, top each pepper with fresh avocado and chopped cilantro. This adds color and flavor. You can also sprinkle some cheese on top before baking for a melty finish. Serve your peppers on a bright plate for a fun look. Pair them with a side salad or some crusty bread. This gives a nice balance to the meal. There are a few things to watch out for when making stuffed bell peppers. One common mistake is not cooking the quinoa enough. Make sure it is fluffy and all the liquid is absorbed before mixing. Another issue is overstuffing the peppers. Too much filling can cause them to burst. Lastly, watch the cooking time. If they bake too long, the peppers can become mushy. Check them a few minutes early to avoid this. Following these tips will help you make perfect stuffed bell peppers every time. Enjoy the full recipe for Colorful Quinoa Stuffed Bell Peppers for more details! {{image_2}} To make stuffed bell peppers vegetarian, focus on plant-based proteins. Use beans, lentils, or quinoa as your base. Here are some tips to create a tasty filling: - Beans: Black beans or kidney beans add texture and protein. - Grains: Quinoa or brown rice provide a hearty base. - Veggies: Add diced zucchini, mushrooms, or spinach for flavor. - Herbs and Spices: Use garlic, onion, and cumin for extra taste. Mix these ingredients well, and stuff your peppers generously. You will have a colorful and flavorful dish! If you're looking for low-carb or keto-friendly options, you can easily make some changes. Here’s how: - Substitute Rice: Use cauliflower rice instead of quinoa or regular rice. - Add Meat: Ground turkey or chicken keeps it low in carbs while adding flavor. - Skip the Beans: Instead of beans, add more vegetables like bell pepper or mushrooms. - Cheese: Top your peppers with cheese for added taste and a low-carb boost. These swaps create a satisfying meal without the extra carbs. Adding protein makes stuffed bell peppers filling and nutritious. Here are some ideas for a protein-packed version: - Ground Meat: Use ground beef, turkey, or chicken mixed with your filling. - Beans: Incorporate black beans or chickpeas for plant-based protein. - Eggs: Mix in beaten eggs to bind the filling and add extra protein. - Cheese: Sprinkle cheese inside the filling and on top for a creamy texture. These options ensure your meal is hearty and satisfying. For the complete recipe, check out the Full Recipe section! To store stuffed bell peppers in the fridge, let them cool first. Place the peppers in an airtight container. This keeps them fresh for up to four days. If you want to keep them longer, consider freezing instead. Make sure to label the container with the date, so you know when you made them. Freezing stuffed bell peppers is easy. Here’s how you do it: 1. Cool the Peppers: Allow the stuffed peppers to cool completely. 2. Wrap: Wrap each pepper tightly in plastic wrap. 3. Bag: Place the wrapped peppers in a freezer-safe bag. 4. Label: Write the date on the bag for easy tracking. 5. Store: Put them in the freezer. They can last up to three months. When you are ready to use them, just thaw in the fridge overnight before reheating. To reheat stuffed bell peppers, follow these steps: - Oven Method: Preheat the oven to 350°F (175°C). Place the peppers in a baking dish. Add a splash of water to keep them moist. Cover with foil and heat for about 20-25 minutes. - Microwave Method: Place a pepper on a microwave-safe plate. Cover it with a damp paper towel. Heat on high for about 2-3 minutes, checking if it’s hot. Both methods keep the peppers tender and tasty. Enjoy your meal! For the full recipe, check out [Full Recipe]. For stuffing, I recommend using large bell peppers. They hold the filling well. Color-wise, red, yellow, and orange peppers are sweet and tasty. Green peppers are less sweet, but they still work great. Choose peppers that are firm and smooth. They should have no blemishes or soft spots. This ensures your stuffed bell peppers are fresh and flavorful. Yes, you can prep your stuffed bell peppers in advance. Prepare the filling and stuff the peppers. Then, cover them and store them in the fridge. They stay fresh for up to two days. When ready to cook, just bake them as directed. This method saves time and makes meal planning easier. I always find this helpful when I have a busy week ahead. Look for a few signs to know your stuffed peppers are ready. First, the peppers should be tender but not mushy. A fork should easily pierce the flesh. Second, the filling should be hot all the way through. Lastly, if you added cheese, it should be bubbly and slightly golden. These signs mean your stuffed bell peppers are perfect! For the full recipe, check out the details above. Stuffed bell peppers are a fun and healthy dish. We covered all the key steps, from gathering ingredients to storage tips. You can mix and match flavors to suit your taste or diet. Pay attention to cooking times for tasty results. Remember, avoid common mistakes for the best peppers. With these tips, you can master stuffed bell peppers easily. Now, it's time to enjoy your delicious creation!

Stuffed Bell Peppers Flavorful and Simple Recipe

Are you ready to create a dish that bursts with flavor and is super easy to make? Stuffed bell peppers

- 2 boneless chicken breasts - 1/4 cup honey - 2 tablespoons Dijon mustard - 1 tablespoon olive oil - Salt and pepper to taste - 4 whole wheat tortillas - 1 cup mixed greens (spinach, arugula, and kale) - 1/2 red bell pepper, thinly sliced - 1/2 cucumber, thinly sliced - 1/4 red onion, thinly sliced - 1 avocado, sliced - Optional: sesame seeds for garnish Gather these fresh ingredients before you start cooking. Using fresh items makes a big difference in flavor and nutrition. I love using whole wheat tortillas for this recipe; they add a nice, nutty taste. The honey and mustard mix brings out the chicken's flavor, making each bite a delight. You can also customize your wraps with your favorite veggies. Check out the Full Recipe for more details on preparation and cooking steps. - Marinating the chicken Start by making a honey mustard marinade. In a small bowl, mix together 1/4 cup honey, 2 tablespoons Dijon mustard, 1 tablespoon olive oil, and a pinch of salt and pepper. This sauce adds a sweet and tangy flavor to the chicken. Place the 2 boneless chicken breasts in a shallow dish and pour half of the marinade over them. Make sure the chicken is well-coated. Let it marinate for at least 15 minutes. This step makes the chicken juicy and tasty. - Preparing the honey mustard sauce While the chicken marinates, reserve the other half of the honey mustard sauce. You’ll use this sauce later when assembling the wraps. This sauce is key for adding flavor to your wraps. - Grilling the chicken breasts Preheat your grill or grill pan to medium-high heat. Once hot, grill the chicken breasts for about 6-7 minutes per side. Cook until they reach an internal temperature of 165°F (75°C). After cooking, let the chicken rest for 5 minutes. Resting allows the juices to stay inside the chicken, making it tender. Slice the chicken into strips for easy wrapping. - Warming the tortillas While the chicken rests, warm the tortillas in a dry skillet. Heat each tortilla for about 30 seconds on each side. This step makes the tortillas soft and easy to roll. Warm tortillas also help prevent tearing when you assemble the wraps. - Assembling the wraps Lay a tortilla flat on a clean surface. Spread a tablespoon of the reserved honey mustard sauce on it. Add a handful of mixed greens in the center of the tortilla. Then, layer the sliced grilled chicken, thinly sliced red bell pepper, cucumber, red onion, and avocado slices on top. Each ingredient adds flavor and crunch. - Tips for folding and securing wraps To fold the wrap, start by folding in the sides of the tortilla. Then, roll it up tightly from the bottom to the top. This method keeps all the fillings secure inside. If you want, slice the wraps in half diagonally for easier serving. For a nice touch, sprinkle sesame seeds on top for extra crunch. Follow these steps for delicious honey mustard chicken wraps. They are easy to make and perfect for any meal! To get the best honey mustard flavor, adjust the sweetness and tanginess. If you like it sweeter, add more honey. If you prefer it tangy, add extra Dijon mustard. Taste your marinade before using it. This way, you can find the right balance for you. For marinating time, I suggest at least 15 minutes. This allows the chicken to soak up the flavors. If you have more time, marinate it for up to an hour. Longer marinating helps the chicken taste even better. Make sure your chicken is cooked through. Use a meat thermometer. The chicken should reach 165°F (75°C) to be safe to eat. Grill the chicken for about 6-7 minutes on each side. This gives it nice grill marks and flavor. To get those great grill marks, avoid moving the chicken too much. Let it sit on the grill for a few minutes before flipping. This helps create that beautiful sear you want. When it comes to sides, pair your wraps with simple options. Fresh fruit or a light salad works well. It keeps the meal light and refreshing. Try serving with a yogurt dip or a honey mustard sauce for extra flavor. For dipping sauces, you can use ranch or a spicy aioli. These add a fun twist and can make your meal more exciting. Enjoy experimenting with different flavors and sides! For the full recipe, check out the detailed instructions included above. {{image_2}} You can make honey mustard wraps without chicken. Try using grilled vegetables. Grilled zucchini, bell peppers, and eggplant work well. They add flavor and texture. Another option is to use plant-based proteins. Tofu or tempeh can soak up the honey mustard sauce. This makes them tasty and filling. Explore different types of tortillas for your wraps. You can choose gluten-free or low-carb options. Corn or lettuce wraps are also great choices. Each adds a unique taste. You should also think about greens and veggies. Try arugula, romaine, or even shredded carrots. They add crunch and color to your wrap. Want to add more flavor? Try spices or herbs in the marinade. Garlic powder, paprika, or thyme can boost taste. You can also mix in other sauces. Ranch or BBQ sauce can create fun twists. These changes let you customize the wraps to your liking, making each bite special. For the full recipe, check out the detailed instructions above. To keep your honey mustard chicken wraps fresh, wrap them tightly in plastic wrap or foil. Place them in an airtight container before storing. This helps keep moisture in and air out. Leftover wraps will last in the fridge for about 3 days. After that, they may lose flavor and texture. If you want to save wraps for later, freezing is a great option. Wrap each assembled wrap in plastic wrap and then place them in a freezer bag. This keeps them safe from freezer burn. To thaw, move the wraps to the fridge for a few hours or overnight. You can also microwave them on low for a quick thaw. Heat them in the microwave for about 1-2 minutes until warm. If you have leftover ingredients, get creative! You can use extra chicken in salads or grain bowls. Mix the honey mustard sauce with yogurt for a tasty dip. Use leftover veggies in omelets or stir-fries. These ideas help reduce food waste and make new meals fun. Making honey mustard is simple. You need honey, Dijon mustard, and olive oil. Just mix them together in a bowl. Start with equal parts honey and mustard. Adjust to taste. If you want it creamier, add a bit more honey. For a kick, add a splash of vinegar. This easy sauce adds great flavor to your wraps. Yes, you can! Chicken is great, but turkey works too. If you prefer beef, grill some steak slices. For a meatless option, try tofu. Just marinate it like the chicken. You can also use shrimp or fish. Each protein will give the wraps a different taste. I love mixed greens for their crunch and flavor. Spinach, arugula, and kale are my favorites. They add great texture and nutrients. You can also use romaine or lettuce for a lighter option. Feel free to mix and match greens to find your favorite combination. To make these wraps gluten-free, choose gluten-free tortillas. There are many brands available now. Check the label to ensure they are certified gluten-free. You can also use lettuce leaves for a low-carb option. Just wrap your fillings in large leaves. This keeps it fresh and crunchy. Reheat leftovers in a microwave or skillet. If using a microwave, place the wrap on a plate and cover it. Heat for about 30 seconds at a time until warm. In a skillet, warm it on medium heat for a few minutes. This keeps the wrap crispy. Enjoy your tasty leftovers! Honey mustard chicken wraps are tasty and easy to make. You learned about the key ingredients, cooking steps, and variations. Remember to marinate the chicken well for full flavor. Don't be afraid to mix up the veggies or try different sauces. With a few simple tips, you can create a wrap your friends will love. Store leftovers right to enjoy later. This dish is fun to customize, so let your creativity shine. Enjoy your tasty wraps and happy cooking!

Honey Mustard Chicken Wraps Tasty and Easy Recipe

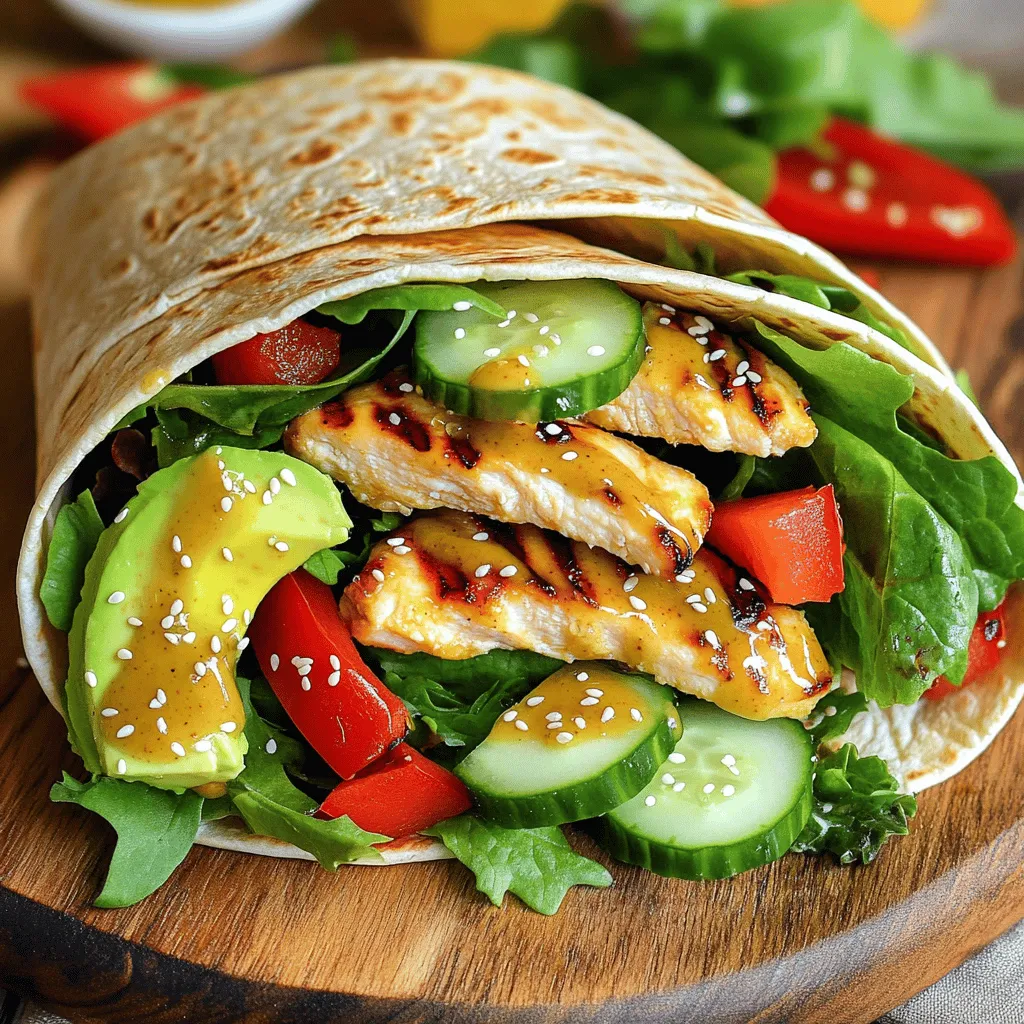
Get ready to elevate your lunch game with my easy Honey Mustard Chicken Wraps! This tasty recipe is packed with

To make delicious carne asada fries, you need fresh ingredients. Here’s what to gather: - 1 lb flank steak - 4 large russet potatoes - 2 tablespoons olive oil - 1 cup shredded cheddar cheese These base ingredients create a hearty and satisfying meal. The right seasonings make the steak shine. Use these for a tasty marinade: - 1 teaspoon chili powder - 1 teaspoon cumin - 1 teaspoon garlic powder - 1 teaspoon onion powder - Salt and pepper to taste Mix these in a bowl. Rub the blend over the flank steak. Let it marinate for at least 30 minutes. This step adds depth and flavor. Toppings can take your fries to the next level. Consider adding: - 1/2 cup sour cream - 1/2 cup guacamole - 1/2 cup pico de gallo - Fresh cilantro for garnish - Sliced jalapeños (optional) These extras bring freshness and creaminess. Feel free to mix and match according to your taste! {{ingredient_image_1}} To start, we will marinate the flank steak. First, mix one teaspoon each of chili powder, cumin, garlic powder, and onion powder in a small bowl. Add salt and pepper to taste. This spice mix adds a lot of flavor. Now, rub this mixture all over the flank steak. Let it sit for at least 30 minutes. For more flavor, you can refrigerate it overnight. Next, let’s prepare the fries. Preheat your oven to 425°F (220°C). Take four large russet potatoes and cut them into fries. Soak the fries in cold water for 30 minutes. This step helps make them crispy. After soaking, drain the fries and dry them with a towel. Now, toss the fries in two tablespoons of olive oil until they are coated. Spread them on a baking sheet lined with parchment paper in a single layer. Bake for 30 to 35 minutes, flipping halfway through. The fries should be golden and crispy. While the fries bake, cook the marinated flank steak. Grill the steak over high heat for about 4 to 5 minutes on each side. This will give you a nice medium-rare. Cook it longer if you like it more done. Once cooked, let the steak rest for 5 minutes. Then, slice it thinly against the grain. Now it’s time to assemble the dish! Once the fries are done, take them out of the oven. Top the hot fries with the sliced carne asada. Sprinkle one cup of shredded cheddar cheese over the top. Put the loaded fries back in the oven for 5 minutes until the cheese melts. After melting, drizzle half a cup of sour cream and half a cup of guacamole over the cheese. Add a generous scoop of half a cup of pico de gallo. Lastly, garnish with fresh cilantro and sliced jalapeños if you like a bit of heat. Enjoy your tasty carne asada fries! To get the best flavor, marinate the steak well. First, mix chili powder, cumin, garlic powder, onion powder, salt, and pepper. Rub this blend over the flank steak. Let it sit for at least 30 minutes. If you have more time, marinate overnight in the fridge. This helps the flavors soak in deeply. Always slice the steak against the grain. This keeps it tender and easy to chew. Start by cutting the russet potatoes into fries. Soak them in cold water for 30 minutes. This removes extra starch and helps them crisp up. After soaking, drain the fries and dry them with a towel. Coat them in olive oil. Spread the fries in a single layer on a baking sheet. Bake at 425°F (220°C) for 30-35 minutes. Flip them halfway for even cooking. When they are golden, you will know they are perfect. To melt cheese perfectly, sprinkle shredded cheddar over the hot fries and steak. Return the loaded fries to the oven for 5 minutes. The heat will melt the cheese nicely. Watch closely to avoid burning. A great tip is to use a broiler for 1-2 minutes for a bubbly finish. Just keep an eye on it! Enjoy your cheesy, savory creation while it’s hot. Pro Tips Marination Magic: Allow the flank steak to marinate overnight for a deeper flavor infusion. Perfectly Cut Fries: Ensure your potato fries are uniformly cut for even cooking and crispiness. Resting the Steak: Let the grilled steak rest before slicing to retain its juices and tenderness. Cheese Melting Tip: Broil the loaded fries for a minute after melting the cheese for a golden finish. {{image_2}} You can switch up the protein in carne asada fries. Try chicken, pork, or shrimp. Marinate these proteins like you do with steak. Use the same spices for tasty results. Each meat adds its own flavor. Chicken works well for a lighter dish. Pork gives a savory twist. Shrimp adds a seafood touch. Want a meat-free option? Use grilled veggies or tofu instead. For the veggies, consider bell peppers, zucchini, and mushrooms. Season them like steak for great taste. Tofu absorbs flavors well, so marinate it too. This way, you still enjoy the rich flavors of carne asada fries. Get creative with toppings! Besides cheese, sour cream, and guacamole, try these ideas: - Black beans for extra protein - Corn salsa for sweetness - Radishes for a crunchy bite - Chipotle crema for a spicy kick Mix and match toppings to fit your mood. You can even add a fried egg on top for breakfast-style fries. Enjoy making this dish uniquely yours! After enjoying your carne asada fries, you may have some left. Store the leftovers in an airtight container. Place the fries and steak in separate containers. This keeps them fresh and prevents sogginess. You can store them in the fridge for up to three days. To reheat the fries, use the oven. Preheat it to 400°F (200°C). Spread the fries on a baking sheet. Bake for about 10 minutes until they are hot and crispy again. For the steak, use a skillet over medium heat. Warm it for a few minutes on each side to keep it juicy. Avoid using the microwave, as it can make both the fries and steak soft. If you want to save some fries and steak for later, freezing is an option. First, let the fries cool completely. Then, place them in a single layer on a baking sheet. Freeze them for about an hour. This prevents them from sticking together. After they are frozen, transfer them to a freezer bag. For the steak, slice it thinly and wrap it tightly in plastic wrap. Store both items for up to three months. When you're ready to eat, thaw them in the fridge overnight before reheating. Carne Asada Fries are a tasty dish that combines crispy fries and grilled steak. You start with golden, crispy potato fries. Then, you top them with marinated, grilled flank steak. Next, add melty cheese, sour cream, guacamole, and pico de gallo. The result is a delicious, filling meal perfect for any time. Yes, you can make Carne Asada Fries in advance. Prepare the steak and fries separately. Store each in airtight containers in the fridge. You can grill the steak and bake the fries ahead of time. When you are ready to eat, just reheat and assemble. This makes it easy to enjoy them later! Carne Asada Fries pair well with many side dishes. Here are some great options: - Mexican street corn (elote) - Simple green salad with lime dressing - Black beans for added protein - Chips and salsa for a crunchy side These sides can add variety and balance to your meal! Carne asada fries are a fun dish to make. We explored the key ingredients, marinating techniques, and preparation steps. I shared tips for perfect fries and melted cheese. You can customize with different proteins or toppings, even for vegetarians. Store leftovers properly to keep them tasty. Enjoy experimenting with flavors and find your favorite combination! This dish is a great way to impress family and friends.

Carne Asada Fries Tasty Meal to Enjoy Anytime

Craving a tasty meal that you can enjoy anytime? Look no further than Carne Asada Fries! This dish melds tender

To make a great Spaghetti Aglio e Olio, you need simple, quality ingredients. Here’s what I use: - 400g spaghetti - 6 cloves garlic, thinly sliced - 1/2 cup extra virgin olive oil - 1 teaspoon red pepper flakes - 1/4 cup fresh parsley, chopped - Salt, to taste - Zest of 1 lemon These ingredients create a dish full of flavor. The garlic gives the pasta its signature taste. The olive oil adds richness, while the red pepper flakes bring heat. You can adjust the recipe with a few optional ingredients. Here are some I love to add: - Grated Parmesan cheese (for serving) - Lemon juice (for extra brightness) Adding these can elevate the dish. Cheese adds creaminess, and lemon juice brightens the flavors even more. Spaghetti Aglio e Olio pairs well with several sides. Here are my top picks: - A fresh green salad - Garlic bread - Steamed vegetables These sides balance the meal. A salad adds crunch, and garlic bread complements the pasta nicely. You can enjoy this dish with any of these options to complete your meal. For the full recipe, check out the detailed steps and tips. First, gather all your ingredients. You need: - 400g spaghetti - 6 cloves garlic, thinly sliced - 1/2 cup extra virgin olive oil - 1 teaspoon red pepper flakes - 1/4 cup fresh parsley, chopped - Salt, to taste - Zest of 1 lemon - Grated Parmesan cheese (optional) Make sure to measure everything out. This will help you cook faster. Start by boiling a large pot of salted water. Once it boils, add the spaghetti. Cook it according to the package instructions until it's al dente. This usually takes around 8-10 minutes. While the pasta cooks, heat the olive oil in a large skillet over medium heat. Add the sliced garlic and sauté it gently. Keep an eye on it! Cook for about 2-3 minutes until the garlic turns golden and smells great. Be careful not to burn it. Next, stir in the red pepper flakes. This will add a nice kick to the oil. Cook for another 30 seconds to let the flavors blend. After the pasta is ready, reserve one cup of the pasta water. Then, drain the spaghetti. Add the spaghetti to the skillet with the garlic oil. Toss everything together. If the pasta seems dry, add a bit of the reserved pasta water to loosen it up. Remove the skillet from heat. Now, stir in the fresh parsley, lemon zest, and salt. Mix everything well to make sure the flavors combine. To serve, place the spaghetti on plates. You can arrange it in a nest shape for a nice look. Drizzle some extra virgin olive oil on top. If you want, add grated Parmesan cheese for creaminess. For a fun touch, garnish with more parsley and a lemon wedge. This makes the dish bright and inviting. Enjoy your savory spaghetti aglio e olio! To get the best garlic flavor, always use fresh garlic. Thinly slice the cloves to release their oils. Heat the olive oil gently before adding garlic. This helps the garlic cook evenly. Stir often to avoid burning. Cook until golden, not brown. A little patience makes a big difference. To cook al dente pasta, start with a large pot of salted water. Bring it to a rolling boil before adding the spaghetti. Follow the package instructions, but check a minute early. The pasta should be firm yet tender. Remember to reserve some pasta water before draining. This water can help adjust the sauce later. For a beautiful presentation, twist the spaghetti into nests on the plate. Drizzle a little extra virgin olive oil on top. Add fresh parsley for color and flavor. A wedge of lemon adds a nice touch too. If you like cheese, sprinkle grated Parmesan on top. It makes the dish look and taste even better. {{image_2}} You can easily add proteins to your spaghetti aglio e olio. Shrimp cooks fast and adds a nice flavor. Just sauté the shrimp for a few minutes before adding the garlic. Chicken is another great choice. Use small pieces and cook them until they’re golden. For a plant-based option, try tofu. Press it to remove extra water, then cube and sauté until crispy. Each protein brings a unique twist to this classic dish. Making spaghetti aglio e olio vegetarian is simple. Just skip the cheese or use a vegan version. You can also add vegetables like spinach or cherry tomatoes for added color and taste. If you want to make it vegan, use nutritional yeast instead of cheese. This adds a cheesy flavor without any dairy. These options keep the dish light but full of flavor. Don't be afraid to have fun with flavors! Fresh herbs like basil or oregano can change the taste a lot. You can toss them in at the end for freshness. A bit of lemon juice enhances the dish too. For spice lovers, try adding more red pepper flakes or even a dash of smoked paprika. Each adjustment can create a new favorite version of this dish. Experiment and find what you love best! For the full recipe, check out the details above. After enjoying your spaghetti, let the leftovers cool down. Place the spaghetti in an airtight container. This keeps it fresh and tasty. You can store it in the fridge for up to three days. If you want to keep it longer, consider freezing it. Make sure to leave some space in the container. The pasta will expand as it freezes. When you're ready to eat your leftovers, reheating is key. For best results, use the stove. Put the spaghetti in a skillet over low heat. Add a splash of water or olive oil. Stir often to heat evenly. This helps keep the pasta moist and soft. You can also use the microwave. Just cover the dish and add a little water. Heat it in short bursts to avoid drying it out. If you choose to freeze your spaghetti, follow these steps. First, let the dish cool completely. Then, portion it into containers or freezer bags. Make sure to squeeze out the air before sealing. Label the bags with the date. Frozen spaghetti can last up to three months. When you’re ready to eat, thaw it in the fridge overnight. Then, reheat as mentioned above. Enjoy your easy and delicious spaghetti anytime! Spaghetti Aglio e Olio is a simple Italian pasta dish. It uses just a few ingredients: spaghetti, garlic, olive oil, and red pepper flakes. The name means "spaghetti with garlic and oil" in Italian. This dish is quick to make, yet full of flavor. You can find it in many Italian restaurants. It’s popular because it’s easy and uses pantry staples. To avoid burning garlic, you need to watch it carefully. Start with medium heat when you cook the garlic in olive oil. Add the sliced garlic to the oil and stir often. Cook it for 2-3 minutes until it turns golden and fragrant. Remove it from the heat before it gets too dark. If you smell a strong burning scent, it’s too late. Remember, burnt garlic tastes bitter. Yes, you can customize Spaghetti Aglio e Olio easily. For a milder dish, reduce the red pepper flakes. You can add more garlic for a stronger flavor. If you like tang, add lemon zest or juice. Fresh herbs like basil or oregano can bring in new flavors. You can also add protein like shrimp or chicken for a heartier meal. The choice is yours! For more details, check the Full Recipe. Spaghetti Aglio e Olio is simple yet delightful. You learned about key ingredients and optional extras for flavor. You discovered step-by-step instructions for perfect pasta and serving tips. I shared ways to enhance garlic flavor and ensure your pasta is al dente. You can also explore variations with proteins and herbs. Remember to store leftovers properly and keep meal quality high. Enjoy your cooking journey, and feel free to tweak the recipe to fit your taste!

Savory Spaghetti Aglio e Olio Simple and Quick Recipe

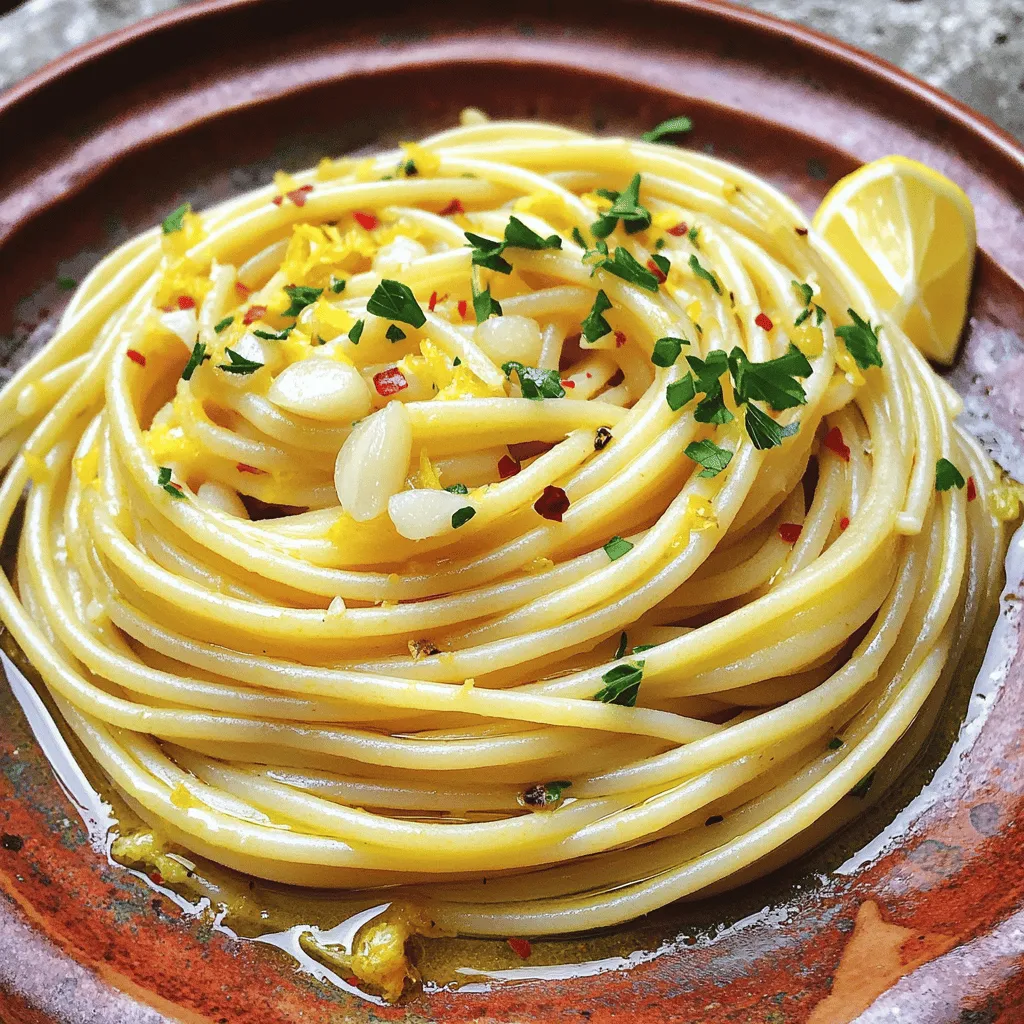
Looking for a quick meal that bursts with flavor? Spaghetti Aglio e Olio is the answer! This simple dish combines

To make this tasty mango coconut chia pudding, you need the following: - 1 cup coconut milk (canned or carton) - 1/2 cup almond milk (or any milk of choice) - 1/3 cup chia seeds - 2 tablespoons maple syrup (optional for sweetness) - 1 ripe mango, diced - 1 teaspoon vanilla extract - Pinch of salt - Toasted coconut flakes, for garnish - Fresh mint leaves, for garnish You can swap any milk for coconut or almond milk based on your taste. If you prefer a sweeter pudding, add more maple syrup. You can also use honey or agave syrup as alternatives. For a creamier texture, use full-fat coconut milk. The chia seeds are key, so don’t skip them! They absorb liquid and create a thick pudding. This pudding is not just tasty but also healthy. Chia seeds are rich in fiber and protein. They help keep you full. Coconut milk adds healthy fats, while mango gives you vitamins. Each serving is about 200 calories, with healthy fats and natural sugars. It’s a great snack or breakfast option! Making mango coconut chia pudding is simple and fun. You will need just a few steps. First, gather your ingredients. You will mix everything in a bowl and chill it. Then, you will serve it with fresh mango and coconut toppings. This easy process makes it a great choice for busy days. 1. In a mixing bowl, combine these ingredients: - 1 cup coconut milk - 1/2 cup almond milk - 1/3 cup chia seeds - 2 tablespoons maple syrup (optional) - 1 teaspoon vanilla extract - Pinch of salt 2. Stir the mixture well. You want to make sure there are no clumps of chia seeds. 3. Cover the bowl with a lid or plastic wrap. Place it in the fridge for at least 4 hours or overnight. This time helps the chia seeds swell and turn your mix into pudding. 4. After it thickens, give it a good stir. Then divide it into jars or bowls for serving. 5. Top each serving with diced mango, making sure it covers the pudding nicely. 6. Add toasted coconut flakes and a few fresh mint leaves on top for a pretty finish. 7. Serve chilled and enjoy your creamy, tropical treat! To get the best pudding, follow these tips: - Stir the mix a couple of times in the first hour. This helps the chia seeds mix evenly. - Use full-fat coconut milk for creaminess. It makes a richer pudding. - Make sure to chill it long enough. The longer it sits, the thicker it gets. - If it’s too thick, stir in a little more milk to your liking. For more details, check the Full Recipe. You can make mango coconut chia pudding a day in advance. Just mix all the ingredients in a bowl. Cover it tightly and place it in the fridge. The chia seeds need time to soak up the liquid. This gives you a creamy pudding texture. If you want it thicker, let it sit overnight. This way, you can enjoy a quick breakfast or snack. For a lovely presentation, use clear jars or bowls. Layer the pudding with diced mango on top. Sprinkle toasted coconut flakes for crunch. Add fresh mint leaves for a pop of color. You can also drizzle some maple syrup on top for extra sweetness. This makes your dessert look and taste amazing. You could even serve it at parties to impress your friends. This recipe is very flexible. If you need it dairy-free, stick with coconut and almond milk. For a vegan option, skip the honey and use maple syrup. If you have nut allergies, use oat milk or soy milk instead. You can also swap chia seeds for flax seeds if you prefer. Just remember, the texture will change a bit. You can still enjoy a tasty treat with these simple swaps! For the complete recipe, check out the Full Recipe section. {{image_2}} You can change the flavor of mango coconut chia pudding by adding other fruits. Berries like strawberries, blueberries, or raspberries work well. Simply mix in your choice of fruit before chilling. You can also try bananas, peaches, or kiwi for a unique taste twist. Mixing different fruits gives you a fun way to enjoy this dish. You can easily swap the coconut milk or almond milk with other types of milk. Try oat milk or soy milk for a different flavor. If you want it creamier, use cashew milk. For sweeteners, maple syrup is great, but you can also use honey or agave syrup. Adjust the sweetness to your taste. Toppings can add extra flavor and texture. Besides toasted coconut flakes, try chopped nuts or seeds for crunch. You can also use fresh fruit slices or a drizzle of honey. Some people enjoy a sprinkle of cinnamon or a few chocolate chips. Get creative with your toppings to make each serving special. For the full recipe, check out the details above. Store your mango coconut chia pudding in an airtight container. Glass jars work well. Make sure to seal it tightly to keep out air. This method keeps your pudding fresh for longer. You can also layer it with fresh mango and coconut flakes for easy serving. Chia pudding lasts about five days in the fridge. After that, it may lose its flavor and texture. Always check for any off smells or colors before eating. If it looks or smells strange, it’s best to throw it out. Chia pudding is best served cold. You don’t need to reheat it. If you prefer a warm treat, heat the pudding gently in a pot. Stir to keep it smooth. Top with fresh fruits or nuts right before serving. This adds flavor and texture to your dish. For more ideas, check the Full Recipe. Chia seeds are small but mighty. They pack in protein, fiber, and healthy fats. Eating them can help you feel full. This can aid in weight control. Chia seeds are also high in omega-3 fatty acids. These fats support heart health. Plus, they help reduce inflammation in the body. They can regulate blood sugar levels too. Adding chia seeds to your diet is a smart choice for health. Yes, you can use frozen mango. It works well and saves time. Just thaw the mango before using it. The flavor stays sweet and tasty. Frozen mango might be softer than fresh mango. This can add a nice texture to your pudding. If you want a chillier treat, use the frozen mango right away. It will keep your pudding cool and refreshing. The pudding lasts about 5 days in the fridge. Make sure to store it in a sealed container. This keeps it fresh and tasty. If you see any water on top, just stir it back in. It won’t affect the flavor. Enjoy your mango coconut chia pudding throughout the week! For the full recipe, check the earlier sections. This blog post covers the key steps to make delicious chia pudding. We looked at the ingredients, measurements, and nutritional info. I shared detailed cooking instructions and tips for a perfect texture. We discussed ways to prep ahead and serve with flair. You can explore flavor variations and substitutions too. Finally, I covered storage and common questions about chia seeds. With this guide, you’ll create tasty, healthy chia pudding that suits your needs. It's time to enjoy your creation and impress your friends!

Mango Coconut Chia Pudding Easy and Healthy Recipe

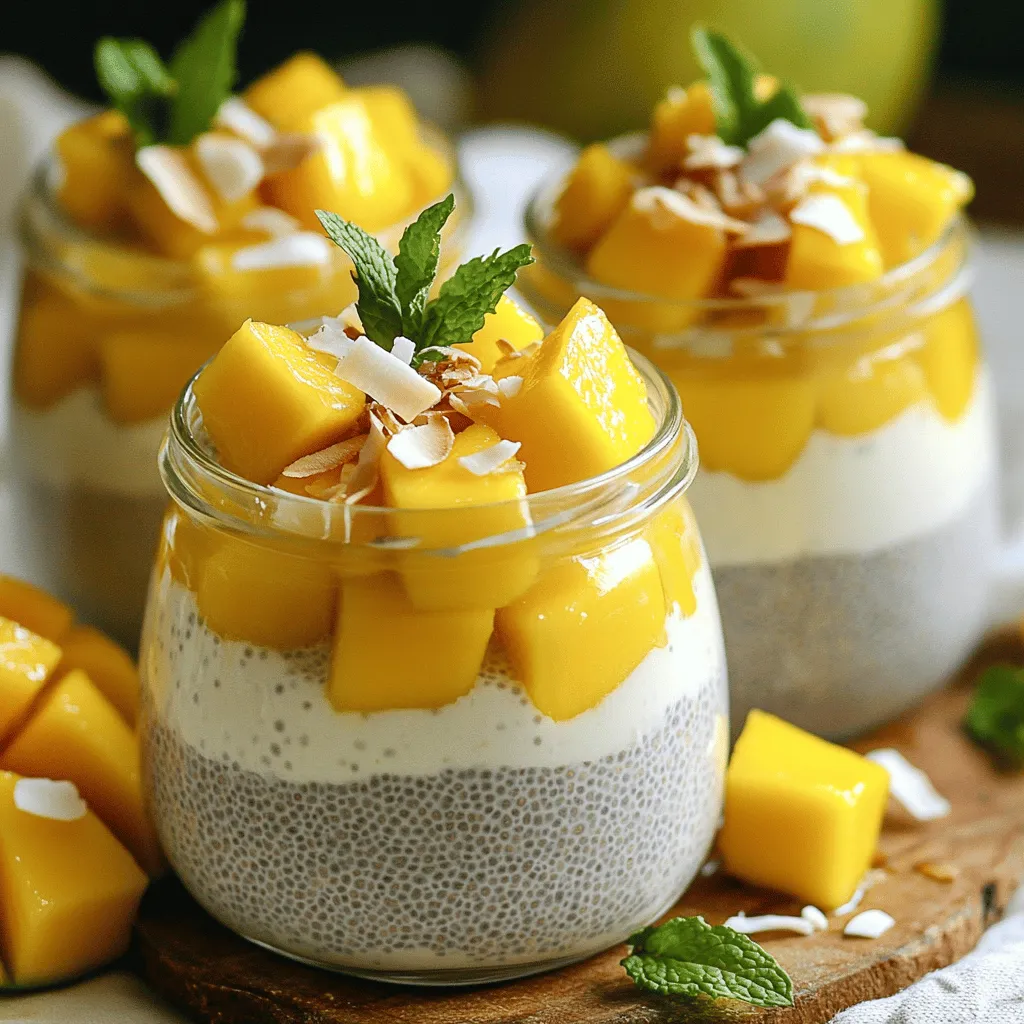
Are you ready to whip up a delicious Mango Coconut Chia Pudding? This easy and healthy recipe brings tropical flavors

- 1 cup all-purpose flour - 1/2 cup unsalted butter, softened - 1/2 cup brown sugar, packed - 1/4 cup granulated sugar - 1 teaspoon vanilla extract - 1/4 teaspoon salt - 1/2 cup mini chocolate chips - 1/2 cup dark chocolate, melted (for coating) - Sea salt flakes (for garnish, optional) Making chocolate chip cookie dough bites is fun and simple. The key is to use the right ingredients. First, you need all-purpose flour. This gives the bites their structure. It also helps create that classic cookie dough feel. Make sure to heat treat the flour to kill any bacteria. Spread it on a baking sheet and bake it for 5 minutes at 350°F (175°C). Let it cool before using. Next, unsalted butter adds creaminess. It helps blend the sugars well. Soften it before mixing. Then, you have brown sugar and granulated sugar. Brown sugar adds moisture and a rich flavor. Granulated sugar helps the bites hold their shape. Vanilla extract adds a sweet aroma. It enhances the overall taste. Salt balances the sweetness. Just a little salt goes a long way. Don't forget the mini chocolate chips. They give your bites that delightful chocolate burst. Lastly, you need dark chocolate for coating. It adds a rich layer. Melt it carefully for a smooth dip. With these ingredients, you can make tasty chocolate chip cookie dough bites. Each bite is a sweet treat you'll love! For the complete steps, check the Full Recipe. Heat treating the flour To make safe cookie dough, we first need to heat treat the flour. This step removes any bacteria. Spread 1 cup of all-purpose flour on a baking sheet. Bake it in a preheated oven at 350°F (175°C) for about 5 minutes. After baking, let the flour cool completely before using it in the dough. Mixing the butter and sugars In a large mixing bowl, add 1/2 cup of softened unsalted butter, 1/2 cup of packed brown sugar, and 1/4 cup of granulated sugar. Use a hand mixer to beat these together until creamy and smooth. This step is key for a rich flavor. Adding in flavors and remaining ingredients Next, stir in 1 teaspoon of vanilla extract and 1/4 teaspoon of salt. Mix until everything is well combined. Gradually add in the cooled flour, mixing just until you no longer see dry flour. Finally, gently fold in 1/2 cup of mini chocolate chips. This dough is now ready to scoop and shape into bites. For the complete recipe, check the Full Recipe. To create your cookie dough bites, you need to scoop and roll the dough. Start by taking a tablespoon of dough. If you use a cookie scoop, it helps make all your bites the same size. Roll the scoop of dough between your palms to form a smooth ball. This step is fun! You can feel how soft and creamy the dough is. Next, place each dough ball on a baking sheet lined with parchment paper. Make sure to leave some space between them. They will not spread much, but it's good to give them room. This step keeps them from sticking together while they chill. Once you finish scooping and rolling, it's time to chill your dough balls. This makes them firm and easier to coat with chocolate later. You will love how simple it is to form these bites. They are ready to be coated and enjoyed! For the full recipe, check out the details in the earlier section. {{image_2}} Chilling the dough bites is key for a great texture. After you scoop and roll the dough into balls, place them on a parchment-lined baking sheet. Put the sheet in the fridge for about 30 minutes. This step firms them up, making them easier to dip. Next, you'll dip the chilled bites in melted chocolate. Use dark chocolate for a rich flavor. Take a cookie dough ball and gently lower it into the chocolate. Make sure it is fully covered. Then, lift it out with a fork. Let the extra chocolate drip off before placing it back on the parchment. Now, let’s add some flair! While the chocolate is still wet, sprinkle sea salt flakes on top. The salt enhances the sweet flavor of the chocolate. After this, put the bites back in the fridge. Chill them for at least 15 minutes. This helps set the chocolate, making them ready to eat. Want to see the complete process? Check out the Full Recipe for more details! To make chocolate chip cookie dough bites that look great, use a tablespoon for scooping. This size gives you uniform bites that are easy to eat. Each scoop should be heaped but not overflowing. - Use a standard tablespoon or a cookie scoop. - Roll the dough quickly between your hands for a nice shape. - Keep the bites about one inch in diameter. This size helps the bites chill well and coat easily. If they are too big, the chocolate may not set right. If they are too small, they can get lost in your snack bowl. You can also use a scale. Aim for about 20 grams per bite for perfect consistency. Once you get the size right, your cookie dough bites will look as good as they taste! Check the Full Recipe for more tips on making these tasty treats. To get a nice coat of chocolate on your cookie dough bites, you need to avoid clumps. Clumpy chocolate can make your treats look messy and uninviting. Here are some techniques to ensure a smooth coating. - Use Quality Chocolate: Start with good dark chocolate. It melts better and coats more evenly. - Chop Chocolate Finely: Chop your chocolate into small pieces. Smaller bits melt faster and more evenly. - Melt with Care: Use a double boiler or microwave to melt chocolate slowly. Stir it often to keep it smooth. - Add Oil: If your chocolate is thick, add a teaspoon of vegetable oil. This helps it flow better and coat well. - Temperature Matters: Make sure your cookie dough bites are cold before dipping. Cold bites help the chocolate set quickly. - Lift with a Fork: Use a fork to dip each bite. This lets excess chocolate drip off easily. These steps will help you achieve a beautiful finish on your chocolate chip cookie dough bites. Enjoy the process! For the full recipe, check the earlier section. You can easily change the flavor of your chocolate chip cookie dough bites. Here are some fun ideas: - Extracts: Instead of just vanilla, try almond or maple extract. A few drops can add a unique twist that surprises your taste buds. - Nuts: Add chopped nuts for crunch. Walnuts, pecans, or hazelnuts work great. They give texture and a nutty flavor that pairs well with chocolate. - Spices: A pinch of cinnamon or nutmeg can warm up the flavor. These spices add depth without overpowering the chocolate. - Mix-Ins: Consider throwing in some mini marshmallows, dried fruit, or coconut flakes. Each adds a fun element that changes the bite completely. - Different Chocolates: Swap mini chocolate chips for white chocolate or peanut butter chips. This will create a whole new flavor profile. Feel free to experiment with these ideas. Your cookie dough bites will taste unique and special each time you make them. For the full recipe, check out the steps to make your delicious treats. You can easily make vegan chocolate chip cookie dough bites with a few swaps. Here’s what you need: - 1 cup all-purpose flour - 1/2 cup coconut oil, softened - 1/2 cup brown sugar, packed - 1/4 cup granulated sugar - 1 teaspoon vanilla extract - 1/4 teaspoon salt - 1/2 cup mini dairy-free chocolate chips - 1/2 cup vegan dark chocolate, melted (for coating) - Sea salt flakes (for garnish, optional) In this recipe, replace unsalted butter with softened coconut oil. This keeps the bites creamy and rich. Use dairy-free chocolate chips to make sure everything remains vegan. When it comes to coating, choose vegan dark chocolate for that tasty finish. The steps are similar to the original recipe. Start by heat treating the flour. Then, mix the coconut oil and sugars until smooth. Add in the vanilla and salt. Gradually stir in the flour, and fold in the mini chocolate chips. Scoop, roll, and chill the dough just like before. Then, dip each ball into melted vegan chocolate. Set them on parchment paper and sprinkle sea salt if desired. Chill again until the coating sets. This way, you can enjoy a sweet treat that fits a vegan diet. For the full recipe, refer to the original instructions above. You can enjoy chocolate chip cookie dough bites even if you're gluten-free. The key is to use alternative flours that still taste great. Here are some choices: - Almond flour: This flour adds a nice nutty flavor. It makes the bites moist and tender. - Coconut flour: Use this for a tropical twist. It absorbs a lot of moisture, so use less flour. - Oat flour: This flour has a mild taste. It's perfect for a soft texture. Just make sure it's labeled gluten-free. - Chickpea flour: This flour is high in protein. It gives a unique flavor and a denser texture. When using gluten-free flours, you may need to adjust the liquid in your recipe. Each flour behaves differently. Start with less flour and add more as needed. Following this method will help you create delicious bites that everyone can enjoy. For the full recipe, check out the details above. You can make your chocolate chip cookie dough bites even more fun with some tasty add-ins. Here are a few ideas that I love: - Coconut Flakes: Add a tropical twist with sweet, shredded coconut. It gives a nice chewiness. - Peanut Butter: Swirl in creamy peanut butter for a rich flavor. It pairs well with chocolate. - Chopped Nuts: Add some crunch with walnuts or pecans. They make the bites feel hearty. - Mini Marshmallows: For a gooey surprise, fold in mini marshmallows. They add sweetness and fun. - Dried Fruit: Try dried cranberries or cherries for a fruity zing. They balance the sweetness nicely. Mixing in these ingredients can change the taste and texture of your bites. Feel free to experiment with what you have! Just remember, keep your mix-ins small so they blend well. Check out the Full Recipe for more details on making these delicious treats. To keep your chocolate chip cookie dough bites fresh, follow these simple storage tips: - Refrigeration: Place the bites in an airtight container. They keep well in the fridge for up to one week. This helps them stay firm and tasty. - Freezing: For longer storage, freeze the bites. Arrange them in a single layer on a baking sheet. Once frozen, transfer them to a freezer-safe bag. They can last for up to three months in the freezer. These methods help retain flavor and texture. Remember to label your containers with the date. This way, you can enjoy your treats at their best! Want to make these bites again? Just pull them out of the freezer and let them thaw in the fridge. You can even enjoy them slightly frozen for a cool treat. Chocolate chip cookie dough bites can last a while if stored right. In the fridge, they stay fresh for about one week. Just keep them in an airtight container to avoid drying out. If you want them to last longer, try freezing them. When frozen, they can stay good for up to three months. Be sure to wrap each bite in plastic wrap or place them in a freezer-safe bag. This will help keep them fresh and tasty! Remember to thaw them in the fridge before enjoying. This way, they will keep their creamy texture and delicious taste. So, stock up on these bites! They are a fun treat to have on hand anytime. For the full recipe, check out the detailed instructions above. Yes, you can eat cookie dough bites raw, but there are some safety issues to consider. Raw flour and raw eggs can carry bacteria. To reduce this risk, I heat-treat the flour before using it. This process kills any harmful bacteria. Simply spread the flour on a baking sheet and bake it at 350°F (175°C) for five minutes. Let it cool completely before mixing it into your dough. Using heat-treated flour makes these delicious bites safe to enjoy. Plus, I skip the eggs in this recipe, which further lowers health risks. So, you can munch on these treats without worry! To make chocolate chip cookie dough bites nut-free, you can easily swap out certain ingredients. - Butter: Use a dairy-free butter if you want a vegan option. - Chocolate Chips: Look for nut-free chocolate chips. Many brands offer safe options. - Flour: The recipe already uses all-purpose flour, which is safe for nut allergies. If you're using other ingredients, check labels carefully. Some brands may process nuts in their facilities. This step helps you avoid any cross-contamination. You can also add different flavors to enhance your bites. For example, use almond extract instead of vanilla. Just be mindful of any nut allergies. Feel free to get creative! You can add ingredients like dried fruit or seeds for more texture. The Full Recipe gives you a solid base to make these bites perfect for everyone. Yes, you can make cookie dough bites without the chocolate coating. The bites will have a different look and taste. Without the chocolate, you get a chewy, sweet dough that shines on its own. They will taste like classic cookie dough, which many people love. To make uncoated bites, simply follow the same recipe. Skip the step where you dip them in melted chocolate. This will save time and still give you a tasty treat. - Texture: Without the chocolate coating, the bites will be softer. They will not have that crunchy outer layer. Chilling them well helps firm up the texture. - Flavor: You might want to add a little more vanilla extract for a richer taste. A sprinkle of sea salt can also enhance the sweetness of the dough. You can also mix in other flavors. Add nuts or dried fruit for a twist. This way, you create a unique version of the classic cookie dough. Enjoy your cookie dough bites just the way you like! When it comes to pre-made cookie dough bites, you have some tasty options. These brands offer great flavors and convenience. - Nestlé Toll House: This brand is known for its classic chocolate chip cookie dough. Their cookie dough bites are soft and sweet. - Pillsbury: They have a variety of cookie dough bites. Their dough is easy to bake or eat raw. - Duncan Hines: This brand offers unique flavors, such as brownie and cookie dough bites. They mix fun with tradition. - Edoughble: This brand specializes in edible cookie dough. Their bites come in many flavors, including funfetti and chocolate chip. - Sweet Loren’s: Their cookie dough bites are made with clean ingredients. They are a great option for those who want healthier treats. These brands make it easy to enjoy cookie dough bites without the fuss of making them from scratch. Each offers a unique taste that can satisfy your sweet tooth. This blog post covered all you need to make cookie dough bites. We started with the must-have ingredients, then detailed how to prepare the dough and form the bites. I shared tips for a smooth chocolate coating and ideas for quick variations. Don't forget about storage tips to keep your bites fresh for longer. You can enjoy these treats raw or customize them to fit your taste. With these steps, you can whip up a batch of delicious cookie dough bites that everyone will love. Happy baking!

Chocolate Chip Cookie Dough Bites Simple Treat Recipe

Ready to satisfy your sweet tooth? These Chocolate Chip Cookie Dough Bites are simple and fun to make! With a

To make easy garlic butter shrimp, you need just a few key items. Here’s what you’ll need: - 1 lb large shrimp, peeled and deveined - 4 tablespoons unsalted butter - 4 cloves garlic, minced - 1 teaspoon red pepper flakes (adjust to taste) - 1 tablespoon fresh lemon juice - 2 tablespoons fresh parsley, chopped - Salt and pepper to taste - Lemon wedges for serving These ingredients come together to create a rich, savory dish. The shrimp offers a sweet flavor, while the garlic gives a nice kick. The butter binds everything, making each bite feel special. You can add some optional ingredients to make the dish even better. Consider these options: - A splash of white wine for depth - Cherry tomatoes for color and sweetness - A pinch of paprika for added warmth - Grated Parmesan for a cheesy twist These additions can elevate your shrimp dish. Feel free to mix and match based on what you enjoy. Do you need to swap ingredients? No problem! Here are some easy changes: - Use olive oil instead of butter for a lighter dish. - Swap shrimp for scallops or chicken if desired. - Fresh herbs can replace parsley, like basil or cilantro. These substitutions keep the dish tasty while catering to your needs. Don't hesitate to experiment to find your perfect blend. For the full recipe, check out the wonderful Butter Garlic Shrimp Delight. Start by melting the butter in a large skillet over medium heat. Watch closely as it foams. This is when you add the minced garlic and red pepper flakes. Cook for about one minute. You want the garlic to smell great, but not burn. Burning the garlic can ruin the flavor. Now, raise the heat to medium-high. Add the peeled and deveined shrimp to the skillet. Season the shrimp with salt and pepper. Cook them for about 2-3 minutes on each side. They should turn pink and opaque. Make sure they are cooked through. Do not overcook them, or they will become tough. Take the skillet off the heat. Stir in fresh lemon juice and chopped parsley. Toss everything well to coat the shrimp in the garlic butter. For serving, plate the shrimp and add lemon wedges on the side. This adds a nice touch and some extra flavor. Enjoy this meal right away for the best taste. You can find the Full Recipe for more details. When picking shrimp, look for freshness. Fresh shrimp should have a clean smell, not fishy. Choose shrimp that are firm and shiny. The shells should be intact without any black spots. If you can, buy wild-caught shrimp. They often taste better than farmed shrimp. Check the size too; large shrimp work best for this dish. One big mistake is overcooking shrimp. They cook fast, usually in just a few minutes. If you cook them too long, they become tough. Also, don’t skip the garlic. Use fresh garlic for the best flavor. Avoid using too much salt at first; you can always add more later. Lastly, be careful with the heat; too high can burn the garlic. To boost flavor, add a splash of white wine when cooking shrimp. It gives a lovely depth. You can also try different herbs like thyme or basil. For a spicy kick, increase the red pepper flakes. A touch of honey can balance the heat and add sweetness. Finally, serve with fresh lemon wedges to brighten the dish. For the full recipe, check the details above. {{image_2}} You can boost your garlic butter shrimp by adding veggies. Broccoli, bell peppers, or snap peas work well. Just chop them into bite-sized pieces. Sauté the vegetables in the butter before adding the shrimp. This way, they stay crisp and vibrant. You create a colorful dish that is full of flavors and nutrients. If you love heat, spice it up! Add more red pepper flakes to the shrimp. You can also try a splash of hot sauce for extra kick. Sriracha or chili oil adds a bold twist. Adjust the spice level to your taste. This variation packs a punch and keeps your taste buds excited. Shrimp is great, but you can switch it up! Use chicken breast for a filling meal. Simply slice it thin and cook it the same way. If you prefer fish, try salmon or scallops. Both cook quickly and absorb the garlic butter flavor well. Each option gives you a fresh twist on this easy dish. You can find the full recipe for all these variations in the recipe section. After enjoying your Easy Garlic Butter Shrimp, you may have some leftovers. To store them, place the shrimp in an airtight container. Make sure to seal it tightly. You can keep it in the fridge for up to two days. This helps keep the shrimp fresh and tasty. When it’s time to eat your leftovers, reheating is key. I suggest using a skillet. Heat it on medium-low. Add a splash of water or a bit of butter to keep the shrimp moist. Stir gently until warmed through. Avoid cooking it too long; you don’t want the shrimp to get tough. If you want to save your shrimp for later, freezing works well. Place the shrimp in a freezer-safe container or bag. Make sure to remove as much air as possible. Label it with the date. You can freeze it for up to three months. When ready to eat, thaw it overnight in the fridge before reheating. Check out the Full Recipe for more details on preparing this dish! Yes, you can use frozen shrimp. Just thaw them first. Place them in cold water for about 15 minutes. This keeps them firm and tasty. Make sure they are peeled and deveined before cooking. Using frozen shrimp is a great time-saver. The flavor remains great, and they cook just as well as fresh shrimp. Garlic butter shrimp pairs well with many sides. You can serve it over rice or pasta. The buttery sauce soaks into these carbs, making it delicious. A fresh salad adds a nice crunch. You can also serve it with garlic bread to soak up the sauce. Vegetables like steamed broccoli or asparagus are also great choices. To make garlic butter shrimp low-carb, skip the pasta or rice. Instead, serve it with zucchini noodles or cauliflower rice. Both options are low in carbs and full of flavor. You can add more veggies like bell peppers or spinach for extra nutrition. This keeps the meal hearty while sticking to keto guidelines. For the full recipe, check out the link provided. In this blog post, we covered how to make easy garlic butter shrimp. You learned about the key ingredients, cooking steps, and tips to avoid mistakes. We also explored tasty variations and how to store leftovers. Garlic butter shrimp is simple yet delicious. With the right tips and tricks, you can impress anyone. Enjoy cooking this dish and make it your own!

Easy Garlic Butter Shrimp Flavorful and Quick Dish

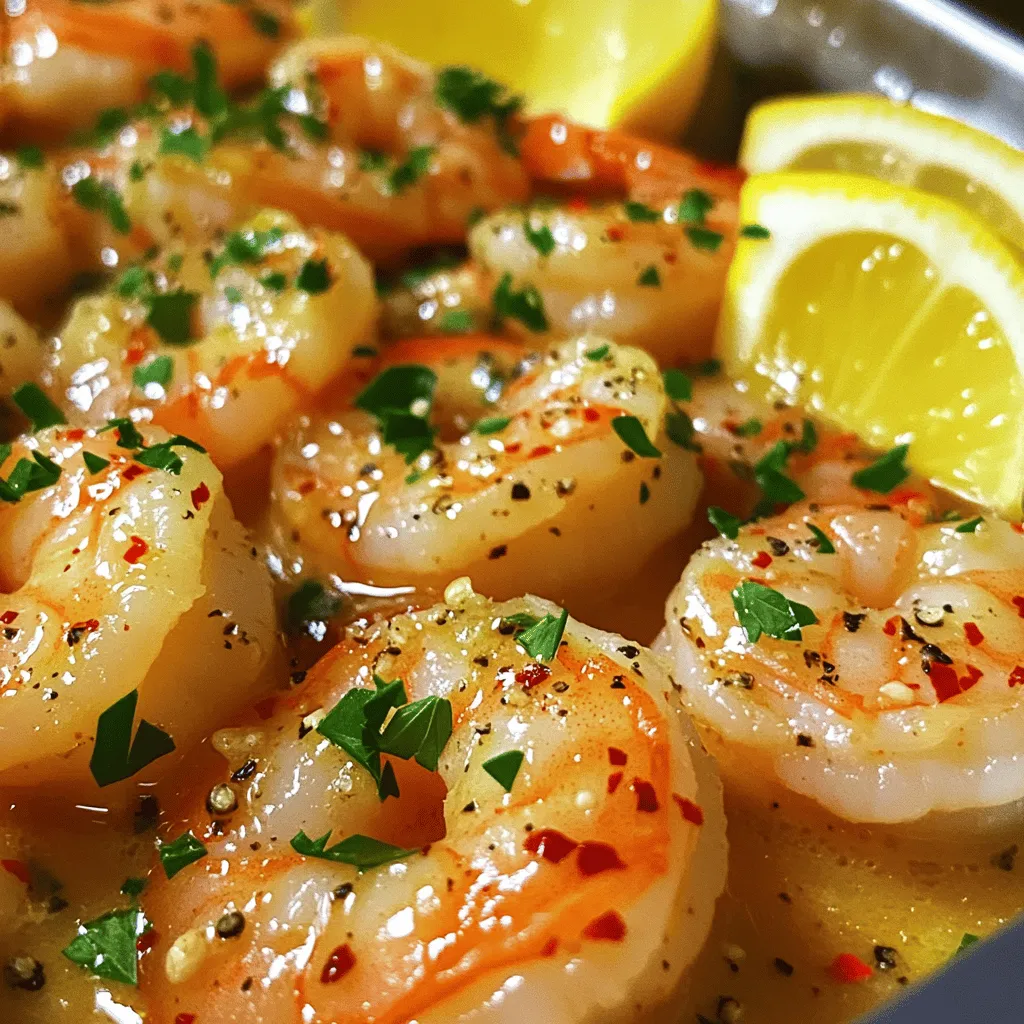
Looking for a quick and tasty meal? You can whip up Easy Garlic Butter Shrimp in under 30 minutes! This

Older posts
Newer posts
← Previous Page1 … Page86 Page87 Page88 … Page123 Next →

dsad

© 2025 Southern Dishes • Built with GeneratePress

Our Policies

  • Copyright Policy
  • Cookie Policy
  • GDPR Policy
  • Privacy Policy
  • Disclaimer
  • Terms Of Use

More Information

  • Home
  • About
  • Contact
  • Appetizers
  • Dessert
  • Dinner
  • Drinks
©2025, Southern Dishes About Back To Top