Skip to content
DisclaimerTerms Of UseGDPR PolicyCookie Policy

Southern Dishes

  • Home
  • Drinks
  • Appetizers
  • Dinner
  • Dessert
  • About
  • Contact
  • Privacy Policy
DisclaimerTerms Of UseGDPR PolicyCookie Policy

Isabella

- 2 cups fresh basil leaves - 2 cloves garlic - Zest and juice of 1 lemon - Cherry tomatoes, halved (for garnish) - Fresh basil leaves (for garnish) - 1/2 cup pine nuts (toasted) - 1/2 cup extra virgin olive oil - 1/2 cup grated Parmesan cheese - Salt and pepper to taste - 12 oz spaghetti or your choice of pasta To make Lemon Basil Pesto Pasta, gather fresh ingredients first. You need bright green basil leaves. The garlic adds a nice kick. Zesting and juicing the lemon gives a fresh taste. For garnishing, cherry tomatoes add color and sweetness. Don't forget extra basil leaves for that pop of green. Next, check your pantry for essentials. Pine nuts provide a nutty flavor when toasted. Extra virgin olive oil binds everything together and adds richness. Grated Parmesan cheese brings a savory depth. Finally, salt and pepper enhance all the flavors. Select 12 ounces of spaghetti or your favorite pasta for this dish. This recipe is simple yet satisfying. You can find the full recipe to guide you through the process. To start, gather your ingredients. You need fresh basil leaves, toasted pine nuts, garlic, lemon zest, and lemon juice. Place all these into a food processor. Pulse the mixture until it is coarsely chopped. This will form the base of your pesto. Next, keep the food processor running. Slowly drizzle in the olive oil. This adds richness and creaminess to your pesto. Blend until the mixture is smooth and well combined. Now it's time to add the grated Parmesan cheese. Toss it in and blend again. Taste your pesto and season with salt and pepper. This step ensures your pesto has the right flavor. In a large pot, bring salted water to a boil. Add the pasta and cook until it is al dente. This usually takes about 8 to 10 minutes. Remember to reserve about one cup of the pasta water before draining. This water is key for adjusting your pesto later. In a large bowl, add your drained pasta. Pour in the pesto and toss well. If the mixture seems too thick, add the reserved pasta water a little at a time. This will help you reach the right consistency. To serve, plate your pasta beautifully. Garnish with halved cherry tomatoes and fresh basil leaves. This adds color and freshness to your dish, making it more appealing. Enjoy your Lemon Basil Pesto Pasta for a tasty and simple meal! For the complete recipe, check out the Full Recipe section. To get creamy pesto, adjust the olive oil. Start with a half cup and add more if needed. This makes the sauce smooth and rich. When you mix the pesto with pasta, use some pasta cooking water. This starchy water helps blend everything perfectly. Add it little by little until you reach the right texture. For pesto dishes, spaghetti is a great choice. Other good options include fettuccine and penne. Each pasta shape has a unique cook time. Check the package for the best cooking time. It's key to cook the pasta until it's al dente. This means it's firm yet tender, which is perfect for holding the sauce. To keep your pesto bright green, store it properly. Use an airtight container and cover it with a thin layer of olive oil. This prevents air from reaching it. If you don’t use all the pesto, it will stay fresh longer this way. Enjoy your Lemon Basil Pesto Pasta with vibrant colors and fresh taste by following these tips! {{image_2}} You can switch pine nuts for walnuts or almonds. Walnuts give a rich, earthy taste. Almonds add sweetness and crunch. Both options work well in pesto. Toast them lightly for more flavor. Just blend them like you would with pine nuts. If you need a dairy-free pesto, try vegan cheese. Nutritional yeast makes a great option. It adds a cheesy flavor without dairy. You can also use cashew cream for creaminess. Blend the cheese until smooth for the best texture. Adding proteins can make your Lemon Basil Pesto Pasta heartier. Grilled chicken or shrimp are excellent choices. They absorb the pesto flavor well. Just cook them separately, then mix them in. This step elevates your dish and adds more nutrients. To store leftover Lemon Basil Pesto Pasta, place it in an airtight container. Make sure the lid seals well to keep out air. The pasta will stay fresh for up to three days in the fridge. If you see any moisture, dab it with a paper towel before sealing. To keep the flavors bright, you can drizzle a little olive oil on top before closing the lid. You can freeze both the pesto and the cooked pasta. For the pesto, spoon it into ice cube trays. This way, you can use small amounts later. Once frozen, pop the cubes out and put them in a freezer bag. They can last up to three months. For cooked pasta, let it cool completely before packing it into a freezer-safe bag. Squeeze out as much air as you can to prevent freezer burn. When you're ready to eat, reheat the pasta gently. Add a splash of water or olive oil to a pan. This will help bring back moisture. Heat it on low, stirring often. If you freeze the pesto, let it thaw in the fridge overnight. Then, mix it in with the reheated pasta. This keeps the taste fresh and the texture nice. Enjoy your meal just as it was made! To make this dish vegan, skip the Parmesan cheese. You can use a dairy-free cheese instead. Nutritional yeast also works well for a cheesy flavor. Blend it into your pesto for added depth. Yes, you can use store-bought pesto to save time. However, making it fresh gives you better flavor. Store-bought options often have preservatives, which can change the taste. Try to find a natural brand for the best result. You can serve Lemon Basil Pesto Pasta with grilled chicken or shrimp for protein. Pair it with a fresh salad for a complete meal. Garlic bread on the side is a great option too. Homemade pesto lasts about one week in the fridge. Store it in an airtight container. You can also cover the surface with a thin layer of olive oil to keep it fresh longer. Yes, you can use other herbs like parsley or cilantro. Each herb will change the flavor. You can also mix herbs for a unique twist on the classic recipe. For a substitute, try using nutritional yeast for a cheesy flavor. You can also use vegan cheese, cashews, or hemp seeds. Each option gives a different texture and taste, so choose what you like best. For the complete recipe, check out the Full Recipe section. In this post, we explored how to make a simple Lemon Basil Pesto Pasta. We discussed fresh ingredients like basil, garlic, and lemon, as well as essential pantry items like pine nuts and Parmesan cheese. I shared step-by-step instructions, from preparing the pesto to plating the dish. You learned about tips for consistency and storage options. Now, you can enjoy a delicious meal while customizing it to your taste. Try different nuts or cheese for variety. Enjoy your cooking adventure!

Lemon Basil Pesto Pasta Tasty and Simple Meal

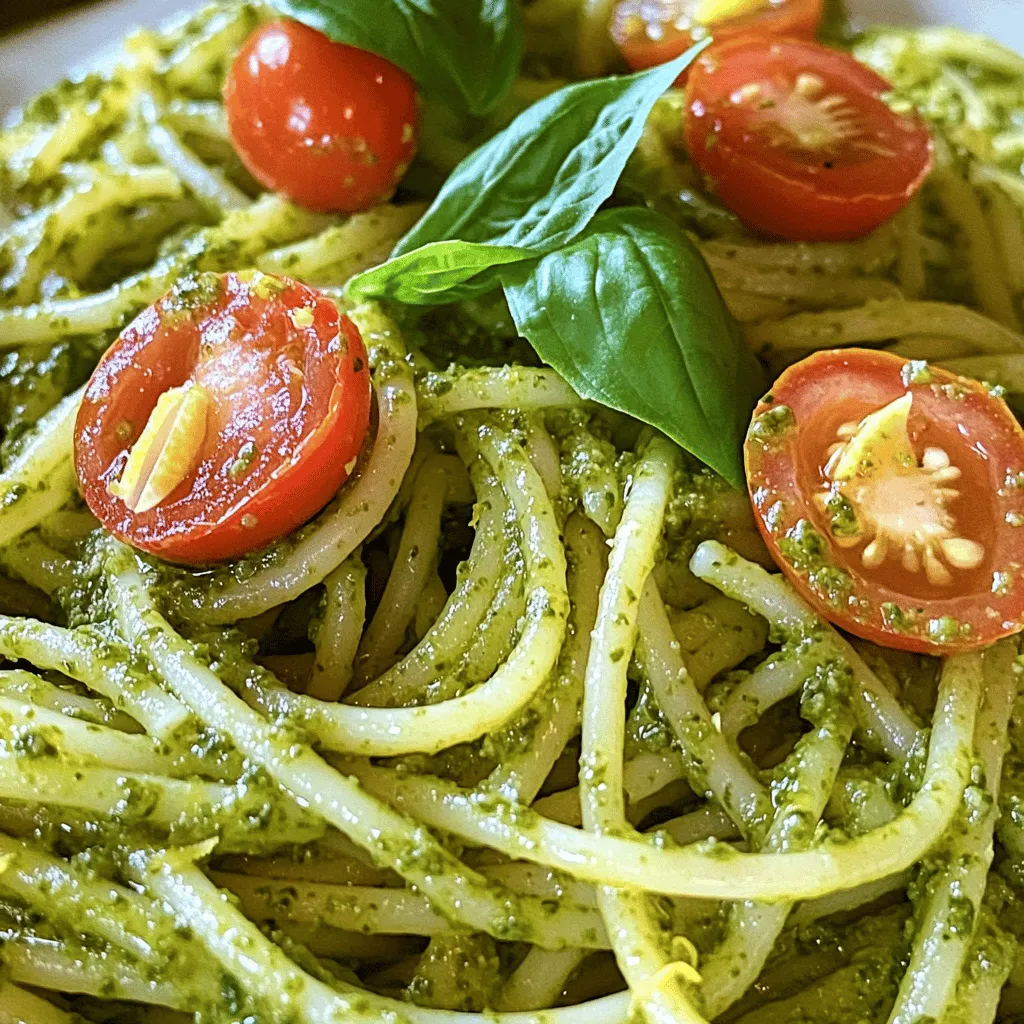
Looking for a quick and fresh meal? Lemon Basil Pesto Pasta is your answer! This bright, zesty dish is easy

- Peaches: Use 1 cup of fresh peaches, sliced for a juicy base. - Blueberries: Add 1 cup of fresh blueberries for a burst of flavor. - Sugar and Sweeteners: Incorporate 2 tablespoons of sugar to balance the sweetness. - Pie Crust Options: Choose 1 pre-made pie crust or make your own for a fresh touch. - Egg and Milk for Wash: For a golden crust, use 1 egg and 1 tablespoon of milk. - Mixing Bowls: You need a large bowl for mixing fruit and sugar. - Baking Sheet: A flat baking sheet helps the galette bake evenly. - Parchment Paper: Line the baking sheet with parchment for easy cleanup. - Whisk and Pastry Brush: Use a whisk for the egg wash and a brush to apply it. - Accurate Measurements: Measure your fruit and sugar carefully for the best taste. - Proper Fruit Preparation: Slice peaches evenly for even cooking and texture. - Choosing the Right Pie Crust: A flaky crust works best. If you prefer homemade, roll it out thin. Using these ingredients and tools, you can create a Peach Blueberry Galette that is both simple and delicious. For the full recipe, check out the detailed instructions provided earlier. You must preheat your oven to 400°F (200°C). This step is very important. A hot oven helps the crust bake evenly. It also allows the fruit to bubble and get juicy. First, mix the fresh peaches and blueberries in a bowl. Add 2 tablespoons of sugar, 1 tablespoon of cornstarch, and a teaspoon of vanilla extract. Squeeze in 1 tablespoon of lemon juice for brightness. Toss everything gently so the fruit is well-coated. Let it sit for 15 minutes. This helps the flavors blend and the juices develop. To avoid a soggy bottom, use cornstarch. It helps absorb excess liquid from the fruit. The sugar also draws out juice, but cornstarch keeps it thick. Roll out your pie crust on parchment paper. Aim for a circle about 12 inches wide. Don't stress about making it perfect; rustic is charming! Spoon the fruit filling into the center of the crust. Leave about 2 inches of space around the edges. This space lets you fold the crust over the fruit. Next, gently fold the edges of the dough over the filling. Overlap the dough slightly to create a pleated edge. This adds texture and a beautiful look. In a small bowl, whisk together 1 egg and 1 tablespoon of milk. This mixture is your egg wash. Brush it over the crust to give it a shiny finish. Using an egg wash gives your galette a golden brown crust. It makes the crust look appetizing and crisp. Place the galette in your preheated oven. Bake it for 25 to 30 minutes. You want the crust to turn golden brown and the fruit to bubble. Check for doneness by looking at the color of the crust. It should be a nice golden shade. The fruit filling should be bubbling around the edges. Try this full recipe for a delightful peach blueberry galette. To make a great crust, avoid these common mistakes: - Not chilling the dough before rolling. - Overworking the dough, which makes it tough. - Not using enough flour on the surface. For a flakier crust, try these alternatives: - Use cold butter or shortening in your dough. - Add a bit of vinegar or lemon juice. - Substitute some flour with almond flour. Want to boost your galette’s flavor? Here are some add-ons: - Add fresh herbs like basil or mint. - Sprinkle cinnamon or nutmeg for warmth. - Mix in a splash of bourbon or rum. Balancing sweetness and tartness is key. Adjust sugar based on fruit ripeness. If your peaches are sweet, add more lemon juice. This contrast makes the dish pop. Best toppings for your galette include: - Whipped cream for a light touch. - Vanilla ice cream for creamy richness. - A drizzle of honey or maple syrup. For presentation, slice the galette into wedges. Serve warm for best flavor. A sprinkle of mint leaves adds a fresh look. You can also place it on a wooden board for a rustic feel. {{image_2}} You can mix up the fruit in your galette. Seasonal fruits often taste best. Try using fresh nectarines or ripe plums in summer. Fall brings apples and pears for a warm flavor. You can even add a splash of lemon zest for brightness. Adding other berries is a great option too. Raspberries or blackberries can add a fun twist. Just remember to balance the sweetness. If using tart berries, you may need more sugar. If you need a gluten-free galette, substitute the pie crust. Look for gluten-free pie crusts at stores. You can also make your own using almond flour. This will keep the crust tender and tasty. To maintain a good texture, chill the dough before rolling it out. This helps it hold its shape better. Don't overwork the dough either; gentle handling is key. For a vegan galette, skip the egg wash. Instead, use a mixture of almond milk and maple syrup. This will give the crust a nice shine. When it comes to sweeteners, choose agave syrup or coconut sugar. These can replace regular sugar without losing flavor. You can adjust the sweetness to your liking. For a delicious Peach Blueberry Galette, try the Full Recipe to start! To keep your galette fresh, let it cool completely. Wrap it in plastic wrap or foil. You can also use an airtight container. Store it in the fridge. It will stay fresh for up to three days. When you’re ready to eat, just reheat it in the oven. This keeps the crust crispy and tasty. If you want to save your galette for later, freezing is a great option. First, let it cool down. Wrap it well in plastic wrap, then place it in a freezer bag. This way, it won’t get freezer burn. You can freeze it for up to two months. When you want to enjoy it again, remove the galette from the freezer. Thaw it overnight in the fridge. Then, reheat it in the oven at 350°F (175°C). Heat it for about 15-20 minutes. This will make the crust nice and warm again. For the full recipe, check the Peach Blueberry Galette Delightfully Simple Recipe section. To make your galette crust crispier, you can use a few simple techniques: - Blind bake the crust: Pre-bake the crust for 10 minutes before adding the filling. - Use cold ingredients: Keep your butter and water cold to create a flaky texture. - Add a sprinkle of cornstarch: Mix a bit of cornstarch into the crust for added crispness. These methods help achieve a golden and crunchy galette. You can use frozen fruit, but there are some points to keep in mind: - Thaw and drain: Thaw the fruit and drain any excess liquid to avoid a soggy filling. - Adjust sugar: Frozen fruit can be sweeter, so taste and adjust the sugar to your liking. - Cook a bit longer: You may need to bake the galette a few extra minutes to ensure the filling is bubbly. Frozen fruit works well, but fresh offers the best texture and flavor. Serving peach blueberry galette is simple and fun: - Slice it up: Cut the galette into wedges for easy sharing. - Add toppings: Serve with whipped cream or vanilla ice cream for extra delight. - Garnish: A sprinkle of mint leaves adds a nice touch of color and flavor. These serving ideas make your galette even more appealing. Look for these signs to know your galette is done: - Golden brown crust: The edges should be a deep golden color, not pale. - Bubbly filling: The fruit juices should bubble up around the edges. - Firm texture: The crust should feel firm and crispy when you gently touch it. These cues help you bake the perfect galette every time. Yes, you can prepare the galette ahead of time: - Make the filling: Prepare your fruit mix and store it in the fridge for up to a day. - Assemble and chill: You can assemble the galette and keep it in the fridge until you're ready to bake. - Bake fresh: Bake it just before serving for the best taste and texture. This way, you save time and impress your guests with a warm dessert. For the full recipe, check the Peach Blueberry Galette Delightfully Simple Recipe. Making a peach blueberry galette involves fresh fruits, the right tools, and simple steps. We covered ingredients, preparation tips, and variations to suit your needs. Whether you want a classic taste or a gluten-free option, there's a way to make it your own. Keep these tips in mind for a tasty dessert. Now it's time to enjoy your galette, impress your friends, and have fun baking!

Peach Blueberry Galette Delightfully Simple Recipe

Are you ready to impress your friends and family with a Peach Blueberry Galette? This delightful treat is easy to

- 1 lb (450g) large shrimp, peeled and deveined - 1 bunch asparagus, trimmed and cut into 2-inch pieces - 4 tablespoons unsalted butter - 4 cloves garlic, minced - 1 teaspoon lemon zest - 2 tablespoons fresh lemon juice - 1 teaspoon red pepper flakes - Salt and black pepper, to taste - Fresh parsley, chopped (for garnish) When I prepare garlic butter shrimp and asparagus, I love to start with fresh ingredients. Fresh shrimp gives the best texture and flavor. Look for shrimp that is firm and smells like the ocean. As for asparagus, choose bright green stalks. They should snap when you break them. The butter in this dish adds richness. It melts into a flavorful sauce and coats each shrimp and piece of asparagus. Garlic is key for depth. It brings a warm, savory note. The lemon zest and juice add a burst of brightness, balancing the richness. Red pepper flakes give a gentle heat. Adjust them based on your spice level. This dish is not only tasty but also colorful with green asparagus and pink shrimp. Each bite is a delight! For a final touch, sprinkle fresh parsley on top. It adds a pop of color and a hint of freshness. You can find the full recipe to make this dish easily at home. Enjoy every bite! - Rinse and dry shrimp under cold water. - Season with salt and pepper to taste. First, you want to make sure the shrimp are clean. Rinsing them helps remove any grit. Drying them with a paper towel makes them cook better. The salt and pepper add a nice flavor to the shrimp. - Sauté asparagus in butter until tender. - Remove and set aside cooked asparagus. Next, melt two tablespoons of butter in a large skillet. Add the asparagus pieces. Cook them for about three to four minutes. You want them to be crisp but tender. Once done, remove them from the skillet and set them aside. - Melt remaining butter in the skillet. - Add minced garlic and red pepper flakes. In that same skillet, add the last two tablespoons of butter. Once it melts, toss in the minced garlic and red pepper flakes. Cook this for about a minute. You want to smell that garlic, but don’t let it burn. - Add seasoned shrimp to the skillet. - Cook until shrimp turn pink and opaque. Now, add the shrimp back to the skillet. Cook them for about three to four minutes. They will turn pink and opaque when done. At this point, gently stir in lemon zest and lemon juice for added flavor. - Return asparagus to the skillet. - Mix everything together and heat through. After the shrimp are cooked, add the asparagus back to the skillet. Stir everything carefully to mix well. Heat it for another minute, so all the flavors blend. - Taste the dish and adjust seasonings. - Garnish with parsley before serving. Finally, taste your dish. You might want to add more salt, pepper, or lemon juice. Once you are happy, remove it from heat. Garnish with fresh parsley to make it look nice. Serve it warm for a delightful meal. For the full recipe, check the details above. When picking shrimp, you have two main choices: fresh or frozen. Fresh shrimp can taste great, but frozen shrimp is often just as good. Look for shrimp that smells clean and has a firm texture. Size matters too! Large shrimp, about 16-20 per pound, work best for this dish. They cook evenly and look impressive on the plate. To get tender asparagus, cook it just right. The best way is to sauté it until it's bright green and slightly soft. This usually takes about 3-4 minutes. When you shop for asparagus, choose stalks that are firm and straight. Look for bright green tips. This helps ensure you have fresh asparagus to complement your shrimp. To boost flavor, I love to make my own seasoning. A mix of lemon zest, garlic, and red pepper flakes gives a tasty kick. You can also add ingredients like cherry tomatoes or bell peppers for extra color and taste. These ideas make your garlic butter shrimp and asparagus even more special. For the full recipe, check out the Garlic Butter Shrimp & Asparagus Delight. {{image_2}} You can switch up the vegetables. Broccoli makes a great choice. It adds a nice crunch. Bell peppers bring color and sweetness. Snap peas add a fresh snap to the dish. Each of these options pairs well with garlic and butter. Feel free to mix them all in for a veggie medley! If you want to change the protein, shrimp is not the only option. Chicken works well too. Just cut it into bite-sized pieces. Cook it the same way as the shrimp. Tofu is another great choice. It soaks up all the garlic butter flavor. Just make sure to press it first to remove extra water. You can control the heat in this dish. If you like it spicy, keep the red pepper flakes. If you want less heat, reduce the amount. You can even leave them out. Add a dash of black pepper instead for flavor. Adjusting spice levels makes this dish perfect for anyone! For the full recipe, check out the [Full Recipe]. To store leftovers properly, place them in an airtight container. Make sure the shrimp and asparagus cool down first. Store in the fridge for up to 3 days. When you want to eat it again, check for any odd smells. If it smells fine, you can reheat it. Best practices for freezing garlic butter shrimp and asparagus include using freezer-safe bags. Remove as much air as you can before sealing. Label the bags with the date. You can freeze for up to 2 months. When ready to eat, thaw in the fridge overnight for best results. To reheat for the best texture and taste, use a skillet over low heat. Add a splash of water or broth to help steam the dish. Stir gently until heated through. This keeps the shrimp juicy and the asparagus tender. Avoid using the microwave, as it can make the shrimp rubbery. It takes about 10 minutes to prep. The total cooking time is around 10 minutes. So, in just 20 minutes, you can have this tasty dish ready to enjoy. Yes, you can use frozen shrimp. Frozen shrimp can save time and are often just as good. To use them, thaw them first under cold water. Pat them dry before cooking. This helps them cook evenly and keeps the dish tasty. This dish pairs well with several sides. Consider serving it with rice or quinoa. Garlic bread also makes a great choice. A fresh salad can add a nice touch too. These sides will balance the meal and enhance the flavors. To lighten up this dish, you can use less butter. Try using olive oil instead. You can also add more vegetables like bell peppers or broccoli. Using whole grain pasta instead of rice can add more fiber. These swaps keep the meal delicious and nutritious. For the full recipe, check the link. This dish of Garlic Butter Shrimp and Asparagus is simple and delicious. You can make it quickly using fresh ingredients. Remember to choose good shrimp and asparagus for the best taste. Feel free to explore variations, like different vegetables or proteins. Storing leftovers is easy, and reheating keeps flavors strong. Enjoy your cooking experience and make it a meal that delights you and others. This easy recipe will surely impress at your next gathering!

Garlic Butter Shrimp and Asparagus Flavorful Delight

Are you ready to make a dish that impresses and delights? Garlic Butter Shrimp and Asparagus brings a burst of

To make these yummy chocolate chip cookie dough bites, you will need: - 1 cup all-purpose flour - 1/2 cup unsalted butter, softened - 1/2 cup brown sugar, packed - 1/4 cup granulated sugar - 1 teaspoon vanilla extract - 1/4 teaspoon salt - 1/2 cup mini chocolate chips - 1/4 cup crushed walnuts (optional) - 1/2 cup dark chocolate chips (for coating) You can swap some ingredients to fit your taste. Try these: - Use coconut oil instead of butter for a dairy-free option. - Replace brown sugar with maple syrup for a different flavor. - Swap mini chocolate chips for white chocolate or peanut butter chips. - Omit walnuts if you prefer a nut-free treat. Each cookie dough bite has about: - Calories: 120 - Total Fat: 7g - Saturated Fat: 4g - Carbohydrates: 14g - Sugar: 8g - Protein: 1g This gives you a sweet treat that’s perfect for a snack! Enjoy the deliciousness without the guilt. Check out the Full Recipe for more details. First, we need to heat-treat the flour. This step makes the flour safe to eat. Spread 1 cup of all-purpose flour on a baking sheet. Bake it at 350°F for about 5 minutes. Let it cool before mixing it into the dough. Next, cream the butter and sugars. Take 1/2 cup of softened unsalted butter. Add 1/2 cup of brown sugar and 1/4 cup of granulated sugar. Use an electric mixer to blend them until the mix is light and fluffy, about 2-3 minutes. Then, mix in 1 teaspoon of vanilla extract and 1/4 teaspoon of salt. Now, combine the dry and wet ingredients. Gradually add the heat-treated flour into the butter mixture. Use a wooden spoon to mix until a dough forms. Baking flour is key for safety. Raw flour can have germs. By baking it, you can kill any harmful bacteria. Always remember to let the flour cool before using it in your recipe. This step keeps your cookie dough bites safe to eat. It’s time for the fun part! Gently fold in 1/2 cup of mini chocolate chips and 1/4 cup of crushed walnuts if you like. Scoop tablespoon-sized amounts of dough. Roll them into balls and place them on a parchment-lined baking sheet. Chill these dough balls for about 30 minutes. This will help them firm up. While they chill, melt 1/2 cup of dark chocolate chips in a microwave-safe bowl. Heat in 30-second intervals, stirring until smooth. Once the dough bites are chilled, dip each one into the melted chocolate. Make sure every bite is fully coated. Place them back on the baking sheet. Finally, put the coated bites in the fridge for about 15 minutes or until the chocolate sets. Now you have a delicious treat ready to enjoy! For more details, check the Full Recipe. When making chocolate chip cookie dough bites, avoid using raw flour. Always heat-treat it first. This helps kill germs. Another mistake is not chilling the dough. If you skip this step, your bites may lose shape. Also, be careful not to overmix the dough. This can make your bites tough instead of soft. To boost flavors, add a pinch of espresso powder to the dough. This small amount enhances the chocolate taste. You can also swap out the vanilla for almond extract. This adds a unique twist. If you enjoy nuts, try adding different kinds, like pecans or almonds. These give extra crunch and flavor too. For a fun presentation, serve bites in a mason jar. You can drizzle extra melted chocolate on top for flair. Adding a sprinkle of sea salt creates a nice contrast. Pair these treats with a glass of milk or coffee for a perfect snack. For a party, arrange them on a platter with fresh fruit. You can find the full recipe in the earlier sections to get started! {{image_2}} You can customize your cookie dough bites easily. Try adding different nuts like pecans or almonds for a new crunch. You can also mix in dried fruits, such as cranberries or raisins, for a sweet twist. If you love coconut, add some shredded coconut to the dough. These add-ins can make each bite unique and fun. The chocolate coating is not the only option. You can use white chocolate for a sweet contrast. For a more intense flavor, try dark chocolate. You can even roll the bites in crushed cookies or sprinkles for a fun look. If you want a healthier choice, consider using yogurt or a dairy-free chocolate coating. If you seek healthier treats, you can make a few swaps. Use almond flour instead of all-purpose flour for a gluten-free version. Replace butter with coconut oil or applesauce to reduce fat. You can also use maple syrup or honey instead of sugar for natural sweetness. These changes can keep the taste while making it a bit better for you. For the full recipe, check out the details above! To keep your cookie dough bites fresh, store them in an airtight container. This helps keep moisture out and preserves their taste. I like to layer parchment paper between the bites. This prevents them from sticking together. You can store them in the fridge for up to one week. If you plan to keep them longer, freezing is the way to go. Freezing cookie dough bites is easy! First, place the bites on a baking sheet in a single layer. Freeze them for about an hour until they are firm. Once frozen, transfer the bites to a freezer-safe bag or container. Be sure to label it with the date. They can last for up to three months in the freezer. When you're ready to enjoy them, just take out what you need and let them thaw in the fridge. Cookie dough bites can stay fresh in the fridge for about one week. If frozen, they last for three months. To enjoy the best flavor and texture, eat them within these time frames. Each bite will taste just as good as when you made them. For the full recipe, check the previous section. Enjoy your sweet treats! Yes, you can eat raw cookie dough, but with some care. Regular cookie dough has raw flour and eggs, which might contain harmful bacteria. In this recipe, we heat-treat the flour to kill any germs. We skip the eggs, making it safer to enjoy. You can keep these cookie dough bites in the fridge for about one week. For longer storage, freeze them. They can last up to three months in the freezer. Just make sure to store them in an airtight container to keep them fresh. The best way to melt chocolate is using a microwave or a double boiler. If you use a microwave, heat dark chocolate chips in a bowl for 30 seconds. Stir the chocolate, then heat again in short bursts until smooth. For a double boiler, place a bowl over simmering water, stirring until melted. This method prevents burning and helps keep the chocolate silky. For the full recipe, check out the steps to make these delightful treats! You learned about the key ingredients for cookie dough bites and their nutrition. We explored the steps to prepare and bake safely. Tips helped avoid common mistakes and enhanced flavors. You saw fun variations, coat options, and healthier choices. Lastly, we discussed how to store them for lasting freshness. These cookie dough bites offer joy and creativity in your kitchen. Enjoy making them!

Chocolate Chip Cookie Dough Bites Irresistible Treat

Do you love the taste of cookie dough but worry about raw ingredients? You’re in luck! In this post, I’ll

- 2 ripe avocados - 4 small eggs - Salt and pepper to taste - 2 tablespoons chopped fresh chives - 2 tablespoons crumbled feta cheese - 1 teaspoon paprika - 1 teaspoon olive oil You can add many tasty toppings to your baked avocado eggs. Here are some ideas: - Suggestions for additional toppings: Try adding diced tomatoes, sliced olives, or crispy bacon bits. These bring great flavor and texture. - Alternatives to feta cheese: If you don't have feta, use goat cheese or shredded cheddar. Both options work well. - Spices and herbs for enhanced flavor: Consider using garlic powder, cumin, or fresh cilantro. These spices add depth and excitement to each bite. Feel free to get creative with your toppings and spices. The beauty of this dish is its versatility. For the full recipe, check out Avocado Delight: Baked Eggs. Enjoy! 1. Preheating the oven: Start by preheating your oven to 425°F (220°C). This step is key for cooking your eggs perfectly. 2. Cutting and preparing avocados: Next, take your ripe avocados and cut them in half. Remove the pit carefully. Use a spoon to scoop out a bit of flesh from the center. This will create room for the egg. 1. Placing avocados in the baking dish: Place the avocado halves in a baking dish. Make sure they can stand upright. If they wobble, use crumpled foil to support them. 2. Cracking eggs and seasoning: Crack an egg into each avocado half. Be careful not to spill it. If the egg is too large, remove some egg white. Season each egg with salt, pepper, and a sprinkle of paprika for flavor. 1. Recommended baking time and temperature adjustments: Bake the avocados in the oven for about 12-15 minutes. The time may change depending on how you like your eggs. 2. Tips for achieving desired egg consistency: Keep an eye on the eggs while they bake. If you like your yolks runny, check them at the 12-minute mark. For firmer yolks, let them bake a bit longer. For the [Full Recipe](#), you can follow these steps and enjoy a healthy meal! To avoid overcooking the eggs, watch them closely. Bake for 12-15 minutes only. If you prefer runny yolks, check them at the 10-minute mark. The key is to see the whites set but the yolk remains soft. For firm avocados, use a baking dish that supports them well. Cut a small slice from the bottom of each avocado half to create a stable base. You can also crumple foil to help prop them up. A steady avocado ensures your eggs won’t spill out. Pair your baked avocado eggs with fresh sides. Sliced tomatoes add color and balance the dish. Toasted bread is perfect for dipping into the eggs. For a more complete meal, consider serving with a light salad or some crispy bacon. For presentation, use a rustic wooden board. Place the avocados on the board, garnished with extra chives. A sprinkle of paprika adds a pop of color. Serve warm for the best experience. Avocados are rich in healthy fats and fiber. They support heart health and help you feel full. One avocado has about 250 calories and offers vitamins like E and K. Eggs add protein and essential nutrients, making this meal well-rounded. Adding toppings like chives boosts flavor and nutrition. Chives have antioxidants, which are great for your immune system. Feta cheese adds a creamy texture and calcium. Each bite is not only tasty but also healthy. {{image_2}} You can mix flavors to make baked avocado eggs even better. For a sweet option, add diced tomato or salsa on top. This brightens up the dish and adds a fresh twist. You can also try a spicy kick by drizzling hot sauce or adding jalapeños. The heat pairs well with the creamy avocado and egg. If you want vegan options, swap the eggs with tofu. Silken tofu works best for a similar texture. For those on low-carb or keto diets, stick to the basic recipe. The avocados and eggs keep it low in carbs while being filling. You can also add cheese for extra flavor if you eat dairy. Want to travel through flavors? Try a Mediterranean style by adding olives and sun-dried tomatoes. This gives a taste of the coast. For a Mexican-inspired twist, top your eggs with fresh cilantro, pico de gallo, or even some black beans. These toppings make the dish fun and unique. For the full recipe, check out Avocado Delight: Baked Eggs. To store leftovers safely, let the baked avocado eggs cool down first. Place them in an airtight container. Keep the eggs and avocados together for the best taste. They can stay fresh in the fridge for up to two days. To maintain freshness, avoid stacking them. This prevents squishing and keeps the presentation nice. For reheating, use the oven for the best results. Preheat to 350°F (175°C). Place the avocado eggs on a baking sheet. Heat for about 10 minutes. This helps keep the eggs soft and the avocados creamy. You can also use a microwave, but be careful. Microwave for 30 seconds at a time to avoid overcooking. Can baked avocado eggs be frozen? I do not recommend it. Freezing changes the texture of both the egg and avocado. If you want to prepare ahead, consider freezing the avocado separately. When ready to cook, thaw it in the fridge overnight. Then, follow the full recipe to bake fresh eggs in the avocado. Can I use larger eggs for baked avocado eggs? Yes, you can use larger eggs. Just make sure the avocado can hold the egg. If not, scoop out a bit more flesh. This helps to avoid spills. What can I substitute for feta cheese? You can use goat cheese or ricotta cheese instead. Both add creaminess and flavor. Nutritional yeast is a great vegan option for a cheesy taste. How long do the avocados last after baking? Baked avocados are best eaten fresh. If you have leftovers, store them in the fridge. They last about one day. The texture may change, but they are still safe to eat. Are baked avocado eggs safe for meal prep? They can be part of meal prep but eat them soon. These eggs may not stay fresh long. It's best to bake them just before you want to eat. Can I use a microwave for baked avocado eggs? Yes, you can microwave them. Place the avocado halves in a microwave-safe dish. Cook in short bursts, checking often. This method may not give the same texture as baking. What’s the best way to serve them warm? Serve them right from the oven for the best taste. Add garnishes like chives and feta right before serving. Pair with toasted bread for a yummy breakfast. How many calories are in baked avocado eggs? Each serving has about 300 calories. This can vary based on toppings. It's a filling option with healthy fats and protein. Are baked avocado eggs healthy for a diet? Yes, they are a great choice for a healthy diet. They have good fats from avocados and protein from eggs. Plus, they are low in carbs, making them diet-friendly. Baked avocado eggs are a simple and tasty dish. We covered the key ingredients and cooking steps. You learned tips for perfection and flavor variations. Plus, we explored health benefits and storage ideas. Feel free to get creative with toppings or spices. Enjoy this dish for breakfast or a snack. You can trust that these baked avocado eggs are both delicious and nutritious. Try them today!

Baked Avocado Eggs Easy and Healthy Breakfast Recipe

Start your day right with a simple and healthy breakfast: Baked Avocado Eggs! This dish combines creamy avocados and protein-packed

To make tasty Caprese skewers, gather these key ingredients: - 1 cup cherry tomatoes - 1 cup fresh mozzarella balls (bocconcini or ciliegine) - Fresh basil leaves - 2 tablespoons balsamic glaze - 1 tablespoon extra virgin olive oil - Salt and pepper to taste - Skewers (wooden or metal) These ingredients bring bright colors and fresh flavors to your plate. You can add your own twist with these optional ingredients: - Prosciutto for a savory bite - Avocado slices for creaminess - Peppers for a crunchy texture - Pine nuts for added crunch Feel free to mix and match. Your skewers can be as unique as you want! Freshness matters in Caprese skewers. Here’s how to choose the best: - Cherry Tomatoes: Look for bright colors and firm skin. Avoid any that feel soft or have wrinkles. - Mozzarella: Pick mozzarella that feels moist and bouncy. Check for a clean, milky smell. - Basil: Choose basil leaves that are vibrant and green. Avoid any with browning or wilting. Using fresh ingredients makes your skewers taste amazing. Quality matters, so take your time when shopping. For the full recipe, check the earlier section. To start, gather your ingredients. You need cherry tomatoes, fresh mozzarella balls, and basil leaves. Wash the tomatoes and basil under cold water. Use a clean towel to pat them dry. This step is key for keeping the flavors bright. Freshness is crucial for Caprese skewers. Now, grab your skewers. You can use wooden or metal ones. Start by threading a cherry tomato onto the skewer. Next, add a fresh basil leaf. Follow this with a mozzarella ball. Repeat this sequence until the skewer is nearly full. You should fit about three tomatoes and three mozzarella balls on each skewer. Leave a bit of space at both ends. This makes it easier to handle. Once you finish assembling the skewers, it's time for the finishing touches. Drizzle the skewers with extra virgin olive oil and balsamic glaze. This adds depth to the taste. Season with salt and pepper, but don’t overdo it. You want to enhance the freshness, not mask it. Finally, arrange the skewers on a serving platter. For a lovely presentation, drizzle more balsamic glaze on top. You can also serve them upright in a jar with extra basil leaves around. This makes your dish pop with color and flavor! To make your Caprese skewers shine, focus on fresh flavors. Use ripe cherry tomatoes. Choose mozzarella that is soft and creamy. Fresh basil adds a bright taste. Drizzle with good balsamic glaze and olive oil for depth. Don’t forget to season with salt and pepper. This helps bring out the ingredients' natural flavors. A light hand is key; you want the fresh taste to stand out. Prep your ingredients before you start. Wash the tomatoes and basil ahead of time. You can also buy mozzarella balls ready to use. If you're short on time, skip the individual assembly. Instead, layer everything in a bowl. Guests can serve themselves, and it saves time. Use sturdy skewers to keep everything in place and avoid mess. Caprese skewers fit many events. For casual get-togethers, serve them on a platter. They make great appetizers at parties. For a picnic, pack them in a container. If it’s a holiday, arrange them in a festive jar. You can add more flavors for special occasions. Consider adding prosciutto or olives for a twist. Serve with fresh bread or a side salad to round out the meal. {{image_2}} While fresh mozzarella is classic, many other cheeses work well. You can try burrata for its creamy texture. Goat cheese adds a tangy taste. Feta cheese offers a bold flavor and crumbly texture. Each cheese brings a unique twist to your skewers. Feel free to mix in extra ingredients for more taste. Add slices of avocado for creaminess. You can include roasted red peppers for a sweet kick. Sun-dried tomatoes offer a rich flavor. Fresh arugula or spinach adds a peppery bite. Just remember to keep the balance, so each flavor shines. You can easily make Caprese skewers vegan. Use marinated tofu or cashew cheese instead of mozzarella. For gluten-free options, simply stick to the fresh ingredients. Always check the labels on sauces to ensure they fit dietary needs. This way, everyone can enjoy these tasty bites. If you have leftover Caprese skewers, store them in the fridge. Use an airtight container to keep them fresh. They will stay good for about two days. Make sure to cover the skewers with a damp paper towel to keep the basil from wilting. The flavors will still be tasty the next day. Meal prep makes life easier. You can prepare the skewers in advance. Just assemble them without the balsamic glaze. Add the glaze right before serving to keep the flavors fresh. Store the skewers in the fridge until you are ready to serve. This method saves time on busy days or during a party. I do not recommend freezing Caprese skewers. The tomatoes and cheese lose their texture when thawed. It's best to enjoy them fresh. You can always prep the ingredients and freeze them separately. When you're ready, just assemble the skewers again. For more ideas, check the Full Recipe for Caprese Skewers. Caprese skewers stay fresh for about two days in the fridge. Store them in a sealed container. The tomatoes and cheese may lose some texture after that time, but they will still taste good. Yes, you can make Caprese skewers ahead of time. Prepare them a few hours before your event. Just keep them in the fridge until you are ready to serve. This way, the flavors meld together nicely. You can mix and match ingredients for fun flavors. Try using different cheeses like feta or goat cheese. Add olives, peppers, or even fruits like mango for sweetness. For a spicy kick, add jalapeños or drizzle with chili oil. Your skewers can be as creative as you want! For the complete recipe, check out the Full Recipe. Caprese skewers are a fun and tasty treat. We covered required and optional ingredients. Fresh selections can make your skewers shine. I shared steps for prep and assembly. Tips helped enhance flavors and save time. You can explore different cheese and diet options. Proper storage keeps leftovers fresh longer. Now, you can make these skewers easy! Enjoy creating your own delicious versions for any occasion. Simple, fresh, and flavorful, Caprese skewers are sure to impress.

Caprese Skewers Fresh and Flavorful Party Bites

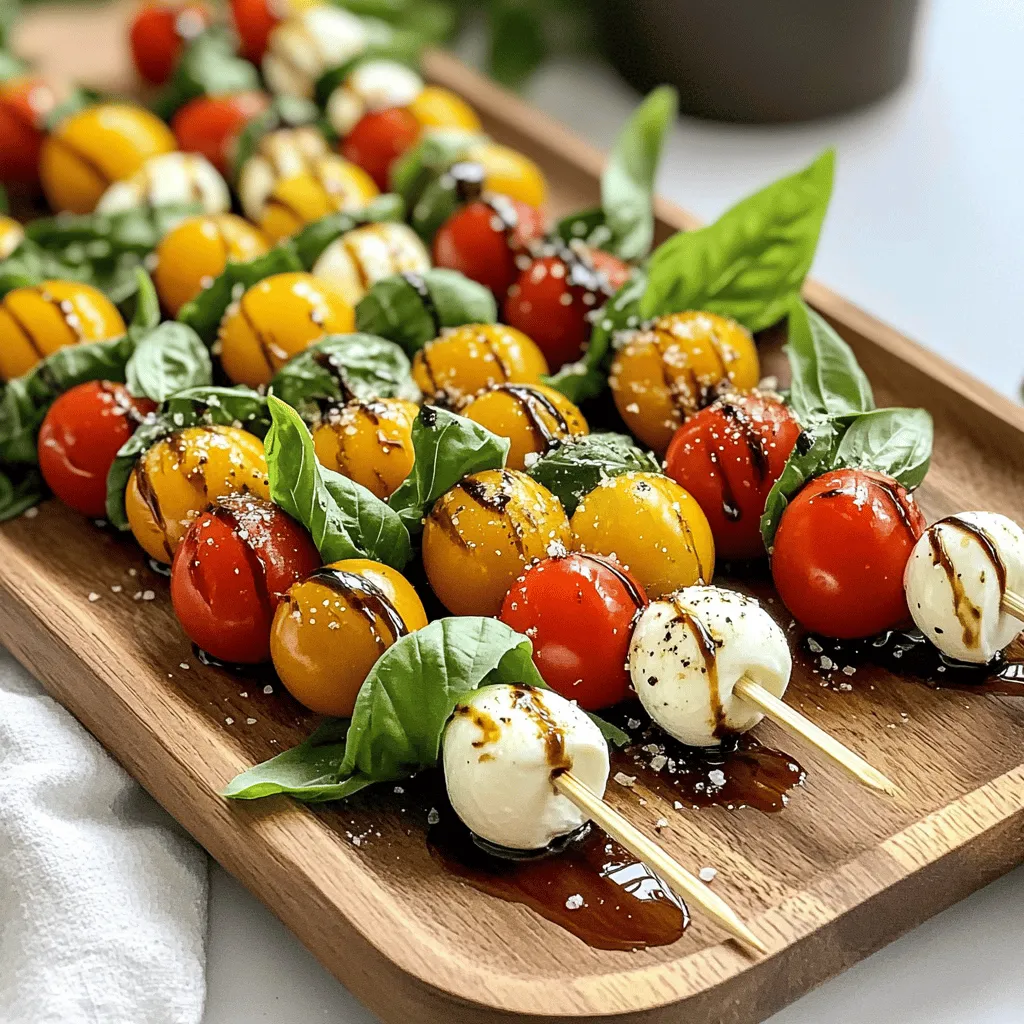
Looking for a simple yet stunning party bite? Caprese skewers are your answer! These fresh and flavorful treats combine juicy

To make a hearty vegan lentil soup, you need some basic ingredients. Here’s what you’ll need: - 1 cup green or brown lentils, rinsed - 1 medium onion, chopped - 2 carrots, diced - 2 stalks celery, diced - 3 cloves garlic, minced - 1 can (14 oz) diced tomatoes - 6 cups vegetable broth - 2 teaspoons ground cumin - 1 teaspoon smoked paprika - 1 bay leaf - 2 cups kale, chopped (stems removed) - Salt and pepper to taste - 2 tablespoons olive oil These ingredients form a strong base for your soup. The lentils pack protein, while the veggies add flavor and nutrition. To take your soup to the next level, consider adding a few more items. Here are some flavor boosters to enhance the taste: - 1 teaspoon dried thyme - 1 teaspoon lemon juice - 1 teaspoon chili powder These spices and herbs will add depth to your soup. They bring warmth and a hint of brightness to each bite. Garnishing your soup makes it look appealing. Here are some options you can use: - Fresh parsley, chopped - A dollop of vegan sour cream - Croutons or toasted bread These garnishes not only add color but also extra flavor. They let you customize each bowl to your liking. For the complete recipe, check out the Full Recipe. First, gather your ingredients. You will need olive oil, onion, carrots, celery, and garlic. Heat the olive oil in a large pot over medium heat. Add the chopped onion and sauté for about five minutes. The onion should turn soft and clear. Next, add the diced carrots and celery. Cook these veggies for another five to seven minutes. They should start to soften nicely. Now, stir in the minced garlic, ground cumin, and smoked paprika. Cook this mix for one minute until the smell fills your kitchen. After your base is ready, it’s time to add the lentils. Pour in the rinsed green or brown lentils. Then, add the can of diced tomatoes, including all the juice. Pour in six cups of vegetable broth and toss in a bay leaf. Stir well to combine everything. Bring the pot to a boil. Once it bubbles, lower the heat to a simmer. Cover the pot and let it cook for about 30 to 35 minutes. You want the lentils to become soft but not mushy. After the lentils are tender, remove the bay leaf from the pot. Stir in the chopped kale and let it wilt for about five minutes. This adds a nice color and nutrition to your soup. Now, season your soup with salt and pepper. Taste it and adjust the seasoning as needed. It’s your soup, so make it just right for you. Finally, serve it hot and garnish with fresh parsley for a lovely touch. For the complete recipe, check the Full Recipe. To make your vegan lentil soup shine, focus on your base. Start by sautéing the onion in olive oil. This step adds a sweet depth. Cook the onion until it is soft and clear. Next, add garlic, cumin, and smoked paprika. These spices bring warmth and delight. Don’t skip the bay leaf; it gives a subtle earthiness. Remember, allow the soup to simmer well. This lets the flavors blend and grow. Texture is key in a good soup. Use green or brown lentils, as they hold their shape well. Rinse them before cooking to remove any grit. While simmering, keep an eye on the lentils. You want them tender, not mushy. If they start to break apart, you have cooked them too long. Adding kale at the end helps keep a nice crunch. Serve your vegan lentil soup hot in a bowl. Top it with fresh parsley for a burst of color. You can pair it with crusty bread for a hearty meal. A squeeze of lemon can brighten the soup’s flavors. For some heat, add a dash of hot sauce. Try serving with a side salad for a fresh touch. For the full recipe, check out the [Full Recipe] section above! {{image_2}} You can easily change up this soup with more veggies. Try adding zucchini or bell peppers. These add great taste and texture. You could also use spinach or Swiss chard instead of kale. Each of these adds a unique twist to your soup. Just remember to chop them small so they cook evenly. While green and brown lentils are popular, don’t stop there! Red lentils cook faster and get creamy. They can give your soup a nice thick texture. Black lentils, also called beluga lentils, keep their shape well. They add a lovely color and taste. Experiment with different lentils for more fun flavors! Spices can really boost your soup's flavor. Try adding thyme or oregano for earthiness. A pinch of red pepper flakes adds heat if you like spice. Fresh herbs like cilantro or basil can brighten each bowl. As you cook, taste and adjust your spices. This way, you make the soup just right for you. Check out the Full Recipe for more ideas! To store leftover soup, let it cool first. Once cooled, pour it into an airtight container. You can keep it in the fridge for up to five days. If you want to keep it longer, freezing is a great option. Just make sure to label the container with the date. Freezing this soup is easy and a smart way to save it. Use freezer-safe containers or bags. Make sure to leave some space in each container. The soup will expand as it freezes. You can store it in the freezer for up to three months. When you're ready to eat, just take it out and thaw it in the fridge overnight. When you’re ready to enjoy your soup again, reheat it on the stove. Pour the soup into a pot and heat over medium heat. Stir often to avoid sticking. If the soup is too thick, add a splash of water or broth. You can also microwave it in a microwave-safe bowl. Heat in short intervals, stirring in between, until it's hot. Enjoy your nourishing soup! Yes, you can make Vegan Lentil Soup in a slow cooker. Start by sautéing the onion, carrots, celery, and garlic in a pan. Then, add these to the slow cooker along with the lentils, tomatoes, broth, and spices. Cook on low for 6-8 hours or on high for 3-4 hours. This method lets the flavors blend well, making the soup extra tasty. Avoid these common mistakes: - Not rinsing the lentils. This can lead to grit in your soup. - Overcooking the vegetables. They should stay slightly firm for texture. - Skipping the seasoning. Salt and pepper enhance the soup's flavor. - Forgetting to remove the bay leaf. It can add a bitter taste if left in. By being careful, you can make a delicious soup. Yes, you can add protein to Vegan Lentil Soup. Some great options are: - Cooked quinoa for extra texture. - Diced tofu for a plant-based protein boost. - Chickpeas for added fiber and protein. - Nuts or seeds for a crunchy topping. These additions make the soup heartier and more filling. Vegan Lentil Soup lasts in the fridge for about 4-5 days. Store it in an airtight container for best results. If you want to keep it longer, consider freezing it. When frozen, the soup can last for up to three months. Just thaw it in the fridge overnight before reheating. This post covered making Vegan Lentil Soup. We discussed key ingredients, cooking steps, and tips for great flavor. Variations add fun with different veggies and spices. Proper storage keeps your soup tasty for later. Remember, avoid common mistakes for the best result. Enjoy your soup creation! It’s healthy and simple. You’ll love how easy it is to make!

Vegan Lentil Soup Nourishing and Flavorful Recipe

Warm up your week with a hearty bowl of Vegan Lentil Soup! This nourishing and flavorful recipe is not only

To make crispy chickpea tacos, you need a few key ingredients. Here’s what you will need: - 2 cans (15 oz each) chickpeas, drained and rinsed - 2 tablespoons olive oil - 1 teaspoon smoked paprika - 1 teaspoon cumin - ½ teaspoon garlic powder - ½ teaspoon onion powder - Salt and pepper to taste - 8 small corn or flour tortillas These ingredients bring bold flavors to your tacos. The chickpeas provide protein and texture. Olive oil adds richness, while spices like paprika and cumin give them depth. You can customize your tacos with tasty toppings. Here are some options: - 1 cup shredded purple cabbage - 1 avocado, sliced - ½ cup fresh cilantro, chopped - 1 lime, cut into wedges - ½ cup Greek yogurt or a dairy-free alternative for drizzling The cabbage adds crunch. Avocado brings creaminess, and cilantro adds a fresh touch. Squeeze lime juice for a zesty kick. These crispy chickpea tacos fit many diets. They are vegan and gluten-free if you use corn tortillas. This makes them great for everyone. You can also substitute Greek yogurt with a plant-based version for a dairy-free option. Enjoy a delicious meal that meets your needs! For the full recipe, check out the instructions provided earlier. Start by draining and rinsing the chickpeas. This step is key, as it cleans them well. Place them in a bowl, then add olive oil. Next, sprinkle in smoked paprika, cumin, garlic powder, onion powder, salt, and pepper. Mix well until every chickpea is coated nicely with the spices. This will give your tacos a rich flavor. Preheat your oven to 400°F (200°C). Line a baking sheet with parchment paper to prevent sticking. Spread the seasoned chickpeas in a single layer on the sheet. Bake for 25-30 minutes. Halfway through, shake the pan gently. This helps them cook evenly. You want them crispy and golden. Keep an eye on them. They should be done when they look crunchy and brown. While the chickpeas bake, warm your tortillas in a dry skillet. Heat them for about 30 seconds on each side. Once the chickpeas are crispy, let them cool for a few minutes. Take a tortilla, add a generous amount of chickpeas. Top it with shredded cabbage, avocado slices, and chopped cilantro. For a creamy finish, drizzle Greek yogurt on top. Squeeze fresh lime juice for added zest. Serve your tacos right away, with lime wedges on the side for extra flavor. Enjoy your tasty meal! To get crispy chickpeas, start by drying them well. After draining, pat them with a towel. This step removes excess moisture. Use high heat in the oven, around 400°F (200°C). This ideal temperature helps them crisp up fast. Toss the chickpeas in oil and spices. Spread them in a single layer on the baking sheet. Don’t crowd them; this keeps air flowing. Shake the pan halfway through baking. This ensures even crispiness on all sides. Mixing flavors can take your tacos to the next level. Consider adding lime juice for a zesty kick. You can also try fresh herbs like mint or dill. These herbs add a fresh taste. For spice lovers, add jalapeños or hot sauce. You can even try adding a fruit salsa. Mango or pineapple salsa works well with chickpeas. These combinations make each bite exciting and new. Warming tortillas makes them more pliable and tasty. Heat a dry skillet on medium. Place the tortillas in the skillet for about 30 seconds per side. This step helps them stay soft and easy to fold. For extra flavor, brush the tortillas with olive oil before warming. You can also toast them in the oven for a crispy edge. Just keep an eye on them to avoid burning. Enjoy these tips for a perfect taco night! {{image_2}} Tacos are fun because you can mix and match toppings. For a fresh twist, try different salsas. Mango salsa adds a sweet touch. Pineapple salsa gives a zesty kick. You can also make slaw with cabbage, carrots, and lime. This adds crunch and flavor. Add some pickled onions for a tangy taste. Chickpeas are great, but you can switch it up. Black beans work well in tacos. They are rich in protein and fiber. Lentils are another option. Cook them until soft and season like chickpeas. You can even mix chickpeas with these alternatives for a hearty meal. Each option adds a unique flavor and texture. If you like heat, there are many ways to spice up your tacos. Add sliced jalapeños for a fresh kick. A drizzle of hot sauce can also bring the heat. You might like chipotle mayo for a smoky flavor. For a bold choice, try a spicy pepper salsa. Each spicy addition can change the taco experience entirely. For the full recipe, check out the Crispy Chickpea Tacos recipe. Store leftover chickpeas in an airtight container. Keep them in the fridge for up to three days. This way, they stay fresh and tasty. If you have extra spices, store those separately. They can help add flavor when you reheat the chickpeas. Assembled tacos are best eaten right away. If you have leftovers, store each part separately. Place the tortillas in a bag and the toppings in containers. This keeps everything fresh and prevents sogginess. If you need to store them, eat within a day. To reheat chickpeas, use an oven or an air fryer. Set the oven to 350°F (175°C) and bake for about 10 minutes. An air fryer works well too—just a few minutes will do. Avoid using the microwave as it makes them soft. Enjoy your crispy chickpeas again! For the full recipe, check the earlier section. Yes, you can prep the chickpeas ahead of time. Bake them and store them in an airtight container. You can also warm the tortillas before serving. Just keep everything separate until serving. This keeps the tacos crispy and fresh. I love using corn tortillas for their flavor and texture. They hold up well with the crispy chickpeas. Flour tortillas are a great choice too if you prefer a softer bite. Both types work well, so choose what you like best. To make these tacos spicier, add more smoked paprika or a pinch of cayenne pepper. If you want less heat, cut back on the spices. You can also top the tacos with mild salsa or sour cream to balance the heat. Crispy chickpeas are so versatile! You can add them to salads or grain bowls for a protein boost. They also work well as a snack on their own. Try them on top of soups for extra flavor and crunch. You can find the full recipe for crispy chickpea tacos at the end of this article. In this article, we explored making crispy chickpea tacos. We covered key ingredients and tasty toppings. You learned how to prep, bake, and assemble your tacos. I shared tips for crispiness and flavor. We also discussed fun variations and storage ideas. Crispy chickpea tacos are easy to make and enjoy. Experiment with flavors and toppings. These tacos are a great meal option anyone can love. You now have the tools to create your own tasty tacos!

Crispy Chickpea Tacos Flavorful and Easy Meal

If you’re looking for a quick and tasty meal, crispy chickpea tacos are here to impress! Packed with flavor and

- 2 ripe bananas - 1/4 cup natural peanut butter - 1 cup unsweetened almond milk - 1 tablespoon honey or maple syrup (optional) - 1 tablespoon chia seeds - 1/2 teaspoon ground cinnamon - A handful of ice cubes To make a great Peanut Butter Banana Smoothie, you need simple yet tasty ingredients. Start with ripe bananas. They add natural sweetness and creaminess. Choose natural peanut butter for rich flavor and healthy fats. Unsweetened almond milk keeps it light but creamy. If you like a little sweetness, add honey or maple syrup. Chia seeds boost nutrients and add texture. Ground cinnamon gives warmth and spice to the mix. Finally, ice cubes chill and thicken your smoothie. - Calories per serving: About 300 - Protein: 10g - Carbohydrates: 35g - Fats: 12g Now, let’s talk numbers. Each serving has around 300 calories, making it a filling snack. You get about 10 grams of protein, which helps you feel full. The smoothie has 35 grams of carbs, mostly from bananas. These carbs give you quick energy. The healthy fats from peanut butter support heart health. Ripe bananas are high in potassium, which is good for your heart too. Chia seeds add fiber, keeping your digestive system happy. This smoothie is not just tasty; it’s also good for you. For the full recipe, check out Peanut Butter Banana Bliss Smoothie. To start, you need to prepare the bananas. - How to prepare the bananas: Peel two ripe bananas. Break them into chunks. Place the chunks into your blender. This step helps the bananas blend smoothly. - Blending procedure: Next, add the natural peanut butter and almond milk. If you want it sweeter, add honey or maple syrup. Include chia seeds and ground cinnamon. Top it off with ice cubes. Blend on high speed for 1-2 minutes. Check for smoothness. - Adjusting consistency and sweetness: If your smoothie is thick, add more almond milk. Taste it. If you want more sweetness, add honey or maple syrup. Blend again until smooth. - Best practices for serving: Pour your smoothie into glasses. Serve it right away for the best taste. - Presentation tips: To make it look great, sprinkle extra chia seeds on top. You can also add a pinch of cinnamon. For a fun touch, add banana slices to the rim of each glass. This makes it look yummy and inviting. For the full recipe, you can check the Peanut Butter Banana Bliss Smoothie section. Enjoy making this delicious drink! To get the perfect texture for your smoothie, start with ripe bananas. They blend smoothly and add natural sweetness. If your smoothie is too thick, simply add a splash of almond milk. Blend again until smooth. For a fun twist, try adding a scoop of cocoa powder or a splash of vanilla extract. This will enhance the flavor and make your smoothie even more enjoyable. You can also experiment with spices like nutmeg or ginger for an extra kick. A good blender is key for making smoothies. I recommend a high-speed blender. Brands like Vitamix or Ninja work great. They blend everything smoothly and quickly. You might also want a measuring cup for your liquids and a spoon for scooping peanut butter. A good cutting board and knife will help you slice the bananas with ease. With these tools, you will make smoothie prep quick and fun! {{image_2}} You can change the taste of your smoothie easily. Here are some fun ideas: - Chocolate peanut butter banana smoothie: Add 2 tablespoons of cocoa powder. This mix gives a rich, chocolatey flavor. - Adding greens: Toss in a handful of spinach or kale. This boosts vitamins without changing the taste much. - Protein-packed variations: Mix in a scoop of protein powder. This helps keep you full longer and adds extra nutrition. Many people have different diets. Here are some swaps you can make: - Dairy-free alternatives: Use coconut milk or oat milk instead of almond milk. These options still taste great and are creamy. - Low-carb or keto adjustments: Skip the banana and use avocado for creaminess. You can also add unsweetened almond milk and a low-carb sweetener. This keeps the flavor while lowering carbs. These variations and substitutions let you enjoy this smoothie in many ways. You can find a blend that fits your taste and diet. For the full recipe, check out Peanut Butter Banana Bliss Smoothie. To keep your smoothie fresh, use an airtight container. Glass jars work great. They keep the taste and texture nice. Store your smoothie in the fridge right after making it. It will stay good for up to 24 hours. After this time, the smoothie may separate and lose its creaminess. If you want to save your smoothie for later, freezing is a great choice. Pour the smoothie into ice cube trays or freezer-safe bags. This way, you can grab just what you need. When you are ready to enjoy it, take out the cubes or bag and thaw them. The best way to thaw is in the fridge overnight. You can also use a blender to mix it back up if it separates. With these simple storage tips, you can enjoy your Peanut Butter Banana Bliss Smoothie anytime! For the full recipe, check back to the main section. Can I use other types of nut butter? Yes, you can. Almond butter, cashew butter, or sunflower seed butter work well. Each nut butter adds its unique taste and texture. Feel free to experiment! What can I substitute for almond milk? You have many options! Use regular milk, soy milk, or oat milk. Each choice changes the flavor slightly, so pick what you love. Is it possible to make this smoothie vegan? Absolutely! Just use plant-based milk and maple syrup instead of honey. This way, your smoothie stays dairy-free and vegan-friendly. What are the best ways to customize my smoothie? You can add extras like berries, spinach, or even cocoa powder. Adjust the recipe to fit your taste and dietary needs. Get creative and have fun! We've covered how to make a tasty banana smoothie with simple ingredients like ripe bananas and peanut butter. I shared prep steps, serving tips, and fun variations. You can even store leftovers or freeze them for later. Remember, this smoothie is not just delicious; it's packed with nutrients. Explore different flavors and find what you like best. Enjoy creating your smooth, healthy treat!

Peanut Butter Banana Smoothie Nourishing and Simple

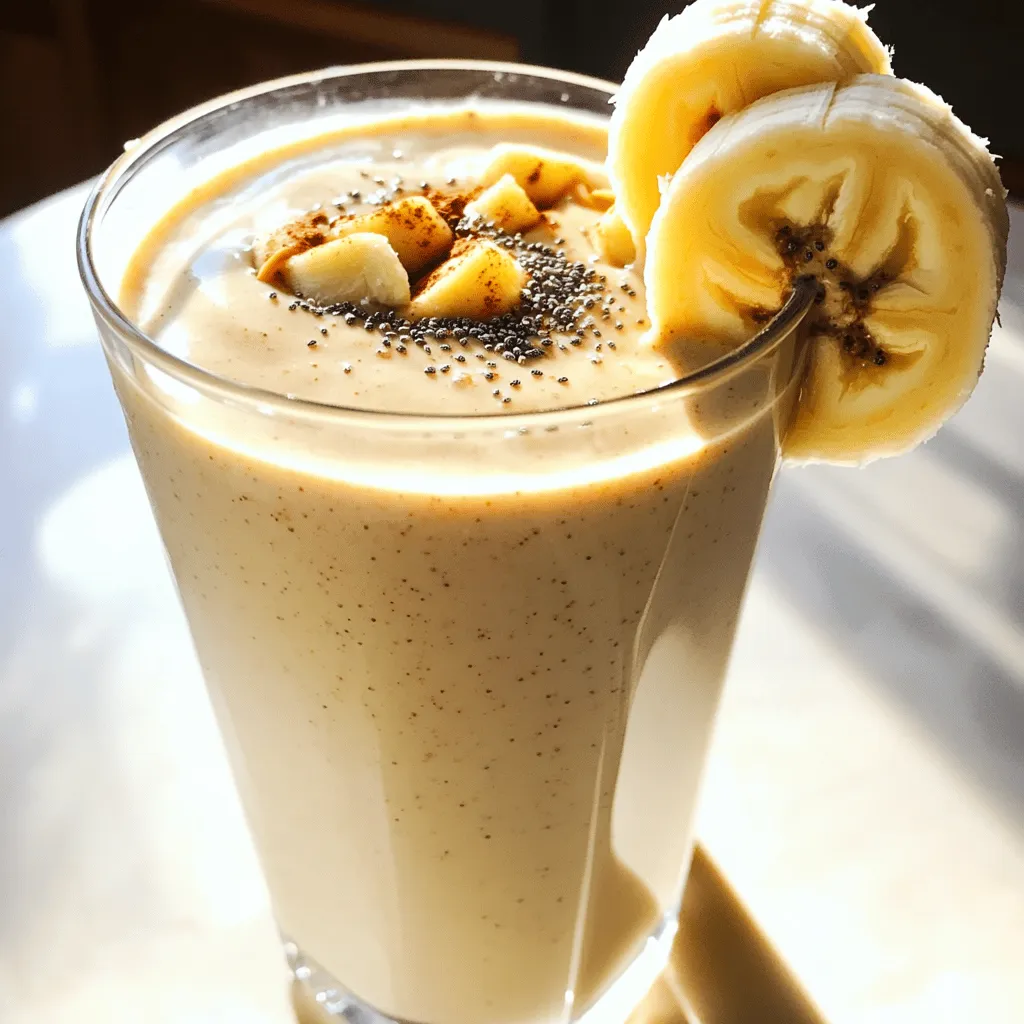
Are you ready for a refreshing treat that’s both tasty and healthy? The Peanut Butter Banana Smoothie is your perfect

For a great beef and broccoli stir fry, you need fresh, simple ingredients. Here’s what you will use: - 1 pound beef flank steak, thinly sliced - 3 cups broccoli florets - 1 red bell pepper, sliced - 3 cloves garlic, minced - 1 inch ginger, grated - 1/4 cup soy sauce (low sodium) - 2 tablespoons oyster sauce - 1 tablespoon cornstarch - 1 tablespoon sesame oil - 2 tablespoons vegetable oil - Cooked jasmine rice, for serving - Sesame seeds and sliced green onions, for garnish These ingredients come together to create a dish that is both tasty and colorful. Using high-quality beef flank steak is key. This cut is tender and full of flavor. Look for steak that has a nice marbling of fat. This fat will melt during cooking, adding juiciness. Always slice the beef thinly against the grain. This keeps the meat tender and easy to chew. Broccoli and bell pepper bring crunch and color to your stir fry. Broccoli is a great source of vitamins. It adds a fresh taste. The red bell pepper adds sweetness and brightness. Garlic and ginger give depth to the flavor. They also add a warm, fragrant aroma. Together, these veggies and aromatics make the dish healthy and delicious. For the full recipe, check out the details above. Enjoy cooking! Start by slicing 1 pound of beef flank steak. Make thin slices against the grain. In a bowl, mix the beef with 1 tablespoon of cornstarch. Add half of the soy sauce, 1 tablespoon of vegetable oil, and stir well. This will help tenderize the beef. Let it marinate for 15 minutes. While the beef marinates, prepare the broccoli. Take 3 cups of broccoli florets. Bring a pot of water to a boil. Add the florets and cook for 2 minutes. This helps keep the bright green color. Next, quickly move the broccoli to a bowl of ice water. This stops the cooking and keeps it crisp. Drain the broccoli and set it aside. Heat the remaining vegetable oil in a large skillet or wok. Use medium-high heat for a good sear. Add the marinated beef in a single layer. Stir-fry for 3-4 minutes until browned. Remove the beef from the pan and set it aside. In the same pan, add 3 cloves of minced garlic, 1 inch of grated ginger, and 1 sliced red bell pepper. Stir-fry for 2-3 minutes until the bell pepper is tender-crisp. Return the cooked beef to the skillet. Add the blanched broccoli, the rest of the soy sauce, and 2 tablespoons of oyster sauce. Stir everything together and cook for another 2-3 minutes until heated through. Drizzle with 1 tablespoon of sesame oil and toss to combine. Remove from heat. For full details, check the Full Recipe. To make this dish pop with flavor, marinate your beef well. Use cornstarch and soy sauce for a tender bite. Marinate for at least 15 minutes. This step is key for juicy beef. Don't skip it! Adding oyster sauce elevates the taste. It brings a rich umami flavor that pairs well with the veggies. Heat is vital for stir-frying. Use a large skillet or wok. Make sure it’s hot before adding the oil. This helps to sear the beef quickly. Avoid overcrowding the pan; cook in batches if needed. Stir-fry for just a few minutes to keep the beef tender. Add the garlic and ginger next for a fragrant boost. One common mistake is overcooking the broccoli. Blanch for just two minutes. This keeps it bright and crisp. Another mistake is not using enough oil. A little vegetable oil helps everything cook evenly. Lastly, don’t skip the sesame oil at the end. It adds a wonderful finish to your stir-fry. For a detailed guide, check the Full Recipe. {{image_2}} You can change this stir-fry by adding different veggies. Try carrots, snap peas, or bell peppers. These add color and crunch. You can even use cauliflower or bok choy for a twist. Just cut them into small pieces. Add them at the same time as the broccoli for even cooking. This way, you get a tasty mix of flavors and textures. Want a different protein? You can swap beef for chicken, shrimp, or tofu. Chicken works well if you slice it thin. Shrimp cooks fast, so add it later in the stir-fry. For tofu, use firm or extra-firm. Cut it into cubes and pan-fry first to get a nice crust. These options make a great meal for everyone, no matter their taste. If you like heat, try a spicy twist. You can add red pepper flakes or sriracha to the sauce. Start with a small amount and taste it. You can always add more heat! Another idea is to mix in sliced jalapeños for a fresh kick. This spicy version makes your meal exciting. Enjoy every bite with a little extra zing. To store leftovers, let the beef and broccoli cool down. Once cool, place it in an airtight container. This helps keep the food fresh. Store it in the fridge for up to three days. If you plan to eat it later, consider freezing it. When you are ready to eat, you can reheat it easily. Use a microwave for quick warming. Heat in 30-second intervals, stirring between each. This helps it heat evenly. If you prefer, use a skillet on low heat. Stir it gently until hot. This keeps the beef tender. To freeze, ensure the dish is completely cool. Divide it into portions for easy meals. Store the portions in freezer-safe bags or containers. Remove as much air as possible to avoid freezer burn. You can freeze it for up to three months. When ready to eat, thaw it overnight in the fridge before reheating. For the full recipe, check out Beef & Broccoli Delight 🥦. For stir fry, slice beef against the grain. This keeps the meat tender. Aim for thin slices, about 1/4 inch thick. Use a sharp knife for clean cuts. If the beef is slightly frozen, it’s easier to slice. Make sure to cut it into bite-sized pieces for quick cooking. Yes, you can use frozen broccoli. It saves time and is easy to find. Just cook it according to package directions before adding it to your stir fry. Keep in mind that frozen broccoli may be softer than fresh. Adjust your cooking time to avoid overcooking. Beef and broccoli stir fry goes well with several sides. Here are some great options: - Jasmine rice - Brown rice - Fried rice - Noodles - Steamed dumplings These sides add variety and texture to your meal. If you want to make this dish at home, check out the Full Recipe above for all the details! In this blog post, we explored the key ingredients for a delicious beef and broccoli stir fry. I shared step-by-step instructions, tips for great flavor, and ways to avoid mistakes. We also discussed variations, storage options, and answered common questions. Overall, making beef and broccoli stir fry is fun and easy. With practice, you’ll impress everyone with your cooking. Enjoy trying out your own twists and having tasty meals ahead!

Beef and Broccoli Stir Fry Quick and Easy Dinner

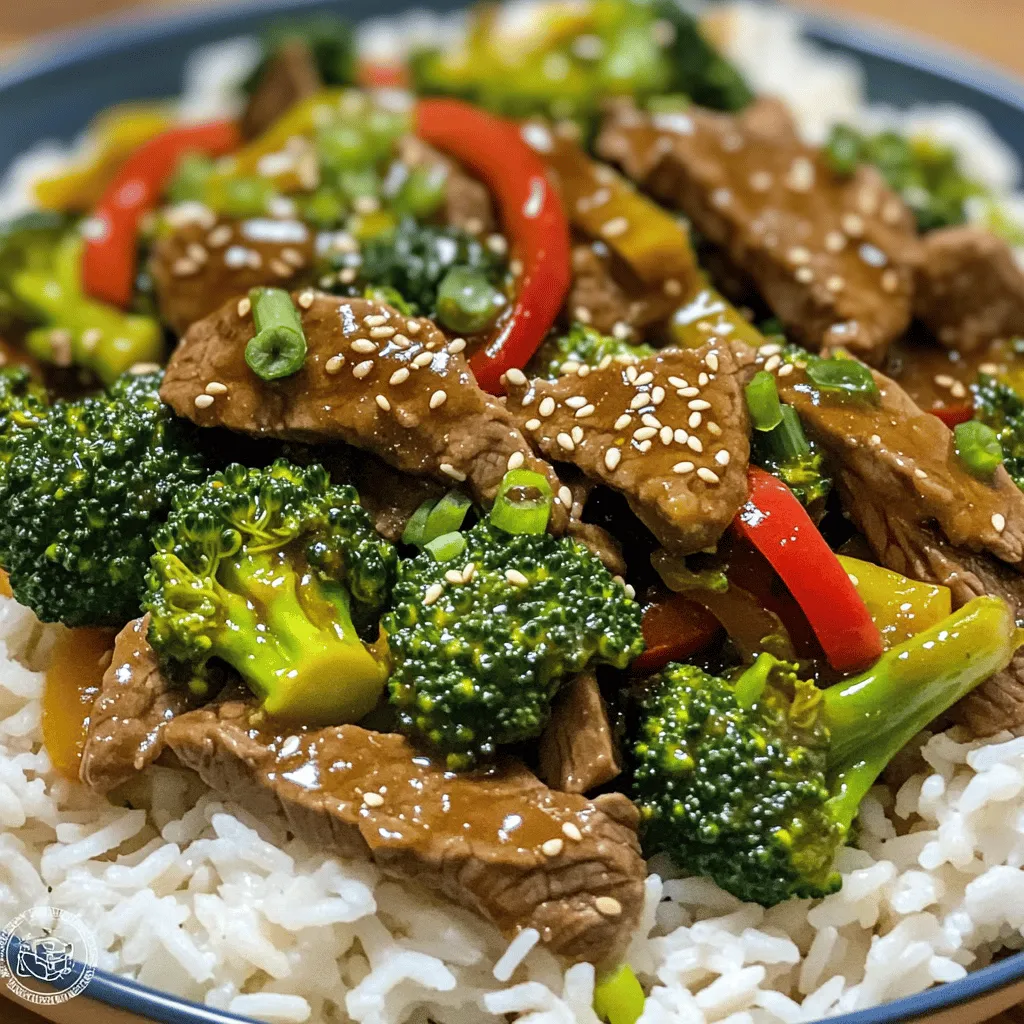
Craving a quick and tasty dinner? Beef and Broccoli Stir Fry hits the spot! I’ll show you how to whip

Older posts
Newer posts
← Previous Page1 … Page85 Page86 Page87 … Page123 Next →

dsad

© 2025 Southern Dishes • Built with GeneratePress

Our Policies

  • Copyright Policy
  • Cookie Policy
  • GDPR Policy
  • Privacy Policy
  • Disclaimer
  • Terms Of Use

More Information

  • Home
  • About
  • Contact
  • Appetizers
  • Dessert
  • Dinner
  • Drinks
©2025, Southern Dishes About Back To Top