![- 4 large russet potatoes - 1 medium onion - 3 cloves garlic - Vegetable broth and cream The heart of this soup is the russet potatoes. They give the soup that rich and creamy feel. I like to peel and dice them, which makes cooking easier. Next, I chop a medium onion to add a sweet flavor. Garlic is key for depth, so I use three cloves, minced finely. For the base of the soup, I combine vegetable broth and heavy cream. This mix creates a smooth and rich texture. - Shredded cheese varieties - Meat options like turkey bacon - Herbs and spices You can customize this soup in many ways. I often add different kinds of shredded cheese for extra flavor. Cheese like cheddar melts well and adds a nice touch. If you want some meat, crumbled turkey bacon is a tasty choice. Fresh herbs like thyme or a dash of smoked paprika can enhance the taste. Feel free to get creative with your choices! - Sour cream - Fresh chives or green onions - Extra shredded cheese Toppings make this dish special. I love a dollop of sour cream to add creaminess. Fresh chives or green onions give a nice crunch and bright color. Don’t forget more shredded cheese on top! It melts beautifully and makes the soup look inviting. Each spoonful becomes a comforting delight with these toppings. For the full recipe, check out the details provided. To start, you need to chop the potatoes and onions. Use a sharp knife for safety. Cut the potatoes into small cubes. This helps them cook faster. For the onions, slice them thinly. This will help them cook evenly. Next, you will sauté the onion and garlic. In a large pot, heat a splash of olive oil over medium heat. Add the chopped onion. Cook it until it turns translucent, about five minutes. This step builds flavor. Then, add the minced garlic. Sauté it for one more minute. You want the garlic to be fragrant but not burnt. Now it is time to cook the soup. Stir in the diced potatoes, vegetable broth, dried thyme, and smoked paprika. Bring the mixture to a boil. After boiling, reduce the heat to low and simmer. Let it cook for about 15 to 20 minutes. You want the potatoes to be tender enough to mash. Once the potatoes are soft, it is time to mash them. Use a potato masher or an immersion blender. Mash the mixture partially. This keeps some chunks for texture, which makes the soup more fun to eat. Next, you will add creaminess to the soup. Stir in one cup of heavy cream and half a cup of shredded cheddar cheese. Cook this on low heat for about five more minutes. Stir often until the cheese melts and the soup becomes creamy. Now, it is time to adjust the flavor. Season with salt and pepper to taste. If you like, add crumbled turkey bacon for a crunchy twist. This step adds great texture and flavor to the soup. To boost the taste of your loaded baked potato soup, use the right spices and herbs. I recommend adding: - 1 teaspoon dried thyme - 1 teaspoon smoked paprika - Salt and pepper to taste These spices add warmth and depth. For a richer taste, try sautéing the onion and garlic longer. This brings out their sweetness. Add a splash of cream at the end for a velvety finish. To get the right balance of creaminess and chunkiness, mash half the potatoes. Use a potato masher for a rough texture. If you want it smoother, an immersion blender works well. Blend just a bit, so you still have some potato chunks. This gives the soup a nice, hearty feel. For the best experience, serve the soup hot in large bowls. Top it with: - Extra shredded cheddar cheese - A dollop of sour cream - Chopped fresh chives or green onions This makes the dish look vibrant and appetizing. Pair it with crusty bread or a fresh salad for a complete meal. If you want to impress, use a wide bowl to show off the colors and textures in your soup. For the full recipe, check out the detailed instructions above. {{image_2}} For a vegetarian twist, swap out the vegetable broth and heavy cream. Use vegetable stock or homemade broth for a fresh taste. For creaminess, try coconut milk or cashew cream. These options add rich flavor without meat. Topping ideas are fun too! Leave out the bacon and load up on toppings like: - Fresh herbs - Roasted garlic - Sautéed mushrooms - Extra cheese - Avocado slices If you want a dairy-free soup, plenty of choices exist. Almond milk or oat milk can replace heavy cream. These options keep the soup creamy without dairy. For cheese lovers, vegan cheese works well. Many brands melt nicely. Some options to try include: - Nutritional yeast for a cheesy flavor - Vegan cheddar shreds - Cashew-based cheese To spice things up, add jalapeños or different cheeses. A sprinkle of crushed red pepper can bring heat. You can also try mixing in herbs like cilantro for a fresh twist. For international flavors, consider: - Adding curry powder for a hint of Indian flair - Stirring in chipotle for a smoky flavor - Trying Italian herbs for a Mediterranean feel These variations help make the soup fun and unique. With so many ways to change it, you can enjoy a new soup each time! For the complete recipe, check the [Full Recipe]. To keep your loaded baked potato soup fresh, store it in airtight containers. Make sure to let the soup cool before sealing it. This helps avoid steam buildup, which can lead to spoilage. - Refrigeration: If you plan to eat leftovers within a few days, keep the soup in the fridge. It stays good for about 3 to 4 days. - Freezing: For longer storage, freeze the soup in freezer-safe containers. It can last for up to 3 months. Reheating soup is easy, and you have options. You can use the microwave or stovetop. - Microwave: Pour your soup into a microwave-safe bowl. Heat it for 1-2 minutes, stirring halfway through. - Stovetop: Place the soup in a pot over medium heat. Stir often to prevent sticking. To maintain creaminess, add a splash of milk or cream while reheating. This helps keep the texture smooth. You can get creative with leftover soup. - Repurpose: Use it as a sauce for pasta or rice. It adds great flavor to any dish. - Serving Base: Consider serving it as a base for casseroles. Pour it over cooked chicken or veggies for a comforting meal. With these tips, you can enjoy your loaded baked potato soup in many tasty ways! For the full recipe, check out the [Full Recipe]. You can store Loaded Baked Potato Soup in the fridge for up to five days. Keep it in an airtight container. If you want to freeze it, let it cool first. Then, transfer it to freezer-safe bags or containers. The soup can last for about three months in the freezer. When you're ready to eat it, thaw it in the fridge overnight. Yes, you can make the soup ahead of time. Just follow the recipe and let it cool completely. Then, store it in the fridge or freezer as mentioned. When reheating, add a splash of cream or broth to keep it creamy. This helps the soup maintain its delicious flavor. To spice up your soup, try adding some cayenne pepper or crushed red pepper flakes. You can also mix in diced jalapeños for heat. Top with spicy cheese or a drizzle of hot sauce for an extra kick. These additions make your soup exciting and full of flavor. To thicken your soup, you can use a potato masher to smash some of the potatoes. Another way is to stir in a bit of cornstarch mixed with cold water. This thickens the soup without changing its taste. You can also add more cheese or cream to boost richness. Loaded baked potato soup is rich, creamy, and filling. We discussed key ingredients like russet potatoes and heavy cream. You can customize with cheese and meats to suit your taste. Next, I shared step-by-step instructions for preparing, cooking, and achieving the perfect texture. I also provided tips for serving and storing leftovers effectively. Finally, you can explore variations for vegetarian or dairy-free options. This soup is versatile, making it a great go-to meal. Enjoy making your own version!](https://southerndishes.com/wp-content/uploads/2025/06/c248775e-d507-4a4d-bd02-1b7fd6d50877.webp)
Loaded Baked Potato Soup Comforting Creamy Delight
If you’re craving a warm, hearty dish that brings comfort to your kitchen, look no further! Loaded Baked Potato Soup
If you’re craving a warm, hearty dish that brings comfort to your kitchen, look no further! Loaded Baked Potato Soup
![- 2 salmon fillets (about 6 ounces each) - 1 cup cooked jasmine rice - 1 cup broccoli florets - 1 medium carrot, julienned - ½ avocado, sliced - ¼ cup low sodium soy sauce - 2 tablespoons honey - 1 tablespoon rice vinegar - 1 tablespoon sesame oil - 2 cloves garlic, minced - 1 teaspoon grated ginger - Sliced green onions - Sesame seeds When I make Teriyaki Salmon Bowls, I focus on fresh and simple ingredients. The salmon is rich in flavor and healthy fats. I always choose wild-caught salmon for the best taste and nutrition. Jasmine rice provides a soft and fragrant base that pairs perfectly with the bold flavors. For the veggies, I use broccoli and carrots. They add bright colors and crunch. You can steam them to keep them crisp. I love adding avocado for creaminess. It balances the dish nicely. The marinade is key to this recipe. I mix soy sauce, honey, rice vinegar, sesame oil, garlic, and ginger. This blend gives the salmon a sweet and savory taste. Letting the salmon soak in this marinade brings out the best flavor. Finally, I top the dish with sliced green onions and sesame seeds. They add a nice touch and a bit of crunch. You can find the full recipe in the article for detailed steps. Enjoy your healthy dinner delight! - Whisk together all marinade ingredients. - Ensure even blending for optimal flavor. Making a good marinade is key. I mix soy sauce, honey, rice vinegar, sesame oil, minced garlic, and grated ginger in a bowl. This mix brings sweet and savory notes. You want to combine them until smooth. The flavors blend better that way. - Place fillets in a shallow dish. - Cover and refrigerate for 30 minutes to 2 hours. I put the salmon fillets in a dish and pour the marinade on top. It’s important to coat the fish well. Cover the dish and let it chill in the fridge. This step makes the salmon tasty. I recommend letting it marinate for at least 30 minutes. - Steam broccoli and carrots for 3-5 minutes. - Ensure they remain crisp and vibrant. Next, I steam the broccoli and carrots. I bring water to a boil and place the veggies in a steamer. Steaming keeps the colors bright and the crunch intact. Cook them for about 3-5 minutes. - Preheat skillet and cook salmon skin-side down for 4-5 minutes. - Flip salmon and add reserved marinade for thicker sauce. For the salmon, I heat a non-stick skillet over medium-high heat. I then add the salmon, skin-side down. It cooks for about 4-5 minutes. After that, I flip it carefully. I pour the reserved marinade into the pan, adding flavor and thickness to the sauce. - Start with jasmine rice as the base. - Layer with vegetables and salmon fillet. Now it’s time to build the bowls! I start with a scoop of jasmine rice. It serves as a nice, fluffy base. Then I layer the steamed broccoli and carrots on top, followed by the salmon fillet. - Drizzle teriyaki sauce over the salmon. - Garnish with green onions and sesame seeds. The final touch is the teriyaki sauce. I drizzle it over the salmon to enhance the flavor. Lastly, I sprinkle sliced green onions and sesame seeds for a nice crunch. This adds color and flavor too. For the full recipe, check out the details above! For the best flavor, let the salmon sit in the marinade longer. A good time is between 30 minutes and 2 hours. This allows the soy sauce and honey to soak in. Taste the marinade before adding the salmon. Adjust the soy sauce and honey to get the sweetness you like. You can make it sweeter or saltier as needed. Use a non-stick skillet to cook the salmon. This helps prevent sticking and makes flipping easy. Keep the heat medium-high to get a nice sear. Avoid overcooking the salmon, as it can become dry. Cook it for about 4-5 minutes on each side. It should be flaky but still moist. Serve the salmon in shallow bowls for a nice look. This makes the dish seem fancy and inviting. Add lime wedges on the side. The lime gives a fresh taste when squeezed over the salmon. It adds a lovely zing that brightens the dish. For a full guide on making these bowls, check out the Full Recipe. {{image_2}} You can swap salmon for tofu for a vegetarian version. This change makes it lighter. Tofu absorbs flavors well, so it will soak up the teriyaki sauce. You can also use chicken breast for a different protein option. Just marinate it the same way. Cook it until golden brown for tasty results. You can use snap peas or bell peppers as alternative veggies in your bowl. They add great crunch. If you want to get creative, try different greens like spinach or bok choy. These greens cook quickly and add nice color. If you want some heat, add crushed red pepper for spice. It wakes up the dish. Another great addition is sesame oil for added nuttiness. Just a little goes a long way in flavoring your meal. Enjoy experimenting with these variations to create your perfect teriyaki salmon bowl! For the complete recipe, check out the [Full Recipe]. - Store leftover salmon bowls in airtight containers. - Consume within 2-3 days for best quality. Keeping your teriyaki salmon bowls fresh is key. I recommend using airtight containers to seal in flavor and moisture. This helps prevent any unwanted odors from your fridge. Make sure to label the containers with the date, so you know when to enjoy them. Eating within 2-3 days ensures you savor that tasty teriyaki goodness at its best. - Freeze cooked salmon and rice separately. - Thaw overnight in the fridge before reheating. If you want to save some for later, freezing is a great option. I suggest freezing the salmon and rice in separate bags or containers. This way, they maintain their texture and taste better when you reheat them. When you’re ready to enjoy your meal, just thaw everything overnight in the fridge. This method helps keep the flavors intact. - Reheat gently in the microwave or on the stovetop. - Add a splash of water to maintain moisture. When it's time to heat up your teriyaki bowls, do it gently. Use the microwave or stovetop on low heat. To keep the salmon moist, add a splash of water before reheating. This little trick prevents dryness and keeps your meal just as delicious as when you first made it. Enjoy every bite! - Follow the detailed recipe steps above for homemade bowls. - Broccoli, avocado, and jasmine rice are excellent pairings. These ingredients add color and balance to your bowl. Broccoli brings a nice crunch and nutrients. Avocado adds creaminess and healthy fats. Jasmine rice gives a fluffy base to soak up the sauce. - Yes, replace salmon with tofu and use maple syrup instead of honey. Tofu absorbs flavors well and offers a great texture. This swap keeps the dish tasty while fitting a vegan diet. - Homemade teriyaki sauce can last about a week when refrigerated. Store it in an airtight container to keep it fresh. It's handy for quick meals later in the week. - Jasmine rice is typically preferred for its flavor and texture. This rice cooks up soft and fluffy, perfect for soaking up the teriyaki sauce. Consider trying it for your next bowl! In this article, we explored how to make delicious teriyaki salmon bowls. We discussed the main ingredients, marinade, and tips for cooking the salmon and vegetables. You learned how to assemble your bowl and add tasty garnishes. You can also try variations like using tofu or different veggies. Remember to store leftovers correctly and enjoy them within a few days. This meal is not only tasty but also healthy and easy to prepare. Enjoy making your teriyaki salmon bowls at home!](https://southerndishes.com/wp-content/uploads/2025/06/c92250de-cd08-4ccd-ae12-3141183ecda4.webp)
Looking to impress at dinner while keeping it healthy? Teriyaki Salmon Bowls are your answer! This dish combines tender salmon,
![- 1 cup all-purpose flour - 1 cup whole wheat flour - 1/2 cup granulated sugar - 1/4 cup brown sugar, packed - 2 tsp baking powder - 1/2 tsp baking soda - 1/2 tsp salt - 1/2 cup unsalted butter, melted - 1/2 cup buttermilk - 2 large eggs - Zest of 1 large lemon - 1/4 cup fresh lemon juice - 1 1/2 cups fresh blueberries (or frozen, thawed) - 1 tsp vanilla extract Selecting the right ingredients is key for the best lemon blueberry muffins. Each part adds flavor and texture. - Selecting ripe blueberries: Look for firm, plump blueberries. They should be a deep blue color. Avoid any that are soft or mushy. Fresh blueberries give the best taste. - Choosing the right type of flour: All-purpose flour gives a light and fluffy texture. Whole wheat flour adds a nutty flavor and more fiber. A mix of both works well for balance. - Freshness of eggs and dairy: Use fresh eggs and buttermilk. This ensures the muffins rise well and taste great. Check the expiration dates before buying. For the full recipe, you can follow the instructions I shared earlier. Each ingredient plays a role in making your muffins delicious. 1. First, preheat your oven to 375°F (190°C). This step is key for even baking. 2. Next, prepare your muffin tin. Line it with paper liners or grease it lightly. This helps muffins come out easily. 1. In a large bowl, combine the all-purpose flour and whole wheat flour. 2. Add the granulated sugar, brown sugar, baking powder, baking soda, and salt. Mix well until you see no lumps. This blend gives your muffins the right rise and flavor. 1. In another bowl, prepare the wet mixture. Mix melted butter and buttermilk together. 2. Next, add the eggs, lemon zest, lemon juice, and vanilla extract. Stir until it’s smooth. The lemon adds a bright taste. 1. Pour the wet mixture into the dry ingredients. Gently mix them until just combined. Be careful not to overmix, or your muffins may become tough. 2. Now, fold in the fresh blueberries. Make sure they are evenly distributed in the batter. This adds bursts of flavor in each bite. 3. Portion the batter into the muffin cups. Fill each cup about 3/4 full for the best rise. 1. Place the muffin tin in the preheated oven. Bake for 18-20 minutes. A toothpick inserted into the center should come out clean. 2. Once baked, let the muffins cool in the tin for about 5 minutes. Then, transfer them to a wire rack to cool completely. This keeps the muffins fluffy and moist. Follow this guide, and you'll enjoy perfect lemon blueberry muffins. For the full recipe, check the details above. To make great lemon blueberry muffins, avoid overmixing. Mix wet and dry ingredients just until they blend. This keeps your muffins light and fluffy. To test for doneness, use a toothpick. Insert it in the center; if it comes out clean, your muffins are ready. You can add spices for extra flavor. Try cinnamon or nutmeg to complement the lemon. You might also want to add a splash of almond or coconut extract for a twist. Incorporating nuts can add crunch. Chopped walnuts or pecans work well with these muffins. When serving, place muffins on a pretty plate. This makes them look inviting. You can also dust them with powdered sugar for a touch of sweetness. Fresh berries or lemon slices on the side add color and appeal. Don’t forget to share the Full Recipe with friends! {{image_2}} You can make gluten-free muffins by using different flours. Almond flour or oat flour works well. Blend these flours with a gluten-free baking mix for best results. You may need to adjust cooking times. Start with the same time and check for doneness. Sometimes, gluten-free muffins take a bit longer. To make vegan muffins, replace eggs with flax eggs or applesauce. Use plant-based milk instead of buttermilk. Almond or soy milk are great choices. For flavor, add more lemon zest or a splash of vanilla. You can also use coconut oil as a butter substitute. This keeps the muffins moist and tasty. You can switch up the flavors in your muffins. Try lemon poppy seed muffins by adding poppy seeds to the batter. Mix in different berries like raspberries or strawberries for a fruity twist. Each berry brings its unique taste to the muffins. This way, you can enjoy a new treat every time. For the full recipe, check out the [Full Recipe]. Store your lemon blueberry muffins at room temperature. Use an airtight container to keep them fresh. They stay good for up to three days this way. For longer storage, wrap each muffin in plastic wrap. This keeps them moist and tasty. You can then place them in a zip-top bag. This method is great for keeping flavors intact. To reheat your muffins, use the microwave or oven. For the microwave, place a muffin on a plate. Heat it for about 10 to 15 seconds. This warms it up without drying it out. If you prefer the oven, preheat it to 350°F (175°C). Wrap the muffin in foil and heat for about 10 minutes. This keeps the muffin soft and delicious. Freezing muffins is a smart way to save them for later. Place cooled muffins in a single layer on a baking sheet. Freeze them for about an hour. Once solid, transfer them to a zip-top bag. This prevents them from sticking together. When ready to eat, take out a muffin and let it thaw at room temperature. You can also reheat it in the microwave or oven. Enjoy your tasty treat anytime! You can find the full recipe in the previous section. You can tell if your muffins are done by looking for a golden brown color. They should also spring back when you touch them lightly. Another great way is to use a toothpick. Stick it into the center of a muffin. If it comes out clean, your muffins are ready! This simple check helps ensure perfect muffins every time. Yes, you can use frozen blueberries in your muffins. However, they may change the texture a bit. Frozen berries can make the batter more watery. To avoid this, let them thaw and drain any excess moisture before adding them. This keeps your muffins fluffy and tasty. If you want a stronger lemon flavor, add more lemon zest or juice to the batter. You can also make a lemon glaze. Mix powdered sugar with lemon juice for a sweet topping. This extra touch gives your muffins a bright, zesty kick. To keep your muffins fresh, cover them with plastic wrap or aluminum foil. Store them in an airtight container at room temperature. For longer storage, place them in the fridge or freezer. This way, your muffins stay moist and delightful for days. In this post, we covered how to make delightful lemon blueberry muffins. You learned about key ingredients, tips for selection, and detailed steps for mixing and baking. Remember, using fresh blueberries and quality flour makes a big difference. Consider the variations for gluten-free or vegan muffins to fit your diet. Store your muffins properly to keep them fresh. Enjoy the process and share these treats with others. Baking these muffins can be a fun and tasty journey!](https://southerndishes.com/wp-content/uploads/2025/06/f91d3769-2e7b-45c0-8111-f3280628320f.webp)
Are you ready to bake the perfect Lemon Blueberry Muffins? Whether you’re a novice or a pro in the kitchen,
![To make a great vegetarian chili, you need some key items. Here’s what you'll need: - 1 tablespoon olive oil - 1 small onion, diced - 2 cloves garlic, minced - 1 bell pepper (any color), diced - 1 zucchini, diced - 1 carrot, diced - 1 can (15 oz) black beans, drained and rinsed - 1 can (15 oz) kidney beans, drained and rinsed - 1 can (15 oz) diced tomatoes, with juice - 1 cup corn kernels (fresh or frozen) These ingredients form a solid base for your dish. The beans add protein, while the veggies provide texture and flavor. Spices make your chili pop! Here are the must-have spices: - 2 tablespoons chili powder - 1 teaspoon cumin - 1 teaspoon smoked paprika - ½ teaspoon cayenne pepper (optional for extra heat) - Salt and pepper to taste Chili powder gives a nice warmth, while cumin adds depth. Smoked paprika provides a hint of smokiness that’s hard to resist. Adjust the cayenne to fit your heat level. Garnishes can elevate your chili. Here are some tasty options: - Fresh cilantro, chopped (for garnish) - Avocado slices (for serving) - Lime wedges (for serving) These add color and freshness. The lime juice brings brightness, while avocado adds creaminess. You can find the full recipe for this vibrant dish [Full Recipe]. First, gather your ingredients. You will need olive oil, onion, garlic, bell pepper, zucchini, and carrot. Heat one tablespoon of olive oil in a large pot over medium heat. Add the diced onion and sauté for about five minutes. The onion should turn soft and clear. Next, stir in two minced garlic cloves and cook for one more minute. You want to smell that garlic! Now, add your diced bell pepper, zucchini, and carrot. Sauté these veggies for five to seven minutes. They should begin to soften and mix well. Once your vegetables are ready, it’s time to add the main ingredients. Add one can each of black beans and kidney beans, both drained and rinsed. Then, add one can of diced tomatoes, corn, two tablespoons of chili powder, one teaspoon of cumin, and one teaspoon of smoked paprika. If you like heat, toss in half a teaspoon of cayenne pepper. Season with salt and pepper to taste. Stir everything together until well mixed. Now, bring your chili mixture to a simmer. Lower the heat and cover the pot. Let it cook for about 20 to 25 minutes. Stir it occasionally to keep it from sticking. After this time, taste your chili. Adjust the seasoning if you need to. If you prefer a thicker chili, cook it uncovered for the last five to ten minutes. Serve it hot. Garnish with fresh cilantro, avocado slices, and lime wedges for a perfect finish. You can find the full recipe to follow along as you cook. To make the best vegetarian chili, focus on fresh ingredients. Use ripe tomatoes and crisp veggies. Sauté them well to build flavor. Don’t rush this step; it’s key. Mix in your spices early. This brings out their full taste. Simmer the chili to blend all the flavors. Remember to taste and adjust as you go. You want a smooth and rich blend. For a full experience, check the Full Recipe for detailed steps. One common mistake is overcooking the beans. They should be tender but not mushy. Another issue is skipping the sautéing step. This step adds depth and flavor. Don’t forget to season in layers. If you add all the salt at once, it won’t taste as good. Lastly, avoid a watery chili. If your mix is too thin, let it simmer without a lid. This helps it thicken up nicely. To spice up your chili, start with fresh spices. Use chili powder, cumin, and smoked paprika. Each adds a unique touch. If you want heat, add cayenne pepper or fresh chilies. Start small and taste as you go. You can also add a splash of lime juice for brightness. Fresh cilantro at the end adds a pop of flavor too. Enjoy experimenting with different spices and herbs! {{image_2}} You can change the veggies to make your chili special. Try adding mushrooms for a meaty texture. Spinach or kale brings a nice green color and boosts nutrients. Sweet potatoes add a touch of sweetness and creaminess. Don't forget about corn; it adds crunch and sweetness too. Feel free to mix and match based on what you have in your fridge. If you want more protein, try using lentils or quinoa. These options cook quickly and soak up all the flavors. Tofu is another great choice. You can cube it and sauté it before adding it to the pot. Tempeh adds a nutty taste and also works well. These protein-packed choices make your chili filling and satisfying. To give your chili a twist, consider adding fresh herbs like oregano or thyme. A splash of Worcestershire sauce adds depth. For a smoky flavor, try adding chipotle peppers in adobo sauce. If you want some sweetness, a touch of maple syrup can balance the heat. You can even add a splash of beer for a unique flavor. Each of these twists makes for a fun cooking adventure. For the complete experience, check out the Full Recipe for Fiery Fiesta Vegetarian Chili. After you enjoy your vegetarian chili, store leftovers in an airtight container. Let it cool to room temperature. Once cool, seal it tightly and place it in the fridge. It should last for about 4 to 5 days. If you want it to last longer, freezing is a great option. For freezing, use freezer-safe containers or bags. Divide the chili into single servings if you like. This way, you can grab just what you need. Be sure to leave space at the top of the container. Food expands when it freezes. Your chili can be frozen for up to 3 months. When you're ready to eat your chili, it's easy to reheat. You can do this on the stove or in the microwave. For the stove, pour the chili into a pot and heat over medium heat. Stir it often until it’s hot. If using a microwave, place it in a bowl and cover it. Heat in 1-minute bursts, stirring in between. Make sure it’s hot all the way through before serving. Enjoy your flavorful meal again! For the full recipe, check out the complete guide. Black beans and kidney beans are two great choices. Black beans add creaminess and depth, while kidney beans bring a hearty texture. You can also use pinto beans for a smooth taste. Mixing different beans gives your chili more flavor and variety. Yes, you can use a slow cooker for vegetarian chili. Just add all your ingredients to the pot and set it to low. Let it cook for about 6-8 hours. This method allows the flavors to blend nicely. You’ll end up with a rich and tasty chili. Vegetarian chili is very healthy. It is packed with fiber and protein from the beans. The vegetables add vitamins and minerals. Using fresh ingredients makes it even better. This dish is low in fat and full of flavor, making it a great choice for any meal. Chili has deep roots in American history. It began in the early 1800s in Texas. People made it with beef, spices, and chili peppers. Over time, many variations appeared, including vegetarian chili. Each region has its own unique twist on this classic dish. To spice up your chili, add cayenne pepper or hot sauce. You can also use spicy chili powder. If you want it milder, reduce the amount of chili powder or skip the cayenne. Adding more tomatoes or beans can also tone down the heat. Feel free to adjust until it fits your taste! For a full recipe to try, check out the Fiery Fiesta Vegetarian Chili! You learned the key ingredients for making vegetarian chili, from basic components to spices. We discussed step-by-step instructions to prepare and cook your chili to perfection. I shared tips to ensure your dish stands out and highlighted safe storage methods. With various additions and options, you can customize your chili to fit your taste. Remember, cooking is about exploring flavors. Enjoy your delicious vegetarian chili and make it your own!](https://southerndishes.com/wp-content/uploads/2025/06/59d34a09-9328-4dee-b283-069e07bb2149.webp)
Are you ready to spice up your meals with a delicious vegetarian chili? This easy recipe guide will walk you

Ready to impress your family with a mouthwatering meal? This Lemon Garlic Roasted Chicken is your answer! With just a
![- Ripe avocados and their importance Ripe avocados are creamy and rich. They offer great flavor and texture. Look for avocados that yield gently to pressure. This ensures a smooth filling and easy scooping. - Tuna and alternative options Use canned tuna for this recipe. It is convenient and packed with protein. You can choose tuna in water for a lighter dish. If you want a different taste, try canned chicken or chickpeas. - Role of Greek yogurt in the recipe Greek yogurt adds creaminess and tang. It also makes the dish healthier by replacing mayo. This swap keeps the filling light while adding protein and probiotics. - Additional ingredients for flavor enhancement Celery and red bell pepper add crunch and color. Fresh dill gives a burst of flavor. The lemon juice brightens the dish. Salt and pepper tie all the flavors together. For a pretty touch, add cherry tomatoes and microgreens. For the full recipe, check out the complete details above. 1. Preparing the tuna mixture: In a medium bowl, mix the drained tuna, Greek yogurt, and Dijon mustard. Add finely chopped celery and red bell pepper for crunch. Stir in fresh dill and lemon juice. Season with salt and pepper to your taste. Mix well until it is creamy and flavorful. 2. Scooping out avocados correctly: Take your ripe avocados and slice them in half. Remove the pit with a spoon. Use a small spoon to scoop out a bit of the avocado flesh. This creates more space for the tuna mixture. Be careful not to scoop too much. You want to keep the avocado halves intact. 3. Stuffing avocados with the mixture: Now, take the prepared tuna mixture and generously fill each avocado half. Press down gently to pack it in. This ensures every bite is full of flavor. - Plating ideas for presentation: Place the stuffed avocados on a bright plate. This makes the green pop against the background. You can arrange them side by side or in a circle for a fun look. - Garnishes that complement the dish: Top the stuffed avocados with halved cherry tomatoes for color. Add a sprinkle of microgreens for a fresh touch. These garnishes add flavor and make the dish more appealing. - Suggested side dishes for a complete meal: Serve your stuffed avocados with a simple green salad or some crunchy tortilla chips. These sides will balance the dish and provide a satisfying meal. For the full recipe, check out the complete instructions. Enjoy making your stuffed avocado with tuna; it is quick and so tasty! Choosing ripe avocados is key. You want them soft but not mushy. Gently press the skin; it should yield slightly. This gives the best texture for your dish. For seasoning, feel free to get creative. Add a pinch of garlic powder for a kick. Try swapping dill with cilantro for a fresh twist. Experiment with flavors to find your favorite mix. To keep the tuna moist, use Greek yogurt as a base. It adds creaminess and flavor. You can also drizzle in a bit of olive oil. This will help maintain the juicy texture of the tuna. You'll need a few essential tools to make this dish easy. A sharp knife helps to cut the avocados cleanly. Use a spoon to scoop out the flesh without damaging the skin. A mixing bowl is crucial for combining the tuna mixture. A sturdy fork works well to mash and mix everything together. For serving, a nice plate makes your dish look appealing. If you want to elevate your presentation, consider using a piping bag. This can help you fill the avocado halves neatly. Check out the Full Recipe for more detailed steps! {{image_2}} You can switch out tuna for chicken or chickpeas. These options taste great and add variety. Chicken gives a savory twist, while chickpeas bring a nice crunch. You can also try different dressings to change the flavor. A spicy sriracha mayo can add heat. A tangy vinaigrette can brighten the taste. Experiment with what you like! To make this dish gluten-free, simply check your ingredients. The recipe is already gluten-free with the right dressings. For a vegetarian option, swap the tuna for chickpeas or black beans. You’ll still enjoy a hearty meal packed with protein. Both options are tasty and fun. You can create a delicious stuffed avocado that fits your needs! The [Full Recipe] has all the details you need to start. When you have leftover stuffed avocados, store them in the fridge. Place them in an airtight container. This keeps the avocados fresh and tasty. If you can, eat them within one day. Avocados brown quickly when cut. To slow down browning, sprinkle lemon juice on exposed flesh. This simple step helps keep your dish looking bright and appealing. You can freeze stuffed avocados, but it's not the best choice. Freezing changes the texture of the avocado. If you do freeze them, wrap each half tightly. Use plastic wrap and then aluminum foil. This protects them from freezer burn. When you're ready to eat, thaw them in the fridge overnight. Do not refreeze them. Thawing takes time, but it's worth it for the best taste. After thawing, check the avocado for any changes. If it looks or smells off, it's better to toss it. Enjoy your stuffed avocados fresh for the best flavor. For the Full Recipe, refer back to the earlier section. How long can stuffed avocados be stored in the fridge? Stuffed avocados stay fresh in the fridge for about one day. The avocado will brown quickly after that. To slow this down, cover them tightly with plastic wrap. This helps keep air out, which causes browning. Can I prepare this dish in advance? You can prep the tuna mixture ahead of time. However, wait to stuff the avocados until just before serving. This keeps the avocados fresh and green. What are the best types of tuna to use? I recommend using canned tuna in water for this dish. It has a lighter flavor. You can also use chunk light tuna or albacore for a firmer texture. Can I use canned tuna in olive oil instead of water? Yes, you can use tuna in olive oil. It adds extra flavor and richness to the dish. Just drain it well before mixing. Best substitutes for Greek yogurt in this recipe If you don’t have Greek yogurt, you can use sour cream. You could also try plain yogurt or even mashed avocado for creaminess. Overview of the nutritional content of stuffed avocados Stuffed avocados offer a rich source of healthy fats, protein, and vitamins. Each serving provides good fiber and essential nutrients. Health benefits of ingredients used in the recipe Avocados are full of healthy fats that support heart health. Tuna adds protein for muscle strength. Greek yogurt brings probiotics, which aid digestion. Together, these ingredients form a nutritious, balanced meal. In this post, we explored how to make delicious stuffed avocados. We discussed key ingredients like ripe avocados and tuna, and how Greek yogurt enhances the dish. I shared detailed steps for preparation and serving, along with tips to perfect your recipe. We also looked at variations to suit different diets and the best ways to store leftovers. Enjoy experimenting with this healthy meal that can fit any preference. You’ll find it easy, fun, and tasty!](https://southerndishes.com/wp-content/uploads/2025/06/c0a498a6-f383-4e7f-9278-bac49daa264e.webp)
Welcome to a delicious journey with my Stuffed Avocado with Tuna! This dish is both tasty and healthy. It combines
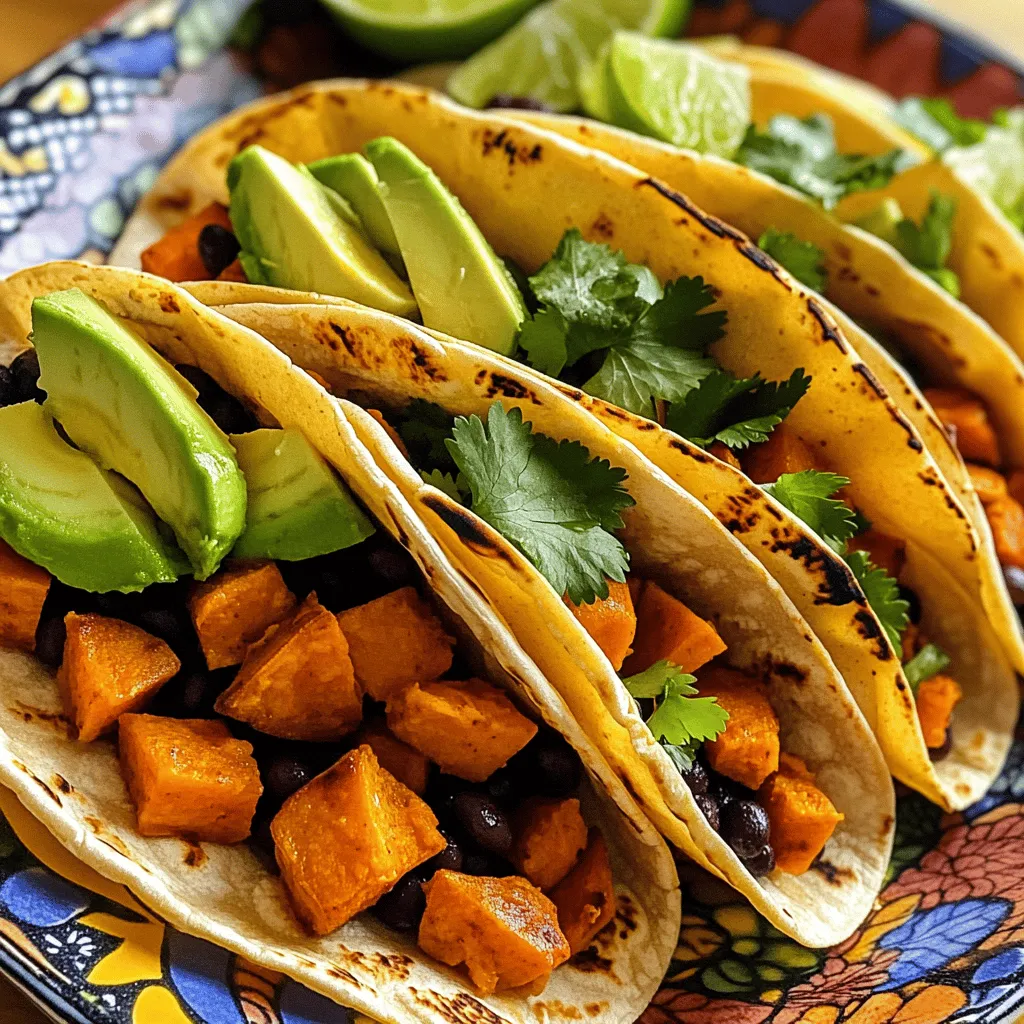
Are you ready for a tasty twist on taco night? Sweet potato and black bean tacos pack a flavorful punch.

Are you ready to indulge in a rich and creamy treat that’s good for you? Chocolate Avocado Mousse is the
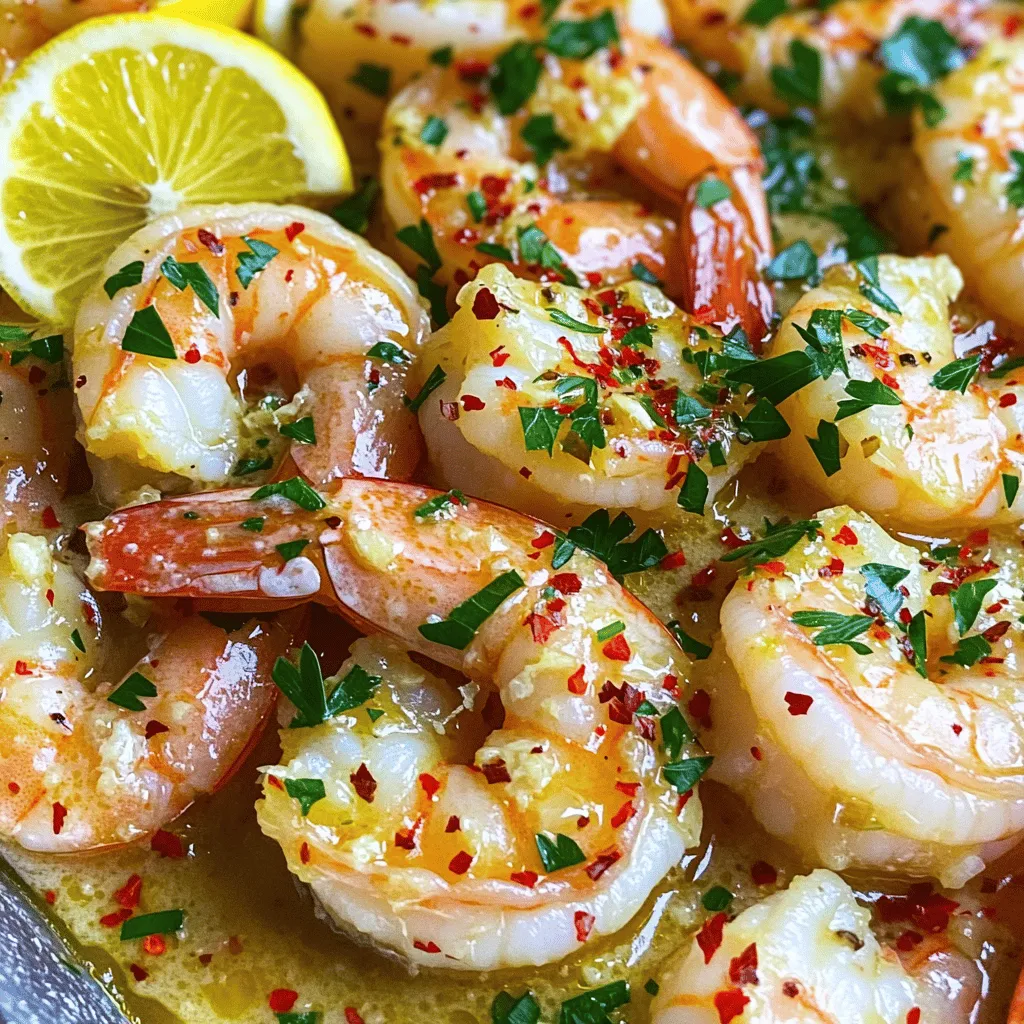
If you crave a quick and tasty meal, this Lemon Garlic Butter Shrimp recipe is for you! With just a

Looking for a quick and tasty breakfast? Try my Cinnamon Roll Casserole! It’s simple to make and perfect for lazy
