Skip to content
DisclaimerTerms Of UseGDPR PolicyCookie Policy

Southern Dishes

  • Home
  • Drinks
  • Appetizers
  • Dinner
  • Dessert
  • About
  • Contact
  • Privacy Policy
DisclaimerTerms Of UseGDPR PolicyCookie Policy

Isabella

Creating cheesy garlic breadsticks is simple with the right ingredients. Here’s what you need: - 1 pound pizza dough (store-bought or homemade) - 4 tablespoons unsalted butter, melted - 4 cloves garlic, minced - 1 teaspoon dried oregano - 1 teaspoon garlic powder - 1 cup mozzarella cheese, shredded - ¼ cup grated Parmesan cheese - Salt to taste - Fresh parsley, chopped (for garnish) You can make your breadsticks even better with a few extras: - Red pepper flakes for heat - Italian seasoning for extra flavor These ingredients help make the breadsticks cheesy and garlicky. The melted butter adds richness, while the cheese gives that gooey texture we all love. You can customize your breadsticks by adding red pepper flakes or Italian seasoning for more flavor. Using good quality cheese and fresh garlic makes a big difference. You can use the Full Recipe to see how to put it all together! - Preheat your oven to 425°F (220°C). Line a baking sheet with parchment paper. - Roll out the pizza dough on a floured surface. Aim for a rectangle about ½ inch thick. - Move the dough to the baking sheet. Use a sharp knife or pizza cutter to slice it into 1-inch wide strips. - In a small bowl, mix melted butter with minced garlic, oregano, garlic powder, and a pinch of salt. Stir until well combined. - Brush the garlic butter mixture over the dough strips. Make sure each strip gets a good amount of the buttery goodness. - Sprinkle the shredded mozzarella and grated Parmesan cheese evenly on top. - Bake in the oven for 12-15 minutes. Look for golden brown breadsticks with bubbly cheese. - Remove from the oven and let cool for a couple of minutes. Use a pizza cutter to separate the breadsticks. - Garnish with freshly chopped parsley before serving. You can find the full recipe for cheesy garlic breadsticks above! Enjoy these warm delights with a side of marinara sauce for dipping. To make great cheesy garlic breadsticks, you can choose store-bought or homemade dough. Store-bought dough saves time. It’s quick and easy. Homemade dough gives a fresh taste. If you have time, I recommend trying it. When rolling out the dough, keep these tips in mind: - Use a lightly floured surface to prevent sticking. - Roll the dough into a rectangle about ½ inch thick. - Make sure the thickness is even for uniform baking. The best cheeses for a cheesy flavor are mozzarella and Parmesan. Mozzarella melts well and gives a gooey texture. Parmesan adds a sharp taste that enhances the dish. For a twist, you can use provolone or fontina cheese. If you need substitutes, here are some ideas: - Use cheddar cheese for a sharper flavor. - Try a blend of cheeses for more depth. You can get creative when serving cheesy garlic breadsticks. Here are some fun ideas: - Serve them warm on a wooden board. - Drizzle leftover garlic butter over the top. - Pair them with marinara sauce for dipping. Other great dipping sauces include: - Ranch dressing for a creamy option. - Hot sauce for a spicy kick. These tips will help you create the best cheesy garlic breadsticks. Enjoy your cooking! {{image_2}} You can spice up your garlic breadsticks in fun ways. - Herb-infused garlic breadsticks: Add fresh herbs like basil or thyme to your garlic butter. This gives a fresh taste that brightens each bite. - Cheesy jalapeño breadsticks: Mix diced jalapeños into the cheese. This adds heat and flavor, perfect for those who enjoy a kick. Experimenting with these flavors can change your breadstick game. You can enjoy classic tastes or try something new. If you have dietary needs, there are easy swaps. - Gluten-free dough options: Look for gluten-free pizza dough at the store. You can also make your own using almond flour or rice flour. - Vegan cheese alternatives: Use vegan mozzarella or cashew cheese. This way, everyone can enjoy cheesy garlic breadsticks, no matter their diet. These swaps help you keep the joy of cheesy garlic breadsticks while meeting different needs. Cheesy garlic breadsticks fit perfectly into many themes. - Perfect pairings for movie nights: Serve these breadsticks with a fun movie. Grab your favorite dipping sauce, like marinara or ranch, for a tasty treat. - Serving at parties and gatherings: These breadsticks are easy to share. Set them out on a platter with a variety of dips. They make a great snack for guests. These themes help you bring cheesy garlic breadsticks into your next fun event, making it memorable and delicious. To keep your cheesy garlic breadsticks fresh, store them in an airtight container. Place a paper towel inside the container to absorb extra moisture. This helps maintain crispness. You can refrigerate them for up to three days. For longer storage, freezing is a great option. Wrap each breadstick in plastic wrap, then place them in a freezer bag. This prevents freezer burn. They can last up to three months in the freezer. When you're ready to eat your leftover breadsticks, you can use the oven for the best taste. Preheat your oven to 350°F (175°C). Place the breadsticks on a baking sheet and bake for about 10 minutes. This method keeps them crispy. If you need a quick option, use the microwave. Place the breadsticks on a plate and cover them with a damp paper towel. Heat for about 30 seconds. This warms them up but may make them soft. In the fridge, the breadsticks last about three days. If frozen, they last up to three months. Always check for signs of spoilage. If they smell off or have mold, throw them away. Freshness is key for great taste. Keeping an eye on your leftovers ensures you enjoy them at their best. For the full recipe, check the earlier sections! To make cheesy garlic breadsticks, start by preheating your oven to 425°F. Roll out your pizza dough into a rectangle. Cut the dough into strips about one inch wide. In a bowl, mix melted butter, minced garlic, oregano, garlic powder, and salt. Brush this mixture over the dough strips. Top with shredded mozzarella and Parmesan cheese. Bake for 12-15 minutes until golden and bubbly. Let them cool and garnish with parsley. For a full recipe, see the details above. Yes, you can switch up the cheese. Try using provolone for a smoky flavor. Cheddar adds a sharp taste and pairs well with garlic. For a creamy touch, use fontina or gouda. Mixing different cheeses can create a unique blend. Feel free to experiment with what you have on hand. Cheesy garlic breadsticks are great with many sides. Marinara sauce is a classic choice for dipping. You can also serve them with a side salad for a fresh touch. Try pairing with soup, like minestrone or tomato basil. For a twist, serve them with a garlic aioli or ranch dressing. Yes, these breadsticks freeze well. After baking, let them cool completely before freezing. Wrap each breadstick in plastic wrap and place them in a freezer bag. They can last up to three months in the freezer. To reheat, bake them at 350°F until warm and crispy. Alternatively, you can microwave them for a quick snack. Cheesy garlic breadsticks are simple to make with great ingredients and easy steps. We covered how to mix the dough, make the garlic butter, and bake them just right. I also shared tips for adding flavor and storing your leftovers. Don't forget, you can mix in different cheeses or spices to suit your taste. Enjoy sharing these breadsticks at your next movie night or gathering. They are sure to impress and delight!

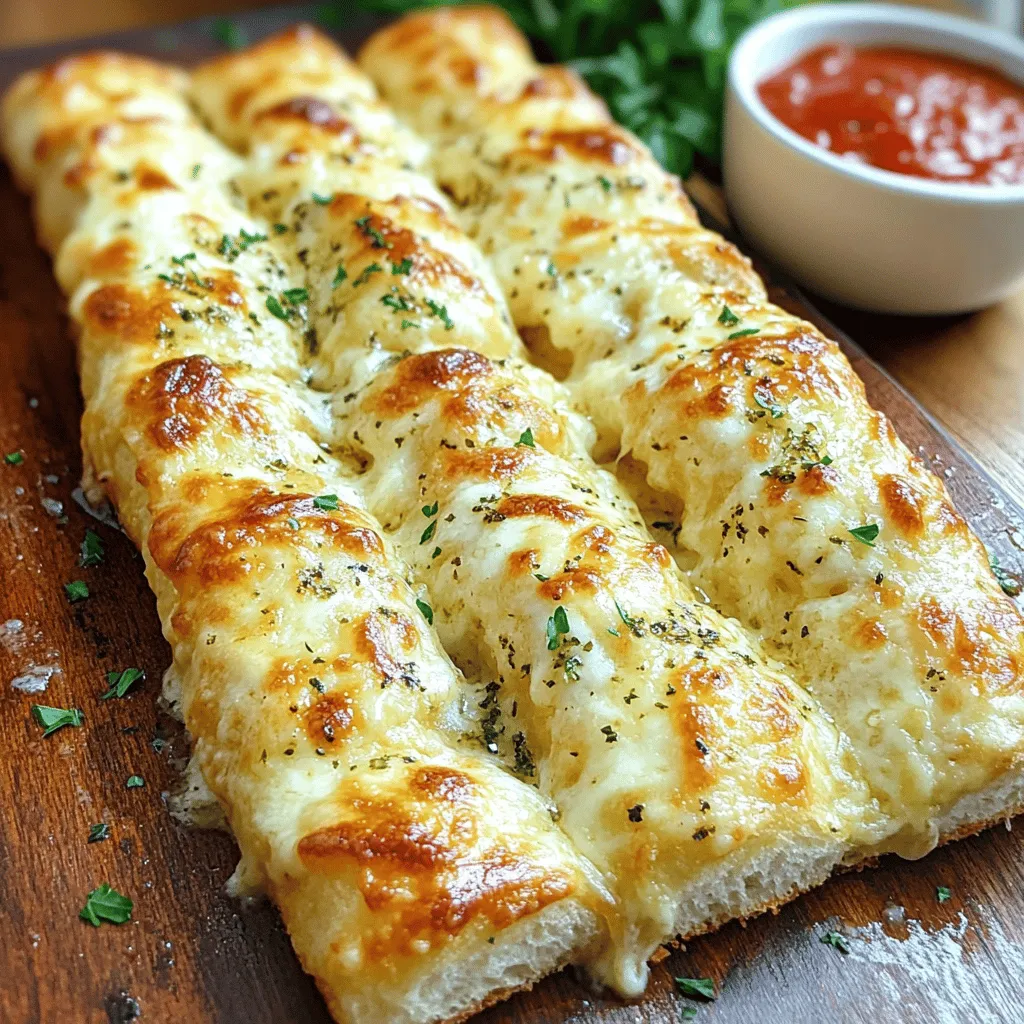
Cheesy Garlic Breadsticks Delightful and Easy Recipe

You’re about to dive into the world of cheesy garlic breadsticks, a treat so simple yet downright irresistible! Imagine warm,

- 2 cups heavy whipping cream - 1 can (14 oz) sweetened condensed milk - 1 teaspoon vanilla extract - 1 ½ cups Oreo cookies, crushed (plus extra for topping) To make this no-churn Oreo ice cream, you need a few simple ingredients. The heavy whipping cream gives it a rich, creamy texture. Sweetened condensed milk adds sweetness and creaminess without the need for an ice cream maker. The vanilla extract enhances the flavor, while crushed Oreo cookies add that classic cookie crunch. - ¼ cup chocolate syrup (for swirls) - Pinch of salt You can also use chocolate syrup for a fun swirl inside the ice cream. A pinch of salt helps to balance the sweetness. These optional ingredients can take your ice cream to the next level, but the main four are enough for a delicious treat. For the full recipe, refer to the instructions provided. 1. Start by whipping the heavy cream. Use an electric mixer for about 3-5 minutes. You want soft peaks to form. 2. In another bowl, mix the sweetened condensed milk with vanilla extract and a pinch of salt. Blend them well until smooth. 3. Next, fold the whipped cream into the condensed milk mixture. Do this in two parts. Use a spatula to carefully combine them without losing air. 4. Once mixed, add the crushed Oreo cookies. Gently fold them in until they are evenly spread throughout the mixture. 1. Now, drizzle the chocolate syrup into the mixture. Lightly swirl it with your spatula for a fun marbled effect. Don’t over-mix; you want to see ribbons of chocolate. 2. Transfer the entire mixture into an airtight container. Smooth out the top. Sprinkle some extra crushed Oreos on top for a nice touch. 3. Cover the container with a lid or plastic wrap. Freeze it for at least 6 hours or overnight until it is firm. For the full recipe, check out the detailed steps and tips provided. Enjoy your homemade no-churn Oreo ice cream! To make your no-churn Oreo ice cream creamy, start by whipping your heavy cream until it forms soft peaks. Soft peaks mean that the cream holds its shape but bends at the tip. This is key for a light texture. It usually takes about 3-5 minutes with an electric mixer. Next, use the folding technique when combining your whipped cream with the sweetened condensed milk. Take a spatula and gently fold the whipped cream into the condensed milk mixture. Do this in two parts. This keeps air in the mix and makes your ice cream fluffy. Be careful not to stir too hard, or you'll lose that airy texture. When it's time to serve, allow the ice cream to sit out for a few minutes. This makes it easier to scoop. You'll want it soft but not melted. For a fun touch, serve your ice cream in waffle cones or bowls. Drizzle extra chocolate syrup on top and sprinkle some crushed Oreos for added crunch. You can even add a dollop of whipped cream for extra flair. Enjoy your creamy and simple delight straight from your kitchen! For more details, check out the Full Recipe. {{image_2}} You can make your No-Churn Oreo Ice Cream even more fun by adding flavors. - Mint chocolate Oreo: Mix in some mint extract. This gives a fresh taste. Try adding crushed mint Oreos for extra minty flavor. - Peanut butter Oreo blend: Swirl in peanut butter for a rich, nutty twist. You can also mix in chopped peanut butter cups for a crunch. Toppings can take your ice cream to the next level. - Additional cookie crumbles: Sprinkle more crushed Oreos on top. This adds great texture and flavor. - Whipped cream or chocolate shavings: Top with whipped cream for a creamy touch. You can also add chocolate shavings for a fancy look. Explore these variations to make your ice cream unique. For the complete recipe, check out the Full Recipe section. To keep your no-churn Oreo ice cream fresh, use an airtight container. This helps stop ice crystals from forming. Make sure the container seals tightly. Store the ice cream in the coldest part of your freezer. This keeps it creamy and smooth. Enjoy your ice cream within two weeks for the best taste. After that, it may lose flavor and texture. If you see ice crystals on top, it's time to toss it out. Also, if it has a strange smell or taste, don’t risk it. Always trust your senses when it comes to food safety. For the full recipe, check the main article. Can I use low-fat cream? Yes, you can use low-fat cream. However, the ice cream may not be as rich and creamy. Heavy cream gives the best texture. How long does it take to freeze? It takes at least 6 hours to freeze. For the best results, freeze overnight. This ensures your ice cream is fully set. Can I make this without Oreos? Absolutely! You can swap Oreos for other cookies, like chocolate chip or vanilla wafers. This gives you new flavors to enjoy. What if the ice cream is too hard? If the ice cream is too hard, let it sit out for a few minutes. This helps soften it before you scoop. How to avoid ice crystals in no-churn ice cream? To avoid ice crystals, whip the cream until soft peaks form. Also, make sure to store it in an airtight container. This keeps the texture smooth and creamy. For the complete recipe, check out the Full Recipe section. You learned about making delicious no-churn Oreo ice cream with simple steps. Use heavy cream, sweetened condensed milk, and crushed Oreos for a tasty treat. I shared tips for getting the best texture and serving ideas. Don't forget to explore flavor and topping variations. Store your ice cream right to keep it fresh. Enjoy making this easy dessert that brings smiles to everyone! Now, grab your ingredients and start creating your own tasty ice cream adventure.

No-Churn Oreo Ice Cream Creamy and Simple Delight

Are you craving a sweet treat without the fuss of ice cream machines? Let me introduce you to my No-Churn

- 4 boneless, skinless chicken breasts - Salt and pepper to taste - 1 teaspoon garlic powder For the chicken, start with four boneless, skinless chicken breasts. I like to use chicken breasts because they cook evenly. Season them well with salt, pepper, and garlic powder. This simple mix brings out the chicken's natural flavor. - 1 cup marinara sauce (homemade or store-bought) - 1 cup mozzarella cheese, shredded - 1/2 cup Parmesan cheese, grated Next, grab one cup of marinara sauce. You can use homemade or store-bought; both work great. Then, get ready for the cheese! You will need one cup of shredded mozzarella cheese and half a cup of grated Parmesan cheese. These cheeses melt beautifully and add rich flavors. - 1 cup breadcrumbs (preferably seasoned) - 1 teaspoon dried basil - 1 teaspoon dried oregano - 1/2 teaspoon red pepper flakes (optional) - 2 tablespoons olive oil - Fresh basil leaves for garnish (optional) For the topping, use one cup of seasoned breadcrumbs. They give a nice crunch. Add one teaspoon each of dried basil and oregano for extra flavor. If you like some spice, toss in half a teaspoon of red pepper flakes. Drizzle two tablespoons of olive oil over the chicken before baking. Finally, if you want to add a fresh touch, use fresh basil leaves to garnish at the end. You can find the full recipe at the beginning of the article. Enjoy your cooking! - Preheat your oven to 375°F (190°C). - Season chicken breasts with salt, pepper, garlic powder, basil, and oregano. Start with fresh chicken breasts. The seasoning adds great flavor. You want to coat them well. - Heat olive oil in a large oven-safe skillet over medium heat. - Sear the chicken breasts 4-5 minutes on each side until golden brown. Searing locks in the juices. When the chicken is golden, it tastes better. Keep an eye on it to avoid burning. - Spread marinara sauce on each chicken breast. - Combine breadcrumbs, mozzarella, and Parmesan; sprinkle over sauce. - Bake for 25-30 minutes until cooked through and top is golden. Use a generous layer of marinara sauce. The cheese and breadcrumbs add a nice crunch. Check if the chicken is done with a meat thermometer. It should reach 165°F (74°C). This Chicken Parmesan Bake is simple and delicious. For the full recipe, see above. To get a golden sear on your chicken, start with a hot skillet. I recommend using a cast-iron or stainless-steel skillet. These types hold heat well and ensure even cooking. - Heat the olive oil over medium heat before adding the chicken. - Add the chicken breasts without crowding the pan. This helps them sear instead of steam. - Sear each side for about 4-5 minutes. Look for a nice brown color. - Don’t rush this step; it builds great flavor. The right cheese mix can make your Chicken Parmesan Bake shine. Use a blend of mozzarella and Parmesan for the best melt and taste. - Shredded mozzarella gives a gooey texture. Grated Parmesan adds a nice salty bite. - For extra flavor, consider adding a bit of smoked cheese. - When it comes to breadcrumbs, seasoned ones work wonders. They add flavor and crunch. - Mix in herbs or spices, like Italian seasoning, to elevate the taste. Pairing your Chicken Parmesan Bake with the right sides enhances the meal. Think about serving it with: - A fresh salad with vinaigrette for a crisp contrast. - Garlic bread for a classic Italian touch. - Roasted vegetables for a healthy option. When it comes to wine, a light red like Pinot Noir or a crisp white like Sauvignon Blanc pairs nicely. These wines won’t overpower the flavors of the dish. For the complete recipe and to dive into a delicious family meal, check out the Full Recipe. {{image_2}} You can switch up the protein in your Chicken Parmesan Bake. If you want to use turkey, it works great. Turkey breasts are lean and cook well in this dish. You can also try eggplant for a tasty vegetarian option. Just slice the eggplant, salt it, and let it sit. This removes excess moisture. After that, just coat and bake it like chicken. While marinara sauce is a classic choice, you can get creative. Try a pesto sauce for a fresh twist. A creamy Alfredo sauce can also make it rich and delicious. You could even mix marinara with a bit of cream for a new flavor. Don't hesitate to experiment with different sauces to match your taste. Enhancing the flavor of your Chicken Parmesan Bake is easy. You can add spices like smoked paprika or Italian seasoning. Fresh herbs, like parsley or thyme, can brighten the dish too. Want some crunch? Toss in vegetables like spinach, bell peppers, or zucchini. They not only add flavor but also boost nutrition. This way, you create a meal that is both tasty and good for you. To keep your Chicken Parmesan Bake fresh, store it in the fridge. Use an airtight container. This will keep out air and moisture. Make sure to cool the dish to room temperature first. Then, place it in the container. It can last up to three days in the fridge. When it's time to enjoy leftovers, you have options. You can use the oven, microwave, or stovetop. For the oven, preheat it to 350°F (175°C). Place your chicken in an oven-safe dish. Cover it with foil to keep moisture in. Bake for 15-20 minutes or until warm. If using a microwave, heat it in short bursts. Start with one minute, then check if it’s warm. Stir between intervals to keep it even. You can freeze Chicken Parmesan Bake before or after baking. For freezing before baking, wrap it tightly in plastic wrap. Then, place it in a freezer-safe bag. When ready to bake, thaw it in the fridge overnight. For after baking, let it cool completely first. Then, follow the same wrapping method. To reheat, thaw it in the fridge and reheat in the oven. This keeps it from drying out. Chicken Parmesan Bake will stay fresh in the fridge for about 3 to 4 days. To keep it tasting great, store it in an airtight container. This helps lock in moisture and flavors. If you notice any off smells or changes in color, it’s best to toss it out. Yes, you can prepare Chicken Parmesan Bake ahead of time. Start by seasoning the chicken and searing it as per the recipe. After that, layer the marinara sauce and cheese mix. Cover the dish tightly and keep it in the fridge for up to 24 hours. When ready to cook, just pop it in the oven. You may need to add a few extra minutes to the baking time since it will be cold. Chicken should reach an internal temperature of 165°F (74°C) for safe eating. Use a meat thermometer to check this. Insert it into the thickest part of the chicken breast without touching the bone. This ensures that the chicken is cooked through and safe to eat. Always let it rest for a few minutes after baking for the best flavor and texture. This blog post covered how to make a delicious Chicken Parmesan Bake. You learned about the key ingredients like chicken, sauces, and cheeses. I provided step-by-step instructions to guide you. Tips helped you achieve the best flavor and texture. You also found variations to suit different diets and storage tips to keep leftovers fresh. In closing, enjoy the cooking process and make this dish your own!

Chicken Parmesan Bake Flavorful Easy Family Meal

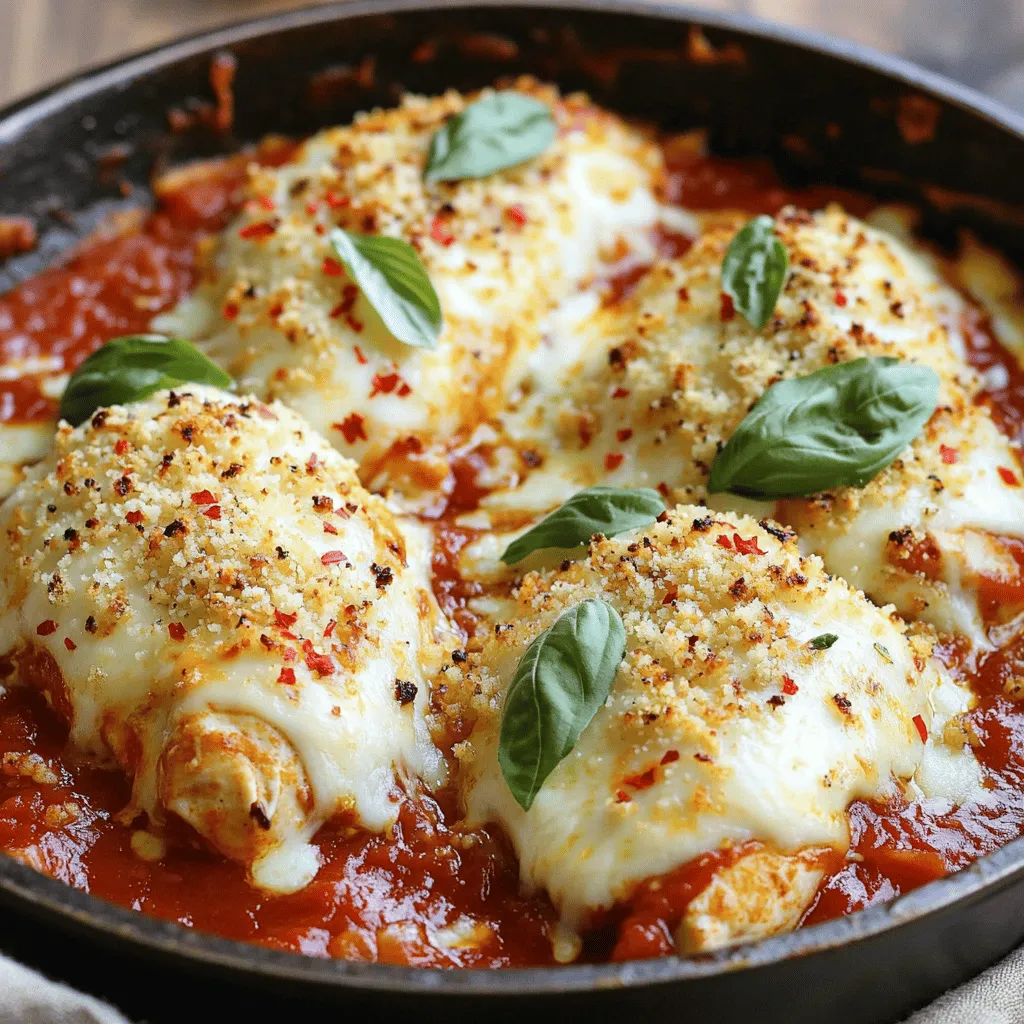
Looking for a quick, tasty dinner that your family will love? This Chicken Parmesan Bake combines juicy chicken, rich marinara,

- 4 large bell peppers (any color) - 1 cup cooked quinoa - 1 cup black beans, drained and rinsed - 1 cup corn kernels (fresh or frozen) - 1 cup diced tomatoes (canned or fresh) - 1 teaspoon cumin - 1 teaspoon smoked paprika - Salt and pepper to taste - 1 cup shredded cheddar cheese - 1 tablespoon olive oil - Fresh cilantro for garnish (optional) When I prepare cheesy stuffed bell peppers, I love to focus on the fresh colors and flavors. Bell peppers come in many shades, from red to yellow to green. For this recipe, I use four large peppers. They will hold the filling well and look great on the plate. The filling is where the magic happens. I mix one cup of cooked quinoa with black beans, corn, and diced tomatoes. Quinoa adds texture and protein. Black beans bring richness and fiber. Corn gives a sweet crunch, while tomatoes add juiciness. Together, they create a colorful blend. I season the filling with cumin and smoked paprika. These spices add warmth and depth. I also add salt and pepper to taste. This simple seasoning makes a big impact on flavor. Finally, I stir in one cup of shredded cheddar cheese. Cheese ties the dish together with its creamy goodness. Just wait until it's melted and bubbly! I drizzle a tablespoon of olive oil over the peppers before baking. This helps them cook and adds a bit of richness. For a fresh touch, I like to garnish with cilantro. It’s optional but adds brightness. You can find the full recipe for these cheesy stuffed bell peppers in the sections above. Enjoy crafting this delightful dish! - Preheat oven to 375°F (190°C). - Cut off tops and remove seeds from bell peppers. First, I set my oven to 375°F. This heat helps cook the peppers just right. Next, I take the bell peppers and cut off their tops. I remove all the seeds and any white parts inside. This way, the peppers can hold the filling well. - Combine quinoa, black beans, corn, diced tomatoes, cumin, smoked paprika, salt, and pepper in a bowl. - Mix until well combined. Now, let’s make the filling. I grab a big bowl and add cooked quinoa, black beans, and corn. I also add diced tomatoes, cumin, smoked paprika, salt, and pepper. I mix everything together well. The flavors blend nicely, making a yummy filling. - Stuff bell peppers with the filling and top with cheese. - Bake covered for 25 minutes, then uncovered for an additional 10 minutes. Next, I stuff each bell pepper with the filling. I pack it down gently to fit more. Then, I sprinkle shredded cheddar cheese on top, covering the filling fully. I place the stuffed peppers in a baking dish, cover it with foil, and bake for 25 minutes. After that, I remove the foil and bake for another 10 minutes. The cheese turns golden and bubbly, which makes it so tempting. You can find the full recipe above if you want to follow along. To make your cheesy stuffed bell peppers perfect, choose peppers that stand upright. This helps them cook evenly. I also recommend using homemade quinoa for added flavor. You can cook it with vegetable broth instead of plain water for a richer taste. Cheese makes these peppers extra tasty. You can try different types of cheese like Monterey Jack or Pepper Jack. Mixing cheeses gives you a fun flavor twist. For example, combining cheddar with mozzarella creates a creamy texture that melts beautifully. When serving, think about adding sides. A fresh side salad or crispy tortilla chips works well. For a burst of flavor, add a squeeze of lime over the peppers. It brightens the dish and balances the cheese. You can find the full recipe to try these ideas at home. {{image_2}} You can easily make cheesy stuffed bell peppers vegetarian. First, substitute cooked brown rice for quinoa. Brown rice adds a nice texture and flavor. Next, add more veggies like zucchini or mushrooms. These vegetables boost the dish's taste and nutrition. You can mix and match based on what you have. Feel free to get creative! Want a protein boost? Include cooked ground turkey or chicken in the filling. This adds heartiness and makes it more filling. If you prefer a plant-based option, mix in tofu. Crumbled tofu absorbs flavors well and adds protein without meat. These options make the dish satisfying for everyone. If you need a gluten-free meal, make sure all canned ingredients are labeled gluten-free. This is important to avoid any gluten in your dish. You can also serve the stuffed peppers with gluten-free sides or toppings. Options like quinoa salad or gluten-free tortillas work well. Enjoy your meal without worry! To keep your cheesy stuffed bell peppers fresh, store them in an airtight container. They will last in the refrigerator for 3-4 days. When you're ready to enjoy them again, reheat in the microwave or oven. This method helps keep the cheese melty and delicious. If you want to save some for later, freeze the stuffed peppers before baking. They are good for up to 3 months. When you want to bake them, take them straight from the freezer. Just adjust the cooking time as needed. This way, you can enjoy a warm, cheesy meal anytime! For the full recipe, check the main article. Yes, you can use any color or variety of bell peppers. Red, yellow, green, or orange all work great. Each type brings its own flavor. Red peppers tend to be sweeter, while green peppers have a sharper taste. Feel free to mix and match to create a colorful dish. Peppers should be soft and the cheese should be melted and bubbly. Check the peppers after baking for 25 minutes. If they feel tender when you poke them, they are likely done. The cheese should look golden and delicious on top. They pair well with salads, rice, or crusty bread. A fresh green salad adds crunch and balance. You can also serve them with fluffy rice for a filling meal. Crusty bread is great for scooping up any leftover filling. Yes, you can prepare the filling and stuff the peppers a day ahead, then bake when ready. Store the stuffed peppers in the fridge. When you are ready to eat, just pop them in the oven. This makes meal prep easy and fun! Check out the Full Recipe for more details. Stuffed bell peppers are easy to make and taste great. You learned about the main ingredients, step-by-step instructions, and tips to perfect this dish. You can even change it up with different fillings or cheeses. For quick meals, store leftovers or freeze them for later. Enjoy your stuffed peppers with sides like salad or chips. Cooking should be fun and creative, and these peppers offer a great way to experiment. I hope you try them soon!

Cheesy Stuffed Bell Peppers Flavorful and Simple Dish

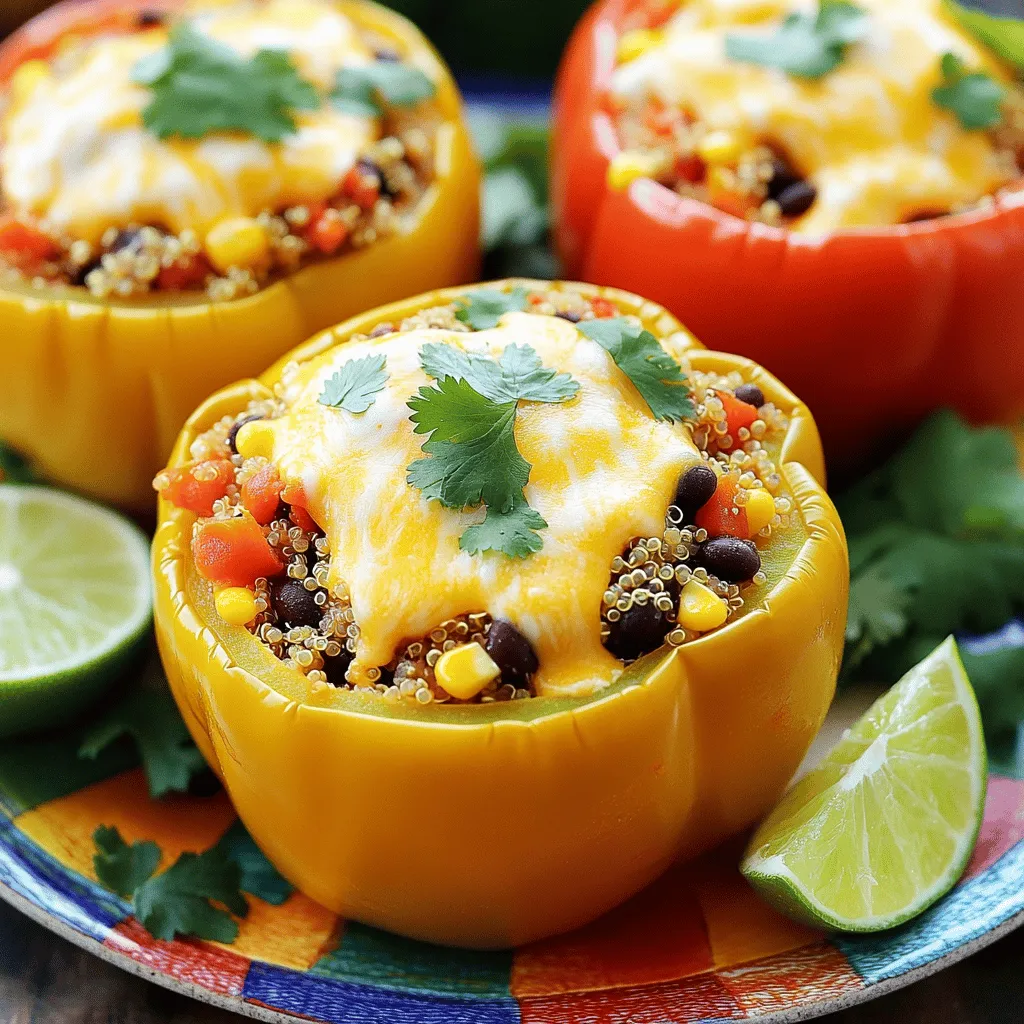
Are you ready to spice up dinner with a dish that is both cheesy and simple? Cheesy stuffed bell peppers

- 2 ripe avocados, peeled and pitted - 1/2 cup unsweetened cocoa powder - 1/2 cup pure maple syrup - 1/4 cup almond milk (or any plant-based milk) - 1 teaspoon vanilla extract - A pinch of sea salt The main stars of this recipe are ripe avocados, cocoa powder, and maple syrup. Ripe avocados give the mousse its rich and creamy texture. Make sure your avocados are soft but not overripe. Cocoa powder adds that deep chocolate flavor we all love. Pure maple syrup brings sweetness without any refined sugars. - Fresh berries - Mint leaves You can dress up your mousse with fresh berries. Strawberries, raspberries, or blueberries add color and a fruity kick. Mint leaves also make a lovely garnish. They add a fresh touch that brightens the dish. - Alternative sweeteners - Different plant-based milk options If you want, you can use other sweeteners. Agave syrup or date syrup can work well. For plant-based milk, try oat milk or soy milk instead of almond milk. These options can change the flavor slightly but still keep it delicious. To start, I grab two ripe avocados. Ripe avocados feel soft when you press them. I peel them and remove the pits. The flesh goes straight into my food processor. Next, I measure out my cocoa powder, maple syrup, almond milk, vanilla extract, and sea salt. I add all these ingredients to the food processor with the avocados. Now comes the fun part—blending! I turn on the food processor. I want to blend until it’s smooth and creamy. This might take a minute or two. If I notice chunks, I stop the processor and scrape down the sides. I do this to make sure everything mixes well. After blending, I taste the mousse. If it needs more sweetness, I add extra maple syrup. Then, I blend it again to mix it in. Chilling the mousse is key. I place it in the fridge for at least 30 minutes. This helps the flavors blend even more and makes it thicker. When it's time to serve, I scoop it into bowls or cups. I love to add fresh berries and a sprig of mint on top for a nice touch. It looks great and tastes even better. For the full recipe, check out the link! To get the best taste in your mousse, adjust the sweetness. If you like it sweeter, add more maple syrup. Always taste your mousse before serving. This way, you can ensure it fits your flavor. Blending is key for a creamy texture. Use a strong food processor or blender. Make sure to scrape down the sides often. This helps mix everything well. Blend until smooth and no lumps remain. Store your mousse in an airtight container. It keeps well in the fridge for up to three days. To avoid browning, cover the top with plastic wrap. This helps keep it fresh and tasty. If you have leftover mousse, try using it in smoothies. Blend it with some almond milk and a banana. You can make a quick and yummy drink! Pair your mousse with fresh fruit. Berries work great for a bright touch. You can also serve it with a nutty granola for crunch. For a fun twist, layer the mousse in a glass with crushed cookies. This makes a beautiful dessert. Adding a sprig of mint on top always looks nice and fresh. Enjoy your delicious Vegan Chocolate Avocado Mousse! For the full recipe, check out the earlier section. {{image_2}} You can make this mousse even better with some simple tweaks. Adding spices like cinnamon gives a warm kick. Just a pinch of cinnamon can make a big difference. You can also try infusing the mousse with coffee. A shot of espresso adds depth and richness. Sea salt can also enhance the chocolate flavor. Just a small pinch balances the sweetness perfectly. If you need nut-free options, use oat milk instead of almond milk. Oat milk gives a nice creamy texture without the nuts. You can also consider low-sugar variations. Instead of maple syrup, try using a low-calorie sweetener. This way, you can enjoy the mousse without the extra sugar. Want to change the number of servings? It’s easy! Just adjust the ingredients based on how many people you serve. If you want to double it, just double each ingredient. For smaller servings, cut the amounts in half. Remember to convert measurements if needed. Use a kitchen scale for the best results. This helps with precision and ensures your mousse stays delicious. For the full recipe, check out the detailed instructions above! Store your vegan chocolate avocado mousse in an airtight container. Glass or plastic containers work great. This mousse can last in the fridge for up to 5 days. Always check for freshness before serving. You can freeze the mousse if you want to save some for later. To freeze, put the mousse in a freezer-safe container. Leave some space at the top for expansion. When you’re ready to eat, thaw it in the fridge overnight. This keeps the texture nice and creamy. Watch for signs of spoilage. If the mousse looks brown or smells off, toss it out. To keep it fresh, use a clean spoon each time you serve. This helps keep bacteria away and keeps the flavor bright and tasty. You can use ripe bananas, but the taste will change. Bananas add sweetness and a fruity flavor. Avocados give a creamy texture and rich taste. If you want that chocolatey flavor, stick with avocados. The mousse lasts about three days in the fridge. Keep it in an airtight container to stay fresh. After three days, it may lose its creaminess and flavor. Yes! You can easily make it nut-free. Just replace almond milk with oat or soy milk. This keeps the mousse creamy without using any nuts. Serve the mousse in small cups or bowls. Add fresh berries or mint leaves on top for color. You can also drizzle some extra maple syrup for added sweetness. Yes, you can make this mousse a day ahead. Just store it in the fridge until you're ready to serve. Chilling it allows the flavors to mix well. This recipe yields about four servings. Each serving is rich and satisfying, making it a perfect dessert for sharing. If you have more guests, feel free to double the recipe. For the full recipe, check the earlier section. To wrap up, we explored how to make a tasty Vegan Chocolate Avocado Mousse. We covered the key ingredients like ripe avocados and cocoa powder. I shared tips on blending and chilling for the best texture. You learned about fun variations and storage tips too. Remember, this mousse is not just delicious but also healthy. Try adding spices or using different sweeteners to make it your own. You can impress friends and family with this simple recipe. Enjoy every creamy bite!

Vegan Chocolate Avocado Mousse Rich and Creamy Delight

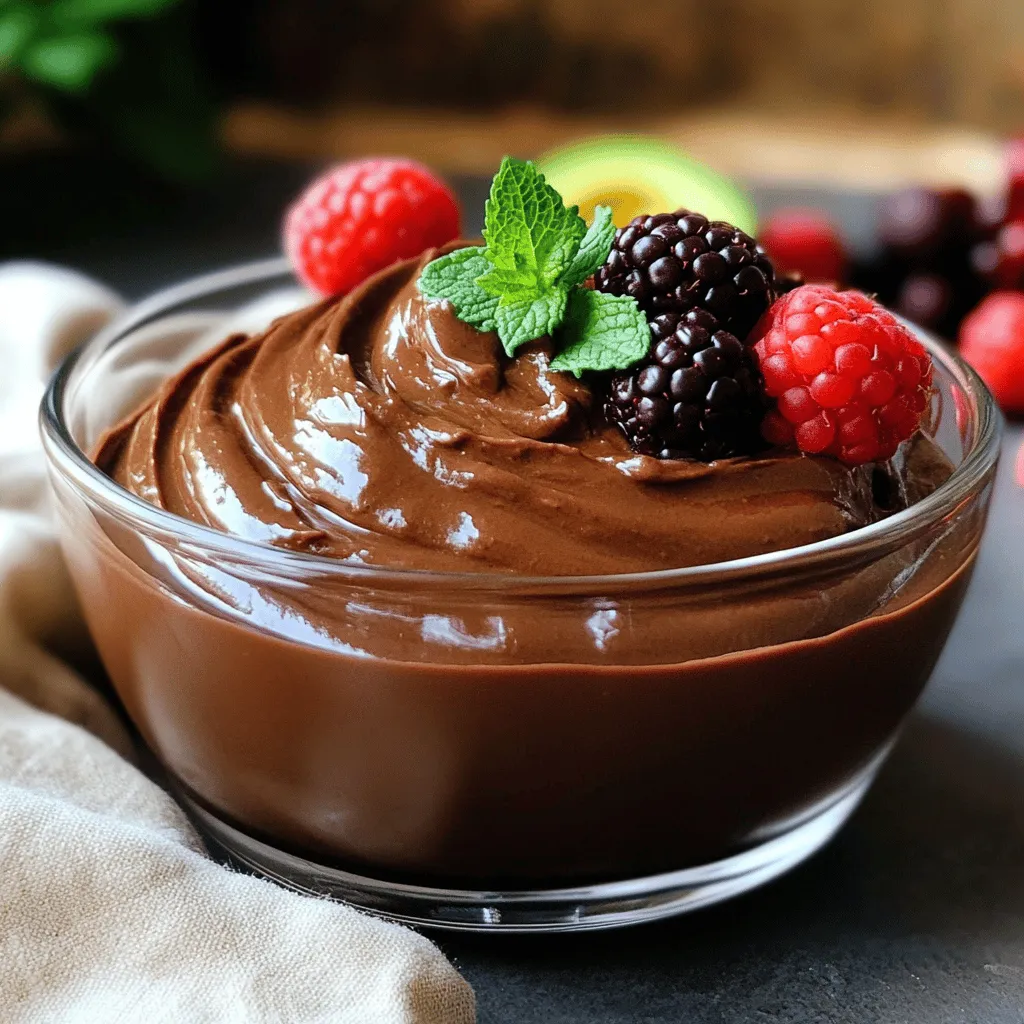
Are you ready to enjoy a rich and creamy dessert without any guilt? This Vegan Chocolate Avocado Mousse is both

To make garlic herb roasted chicken, you need a few key items. Here’s what you’ll need: - 1 whole chicken (about 4-5 pounds) - 1 head of garlic, cloves peeled - 4 tablespoons olive oil - 2 tablespoons fresh rosemary, minced - 2 tablespoons fresh thyme, minced - 1 tablespoon fresh parsley, chopped - 1 lemon, quartered - Salt and black pepper to taste - 1 cup chicken broth Fresh herbs bring great flavor to your roasted chicken. I like to use: - Rosemary: It has a piney taste that pairs well with chicken. - Thyme: This herb adds a slight earthiness and depth. - Parsley: It brightens the dish with fresh notes. These herbs work together to create a delightful flavor. You can enhance your dish even more with a few extras. Consider adding: - Lemon zest: It gives a citrusy punch. - Paprika: This adds a smoky depth and color. - Red pepper flakes: For a touch of heat. Feel free to mix and match to suit your taste! For the full recipe, check out the detailed guide. First, you need to prep your chicken. Start by preheating your oven to 375°F (190°C). This helps cook the chicken evenly. Next, pat the whole chicken dry using paper towels. This step is key for crispy skin. Place the chicken in a large roasting pan. Gather your ingredients. You will need olive oil, fresh herbs, garlic, lemon, salt, and pepper. In a small bowl, mix the olive oil, minced rosemary, thyme, chopped parsley, salt, and pepper. Now comes the fun part: seasoning! Carefully loosen the skin of the chicken. Use your fingers to create pockets without tearing the skin. Rub the herb mixture generously under the skin. This helps infuse flavor into the meat. Next, stuff the cavity with the peeled garlic cloves and lemon quarters. The garlic will roast beautifully, adding flavor. It’s a simple step that makes a huge difference. Pour the chicken broth into the roasting pan. This will keep the chicken moist while it cooks. Place the chicken in the oven and roast for about 1.5 hours. Check the internal temperature using a meat thermometer. It should reach 165°F (74°C). To make it even juicier, baste the chicken with pan juices every 30 minutes. Once cooked, take the chicken out and let it rest for 10-15 minutes. This step is important for juicy meat. Finally, carve the chicken and serve it with roasted garlic and broth. For the full recipe, refer to the earlier section. Enjoy your flavorful garlic herb roasted chicken! To boost the taste of your garlic herb roasted chicken, use fresh herbs. Fresh rosemary, thyme, and parsley enhance the flavor. Mix these herbs with olive oil, salt, and pepper. This mix makes the chicken juicy and tasty. You can also add lemon for a fresh zing. Stuff the chicken with lemon and garlic. This adds depth to the flavor. For a richer taste, pour chicken broth in the pan. The broth keeps the meat moist as it cooks. Crispy skin is a must for great roasted chicken. Start by patting the chicken dry. Use paper towels to remove excess moisture. This helps the skin get crispy. Loosen the skin gently with your fingers. Rub the herb mixture under the skin. It gets flavor right where you want it. Roast the chicken at 375°F (190°C). Baste it every 30 minutes with the pan juices. This keeps the skin from drying out while still getting crispy. One common mistake is not drying the chicken. Wet skin leads to soggy results. Another mistake is overcooking. Use a meat thermometer to check the temperature. The chicken should reach 165°F (74°C). If you take it out too early, it will be undercooked. Also, don’t forget to let it rest after roasting. This step keeps the juices in the meat. Follow these tips, and you will enjoy a perfect garlic herb roasted chicken. For the full recipe, check out the recipe above. {{image_2}} You can switch up the herbs in this dish. Instead of rosemary and thyme, try using sage or oregano. Each herb brings a unique flavor. For a zesty kick, add basil or cilantro. Mix and match to find your favorite blend. Use what you have on hand for a fun twist. Want to add some extra flavor? Try adding spices like paprika or cumin. You can also use citrus zest for brightness. A splash of white wine or balsamic vinegar in the broth adds a new depth. Explore different flavors to make this dish your own. You don’t have to roast the chicken in the oven. An air fryer cooks it fast and makes the skin crispy. Just season the chicken as usual and set it in the fryer. For an easy method, use a slow cooker. It keeps the chicken juicy and tender. Just season the chicken, add broth, and let it cook low and slow. Check out the Full Recipe for more details! After your garlic herb roasted chicken cools, wrap it tightly in plastic wrap or foil. You can also place it in an airtight container. Store it in the fridge for up to three days. Make sure to keep any juices or broth in a separate jar. This keeps the chicken moist and tasty. To reheat the chicken, use a low oven heat. Set it to 325°F (160°C). Place the chicken in a baking dish and add a splash of chicken broth. Cover it with foil to keep moisture in. Heat for about 20-30 minutes or until warm. You want the chicken juicy, not dry. If you want to save leftovers for later, freezing works well. Remove the meat from the bones and cut it into pieces. Place the pieces in a freezer bag. Squeeze out all the air before sealing. Label the bag with the date. You can freeze the chicken for up to three months. When ready to eat, thaw it in the fridge overnight before reheating. For the full recipe, check out the Garlic Herb Roasted Chicken section. You should cook garlic herb roasted chicken for about 20 minutes per pound. For a 4 to 5-pound chicken, this means roughly 1.5 hours in the oven. Always check the internal temperature. It should reach 165°F (74°C) to be safe to eat. Use a meat thermometer to ensure perfect doneness. Yes, you can use dried herbs instead of fresh. Dried herbs are more potent, so use less. A good rule is to use one-third of the amount. For example, if the recipe calls for 2 tablespoons of fresh rosemary, use about 2 teaspoons of dried rosemary. The flavor will still be great! Roasted chicken pairs well with many sides. Here are some tasty options: - Roasted vegetables like carrots, potatoes, or Brussels sprouts - A fresh green salad with light dressing - Creamy mashed potatoes or garlic bread - Rice or quinoa for a healthy side These sides will complement your garlic herb roasted chicken nicely. For more ideas, check out the Full Recipe. In this blog post, we covered how to make garlic herb roasted chicken. You learned about the key ingredients, step-by-step instructions, and tips for success. We explored flavor variations and how to store your leftovers. Roasting chicken is easy and fun. With fresh herbs and careful seasoning, you'll impress your family. Always aim for crispy skin and avoid common mistakes. Enjoy a dish that brings warmth and flavor to your table!

Garlic Herb Roasted Chicken Crispy and Flavorful Dish

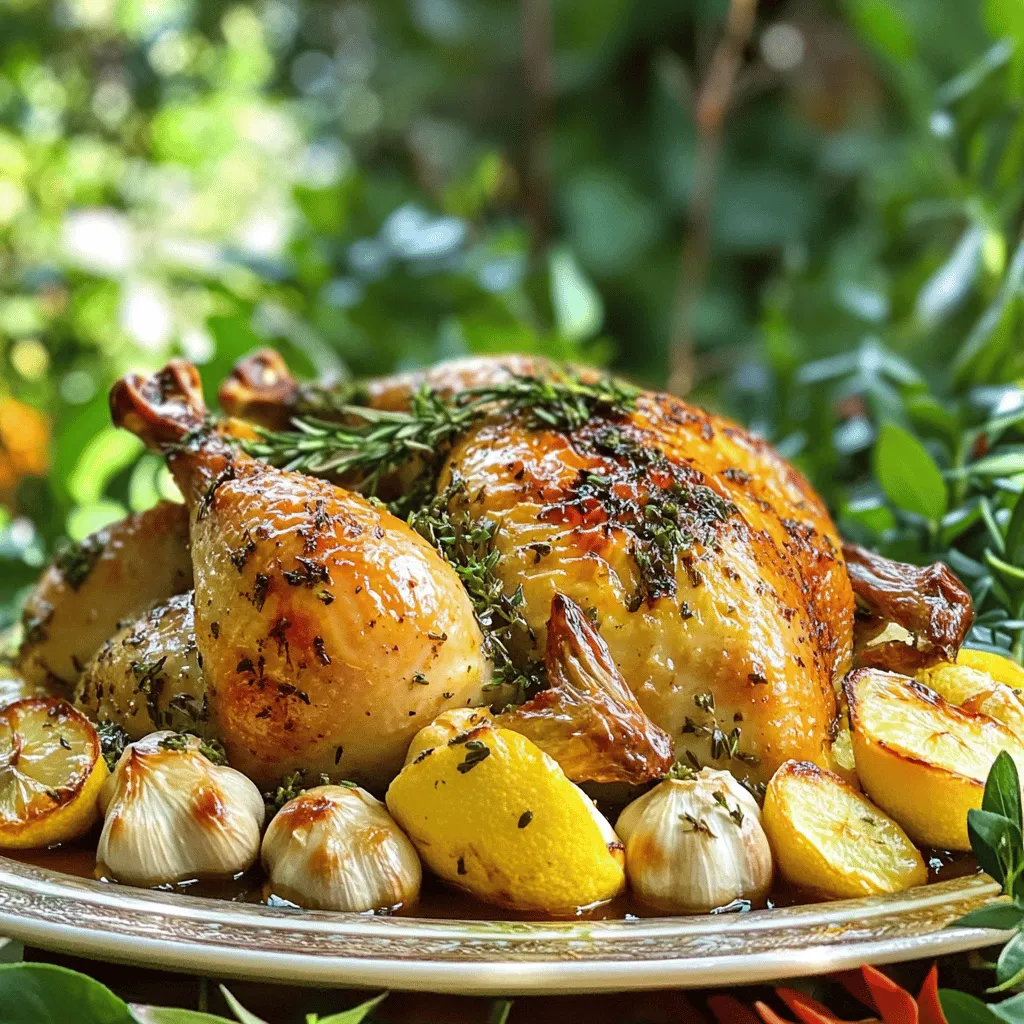
Are you ready to impress your friends and family with a truly delicious dish? Garlic Herb Roasted Chicken is the

- 1 cup creamy peanut butter - 1/2 cup honey or maple syrup - 2 cups rolled oats - 1/2 cup unsweetened cocoa powder - 1 teaspoon vanilla extract - 1/4 teaspoon salt - 1/2 cup chocolate chips (dairy-free if preferred) - 1/4 cup crushed nuts or shredded coconut for topping (optional) These ingredients form the base of your no bake chocolate peanut butter bars. The creamy peanut butter gives the bars a rich flavor and smooth texture. Honey or maple syrup adds sweetness and binds everything together. Rolled oats provide a hearty element that helps keep the bars firm. Unsweetened cocoa powder gives that wonderful chocolate taste without too much sweetness. A touch of vanilla extract and salt enhances all the flavors. Finally, chocolate chips add a delightful surprise in every bite. You can even top them with nuts or coconut for extra crunch and flavor. If you want a little twist, you can change some ingredients. Here are a few ideas: - Alternative sweeteners: Use agave syrup, brown rice syrup, or stevia to fit your taste or diet. - Different nut butters: Swap peanut butter for almond butter or sunflower seed butter. This can change the flavor and keep it nut-free. - Gluten-free options: Use gluten-free rolled oats and ensure your chocolate chips are also gluten-free. These substitutions allow you to customize the bars to your liking while keeping them delicious. Start by mixing the peanut butter and honey in a large bowl. Use a spatula to blend them well until they are smooth. This step is crucial for a creamy texture. Next, add the dry ingredients: rolled oats, cocoa powder, vanilla extract, and salt. Stir until everything is mixed well. You want a thick dough that holds together nicely. Now, line an 8x8-inch baking dish with parchment paper. Make sure to leave some paper hanging over the sides. This makes it easy to lift the bars out later. Pour the mixture into the dish. Press it down firmly with your hands or a spatula. Aim for an even layer, so every bite is just as tasty. Cover the dish with plastic wrap or foil. Place it in the refrigerator for at least 2 hours. This helps the bars set and become firm. Once they are ready, lift the bars out using the parchment paper. Cut them into squares or rectangles based on your preference. Enjoy your delicious no-bake chocolate peanut butter bars! For the full recipe, check the earlier section. To make the best no bake chocolate peanut butter bars, focus on mixing right. Start with creamy peanut butter and honey. Mix them until smooth. This helps create a nice base. When you add oats and cocoa powder, mix slowly. Stir until you see no dry spots. If you mix too fast, it might get crumbly. To ensure firm bars, press the mixture hard into your dish. Use a spatula or your hands. This helps it stick together. Let them chill in the fridge for at least two hours. This time helps them set well. Store your bars in an airtight container. They stay fresh in the fridge for up to a week. You can also wrap them in plastic wrap. This keeps them safe from air. If you want to store them longer, consider freezing. Wrap each bar separately. They will last for about three months in the freezer. Just remember to thaw them before eating. These bars go well with fresh fruit. Try them with apples or bananas for a tasty snack. You can also serve them with yogurt. A dollop of dairy-free yogurt can add creaminess. For a crunchy twist, enjoy them with nuts. Almonds or walnuts give a nice texture. Add a sprinkle of sea salt on top to enhance the flavor. You can find the Full Recipe to make these delicious bars. {{image_2}} You can change the taste of these bars with ease. Try adding flavor extracts to the mix. A teaspoon of almond or coconut extract boosts the flavor. If you want more protein, swap cocoa powder for protein powder. This change makes the bars tasty and healthy. Mix in some fun extras for more texture and taste. Dried fruits like raisins or cranberries add sweetness. You can also sprinkle in seeds like chia or flaxseed for a healthy crunch. These add-ins make each bite interesting and nutritious. You can make these bars fit any occasion. For holidays, add festive toppings like colored sprinkles or crushed peppermint. This makes them fun and appealing for celebrations. You can also shape them into themed designs for a special touch. Feel free to explore these variations and make the recipe your own! For the full recipe, check out the complete guide. You can use maple syrup or agave syrup as a sweetener. Both options add a nice flavor. They work well in this recipe. Maple syrup gives a light, sweet taste. Agave syrup is a bit sweeter than honey. You can try them in equal amounts. Adjust based on your taste. To make these bars vegan, swap honey for maple syrup. Use dairy-free chocolate chips too. These small changes keep the bars rich and tasty. You can also try nut butters like almond or cashew. They add a different flavor and still hold well. Yes, you can freeze these no-bake bars. After cutting them, wrap each piece in plastic wrap. Place them in a freezer-safe bag. They will stay fresh for up to three months. To enjoy, just thaw them in the fridge. This way, you always have a quick treat ready. For the best taste, eat them within a month. This no-bake chocolate peanut butter bars recipe is quick and easy. You can whip these up in just 10 minutes. Plus, it makes 12 delicious bars, perfect for sharing or snacking. The key ingredients are: - 1 cup creamy peanut butter: Great source of protein. - 1/2 cup honey or maple syrup: Natural sweetener full of nutrients. - 2 cups rolled oats: High in fiber, good for digestion. - 1/2 cup unsweetened cocoa powder: Adds rich flavor and antioxidants. - 1 teaspoon vanilla extract: Enhances the overall taste. - 1/4 teaspoon salt: Balances sweetness and enhances flavors. - 1/2 cup chocolate chips: Adds a delightful chocolatey touch. - 1/4 cup crushed nuts or shredded coconut (optional): Gives added crunch. To make the bars, start by mixing the peanut butter and honey in a large bowl. Use a spatula and stir until smooth. Next, add rolled oats, cocoa powder, vanilla extract, and salt. Stir until you have a thick dough. Now, fold in chocolate chips. Make sure they mix evenly into the dough. Line an 8x8-inch baking dish with parchment paper. Leave some paper hanging over the edges. This helps to lift the bars out later. Pour the mixture into the dish. Press it down firmly with your hands or spatula. If you want, sprinkle the crushed nuts or shredded coconut on top. Press them gently into the mixture. Cover the dish with plastic wrap. Place it in the fridge for at least 2 hours. This will help the bars set and firm up. Once they are ready, lift them out using the parchment paper. Cut them into squares or rectangles. For a nice touch, you can drizzle some melted chocolate on top. It adds a shiny finish. You can also serve the bars on a pretty plate for a fun look. If you want to impress your friends, add some fresh fruit on the side. Enjoy your tasty no-bake chocolate peanut butter bars! Making no-bake bars is simple and fun. You start with key ingredients like peanut butter, oats, and cocoa. I shared tips on mixing and assembling the bars to get the best texture. You can also customize flavors and add-ins. In conclusion, these bars are tasty, healthy, and easy to make. Try various ingredients or serve them with your favorite snacks. Enjoy your homemade treat!

No Bake Chocolate Peanut Butter Bars Simple Recipe

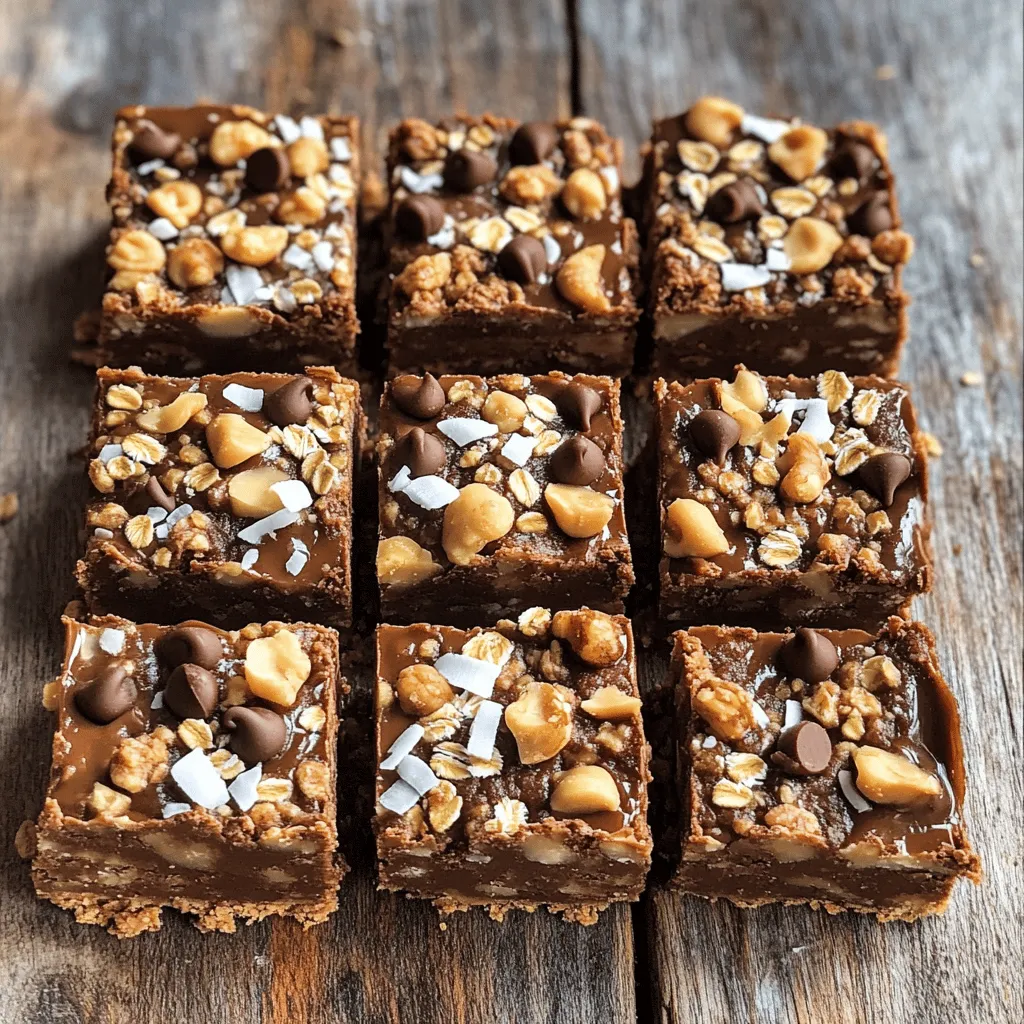
Are you craving a sweet treat without the fuss of baking? Look no further! These No Bake Chocolate Peanut Butter

Fresh strawberries are the star of this dish. You need 2 cups of ripe strawberries. Make sure to hull and slice them. This step helps release their sweet juices. I mix them with 2 tablespoons of sugar. Let them sit for about 15 minutes. This makes the strawberries extra juicy and tasty. You will need 1 pound of pound cake. Cut it into cubes for easy layering. The soft texture of the pound cake absorbs the strawberry juices. It adds a nice base for your trifle. You can use store-bought cake or make your own. Either way, it will taste great! The creamy layer is key to this trifle's charm. Use 2 cups of heavy whipping cream. Mix it with 1/2 cup of powdered sugar and 1 teaspoon of vanilla extract. Whip until stiff peaks form. Now, add 1 cup of Greek yogurt. This adds a tangy taste and a creamy texture. It makes your trifle rich yet light. These ingredients are simple but work together beautifully. You can find the full recipe at the end of this article. First, take 2 cups of fresh strawberries. Remove the green tops and slice them. Place the sliced strawberries in a mixing bowl. Add 2 tablespoons of sugar to the bowl. Toss the strawberries gently to coat them in sugar. Let them sit for 15-20 minutes. This helps the strawberries release their juices. You will have sweet, juicy strawberries ready for your trifle. While the strawberries are resting, it’s time to make the whipped cream. Grab a clean mixing bowl and add 2 cups of heavy whipping cream. Next, add 1/2 cup of powdered sugar and 1 teaspoon of vanilla extract. Using an electric mixer, whip the cream until you see stiff peaks form. This means the cream holds its shape. Now, gently fold in 1 cup of Greek yogurt. Mixing these adds creaminess and a slight tang. Your whipped cream is now ready to layer. To build your trifle, get a trifle dish or individual glass cups. Start with a layer of cubed pound cake at the bottom. Add a layer of the juicy strawberries next. Then, spoon a layer of the whipped cream mixture on top. Repeat these layers until you run out of ingredients. Make sure to finish with a layer of whipped cream. Chill the trifle in the refrigerator for at least 1 hour. This helps the flavors meld together. Just before serving, garnish with fresh mint leaves for a nice touch. Enjoy this delightful treat! For the full recipe, check the details above. To make your trifle shine, choose ripe strawberries. Look for bright red color and firm texture. Avoid any with soft spots or mold. If they smell sweet, they are likely fresh and tasty. Wash them gently and hull them before slicing. This method keeps the berries juicy and vibrant in your dessert. Whipped cream can make or break your trifle. Start with cold heavy cream for the best results. Use a clean bowl and beaters to whip the cream. Mix until stiff peaks form, but don’t over-mix. Add powdered sugar and vanilla extract to sweeten it up. For a twist, fold in Greek yogurt. This adds a nice tang and creaminess. Layering is key to a stunning trifle. Start with a layer of pound cake cubes at the bottom. Then, add a layer of macerated strawberries. Follow this with a layer of whipped cream. Repeat these layers until you fill the dish. Finish with a generous dollop of whipped cream on top. Garnish with fresh mint leaves for a pop of color. This simple method makes your trifle look fancy and inviting. For the full recipe, check out the details above! {{image_2}} If you want a gluten-free trifle, swap the pound cake for gluten-free cake. You can also use gluten-free ladyfingers or sponge cake. These options work great, and they keep the same soft texture. Just check the labels to ensure they are truly gluten-free. This way, everyone can enjoy this tasty treat. You can mix it up by adding other fruits. Try blueberries, raspberries, or peaches. These fruits add a burst of flavor and color. Layer them just like the strawberries. Each fruit brings its own sweetness and tartness. You can even make a mixed fruit trifle for a fun twist. Consider using flavored yogurt instead of plain Greek yogurt. Strawberry, vanilla, or even lemon yogurt can add extra taste to your trifle. This simple change gives a new layer of flavor. Just remember to keep the balance with your other ingredients. You want to keep it sweet but not overwhelming. For the complete recipe, check the Full Recipe section above. To store leftovers, place the trifle in an airtight container. If you made your trifle in individual cups, cover each cup with plastic wrap. This keeps the dessert fresh and tasty. Try to eat the leftovers within two days for the best flavor. Always keep your trifle in the fridge. The cool air helps the flavors mix and stay fresh. Avoid storing it near strong-smelling foods, as it can absorb those odors. If possible, keep it on a shelf in the fridge, not the door. This keeps it at a stable cold temperature. You do not need to reheat the trifle. It tastes best served cold. When ready to serve, gently uncover it. You can add a few fresh strawberries or mint leaves on top for a beautiful look. This makes the trifle even more inviting. Enjoy your Strawberry Shortcake Trifle fresh from the fridge! You can find the full recipe earlier in this article. You can make the Strawberry Shortcake Trifle a day in advance. Prepare the layers and assemble the trifle. Cover it with plastic wrap and chill it in the fridge. This helps the flavors blend nicely. Just add garnish before serving. Yes, you can use frozen strawberries. Thaw them first and drain any extra liquid. You may need less sugar since frozen strawberries can be sweeter. This option is great if fresh strawberries are not available. You can mix it up with different flavors. Try using peaches, blueberries, or raspberries. You can also use flavored yogurt, like lemon or coconut. These flavors add a fun twist to the classic recipe. The trifle lasts for about 2 to 3 days in the fridge. Keep it covered to prevent drying out. After a few days, the layers may start to blend. Enjoy it fresh for the best taste! We covered how to make a delicious Strawberry Shortcake Trifle with fresh strawberries, pound cake, and whipped cream. Each step, from selecting the best berries to layering for a pretty look, helps you create a tasty dessert. Remember to try variations like gluten-free options or using yogurt flavors. Store your trifle correctly to keep it fresh. With these tips, you can impress your friends and family. Enjoy making and sharing this delightful dessert!

Strawberry Shortcake Trifle Delightful and Simple Treat

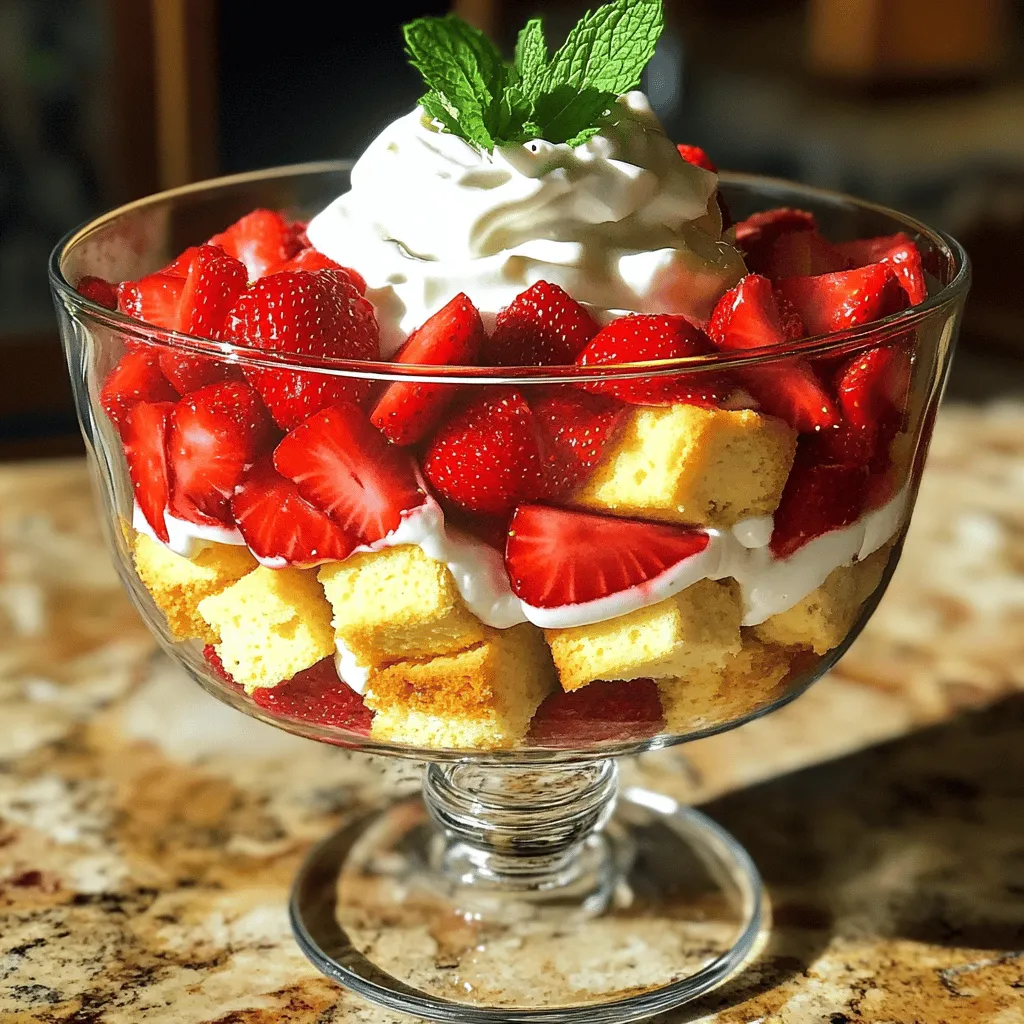
If you crave a sweet, easy dessert, the Strawberry Shortcake Trifle is perfect for you. This delightful treat layers fresh

This Chicken Caesar Pasta Salad is simple and quick to make. It combines fresh flavors with tasty textures. You can enjoy it as a main dish or a side. The whole process takes about 30 minutes from start to finish. - 2 cups rotini pasta - 1 cup cooked chicken breast, diced - 1 cup romaine lettuce, chopped - ½ cup cherry tomatoes, halved - ½ cup Parmesan cheese, grated - ½ cup Caesar dressing (store-bought or homemade) - ¼ cup croutons - 1 tablespoon olive oil - Salt and pepper to taste - Fresh parsley, chopped, for garnish These ingredients create a great balance of taste and nutrition. The rotini pasta holds the dressing well, making each bite flavorful. The chicken adds protein, while the lettuce and tomatoes bring freshness. You can customize your salad by adding some extra ingredients. Consider adding: - Cooked bacon for a smoky flavor. - Avocado for creaminess. - Bell peppers for crunch. These options can enhance the dish and make it your own. Each addition can change the taste and feel of the salad, so get creative! The Full Recipe gives a solid base, but feel free to mix it up. First, you need to cook the rotini pasta. Bring a big pot of salted water to a boil. Once it’s bubbling, add the rotini pasta. Cook it according to the package directions until it is al dente. This usually takes about 8 to 10 minutes. After it cooks, drain the pasta in a colander. Rinse it under cold water. This cools it down and stops the cooking. Set the pasta aside while you prepare the other ingredients. In a large mixing bowl, combine the cooked pasta with diced chicken, chopped romaine lettuce, and halved cherry tomatoes. Make sure to toss gently so everything mixes well. You want the chicken and veggies to spread evenly throughout the pasta. This step makes the salad colorful and tasty. Now, let’s make the salad dressing. In a small bowl, whisk together the Caesar dressing and olive oil. This will make the dressing creamy and smooth. Pour the dressing mixture over your pasta and veggies. Toss everything together until the pasta is well-coated. Add in the grated Parmesan cheese, and season with salt and pepper to taste. Finally, fold in the croutons for that nice crunch. Transfer the salad to a serving bowl and garnish with fresh parsley. You can find the full recipe above for more details. Enjoy your delicious Chicken Caesar Pasta Salad! To cook pasta just right, follow these steps. Start with a large pot of salted water. Add the rotini pasta when the water boils. Cook it according to the package directions, usually around 8 to 10 minutes. Test it for doneness by tasting a piece; it should be al dente, meaning firm but not hard. Drain the pasta and rinse it under cold water to stop the cooking. This keeps it from getting mushy and keeps your salad fresh. Seasoning is key to a tasty Chicken Caesar Pasta Salad. Once you mix the pasta with chicken and veggies, add salt and pepper to taste. Remember, the Caesar dressing has flavor, so go easy on the salt. You can also add a squeeze of lemon juice for a bright touch. For extra flavor, mix in a pinch of garlic powder or Italian herbs. This will deepen the taste and add great layers to your dish. For a beautiful presentation, serve your salad in a large, shallow bowl. This allows everyone to see the colorful ingredients. Top the salad with extra grated Parmesan and croutons for a crunchy touch. Scatter some halved cherry tomatoes on top for a pop of color. Lastly, sprinkle fresh parsley over the dish to add a fresh look. You want it to look as good as it tastes! {{image_2}} You can switch up the protein in your Chicken Caesar Pasta Salad. Try using grilled shrimp or sliced steak for a new twist. If you like, add diced turkey or even some crispy bacon bits. Each choice brings a unique flavor. You can use leftover meat, too. It makes this salad quick and easy. If you want a vegan or vegetarian version, it’s simple! Skip the chicken and add chickpeas or black beans instead. Use a plant-based Caesar dressing or a tahini dressing for creaminess. You can also toss in some avocado for a rich taste. Adding roasted veggies like bell peppers or zucchini can also boost flavor and nutrients. While classic Caesar dressing is great, feel free to get creative! You can use ranch dressing or a zesty vinaigrette instead. A lemon or yogurt-based dressing adds a fresh twist. For a spicy kick, consider adding sriracha to any dressing. Mix and match until you find your favorite! You can find the full recipe for Chicken Caesar Pasta Salad above to get started today! You can store Chicken Caesar Pasta Salad in the fridge. Use an airtight container for best results. The salad will stay fresh for up to three days. Keep the croutons separate to maintain their crunch. If you mix them in, they may get soggy. Freezing this pasta salad is not recommended. The lettuce and dressing do not freeze well. However, you can freeze the cooked chicken and pasta. Thaw them later for a quick meal. Just remember to make a fresh salad when you are ready to eat. To revive leftovers, start by removing any croutons. If the salad seems dry, add a bit more dressing. Toss everything gently to mix. You can serve it cold or let it sit at room temperature for a bit. Avoid heating it in the microwave, as it may ruin the texture. Enjoy your easy and tasty meal! The best pasta for Chicken Caesar Pasta Salad is rotini. Its spiral shape holds the dressing well. You can also use fusilli or penne if you prefer. These shapes make each bite full of flavor. Choose a pasta that cooks quickly and stays firm. Avoid pasta that gets mushy too fast. Yes, you can make this salad ahead of time! It tastes even better after the flavors mix. Prepare the pasta and dressing a day before. Keep the lettuce and croutons separate until serving. This keeps the salad fresh and crunchy. Store it in the fridge in an airtight container. Making homemade Caesar dressing is easy. Start with these simple steps: 1. In a bowl, mix together: - 1 clove garlic, minced - 2 anchovy fillets, mashed (optional) - 1 tablespoon Dijon mustard - 2 tablespoons red wine vinegar - ½ cup mayonnaise - ¼ cup grated Parmesan cheese - Salt and pepper to taste 2. Whisk until smooth. 3. For a thinner dressing, add a little water or lemon juice. 4. Taste and adjust seasoning if needed. This dressing adds a rich flavor to your Chicken Caesar Pasta Salad. For more details, check the Full Recipe. This blog post guides you through making Chicken Caesar Pasta Salad. We covered the key ingredients, recipe steps, and helpful tips. You learned about tasty variations and storage ideas too. When you follow these steps, your salad will impress everyone. Experiment with flavors and enjoy the process. With these skills, you’ll create a dish that’s both easy and delicious. Keep this recipe handy for a quick meal or a gathering. Trust me, this salad will be a hit!

Savory Chicken Caesar Pasta Salad Easy and Tasty Meal

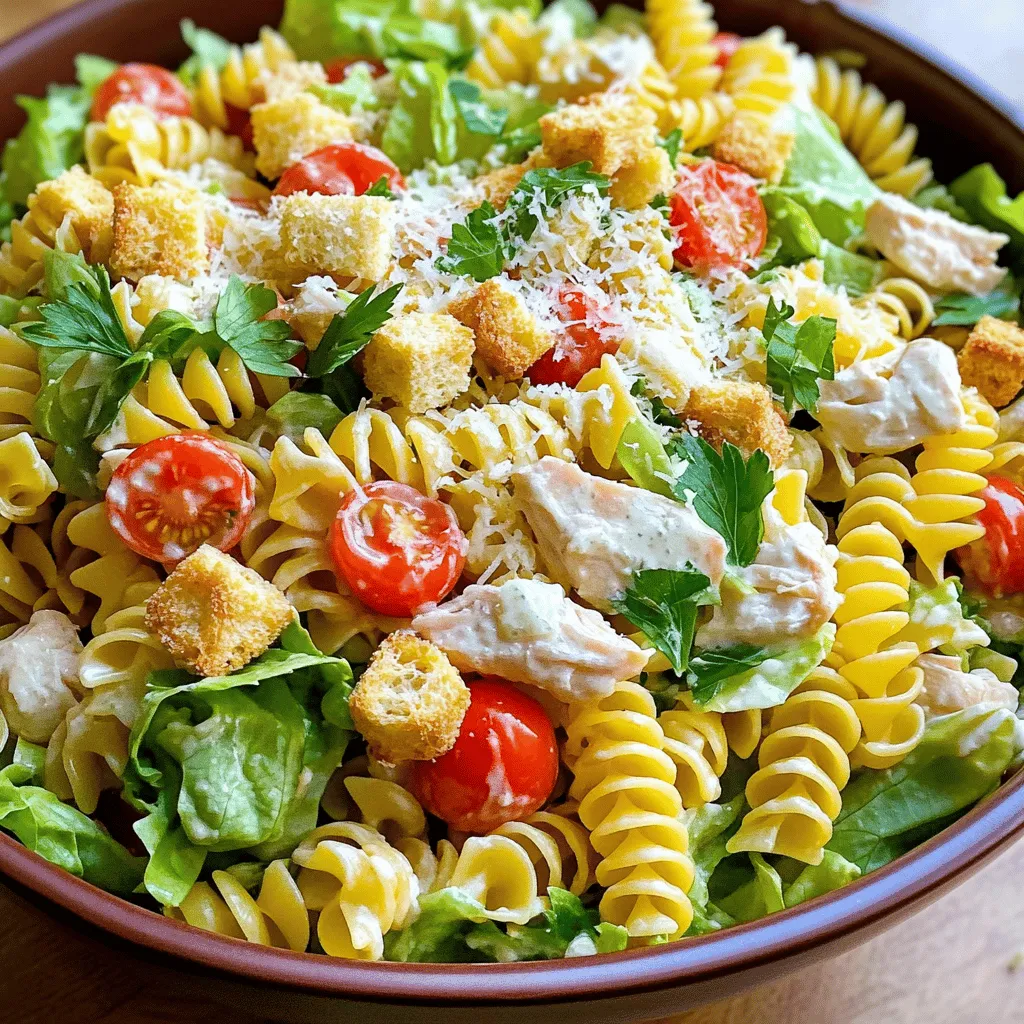
Looking for a quick, tasty meal? Look no further than my Savory Chicken Caesar Pasta Salad! This dish blends juicy

For a tasty taco casserole, you'll need these main ingredients: - 1 lb ground turkey or chicken - 1 small onion, diced - 2 cloves garlic, minced - 1 bell pepper, diced (any color) - 1 can (15 oz) black beans, drained and rinsed - 1 can (15 oz) corn, drained - 1 can (10 oz) diced tomatoes with green chilies - 1 packet taco seasoning - 2 cups tortilla chips, slightly crushed - 2 cups shredded Mexican cheese blend - 1 cup sour cream These ingredients combine to create a rich and flavorful dish. The ground turkey or chicken adds protein, while the beans and corn bring fiber. The diced tomatoes with green chilies add a nice kick, and the cheese melts beautifully, creating a gooey layer. To elevate your casserole, consider adding these optional garnishes: - Fresh cilantro, chopped - Jalapeño slices Garnishes like cilantro and jalapeños enhance flavor and add color. You can mix and match to suit your taste. If you want to switch things up, here are some substitutions: - Use ground beef or pork instead of turkey or chicken. - Replace black beans with pinto beans or kidney beans. - Try using fresh tomatoes instead of canned ones if you prefer. - Go for a dairy-free cheese for a dairy-free version. These substitutions keep the dish interesting while maintaining the overall flavor. Feel free to mix and match based on what you have at home. For the full recipe, check out the details above. Start by preheating your oven to 350°F (175°C). In a large skillet over medium heat, cook 1 lb of ground turkey or chicken until it's browned. Use a spoon to break it apart as it cooks. Then, add 1 small diced onion, 2 minced garlic cloves, and 1 diced bell pepper. Sauté these veggies for about 5-7 minutes until they soften. Next, stir in 1 can of black beans, 1 can of corn, and 1 can of diced tomatoes with green chilies. Add 1 packet of taco seasoning, and cook for another 3-4 minutes until it’s all mixed well and hot. Grab a greased 9x13 inch baking dish. Start by layering half of the crushed tortilla chips on the bottom. Then, add half of the meat mixture. Top it with 1 cup of shredded Mexican cheese. Repeat these layers with the rest of the chips, meat mixture, and finish with the remaining cheese on top. Cover the baking dish with foil. Bake your casserole in the oven for 20 minutes. After that, remove the foil and bake for another 10 minutes. This helps the cheese melt and bubble nicely. Once it's out of the oven, let it cool for about 5 minutes before serving. Enjoy it warm with sour cream, fresh cilantro, and jalapeño slices if you like. This simple process makes a delicious Easy Taco Casserole. For the full recipe, check out the details above. You can make your taco casserole unique. Start by changing the meat. Use ground beef, pork, or even lentils for a veggie twist. Want more heat? Add diced jalapeños or a spicy salsa. You can also switch the beans. Try pinto or kidney beans instead of black beans. Mix in extra veggies like zucchini or mushrooms for more flavor. To get the best texture, make sure to crush the tortilla chips just right. They should be slightly broken but not dust. Layer them well to keep a nice crunch. Bake the casserole covered first, so it heats evenly. Then, take off the foil to let the cheese melt and bubble. This gives you a great golden crust on top. Serve your casserole hot from the oven. Add a dollop of sour cream on top for creaminess. You can also sprinkle fresh cilantro for a burst of color and flavor. If you like a bit of crunch, add some avocado slices or crushed tortilla chips on top. For a fun twist, serve it with a side of guacamole or salsa. Check out the Full Recipe for more serving ideas. {{image_2}} You can easily make a vegetarian taco casserole. Just swap the meat for extra beans or lentils. I love using black beans and pinto beans for texture. You can also add chopped mushrooms for a hearty feel. Don't forget to use vegetable broth instead of chicken broth when needed. For cheese lovers, choose a plant-based cheese to melt on top. This option is tasty and packed with nutrients. If you're watching carbs, you can adjust the recipe. Replace tortilla chips with cauliflower rice or shredded zucchini. This keeps the casserole low-carb and still delicious. You can also use ground turkey or chicken, which are lower in carbs. Adding more veggies, like bell peppers and spinach, boosts flavor without extra carbs. This option still feels filling and satisfying. Want some heat? Add jalapeños or diced green chilies to the meat mix. You can also use spicy taco seasoning for a kick. For extra spice, top the casserole with hot sauce before serving. If you enjoy bold flavors, consider adding chipotle peppers in adobo sauce. This gives the dish a smoky taste that’s sure to impress. You can find the full recipe and all these tasty variations in one spot! To store leftover taco casserole, let it cool first. Transfer the casserole to an airtight container. You can also keep it in the baking dish covered tightly with foil or plastic wrap. This keeps the flavors fresh and prevents drying out. It will stay good in the fridge for up to four days. To reheat taco casserole, preheat your oven to 350°F (175°C). Cover the casserole with foil to keep it moist. Bake for about 20 minutes, or until heated through. You can also use a microwave. Place a portion on a microwave-safe plate. Heat it for about 2-3 minutes. Stir halfway to ensure even heating. You can freeze taco casserole for a later meal. First, let it cool completely. Then, wrap it tightly in plastic wrap and foil. This helps prevent freezer burn. It can stay fresh in the freezer for up to three months. When ready to eat, thaw it in the fridge overnight. Reheat as directed above for a quick and tasty meal. For more details on making this easy dish, check the Full Recipe. Yes, you can use ground beef. It adds a rich flavor. Just cook it the same way as turkey or chicken. Remember, ground beef has more fat. If you want a leaner dish, stick with turkey or chicken. To spice it up, add jalapeños to the meat mix. You can also use spicy taco seasoning. Another option is to top it with hot sauce before serving. Adjust the spice level to fit your taste. Easy Taco Casserole goes well with simple sides. Try a fresh salad or Mexican rice. You can also serve it with guacamole or chips. These sides balance the flavors and add more fun to your meal. For more ideas, check out the Full Recipe. In this post, I covered easy taco casserole ingredients, preparation steps, and cooking tips. I shared variations, storage info, and FAQs to guide you. Taco casserole is simple and fun to make. You can customize it to fit your taste. Don't hesitate to try new flavors. Remember to store leftovers for future meals. Enjoy your cooking and delight in the tasty results!

Easy Taco Casserole Tasty and Simple Dinner Idea

Looking for a quick and tasty dinner idea? My Easy Taco Casserole is the perfect choice! Packed with flavor and

Older posts
Newer posts
← Previous Page1 … Page79 Page80 Page81 … Page124 Next →

dsad

© 2025 Southern Dishes • Built with GeneratePress

Our Policies

  • Copyright Policy
  • Cookie Policy
  • GDPR Policy
  • Privacy Policy
  • Disclaimer
  • Terms Of Use

More Information

  • Home
  • About
  • Contact
  • Appetizers
  • Dessert
  • Dinner
  • Drinks
©2025, Southern Dishes About Back To Top