Skip to content
DisclaimerTerms Of UseGDPR PolicyCookie Policy

Southern Dishes

  • Home
  • Drinks
  • Appetizers
  • Dinner
  • Dessert
  • About
  • Contact
  • Privacy Policy
DisclaimerTerms Of UseGDPR PolicyCookie Policy

Isabella

Here’s what you need to make Brown Butter Apple Cider Sugar Cookies: - 1 cup unsalted butter - 1 cup apple cider - 2 cups all-purpose flour - 1 cup granulated sugar - 1/2 cup packed brown sugar - 1 teaspoon baking soda - 1/2 teaspoon baking powder - 1/2 teaspoon salt - 2 teaspoons cinnamon - 1/2 teaspoon nutmeg - 1 large egg - 1 teaspoon vanilla extract - 1/2 cup caramel sauce (for drizzling) These ingredients create a warm and cozy flavor. The brown butter gives a nutty taste, while the apple cider adds a hint of sweetness. The spices, like cinnamon and nutmeg, make these cookies even more special. You can find all of these ingredients at your local grocery store. When gathering your ingredients, focus on quality. Use fresh apple cider for the best flavor. Choose butter that is unsalted to control the salt content. This recipe yields about 24 cookies, perfect for sharing or enjoying alone! To brown butter, start with a medium saucepan. Melt 1 cup of unsalted butter over medium heat. Stir it often. Watch closely as it changes color. It should turn golden brown and smell nutty. This step adds a rich flavor. Once it reaches the right color, take it off the heat. Let it cool for about 10 minutes. This cooling helps keep the cookies from spreading too much. Next, we need to reduce the apple cider. Pour 1 cup of apple cider into a small saucepan. Heat it on medium until it boils. Once it boils, lower the heat. Let it simmer for 10-15 minutes. You want it to reduce to about 1/3 cup. This step concentrates the apple flavor. After reducing, set it aside to cool. Using cooled cider is important for the dough's texture. Now, let’s mix our ingredients. In a bowl, whisk together 2 cups of all-purpose flour, 1 teaspoon of baking soda, 1/2 teaspoon of baking powder, 1/2 teaspoon of salt, 2 teaspoons of cinnamon, and 1/2 teaspoon of nutmeg. Set this dry mix aside. In a large bowl, combine the cooled brown butter, 1 cup of granulated sugar, and 1/2 cup of packed brown sugar. Mix until it looks smooth. Next, beat in 1 large egg and 1 teaspoon of vanilla extract. Mix until everything is well combined. Now, fold in the reduced apple cider. Mix gently until it is fully incorporated. Finally, add the dry ingredients. Mix just until combined. Be careful not to overmix. Overmixing can lead to tough cookies. To get the best texture for your cookies, chill the dough for at least one hour. This helps the cookies hold their shape while baking. Dos and Don’ts for Cookie Consistency: - Do use a cookie scoop for even sizes. - Do check your oven temperature; an oven thermometer is helpful. - Don’t overmix the dough; mix until just combined. - Don’t skip the chilling step; it makes a huge difference. You can switch up the spices to match your taste. Try using allspice or ginger instead of cinnamon and nutmeg. Adding Mix-Ins: - You can fold in chopped nuts like walnuts or pecans. - For a sweet twist, add chocolate chips or dried fruit. Make your cookies stand out by stacking them on a decorative platter. Drizzle them with caramel sauce for a sweet touch. Using Caramel Drizzle Effectively: - Warm the caramel sauce slightly to make it easier to drizzle. - Use a spoon or squeeze bottle for a neat look. - Sprinkle a little cinnamon on top for added flair. {{image_2}} To keep your Brown Butter Apple Cider Sugar Cookies fresh, store them correctly. First, wait until the cookies cool completely. Warm cookies can create steam in the container, making them soggy. Use an airtight container to keep them moist. A glass jar or a plastic container works well. You can also layer cookies with parchment paper between them. This method prevents sticking. Store the cookies at room temperature for up to one week. If you want them to last longer, consider freezing them. Freezing cookie dough is a great way to have fresh cookies anytime. First, scoop the dough into tablespoon-sized balls. Place them on a baking sheet lined with parchment paper. Freeze the dough balls for about an hour. Once they are firm, transfer them to a freezer-safe bag or container. To bake frozen cookies, preheat your oven. No need to thaw the dough. Just add a couple of extra minutes to the baking time. Enjoy fresh cookies straight from the oven! What drinks go best with Brown Butter Apple Cider Sugar Cookies? I recommend pairing these cookies with warm apple cider. The flavors blend well together. You can also serve them with a glass of milk. The creamy texture of milk balances the spices in the cookies. For seasonal drinks, try spiced chai or pumpkin spice latte. These drinks add warmth and enhance the fall vibe. You can also enjoy them with a cup of hot chocolate. The sweetness of chocolate complements the cookies nicely. When should you serve these cookies? These cookies shine at bake sales. Their unique flavor will attract buyers. They are also perfect for holiday gatherings. Their taste brings warmth and joy to any event. You can serve them at birthday parties or family get-togethers. Their sweet aroma fills the room with cheer. They also make great gifts for friends or neighbors. Everyone loves homemade treats, especially during fall. Can I substitute margarine for butter? No, I do not recommend using margarine. Butter gives these cookies a rich flavor. Brown butter adds a nutty taste that margarine cannot match. The texture and taste will change if you use margarine. How do I ensure my cookies don’t spread too much? To prevent spreading, chill your cookie dough for at least one hour. This helps the butter firm up. Also, avoid overmixing after adding the dry ingredients. This keeps the cookies thick and chewy. Is it okay to use store-bought apple cider? Yes, store-bought apple cider works just fine. Look for a quality brand without added sugars. The flavor may vary slightly, but it will still taste great in the cookies. How long do these cookies last? These cookies can last up to a week if stored properly. Keep them in an airtight container at room temperature. For longer freshness, you can freeze them for up to three months. Now you know how to make delicious Brown Butter Apple Cider Sugar Cookies. You learned about key ingredients, step-by-step instructions, and expert tips for the best results. Using the right spices or adding fun mix-ins can make each batch unique. Proper storage keeps your cookies fresh, and pairing them with drinks enhances their flavor. Enjoy these cookies at events or cozy gatherings. Bake them with joy and share them with friends and family. Happy baking!

Savory Brown Butter Apple Cider Sugar Cookies Recipe

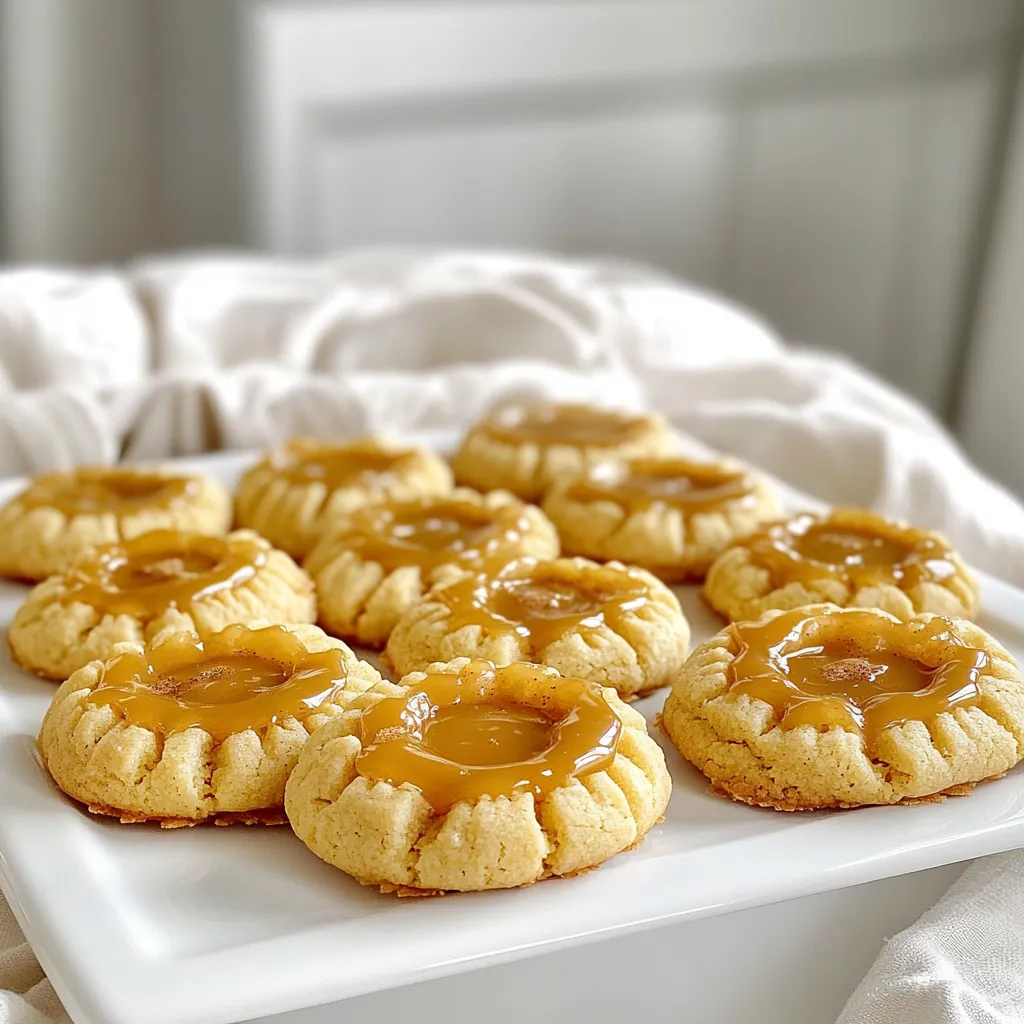
Get ready for a fall treat you won’t forget! My Savory Brown Butter Apple Cider Sugar Cookies blend rich, nutty

To make these cookie dough protein bars, you need a few key items: - 1 cup oat flour - 1/2 cup vanilla protein powder - 1/2 cup almond butter - 1/4 cup maple syrup These ingredients form the base of your bars. Oat flour gives a nice texture. Vanilla protein powder adds flavor and boosts protein. Almond butter adds creaminess and healthy fats. Maple syrup sweetens the mix and helps bind everything together. You can add some fun extras to make your bars even better: - 1/4 cup chocolate chips - 1/4 cup chopped nuts - 2-3 tablespoons almond milk Chocolate chips add a sweet touch. Chopped nuts give a nice crunch. Almond milk helps adjust the dough’s consistency when needed. For a little more flavor, include: - 1 teaspoon vanilla extract - A pinch of salt Vanilla extract enhances the cookie dough taste. A pinch of salt balances the sweetness and brings out the flavors. By using these ingredients, you can create a nutritious snack that tastes just like cookie dough! - First, grab a large mixing bowl. - Combine 1 cup of oat flour and 1/2 cup of vanilla protein powder. - Add a pinch of salt to the dry mix. - Mix well. You want to ensure no lumps are there. - Next, add 1/2 cup of almond butter. - Pour in 1/4 cup of maple syrup and 1 teaspoon of vanilla extract. - Stir until the mix comes together into a thick dough. - If it feels too dry, add 2-3 tablespoons of almond milk. - Mix after each tablespoon until you get cookie dough consistency. - Now it's time to fold in extra flavors. - Add 1/4 cup of chocolate chips and 1/4 cup of chopped nuts. - Gently fold them into the dough. Make sure they spread out evenly. - Line an 8x8 inch baking pan with parchment paper. - Leave some overhang for easy removal. - Press the dough into the pan with your hands or a spatula. - Make sure it is even and compact. - Refrigerate for at least 30 minutes to set. - After chilling, cut them into bars or squares. - Store the bars in an airtight container in the fridge for a week. - You can freeze them for longer storage, too. To get the right texture for your bars, almond milk is key. If your mixture feels too dry, add almond milk. Start with one tablespoon at a time. Mix well after each addition. This will help you reach that perfect cookie dough feel. You want it thick, but not crumbly. You can make these bars your own. Try adding a dash of cinnamon or nutmeg for warmth. Do you love chocolate? Add cocoa powder for a rich twist. Different nut butters can also change the taste. Peanut butter or cashew butter can work well too. How you cut and serve your bars can make a difference. Try cutting them into fun shapes using cookie cutters. For toppings, consider drizzling melted chocolate on top. Chopped nuts or shredded coconut can add some crunch and flair. {{image_2}} You can change up the cookie dough flavor by adding different mix-ins. Some great options are: - Dried fruits like cranberries or raisins - Nut butters like peanut or cashew - Spices like cinnamon or cocoa powder If you want to make these bars vegan or gluten-free, use: - Gluten-free oat flour - Plant-based protein powder - A nut or seed butter that fits your diet To give these bars a nutrition boost, consider adding seeds or superfoods. Some excellent choices are: - Chia seeds for Omega-3s - Flaxseeds for fiber and protein - Hemp seeds for extra protein You can also try substituting the protein powder flavors. Vanilla works well, but chocolate or peanut butter adds a fun twist. These protein bars are perfect for pairing with yogurt or fresh fruit. The creamy yogurt complements the bars' texture well. You can also enjoy them as pre or post-workout snacks. They provide energy and help with muscle recovery. Store your cookie dough protein bars in an airtight container in the fridge. This keeps them fresh and tasty. They stay good for up to a week. After that, they may lose flavor and texture. If you want to keep them longer, freeze the bars. Wrap each bar in plastic wrap or foil. Then place them in a freezer-safe bag. To thaw, take a bar out and leave it in the fridge overnight. You can also thaw it at room temperature for a few hours. For the best texture, eat the bars cold. You can also let them sit at room temp for a few minutes. This helps soften them a bit. Avoid using a microwave, as it can change the texture. Enjoy your healthy treat! Yes, you can use regular flour. However, oat flour adds a nice flavor and texture. It also keeps the bars gluten-free if that is important to you. If you use regular flour, the bars may not be as soft. These protein bars will last about a week in the fridge. Make sure to store them in an airtight container. If you want them to last longer, you can freeze them. They stay fresh for up to three months in the freezer. You can swap almond butter for any nut butter you like. Peanut butter, cashew butter, or sunflower seed butter work well too. Just remember that the taste will change a bit based on the butter you choose. Yes, it is best to refrigerate the bars. This helps them set and keeps them fresh longer. If you skip refrigeration, they may become too soft and lose their shape. You can leave out the chocolate chips if you prefer. The bars will still taste great without them. You can also try adding dried fruit or seeds for a different flavor and texture. You now know how to make tasty protein bars at home. We covered key ingredients like oat flour, almond butter, and maple syrup. You learned step-by-step instructions to mix, form, and store the bars. Tips for perfect consistency and flavor enhancements were shared, helping you customize your snack. Variations let you explore different tastes and nutrition boosters. With proper storage, your bars stay fresh for longer. Enjoy making these energy-packed snacks that are easy to store and share.

Cookie Dough Protein Bars No Bake Easy Delight

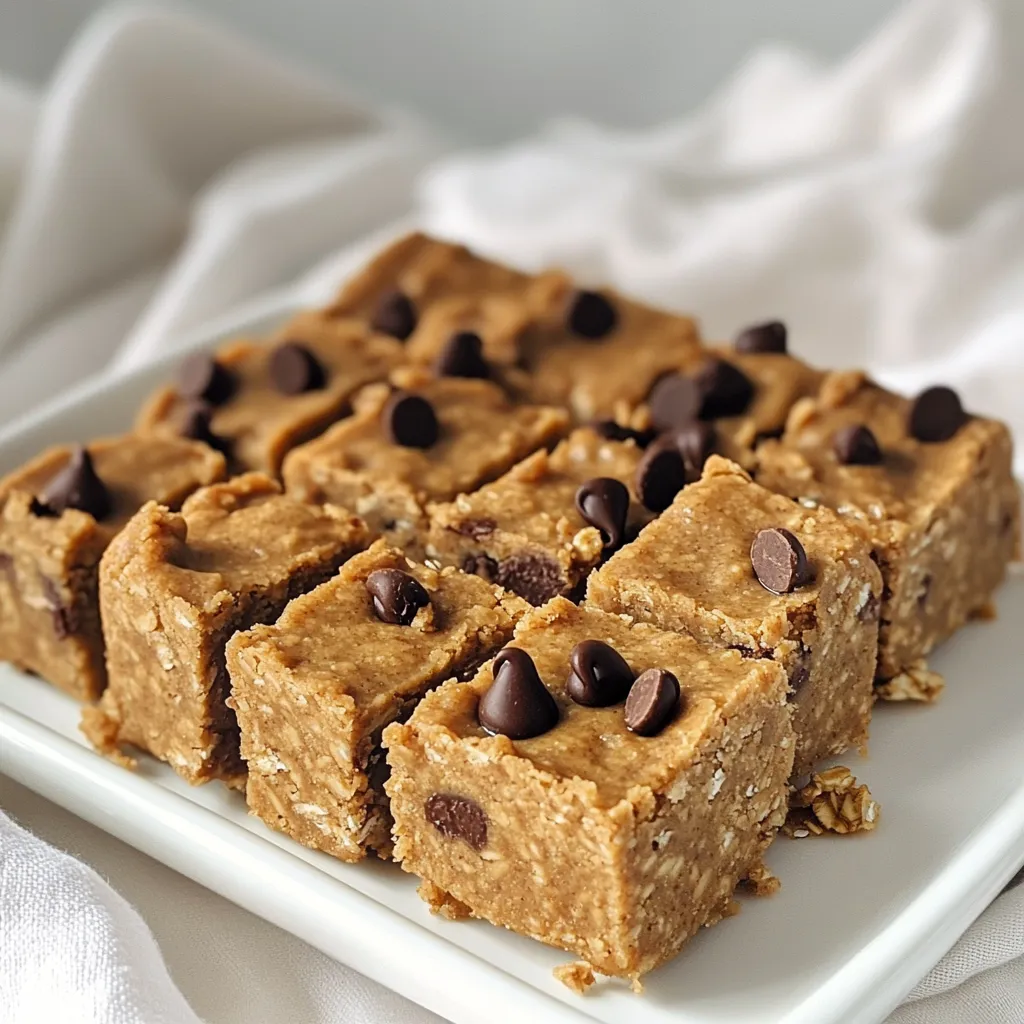
Are you craving a sweet treat that’s also healthy? I get it! These No-Bake Cookie Dough Protein Bars are perfect

To make these raspberry almond scones, you will need: - 2 cups all-purpose flour - 1/2 cup granulated sugar - 1 tablespoon baking powder - 1/2 teaspoon salt - 1/4 cup cold unsalted butter, cubed - 1/2 cup heavy cream - 1/4 cup almond milk - 1 large egg - 1 teaspoon almond extract - 1 cup fresh raspberries - 1/4 cup sliced almonds (plus extra for topping) - 1 tablespoon coarse sugar for sprinkling (optional) Fresh ingredients make a big difference in your baking. They enhance flavor and texture. For example, fresh raspberries provide bright bursts of taste. The flavor from stale items will not shine through. Always use fresh almonds, butter, and milk. This ensures the best results for your scones. You can make some easy swaps if you need to. Here are a few ideas: - Use whole wheat flour for a nuttier taste. - Swap granulated sugar for brown sugar for more depth. - If you lack heavy cream, try using whole milk. It may change the texture slightly. - For a dairy-free version, use coconut cream instead of heavy cream. - You can use any berry, like blueberries, for a different flavor. These substitutions will keep your scones delicious while fitting your needs! Start by preheating your oven to 400°F (200°C). Line a baking sheet with parchment paper. This step helps the scones bake evenly and not stick. Next, take a large bowl. Add 2 cups of all-purpose flour, 1/2 cup of granulated sugar, 1 tablespoon of baking powder, and 1/2 teaspoon of salt. Use a whisk to mix these dry ingredients well. In another bowl, combine 1/2 cup of heavy cream, 1/4 cup of almond milk, 1 large egg, and 1 teaspoon of almond extract. Whisk these ingredients until they blend smoothly. Now, pour the wet mixture into the dry ingredients. Stir gently until just combined. Remember, don’t overmix! This keeps the scones light and fluffy. Now, turn the dough out onto a floured surface. Shape it into a circle about 1 inch thick. Then, use a sharp knife to cut the dough into 8 equal wedges. This makes it easy to separate them for baking. Transfer the cut scones to your prepared baking sheet, leaving about 2 inches between each one. For a lovely finish, sprinkle the tops with sliced almonds and coarse sugar. This adds a nice crunch. Bake the scones in your preheated oven for 18-20 minutes. They should turn golden brown. To check if they’re done, insert a toothpick into the center. If it comes out clean, they are ready. Let the scones cool on the baking sheet for 5 minutes. After that, move them to a wire rack to cool completely. Enjoy your delicious raspberry almond scones! To get a nice texture in your scones, keep your butter cold. Cold butter helps create flaky layers. I cut the butter into small cubes. This way, it mixes better with the flour. Use your fingers or a pastry cutter to blend the butter. Stop when the mix looks like coarse crumbs. Overmixing will make the scones tough, so stir gently. For more flavor, always use fresh ingredients. Choose ripe raspberries for a sweet burst in every bite. Almond extract adds a lovely nutty taste. I also like to sprinkle coarse sugar on top before baking. This gives a crunchy finish that contrasts nicely with the soft scone. Many people overmix the dough. This leads to dense scones instead of light ones. Also, avoid skipping the chilling time. If your dough is warm, the scones will spread too much. Lastly, watch the baking time. Each oven is different. Start checking your scones at 18 minutes to ensure they don't overbake. {{image_2}} You can change the flavor of your raspberry almond scones easily. Try adding lemon zest for a bright taste. You can also mix in dark chocolate chips for a rich twist. If you want some crunch, add chopped walnuts or pecans. Each of these choices adds a new layer of flavor and fun. If you need a gluten-free option, use a gluten-free flour blend. This blend should work well in place of all-purpose flour. Make sure it contains xanthan gum, which helps give the scones a nice texture. You can also add a bit of almond flour for a nutty taste. Frozen raspberries work great in this recipe. They save you time and avoid waste. When using frozen raspberries, do not thaw them first. Just fold them directly into the dough. This will keep the scones from turning too mushy. You might want to bake them a few minutes longer, as they can add extra moisture. To keep your baked raspberry almond scones fresh, store them in an airtight container. They will stay good for about two days at room temperature. If you want to keep them longer, place them in the fridge. They will last up to a week when chilled. To enjoy warm scones again, preheat your oven to 350°F (175°C). Place the scones on a baking sheet. Heat for about 5 to 10 minutes. You can also use a microwave. Just warm them for about 15-20 seconds. Be careful not to overheat them, or they may become tough. For longer storage, you can freeze the scones. First, let them cool completely. Then, wrap each scone in plastic wrap. Place the wrapped scones in a zip-top bag. They can stay in the freezer for up to three months. When you are ready to eat them, simply thaw in the fridge overnight, then reheat as needed. Yes, you can! Blueberries, strawberries, or blackberries work well. Just ensure the fruit is fresh or thawed if frozen. Cut larger fruits into smaller pieces to mix evenly. This way, every bite bursts with flavor. Serve them warm for the best taste. A dusting of powdered sugar adds sweetness. Pair with clotted cream or whipped butter for a rich touch. You can also enjoy them with jam or even a fruit spread. Look for a golden brown color on top. Insert a toothpick into the center; it should come out clean. If the toothpick has wet dough, bake a few minutes longer. The scones should feel firm yet soft. Yes, you can prepare the dough a day in advance. Wrap it tightly in plastic wrap and store it in the fridge. When ready to bake, shape it and cut the scones. This saves time and still gives you fresh scones! In this blog post, we covered how to make delicious raspberry almond scones. We discussed the fresh ingredients needed and why they matter. You learned step-by-step how to prepare the dough, mix, shape, and bake the scones. We also shared tips to get the best texture and flavor. You explored variations, including gluten-free options and how to store leftovers. Keep these key points in mind for a tasty treat, and don't be afraid to try new flavors. Happy baking!

Raspberry Almond Scones Bakery Style Delicious Treat

Welcome to the world of baking where your kitchen transforms into a cozy bakery! Today, I’m excited to share my

To make Creamy Sun Dried Tomato Pasta, gather these key items: - 12 oz fettuccine or spaghetti - 1 cup sun-dried tomatoes, chopped - 1 cup heavy cream - 1 cup vegetable broth - 1 tablespoon olive oil - 3 cloves garlic, minced - 1 teaspoon dried basil - 1 teaspoon dried oregano - 1/2 teaspoon crushed red pepper flakes (optional) - 1/2 cup grated Parmesan cheese - Salt and pepper to taste - Fresh basil leaves for garnish You can swap ingredients based on what you have: - Use penne or rotini instead of fettuccine or spaghetti. - Try coconut cream for a dairy-free version. - Use chicken broth instead of vegetable broth for added flavor. - Fresh basil can replace dried basil if you have it on hand. To cook this dish efficiently, you will need: - A large pot or deep skillet for cooking. - A wooden spoon for stirring. - A measuring cup for the cream and broth. - A cutting board and knife for chopping tomatoes and garlic. - A grater for the Parmesan cheese. These ingredients and tools will help ensure your pasta turns out creamy and delicious! 1. Heat 1 tablespoon of olive oil in a large pot over medium heat. 2. Add 3 cloves of minced garlic and sauté for 1 minute. 3. Add 1 cup of chopped sun-dried tomatoes. Stir for 1 more minute. 4. Pour in 1 cup of vegetable broth. Bring this mixture to a gentle simmer. 5. Add 12 oz of fettuccine or spaghetti to the pot. Make sure it's all submerged. 6. Cook the pasta for 10-12 minutes. Stir occasionally to keep it from sticking. 7. Once the pasta is al dente, lower the heat. Slowly add 1 cup of heavy cream. 8. Mix in 1 teaspoon of dried basil and 1 teaspoon of dried oregano. 9. If you like a kick, add 1/2 teaspoon of crushed red pepper flakes. 10. Cook for an extra 3-4 minutes until the sauce thickens. 11. Stir in 1/2 cup of grated Parmesan cheese until it melts. 12. Season with salt and pepper to taste. 13. Remove from heat and garnish with fresh basil leaves. - Prep all your ingredients before you start cooking. This saves time. - While the pasta cooks, clean up any mess. This keeps your workspace tidy. - Plan to serve right after you finish cooking. This keeps the pasta creamy. - Sautéing garlic in olive oil adds deep flavor. Keep an eye on it to avoid burning. - Stirring the pasta occasionally helps it cook evenly and prevents sticking. - Lowering the heat before adding cream keeps the sauce from curdling. - Adding cheese off the heat allows it to melt smoothly into the sauce. To make your creamy sun-dried tomato pasta rich, use heavy cream. It blends well with the sun-dried tomatoes and cheese. Stir in the cream slowly. This helps keep the sauce smooth. If you want even more creaminess, add a bit more cheese at the end. Parmesan melts nicely and thickens the sauce. You can prep this dish ahead of time. Cook the pasta and sauce separately. Store them in the fridge. When you’re ready to eat, combine them in a pot. Heat gently, adding a splash of broth or cream to help it blend again. This method keeps the pasta from getting mushy. Serve this pasta in deep bowls. Drizzle with olive oil for shine. A sprinkle of grated Parmesan on top adds flavor and looks nice. For a pop of color, add fresh basil leaves as a garnish. This makes each plate look fresh and inviting. {{image_2}} You can easily add protein to your creamy sun-dried tomato pasta. Chicken is a great choice. Just dice cooked chicken and mix it in at the end. Shrimp is another tasty option. Sauté shrimp in olive oil before adding the garlic. This gives you a nice flavor boost. You can also use cooked sausage for a heartier dish. Just slice it and add it to the pot. If you prefer a vegetarian option, you can skip the meat altogether. Try adding extra vegetables like spinach or zucchini. These add color and nutrition to your meal. You can also use chickpeas for a protein-rich option. Just toss them in with the pasta. Another idea is to replace the heavy cream with a plant-based cream. This makes the dish vegan-friendly. To make your sauce even better, consider a few enhancements. Adding a splash of white wine can elevate the flavor. Just pour it in after the garlic and let it simmer. You can also play with the herbs. Fresh herbs like thyme or parsley can brighten the dish. For a spicy kick, add more crushed red pepper flakes. If you want a tangy twist, a squeeze of lemon juice works wonders. Mix and match these ideas to create your perfect creamy sun-dried tomato pasta. To keep your creamy sun-dried tomato pasta fresh, let it cool first. Use an airtight container. This helps keep the flavors and texture. Store it in the fridge for up to three days. When you're ready to enjoy leftovers, put the pasta in a pot. Add a splash of water or extra cream. Heat it on low, stirring often. This keeps it creamy and prevents burning. You can also use the microwave. Heat it in short bursts, stirring in between. If you want to freeze your pasta, make sure it is cool. Use a freezer-safe container, leaving some space at the top. It will expand as it freezes. You can freeze it for up to three months. To thaw, move it to the fridge overnight. Reheat it as mentioned above. Enjoy your creamy pasta later! Yes, you can use fresh tomatoes. However, fresh tomatoes will change the flavor and texture. Sun-dried tomatoes add a rich, intense taste that fresh ones lack. If you choose fresh tomatoes, use about 2 cups, diced. Cook them until soft before adding the broth to enhance the flavor. To lighten this creamy sun-dried tomato pasta, try these tips: - Swap heavy cream for half-and-half or a plant-based cream. - Use whole wheat pasta for added fiber. - Reduce the amount of cheese or skip it entirely. - Add more veggies like spinach or zucchini for bulk without calories. These changes will keep the dish tasty and satisfying. This dish pairs well with several sides: - A simple green salad with vinaigrette. - Garlic bread for a crunchy bite. - Roasted vegetables like asparagus or broccoli. - Grilled chicken or shrimp for extra protein. These options enhance the meal and make it more filling. In summary, we covered the key ingredients, cooking steps, and storage tips for this dish. You learned how to make it creamy and flavorful through best practices and variations. Remember, you can mix proteins or go vegetarian based on your taste. Store safely and enjoy later with the reheating tips. This dish is versatile and can be adapted to suit your needs. Happy cooking!

Creamy Sun Dried Tomato Pasta One Pot Delight

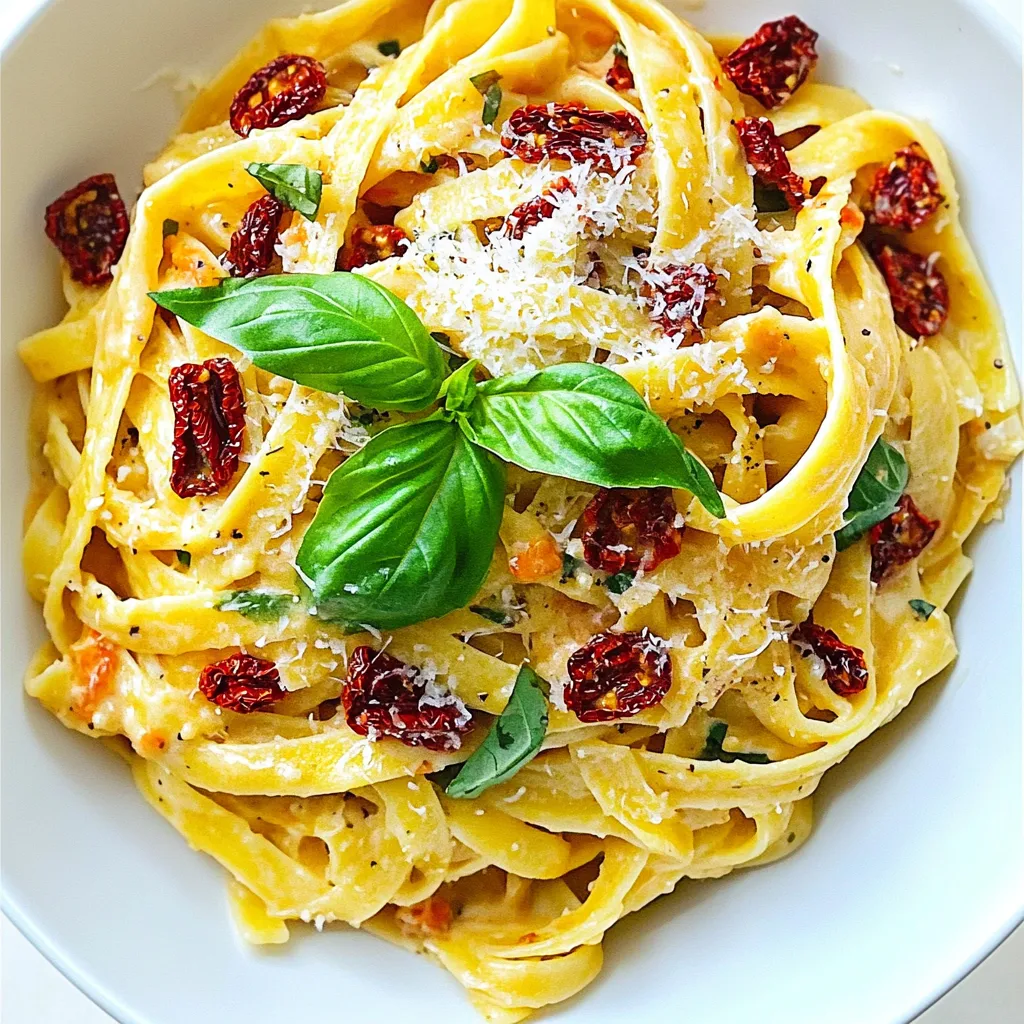
Looking for a simple yet delicious pasta dish? My Creamy Sun Dried Tomato Pasta One Pot Delight will impress your

- 1 large head of cauliflower, cut into bite-sized florets - 1 cup all-purpose flour - 1 cup unsweetened almond milk (or milk of choice) - 1 teaspoon garlic powder - 1 teaspoon onion powder - 1 teaspoon smoked paprika - ½ teaspoon salt - ½ teaspoon black pepper - 1 cup buffalo sauce (store-bought or homemade) - 1 tablespoon olive oil - Fresh parsley, chopped (for garnish) - Extra spices like cayenne for heat - Vegan cheese for added flavor - Green onions for a fresh crunch - Large mixing bowl - Whisk for batter mixing - Air fryer for cooking - Spray bottle with oil for easy coating - Serving platter for presentation To start, grab a large bowl. In this bowl, whisk together the following ingredients: - 1 cup all-purpose flour - 1 cup unsweetened almond milk (or milk of choice) - 1 teaspoon garlic powder - 1 teaspoon onion powder - 1 teaspoon smoked paprika - ½ teaspoon salt - ½ teaspoon black pepper Mix them until you have a smooth batter. Make sure there are no lumps. This batter will coat the cauliflower and give it a crispy texture. Set this bowl aside for now. Next, cut 1 large head of cauliflower into bite-sized florets. Dip each floret into the batter. Ensure each piece is fully coated. Shake off any extra batter. Now it's time to preheat your air fryer to 400°F (200°C). Lightly spray the air fryer basket with olive oil to prevent sticking. Place the battered cauliflower florets in a single layer in the basket. If your air fryer is small, you may need to cook in batches. Cook the cauliflower for 12-15 minutes. Remember to shake the basket halfway through. This helps the cauliflower cook evenly. When done, the florets should look crispy and golden. In a separate bowl, mix the air-fried cauliflower with 1 cup of buffalo sauce. Toss until all the pieces are evenly coated. Return the coated cauliflower to the air fryer. Cook it again for 3-5 minutes. This step helps the sauce set and caramelize a bit. When finished, take out the cauliflower and place it on a serving platter. For a finishing touch, drizzle a little olive oil over the top and sprinkle with chopped parsley. This adds a nice freshness to your dish. Enjoy your crispy buffalo cauliflower! To make your cauliflower crispy, follow a few simple steps. First, ensure you coat each floret in batter. A good coating helps trap air, leading to that perfect crunch. Next, avoid overcrowding the air fryer basket. Give each piece space to cook evenly. Shake the basket halfway through cooking to allow for even crisping. Lastly, a light spray of oil before cooking boosts the crispiness and flavor. Feel free to get creative with flavors! You can use different spices in the batter for a unique twist. Try adding cayenne pepper for heat or smoked paprika for a deeper flavor. You can also experiment with different sauces. BBQ sauce, ranch, or even teriyaki can give your cauliflower a fresh taste. Mix up the garnishes too! Chopped scallions or crumbled feta can add extra flavor and color. Pair your buffalo cauliflower with tasty dipping sauces. Classic choices include ranch or blue cheese dressing. Both add a creamy contrast to the spicy cauliflower. If you want something lighter, try a yogurt-based dip with herbs. A simple garlic aioli also works well. You can even make a spicy dip by mixing mayo with sriracha for an extra kick. The right sauce can elevate your dish to new heights! {{image_2}} This Buffalo cauliflower recipe serves four. Each serving has about 150 calories. Most calories come from the flour and buffalo sauce. The cauliflower adds volume with fewer calories. - Fiber: Cauliflower is high in fiber. This helps with digestion. - Vitamin C: A serving gives a good amount of vitamin C. This boosts your immune system. - Folate: Cauliflower is rich in folate. It supports cell health and function. - Potassium: This helps regulate blood pressure. Cauliflower can support heart health. Cauliflower is a great vegetable. It is low in calories and high in nutrients. Eating cauliflower may help with weight loss. It is also rich in antioxidants. These can help reduce the risk of diseases. The fiber in cauliflower aids digestion and keeps you full. Plus, it is versatile. You can use it in many dishes. Enjoying this dish gives you a tasty way to add healthy veggies to your meal. Buffalo cauliflower is tasty on its own, but it shines with side dishes. Here are some great options: - Celery sticks: They add a nice crunch and coolness. - Carrot sticks: Sweet and crunchy, they balance the heat. - Creamy coleslaw: This adds creamy texture and freshness. - Quinoa salad: A light salad brings a healthy grain option. - Garlic bread: Perfect for soaking up extra sauce. How you serve your buffalo cauliflower makes a big difference. Here are some fun ideas: - Garnish: Sprinkle fresh parsley on top for color. - Platter Style: Arrange florets on a large platter. - Dipping Bowls: Add small bowls of ranch or blue cheese dressing. - Layering: Stack cauliflower in a tower for a fun look. - Colorful Plates: Use bright plates to make the dish pop. The right drink can enhance your meal. Here are some great pairings: - Light beer: Its crispness cools the spice. - Sparkling water: A refreshing choice that cleans your palate. - Iced tea: Sweet or unsweetened, it complements the flavors well. - White wine: A crisp Sauvignon Blanc pairs nicely. - Lemonade: Its sweetness balances the spicy heat. Yes, you can use any sauce you like. For a twist, try BBQ sauce or teriyaki sauce. Both give a sweet and tangy flavor. You can also use a spicy sriracha or chipotle sauce for heat. Just mix your choice of sauce with the air-fried cauliflower as you would with buffalo sauce. To store leftovers, let the cauliflower cool completely. Place it in an airtight container. You can keep it in the fridge for up to three days. If you want to reheat it, use the air fryer again for best results. This will help regain its crispy texture. Yes, this recipe can easily be made vegan. Use almond milk or any plant-based milk in the batter. Ensure that the buffalo sauce is also vegan-friendly. Many brands offer vegan options, so just check the label. This way, you can enjoy a tasty dish that fits your diet! This blog post covered making delicious buffalo cauliflower. We looked at the key ingredients and equipment you need. Then, I shared easy steps for preparing and air frying the cauliflower. Tips helped you get that perfect crisp, and I offered flavor variations. We discussed nutritional information and healthy benefits, as well as serving ideas and answers to common questions. In the end, buffalo cauliflower is tasty and fun to make. You can enjoy it as a snack or a side. Dive in, experiment, and have fun in the kitchen!

Buffalo Cauliflower Air Fryer Crispy Delight Recipe

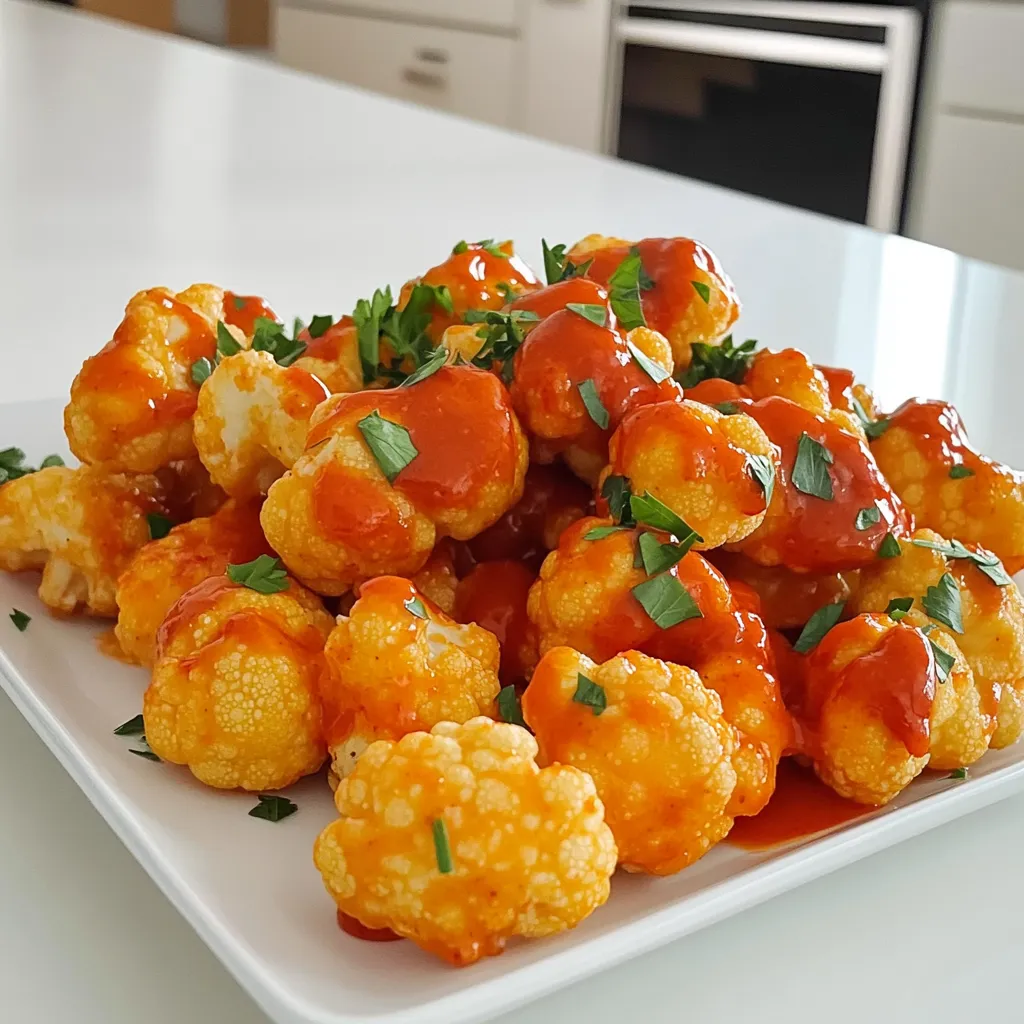
Want to enjoy a tasty snack that’s both healthy and fun to make? Look no further! In this Buffalo Cauliflower

- 6 medium russet potatoes, peeled and diced - 1 medium onion, chopped - 3 cloves garlic, minced - 4 cups vegetable broth The heart of this soup is the russet potatoes. Their creamy texture makes the soup rich. I love to peel and dice them into small pieces for even cooking. The onion and garlic add depth and warmth. Use fresh ingredients for the best flavor. Pouring vegetable broth over these veggies brings everything together, creating a warm base. - 1 cup heavy cream - 1 cup shredded cheddar cheese (plus extra for topping) - 1/2 cup sour cream These dairy ingredients add a smooth, creamy touch. Heavy cream makes the soup indulgent. Cheddar cheese melts in, giving that classic baked potato flavor. I often sprinkle extra cheese on top for a tasty finish. Sour cream adds a tangy zest and enhances the overall flavor. - 1 teaspoon smoked paprika - Salt and pepper to taste - Optional toppings: crispy bacon bits, diced tomatoes, extra shredded cheese, and chives Smoked paprika brings a hint of smokiness to the soup. Salt and pepper are key for balancing flavors. You can customize the toppings to your liking. Crispy bacon bits add crunch, while diced tomatoes give freshness. I enjoy adding chives for a pop of color and flavor. Each topping enhances the soup, making it even more exciting to eat. - First, combine the diced potatoes, chopped onion, and minced garlic in your slow cooker. - Next, pour the vegetable broth over the vegetables, submerging them well. - Now, season with smoked paprika, salt, and pepper. Stir gently to mix. - Cover the slow cooker and cook on low for 6-7 hours or on high for 3-4 hours. The goal is for the potatoes to be tender. - Once cooked, use a potato masher or an immersion blender to mash the potatoes to your desired texture. - Stir in the heavy cream, shredded cheddar cheese, and sour cream. Mix well until everything is melted and combined. - Taste your soup and adjust the seasoning if needed. If the soup feels too thick, add more vegetable broth or water to get the texture you like. Garnishing makes your soup pop. Here are some fun ideas: - Add crispy bacon bits for crunch. - Top with diced tomatoes for a fresh taste. - Use extra shredded cheese for a cheesy finish. - Sprinkle chives for a hint of onion flavor. For a rustic look, serve in deep bowls. A sprinkle of green onions on top adds color. Pair the soup with crusty bread for dipping. It looks great and tastes even better! To cook evenly, cut potatoes into similar sizes. This helps them cook at the same rate. Stir the soup halfway through cooking to mix flavors. Adjust seasoning after cooking. Taste before serving and add more salt or pepper if you want. Remember, you can always add, but you can’t take away! For a creamy soup, use a potato masher to lightly mash the potatoes. This keeps some chunks for texture. If you want a smoother soup, use an immersion blender. If the soup is too thick, add more vegetable broth or water. Start with a little and stir. Keep adding until you reach your preferred thickness. {{image_2}} You can spice up your loaded baked potato soup. Try adding chopped jalapeños or a dash of hot sauce for a kick. This simple change can make your soup exciting and fun. For a different taste, use fresh herbs like thyme or rosemary. These herbs add a lovely aroma and depth to the dish. Just toss in a few sprigs while it cooks, and enjoy the freshness. If you need gluten-free options, this soup can still shine. Use gluten-free vegetable broth and check your cream and cheese for gluten-free labels. For vegan adaptations, swap the heavy cream with plant-based cream. You can also use dairy-free cheese to keep the flavor rich while making it vegan-friendly. This way, everyone can enjoy the warmth of this soup, no matter their diet. Toppings can take your soup from good to great. Consider adding roasted garlic for a rich flavor or pickled jalapeños for a zesty kick. You can also go classic with crispy bacon bits or extra shredded cheese. Pair your soup with crusty bread or soft rolls for a hearty meal. This combo makes for a cozy dinner that warms both the body and soul. To keep your loaded baked potato soup fresh, follow these tips: - Refrigerating: Place your soup in airtight containers. Let it cool first before sealing. This helps prevent moisture buildup. - Freezing: If you want to freeze the soup, use freezer-safe containers. Leave some space at the top. Soup expands when it freezes. I recommend glass containers for both storage types. They are durable and do not hold smells. To reheat your loaded baked potato soup, use these methods: - Stovetop: Pour the soup into a pot. Heat it over medium-low heat. Stir often to avoid sticking. - Microwave: Place the soup in a microwave-safe bowl. Heat in short bursts of 1-2 minutes, stirring in between. When reheating, add a splash of cream or broth. This keeps the texture creamy and smooth. Your loaded baked potato soup can last: - In the fridge: 3 to 4 days. Store it in airtight containers to maintain freshness. - In the freezer: Up to 3 months. Just thaw overnight in the fridge before reheating. Watch for signs of spoilage. If the soup smells off or has a strange color, it’s best to toss it. To make this soup without a slow cooker, follow these steps: 1. Start by peeling and dicing six medium russet potatoes. 2. Chop one medium onion and mince three cloves of garlic. 3. In a large pot, add the potatoes, onion, and garlic. 4. Pour four cups of vegetable broth into the pot. 5. Season with salt, pepper, and one teaspoon of smoked paprika. 6. Cook over medium heat for about 20 to 25 minutes. Stir occasionally until the potatoes are soft. 7. Use a potato masher to mash the potatoes to your liking. 8. Stir in one cup of heavy cream, one cup of shredded cheddar cheese, and half a cup of sour cream. 9. Mix until well combined. Adjust seasoning as needed. 10. Serve hot, topped with your favorite garnishes. If you want a lighter or dairy-free option, try these alternatives: - Use one cup of coconut cream for a rich, dairy-free texture. - One cup of cashew cream works well for a nutty flavor. - You can also mix one cup of unsweetened almond milk with a tablespoon of cornstarch for creaminess. - For a lighter option, use one cup of Greek yogurt or low-fat sour cream. Absolutely! Adding vegetables boosts flavor and nutrition. Here are some great options: - Carrots: Dice and add them for a sweet touch. - Celery: Chop and stir in for extra crunch and flavor. - Broccoli: Add small florets for color and nutrients. - Spinach or kale: Toss in some greens for freshness. - Peas: Sweet peas add a fun pop of color and taste. Experiment with these veggies to make your soup even more delicious! This blog post covers how to make delicious Loaded Baked Potato Soup. You learned about key ingredients, clear steps, and helpful tips for perfecting the dish. Flavor variations and dietary options also enhance its appeal. Remember, small changes can make this soup your own. Try different toppings or spices to fit your taste. With a bit of creativity, you'll enjoy a comforting and rich meal. Happy cooking!

Loaded Baked Potato Soup Slow Cooker Comfort Food

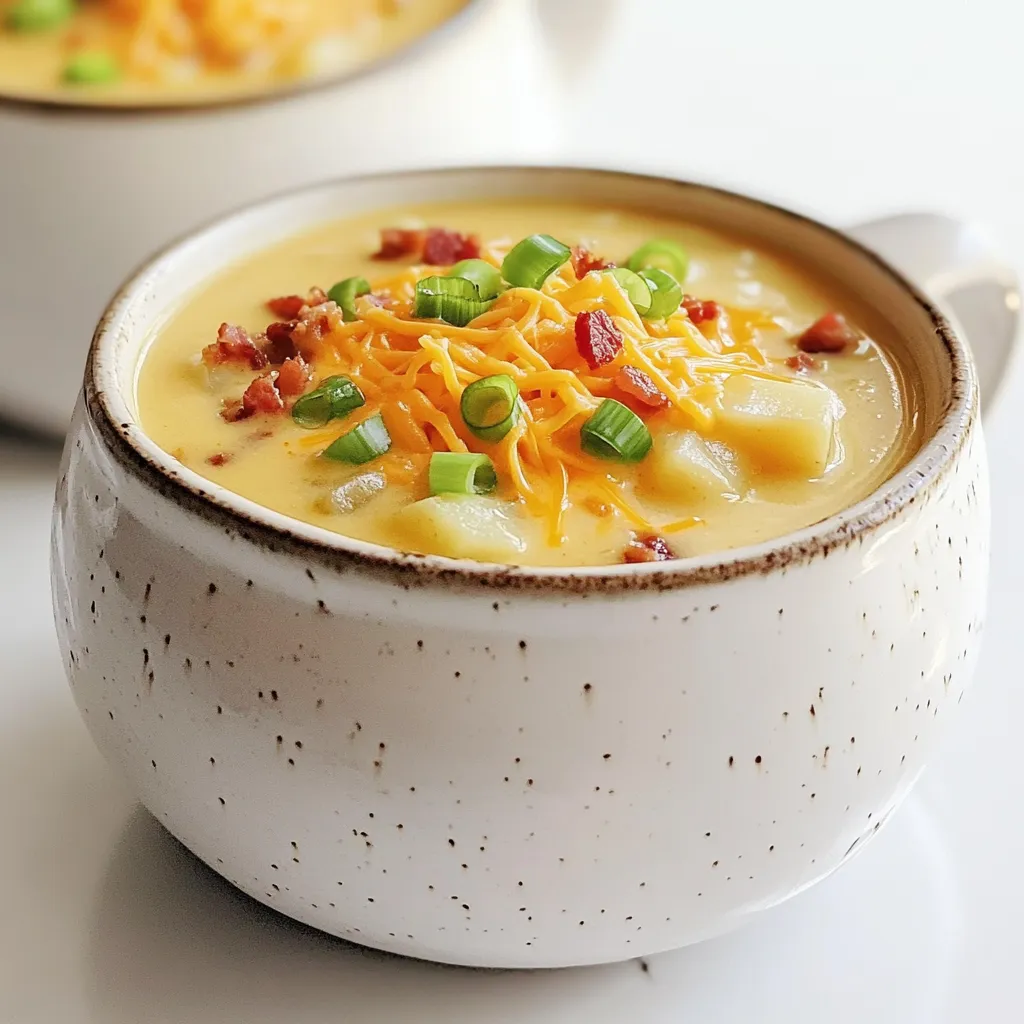
Are you ready to warm up with a bowl of creamy, comforting goodness? This Loaded Baked Potato Soup made in

- 1 cup graham cracker crumbs - 1/4 cup granulated sugar - 1/2 cup unsalted butter, melted - 16 ounces cream cheese, softened - 3/4 cup granulated sugar - 1 teaspoon vanilla extract - 2 large eggs - 1/2 cup sour cream - 2 cups apples, peeled and diced - 1 tablespoon lemon juice - 1/2 teaspoon cinnamon - 1/4 cup brown sugar - 1/2 cup rolled oats - 1/2 cup all-purpose flour - 1/2 cup brown sugar - 1/4 teaspoon salt - 1/4 cup unsalted butter, melted - 1/2 cup caramel sauce Each ingredient plays a key role in making these cheesecake squares a delight. The graham cracker crumbs form a crunchy base. Butter adds richness, while sugar gives sweetness. In the cheesecake filling, cream cheese is the star. It creates a smooth and creamy texture. Sugar balances the tanginess. Vanilla adds warmth, and eggs help set the filling. Sour cream makes it rich and luscious. For the apple filling, I love using Granny Smith apples. They stay firm and add tartness. Lemon juice brightens the flavor. Cinnamon and brown sugar add warmth and sweetness. The crumble topping is the finishing touch. Rolled oats give it a hearty crunch. Flour and brown sugar add sweetness, while a pinch of salt enhances all the flavors. The melted butter brings it together into a crumbly mixture. Finally, the caramel sauce adds a sweet drizzle. It ties all the elements together for a delicious treat. 1. Preheat your oven to 350°F (175°C). This step is key for baking. 2. In a mixing bowl, combine 1 cup of graham cracker crumbs, 1/4 cup of granulated sugar, and 1/2 cup of melted unsalted butter. 3. Stir until everything mixes well. 4. Press the mixture into the bottom of a lined 9x9-inch baking pan. Make sure it is even. 1. In a large bowl, beat 16 ounces of softened cream cheese until it is smooth. 2. Gradually add 3/4 cup of granulated sugar and continue beating until fluffy. 3. Mix in 1 teaspoon of vanilla extract. 4. Add 2 large eggs one at a time, mixing well after each. 5. Fold in 1/2 cup of sour cream until well combined. 1. In another bowl, toss 2 cups of peeled and diced apples with 1 tablespoon of lemon juice, 1/2 teaspoon of cinnamon, and 1/4 cup of brown sugar. 2. Ensure the apples are well coated. This adds great flavor. 1. In a separate bowl, mix 1/2 cup of rolled oats, 1/2 cup of all-purpose flour, 1/2 cup of brown sugar, and 1/4 teaspoon of salt. 2. Pour in 1/4 cup of melted butter and stir until the mixture is crumbly. 1. Pour half of the cheesecake filling over the crust in the baking pan. 2. Spread it evenly. 3. Add the apple filling on top. 4. Layer the remaining cheesecake filling over the apples. 5. Finally, sprinkle the crumble topping on top. 1. Bake in the preheated oven for 40-45 minutes. 2. The cheesecake should be set and the edges lightly golden. 3. The center may jiggle a bit, but it will firm as it cools. 4. Let the cheesecake cool to room temperature. 5. Refrigerate for at least 4 hours or overnight to set completely. 6. Cut into squares and drizzle each with caramel sauce before serving. How to achieve smooth cheesecake filling To get a smooth cheesecake filling, make sure your cream cheese is soft. Leave it at room temperature for about 30 minutes. Beat the cream cheese well before adding sugar. Mix until fluffy, then add eggs one at a time. This method helps avoid lumps for a creamy texture. Ensuring the crust stays firm A firm crust makes a big difference. After mixing the crust ingredients, press them firmly into the pan. Use the bottom of a glass to pack it down evenly. Baking it for a few minutes helps it set up nicely. Preventing cracks in the cheesecake To prevent cracks, avoid overmixing after adding eggs. Overmixing adds air, which can lead to cracks. Also, bake at a lower temperature. This allows the cheesecake to cook evenly, reducing the chance of cracks on top. How to check for doneness Check for doneness by gently shaking the pan. The cheesecake should be set around the edges but slightly jiggly in the center. It will firm up as it cools. A toothpick inserted in the center should come out mostly clean but not dry. Pairing with additional toppings Top each square with extra caramel sauce for added sweetness. You can also add whipped cream or a sprinkle of cinnamon. Fresh apple slices on top add a nice crunch and flavor. Creative serving ideas Serve these squares warm for a cozy treat. You can also chill them for a refreshing dessert. Cut them into fun shapes for parties or special occasions. {{image_2}} For those needing gluten-free options, use gluten-free graham cracker crumbs for the crust. You can also swap the flour in the crumble topping with almond flour or oat flour. These changes keep the taste while making it safe for gluten-sensitive folks. If you’re looking for vegan alternatives, replace cream cheese with a vegan cream cheese. Use flaxseed meal mixed with water instead of eggs. For the sour cream, try coconut yogurt or vegan sour cream. You'll still get a creamy filling without the dairy. Want to mix it up? Add nuts or dried fruits to your filling. Walnuts, pecans, or raisins can add a nice crunch or chewiness. Just make sure to chop them small so they blend well. Using different types of apples also changes the flavor. Granny Smith gives a tart taste, while Honeycrisp offers sweetness. Try using a mix for a balanced flavor profile. When holidays roll around, you can modify this recipe for festive cheer. Pumpkin spice can be added to the cheesecake filling for a warm, seasonal twist. Just blend in a teaspoon of pumpkin pie spice for that cozy feel. Incorporating seasonal fruits can also make this dessert shine. Use fresh cranberries in fall or ripe strawberries in summer. Each fruit adds a new layer of taste and keeps the recipe fresh year-round. To store leftovers, let your squares cool completely. Then, cut them into pieces. Place the squares in an airtight container. You can also use plastic wrap to cover them tightly. This keeps them fresh and prevents drying out. For best results, store them in the fridge. If you want to freeze caramel apple crumble cheesecake squares, wrap them well. Use plastic wrap and then foil for extra protection. This prevents freezer burn. To thaw, move them to the fridge overnight. If you need to reheat, do so gently in the oven. Set it to a low temperature to warm them without cooking further. These delicious squares can last about five days in the fridge. Check for any signs of spoilage, like an off smell or mold. If they look or smell strange, it’s best to toss them. Enjoy the best flavors by eating them sooner rather than later! Granny Smith apples work best. They add a nice tartness that balances the sweet cheesecake. You can also try Honeycrisp apples for a sweeter flavor. Just pick apples that hold their shape when baked. Yes, you can use a store-bought crust. It saves time and effort. Just choose a graham cracker crust for the best flavor. Make sure it fits your baking pan. You can make these squares a day before. Just follow the recipe and let them cool. Refrigerate them overnight. This helps the flavors meld and makes cutting easier. You can use Neufchâtel cheese as a lighter option. It has less fat but still tastes great. If you're looking for dairy-free, try a cream cheese alternative made from nuts. Yes, it is important to chill the squares. Refrigerating helps them set properly. It also enhances the flavors. Let them chill for at least four hours or overnight for the best results. This recipe for caramel apple crumble cheesecake squares combines sweet crust, creamy filling, and spiced apples. You learned to prepare each layer and assemble your dessert. Using the tips and variations can help you create a unique version that suits your taste or dietary needs. Storing leftovers properly ensures you enjoy each bite later. I hope you find this recipe easy and fun. Now, gather your ingredients and enjoy baking!

Caramel Apple Crumble Cheesecake Squares Delight

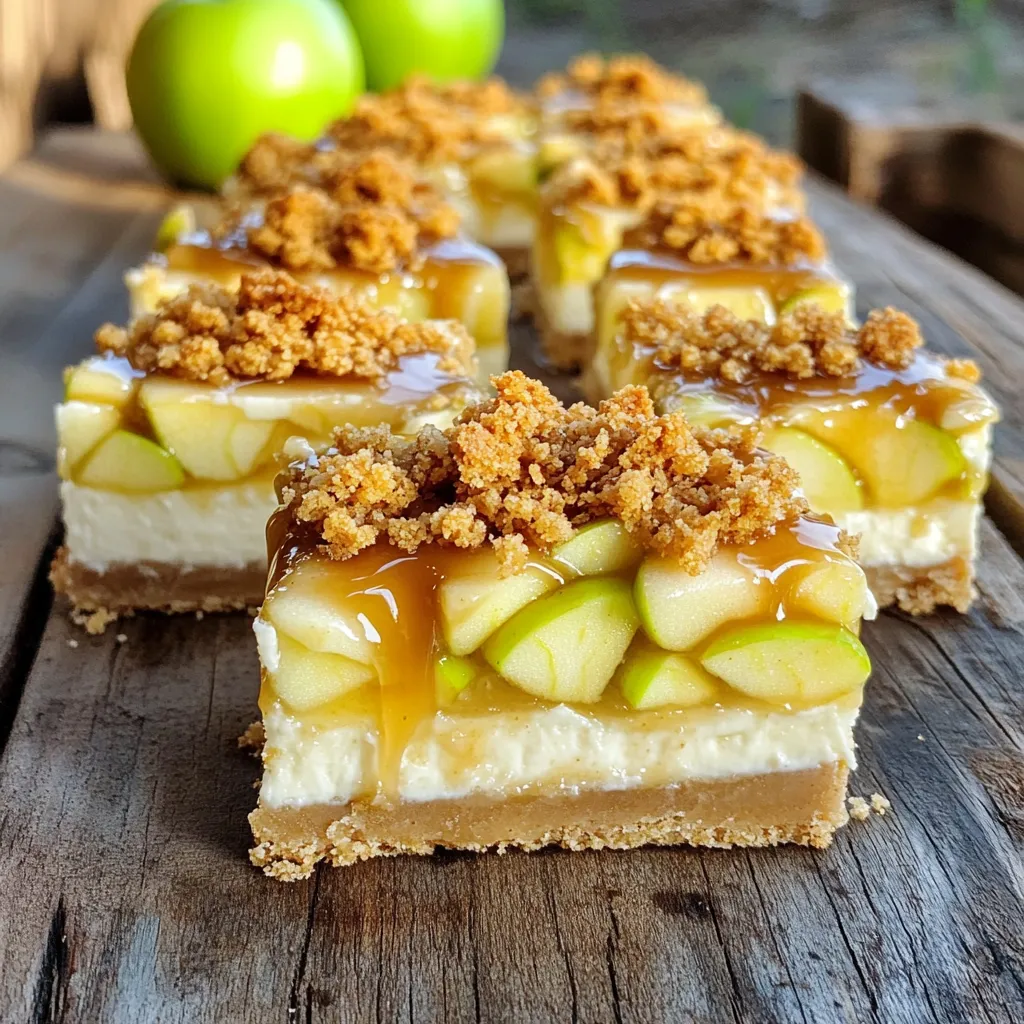
Craving a fall treat that blends sweetness, creaminess, and crunch? Dive into my Caramel Apple Crumble Cheesecake Squares Delight! This

- 1 medium head of cauliflower, cut into bite-sized florets - 1 cup all-purpose flour - 1 teaspoon garlic powder - 1 teaspoon onion powder - 1 teaspoon paprika - 1 cup milk (or plant-based milk) - 1 cup hot sauce (like Frank’s RedHot) - 2 tablespoons melted butter (or plant-based butter) - 1/2 teaspoon cayenne pepper (optional, for extra heat) - Salt and pepper to taste - Fresh parsley, chopped (for garnish) Gathering the right ingredients makes cooking fun and easy. Start with a medium head of cauliflower. Cut it into small florets, perfect for snacking. Then, grab a cup of all-purpose flour. This is key for the crispy coating. Next, you need some spices. Garlic powder, onion powder, and paprika add great flavor. Use a teaspoon of each to pack a punch. For the batter, you will need a cup of milk. You can use regular milk or plant-based milk if you prefer. This helps make the batter smooth. Now for the heat! A cup of hot sauce, like Frank's RedHot, brings the buffalo flavor. You can add two tablespoons of melted butter to make it rich. If you want more heat, toss in half a teaspoon of cayenne pepper. Don’t forget salt and pepper to taste! Finally, a sprinkle of fresh parsley makes a lovely garnish. It adds color and freshness to your dish. With these ingredients, you are ready to create something tasty. These spicy Buffalo cauliflower bites will surely impress! Start by preheating your oven to 450°F (230°C). This high heat helps make the cauliflower crispy. Next, grab a baking sheet and line it with parchment paper. This step keeps the bites from sticking and makes cleanup easy. In a large bowl, mix the dry ingredients. Combine 1 cup of all-purpose flour, 1 teaspoon of garlic powder, 1 teaspoon of onion powder, 1 teaspoon of paprika, salt, and pepper. Whisk them together until well blended. Now it’s time to make the batter. Slowly add 1 cup of milk to the dry mix. You can use regular milk or any plant-based milk you like. Stir the mixture gently until it forms a smooth batter. Make sure the batter is thick enough to coat the cauliflower florets evenly. Once you have the batter ready, dip each cauliflower floret into it. Let any extra batter drip off before placing them on the prepared baking sheet in a single layer. Bake them for about 20 to 25 minutes. You want them golden brown and crispy. While the cauliflower bakes, prepare the Buffalo sauce. In a bowl, mix 1 cup of hot sauce, 2 tablespoons of melted butter, and 1/2 teaspoon of cayenne pepper if you want more heat. Stir this until it’s well combined. After the initial bake, take the cauliflower out of the oven. Toss the baked florets in the Buffalo sauce until they are well coated. Then, place them back on the baking sheet. Bake again for another 10 to 15 minutes to get that extra crispiness. Once they are done, serve your spicy Buffalo cauliflower bites hot. Garnish with chopped parsley for a fresh touch. Enjoy with celery sticks and your favorite dipping sauce! To get that perfect crunch, oven temperature is key. Preheat your oven to 450°F (230°C). A hot oven helps the batter cook quickly, locking in moisture while creating a crispy outer layer. Batter consistency matters too. Your batter should be thick enough to coat the cauliflower. This helps it stick during baking. If it’s too runny, the batter won’t hold. If it’s too thick, it won’t spread evenly. Aim for a smooth, velvety texture. Want to amp up the flavor? Consider adding spices like smoked paprika or cumin. These spices boost the taste and add a new twist to your bites. You can also experiment with different sauces. Try barbecue sauce for a sweet kick or sriracha for even more heat. Presentation is important! Serve your cauliflower bites on a colorful platter. Pair them with celery sticks for crunch. A side of ranch or blue cheese dressing adds creamy goodness. For garnish, sprinkle fresh parsley on top. This not only looks good, but it also adds a fresh flavor. {{image_2}} You can easily make these bites vegan and gluten-free. For a vegan option, swap cow’s milk for almond or oat milk. Instead of butter, use plant-based butter. For gluten-free bites, replace all-purpose flour with almond flour or a gluten-free flour blend. Both options keep the bites tasty and satisfying. You might consider air frying as an alternative cooking method. This method uses less oil and gives a crispy finish. Just set the air fryer to 400°F (200°C) and cook for about 15 minutes. This gives a healthy twist to your cauliflower bites. Spice levels can be adjusted based on your taste. If you want mild bites, reduce the amount of hot sauce. You can also skip the cayenne pepper. For those who love heat, add extra cayenne or use a hotter hot sauce, like Sriracha or habanero sauce. This way, you create the perfect heat for everyone. Mixing different hot sauces can also add a unique flavor. Try blending buffalo sauce with BBQ sauce for a sweet and spicy combo. Each variation gives a new twist to the classic recipe. Adding cheese can enhance the flavor. After you coat the cauliflower in hot sauce, sprinkle some shredded cheese on top before the second bake. Cheddar or blue cheese works great. You can also experiment with spices. Consider adding cumin or smoked paprika for a different taste. Want more veggies? Mix in bell peppers or zucchini with the cauliflower. This adds color and nutrition to your dish. These variations make your spicy Buffalo cauliflower bites fun and exciting every time. To store leftovers, wait for the cauliflower bites to cool. Place them in an airtight container. This keeps them fresh for about 3 days in the fridge. For longer storage, use the freezer. Freeze them in a single layer on a baking sheet first. Once frozen, transfer them to a freezer-safe bag. This way, they won’t stick together. The best containers for freezing are those that are airtight. Look for freezer-safe glass or heavy-duty plastic bags. This helps prevent freezer burn. You can also use aluminum foil, but be sure it’s tightly wrapped. To reheat for crispiness, the oven is your best friend. Preheat it to 400°F (200°C). Spread the bites on a baking sheet. Heat for about 10–15 minutes until they are hot and crispy. This method revives their texture well. Using the microwave is faster but may make them soggy. If you must use the microwave, heat in short bursts. Check every 30 seconds until hot. But remember, the oven gives you crispiness back. Yes, you can make these spicy Buffalo cauliflower bites ahead of time. Cook them fully, then cool them. Place them in a container and store them in the fridge. They stay fresh for about three days. When you are ready to eat, just reheat them in the oven. This will help keep them crispy. To kick up the heat, add more cayenne pepper to the batter. You can also mix extra hot sauce into the Buffalo sauce. Try using a hotter brand of hot sauce if you want an intense flavor. Adjust the spice level to suit your taste. Remember, you can always add more, but it’s hard to take it away! - Alternatives to ranch or blue cheese dressing: Try hummus for a creamy option or guacamole for a fresh twist. A spicy yogurt sauce also pairs well and adds a cool contrast. - Low-calorie dipping options: Consider a light vinaigrette or a zesty salsa. Both add flavor without too many calories. You could also use a simple mix of Greek yogurt and herbs for a healthy dip. Buffalo cauliflower bites are tasty and fun. We covered ingredients like cauliflower, flour, and spices. You learned step-by-step how to prepare, bake, and flavor them. Tips for crispiness and serving ideas helped enhance your dish. You can even adapt the recipe to fit vegan or gluten-free diets. Try these bites at your next gathering. They offer great flavor and can impress anyone. Enjoy experimenting with different flavors and serving options. Happy cooking!

Spicy Buffalo Cauliflower Bites Flavorful Game Changer

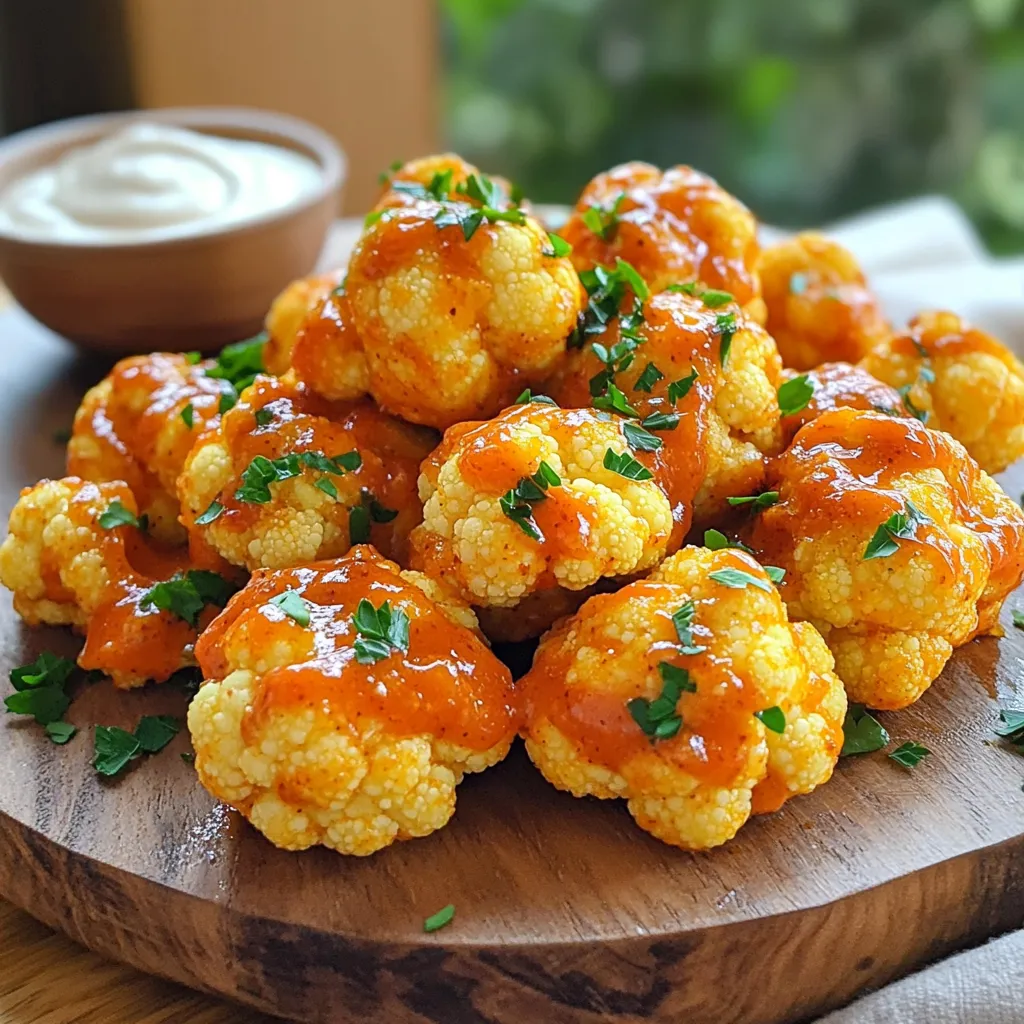
Are you ready to spice up your snack game? These Spicy Buffalo Cauliflower Bites are a crispy, flavor-packed treat perfect

For the No-Bake Mocha Espresso Cheesecake Bars, gather these key ingredients: - 1 ½ cups digestive biscuits or graham cracker crumbs - ½ cup unsalted butter, melted - 2 cups cream cheese, softened - 1 cup powdered sugar - 1 cup heavy whipping cream - 1 tablespoon instant espresso powder - 2 tablespoons hot water - 1 teaspoon vanilla extract - 2 tablespoons cocoa powder - Chocolate shavings and coffee beans for garnish You can swap ingredients if needed. Here are some ideas: - Digestive biscuits: Use graham crackers, Oreos, or any cookie you like. - Unsalted butter: Coconut oil works well for a dairy-free option. - Cream cheese: Substitute with vegan cream cheese for a dairy-free dessert. - Powdered sugar: You can use coconut sugar or a sugar substitute for lower sugar. - Heavy whipping cream: Try coconut cream to make it dairy-free. Quality matters for great taste. Here are my tips: - Cream cheese: Choose full-fat cream cheese for a rich, creamy texture. - Espresso powder: Use a good brand for a strong coffee flavor in the bars. - Cocoa powder: Opt for unsweetened cocoa for the best chocolate taste. - Butter: Always use fresh unsalted butter for the crust to avoid saltiness. - Whipping cream: Use chilled heavy cream for the best whipping results. These tips help ensure your No-Bake Mocha Espresso Cheesecake Bars turn out perfectly! To start, gather your ingredients for the crust. Use 1 ½ cups of digestive biscuits or graham cracker crumbs. Mix these crumbs with ½ cup of melted unsalted butter in a medium bowl. Keep mixing until it looks like wet sand. Now, press this mixture firmly into the bottom of an 8x8-inch baking dish. Make sure it forms an even layer, as this will hold your cheesecake together. Set it aside while you prepare the filling. Next, let’s make the espresso. Take 1 tablespoon of instant espresso powder and add it to a small bowl. Pour in 2 tablespoons of hot water. Stir until the espresso powder dissolves completely. This step adds a rich coffee flavor to your cheesecake. Let the mixture cool slightly before adding it to the filling. Now, grab a large mixing bowl. Add 2 cups of softened cream cheese to it. Use an electric mixer to beat the cream cheese until it is smooth and creamy. Gradually mix in 1 cup of powdered sugar and 2 tablespoons of cocoa powder. Keep mixing until everything is well combined. This will give your filling a nice sweetness and a hint of chocolate. In a separate bowl, pour 1 cup of heavy whipping cream. Whip it until stiff peaks form. This means the cream should hold its shape when you lift the whisk. Carefully fold this whipped cream into the cream cheese mixture. Do this gently to keep the mixture light and airy. This step is key to a fluffy cheesecake. Pour the espresso cheesecake filling over the prepared crust. Use a spatula to smooth the top. Cover the baking dish and refrigerate it for at least 4 hours. This allows the cheesecake to set firmly. Once it’s chilled, slice the cheesecake into bars. For a special touch, garnish each bar with chocolate shavings and a few whole coffee beans. Enjoy your delicious creation! To get the best texture in your cheesecake bars, focus on your cream cheese. Make sure it is softened. Cold cream cheese makes lumps. Use an electric mixer to beat it well. This will help create a smooth base. When you fold in the whipped cream, do it gently. This keeps your bars light and fluffy. You can easily enhance flavors by adding extras. Try mixing in a bit of chocolate or coffee liqueur. You could also add a splash of almond extract for depth. If you love nuts, crushed walnuts or hazelnuts work well too. For a fruity twist, consider adding a layer of fruit puree on top. Presentation can make your bars shine. After cutting them, place each bar on a small plate. Garnish with chocolate shavings and coffee beans. This adds a nice touch and looks fancy. For a pop of color, add fresh berries on the side. Arrange them nicely for a stunning display. {{image_2}} You can easily make gluten-free mocha espresso cheesecake bars. Swap out the digestive biscuits for gluten-free graham cracker crumbs. Many brands offer tasty options. Just check the package for gluten-free labels. Use the same amount as the recipe calls for. Your bars will still taste great! If you want a twist, try different flavors. For a minty touch, add peppermint extract instead of vanilla. You can also mix in some caramel sauce for a sweet kick. Experiment with flavored coffee, like hazelnut or vanilla. Each variation will give a new taste to your bars. To make these bars vegan, use plant-based cream cheese. There are many brands available that taste just like regular cream cheese. Replace the heavy whipping cream with coconut cream, whipped until fluffy. Use maple syrup instead of powdered sugar for sweetness. These swaps keep your bars creamy and delicious! To store leftover bars, wrap them tightly. Use plastic wrap or foil to cover the dish. This helps keep the bars fresh. Place them in the fridge for up to five days. If you use an airtight container, the bars will last longer. You can freeze these cheesecake bars for up to three months. First, cut the bars into pieces. Then, wrap each piece in plastic wrap. Place the wrapped bars in a freezer-safe bag. Label the bag with the date. To eat, thaw them in the fridge overnight. For the best taste, keep the bars cold until serving. Always use clean utensils to cut the bars. This prevents any bacteria from getting in. Try to keep the bars covered when not being served. This will help them stay creamy and delicious. Yes, you can use many types of cookies. Options include Oreos, vanilla wafers, or any cookie you love. Just crush them to make crumbs before mixing with melted butter. This change can bring a fun twist to your cheesecake bars. You can store the cheesecake bars in the fridge for up to one week. Just make sure to cover them well with plastic wrap or foil. This keeps them fresh and tasty for longer. If you need a substitute for cream cheese, try Greek yogurt or silken tofu. Both will change the flavor and texture, but they can work well in this recipe. Use the same amount as cream cheese for a good balance. Yes, these bars are perfect for making ahead. You can prepare them a day or two before serving. Just remember to keep them in the fridge until you are ready to enjoy them. Absolutely! Get creative with toppings. You can add whipped cream, chocolate sauce, or fresh berries. Even crushed nuts or caramel drizzle can enhance the flavors and presentation of your cheesecake bars. This blog post covered everything you need for delicious cheesecake bars. We explored key ingredients and tasty substitutes that enhance flavor. I shared step-by-step instructions to guide you through making the perfect crust, espresso mixture, and creamy filling. You also learned helpful tips for texture and presentation. Feel free to adapt recipes for gluten-free or vegan options. With proper storage, your leftovers will stay fresh. Enjoy your cheesecake bars and impress your friends and family!

No-Bake Mocha Espresso Cheesecake Bars Delight

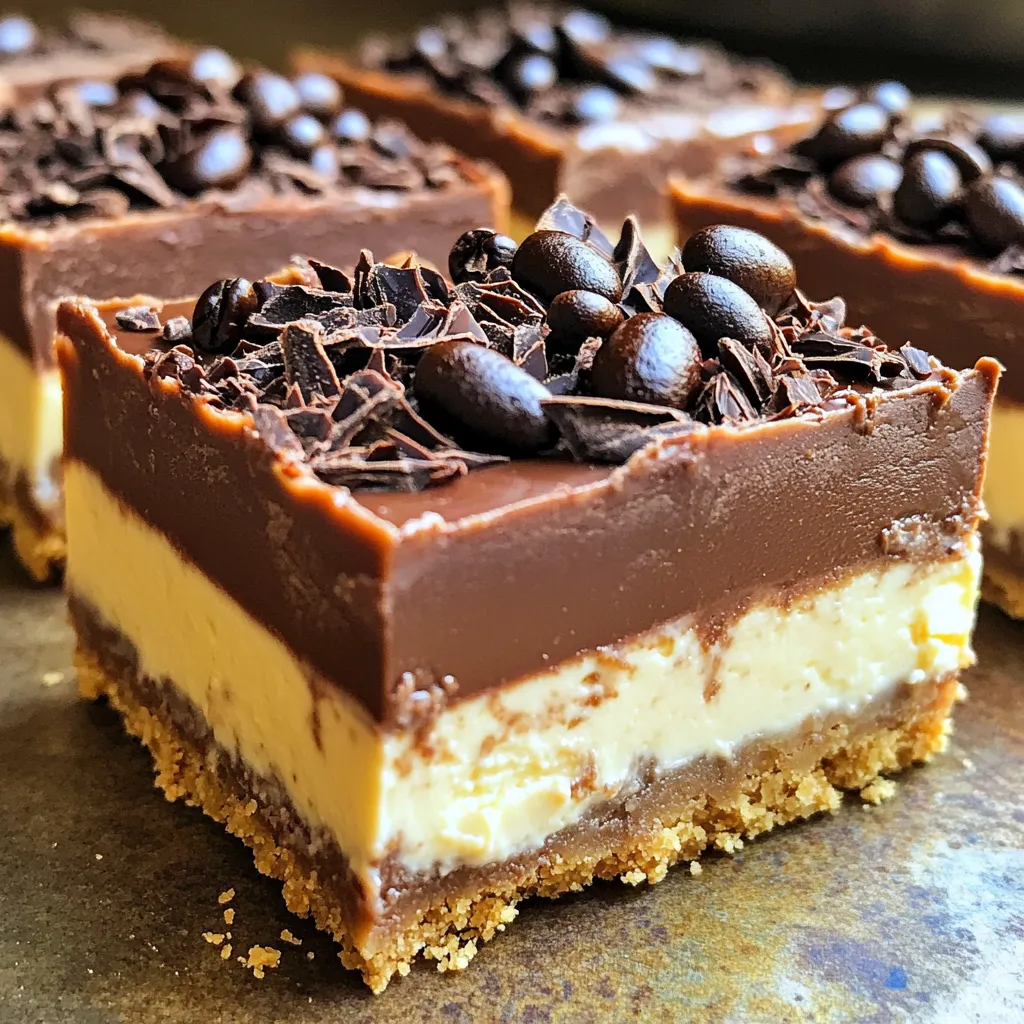
Are you ready to treat yourself to something decadent and delicious? No-Bake Mocha Espresso Cheesecake Bars are the perfect mix

- 2 ripe bananas, mashed - 1 cup cottage cheese, low-fat - 2 large eggs - 1/4 cup honey or maple syrup - 1 teaspoon vanilla extract - 1 teaspoon baking soda - 1/2 teaspoon baking powder - 1/2 teaspoon cinnamon - 1 1/2 cups whole wheat flour - 1/2 cup chopped walnuts or pecans (optional) - Pinch of salt Using these ingredients, you can create a high-protein banana bread. Each item plays a vital role. The ripe bananas add natural sweetness and moisture. Cottage cheese packs protein while keeping the bread soft. Eggs help bind everything together. Sweeteners, like honey or maple syrup, bring in sweetness and flavor. Vanilla extract gives a warm, comforting note. Baking soda and baking powder make the bread rise, so it becomes fluffy. Cinnamon adds a warm spice that complements the bananas. Whole wheat flour brings in fiber and gives a hearty texture. If you like a crunchy bite, add walnuts or pecans. Lastly, a pinch of salt enhances all the flavors, making the bread taste great. This combination makes a tasty, high-protein treat. You can enjoy it for breakfast or as a snack. Each ingredient works together to create a delicious result. 1. Preheat your oven to 350°F (175°C). Grease a 9x5 inch loaf pan or line it with parchment paper. This helps the bread come out easily after baking. 2. In a large mixing bowl, add the mashed bananas, cottage cheese, eggs, honey (or maple syrup), and vanilla extract. Mix them well until you have a smooth mixture. This step is key for good flavor and texture. 3. In a different bowl, whisk together the whole wheat flour, baking soda, baking powder, cinnamon, and salt. This keeps the baking agents well mixed and ready to combine. 4. Gradually add the dry ingredients to your wet mixture. Stir gently until just combined. Be careful not to overmix, or the bread can become tough. 5. If you want a crunchy texture, fold in the chopped walnuts or pecans. This adds a nice flavor and a bit of crunch. 6. Pour the batter into your prepared loaf pan. Smooth the top with a spatula for a nice finish. 7. Bake in the preheated oven for 50-60 minutes. Check for doneness by inserting a toothpick into the center. If it comes out clean, your banana bread is ready! 8. After baking, let the bread cool in the pan for about 10 minutes. This helps it set and makes it easier to remove. 9. Carefully transfer the bread to a wire rack to cool completely. This prevents sogginess and keeps the crust nice and firm. To make the best high-protein cottage cheese banana bread, you must avoid overmixing the batter. Overmixing can make the bread tough. Mix just until the dry and wet ingredients combine. This keeps the bread soft and fluffy. Moisture is key to a great banana bread. The mashed bananas and cottage cheese add a lot of moisture. To keep it moist, use ripe bananas. They should be soft and spotty. If you want extra moist bread, you can add a little more cottage cheese or some yogurt. This banana bread tastes great on its own, but you can make it even better. Spread nut butter on warm slices for a protein boost. Honey also adds a nice touch of sweetness. This bread is perfect for breakfast or as a snack. Pair it with a cup of tea or coffee. You can even enjoy it with fresh fruit on the side. Slices are great for kids and adults alike. {{image_2}} You can easily add more protein to your banana bread. One great way is to include protein powder. A scoop of your favorite protein powder will enhance the protein content without changing the taste much. You can also try using alternative high-protein ingredients. For instance, swap some of the whole wheat flour for almond flour or chickpea flour. Both options add protein and fiber. Another choice is to use Greek yogurt instead of cottage cheese. This swap keeps the bread moist and rich in protein. Spices can elevate your banana bread. Try adding nutmeg for a warm flavor. You can also use different vanilla extracts, like pure vanilla or vanilla bean paste, to change up the taste. Incorporating fruits can make your bread even better. Toss in berries for a fresh burst of flavor. You might also consider adding chocolate chips for a sweet touch. Both options bring extra joy to each slice. Store your high-protein cottage cheese banana bread in a cool, dry place. This keeps it fresh longer. Use an airtight container to seal in moisture. A glass or plastic container works well. You can also wrap the bread in plastic wrap. This adds an extra layer of protection. To freeze your banana bread, let it cool completely first. Wrap it tightly in plastic wrap. Then, place it in a freezer-safe bag or container. This helps prevent freezer burn. You can freeze it for up to three months. When ready to enjoy, thaw it in the fridge overnight. For a quick option, leave it on the counter for a few hours. Yes, you can use Greek yogurt in place of cottage cheese. Greek yogurt gives a similar texture. It also offers a creamy taste. Just keep in mind that the flavor may change a bit. This banana bread stays fresh for about 3 to 4 days at room temperature. You can also store it in the fridge for about a week. To keep it fresh longer, wrap it well and freeze it. Yes, this banana bread is great for meal prep. You can slice it and store it in airtight containers. This makes it easy to grab for breakfast or a snack. Yes, you can make this banana bread gluten-free. Simply switch the whole wheat flour with a gluten-free flour blend. Make sure your baking soda and baking powder are also gluten-free. This banana bread is high in protein due to the cottage cheese and eggs. It has healthy carbs from the bananas and whole wheat flour. The walnuts or pecans add healthy fats. Plus, it gives you fiber, vitamins, and minerals. It’s a balanced treat! You now have all the steps to make a tasty banana bread. We covered each ingredient, from ripe bananas to spices. I shared tips to keep your bread moist and flavorful. You can also try fun variations with fruits and protein boosts. Remember, store your bread well to keep it fresh. Now it’s time to bake. Enjoy this simple yet delicious recipe for any meal or snack. I hope you love it as much as I do!

High-Protein Cottage Cheese Banana Bread Delight

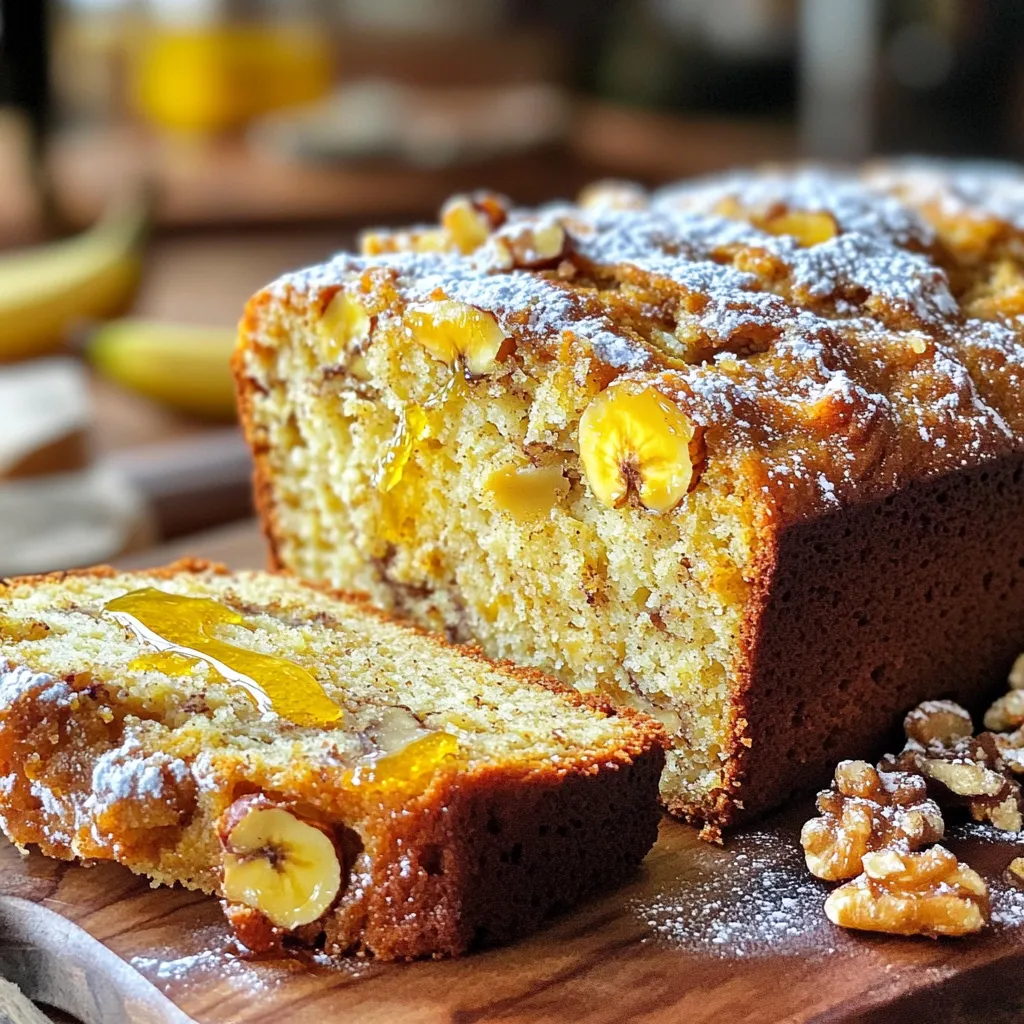
If you love banana bread but want a protein boost, you’re in for a treat! This High-Protein Cottage Cheese Banana

Older posts
Newer posts
← Previous Page1 … Page7 Page8 Page9 … Page143 Next →

dsad

© 2025 Southern Dishes • Built with GeneratePress

Our Policies

  • Copyright Policy
  • Cookie Policy
  • GDPR Policy
  • Privacy Policy
  • Disclaimer
  • Terms Of Use

More Information

  • Home
  • About
  • Contact
  • Appetizers
  • Dessert
  • Dinner
  • Drinks
©2025, Southern Dishes About Back To Top