Skip to content
DisclaimerTerms Of UseGDPR PolicyCookie Policy

Southern Dishes

  • Home
  • Drinks
  • Appetizers
  • Dinner
  • Dessert
  • About
  • Contact
  • Privacy Policy
DisclaimerTerms Of UseGDPR PolicyCookie Policy

Isabella

- 3 medium zucchinis - 1 cup ricotta cheese - 1 cup shredded mozzarella cheese - 1 cup marinara sauce - 1/2 cup grated Parmesan cheese - 1 egg - 1 teaspoon Italian seasoning - 2 cloves garlic, minced - Salt and pepper to taste - Fresh basil leaves for garnish You can swap ricotta cheese with cottage cheese or cream cheese for a different taste. If you need dairy-free options, use tofu blended with a bit of lemon juice. You can also try goat cheese or feta for a unique flavor twist. When choosing zucchini, look for medium-sized ones. They roll better and have less water. Fresh zucchini has firm skin and vibrant color. Avoid ones with soft spots or wrinkles. Organic zucchinis are often tastier and safer but conventional zucchinis also work well. To make perfect zucchini lasagna roll-ups, start by slicing the zucchinis. Use a mandoline or a sharp knife. Aim for 1/4-inch thick strips. This thickness helps them cook evenly and roll easily. Next, we need to draw out moisture from the zucchini. This step is key for keeping your roll-ups firm. Sprinkle the slices with salt and let them sit for 10 minutes. The salt pulls out moisture. After that, pat the slices dry with a paper towel. This helps avoid slimy roll-ups. Now, let’s mix the filling. In a bowl, add ricotta cheese, 1/2 cup of mozzarella cheese, grated Parmesan, and an egg. Then, add Italian seasoning, minced garlic, salt, and pepper. Mix everything until it’s well blended. This filling will add great flavor to your roll-ups. For the rolling technique, take a zucchini strip and spread about 2 tablespoons of the cheese mixture on it. Then, roll it up tightly from one end to the other. Place each roll seam-side down in your baking dish. Repeat this until all strips are filled and rolled. Preheat your oven to 375°F (190°C). This temperature helps the cheese melt perfectly. Spread a thin layer of marinara sauce at the bottom of your baking dish. After placing the rolls, pour the remaining sauce over them. Sprinkle the rest of the mozzarella cheese on top. Cover the dish with foil to keep moisture in while baking. Bake for 25 minutes. Then, remove the foil and bake for another 10 minutes. This step makes the cheese bubbly and golden brown. Let the dish cool for a few minutes before serving. To keep your zucchini rolls intact, slice the zucchinis evenly. I use a mandoline for this. It helps me get perfect 1/4-inch slices every time. After cutting, sprinkle salt on the slices. Let them sit for ten minutes to draw out moisture. This step is key! Pat them dry with a paper towel to avoid soggy rolls. Next, when rolling, spread the cheese mixture evenly. Start at one end and roll tightly. Place the rolled-up zucchinis seams-side down. This keeps them from unrolling during baking. For side dishes, I love pairing these roll-ups with a fresh salad. A simple arugula salad works great! The peppery taste complements the rich flavors of the roll-ups. You can also serve with garlic bread for a hearty meal. For presentation, arrange the roll-ups in a colorful dish. Drizzle extra marinara sauce on top and sprinkle with fresh basil. This adds a pop of color and makes it look fancy! You can change up the cooking method for fun! Try grilling the zucchini before rolling. It adds a smoky flavor. Another option is sautéing the zucchini in a pan with a little olive oil. This gives a nice texture and taste. If you want a twist on flavors, use a different sauce. Pesto or Alfredo can make great alternatives to marinara. You can also mix sauces for a unique taste. Enjoy experimenting with flavors! For the full recipe, check the provided details. {{image_2}} You can make your zucchini lasagna roll ups heartier by adding ground meat or sausage. Brown some ground beef, turkey, or Italian sausage in a pan. Drain any excess fat, then mix it into your cheese filling. This adds protein and a savory taste. If you prefer a vegetarian option, consider using plant-based proteins. Cooked lentils or crumbled tofu can replace meat. They soak up flavors well and provide good texture. These options keep your dish light but still filling. Switching up your sauce can transform your dish. Try a rich pesto or a creamy Alfredo for a different taste. Both sauces blend well with the zucchini and cheese. You can also make homemade marinara sauce. Use fresh tomatoes, garlic, and herbs. Just simmer them together for a simple, tasty sauce. This gives your roll ups a fresh, vibrant flavor. To enhance your roll ups, add herbs and spices. Fresh basil, oregano, and thyme work wonderfully. Mix them into your cheese filling for a burst of flavor. You can also incorporate more veggies into the mix. Chopped spinach, bell peppers, or mushrooms can add crunch and nutrients. This not only boosts flavor but also increases the health benefits of your meal. For the full recipe, check out the complete guide to Zucchini Lasagna Roll Ups. To keep your zucchini roll-ups fresh, place them in an airtight container. They stay best in the fridge. If you cover the dish tightly, they last up to three days. Make sure to let them cool first before storing. This helps avoid extra moisture. You can freeze zucchini roll-ups for later. First, let them cool completely. Then, place them in a single layer on a baking sheet. Freeze until firm, about two hours. After that, transfer them to a freezer bag. They can last up to three months. To reheat after freezing, thaw them in the fridge overnight. Then, bake at 375°F (190°C) for 20 to 25 minutes. This warms them through and makes the cheese nice and melty. You can make zucchini roll-ups ahead of time. Prep the filling and slice the zucchinis a day before. Store them separately in the fridge. This way, you can quickly assemble and bake them when ready. For storage, use glass containers or BPA-free plastic ones. These keep your roll-ups safe and fresh. Make sure the lids fit tightly to keep out air. Enjoy your meal prep! For the full recipe, check out the provided link. Yes, you can make these roll-ups ahead of time. Here’s how to do it: - Prepare the zucchini and cheese mixture as directed in the recipe. - Roll the zucchini with the cheese mixture and place them in a baking dish. - Cover the dish with plastic wrap or foil and store it in the fridge for up to 24 hours. - When ready to bake, add the sauce and cheese on top, then heat in the oven. This method saves time for busy weeknights or gatherings. You can prepare it during the day and bake it later. To keep your zucchini roll-ups firm, follow these steps: - Slice the zucchini thinly, about 1/4 inch thick. Use a mandoline or sharp knife. - Sprinkle the slices with salt and let them sit for 10 minutes. This draws out extra moisture. - After 10 minutes, pat the zucchini slices dry with a paper towel. - Avoid overcooking in the oven. Bake just until the cheese is bubbly. These tips help keep each bite crisp and delicious. Absolutely! You can try other vegetables for your roll-ups, such as: - Eggplant: Slice it thinly and prepare it the same way as zucchini. - Bell Peppers: Cut them into flat strips. They add a sweet flavor. - Carrots: Use a vegetable peeler to create thin, long strips. Feel free to mix and match different veggies for a fun twist! In this post, we explored how to make delicious zucchini roll-ups. You learned about the needed ingredients, substitutions, and tips for fresh zucchini. I detailed the step-by-step instructions and shared useful tips to perfect your dish. Don't forget the variations to customize your roll-ups, such as adding meat or different sauces. Finally, I covered storing and reheating leftovers for future meals. I hope you feel ready to enjoy this tasty dish your way!

Zucchini Lasagna Roll Ups Delicious and Easy Recipe

Zucchini Lasagna Roll Ups are a fun and tasty way to enjoy a classic dish! These roll-ups are easy to

- Ripe peaches: Use 2 ripe peaches, peeled and diced. They add natural sweetness and moisture. The peaches give a lovely flavor and a juicy bite in each muffin. - Dry ingredients: You will need 1 ½ cups of all-purpose flour, ½ cup of granulated sugar, and ½ cup of brown sugar. Add 1 tablespoon of baking powder, ½ teaspoon of baking soda, and ½ teaspoon of salt. These ingredients help the muffins rise and create a soft texture. - Wet ingredients: Melt ½ cup of unsalted butter, and use 2 large eggs, ½ cup of milk, and 1 teaspoon of vanilla extract. The butter and eggs help bind the muffins, while milk adds moisture and richness. Vanilla gives a warm flavor that enhances the peaches. - Oats and flour: For the topping, mix ½ cup of rolled oats with ¼ cup of all-purpose flour. The oats add crunch, while the flour helps bind the topping. - Brown sugar and cinnamon: Use ½ cup of packed brown sugar and 1 teaspoon of cinnamon. Brown sugar gives a deep, caramel flavor, while cinnamon adds warmth and spice. - Butter: Soften ¼ cup of unsalted butter for the topping. This helps create a crumbly texture. Adjust the sugar to your taste for sweetness and the oats for crunch. This recipe is perfect for breakfast or a snack. For the full recipe, check out Peachy Crunch Muffins with Streusel. First, preheat your oven to 375°F (190°C). Line your muffin tin with paper liners or lightly grease them. This step ensures your muffins won’t stick. Next, in a large bowl, mix the dry ingredients. Whisk together 1 ½ cups of flour, ½ cup granulated sugar, ½ cup brown sugar, 1 tablespoon baking powder, ½ teaspoon baking soda, ½ teaspoon salt, and 1 teaspoon cinnamon. This creates a great base for your muffins. In another bowl, combine ½ cup melted butter, 2 large eggs, ½ cup milk, and 1 teaspoon vanilla extract. Whisk until smooth. Pour this wet mix into the dry mix. Stir gently until just combined. It’s key to avoid overmixing; this keeps the muffins light and fluffy. Finally, fold in 2 ripe peaches, diced. Do this carefully to keep the peaches intact. You want even distribution without breaking everything down. For the streusel, mix ½ cup rolled oats, ¼ cup flour, ½ cup brown sugar, and 1 teaspoon cinnamon in a medium bowl. Then, add ¼ cup softened butter. Use your fingers or a fork to mix until the mixture becomes crumbly. This crumbly texture gives the topping that perfect crunch. Set this aside while you prepare to fill your muffin tins. Now, spoon the batter into the muffin tins. Fill each cup about two-thirds full. This allows room for the muffins to rise without overflowing. Sprinkle a generous amount of streusel topping over each muffin. Bake for 20-25 minutes. To check for doneness, insert a toothpick into the center of a muffin. If it comes out clean, your muffins are ready. Let them cool in the tin for about 5 minutes. After that, transfer them to a wire rack to cool completely. Enjoy the warm, peachy goodness of your Classic Peach Streusel Muffins! For the complete recipe, refer to the Full Recipe provided. To get the best muffins, avoid overmixing. Overmixing can make your muffins dense. Mix the wet and dry ingredients until just combined. This keeps them light and fluffy. Measure your ingredients carefully. Too much flour can lead to dry muffins. For fluffy muffins, use room temperature eggs and milk. Cold ingredients can slow down the rising process. Preheat your oven to 375°F (190°C) before you start. This ensures an even bake. To achieve a beautifully domed muffin top, fill each muffin cup two-thirds full. This allows room for rising. Avoid opening the oven door while baking. This can cause the muffins to sink. Present your muffins warm for the best taste. A sprinkle of powdered sugar on top makes them look special. Serve with a slice of fresh peach on the side for a lovely touch. Pair these muffins with a cup of coffee or tea. They also go well with yogurt or a scoop of ice cream. For added flavor, drizzle with honey or maple syrup. Store your muffins in an airtight container. This keeps them fresh for up to three days. If you want to keep them longer, freeze them. Just make sure to wrap them well to prevent freezer burn. {{image_2}} You can use other fruits in these muffins. Blueberries, apples, or even raspberries work well. When swapping fruits, taste first. You may need to change the sugar. For instance, apples are sweeter than peaches. If you mix fruits, like peaches and blueberries, it creates a fun burst of flavor. Just make sure to keep the total fruit amount the same. Want to make these muffins healthier? You can use whole wheat flour instead of all-purpose flour. This adds fiber, making your muffins more filling. For gluten-free muffins, use almond or coconut flour. You can also lower the sugar without losing taste. Try using honey or maple syrup instead. Adding nuts or seeds boosts nutrition. Chopped walnuts or sunflower seeds add crunch and protein. To keep your muffins fresh for a few days, store them in an airtight container. This helps to keep moisture in and prevents them from going stale. If you live in a humid area, placing a piece of bread in the container can help absorb excess moisture. You can also refrigerate them for longer freshness. When you want to enjoy one, simply reheat it in the microwave for about 10-15 seconds. This warms them up and brings back that fresh-baked taste. If you want to save muffins for later, freezing is a great option. Wrap each muffin in plastic wrap and then place them in a freezer bag. This keeps them from getting freezer burn. You can freeze these muffins for up to three months. When you're ready to eat, just take one out and let it thaw at room temperature. If you want to enjoy it warm, pop it in the microwave for about 20-30 seconds. This keeps the texture soft and delicious. How do I ensure my muffins rise properly? To help muffins rise, make sure your baking powder is fresh. Mix dry and wet ingredients separately. Combine them gently to keep air in the batter. Overmixing can flatten your muffins. Can I substitute fresh peaches with canned or frozen? Yes, you can use canned or frozen peaches. If using canned, drain them well. For frozen, thaw and pat dry before adding. Fresh peaches give the best flavor, but substitutes work too. What are the best ways to prevent muffin sticking in tins? To prevent sticking, use paper liners or grease the tins well. Cooking spray or butter works great. Allow muffins to cool slightly before removing them to avoid tearing. How do I know when the muffins are done? Muffins are done when a toothpick inserted in the center comes out clean. You can also check the tops; they should be golden brown and spring back when lightly pressed. Can I make these muffins ahead of time? Yes, you can prepare the batter the night before. Store it in the fridge. This helps save time in the morning. Just remember to mix gently before baking. What can I do if my streusel topping is too dry? If your streusel is too dry, add a bit more melted butter. Mix until you achieve a crumbly texture. You want it to stick together but not be wet. Adjust until it looks just right. For the full recipe, check out the complete guide on Classic Peach Streusel Muffins. You learned how to make classic peach streusel muffins in this guide. I broke down the main ingredients, the step-by-step instructions, and shared tips for perfect texture. Remember to fold in the peaches gently and avoid overmixing. You can switch fruits or make healthier swaps, too. Store your muffins properly to keep them fresh. With practice, you’ll bake perfect muffins every time. Enjoy sharing these tasty treats with friends and family!

Classic Peach Streusel Muffins Delightful and Easy Recipe

Are you ready to bake something delicious? My Classic Peach Streusel Muffins are soft, fruity, and easy to make. With

- 4 medium zucchinis - 4 tablespoons unsalted butter - 4 cloves garlic, minced - 1 teaspoon red pepper flakes - 1/4 cup freshly grated Parmesan cheese - Salt and pepper to taste - Fresh basil leaves for garnish - Juice of 1 lemon To make garlic butter zucchini noodles, you need fresh, quality ingredients. Start with medium zucchinis. They should feel firm and have a shiny skin. The butter adds richness, while the garlic brings a savory depth. Red pepper flakes give a nice kick. Adjust the amount based on your spice preference. Parmesan cheese is key for flavor and creaminess. Freshly grated cheese melts better than pre-grated. Don’t skip the salt and pepper; they enhance all the flavors. Fresh basil leaves are perfect for garnish and add a lovely aroma. Finally, lemon juice brightens the dish and balances the richness. - Spiralizer or vegetable peeler - Large skillet - Cooking utensils For tools, a spiralizer or vegetable peeler is essential. These help create the zucchini noodles, or "zoodles." A large skillet is best for cooking everything together. You will need basic cooking utensils like a spatula and measuring spoons. With these ingredients and tools, you are ready to make a delicious meal. Be sure to check the full recipe for detailed steps! To start, you need to make your zucchini noodles. You can use a spiralizer or a vegetable peeler. A spiralizer will give you the best shape. If you use a peeler, create long, flat strips. Tips for even noodle thickness: - Choose medium-sized zucchinis for uniformity. - Keep your hands steady while spiralizing or peeling. - Aim for noodles that are about the same thickness for even cooking. Next, it's time to make your garlic butter sauce. Begin by melting the butter in a large skillet. Use medium heat to prevent burning. Watch it closely, as butter can burn quickly. Sautéing garlic for the best flavor: - Add minced garlic to the melted butter. - Sauté for about 30 seconds until you smell that amazing aroma. - Be careful not to burn the garlic; it can turn bitter if overcooked. Now, it's time to combine everything. Toss the zucchini noodles in the garlic butter sauce. Make sure they are well coated. Cook them for about 3-4 minutes. You want them tender but still with a slight bite, which is called al dente. - Ensure noodles are cooked al dente: - Stir occasionally to avoid sticking. - Check for doneness by tasting a noodle. Follow these steps for a delicious Garlic Butter Zucchini Noodles dish. For the complete recipe, check out the Full Recipe section. Adjusting spice levels is easy. If you love heat, add more red pepper flakes. Just sprinkle in a little extra to the pan. If you want less spice, cut back on the flakes. You can also swap in other herbs for fresh taste. Try adding fresh thyme, oregano, or even parsley. Each herb brings its own unique flavor. Don’t hesitate to experiment! To avoid mushy zucchini noodles, keep an eye on your cooking time. Cook them for just 3-4 minutes. You want them tender but still firm, or al dente. This will give you the best texture. Another tip is to use medium heat while cooking. This helps the noodles cook evenly without losing their shape. Zucchini noodles pair well with proteins. Grilled shrimp or chicken adds great flavor and makes the meal more filling. You can also go vegetarian with cooked tofu for added protein. A side salad complements this dish well. It adds freshness and crunch to your meal. A simple green salad with lemon vinaigrette works perfectly. For the full recipe, check out the Garlic Butter Zucchini Noodles section. {{image_2}} You can make Garlic Butter Zucchini Noodles even better by adding protein. - Incorporating shrimp or chicken: Cook shrimp or chicken in the skillet with the garlic. This adds flavor and makes the dish heartier. Just cook the protein first, then add the zoodles. - Making it vegetarian-friendly with tofu: For a plant-based option, cube firm tofu and sauté it until golden. Toss it in with the zoodles to absorb the garlic butter goodness. Switching up the sauce can change the whole dish. - Using olive oil instead of butter: For a lighter dish, swap butter for olive oil. It adds a nice taste while keeping it healthy. - Experimenting with pesto or marinara: Try tossing the zoodles in pesto for a fresh twist. Marinara can also work well if you want a tomato base. You can boost flavor by using seasonal ingredients. - Adding seasonal vegetables: Add bell peppers, cherry tomatoes, or asparagus for color and nutrition. Just sauté them with the garlic for a few minutes first. - Incorporating herbs like thyme or oregano: Fresh herbs can elevate the dish. Add them at the end of cooking for a burst of flavor. For the full recipe, check out the detailed steps and tips for making this dish shine! To keep your zucchini noodles fresh, place them in airtight containers. This helps to lock in moisture and flavor. Make sure to refrigerate them within two hours of cooking. Proper storage can keep them tasty for about three days. Avoid leaving zoodles out at room temperature, as this can cause spoilage. When you reheat the zoodles, use low heat to keep their texture. I recommend the stovetop method for the best results. Just warm them gently in a pan for a few minutes. If you use the microwave, heat them in short bursts to prevent sogginess. Stir them in between to ensure even heating. Can you freeze zoodles? Yes, but it’s best to blanch them first. Blanching means briefly boiling them and then cooling them in ice water. This helps preserve their color and texture. To thaw, place them in the fridge overnight. Avoid microwaving them right away, as this can make them mushy. Enjoy your Garlic Butter Zucchini Noodles anytime with these storage tips! For the complete recipe, check out the Full Recipe section. You can make zucchini noodles without a spiralizer by using a vegetable peeler. Simply peel long strips from the zucchini. You can also use a sharp knife to cut the zucchini into thin noodles. The key is to make even strips for a nice texture. If you want even thinner noodles, try a box grater. Grate the zucchini using the largest holes for a noodle-like shape. This method is quick and works well if you don’t have a spiralizer. Yes, you can use pre-packaged zucchini noodles. These noodles save time and effort. They are great for busy cooks. However, they may have a shorter shelf life. Always check the expiration date. Pre-packaged noodles can also have added preservatives, which you may want to avoid. If you choose this option, rinse them well before cooking to remove any excess moisture. If you need a substitute for Parmesan cheese, you have options. Nutritional yeast is a popular non-dairy alternative that adds a cheesy flavor. You can also use pecorino cheese, which has a similar taste. For a nut-based option, try cashew cheese. You can make it by blending soaked cashews with lemon juice and salt. Each option brings a different taste, so feel free to experiment. In this post, we covered how to make tasty zucchini noodles. We listed the needed ingredients and tools, then shared easy steps to prepare the dish. I shared tips on flavor and cooking to ensure success. You can also try fun variations, store leftovers, and answer common questions. Enjoy making this healthy dish! With practice, you'll become skilled at creating delicious meals. Dive in and savor the fresh taste of zucchini noodles today!

Garlic Butter Zucchini Noodles Easy and Flavorful Dish

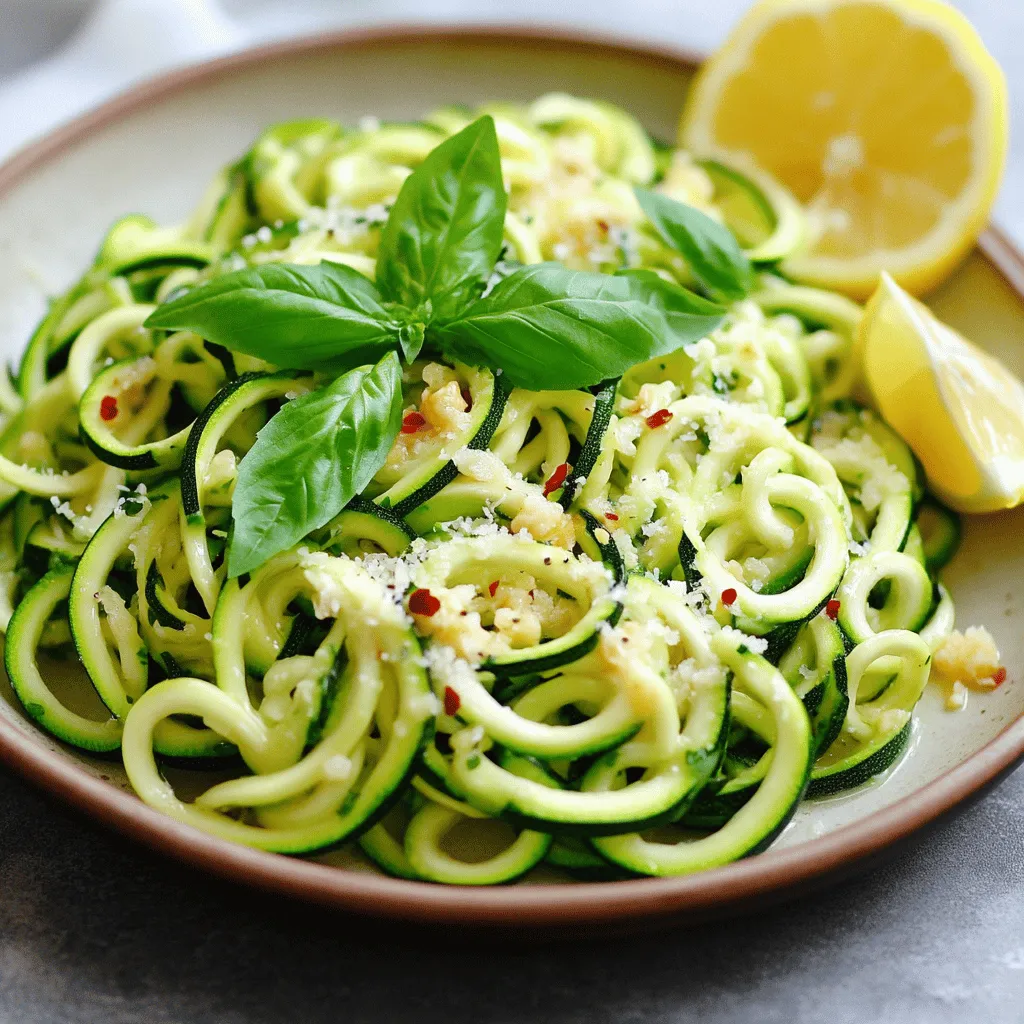
If you’re craving a quick, tasty meal that’s packed with flavor, Garlic Butter Zucchini Noodles are the answer! With just

- 2 cups rolled oats - 1 cup almond flour - 1/2 cup brown sugar - 1/2 teaspoon salt - 1/2 teaspoon cinnamon - 1/2 cup melted coconut oil - 1/4 cup honey or maple syrup - 1 teaspoon vanilla extract - 2 large ripe peaches, diced - 1 cup fresh raspberries - 1 tablespoon lemon juice - Optional: 1/4 cup chopped nuts To make Peach Raspberry Oat Bars, gather these ingredients first. The oats and almond flour form a hearty base. Brown sugar adds sweetness that balances the tart raspberries and juicy peaches. Salt and cinnamon round out the flavor, making each bite delicious. For the wet ingredients, melted coconut oil keeps the bars moist. Honey or maple syrup adds a natural sweetness, while vanilla extract gives a lovely aroma. Now, let's talk fruit. Peaches bring a soft and sweet taste, while raspberries add a bit of tang. Lemon juice brightens the flavors. If you like nuts, add some for crunch. This mix of ingredients creates a tasty treat that’s simple to make. Check out the Full Recipe for complete steps! 1. Preheat your oven to 350°F (175°C). Line an 8x8 inch baking dish with parchment paper. Leave some paper hanging over the edges. This will help you lift the bars out later. 2. In a large bowl, mix together the dry ingredients. Combine 2 cups rolled oats, 1 cup almond flour, 1/2 cup brown sugar, 1/2 teaspoon salt, and 1/2 teaspoon cinnamon. Stir until everything is well mixed. 3. In another bowl, whisk together the wet ingredients. Combine 1/2 cup melted coconut oil, 1/4 cup honey or maple syrup, and 1 teaspoon vanilla extract. Make sure this mixture is smooth. 4. Pour the wet mixture into the dry ingredients. Stir until everything blends well. The mix should be crumbly but hold together when pressed. 5. Save 1 cup of the oat mixture for the topping. Press the rest evenly into the bottom of your prepared baking dish. This will be your base. 6. In a separate bowl, mix 2 large diced peaches, 1 cup fresh raspberries, and 1 tablespoon lemon juice. If you want, add 1/4 cup chopped nuts. Gently fold the fruit until it's coated. 7. Spread the fruit mixture evenly over the oat base in the dish. 8. Crumble the reserved oat mixture over the fruit layer for the topping. 9. Bake the bars for 25-30 minutes. Look for a golden brown color on top. 10. Let the bars cool for at least 30 minutes in the dish. Use the parchment paper to lift them out. Cut them into squares or rectangles. For the full recipe, check out the details above. Enjoy making your delicious peach raspberry oat bars! - Set your oven to 350°F (175°C). This temperature works best for baking oat bars. - Bake for 25-30 minutes. Look for a light golden color on top. - To check if the bars are done, insert a toothpick in the center. If it comes out clean, the bars are ready. - Serve these bars on a bright plate. A colorful plate makes the bars pop! - Dust the top with powdered sugar for sweetness and a nice look. - Add fresh raspberries and a mint leaf as garnishes. This adds color and freshness. - Store bars in an airtight container. This keeps them fresh longer. - Add a pinch of nutmeg for a warm flavor boost. - A splash of almond extract can give the bars a nice twist. - Adjust sweetness by adding more or less honey or maple syrup. Taste as you go! - If you like a tart flavor, squeeze extra lemon juice over the fruit mix. {{image_2}} You can switch out peaches for other fruits. Try using nectarines or plums for a new taste. Berries like blueberries or strawberries work well too. If you choose frozen berries, they are easy to use. Just thaw them slightly before adding to your mix. This way, you save time and still enjoy great flavor. If you need a gluten-free option, use oat flour instead of almond flour. It keeps the texture nice and soft. For a vegan version, replace honey with maple syrup. Both options add sweetness without changing the taste. Adding nuts or seeds boosts flavor and crunch. Chopped walnuts or pecans are great choices. If someone has nut allergies, skip the nuts. Instead, add sunflower seeds or pumpkin seeds for a tasty and safe option. You can also make them nut-free by simply leaving them out. These variations are easy to try. They let you make Peach Raspberry Oat Bars your own while keeping them delicious. Explore the [Full Recipe] for more details on making these bars. To keep your Peach Raspberry Oat Bars fresh, store them in the fridge. Place the bars in an airtight container. This method helps retain their moisture and flavor. If you leave them out, they can dry out quickly. Use parchment paper to separate layers if stacking. You can freeze these bars for later enjoyment. First, let them cool completely. Wrap each bar in plastic wrap. Then, place them in a freezer-safe bag or container. Label the bag with the date. They will stay fresh for up to three months. To thaw, move a bar to the fridge overnight or heat in the microwave for a few seconds. If you want a warm treat, reheating is simple. Use a microwave for quick warming. Heat for about 10-15 seconds. You can also warm them in the oven at 350°F (175°C) for 5-10 minutes. Serve them with a scoop of yogurt or a drizzle of honey for extra flavor. Enjoy your Peach Raspberry Oat Bars, fresh and warm! To make Peach Raspberry Oat Bars, start by preheating your oven to 350°F (175°C). Line an 8x8 inch baking dish with parchment paper. In a large bowl, mix together 2 cups of rolled oats, 1 cup of almond flour, 1/2 cup of brown sugar, 1/2 teaspoon of salt, and 1/2 teaspoon of cinnamon. In another bowl, whisk together 1/2 cup of melted coconut oil, 1/4 cup of honey or maple syrup, and 1 teaspoon of vanilla extract. Combine the wet and dry mixes until crumbly. Press most of this mixture into the baking dish. For the fruit layer, combine 2 diced peaches, 1 cup of raspberries, and 1 tablespoon of lemon juice in a bowl. Spread this fruit mix over your oat base. Crumble the reserved oat mix on top and bake for 25-30 minutes. Let them cool before cutting. If you need a nut-free option, you can use oat flour or all-purpose flour instead of almond flour. These options work well to keep the texture light and tasty. If you want a gluten-free choice, use certified gluten-free oat flour. This will allow you to create a similar flavor while ensuring it meets your dietary needs. Yes, you can use frozen fruit in your bars! Frozen peaches and raspberries are great options. They are often picked at peak ripeness, making them tasty. Just remember to thaw them first and drain any excess liquid. This helps prevent your bars from becoming too soggy. Using frozen fruit also saves you time and can be more convenient. Peach Raspberry Oat Bars stay fresh for about 5 days when stored properly in an airtight container at room temperature. If you want them to last longer, you can refrigerate them for up to 2 weeks. For even longer storage, you can freeze the bars for up to 3 months. When ready to eat, simply thaw them overnight in the fridge or at room temperature. To wrap it up, we covered how to make tasty Peach Raspberry Oat Bars. You learned about the key ingredients, both wet and dry, and the steps to put them together. Tips for baking and presentation helped you plan ahead. You also saw ways to customize and store your bars. I hope you feel ready to try this simple recipe. Enjoy your baking adventure!

Peach Raspberry Oat Bars Deliciously Simple Recipe

Are you looking for a tasty and easy snack? These Peach Raspberry Oat Bars are perfect! With just a few

For these tasty zucchini fritters, you will need: - 2 medium zucchinis, grated - 1 teaspoon salt - 1/2 cup all-purpose flour - 1/4 cup grated Parmesan cheese - 2 large eggs, beaten - 1/4 teaspoon black pepper - 1/4 teaspoon garlic powder - 1/4 teaspoon cayenne pepper (optional) - 1/4 cup green onions, finely chopped - Olive oil for frying These ingredients come together to create a delicious treat that bursts with flavor. You can easily change this recipe to fit your taste. Here are some ideas: - Use whole wheat flour for a healthier option. - Swap Parmesan for feta cheese for a tangy twist. - Add herbs like parsley or dill for extra freshness. - Try adding corn or bell peppers for added crunch. Feel free to get creative with these add-ins! To enhance your zucchini fritters, serve them with tasty dips. Here are some great choices: - Greek yogurt mixed with lemon juice and garlic. - Sour cream with fresh herbs. - Spicy aioli for a flavorful kick. - Homemade salsa for a fresh, zesty option. These dips will elevate your fritters and make them even more enjoyable. For the full recipe, check out the details above. Start by washing your zucchinis well. I always choose medium-sized ones for the best texture. Grate the zucchinis using a box grater. Place the grated zucchini in a large bowl. Add one teaspoon of salt. This helps draw out extra moisture. Let this sit for about ten minutes. You will notice some water pooling at the bottom. After the time is up, grab a clean dish towel or cheesecloth. Squeeze the zucchini firmly to get rid of as much liquid as you can. You want the zucchini to be dry, so your fritters are not soggy. Once squeezed, transfer the zucchini to a dry bowl. Now, it’s time to make the batter. To the bowl with your zucchini, add the following ingredients: - 1/2 cup all-purpose flour - 1/4 cup grated Parmesan cheese - 2 large eggs, beaten - 1/4 teaspoon black pepper - 1/4 teaspoon garlic powder - 1/4 teaspoon cayenne pepper (optional for heat) - 1/4 cup green onions, finely chopped Mix all these ingredients until well combined. The batter should be thick but still hold together. If it seems too wet, add a little more flour. Stir in the chopped green onions for flavor and crunch. Heat a tablespoon of olive oil in a non-stick skillet over medium heat. I like to test the heat by dropping a small bit of batter in. If it sizzles, you’re ready! Take heaping tablespoons of your mixture and form small patties. Aim for about 1/2 inch thick. Carefully place them in the skillet, making sure not to overcrowd. This allows them to cook evenly. Cook for about 3-4 minutes on each side. Look for a golden brown color and a crispy texture. Once done, transfer the fritters to a paper towel-lined plate. This helps soak up any extra oil. Repeat until all the batter is used, adding more oil as needed. Enjoy your delicious homemade fritters warm! You can find the full recipe for more details. To make crispy zucchini fritters, start by removing moisture. Grate your zucchinis and sprinkle them with salt. Let them sit for ten minutes. This draws out extra water. After that, squeeze the grated zucchini in a clean towel. Aim to get out as much liquid as you can. The drier the zucchini, the crispier the fritters! Avoid using too much flour. It can make the fritters dense. Stick to the half cup listed in the Full Recipe. Also, do not overcrowd the skillet. This will steam the fritters instead of frying them. Fry them in small batches to ensure they cook evenly. Lastly, do not skip the resting step with salt. It’s key for perfect texture. Zucchini fritters pair well with many dips. Try serving them with Greek yogurt or sour cream. A sprinkle of fresh herbs gives a nice touch too. You can also serve them with a side salad for a light meal. Add a squeeze of lemon for a fresh burst of flavor. Enjoy them warm for the best taste! {{image_2}} You can make these fritters gluten-free with a few simple swaps. Use almond flour, chickpea flour, or gluten-free all-purpose flour instead of regular flour. Each of these options gives a nice texture. They still taste great and hold together well. Want to make your fritters heartier? You can add cooked protein like shredded chicken or crumbled feta. You can also mix in other veggies. Try adding corn, grated carrots, or chopped spinach. This adds color and nutrients to your dish. Just keep in mind that you may need to adjust the flour amount to keep the texture right. Do you like heat? Add more cayenne pepper or even diced jalapeños for a kick. If you prefer mild flavors, skip the spice entirely. You can also add fresh herbs like parsley or dill for flavor without the heat. This way, you can customize your fritters to suit your taste. Check the Full Recipe for more ideas on mixing flavors. To keep your leftover fritters fresh, place them in an airtight container. You can store them in the fridge for up to three days. Make sure they cool down before sealing them. This helps prevent moisture buildup. For the best taste, reheat your fritters in a skillet. Heat a small amount of olive oil over medium heat. Add the fritters and cook for about two minutes on each side. This will make them crispy again. You can also use an oven. Preheat to 350°F (175°C) and bake for 10 minutes. If you want to save fritters for later, freezing works well. Place cooked fritters in a single layer on a baking sheet. Freeze them for about an hour. After that, transfer them to a freezer bag. They can last up to three months in the freezer. When you are ready to eat them, just reheat as mentioned above. Enjoy your fritters anytime! For the full recipe, check out the main section. Yes, you can use other squash. Yellow squash and pattypan squash work well too. They have a similar texture and flavor. Grate them just like zucchini. This keeps your fritters light and fluffy. You can replace eggs with mashed potatoes or flaxseed meal. Use 1 tablespoon of flaxseed meal mixed with 3 tablespoons of water. Let it sit for a few minutes to thicken. This mix will help bind the fritters without eggs. I love serving zucchini fritters warm with a side sauce. Try Greek yogurt or sour cream. You can also add fresh herbs like dill or parsley on top. This makes the dish colorful and tasty. Yes, salting is important. It helps draw out extra moisture from the zucchini. This step keeps your fritters from being soggy. Let the salted zucchini rest for about 10 minutes. Afterward, squeeze out the liquid for the best texture. For the full recipe, check out the detailed instructions and tips to make your fritters perfect! Zucchini fritters are easy to make and tasty. We covered main ingredients and how to cook them. You can try add-ins for a unique twist too. Remember to store any leftovers properly and follow reheating tips for best taste. Avoid common mistakes to achieve crispy fritters. With these steps and options, you’ll enjoy perfect zucchini fritters every time. Get creative, and make this recipe your own!

Easy Zucchini Fritters Tasty and Simple Recipe

Looking for a simple dish to showcase fresh zucchini? You’re in the right place! My Easy Zucchini Fritters are tasty,

When making Cheesy Zucchini Bake, you need a few key ingredients. Each one adds flavor and texture. Here’s what you will need: - Zucchini and Cheese Components - 4 medium zucchinis, sliced into rounds - 1 cup ricotta cheese - 1 cup shredded mozzarella cheese - ½ cup grated Parmesan cheese - Seasonings and Additions - 2 cloves garlic, minced - 1 teaspoon dried oregano - 1 teaspoon dried basil - ½ teaspoon red pepper flakes (optional) - Salt and pepper to taste - Topping Ingredients - 1 cup breadcrumbs (panko preferred for extra crunch) - 2 tablespoons olive oil - Fresh basil or parsley for garnish These ingredients create a rich and cheesy dish. The zucchini adds a fresh taste. You can mix and match the spices, too. Enjoy your cooking! For the complete method, check the Full Recipe. - Prepping the Baking Dish Start by preheating your oven to 375°F (190°C). Grab a 9x13-inch baking dish. Lightly grease it with non-stick spray or olive oil. This step helps prevent sticking. - Seasoning the Zucchini Take 4 medium zucchinis and slice them into rounds. In a large bowl, mix the sliced zucchinis with 2 minced garlic cloves, 1 teaspoon of dried oregano, 1 teaspoon of dried basil, and ½ teaspoon of red pepper flakes if you like spice. Add salt and pepper to taste. Toss everything well. This ensures each piece gets seasoned. - Mixing the Cheese In another bowl, combine 1 cup of ricotta cheese, half of the mozzarella cheese (½ cup), and half of the Parmesan cheese (¼ cup). Stir until well mixed. This creamy blend will add richness to your dish. - First Layer: Zucchini and Ricotta Layer half of the seasoned zucchinis in the bottom of the greased dish. Spread half of the ricotta mixture over the zucchinis evenly. This creates a solid base for your bake. - Second Layer: Final Zucchini and Ricotta Repeat with the remaining zucchinis and the rest of the ricotta mixture. This double layer enhances flavor and texture in every bite. - Adding Cheese and Breadcrumbs Sprinkle the top layer with the remaining mozzarella (½ cup) and Parmesan cheese (¼ cup). This will create a cheesy crust as it bakes. In a small bowl, mix 1 cup of breadcrumbs (panko works great) with 2 tablespoons of olive oil. Toss until the crumbs are coated. Sprinkle this mixture over the cheese layer. - Baking Instructions Place the dish in the preheated oven. Bake for 25-30 minutes. You want the top to be golden brown and bubbling. Once done, let it cool for a few minutes before slicing. Enjoy your delicious Cheesy Zucchini Bake! For the full recipe, check out the details above. How to Prevent Soggy Zucchini To avoid soggy zucchini, you need to remove excess moisture. Slice the zucchini and sprinkle salt on it. Let it sit for about 10-15 minutes. This draws out water. Afterward, pat the slices dry with a towel. This simple step makes a huge difference. Best Cheese Combinations Using a mix of cheeses creates a rich flavor. I love ricotta for creaminess. Mozzarella adds stretch, while Parmesan gives a nice bite. You can also try mixing in some sharp cheddar for a different taste. Feel free to experiment and find your favorite blend! Serving Suggestions To serve, cut the Cheesy Zucchini Bake into squares. Place them on a colorful plate. This adds visual appeal. Pair it with a fresh salad or crusty bread for a complete meal. Your guests will love the look and taste! Garnishing Ideas Garnish with fresh basil or parsley. This adds a pop of color and freshness. You can also drizzle a little olive oil on top. A sprinkle of red pepper flakes gives a nice touch too. These small details make your dish shine. Best Bakeware to Use Use a 9x13-inch baking dish for this recipe. Glass or ceramic works well. These materials heat evenly and help with browning. A non-stick option can make serving easier too. Essential Kitchen Tools You will need a sharp knife for slicing zucchini. A mixing bowl is key for combining your cheese. Don’t forget measuring cups and spoons to get the amounts right. A spatula helps layer the ingredients neatly. Having these tools makes cooking smooth and fun! For the full recipe, check out the section above! {{image_2}} Vegetarian and Gluten-Free Options This Cheesy Zucchini Bake is a perfect vegetarian dish. You can easily make it gluten-free. Just use gluten-free breadcrumbs instead of regular ones. This way, everyone can enjoy it! Vegan Cheese Alternatives If you are vegan, you can swap out the cheeses. Use plant-based ricotta and mozzarella. Almond or cashew cheese works well too. It gives that creamy texture without any dairy. Adding Other Vegetables Feel free to mix in other veggies. Spinach, mushrooms, or bell peppers add great flavor. Just chop them small and add them to the zucchini. This makes the dish even more colorful and tasty. Spice It Up: Heat Variations Want some heat? Add more red pepper flakes or diced jalapeños. You can also sprinkle some cayenne pepper on top. Adjust the spice to your liking for a bold kick! Complementary Dishes Pair this bake with a fresh salad. A simple green salad with lemon dressing works great. You can also serve it with crusty bread for a hearty meal. Meal Pairings This Cheesy Zucchini Bake fits well with grilled chicken or fish. It's a lovely side to any protein. You can even enjoy it as a main dish on its own. For the full recipe, check out the Cheesy Zucchini Bake 🥒 section above. - Refrigeration Tips: Let the Cheesy Zucchini Bake cool down first. Place it in an airtight container. This keeps it fresh for up to three days in the fridge. - Freezing Instructions: If you want to freeze it, cut it into portions. Wrap each piece tightly in plastic wrap, then place them in a freezer bag. It can last up to three months in the freezer. - Best Methods for Reheating: The oven is the best choice. Preheat it to 350°F (175°C), then place the bake in for about 15-20 minutes. You can also use the microwave for quick reheating, but it may get soggy. - Keeping It Fresh: Cover the dish with foil while reheating in the oven. This helps retain moisture and keeps the cheese melty and delicious. - How Long It Lasts in the Refrigerator: In the fridge, your Cheesy Zucchini Bake lasts about three days. If you see any moisture or changes in smell, it’s time to toss it. - Signs of Spoilage: Look for changes in color or an off smell. If the cheese looks dry or moldy, it’s best to discard it. Always trust your senses when it comes to food safety! How to make Cheesy Zucchini Bake ahead of time? You can prepare Cheesy Zucchini Bake a day in advance. Simply follow the recipe up to the baking step. Cover the dish with plastic wrap and store it in the fridge. Bake it when you are ready to serve. Can I use frozen zucchini in this recipe? Yes, you can use frozen zucchini. Just thaw and drain it well to remove excess water. This helps keep the bake from becoming soggy. What can I substitute for ricotta cheese? If you need a substitute, try cottage cheese or cream cheese. Both will give a creamy texture, though the taste may vary slightly. What to do if the bake is watery? If your bake turns watery, check the zucchini before mixing. Salt the zucchini slices and let them sit for 10 minutes. This helps draw out excess moisture. How to tell when it's done baking? The bake is ready when the top is golden brown and bubbly. You can also insert a knife in the center; it should come out clean. Can I use different types of cheese? Absolutely! Feel free to mix cheeses like cheddar, gouda, or feta. Each will add a unique flavor to the dish. Is this recipe suitable for meal prep? Yes, this recipe is great for meal prep! You can store portions in airtight containers. Just reheat in the microwave or oven when ready to eat. For the full recipe, check out the detailed instructions above. In this blog post, we explored how to make a delicious Cheesy Zucchini Bake. We covered each step, from gathering ingredients to baking and serving. I shared tips to keep zucchini firm and suggested cheese combinations to enhance flavor. With easy variations, you can adapt the dish to fit dietary needs. Storage tips ensure your leftovers stay fresh. Now, you can enjoy a tasty meal with lots of veggies. A Cheesy Zucchini Bake is simple and full of flavor. Try it and make it your own!

Cheesy Zucchini Bake Bold and Flavorful Dinner Idea

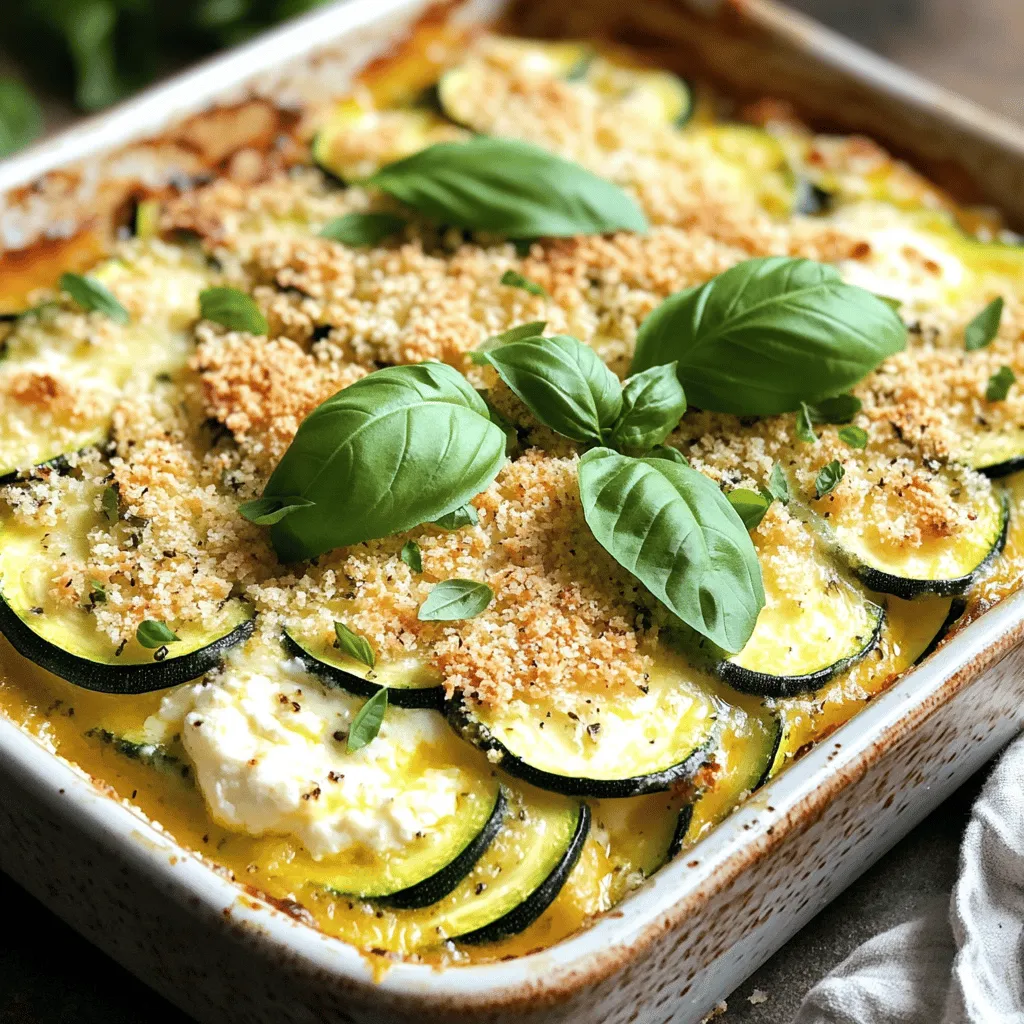
Looking for a bold and flavorful dinner idea? Let me introduce you to my Cheesy Zucchini Bake! This dish is

To make a healthy Greek yogurt parfait, you need simple, fresh items. Here are the key ingredients: - 2 cups Greek yogurt (plain, low-fat or non-fat) - 1 cup granola (choose a low-sugar variety) - 1 cup mixed berries (strawberries, blueberries, raspberries) - 2 tablespoons honey or maple syrup (optional, adjust to taste) - A pinch of cinnamon - Fresh mint leaves for garnish These ingredients work well together. The yogurt gives creaminess, while the granola adds crunch. Berries bring brightness and natural sweetness. You can add your own twist with these optional ingredients: - Nuts (like almonds or walnuts) - Seeds (like chia or flaxseed) - Coconut flakes - Other fruits (like bananas or peaches) - Yogurt flavors (like vanilla or berry) Feel free to mix and match. Don’t be afraid to try new things. Each ingredient can change the taste and look of your parfait. Each ingredient in your parfait comes with health benefits: - Greek yogurt is high in protein. It helps keep you full and supports muscle health. - Granola provides fiber. It helps with digestion and keeps your gut happy. - Mixed berries are rich in vitamins and antioxidants. They support your immune system and are great for skin health. - Honey or maple syrup can add sweetness. Use sparingly for a little energy boost. - Cinnamon may help lower blood sugar levels. It also adds a warm flavor. - Mint leaves are refreshing and can aid digestion. Incorporating these ingredients makes your parfait both tasty and healthy. Enjoy the creamy, crunchy, and fruity layers in every bite! For the full recipe, check the details above. To start, grab a medium bowl. Add 2 cups of Greek yogurt. I prefer plain, low-fat yogurt for its rich taste. Next, mix in a pinch of cinnamon. If you want some sweetness, add 2 tablespoons of honey or maple syrup. Stir well until combined. Make sure to taste it. Adjust the sweetness if needed. This mixture will be the creamy base of your parfait. Now, it's time to build your parfait. Take serving glasses or bowls. Start by adding a layer of the yogurt mixture at the bottom. Use about a quarter of the yogurt mix for each glass. Then, sprinkle a layer of granola on top. I suggest using a low-sugar granola for a healthier option. Next, add a layer of mixed berries. You can use strawberries, blueberries, and raspberries. Repeat these layers until the glasses are almost full. Finish with a final layer of yogurt on top. Presentation is key for a parfait. To make it look pretty, add a few extra berries on top. A fresh mint leaf adds a nice touch too. Serve these parfaits chilled for the best taste. They are perfect for breakfast or a healthy snack. You can find the full recipe in the link above for more details. Enjoy your tasty treat! When picking Greek yogurt, look for a few key things. First, choose plain yogurt. This has no added sugars. Check the label for live cultures; these are good for your gut. I prefer low-fat or non-fat options for fewer calories. Lastly, find a brand with a thick texture. This gives a creamy feel in your parfait. Layering is fun and makes your parfait look great. Start with yogurt at the bottom. Use a spoon for even layers. Next, add granola. It gives a nice crunch. Then, pile on the berries. Mix different colors for a pretty look. Repeat these layers until your cup is full. Finish with yogurt on top and a berry or mint leaf for flair. Spices can make your parfait pop! I love adding a pinch of cinnamon. It brings warmth and sweetness. You can also try a dash of nutmeg for a different taste. If you want a sweet kick, drizzle honey or maple syrup on each layer. These small touches can transform your parfait into a tasty treat. For the full recipe, check the section above. {{image_2}} You can change the fruit in your parfait with the seasons. In spring, use fresh strawberries. Summer brings ripe peaches and juicy cherries. In fall, try sliced apples or pears. Winter is perfect for citrus fruits like oranges and grapefruits. Each fruit adds a new taste and color to your parfait. Plus, they boost your vitamins and minerals. Adding nuts and seeds gives your parfait a nice crunch. Almonds, walnuts, or pecans work well. You can also try chia seeds or flaxseeds for extra fiber. These additions not only add texture but also provide healthy fats. Just a handful goes a long way in making your parfait more filling. If you want a dairy-free or vegan option, use coconut yogurt or almond yogurt. These substitutes keep the creamy texture and taste great. You can also use maple syrup instead of honey. This way, you can enjoy a tasty treat that fits your diet. With these swaps, everyone can enjoy a delicious parfait. For a full recipe, check out the details above. To keep your parfait fresh, cover it tightly. You can use plastic wrap or a lid. This helps keep air out and prevents drying. Store it in the fridge. Eat it within a few days for the best taste. Choose glass jars or plastic containers with secure lids. Glass jars help you see the layers, which is fun! Look for containers that are easy to open. This makes serving simple and quick. Leftover parfaits last about 3 days in the fridge. After that, the yogurt can get watery, and the granola may become soggy. Check for any off smells or changes in texture. If it looks or smells strange, toss it out for safety. Enjoy your Healthy Greek Yogurt Parfait fresh for the best flavor! You can find the full recipe above. Greek yogurt is a great source of protein. It helps build muscle and keeps you full. It also has probiotics that support gut health. These friendly bacteria can aid digestion and boost your immune system. Plus, Greek yogurt is lower in sugar than regular yogurt. This makes it a healthier choice for snacks and meals. Yes, you can make this parfait ahead of time! Just layer the yogurt, granola, and berries. Store it in the fridge for up to a day. This keeps the parfait fresh and tasty. If you want the granola crunchy, add it just before serving. This way, it won't get soggy. To cut sugar, use unsweetened Greek yogurt. You can skip the honey or maple syrup, too. Fresh fruits add natural sweetness, so load up on berries. Choose a low-sugar granola for your parfait. This helps keep the treat healthy and delicious. You can always add a pinch of cinnamon for flavor without extra sugar. For the full recipe, check the section above. Enjoy your healthy Greek yogurt parfait! Making a parfait is easy and fun. We covered key ingredients, optional tweaks, and the health benefits. I shared simple steps to prepare and serve your parfait. Tips on yogurt choice and perfect layering help improve your dish. You also learned variations with seasonal fruits and vegan options. In conclusion, this parfait is not just tasty; it's also good for you. Enjoy experimenting with flavors to make it your own. Happy layering!

Healthy Greek Yogurt Parfait Simple and Tasty Treat

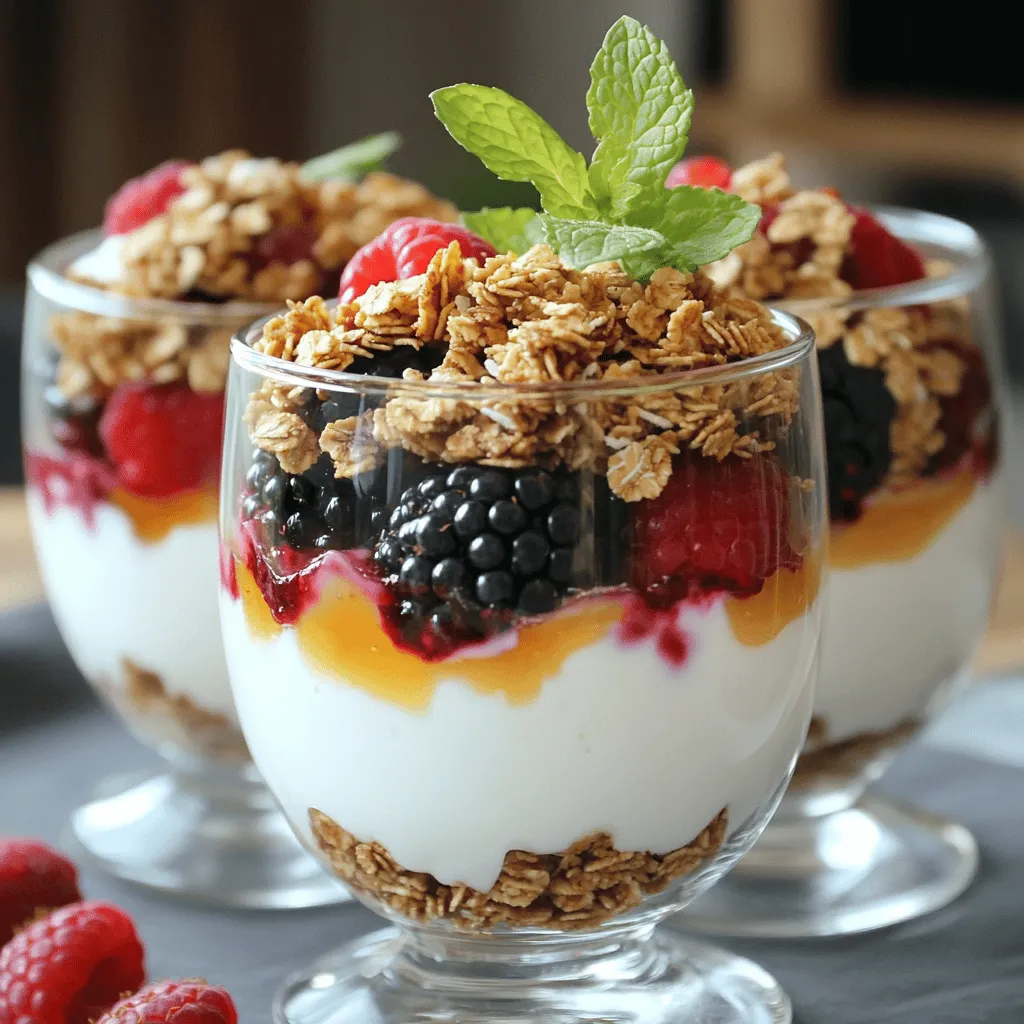
Are you ready to dive into a delightful and healthy treat? My Healthy Greek Yogurt Parfait is simple to make

- 1 can (15 oz) sliced peaches in syrup, undrained - 1 box (15.25 oz) yellow cake mix - 1/2 cup unsalted butter, melted - 1 cup fresh diced peaches (optional) - 1 teaspoon cinnamon - 1 cup chopped pecans or walnuts (optional) - Vanilla ice cream or whipped cream for serving (optional) Gathering the right ingredients is key to making this Easy Peach Dump Cake. You start with a can of sliced peaches in syrup. This brings a sweet and juicy flavor. You can use fresh peaches for a bit of extra taste. Next, grab a box of yellow cake mix. It makes everything simple and quick. Melt half a cup of unsalted butter. This adds richness to the cake. A teaspoon of cinnamon gives it warmth and spice. You can add chopped pecans or walnuts if you like crunch. For a treat, serve it warm with vanilla ice cream or whipped cream. It makes a great dessert for any occasion. - Gluten-free cake mix option - Dairy-free substitutes for butter - Natural sweeteners instead of sugar If you have dietary needs, you can still enjoy this cake. Look for a gluten-free cake mix. It works just as well. For those avoiding dairy, use coconut oil or a dairy-free butter. Instead of sugar, try using natural sweeteners like honey or maple syrup. These swaps keep your dessert delicious while meeting your needs. - Preheat your oven to 350°F (175°C). - Grease the baking dish properly. This step helps prevent sticking. - Pour the sliced peaches into the dish. Make sure to include the syrup for extra flavor. - Evenly sprinkle the cake mix on top of the peaches. Do not stir; it should look messy! - Drizzle the melted butter over the cake mix. Cover as much as possible for a rich taste. - Sprinkle cinnamon on top. If you like nuts, add them now for crunch. - Bake in the preheated oven for 35-40 minutes. Check for doneness when the top is golden brown. - The cake should be bubbly around the edges. Let it cool for about 10 minutes before serving. You can find the complete process in the Full Recipe. Enjoy the sweet simplicity of this easy peach dump cake! One key mistake is keeping the cake mix dry. If it gets wet, the cake won't rise well. Always remember not to stir the cake mix in. Layering the ingredients is crucial. The mix needs to sit on top of the peaches to create a nice texture. A splash of vanilla extract can boost the taste. This small step makes a big difference. When choosing peaches, fresh ones add a bright flavor. Canned peaches are easy and still tasty. If you use fresh, make sure they are ripe and juicy. Serving the cake warm is best. A scoop of ice cream or whipped cream on top adds creaminess. For a pretty look, garnish with fresh peach slices. A sprig of mint can brighten the plate too. These details make your dessert feel special and inviting. {{image_2}} You can easily change the fruit in this dump cake. Swap the peaches for blueberries or apples. Both fruits add a new twist to the flavor. If you want to mix things up even more, try a mixed fruit dump cake. Use a blend of your favorite fruits. This gives you a tasty treat that's fun and fresh. You can also add fun flavors to your dump cake. Try mixing in chocolate chips or dried fruits. This adds sweetness and texture. Another idea is to use flavored cake mixes, like butter or lemon. Each mix changes the taste and makes it unique. Experiment with different flavors to find your favorite! If you want a healthier dump cake, you can make some swaps. Use natural sweeteners like honey or maple syrup instead of sugar. This makes it lower in sugar and still tasty. You can also try vegan dump cake variations. Replace the butter with coconut oil or a non-dairy option. These changes help you enjoy dessert while being mindful of your health. You can check the Full Recipe for details on how to make this dessert! To store leftovers, let the dump cake cool first. Then, cover it tightly with plastic wrap or foil. You can also transfer it to an airtight container. This keeps it fresh in the fridge for up to four days. Glass or plastic containers work well here. If you want to save the dump cake for later, freezing is a great option. Cut it into squares and wrap each piece in plastic wrap. Place the wrapped squares in a freezer bag and seal it. This cake keeps well for up to three months. When you are ready to enjoy it, thaw it in the fridge overnight. To reheat, place it in the oven at 350°F (175°C) for about 15 minutes. This keeps the texture nice and soft. To make the cake last longer, follow some best practices. Store it in the fridge for up to four days. If you freeze it, it can last for about three months. Always check for any signs of spoilage before eating. If it smells off or shows mold, it’s time to toss it. You can make a homemade version of this cake. Use fresh peaches, sugar, and butter. For the cake mix, you can use flour, baking powder, and salt. Mix these dry ingredients well. Then, add melted butter and milk for moisture. This gives you a fresh base. You can also add vanilla for more flavor. This version takes more time but tastes great! Yes, you can use frozen peaches. They work well if you thaw them first. Drain excess liquid to keep the cake from being soggy. Frozen peaches can be just as tasty. They save you time and are great in a pinch. Fresh or canned peaches also work well, depending on your choice. Serve the warm cake in bowls. A scoop of vanilla ice cream on top is the best choice. Whipped cream is also a great option. You can add a slice of fresh peach for extra flair. Serve with a drizzle of caramel sauce for a sweet touch. This makes every bite special! You can prepare this cake in advance. Just make the cake and store it in the fridge. Reheat it in the oven for the best texture. You can bake it, let it cool, and cover it. When ready to serve, warm it until hot. This way, you have a tasty dessert ready to go! Try this [Full Recipe] for detailed steps! This blog post covered how to make a delicious peach dump cake. You learned about the key ingredients, easy steps for baking, and helpful tips to enhance flavor. We also explored diet-friendly ingredient swaps and variations to try. Remember, this dessert is both simple and versatile. Feel free to mix it up with different fruits and tweaks. With these strategies and recipes, you can enjoy a tasty treat that fits your taste and lifestyle. Happy baking!

Easy Peach Dump Cake Delicious and Simple Dessert

Looking for a quick and tasty dessert? This Easy Peach Dump Cake is a game-changer! With just a few simple

- 2 medium zucchinis - 1 cup breadcrumbs (preferably whole wheat) - ½ cup freshly grated Parmesan cheese - 1 teaspoon garlic powder - 1 teaspoon onion powder - ½ teaspoon dried oregano - ½ teaspoon salt - ¼ teaspoon black pepper - 2 large eggs - Olive oil spray or drizzle - Baking sheet - Parchment paper - Medium bowls - Whisk or fork - How to measure breadcrumbs accurately: Use a dry measuring cup. Scoop the breadcrumbs, then level off with a knife. This ensures you get the right amount without packing them down. - Grating Parmesan cheese by hand vs. using pre-grated: Freshly grated Parmesan gives better flavor and melts nicely. Pre-grated cheese often has anti-caking agents that can change the texture. If you can, grate it fresh for the best taste! These ingredients and tools will help you create tasty Baked Parmesan Zucchini Fries. For the full recipe, check out the detailed instructions. Enjoy cooking! - Preheat the oven to 425°F (220°C). - Prepare a baking sheet with parchment paper. - Rinse the zucchinis and slice them into fries. Start by preheating your oven. This step ensures that your fries cook evenly. Next, line your baking sheet with parchment paper. This will help the fries crisp up and make clean-up easy. Now, wash the zucchinis under cold water. Cut off both ends, and slice each zucchini into quarter-inch thick fries. Aim for uniform sizes to ensure they bake evenly. - Mix breadcrumb mixture ingredients. - Beat eggs in a separate bowl. - Coat zucchini fries in egg and then in breadcrumb mixture. In a medium bowl, combine the breadcrumbs, grated Parmesan, garlic powder, onion powder, oregano, salt, and pepper. Stir it well to mix all the flavors. In another bowl, beat the eggs. This will help the breadcrumbs stick to the zucchini. Take each zucchini fry, dip it into the egg, letting the extra egg drip off. Then, roll it in the breadcrumb mixture until it's fully coated. Place the coated fries on your prepared baking sheet. - Arrange fries on the baking sheet. - Apply olive oil spray. - Bake for 20-25 minutes, flipping halfway. Make sure to arrange the fries in a single layer on the baking sheet. This avoids steaming and helps them stay crispy. Lightly spray or drizzle olive oil over the fries. This will add flavor and help them crisp up. Now, bake them in your preheated oven for 20 to 25 minutes. Flip them halfway through baking to ensure even browning. Once they are golden brown and crispy, they are ready to enjoy! For the full recipe, check out the earlier section. To get that nice crunch, oil is key. It helps the fries get golden and crispy. I suggest using olive oil spray or a light drizzle. This way, you coat them without making them too greasy. Place your baking sheet on the middle rack of the oven. This allows for even heat, making the fries crisp up nicely. Zucchini fries taste amazing with dips. I love pairing them with marinara or ranch. They add a creamy or tangy touch. For a fun twist, serve them in a cone-shaped holder. This adds a nice visual and is easy to grab. You can also sprinkle some chopped parsley on top for color. One big mistake is overcrowding the baking sheet. If you put too many fries close together, they will steam instead of bake. Make sure to space them out. Another mistake is not preheating the oven. Preheating is crucial for that perfect crisp. Without it, the fries may end up soggy. {{image_2}} You can make your Baked Parmesan Zucchini Fries even better with some tasty tweaks. Adding spices like paprika or cayenne gives them a kick. You just sprinkle a bit into the breadcrumb mix. If you want a different cheese flavor, try Asiago or pecorino. Both options melt well and add depth to your fries. For those who need gluten-free options, use almond flour or gluten-free breadcrumbs. Both work well and keep that crunch. If you're looking for a vegan version, swap the eggs for flax eggs. Just mix one tablespoon of ground flaxseed with three tablespoons of water. Let it sit for a few minutes to thicken. It binds the breadcrumbs just like eggs do. Baked Parmesan Zucchini Fries can also be a canvas for other vegetables. Add eggplant or sweet potatoes for a colorful twist. Slice them up like zucchini for even cooking. Fresh herbs can elevate the fries too. Basil or thyme adds a fragrant touch. Just chop a bit and sprinkle it on before baking. For the full recipe, check out the details above. To keep your baked Parmesan zucchini fries fresh, store them in an airtight container. Place a paper towel inside to absorb moisture. This helps them stay crispy. You can keep them in the fridge for about 3 to 4 days. If they start to lose crunch, don’t worry; you can revive them! If you have extra zucchini fries, freezing is a great option. First, let them cool completely after baking. Then, arrange them in a single layer on a baking sheet. Freeze for about an hour, then transfer them to a freezer bag. This way, they won’t stick together. You can keep them frozen for up to 3 months. When you want to eat them, reheat in the oven at 400°F (200°C) for about 10-15 minutes. This keeps them from getting soggy. There are many fun ways to enjoy your leftovers! You can chop them up and toss them into a salad for extra crunch. They also make a great topping for pizza. Just sprinkle them on before baking for a tasty twist. You can even blend them into a dip or serve them with a sauce for a snack. The options are endless! For the full recipe, check out [Full Recipe]. Baked Parmesan zucchini fries stay fresh in the fridge for about 3 days. Place them in an airtight container. You can freeze them for up to 2 months. For best results, freeze them after baking. This keeps their taste and texture. Yes, you can prepare zucchini fries ahead of time. You can pre-assemble them by coating the zucchini and placing them on the baking sheet. Cover the sheet with plastic wrap and store it in the fridge. You can also bake them a day before. Just reheat them in the oven for a crispy finish. Zucchini fries are a great healthy snack. Zucchini has low calories and high water content. It is a good source of vitamins A and C, which help with eye health and immunity. Using whole wheat breadcrumbs adds fiber, making them even better for you. Plus, you can control the amount of oil and salt used. This way, you enjoy a tasty treat that’s also good for you. This blog post covers how to make tasty baked zucchini fries, from ingredients to storage tips. You learned about the right tools and steps for a crunchy texture. We shared simple ways to boost flavor and avoid common mistakes. Remember, the key is in the details, from oil use to baking method. Enjoy experimenting with different flavors and sharing this healthy snack! With practice, you’ll master these fries and impress anyone who tries them.

Baked Parmesan Zucchini Fries Crunchy and Delicious Snack

Ready to take your snacking game to the next level? These Baked Parmesan Zucchini Fries are the perfect blend of

Creating a rich Chocolate Peanut Butter Mug Cake is simple and fun. Here’s what you need: - 4 tablespoons all-purpose flour - 4 tablespoons sugar - 2 tablespoons cocoa powder - 1/8 teaspoon baking powder - 1/8 teaspoon salt - 3 tablespoons milk - 2 tablespoons peanut butter (creamy or crunchy) - 2 tablespoons vegetable oil - 1/4 teaspoon vanilla extract - Optional: Chocolate chips or chopped nuts for topping These ingredients come together to create a warm, gooey treat. Each bite offers a delightful mix of chocolate and peanut butter flavors. You can play with this recipe by adding chocolate chips or nuts for a fun twist. Using creamy peanut butter gives a smooth texture, while crunchy adds a nice bite. Feel free to explore the Full Recipe for step-by-step instructions to bring this mug cake to life. Enjoy the ease of making a tasty dessert in just a few minutes! - In a microwave-safe mug, combine: - 4 tablespoons all-purpose flour - 4 tablespoons sugar - 2 tablespoons cocoa powder - 1/8 teaspoon baking powder - 1/8 teaspoon salt - Mix well until there are no lumps. This step is crucial. You want a smooth base for your cake. - Add these wet ingredients to your dry mix: - 3 tablespoons milk - 2 tablespoons peanut butter (creamy or crunchy) - 2 tablespoons vegetable oil - 1/4 teaspoon vanilla extract - Stir until you have a smooth batter. Mixing well ensures your cake will rise and taste great. - Microwave the mug cake on high for about 1 minute and 30 seconds. - Keep an eye on it as it cooks. Microwaves can vary in power. Adjust the time if needed. - The cake should rise and look set on top when done. - Carefully remove the mug from the microwave. It will be hot! Let it cool for a minute or so before enjoying. - For extra flavor, sprinkle chocolate chips on top while the cake is warm. Enjoy it straight from the mug with a spoon! For the full recipe, check out the section above. To get the best mug cake, watch your cooking time. Different microwaves have different wattages. If yours is strong, cook for about 1 minute and 15 seconds. If it’s weaker, aim for 1 minute and 45 seconds. Always check the cake. It should rise and look set on top. Mixing is also key. Make sure to stir the dry ingredients well before adding the wet ones. This helps avoid lumps. A smooth batter ensures a fluffy cake. Want to make your mug cake even better? Add chocolate chips or nuts to the batter. They give extra flavor and texture. Mix in a tablespoon for a tasty surprise. After cooking, you can top your cake with more chocolate chips, whipped cream, or even a scoop of ice cream. This makes your treat rich and fun. Serve your mug cake warm. It pairs wonderfully with ice cream or whipped cream. This combination makes a perfect dessert. For a special touch, use decorative mugs. They make the cake look fancy and festive. You can find the full recipe for this chocolate peanut butter mug cake above. Enjoy your delicious creation! {{image_2}} You can change up your chocolate peanut butter mug cake by swapping out ingredients. If you don't have peanut butter, try almond butter or Nutella. They both add a nice touch. For those on a gluten-free diet, use almond flour instead of all-purpose flour. This keeps the cake tasty while meeting dietary needs. Change the flavor of your mug cake by adding different extracts. Mint or coffee extracts can give it a unique twist. You can also add spices like cinnamon or espresso powder for depth. A little cinnamon can warm it up, while espresso powder adds a rich coffee taste. If you're vegan, you can still enjoy this treat! Use plant-based milk in place of regular milk. There are also low-sugar options for those who want to cut back on sweeteners. Try using stevia or monk fruit sweetener. This way, you can enjoy a delicious dessert that fits your diet. For the full recipe, check the previous section. If you have any leftover mug cake, store it in an airtight container. This keeps it fresh for longer. You can also cover the mug with plastic wrap. If you want to reheat it, place it back in the microwave for about 10 to 15 seconds. This should warm it up nicely without drying it out. You can refrigerate the mug cake for up to three days. Just make sure it is sealed well. If you want to save it for later, freezing is a great option. Wrap the cooled mug cake in plastic wrap, then place it in a freezer-safe bag. It can last in the freezer for about a month. When you need it, thaw it in the fridge overnight before reheating. For the best taste, eat your mug cake within two days of making it. After that, it may lose its flavor and texture. Signs that your mug cake is no longer fresh include a dry or hard texture. If it smells off or has visible mold, it's best to throw it away. Enjoy the full flavor experience by eating it fresh! A mug cake usually takes about 1 minute and 30 seconds in the microwave. However, cooking time can change based on your microwave's wattage. If your microwave is stronger, check it after 1 minute. If it is weaker, it may need an extra 30 seconds. The cake should rise and look set when it’s done. You can use a larger mug, but keep in mind the cake's size. A bigger mug may spread the batter too thin, affecting how it cooks. This could mean a longer cooking time. For best results, stick to a standard-sized mug. You can adjust the recipe to fit your needs. If you're avoiding sugar, use a sugar substitute. For gluten-free options, swap all-purpose flour for almond flour. If you have a nut allergy, try sunflower seed butter instead of peanut butter. Just remember, changes may alter the final flavor and texture. You learned how to make a quick and tasty mug cake. We covered the ingredients, steps, and easy tips to perfect it. You can also tweak recipes for different diets or flavors. It's simple to store leftovers, too. Remember, creativity can make this mug cake even better. Experiment and have fun with it. Enjoy your delicious treat, and share it with others!

Chocolate Peanut Butter Mug Cake Decadent and Easy Treat

If you crave a sweet treat that’s both quick and delicious, you’re in the right place! My Chocolate Peanut Butter

Older posts
Newer posts
← Previous Page1 … Page74 Page75 Page76 … Page126 Next →

dsad

© 2025 Southern Dishes • Built with GeneratePress

Our Policies

  • Copyright Policy
  • Cookie Policy
  • GDPR Policy
  • Privacy Policy
  • Disclaimer
  • Terms Of Use

More Information

  • Home
  • About
  • Contact
  • Appetizers
  • Dessert
  • Dinner
  • Drinks
©2025, Southern Dishes About Back To Top