Skip to content
DisclaimerTerms Of UseGDPR PolicyCookie Policy

Southern Dishes

  • Home
  • Drinks
  • Appetizers
  • Dinner
  • Dessert
  • About
  • Contact
  • Privacy Policy
DisclaimerTerms Of UseGDPR PolicyCookie Policy

Isabella

To make a tasty berry basil lemonade, you need a few key items. Here’s what you will need: - 1 cup mixed berries (strawberries, blueberries, raspberries) - 1/2 cup fresh basil leaves, packed - 1 cup freshly squeezed lemon juice (about 4-6 lemons) - 1/2 cup honey or agave syrup (adjust to taste) - 4 cups water (still or sparkling) - Ice cubes - Additional berries and basil for garnish These ingredients create a bright and flavorful drink that will keep you cool. Fresh basil gives the drink a unique twist. The tartness of lemons balances perfectly with the sweetness of berries and honey. You can tweak this recipe to suit your taste. Here are some optional ingredients you might like: - Mint leaves for a refreshing twist - Ginger for a spicy kick - A splash of soda for fizz - A pinch of salt to enhance flavors These options let you play with flavors. You can create a drink that fits your mood or the season. When making berry basil lemonade, you can use fresh or frozen berries. Fresh berries taste great and look pretty in the drink. They add a vibrant color and aroma. On the other hand, frozen berries are convenient and often just as tasty. They can also chill your drink more quickly. Both options work well, so pick what you have on hand. Using frozen berries can save time. Just blend them straight from the freezer without thawing. Fresh or frozen, you will enjoy this delightful drink! For a complete guide on making this drink, check out the Full Recipe. To start, gather your mixed berries. Use strawberries, blueberries, and raspberries to get a nice blend of flavors. Take one cup of these berries and place them in a blender. Add half a cup of water to help them blend smoothly. Pulse the blender until the mixture is smooth. Next, strain the juice through a fine mesh sieve into a bowl. This step removes the pulp and seeds. You want just the juice for your lemonade. This berry juice will be the star of your drink. Now, grab a large pitcher and add the fresh basil leaves. You need half a cup of packed basil for a strong flavor. Use a wooden spoon to muddle the basil with honey or agave syrup. This means you will press the basil leaves down to release their oils. The smell will be amazing! Muddling also helps the basil mix well with the other ingredients. Once the basil is muddled, it’s time to add the other ingredients. Pour in the freshly squeezed lemon juice. You will need about one cup, which is around four to six lemons. Then, add the berry juice you prepared earlier. Next, pour in three and a half cups of water. This will balance the flavors and make your lemonade refreshing. Stir everything well with a spoon. Taste it to see if you want to adjust the sweetness. After mixing, cover the pitcher and place it in the fridge. Let it chill for at least 30 minutes. This time allows the flavors to meld together perfectly. When you’re ready to serve, fill glasses with ice cubes. Pour the chilled berry basil lemonade over the ice. For a pretty touch, garnish your drink with extra berries and basil leaves. Enjoy your refreshing summer drink delight! For the complete Berry Basil Lemonade recipe, check the Full Recipe section. When you make Berry Basil Lemonade, the sweetness matters. Start with 1/2 cup of honey or agave syrup. Taste the mix after adding it. If it feels too tart, add more sweetener slowly. Stir well after each addition. Honey and agave can taste different, so trust your taste buds. Some people like it sweeter, while others prefer a tangy kick. The berries you pick change the drink's flavor. I love using a mix of strawberries, blueberries, and raspberries. Strawberries add a sweet base, blueberries bring depth, and raspberries add tartness. Fresh berries are best. If you can’t find fresh, frozen berries work too. Just thaw them before blending. For the best flavor, muddle the basil well. This helps release its oils, which make the drink pop. Combine berries and basil in the pitcher with lemon juice. Chill it in the fridge for at least 30 minutes. This time lets the flavors blend. Serve over ice with extra berries and basil. It looks beautiful and tastes amazing! For the full recipe, check the earlier section. {{image_2}} To make a sparkling berry basil lemonade, swap out still water for sparkling water. This adds fizz and makes the drink even more fun. Just follow the full recipe, but use sparkling water in the last step. The bubbles will lift your spirits on a hot day. You can also garnish with a few extra berries and basil leaves for a pop of color. If you love mint, add it to your drink! Just mix fresh mint leaves with the basil when you muddle. This gives your lemonade a cool twist. You can use equal parts mint and basil or adjust based on your taste. The mint will add a fresh and bright note to the drink. It's a great way to switch things up while keeping the berry flavor strong. For a fun adult drink, turn your berry basil lemonade into a cocktail. Add a splash of vodka or gin to your glass before pouring in the lemonade. This keeps the refreshing taste while adding a kick. You can also rim your glasses with sugar for a sweet touch. Make it festive by adding a few slices of lemon or extra berries on top. This twist makes it perfect for summer parties or gatherings. After you make your Berry Basil Lemonade, pour any leftovers into a clean pitcher. Make sure to cover it tightly with a lid or plastic wrap. This keeps the drink fresh and tasty. If you have leftover ice, store it separately to avoid watering down the lemonade. You can store your Berry Basil Lemonade in the fridge for up to three days. After that, the flavors may fade. If you notice any change in color or scent, it’s best to toss it. Always trust your senses. To keep your lemonade fresh, store it in an airtight container. This helps lock in the flavors. You can add extra basil and berries just before serving. This not only looks beautiful but also enhances the taste. For the best experience, serve it cold and over ice. You’ll enjoy every sip of this refreshing drink. Yes, you can use bottled lemon juice. However, fresh lemon juice tastes better. It has more flavor and aroma. Bottled juice may have preservatives that change the taste. For a special drink, I recommend using fresh lemons. They make your Berry Basil Lemonade pop with brightness. To make Berry Basil Lemonade vegan, simply replace honey with agave syrup or maple syrup. Both options work well. They add sweetness without any animal products. This small change keeps the drink delicious and plant-based. You can enjoy it knowing it fits your diet. Basil is full of vitamins and antioxidants. It helps with digestion and has anti-inflammatory properties. Berries, like strawberries and blueberries, are rich in vitamins too. They support heart health and boost your immune system. This drink not only tastes great but also gives your body a healthy boost. Yes, you can adjust the batch size easily. To make a smaller batch, simply halve the ingredients. For a larger batch, double the amounts. Just keep the same ratios. This way, you can enjoy Berry Basil Lemonade with any number of friends or family. Berry Basil Lemonade lasts about 3 to 5 days in the fridge. Store it in a sealed container to keep it fresh. Over time, the flavors may change, but it will still taste good. Just give it a stir before serving again. Enjoy this refreshing drink whenever you like! This blog post outlined how to make refreshing Berry Basil Lemonade. We covered key ingredients, preparation steps, and variations to fit your taste. You learned about storage and ways to keep it fresh. The right berries and herbs make a big difference in flavor. In the end, you can enjoy this drink any time. Keep experimenting with new twists. Each sip will remind you of summer's joy.

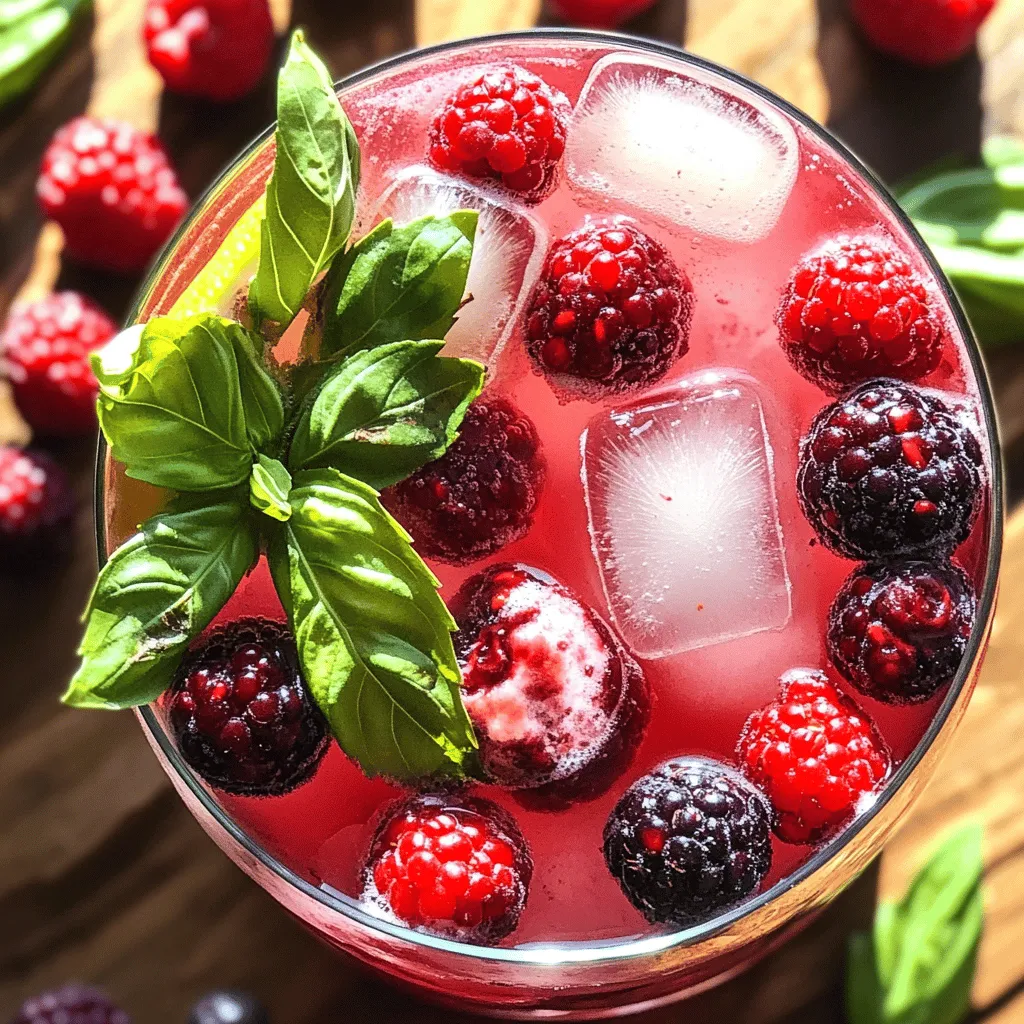
Berry Basil Lemonade Refreshing Summer Drink Delight

Looking for a cool drink to sip on this summer? You’re in for a treat! Berry Basil Lemonade is not

- 1 cup almond milk (or any milk of choice) - 1 cup water - 2 bags of black tea (or 2 tablespoons loose-leaf) - 1 tablespoon pumpkin puree - 1 tablespoon maple syrup - 1/2 teaspoon pumpkin pie spice - 1/4 teaspoon vanilla extract - 1/4 teaspoon ground cinnamon - Whipped cream (optional) You can make this drink your own with easy swaps. For a dairy-free option, use oat or coconut milk instead of almond milk. If you want less sugar, try using stevia or agave syrup instead of maple syrup. These changes keep the drink tasty and cozy. Using fresh pumpkin can enhance the flavor. Fresh pumpkin gives a vibrant taste and bright color. You can roast your pumpkin pieces to add depth to the drink. Canned pumpkin is a time-saver. It still tastes great and is easy to use. Both options work well, depending on your time and taste! For the full recipe, check out the detailed steps in the main article! To start, you need to heat the almond milk and water. In a saucepan, combine 1 cup of almond milk with 1 cup of water. Set the heat to medium. Watch it closely as it simmers. Do not let it boil. This step helps blend the flavors well. Next, steep the black tea. After the almond milk and water mix is warm, add two bags of black tea. Let them steep for about five minutes. This time allows the tea to develop a strong flavor. After steeping, remove the tea bags. Now, you are ready to mix in the good stuff. Start by whisking in the pumpkin and spices. Add 1 tablespoon of pumpkin puree and 1 tablespoon of maple syrup. Then, include 1/2 teaspoon of pumpkin pie spice, 1/4 teaspoon of vanilla extract, and 1/4 teaspoon of ground cinnamon. Whisk everything together until it is smooth. This step creates the rich flavor of the chai latte. You want to achieve the right consistency. Keep heating the mixture gently. Stir occasionally, but do not let it boil. Ensure it is warm and well combined. For a frothy drink, consider blending options. You can use a blender to froth it up. Pour the mixture into the blender and blend until creamy. If you prefer, use an immersion blender directly in the pan. This method is simple and effective. Now, for presentation tips. Pour the pumpkin spice chai latte into mugs. If you like, top it with whipped cream. Finish by sprinkling a bit more pumpkin pie spice or ground cinnamon on top. This adds a lovely touch to your cozy drink. Enjoy your homemade pumpkin spice chai latte! For more details, check the Full Recipe. To make your pumpkin spice chai latte even better, try adding more spices. You can mix in a pinch of nutmeg or cardamom for depth. You can also adjust the sweetness. If you like it sweeter, add more maple syrup or honey. For a different twist, use brown sugar or coconut sugar. Each option gives a unique taste to your latte. If you want a dairy-free drink, almond milk works great. You can also try oat milk or coconut milk. These options will keep your chai latte creamy and rich. For toppings, use coconut whipped cream or almond whipped cream. They add a nice touch while keeping it vegan. Batch preparation is a smart way to save time. You can make a large batch of chai base. Store it in the fridge for up to three days. When you want a latte, just heat it up and add milk. Using ready-made ingredients also helps. You can buy pumpkin puree or pumpkin spice blends to save time. This way, you’ll have a delicious drink in no time. Follow this [Full Recipe] for your perfect pumpkin spice chai latte! {{image_2}} You can use many types of milk for your chai latte. Almond milk is a great start. It adds a nutty flavor. If you want something richer, try coconut milk. It gives a creamy texture with a hint of sweetness. Oat milk is another choice. It froths well and has a mild taste. Soy milk works, too, offering a nice balance. Feel free to mix and match to find your perfect blend. Get creative with add-ins for your pumpkin spice chai latte. You can make a chocolate version by adding cocoa powder or chocolate syrup. This gives your drink a sweet twist. For caramel lovers, drizzle some caramel sauce on top. You can also add a shot of espresso for a caffeinated boost. This will give your latte a nice kick to start your day. If you prefer cold drinks, try an iced pumpkin spice chai latte. Start by brewing your chai as usual. Once it's ready, let it cool. Then, pour it over ice in a tall glass. You can blend it with ice for a refreshing, slushy drink. Add whipped cream on top for an indulgent treat. This version is perfect for warm days, keeping you cool and cozy. For the full recipe, check out the details above! To keep your pumpkin spice chai latte fresh, store it in an airtight container. This helps prevent any strange smells or flavors from getting in. Place it in the fridge and try to use it within three days. If you want to save some for later, you can freeze it. Just remember to leave some space in the container, as liquids expand when frozen. When reheating, use a saucepan over low heat. Stir it often to keep it from sticking. If you want to use the microwave, heat it in short bursts. Start with 30 seconds, then stir and check the temperature. This way, you keep the flavors intact and avoid overheating. Most of the ingredients in your chai latte have a good shelf life. Almond milk lasts about 7-10 days after opening, while canned pumpkin can stay fresh for a year if unopened. Black tea has a long shelf life, too, often lasting up to two years when stored correctly. Always check the labels and store them in a cool, dry place for best results. For the full recipe, check the earlier sections of the article. To make a Pumpkin Spice Chai Latte at home, gather these items: - 1 cup almond milk (or any milk of choice) - 1 cup water - 2 bags of black tea (or 2 tablespoons loose-leaf) - 1 tablespoon pumpkin puree - 1 tablespoon maple syrup (adjust to taste) - 1/2 teaspoon pumpkin pie spice (plus more for garnish) - 1/4 teaspoon vanilla extract - 1/4 teaspoon ground cinnamon - Whipped cream (optional) Start by heating the water and almond milk in a saucepan until it simmers. Add the black tea bags and steep for 5 minutes. Then, take the tea bags out. Mix in the pumpkin puree, maple syrup, pumpkin pie spice, vanilla, and cinnamon. Heat until warm, but don’t boil. You can blend it for a frothy finish. Pour it into mugs, add whipped cream if you like, and sprinkle more spice on top. For the full recipe, check out the details above. Pumpkin spice has many benefits. It contains cinnamon, ginger, nutmeg, and cloves. Each spice offers health perks. - Cinnamon: Helps lower blood sugar and reduces inflammation. - Ginger: Aids digestion and can ease nausea. - Nutmeg: Promotes good sleep and has antioxidant properties. - Cloves: Packed with antioxidants and may support liver health. These spices not only add flavor but also boost your health. Plus, pumpkin itself is full of vitamins A and C. It also provides fiber, which is good for digestion. Yes, you can use decaffeinated tea for your Pumpkin Spice Chai Latte. Many people enjoy chai without caffeine. Look for decaf black tea bags or loose-leaf options. This way, you can enjoy the rich flavors without the caffeine jitters. You may also find herbal chai blends that include spices without any tea leaves. So, you can sip on this cozy drink any time of day. You can find Pumpkin Spice Chai Latte at many grocery stores. Look for popular brands like Tazo or Stash. They often offer tea bags or instant mixes. If you prefer local coffee shops, many serve this drink during the fall season. You can also check online retailers for packaged mixes or specialty teas. This way, you can enjoy the taste of pumpkin spice chai latte wherever you are! This recipe for Pumpkin Spice Chai Latte is easy and fun. We covered ingredients, preparation steps, and tips for flavor. You can swap ingredients to fit your tastes. Making it vegan or finding shortcuts is possible. Try different milks or add chocolate for variety. Store leftovers to enjoy later. Now, it's your turn to create your perfect drink. Enjoy the warm flavors and share it with friends!

Pumpkin Spice Chai Latte Delicious and Cozy Recipe

Fall is here, and nothing warms the soul like a delicious, cozy Pumpkin Spice Chai Latte. This easy recipe combines

To make a Honey Almond Matcha Latte, gather these simple ingredients: - 1 teaspoon matcha green tea powder - 1 cup almond milk (unsweetened or sweetened) - 1 tablespoon honey (or maple syrup for vegan option) - 1/2 teaspoon vanilla extract - 1/4 teaspoon cinnamon (optional) - Ice cubes (for iced version) Matcha green tea powder is the star of this drink. It gives a rich green color and a unique flavor. Almond milk makes the latte creamy. You can choose unsweetened if you want less sugar. Honey adds sweetness, but use maple syrup if you prefer a vegan option. Vanilla extract brings warmth and depth. Cinnamon is great for a hint of spice. If you want an iced version, just add ice cubes after mixing. This drink is not only tasty but also healthy. Each ingredient works together to create a delightful experience. For the complete recipe, check the [Full Recipe]. Sifting the Matcha Powder Start by sifting 1 teaspoon of matcha green tea powder into a small bowl. This step helps remove lumps. It makes the matcha smoother for your latte. Preparing the Matcha Mixture Next, add a few tablespoons of hot water to the sifted matcha. Use a whisk or a matcha whisk (chasen) to mix. Whisk it well until you get a frothy mix. This is key for a good latte. Heating the Almond Milk For the warm version, pour 1 cup of almond milk into a small saucepan. Heat it over medium heat until it's warm. Make sure it does not boil. If you want an iced latte, skip this step. Combining Ingredients for Warm Latte Once the almond milk is warm, take it off the heat. Stir in 1 tablespoon of honey (or maple syrup), 1/2 teaspoon of vanilla extract, and 1/4 teaspoon of cinnamon (if you like). Mix until it's well blended. Creating an Iced Version If you prefer it cold, fill a glass with ice cubes. Pour the dissolved matcha over the ice. Then, add the sweetened almond milk mixture. Stir gently to combine. Garnishing Tips You can make your latte look pretty. For a garnish, sprinkle a little matcha powder on top or add a cinnamon stick. This adds a nice touch and extra flavor. Now you have a delicious Honey Almond Matcha Latte! For the complete details, check the Full Recipe. Choosing the Right Matcha Powder Select high-quality matcha for a bright color and rich taste. Look for matcha labeled "ceremonial grade" for the best flavor. A good matcha adds a smooth finish to your latte. Avoid lower grades, as they can taste bitter or grassy. Tips for Frothing Almond Milk Almond milk can be tricky to froth. To get good foam, use unsweetened almond milk. Heat it gently and whisk or use a frother. If you want more foam, try adding a pinch of sugar. This helps create a thicker texture. Adjusting Sweetness for Personal Preference Honey adds a nice touch, but you can change it to fit your taste. Use more or less honey based on your liking. If you want a vegan option, maple syrup works well. You can also skip sweeteners for a less sugary drink. {{image_2}} Vegan Substitutions If you want a vegan Honey Almond Matcha Latte, use maple syrup instead of honey. This swap keeps the drink sweet and tasty. You can also choose plant-based milk, like oat or soy milk. Both options create a creamy texture. Flavor Variations You can make your latte even more fun. Try adding chocolate syrup for a mocha twist. You can also experiment with different sweeteners, like agave or coconut sugar. Each option will change the taste and give you new flavors to enjoy. Different Milk Options Almond milk is great, but other types work too. Soy milk offers a thicker feel. Oat milk has a naturally sweet taste, while coconut milk adds a tropical twist. Each milk alters the taste, so pick the one you love best. For the complete recipe, check out the Full Recipe. Storing Matcha Powder To keep matcha fresh, store it in an airtight container. Light and air can spoil its flavor. Always place it in a cool, dark place. Avoid the fridge as moisture can harm the powder. Use within a month for the best taste. Keeping Almond Milk Fresh Store almond milk in the fridge. Always check the expiration date on the carton. If you open a container, use it within seven days. Shake it well before using to mix any settled parts. Pre-Making the Latte for Later Consumption You can make the Honey Almond Matcha Latte in advance. Prepare the matcha and sweetened almond milk separately. Store them in the fridge in sealed containers. When ready to drink, mix them again. For the best flavor, consume within two days. Enjoy your tasty latte anytime! Matcha offers many health benefits. It is high in antioxidants. These help fight free radicals. Matcha can boost your energy and focus. It also supports weight loss and metabolism. Plus, it can calm your mind without making you sleepy. Yes, you can skip the sweetener. The matcha and almond milk still taste great. If you want, add a pinch of salt. This will enhance the flavor without extra sweetness. You can find high-quality matcha in health stores or online. Look for brands that focus on organic products. Check for bright green color and fine texture. This shows it is fresh and pure. To find cafes near you, search online. Use terms like "Honey Almond Matcha Latte near me." Many local coffee shops offer this drink. You can also check out specialty tea shops for unique options. Yes, a blender works well too. It can mix the matcha and water well. Just be careful not to over-blend. You want the frothy texture, similar to whisking by hand. You now know how to make a Honey Almond Matcha Latte. We covered the best ingredients to use, step-by-step directions, and helpful tips to perfect your drink. I also shared storage advice and answered common questions about matcha. Feel free to get creative with flavors and variations. This drink can be your daily treat or an energizing boost. Remember, a good matcha latte is all about personal taste. Enjoy crafting your own version and share it with friends!

Honey Almond Matcha Latte Simple and Flavorful Recipe

Are you ready to elevate your coffee routine with a delightful twist? My Honey Almond Matcha Latte is the perfect

- 1.5 kg baby potatoes, halved - 200 g feta cheese, crumbled - 3 tablespoons olive oil - 4 cloves garlic, minced - 1 tablespoon dried oregano - 1 teaspoon lemon zest - 1 teaspoon smoked paprika - Salt and pepper to taste - Fresh parsley, chopped (for garnish) When measuring ingredients, be precise for the best taste. Use a kitchen scale for the potatoes and cheese. A tablespoon works great for olive oil and dried herbs. For the garlic, one clove equals about one teaspoon when minced. You can also use a zester for the lemon zest. Always choose fresh ingredients for the best flavor. Look for firm, smooth baby potatoes without blemishes. The feta cheese should be creamy and crumbly, not dry. Use high-quality olive oil for richness. Fresh garlic will give a stronger taste than pre-minced options. When selecting oregano, dried is fine, but fresh will add a lovely touch. For the lemon, pick one that feels heavy for its size; it will be juicier and more flavorful. By using quality ingredients, you ensure your Greek Feta Roast Potatoes are a hit. For the complete recipe, check out the Full Recipe section. To start, you need to gather your ingredients. Here’s what you will need: - 1.5 kg baby potatoes, halved - 200 g feta cheese, crumbled - 3 tablespoons olive oil - 4 cloves garlic, minced - 1 tablespoon dried oregano - 1 teaspoon lemon zest - 1 teaspoon smoked paprika - Salt and pepper to taste - Fresh parsley, chopped (for garnish) First, preheat your oven to 220°C (430°F). In a large bowl, mix the halved potatoes with olive oil, minced garlic, dried oregano, lemon zest, smoked paprika, salt, and pepper. Toss everything until the potatoes are evenly coated. This step is key for flavor! Next, spread the potatoes on a large baking tray lined with parchment paper. Make sure they’re in one layer. This helps them roast evenly. Place the tray in the oven and roast for about 30-35 minutes. They should turn golden and crispy. Remember to toss them halfway through cooking for the best results. After the initial roasting, take the tray out of the oven. Sprinkle the crumbled feta cheese over the hot potatoes. Return the tray to the oven and bake for another 5 minutes. This will slightly soften the feta without letting it melt completely. Once the potatoes are done, remove the tray from the oven. Garnish the dish with fresh parsley before serving. This adds a pop of color and freshness. For a beautiful presentation, serve the potatoes hot on a rustic wooden board. Drizzle a bit of olive oil on top and finish with a sprinkle of parsley. Enjoy your Greek Feta Roast Potatoes! For the complete method, check out the Full Recipe. To get crispy potatoes, start with small baby potatoes. Halving them helps create more surface area. Use enough olive oil. I recommend three tablespoons. This oil coats the potatoes and helps them crisp. Make sure your oven is hot, too. Set it to 220°C (430°F) before cooking. Toss the potatoes halfway through roasting. This way, they brown evenly on all sides. To boost flavor, add garlic and herbs. I use four cloves of minced garlic and one tablespoon of dried oregano. These ingredients add depth to the dish. A teaspoon of lemon zest brightens the taste. Smoked paprika gives a nice smoky flavor, too. Don't skip the feta cheese! Crumble it over the hot potatoes for a salty kick. Fresh parsley adds color and freshness. Avoid overcrowding the baking tray. If the potatoes are too close, they will steam instead of roast. This will make them soft, not crispy. Always use parchment paper; it helps with cleanup and prevents sticking. Don't forget to toss the potatoes while they cook. This ensures they brown nicely on all sides. Lastly, check your feta. It should soften but not melt completely. Follow the Full Recipe for best results. {{image_2}} You can change this dish by adding more flavors. Here are some fun ideas: - Cherry tomatoes: Add halved tomatoes for sweetness. - Olives: Toss in some olives for a salty kick. - Red onion: Use slices for a sweet and savory touch. - Spinach: Fold in fresh spinach for a pop of color and nutrition. - Chili flakes: Add heat with some chili flakes. Each of these ingredients brings a unique taste. Feel free to mix and match based on what you like. This dish can fit many diets. For a vegan version, skip the feta cheese. You can use a vegan cheese alternative. For gluten-free, this recipe is already safe. Just ensure your ingredients are gluten-free. These changes keep the dish tasty while meeting diet needs. Serve Greek feta roast potatoes in fun ways. Here are some ideas: - As a side: Pair with grilled chicken or fish for a complete meal. - In a salad: Toss warm potatoes in a fresh salad for a hearty addition. - On a platter: Serve on a large plate for sharing at parties. - With dips: Offer yogurt or tzatziki on the side for extra flavor. These ideas help you enjoy the dish in different styles. Check out the Full Recipe for more details! After cooking Greek Feta Roast Potatoes, let them cool to room temperature. Store leftovers in an airtight container. Keep them in the fridge if you plan to eat them again within a few days. They taste best within three days. If you want to keep them longer, freezing is a great option. To reheat, you can use an oven or a microwave. For the oven, preheat it to 180°C (350°F). Spread the potatoes on a baking sheet and heat for about 10-15 minutes. This keeps them crispy. If using a microwave, place them in a bowl and heat for one to two minutes. However, they may lose some crispness. To freeze, make sure the potatoes are completely cool. Place them in a freezer-safe bag or container. They can last up to three months in the freezer. When you want to eat them, thaw them in the fridge overnight. Reheat them in the oven for the best taste. For the full recipe, check out the earlier section. To make Greek Feta Roast Potatoes, first, gather your ingredients. You need baby potatoes, feta cheese, olive oil, garlic, oregano, lemon zest, smoked paprika, salt, and pepper. 1. Preheat your oven to 220°C (430°F). 2. In a bowl, mix halved baby potatoes with olive oil, minced garlic, oregano, lemon zest, smoked paprika, salt, and pepper. 3. Toss the mix well until the potatoes are coated. 4. Spread the potatoes on a baking tray lined with parchment paper. 5. Roast them for 30-35 minutes until they turn golden and crispy. 6. Halfway through, toss the potatoes for even cooking. 7. After roasting, sprinkle crumbled feta over the hot potatoes. 8. Bake for another 5 minutes. Remove when the feta softens but doesn’t melt. 9. Garnish with fresh parsley before serving. This process creates crispy, flavorful potatoes that shine with the creamy feta. Yes, you can use other cheeses. Feta brings a unique taste, but you could try goat cheese or ricotta. Both choices will change the flavor slightly. Goat cheese adds tanginess, while ricotta offers creaminess. Just remember, the cheese should be crumbled and placed on the potatoes during the last few minutes of baking. This way, it warms up without fully melting. These potatoes pair well with many dishes. You can serve them alongside grilled chicken or lamb. Their flavors match perfectly. You might also enjoy them with a fresh Greek salad. The crunchy veggies balance the creamy feta. For a lighter meal, serve with tzatziki sauce or a yogurt dip. Each option enhances the overall meal experience. For the complete recipe, check the Full Recipe link! In this post, I shared how to make Greek Feta Roast Potatoes. I covered ingredients, preparation steps, and cooking details. I also shared tips for crispy potatoes and flavor boosts. You learned about variations and storage advice, ensuring your dish stays fresh. In conclusion, cooking these potatoes is fun and rewarding. Explore your own twists and enjoy every bite!

Greek Feta Roast Potatoes Simple and Tasty Dish

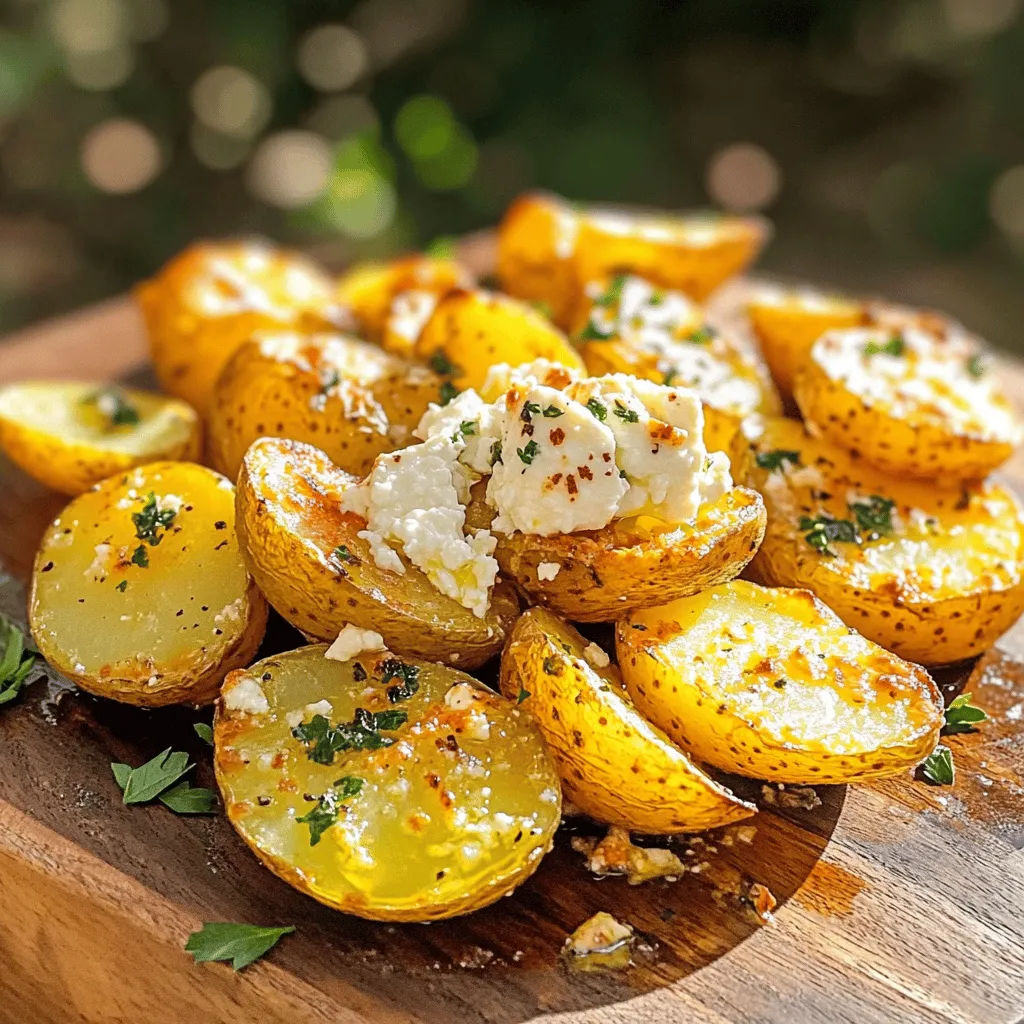
Looking for a simple dish that bursts with flavor? My Greek Feta Roast Potatoes are just the ticket! These potatoes

To make the Minted Pineapple Mojito Mocktail, you need some fresh and vibrant ingredients. Here’s what to gather: - 1 cup fresh pineapple chunks - 10 fresh mint leaves - 2 tablespoons honey or agave syrup - Juice of 1 lime - 2 cups soda water or sparkling water - Ice cubes - Pineapple slices and mint sprigs for garnish Each ingredient plays a key role in creating a balanced and refreshing drink. The pineapple adds sweetness and a tropical vibe. Mint brings a cool, herbal flavor that brightens the drink. Honey or agave syrup sweetens the mix without overpowering it. The lime juice adds a zesty kick, balancing the sweetness nicely. Soda water gives it a bubbly texture, making it fun to sip. Ice cubes keep your drink cool and refreshing. Finally, the garnish of pineapple slices and mint sprigs adds a touch of beauty, making it perfect for serving. For the full recipe, check out the details above. Enjoy crafting this delightful mocktail! Start by muddling the pineapple and mint. In a sturdy glass or cocktail shaker, add 1 cup of fresh pineapple chunks and 10 fresh mint leaves. Use a muddler or the back of a spoon to gently press down. This helps release the juices and oils. You want to see the mint leaves start to tear a bit. This step is key for flavor. Next, mix in 2 tablespoons of honey or agave syrup and the juice of 1 lime. Muddle the mixture again to blend the flavors well. The sweetness of honey and the tartness of lime will balance nicely with the pineapple. Now it’s time to assemble your mocktail. Fill your glass or shaker with ice cubes. Then pour in 2 cups of soda water or sparkling water over the ice. This adds a refreshing fizz. Stir gently to combine everything without losing the bubbles. Taste your drink, and adjust the sweetness as needed. If you want it sweeter, add a touch more honey or lime. Garnishing makes your drink pop! Use a slice of pineapple and a sprig of mint for the top. It adds color and makes it look fancy. For presentation, consider using clear glasses to show off those beautiful layers. You can also add a fun straw or even a tiny umbrella for a tropical vibe. Enjoy your Minted Pineapple Mojito Mocktail! Check out the Full Recipe for more details. To make your minted pineapple mojito mocktail really pop, you need to muddle well. Muddling helps release all the great flavors. Here’s how to get the most out of your ingredients: - Use a sturdy glass or shaker: This gives you a good grip while muddling. - Press, don’t smash: Gently press the pineapple and mint. This helps keep the flavors bright and fresh. - Keep it simple: You can use the back of a wooden spoon if you don’t have a muddler. Using the right tools makes muddling easy and effective. Not everyone likes the same level of sweetness, and that's okay! Here are some ways to adjust the sweetness: - Try different sweeteners: If you don’t want honey or agave, use maple syrup or stevia. Each brings its own flavor. - Balance flavors: If it’s too sweet, add more lime juice. This will give it a nice, fresh tartness. Finding the right balance makes your mocktail even better. Want to save time? You can prepare your minted pineapple mojito mocktail in advance. Here’s how: - Prep ingredients early: You can muddle the pineapple and mint ahead of time. Just store them in the fridge. - Keep everything fresh: If you prepare your ingredients, store them in airtight containers. This helps keep the flavors fresh. Making it ahead means you can enjoy your drink without the fuss later. For the full recipe, check out the instructions above. {{image_2}} You can switch up the fruit in your mocktail. Mango and strawberry are great options. Each adds a sweet twist. Try ripe mango chunks for a tropical flair. Strawberries give a refreshing taste. Use whatever is in season for the best flavor. Peaches or berries also work well. Each fruit brings its own fun! Not a fan of mint? You can use basil or cilantro instead. Basil adds a sweet and spicy taste. It pairs nicely with pineapple. Cilantro gives a fresh, bright flavor. Mixing herbs can create fun new tastes. You could even try a blend of herbs for a unique drink. This mocktail is great with many meals or snacks. It pairs well with spicy dishes like tacos. You can serve it alongside a light salad too. Planning a party? Scale up the recipe easily. Just multiply the ingredients by the number of guests. You can make a big batch in a pitcher. Everyone will love this refreshing drink! For the complete recipe, check out the Full Recipe section. When you have leftover mocktail parts, store them in airtight containers. This keeps them fresh. You can keep the prepared drink in the fridge for up to two days. If you notice any strange smells or changes in color, it's best to throw it away. You can freeze fresh fruit like pineapple. Just cut it into chunks and place it in a freezer bag. This way, you have fruit ready for your next drink. You can also make ice cubes with herbs. Simply blend mint leaves with water, pour it into an ice tray, and freeze. These cubes add flavor when they melt. It's important to know when to toss prepared ingredients. If your fruit starts to look mushy or discolored, it's time to discard it. Mold is another sign that something is bad. Always trust your senses—if it smells off, don’t use it. For the best taste, use fresh ingredients whenever possible. For the full recipe, check out the earlier sections. You can use canned pineapple in this mocktail. However, it may change the flavor a bit. Canned pineapple often has added sugar, which can make it sweeter. This sweetness can mask the fresh taste you want in your drink. If you choose canned, rinse it well to reduce sweetness. Use the same amount as fresh pineapple. You can still enjoy a tasty drink, but fresh fruit gives the best flavor. To make the mocktail more tart, simply add more lime juice. Lime juice gives that zesty kick. Start with half a lime and keep adding to your taste. You can also try other acids like lemon juice or even a splash of vinegar. Each adds a unique flavor twist while boosting tartness. Adjust slowly and taste as you go. Yes, this mocktail has great health benefits! Pineapple is full of vitamins and antioxidants. It helps boost your immune system. Mint adds fresh flavor and can aid digestion. This drink is low in calories too, especially if you use less honey or agave. You can also skip the sweetener for a truly healthy treat. Enjoy guilt-free and refreshing sips! This blog showed how to make a tasty pineapple mint mocktail. You learned the best ingredients, creative steps, and many tips for success. Remember to adjust the sweetness and try different fruits. Make this drink for parties or just for fun. Having fresh ingredients makes it special. Store your leftovers wisely to keep them fresh. Enjoy making and sharing this refreshing drink with friends!

Minted Pineapple Mojito Mocktail Refreshing Treat

Looking for a refreshing drink that captures summer? Try my Minted Pineapple Mojito Mocktail! This simple recipe combines fresh pineapple,

To make a tasty Golden Ginger Matcha Latte, you need a few simple ingredients. Here’s what you will need: - 1 teaspoon matcha green tea powder - 1 teaspoon freshly grated ginger - 1 cup milk of choice (almond, oat, or coconut) - 1 tablespoon honey or maple syrup (adjust to taste) - 1/4 teaspoon turmeric powder - Pinch of sea salt - Optional: 1/2 teaspoon vanilla extract - Ground cinnamon for topping Each ingredient brings its own flavor and health benefits. Matcha gives you a nice boost of energy. Ginger adds a warm kick and helps with digestion. Milk makes it creamy and smooth. Sweeteners like honey or maple syrup add just the right amount of sweetness. Turmeric adds a golden color and has anti-inflammatory properties, while sea salt enhances all the flavors. Finally, cinnamon gives a lovely finish. For the full recipe, you can check out the instructions to create this delicious drink. This latte is not just a drink; it’s a hug in a mug! - Sifting and whisking matcha Start by sifting 1 teaspoon of matcha green tea powder into a small bowl. This helps to remove clumps and ensures a smooth drink. Next, whisk in a few tablespoons of hot water. Do not use boiling water, as it can make the matcha bitter. Whisk until you see bubbles and the mixture is frothy. Set this aside for later. - Infusing ginger with milk Take 1 teaspoon of freshly grated ginger and put it in a saucepan. Add 1 cup of your favorite milk, like almond, oat, or coconut. Heat this mixture over medium heat. Stir gently for about 3 to 4 minutes. You want it warm but not boiling. The kitchen will smell great as the ginger infuses the milk. - Combining ingredients and flavors Once the milk is warm, add 1/4 teaspoon of turmeric powder, honey or maple syrup, and a pinch of sea salt. If you like, you can add 1/2 teaspoon of vanilla extract for extra flavor. Whisk all these ingredients together until they blend well. - Straining and mixing for a frothy finish Remove the saucepan from the heat. Use a fine mesh strainer to pour the ginger-infused milk into a large mug. This step removes the ginger bits. Now, slowly pour the prepared matcha into the mug. Whisk gently to mix everything. This will create a nice froth on top. For a final touch, sprinkle some ground cinnamon on top. This simple process will give you a warm, energizing drink that is both delicious and healthy. You can find the complete details in the Full Recipe. To make the best Golden Ginger Matcha Latte, you need to pay attention to detail. Here are some tips to help you succeed: - How to avoid clumps in matcha: Always sift the matcha green tea powder first. This step helps break up any lumps. After sifting, whisk the matcha with a bit of hot water. Use a bamboo whisk or a regular whisk. The goal is to mix until smooth and frothy. - Infusion tips for maximizing ginger flavor: Use fresh ginger for the best taste. Grate the ginger finely to release its oils and flavors. When you warm the ginger with the milk, stir gently. This method allows the flavors to meld without boiling, which can dull the taste. - Achieving the perfect froth and consistency: After straining the ginger from the milk, slowly add the matcha. Whisk gently to combine. This action creates a light froth. If you want more froth, you can use a milk frother. The right texture makes the latte creamy and enjoyable. These simple steps will help you create a delicious and energizing drink every time. For the full recipe, check out the Golden Ginger Matcha Latte section. Enjoy! {{image_2}} Matcha green tea is a star. It is packed with antioxidants. These help fight free radicals in your body. By drinking matcha, you can boost your immune system. It may also improve your brain function. You feel alert but calm at the same time. Ginger is another great ingredient. It helps reduce inflammation in your body. This can ease pain and improve your digestion. Ginger also has compounds that fight sickness. Adding fresh ginger to your latte can give you a health boost. Turmeric is the last ingredient worth noting. It contains curcumin, which has strong anti-inflammatory effects. This can help with joint pain and even heart health. Turmeric also supports your immune system. It pairs well with ginger and matcha in this latte. These ingredients together make a powerful drink. You get a mix of antioxidants, anti-inflammatory agents, and health benefits. This Golden Ginger Matcha Latte is not just tasty; it's good for you too! For a full guide on how to make this latte, check out the Full Recipe. You can make your Golden Ginger Matcha Latte even better by customizing it. Here are some easy ways to do that. - Dairy-free alternatives: You can use almond, oat, or coconut milk. Each milk adds a unique flavor. Almond milk is nutty and light. Oat milk is creamy and sweet. Coconut milk gives a tropical twist. - Sweetener substitutions and adjustments: Honey and maple syrup are great, but you can try others too. Agave syrup is a good choice for a mild taste. Coconut sugar adds a caramel hint. Adjust the amount based on your taste buds. - Flavor additions: Spice it up! You can add a pinch of ground nutmeg or cardamom. Both bring warmth to your drink. A splash of vanilla extract gives a lovely aroma. You could even add a hint of cayenne pepper for a kick. Feel free to experiment until you find your perfect matcha latte. Each small change can make a big difference. For the full recipe, check the Golden Ginger Matcha Latte details above. How to make a stronger version? To make a stronger Golden Ginger Matcha Latte, add more matcha powder. You can use 1.5 teaspoons instead of 1. This boosts the flavor and caffeine. You can also increase the ginger. A little more ginger makes it spicier and more aromatic. Can I use powdered ginger instead of fresh? Yes, you can use powdered ginger. Use about 1/4 teaspoon of powdered ginger. It will give a different taste, but it still works. Fresh ginger has a brighter flavor, while powdered is more mellow. Where to find high-quality matcha? Look for matcha at specialty tea shops or online. Check for vibrant green color and fine texture. Quality matcha will often say “ceremonial grade” on the label. This ensures you get the best flavor and health benefits. What are the best milk options for lattes? You can use many types of milk for your latte. Almond, oat, and coconut milk are great choices. Each adds its own flavor and creaminess. Choose the one you like best or mix them for fun! This blog post covered how to make a Golden Ginger Matcha Latte. We discussed key ingredients, like matcha, fresh ginger, and milk. The step-by-step guide ensures your latte is smooth and frothy. I also shared tips to avoid clumps and enhance ginger flavor. We explored the health benefits of matcha, ginger, and turmeric. Finally, I offered ways to customize your latte. Now, you have everything needed to craft this tasty drink. Enjoy your delicious, healthy treat that’s good for both body and mind!

Golden Ginger Matcha Latte Energizing and Healthy Drink

Are you ready to boost your energy with a delicious twist? The Golden Ginger Matcha Latte packs a punch of

- 1 cup fresh honeydew melon, diced - 2 cups milk (dairy or non-dairy) - 1 cup brewed green tea, cooled - 1 bunch fresh mint leaves - 1 tablespoon sugar or honey (to taste) Honeydew melon gives this drink its sweet and juicy base. Choose a ripe melon for the best flavor. You can use either dairy milk or any non-dairy milk you prefer. The brewed green tea adds a nice depth to the drink. Fresh mint leaves bring a cooling effect that balances the sweetness. If you like things sweet, you can adjust the sugar or honey to your taste. - Ice cubes - Mint sprigs for garnish Ice cubes keep your drink cool and refreshing. Garnishing with mint sprigs not only looks nice but also adds a burst of minty aroma as you sip. These simple additions make your Honeydew Mint Milk Tea even more enjoyable and appealing. For the complete preparation, check the Full Recipe. - First, take 1 cup of fresh honeydew melon and dice it. - Next, put the diced honeydew and 1 cup of milk into a blender. - Blend until smooth and creamy. - In another bowl, mix 1 cup of brewed green tea with the remaining milk. - If you like it sweet, add 1 tablespoon of sugar or honey and stir. - Now, strain the honeydew-milk mixture using a fine sieve or cheesecloth. - This step removes any pulp and gives a silky texture. - In a large glass or pitcher, combine the strained honeydew mixture with the green tea and milk mixture. - Stir gently to mix everything well. - Take a handful of fresh mint leaves and bruise them. - You can do this by tapping them lightly with the back of a spoon. - Add the bruised mint leaves to your mixture. - Fill glasses with ice cubes. - Pour the honeydew milk tea mixture over the ice. - Finally, garnish each glass with extra sprigs of mint. For the complete recipe, check out the [Full Recipe]. To get the best flavor from your Honeydew Mint Milk Tea, start with ripe honeydew melon. A ripe honeydew should feel heavy for its size and have a creamy yellow skin. If it smells sweet, it’s ready to use. Choosing the right mint is also key. Use fresh mint leaves that are bright green and fragrant. Avoid any that are wilted or brown. Straining the mixture is vital for a smooth drink. When you blend honeydew and milk, small bits of pulp can form. By straining this mixture, you ensure a silky texture. This simple step takes your drink from good to great. Use a fine sieve or cheesecloth for the best results. Sweetness can change the whole drink. Start with one tablespoon of sugar or honey and taste it. If you want it sweeter, add more until it fits your taste. Remember, you can always add more, but it’s hard to take it out. So, start small and adjust as needed. For the complete recipe, check out the Full Recipe section. Enjoy crafting your perfect Honeydew Mint Milk Tea! {{image_2}} You can switch up the milk for your Honeydew Mint Milk Tea. Try non-dairy milk like oat, almond, or coconut. Each type brings its own taste. Oat milk gives a creamy texture, while almond adds a nutty touch. You can also experiment with flavored milk. Vanilla or coconut milk can add a fun twist to your drink. Get creative by adding other fruits. Cantaloupe pairs well with honeydew and adds a fresh taste. Just blend it in with the honeydew for a fruity kick. You can also infuse your drink with other herbs. Basil adds a sweet, aromatic layer that complements the mint. Just toss in a few basil leaves along with the mint. You can customize the sweetness of your drink. Use flavored syrups like vanilla or caramel to change the taste. If you want a richer treat, try adding a scoop of ice cream. It will make your Honeydew Mint Milk Tea extra creamy and fun. Just remember to blend it well to mix it in smoothly. For the full recipe, check out the Honeydew Mint Milk Tea section above. To keep your honeydew mint milk tea fresh, store it in the fridge. Use a sealed container to prevent any odors from mixing in. The tea stays fresh for about two days. After that, you may notice a change in flavor and texture. If you have leftover honeydew or mint, use them in smoothies or salads. You can also blend the honeydew into yogurt for a tasty snack. Fresh mint works great in water or as a garnish on other dishes. Honeydew mint milk tea is a cool drink that combines sweet honeydew melon and fresh mint. The drink has a smooth and creamy texture, thanks to the milk. The green tea adds a light flavor, making it refreshing. The mint gives it a bright, herbal note that balances the sweetness of the honeydew. Each sip feels like summer in a glass! Yes, you can easily make this tea vegan. Simply swap regular milk for non-dairy options. Good choices include almond milk, oat milk, or coconut milk. These plant-based milk types add different flavors. Each one pairs nicely with honeydew and mint. Just make sure to check the labels for added sugars. To boost the mint flavor, use more fresh mint leaves. You can also bruise the leaves before adding them. This helps release their oils, making the tea taste more minty. Another tip is to steep the mint leaves in the hot tea for a few minutes. Just remember not to overdo it; too much mint can be overpowering. Absolutely! Honeydew mint milk tea shines in hot weather. It’s cool, refreshing, and hydrating. Serve it over ice for a chilled treat. You can also add extra ice cubes for a slushy texture. This drink pairs well with summer meals, picnics, or just relaxing in the sun. Enjoy it any time you need a boost during warm days! Honeydew mint milk tea is a refreshing drink made from simple, tasty ingredients. We discussed each step, from blending honeydew to pouring over ice. I shared tips on picking ripe fruits and adjusting sweetness. Remember, you can customize it with different milks or fruits. Store it properly to enjoy it later. Whether you want a cool drink for summer or a fun twist on tea, this drink is a great choice. Dive in and enjoy crafting your unique version today!

Honeydew Mint Milk Tea Refreshing Summer Drink Recipe

Looking for a cool, refreshing drink to beat the summer heat? Let me introduce you to Honeydew Mint Milk Tea!

To make a Kiwi Pineapple Punch, gather these items: - 4 ripe kiwis, peeled and sliced - 1 medium pineapple, peeled, cored, and chopped - 2 cups coconut water - 1 cup freshly squeezed lime juice - 2 tablespoons honey or agave syrup (optional, for sweetness) - 1 cup sparkling water (optional, for fizz) - Ice cubes - Fresh mint leaves for garnish When choosing your kiwis, pick ones that feel slightly soft. This means they are ripe and sweet. For the pineapple, look for one that smells sweet at the base. A fresh, juicy pineapple adds great flavor. For coconut water, select a brand that is pure and has no added sugar. Fresh lime juice is key; it gives the punch a bright, zesty kick. If you choose to use honey or agave syrup, make sure it's pure and natural. If you want a sugar-free option, omit the honey or agave syrup. You can also use stevia or another low-calorie sweetener. For those who prefer a non-coconut flavor, swap coconut water with filtered water or cold green tea. If you want more fizz, opt for tonic water instead of sparkling water. This punch is flexible to suit your taste and needs! Start by gathering all your ingredients. You will need 4 ripe kiwis, 1 medium pineapple, 2 cups of coconut water, and 1 cup of freshly squeezed lime juice. If you want it sweeter, grab 2 tablespoons of honey or agave syrup. Don’t forget 1 cup of sparkling water and some ice cubes. Fresh mint leaves will add a nice touch for garnish. Now, let’s blend the fruits. Take your peeled and sliced kiwis and chopped pineapple. Place them in a blender. Blend on high until you achieve a smooth puree. This will form the base of your punch. The bright colors will make your drink pop! In a large pitcher, mix the coconut water and lime juice. If you want a sweet punch, add honey or agave syrup. Stir well until it dissolves. Next, pour in your kiwi-pineapple puree. Gently stir to combine everything. If you like fizz, add the sparkling water just before serving. Pour the punch over ice cubes in glasses. Finally, garnish with fresh mint leaves. Enjoy your refreshing drink! For the full recipe, check the complete list above. To keep your Kiwi Pineapple Punch cool, chill all your ingredients first. Place the coconut water, lime juice, and fruit in the fridge for at least an hour. This step makes the punch refreshing right from the start. If you need to chill it fast, you can add ice cubes directly to the pitcher. Just remember, too much ice can water it down. Taste is key. If you want a sweeter punch, add honey or agave syrup. Start with a little and mix well. Then taste again to see if it meets your preference. You can also add more lime juice for extra zing. Adjusting flavors gives your punch a personal touch. When serving this punch, choose clear glasses to show off the vibrant colors. Add ice cubes to each glass, then pour the punch over. For a fun twist, garnish with fresh mint leaves or even a slice of kiwi. This drink is perfect for summer parties, barbecues, or just a sunny afternoon. You can find the full recipe for more detailed instructions. Enjoy! {{image_2}} You can easily switch this punch from non-alcoholic to alcoholic. For a fun twist, add rum or vodka. Use about 1 to 2 cups of your favorite spirit. This change brings a party vibe to your drink. If you prefer a non-alcoholic version, just skip the booze. The fruity flavors still shine through and keep it refreshing. Feel free to get creative with other fruits! You can add strawberries, mangoes, or oranges. These fruits match well with kiwi and pineapple. Each fruit brings a new taste and color. You can also mix in herbs like basil for a unique flavor. Try adding ginger for a spicy kick! Each addition makes your punch special. Want to serve a crowd? Simply double or triple the recipe! Just remember to keep the same ratio of ingredients. If you're making less, halve the recipe. This way, your punch will always taste great. Use a large pitcher for big batches or smaller jars for personal servings. This punch adapts to your needs, making it perfect for any event. For the full recipe, check out the details above. To keep your Kiwi Pineapple Punch fresh, store it in a clean, airtight container. A glass jar or pitcher works well. Avoid using metal containers, as they can alter the taste. Make sure to fill the container to the top to limit air exposure. This will help the punch stay tasty for longer. The Kiwi Pineapple Punch lasts about 3 to 5 days in the fridge. If you used sparkling water, it may lose its fizz sooner. To keep it fresh, stir it gently before serving. If you notice any changes in color or smell, it’s best to discard it. You can freeze Kiwi Pineapple Punch for later use. Pour the punch into ice cube trays or freezer-safe bags. This way, you can use it as a refreshing ice cube in drinks or as a slushy treat. The punch stays good in the freezer for about 2 to 3 months. Just remember to thaw it in the fridge before enjoying it again. Check the [Full Recipe] for more tips on making this delightful drink. Yes, you can make Kiwi Pineapple Punch ahead of time. It tastes great after chilling. I suggest mixing the base ingredients first. Store it in the fridge for up to three days. Just add the sparkling water right before serving. This keeps the fizz fresh and fun. You can serve Kiwi Pineapple Punch with light snacks. Fresh fruit platters work well. Try chips with salsa or guacamole, too. For a heartier option, serve grilled shrimp or chicken skewers. These pair nicely and enhance the tropical vibe. Guests will love the mix of flavors and textures. To boost refreshment, use frozen fruit instead of ice cubes. This keeps your punch cold without watering it down. You can also add more coconut water for a creamy taste. Fresh herbs like basil or lemon balm add an herbal note. If you want more zing, squeeze in extra lime juice. These tips make the punch even more delightful for hot days. Check out the Full Recipe for all the details! This blog post covered how to make Kiwi Pineapple Punch. You learned about ingredients, from quality choices to substitutions. We walked through the steps, from prepping the fruit to serving the mix. Tips offered ideas on chilling, sweetness, and special occasions. We explored variations for all tastes and storage for leftovers. In closing, this punch is fun and easy to make. Feel free to get creative with flavors. Enjoy this drink at your next gathering!

Kiwi Pineapple Punch Refreshing Summer Drink Recipe

Get ready to cool off with my Kiwi Pineapple Punch! This refreshing summer drink is the perfect blend of sweet

To make the Lavender Earl Grey Slush, you need some simple and fresh ingredients. Here’s the full list of what you will need: - 2 cups water - 2 tablespoons Earl Grey tea leaves - 2 tablespoons dried culinary lavender - 1/2 cup honey or agave syrup (adjust to taste) - 1 cup ice cubes - 1 tablespoon fresh lemon juice - 1 pinch of salt - Additional lavender buds for garnish (optional) These ingredients blend together to create a unique and refreshing treat. The water serves as the base, while the Earl Grey tea leaves and lavender bring floral notes. Honey or agave syrup adds sweetness, and the lemon juice gives a nice zing. The ice cubes make it icy and slushy, perfect for summer. Feel free to adjust the amount of honey or agave to match your taste. You can also add more lemon juice for extra brightness. The extra lavender buds are optional but add a lovely touch when you serve the slush. For the best flavor, use high-quality tea and culinary lavender. These will give your slush a bold and aromatic taste. Once you gather all the ingredients, you are ready to create a delightful summer drink. Check out the Full Recipe for detailed steps on how to prepare this slush. - Step 1: Bring 2 cups of water to a boil in a medium saucepan. - Step 2: Once boiling, remove the pot from heat. Add 2 tablespoons of Earl Grey tea leaves and 2 tablespoons of dried culinary lavender. Cover the pot and let it steep for 10-15 minutes. - Step 1: After steeping, strain the mixture to remove the tea leaves and lavender buds. - Step 2: While the tea is still warm, stir in 1/2 cup of honey or agave syrup until it fully dissolves. Let the mixture cool to room temperature. - Step 1: Once cooled, pour the tea mixture into a blender. Add 1 cup of ice cubes, 1 tablespoon of fresh lemon juice, and a pinch of salt. Blend until it becomes slushy. - Step 2: Taste the slush and adjust sweetness if needed by adding more honey or agave syrup. Pour the slush into chilled glasses. You can garnish it with additional lavender buds if you like. This refreshing treat is perfect for hot days and tastes just like summer! You can find the full recipe to make this delightful Lavender Earl Grey Slush in the earlier section. To make the best Lavender Earl Grey Slush, blending is key. Start by adding the cooled tea mixture to your blender. Then, add the ice cubes. Blend at a low speed first. After a few seconds, increase the speed. This method helps break down the ice evenly. You want a slushy texture, not a smoothie. For the best ice quality, use fresh ice. If your ice smells or tastes stale, it can affect your slush. Also, try to use larger ice cubes. They blend better and create a fluffier texture. Balancing sweetness in your slush is vital. If you like it sweeter, add more honey or agave syrup. Start with a little, then taste. You can always add more, but you can't take it out. Consider adding a splash of fresh lemon juice. It brightens the flavor and adds a nice zing. If you want to get creative, pair your slush with a light snack. Shortbread cookies or scones go well. They complement the floral notes of the lavender. For more tips, check out the Full Recipe. {{image_2}} You have options when it comes to sweeteners for your Lavender Earl Grey Slush. You can try using maple syrup or agave syrup. Both add a nice flavor and sweetness. Maple syrup gives a warm taste, while agave is light and smooth. If you want a low-calorie option, consider stevia or other sugar alternatives. They can work well in this recipe too. Just remember to adjust the amount based on your taste. Fruits can make your slush even more fun! You can add berries like strawberries or blueberries. These will add color and a burst of flavor. Citrus fruits like lemons or oranges also work great. They give a tangy kick that pairs well with the lavender and tea. If you want to get creative, you can mix in herbal flavors too. Fresh mint or basil can add a refreshing twist. Just chop them up and blend them with the other ingredients. For the full recipe, check out the instructions above! You can keep the Lavender Earl Grey slush in the fridge for up to three days. To store it, pour any leftovers into an airtight container. This way, it stays fresh and tasty. If you notice it separates, just give it a quick stir before serving again. If you want to enjoy the slush later, freezing is a great option. Pour the slush into a freezer-safe container. Leave some space at the top, as liquids expand when frozen. When you’re ready to enjoy it, take it out and let it thaw in the fridge for a few hours or overnight. Keep in mind that the texture may change after freezing. It can become a bit more icy than slushy. If that happens, blend it again with a little water to bring back the slushiness. Enjoy your refreshing treat anytime! For the full recipe, check out the details above. Yes, you can use regular tea. Earl Grey has a unique flavor from bergamot. If you prefer, try black tea or green tea. Each type will give a different taste. Feel free to experiment to find what you love. Yes, the slush is great for kids. However, watch the honey amount. For younger ones, use less honey. You can also swap honey for maple syrup, agave, or even sugar. These options are safe for kids. Earl Grey has caffeine, but it's low. Limiting their intake is key. Lavender has many benefits. It can help calm nerves and promote sleep. Some studies say it may ease headaches and anxiety. Lavender also has antioxidants, which are good for health. Adding it to your slush makes it tasty and beneficial. Making this slush vegan is easy. Swap honey with agave syrup or maple syrup. Both options add sweetness without animal products. You can also use coconut cream instead of regular cream. This keeps it rich and dairy-free. This blog post covered a delightful slush recipe using Earl Grey tea and lavender. You learned about essential ingredients, step-by-step instructions, and tips for the best results. We discussed variations with different sweeteners and fruits to fit your taste. Lastly, I shared storage tips and answered common questions. Experiment with this refreshing drink. It’s simple and fun to make, plus it offers unique flavors. You’ll enjoy it all summer long, with or without friends.

Lavender Earl Grey Slush Refreshing Summer Treat

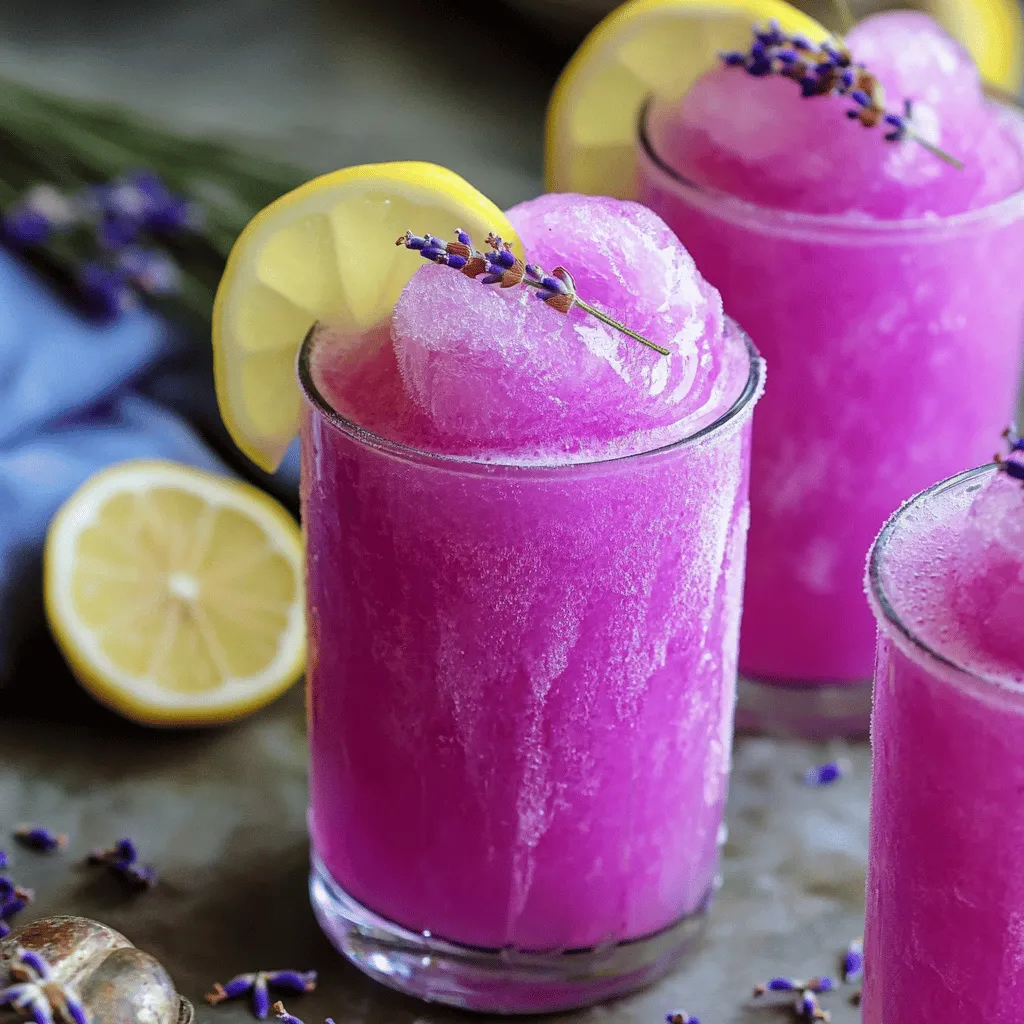
Looking for a cool and tasty way to beat the summer heat? Try my Lavender Earl Grey Slush! This refreshing

To make the Almond Joy Mocha Blend, you will need a few key ingredients that blend together for a rich, creamy drink. Here’s your detailed ingredients list: - 1 cup brewed coffee (strong) - 1 cup almond milk (or any milk of choice) - 2 tablespoons cocoa powder - 2 tablespoons unsweetened shredded coconut - 2 tablespoons almond butter - 1-2 tablespoons maple syrup or honey - 1 teaspoon vanilla extract - A pinch of salt - Slivered almonds for topping Each ingredient plays a vital role. The brewed coffee gives you that caffeine kick. Almond milk keeps it creamy while adding a nutty taste. Cocoa powder adds chocolate flavor, and shredded coconut brings a texture you can enjoy. Almond butter adds richness, while maple syrup or honey sweetens the mix. The vanilla extract is like a magic touch, and salt balances all the flavors. Finally, slivered almonds add a nice crunch on top. For the full recipe, check out the instructions to make this delightful drink! - Brew a strong cup of coffee. Use your favorite method for the best flavor. - In a small saucepan, combine 1 cup of almond milk, 2 tablespoons of cocoa powder, and 2 tablespoons of shredded coconut. - Heat the mixture over medium heat. Whisk it together until fully mixed. Avoid boiling. - Once heated, remove the saucepan from heat. Stir in 2 tablespoons of almond butter, 1 teaspoon of vanilla extract, 1-2 tablespoons of maple syrup, and a pinch of salt. Mix until smooth and creamy. - In a blender, combine the brewed coffee and the chocolate mixture. Blend on high for about 20-30 seconds until well combined and frothy. - Taste your blend. Adjust sweetness if needed by adding more maple syrup or honey. - Pour the mocha blend into a mug. Top it with slivered almonds and extra shredded coconut if you like. Enjoy your delicious Almond Joy Mocha Blend! Find the full recipe for more details. - Adjust sweetness to taste with maple syrup or honey. Start with one tablespoon. Taste and add more if needed. - Use a blender for a frothier texture. Blend the mocha mix for about 20-30 seconds until it’s smooth and creamy. - Serve in clear mugs to display layers. It makes the drink look fancy and fun. - Sprinkle cocoa powder on top for an elegant touch. This simple step really enhances the look. {{image_2}} You can make your Almond Joy Mocha Blend even better. Here are some fun ideas: - Add a dash of cinnamon or nutmeg for warmth. This simple tweak adds spice and comfort to the drink. It’s perfect for colder days or when you need a cozy treat. - Substitute hazelnut milk for a different flavor profile. Hazelnut milk can enhance the nutty taste. This switch gives your mocha a lovely twist, adding depth to the overall flavor. If you have dietary needs, don’t worry! You can still enjoy this drink: - Use non-dairy milk alternatives for a vegan option. Almond milk works great, but you can also try oat or soy milk. This keeps the drink creamy and delicious without any dairy. - Substitute almond butter with peanut or sunflower seed butter. If you’re allergic to nuts or want a change, this works well. Peanut butter will give a rich flavor, while sunflower seed butter keeps it nut-free and tasty. Explore these variations to find what you love best! For the full recipe, check out the details above. To keep your Almond Joy Mocha Blend fresh, store any leftover mixture in an airtight container. Place it in the fridge right away. This helps lock in the flavors. Enjoy your drink within 2-3 days for the best taste. The blend can lose its yummy flavor if stored too long. When you want to enjoy it again, gently reheat the mocha blend. You can use the stove or the microwave. If using the stove, warm it over low heat, stirring often. For the microwave, heat it in short bursts. Stir in between to avoid hot spots. This method keeps the flavors nice and tasty. Almond Joy Mocha Blend is a delightful drink inspired by the classic candy bar. It combines rich coffee, creamy almond milk, and chocolatey cocoa powder. This drink also features shredded coconut and almond butter, giving it a sweet, nutty flavor. The result is a smooth, indulgent mocha that pleases your taste buds. You can enjoy this drink hot or cold, making it perfect for any season. Yes, you can use regular milk. If you choose whole milk, it will add creaminess. Skim milk will make it lighter but less rich. Your drink will still taste good, but the nutty flavor will change. Almond milk gives a unique taste that complements the other ingredients well. You can find Almond Joy Mocha Blend ingredients at most grocery stores. Look for almond milk, cocoa powder, and almond butter in the baking or dairy aisles. You can also buy these ingredients online at stores like Amazon or Walmart. Specialty stores may have unique brands of almond butter or coconut. You can easily change this recipe to fit your taste. Here are some ideas: - Use hazelnut milk for a different flavor. - Add a pinch of cinnamon for warmth. - Substitute almond butter with peanut butter for a twist. - Top with whipped cream for extra indulgence. - Adjust sweetness with more or less maple syrup. Feel free to make it your own! For the complete recipe, check out the Full Recipe section. The Almond Joy Mocha Blend is a tasty drink with rich flavors. You start by brewing strong coffee and mixing in almond milk, cocoa, and coconut. Then, you blend it all together for a creamy finish. Try adding your favorite spices or milk options. You can store leftovers for a few days. Enjoy this drink hot or iced. It's an easy, fun treat for anyone who loves chocolate and coffee. Explore and make it your own!

Almond Joy Mocha Blend Rich and Flavorful Recipe

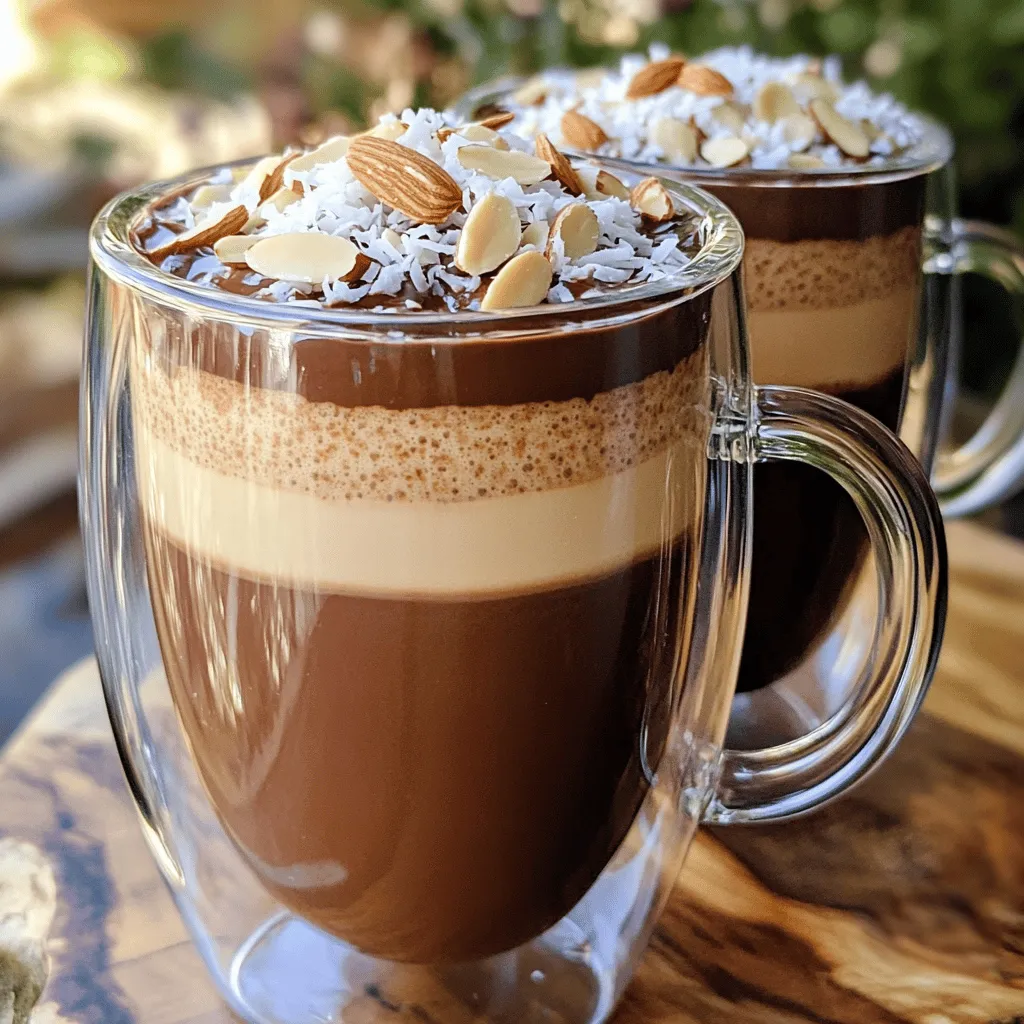
If you’re craving a flavor-packed drink that brings together the rich taste of coffee, chocolate, and almonds, then the Almond

Older posts
Newer posts
← Previous Page1 … Page67 Page68 Page69 … Page127 Next →

dsad

© 2025 Southern Dishes • Built with GeneratePress

Our Policies

  • Copyright Policy
  • Cookie Policy
  • GDPR Policy
  • Privacy Policy
  • Disclaimer
  • Terms Of Use

More Information

  • Home
  • About
  • Contact
  • Appetizers
  • Dessert
  • Dinner
  • Drinks
©2025, Southern Dishes About Back To Top