Skip to content
DisclaimerTerms Of UseGDPR PolicyCookie Policy

Southern Dishes

  • Home
  • Drinks
  • Appetizers
  • Dinner
  • Dessert
  • About
  • Contact
  • Privacy Policy
DisclaimerTerms Of UseGDPR PolicyCookie Policy

Isabella

- 2 medium zucchinis (zoodles) - 1 cup basil pesto (store-bought or homemade) - 1 cup cherry tomatoes, halved - 1 cup cooked chickpeas (canned or boiled) - 1/4 cup toasted pine nuts - 1/2 teaspoon garlic powder - Salt and pepper to taste - Fresh basil leaves for garnish - Grated Parmesan cheese for serving (optional) The ingredients for the Easy Pesto Zoodle Bowl are fresh and simple. Zucchini offers a crunchy base. The basil pesto adds a rich, vibrant flavor. Cherry tomatoes bring sweetness and color. Chickpeas boost protein and fiber, making this bowl hearty. Toasted pine nuts add a delightful crunch. Garlic powder enhances the taste without being strong. A dash of salt and pepper balances all the flavors. Fresh basil leaves on top make it look fancy. You can also sprinkle Parmesan cheese if you want more flavor. This recipe serves 2-3 people. Each serving has about 300 calories. It has around 15 grams of fat, 10 grams of protein, and 30 grams of carbs. - Zucchini: Low in calories and high in water. Great for hydration and low-carb diets. - Basil Pesto: Provides healthy fats from olive oil and nuts. It also has vitamins and antioxidants. - Cherry Tomatoes: Packed with vitamins C and K. They also have potassium and folate. - Chickpeas: Full of protein and fiber, they keep you full longer. - Pine Nuts: A good source of healthy fats and magnesium. Each ingredient not only makes this dish tasty but also healthy. The combination of flavors and nutrients makes this Easy Pesto Zoodle Bowl a wonderful choice for any meal. You can find the Full Recipe above for step-by-step instructions. Spiralizing the zucchinis To start, you need zoodles. Take two medium zucchinis and spiralize them. If you don’t have a spiralizer, use a vegetable peeler. You can make thin strips that work well too. Zoodles are fun and a great pasta alternative. Preparing the pesto (store-bought vs. homemade) Next, you need basil pesto. You can buy it or make your own. Store-bought pesto saves time. Homemade pesto gives a fresh taste. If you choose homemade, blend fresh basil, garlic, nuts, and olive oil. Either way, you get a tasty flavor boost! Tossing zoodles with pesto Now, take a large bowl. Add the zoodles and the pesto. Toss them well until the zoodles are fully coated. The green color of the pesto makes the dish look bright and fresh. Mixing tomatoes and chickpeas In another bowl, mix the halved cherry tomatoes and cooked chickpeas. Season this mix with garlic powder, salt, and pepper. These ingredients add texture and protein, making your meal more filling. Plating the zoodle bowl Divide the zoodle mix into serving bowls. Make each bowl look pretty. Top with toasted pine nuts and fresh basil leaves. The nuts add crunch, while basil gives a lovely aroma. Optional topping ideas For an extra touch, sprinkle grated Parmesan cheese on top. This adds a nice salty flavor. You can also get creative with your toppings, like adding crushed red pepper flakes for heat or extra veggies for more color. For the full recipe, check the section above. Enjoy your flavorful and healthy Easy Pesto Zoodle Bowl! To boost the taste of your Easy Pesto Zoodle Bowl, consider adding spices or herbs. A pinch of red pepper flakes adds heat, while crushed black pepper gives depth. You can also mix in fresh herbs like parsley or oregano for a fresh kick. When you apply the pesto, make sure to coat every zoodle well. This way, every bite is full of flavor. I recommend using your hands to toss gently, ensuring an even spread. Getting the right zoodle consistency is key. When spiralizing, aim for uniform strands. This helps in even cooking and a more appealing look. To avoid soggy zoodles, do not overcook them. You only need to toss them with the pesto briefly. If you want a crunch, sauté them for just a minute. This keeps them firm and delicious. Make your zoodle bowl pop! Use colorful tableware to enhance the dish's appeal. Bright bowls can make the meal look even tastier. For garnishing, consider fresh basil leaves or a sprinkle of toasted pine nuts. This not only adds flavor but also adds color. A touch of grated Parmesan on top gives a nice finish, making it look gourmet. For the full recipe, check out the details above. {{image_2}} You can switch out the pesto if you want. Try sun-dried tomato pesto or arugula pesto for a twist. Both options give a great taste. You can also make your own pesto at home. Just blend fresh basil, garlic, nuts, and olive oil. If you want a nut-free version, use sunflower seeds instead of pine nuts. For vegetables, zoodles are fun, but other options work too. Consider using carrots or bell peppers. You can also mix in some shredded cabbage for extra crunch. The key is to pick what you like and have fun with it. Adding protein to your zoodle bowl makes it more filling. Grilled chicken or shrimp adds a lot of flavor. Just cook them first and then toss them in. If you prefer plant-based options, tofu is great. You can pan-fry it until golden brown for extra taste. Legumes like chickpeas or black beans can boost protein too. They add texture and richness. Stir them in with the other ingredients. This makes your meal hearty and satisfying. Experimenting with different pesto flavors can elevate your dish. Sun-dried tomato pesto gives a rich, savory taste. Arugula pesto adds a peppery twist. You can try mixing these with classic basil pesto for fun new flavors. Cheese is another way to change things up. Use Pecorino Romano instead of Parmesan for a sharper taste. Crumbled feta or goat cheese can also add creaminess. Don’t be afraid to play with flavors to find what you love best. To store your zoodle bowl, place it in an airtight container. This keeps moisture in and prevents drying. Store it in the fridge and try to eat it within three days for the best taste. To keep zoodles fresh, layer paper towels in the container. This absorbs extra moisture and helps maintain their crunch. Can you freeze zoodle bowls? Yes, but I recommend separating the components first. Zoodles can become mushy when frozen, so it's best to freeze them without sauce. For proper freezing, place zoodles in a freezer bag and remove as much air as possible. Freeze pesto in ice cube trays for easy use later. When reheating zoodles, use the stovetop for the best texture. Heat a pan over medium heat and add a splash of water. Add zoodles and sauté for a minute or two. This warms them up without making them mushy. Always avoid the microwave for zoodles, as they can get soggy. You can make zoodles without a spiralizer using a few simple tools. A vegetable peeler works well. Just peel long strips from the zucchini. You can also use a box grater. Grate the zucchini to create thin, noodle-like strips. A knife can work too, if you cut the zucchini into thin slices. Any of these methods will give you a fresh, zoodle-like texture for your dish. Yes, you can use many other vegetables for this recipe. Carrots are a great choice; they add sweetness. Cucumbers can give a nice crunch, too. Butternut squash works well when cooked. You can try bell peppers for a colorful twist. Keep in mind that different veggies will change the taste and texture. Feel free to mix and match based on your preference! Making pesto from scratch is simple! Start by blending fresh basil, garlic, and pine nuts in a food processor. Add olive oil slowly until it’s smooth. Mix in grated Parmesan cheese for flavor. For a detailed recipe, check out my homemade pesto recipe. This homemade touch will elevate your zoodle bowl! For the complete flavor experience, don't forget to check the Full Recipe. In this post, I covered how to make a delicious zoodle bowl. You learned about the best ingredients, step-by-step instructions, and storage tips. We also explored flavor variations and how to keep your zoodles fresh. Remember, you can always adapt this recipe to match your tastes and needs. Enjoy creating your own zoodle masterpiece with fresh ingredients. Eating healthy can be fun and tasty!

Easy Pesto Zoodle Bowl Flavorful and Healthy Meal

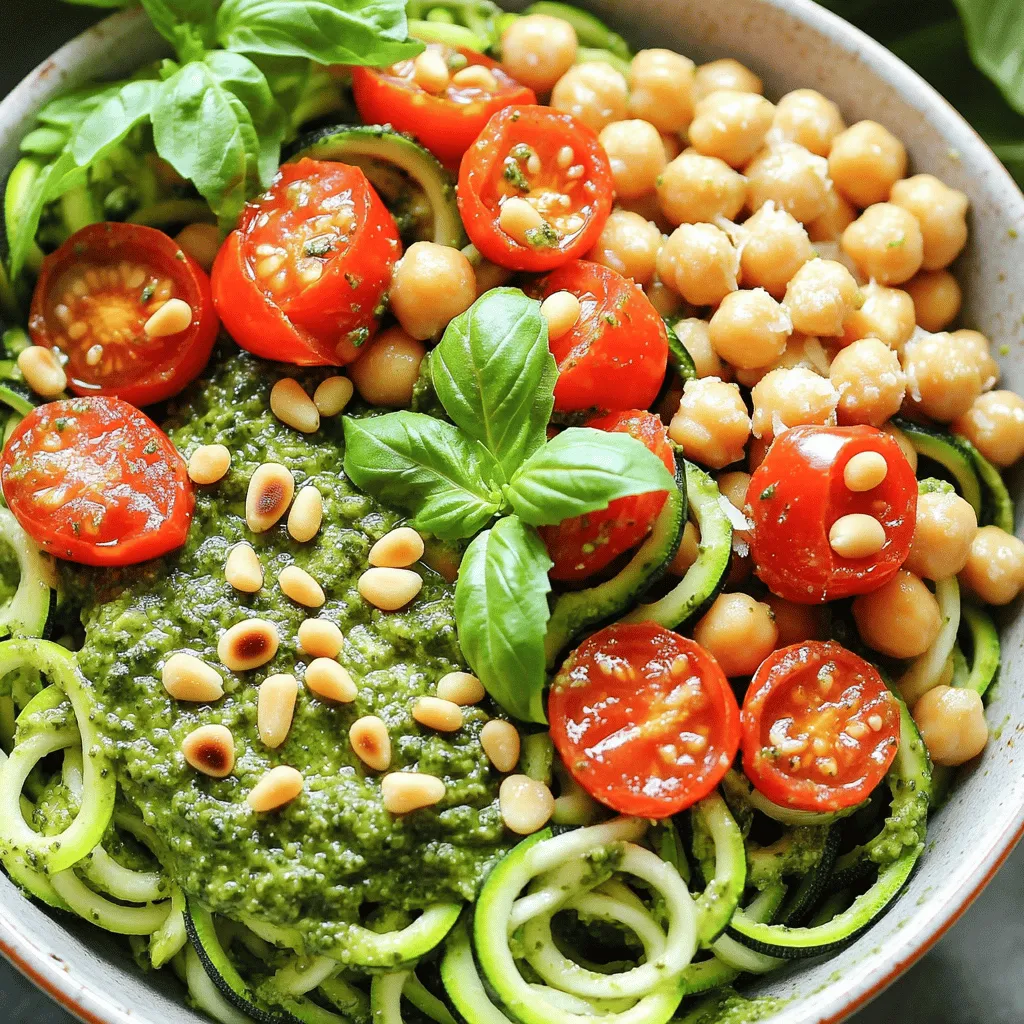
Looking for a quick, tasty meal that’s also good for you? My Easy Pesto Zoodle Bowl is the answer. With

- 1 block (14 oz) firm tofu, pressed and drained - 2 tablespoons soy sauce - 1 tablespoon sesame oil The main ingredients for crispy air fryer tofu are simple yet full of flavor. Firm tofu is key. It holds its shape well and crisps nicely in the air fryer. Soy sauce gives it a savory taste, while sesame oil adds a touch of richness. - 1 tablespoon cornstarch - 1 teaspoon garlic powder - 1 teaspoon onion powder - 1/2 teaspoon black pepper - 1/2 teaspoon smoked paprika Seasonings bring the dish to life. Cornstarch makes the tofu crispy. Garlic powder and onion powder add depth. Black pepper gives a nice kick, and smoked paprika adds a hint of smokiness. - Green onions - Sesame seeds Garnishes add a finishing touch. Chopped green onions give freshness. Sesame seeds add crunch and flavor. You can use them or skip them based on your taste. For the full recipe, check out the detailed instructions. To start, you need to press and drain the tofu. This step is key to getting crispy tofu. Wrap the block of tofu in a clean towel. Then place a heavy object on top. Let it sit for about 15 minutes. This will help remove excess water. Next, cube the tofu into bite-sized pieces. Aim for about 1-inch cubes. This size ensures even cooking. You want each piece to be crispy and golden. Now it's time to mix the marinade ingredients. In a large bowl, add the soy sauce, sesame oil, garlic powder, onion powder, black pepper, and smoked paprika. Whisk these together until well combined. The mix should smell amazing! Once mixed, add the cubed tofu to the bowl. Gently toss the cubes to coat each piece evenly in the marinade. Let the tofu sit for 15 minutes. This allows it to soak up all those great flavors. First, preheat your air fryer to 400°F (200°C). This step is important for a nice crisp. Next, arrange the tofu cubes in a single layer in the air fryer basket. Do not overcrowd the basket. If your air fryer is small, cook in batches. Now, air fry the tofu for 15-20 minutes. Shake the basket halfway through. This helps the tofu cook evenly. Your goal is golden brown and crispy tofu. Once done, remove the tofu from the air fryer. Let it cool for a moment before serving. Enjoy your crispy air fryer tofu! Check out the Full Recipe for more tips and details. To get crispy air fryer tofu, cornstarch is key. It creates a nice, crunchy layer. After marinating, toss the tofu with cornstarch. This thin coating helps absorb moisture, leading to a crispier bite. Control your air fryer temperature well. Set it to 400°F (200°C). This high heat cooks the tofu quickly, sealing in flavors while making it crispy. Crispy tofu pairs well with many dips. Try a tangy soy sauce mix or a spicy peanut sauce. You can also add a drizzle of hoisin for some sweetness. For side dishes, serve the tofu over rice or quinoa. You can add steamed veggies for a balanced meal. One big mistake is overcrowding the air fryer basket. Leave space between tofu pieces. If they touch, they won’t crisp up. Cook in batches if needed. Another mistake is skipping marination time. Letting the tofu soak for 15 minutes helps it absorb all the tasty flavors. This makes a huge difference in taste. For the full recipe, check out the Crispy Air Fryer Tofu Delight. {{image_2}} You can change the flavor of your crispy tofu easily. For a spicy kick, use chili powder. Start with a teaspoon and adjust to your taste. This adds heat and depth. For something sweeter, try honey or maple syrup. Mix it in the marinade for a tasty twist. Both options let you customize your dish. Explore and find what you like best! While air frying gives great results, you can also bake or pan-fry tofu. To bake, set your oven to 400°F (200°C). Place the marinated tofu on a lined baking sheet. Bake for 25-30 minutes, flipping halfway through. This method yields a crispy exterior too. If you pan-fry, heat oil in a skillet. Cook the tofu until golden brown on all sides. Each method offers a different texture and flavor. Tofu is versatile and fits many dishes. Try it in a salad bowl. Add fresh greens, veggies, and your favorite dressing. This makes for a healthy and colorful meal. Another option is stir-frying. Toss the crispy tofu with veggies and sauce. Serve it over rice or noodles for a complete dish. The possibilities are endless! For the full recipe, check out the details above. To keep your crispy air fryer tofu fresh, start by letting it cool. Place the tofu in an airtight container. This helps lock in the flavor and texture. Store it in the fridge for up to 3 days. Avoid using a regular plastic bag, as it can make the tofu soggy. When you're ready to enjoy the leftovers, air frying is the best option. Preheat your air fryer to 350°F (175°C). Place the tofu in the basket and air fry for about 5 to 7 minutes. This restores its crispiness. If you don’t have an air fryer, you can also use a skillet over medium heat. Just add a splash of oil and cook until heated through. You can freeze crispy tofu if you want to save some for later. Place the cooled tofu in a single layer on a baking sheet. Freeze it for about an hour. Once it’s firm, transfer it to a freezer-safe bag. This method helps keep the tofu from clumping together. When you're ready to eat, thaw it in the fridge overnight. Reheat it using the air fryer or skillet method. Enjoy your tasty tofu anytime! For the full recipe, check out the Crispy Air Fryer Tofu Delight 🥢. It usually takes about 15 to 20 minutes to air fry tofu. The cooking time may vary based on the size of the tofu cubes and your air fryer model. Make sure to check for a golden-brown color. Shaking the basket halfway through helps cook the tofu evenly. Using soft tofu is not recommended for this recipe. Firm tofu holds its shape better and crisps up nicely. Soft tofu may crumble and won’t give you that desired crispy texture. If you want a softer dish, consider a different recipe for soft tofu. Crispy air fryer tofu pairs well with many sides. Try serving it over rice or quinoa. You can also enjoy it in a salad or a wrap. Add some steamed veggies or a tasty dipping sauce for extra flavor. To enhance crispiness, first coat the tofu in cornstarch. This helps create a crunchy outside. Also, ensure your air fryer is preheated to 400°F (200°C). Don’t overcrowd the basket; this allows hot air to circulate. Flipping or shaking the tofu halfway through cooking also helps it get even crispier. For the full recipe, check the details above. This blog post guides you through making crispy air fryer tofu. We covered key ingredients, like firm tofu and seasonings. You learned how to prepare, marinate, and cook the tofu for the best results. We shared tips for crispiness and storage advice, plus variations to suit your taste. Remember to avoid common mistakes, like overcrowding the basket. Enjoy experimenting with flavors and serving styles. Your tasty tofu journey is just beginning, so have fun in the kitchen as you create and share delicious meals.

Crispy Air Fryer Tofu Simple and Flavorful Recipe

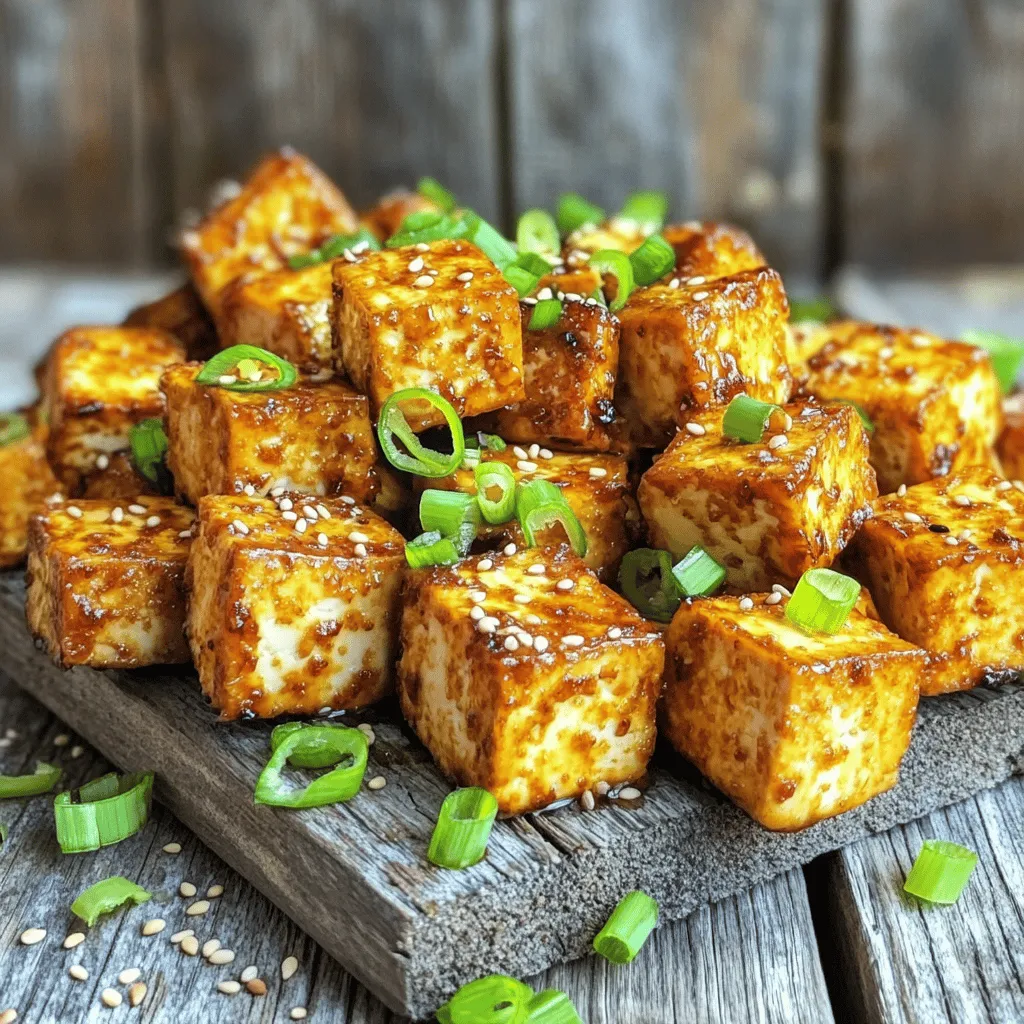
Looking for a tasty way to enjoy tofu? You’ve hit the jackpot with my Crispy Air Fryer Tofu recipe! This

To make Vegan Buffalo Cauliflower Bites, you need a few key items: - 1 medium head of cauliflower, cut into bite-sized florets - 1 cup all-purpose flour - 1 cup unsweetened plant-based milk (like almond or oat milk) - 1 cup buffalo sauce - 2 tablespoons vegan butter, melted For flavor, add these spices: - 1 teaspoon garlic powder - 1 teaspoon onion powder - 1 teaspoon paprika - 1 teaspoon salt - 1/2 teaspoon black pepper These ingredients create the perfect balance of crunch and flavor. The cauliflower becomes tender inside and crispy outside, while the buffalo sauce gives it a spicy kick. You can adjust the recipe based on your dietary needs. Here are some ideas: - For gluten-free bites, use gluten-free flour. - To make it low-carb, substitute flour with almond flour. - If you like extra flavor, add a sprinkle of nutritional yeast. For garnishes, consider adding: - Fresh parsley, chopped - Green onions, sliced These extras can make your dish look and taste even better. For detailed steps, check the Full Recipe. 1. Preheat the oven and prepare the baking sheet First, preheat your oven to 450°F (230°C). This high heat is key for a crispy finish. While it heats, line a baking sheet with parchment paper. This helps prevent sticking and makes cleanup easier. 2. Mixing batter and coating cauliflower florets In a large bowl, combine 1 cup of all-purpose flour and 1 cup of unsweetened plant-based milk. Add 1 teaspoon of garlic powder, 1 teaspoon of onion powder, 1 teaspoon of paprika, 1 teaspoon of salt, and 1/2 teaspoon of black pepper. Whisk until smooth. Next, dip each cauliflower floret into this batter. Make sure to coat them completely. Then, place the coated florets on the prepared baking sheet in a single layer. 1. Baking the cauliflower bites to achieve crispy texture Bake the cauliflower bites in the preheated oven for 20-25 minutes. Flip them halfway through to ensure even cooking. You want them to turn golden and crispy. This step is vital for the right texture. 2. Applying buffalo sauce and a second bake While the bites bake, mix 1 cup of buffalo sauce with 2 tablespoons of melted vegan butter in a small bowl. Once the cauliflower is done, transfer the bites to a large bowl. Pour the buffalo sauce mixture over them and toss to coat. Return the coated cauliflower to the baking sheet and bake for another 10 minutes. This final bake helps the sauce stick and enhances the flavor. For the full recipe, check the instructions above for delicious vegan buffalo cauliflower bites! To create crispy buffalo cauliflower bites, focus on the batter consistency. You want it thick enough to cling but not too heavy. A good mix contains equal parts flour and milk. This balance creates a light, crispy coat. When coating the cauliflower, dip each piece fully and shake off excess batter. This helps avoid soggy bites. Arrange them in a single layer on the baking sheet. This space allows hot air to circulate, making them crispy. For the best results, preheat your oven to 450°F (230°C). This high heat helps the batter crisp up quickly. Bake the cauliflower for 20-25 minutes, flipping them halfway. This ensures even browning and crunch. Want to add extra flavor to your buffalo bites? Try adding spices like smoked paprika or cayenne pepper for a smoky kick. You can also experiment with different sauces. A splash of lemon juice or a dash of hot sauce can elevate the taste. Incorporating unique ingredients can also enhance your bites. Consider tossing in nutritional yeast for a cheesy flavor. You can even mix in some chopped herbs like cilantro or basil for freshness. These small tweaks can make your vegan buffalo cauliflower bites even more delicious. For the full recipe, check out the details included in this article. {{image_2}} You can switch up the flavor of your buffalo cauliflower bites easily. Try different spice blends like Cajun or even a smoky barbecue sauce. This gives you a fun twist to the classic buffalo taste. If you want to make it gluten-free, use almond flour instead of all-purpose flour. For low-carb options, try using crushed pork rinds or coconut flour. These alternatives keep the bites crispy while meeting your needs. These bites pair well with various dips. Vegan ranch is a popular choice, giving a cool contrast to the spicy cauliflower. You can also serve them with guacamole for a creamy touch. For side dishes, think of crispy celery sticks or a fresh salad. Both balance the heat of the buffalo sauce. For an impressive presentation, arrange the bites on a platter with the dips. This will make your dish look appealing and fun to eat. If you want to explore the full recipe, check out the [Full Recipe] for step-by-step guidance. Enjoy experimenting with these variations! To keep your Vegan Buffalo Cauliflower Bites fresh, store leftovers in an airtight container. This helps lock in moisture and flavor. Place the container in the fridge if you plan to eat them within a few days. If you want to keep them longer, you can freeze the bites. Just make sure they are completely cool before freezing. For reheating, I recommend the oven. Preheat your oven to 375°F (190°C). Place the bites on a baking sheet. Heat them for about 10-15 minutes, or until they feel hot and crispy again. This method helps maintain their crunch. Avoid microwaving, as it can make them soggy. These crispy bites can last in the fridge for about 3 to 5 days. If you freeze them, they can last up to 2 months. Just be sure to label your container with the date. This way, you know how long they’ve been stored. Enjoy these tasty treats at their best! For the full recipe, check out my complete guide. How can I make Vegan Buffalo Cauliflower Bites spicier? To add more heat, use extra buffalo sauce. You can also mix in cayenne pepper or hot sauce. If you want, try a spicier brand of buffalo sauce. Just remember, start with a little and taste as you go. This way, you can control the spice level to your liking. Can I bake instead of fry for different textures? Yes, baking is a great option! It makes the bites crispy without extra oil. Follow the baking instructions from the full recipe to get that perfect crunch. Just be sure to flip the bites halfway through baking. This helps them crisp up on all sides. Are Vegan Buffalo Cauliflower Bites healthy? Yes, they are a healthy snack! Cauliflower is low in calories and full of fiber. The batter uses plant-based milk and flour, which keeps it light. You can control the sauce's spice and heat, making it a fun and healthier choice for gatherings. How many servings are in this recipe? This recipe serves four people. It makes a great appetizer or snack for a small group. If you plan to serve more, consider doubling the recipe. Everyone loves these tasty bites! Vegan Buffalo Cauliflower Bites blend simple ingredients for a tasty twist on a classic. You can customize them with spices and sauces for different flavors. Following the steps ensures a crispy texture that enhances each bite. Store leftovers properly to enjoy them later. This recipe offers healthy options with just a few swaps. You’ve got the info to serve up these delicious bites any time. Make them your own and enjoy every crunch!

Vegan Buffalo Cauliflower Bites Crispy and Flavorful Treat

Are you ready to spice up your snack game? These Vegan Buffalo Cauliflower Bites are the perfect crispy and flavorful

- 2 cups rolled oats - 1 cup almond butter (or peanut butter) - 1/2 cup honey or maple syrup - 1/2 cup dark cocoa powder - 1 tablespoon vanilla extract - 1/4 teaspoon salt These main ingredients form the base of your no-bake chocolate oat bars. The rolled oats give the bars a chewy texture. Almond butter or peanut butter adds creaminess and flavor. Honey or maple syrup serves as the sweetener, while dark cocoa powder brings rich chocolate taste. The vanilla extract enhances all the flavors, and the salt balances the sweetness. - 1/2 cup dark chocolate chips (or vegan chocolate chips) - 1/2 cup crushed nuts (almonds, walnuts, or pecans) - 1/4 cup shredded coconut for topping These optional add-ins allow for personalization. Dark chocolate chips add extra chocolatey goodness. Crushed nuts add crunch and healthy fats. Shredded coconut gives a tropical touch. Feel free to mix and match based on what you enjoy! Each bar contains about 150 calories, 4 grams of protein, 7 grams of fat, and 20 grams of carbs. This makes them a great snack that combines energy and nutrition. For a more detailed breakdown, check the Full Recipe. 1. Start by mixing your dry ingredients. In a large bowl, add 2 cups rolled oats, 1/2 cup dark cocoa powder, and 1/4 teaspoon salt. Stir until everything is well combined. 2. Next, melt the almond butter and sweetener. In a separate bowl, add 1 cup almond butter and 1/2 cup honey (or maple syrup). Heat for about 20-30 seconds in the microwave until warm and easy to mix. 3. Now, combine and mix all components. Pour the melted almond butter mixture into the dry oat mix. Add 1 tablespoon vanilla extract. Stir well until it becomes sticky and thick. 4. Fold in 1/2 cup dark chocolate chips and 1/2 cup crushed nuts, like almonds or walnuts. Make sure they are evenly spread throughout the mixture. 1. Line your baking dish. Take an 8x8 inch dish and line it with parchment paper. Leave some paper hanging over the edges. This makes removal easy later. 2. Press the mixture into the dish. Use your hands or the back of a spatula. Make sure it’s pressed down firmly. This helps the bars hold their shape. 1. Refrigerate your bars. Place the baking dish in the fridge for 30-60 minutes. This helps the bars set and become firm. 2. How to cut the bars properly. Once they are set, lift them out using the parchment paper. Use a sharp knife to cut them into squares or rectangles. Enjoy your tasty treats! For the full recipe, check out the details above. To make the best no-bake chocolate oat bars, you must press the mixture firmly into the dish. This step is key. It helps the bars hold together once they set. If you don’t press hard enough, they may crumble when you cut them. Aim for a sticky consistency when mixing the wet and dry ingredients. This stickiness ensures the bars bind well. You want a mix that feels like cookie dough. If it's too dry, the bars will fall apart. If it's too wet, they won't set properly. You can swap almond butter for other nut butters like peanut or cashew. Each choice adds a unique flavor. If you need a nut-free option, try sunflower seed butter. It works well and is safe for those with allergies. For sweeteners, honey is great, but maple syrup is a good choice, too. You can even use agave nectar if you prefer. For a sugar-free version, try a natural sweetener like stevia. If you're looking for gluten-free options, make sure to use certified gluten-free oats. This allows everyone to enjoy these tasty bars without worry. When serving these bars, presentation matters. Place them on a nice platter. You can drizzle melted chocolate on top for a fun touch. This adds both charm and extra chocolatey goodness. Pair the bars with fresh fruit or a dollop of yogurt. Greek yogurt is fantastic for a protein boost. It balances the sweetness of the bars. You can also try serving them with a scoop of ice cream for a fun dessert treat. For the full recipe, check out the detailed instructions above! {{image_2}} You can easily change the flavor of your no-bake chocolate oat bars. Adding spices like cinnamon or nutmeg brings warmth and depth. Just a pinch can make a big difference. You can also switch up the nut butter. Almond butter gives a nutty taste, while peanut butter adds a classic flavor. Try sunflower seed butter for a nut-free option! This recipe can fit many diets. To make it vegan, use maple syrup instead of honey. For a gluten-free option, ensure your oats are certified gluten-free. You can also lower the sugar by using less honey or syrup. This way, you control the sweetness! Want to make your bars even more exciting? Add seeds or dried fruits, like raisins or cranberries, for extra texture. Incorporating superfoods like chia seeds boosts nutrition. Just sprinkle in a few tablespoons for added crunch and health benefits. These small changes can make your chocolate oat bars even more enjoyable! To keep your no-bake chocolate oat bars fresh, store them in an airtight container. You can use a glass or plastic container with a tight lid. This method helps keep moisture out and maintains the bars' texture. If you layer them, place parchment paper between the bars to prevent sticking. For long-term storage, you can freeze the bars. Wrap each bar in plastic wrap or foil. Then, put them in a freezer bag or container. This keeps them fresh for up to three months. When you're ready to eat, thaw them in the fridge overnight or at room temperature for a few hours. This helps restore their texture. In the fridge, these bars stay fresh for about one week. If you freeze them, they last much longer, around three months. This makes them a great make-ahead snack. If you store them properly, you can enjoy their rich taste anytime you want. No-bake chocolate oat bars can last up to one week in the fridge. Store them in an airtight container to keep them fresh. If you want to make them last longer, you can freeze them. They stay good in the freezer for up to three months. Just wrap them well to avoid freezer burn. Yes, you can easily make these bars nut-free. Simply replace the almond butter with sunflower seed butter or pumpkin seed butter. These options give a similar creamy texture. You can also skip the nuts altogether or use seeds like pumpkin or sunflower seeds for added crunch. To cut no-bake bars neatly, let them chill fully in the fridge. Once set, lift them out using the parchment paper. Place them on a cutting board. Use a sharp knife and make smooth, even cuts. Wipe the knife with a damp cloth between cuts for cleaner edges. No-bake chocolate oat bars are simple and delicious. You learned about the main ingredients, optional add-ins, and how to make them step by step. We also discussed helpful tips to perfect the texture and served suggestions. You can customize these bars with different flavors and dietary options. Remember to store them properly for the best freshness. Enjoy making your own tasty treats. They are great for snacks or desserts!

No-Bake Chocolate Oat Bars Easy and Delicious Treat

Looking for a quick, tasty treat? You’re in the right place! These No-Bake Chocolate Oat Bars are easy to make

- 2 ripe avocados - 1 cup cherry tomatoes, halved - 1 cup fresh mozzarella balls, halved - 1/4 cup fresh basil leaves, chopped - 2 tablespoons balsamic glaze - 1 tablespoon extra virgin olive oil - Salt and pepper to taste To make Caprese stuffed avocado, start with fresh, ripe avocados. They should be soft but not mushy. The cherry tomatoes add a juicy burst, while fresh mozzarella brings creaminess. Basil gives a lovely herbal note, making each bite special. You can drizzle balsamic glaze for a sweet touch and extra virgin olive oil for richness. Salt and pepper bring the flavors together. When you gather these ingredients, you create a colorful and tasty dish that looks as good as it tastes. This recipe is quick and easy, perfect for a snack or light meal. You can find the full recipe above. Make sure to use fresh ingredients for the best results. - Cut the avocados in half and remove the pit. - Scoop out some flesh to create space for stuffing. First, you want to choose ripe avocados. Ripe avocados feel slightly soft when you press them. After slicing them in half, use a spoon to carefully remove the pit. Make sure to keep the skin intact. Next, scoop out a little flesh to make room for your delicious filling. Don’t throw away the flesh; you can mix it into your salad or use it for guacamole. - Combine cherry tomatoes, mozzarella balls, and basil in a bowl. - Drizzle with olive oil and balsamic glaze, then season with salt and pepper. Now, take a mixing bowl and add your halved cherry tomatoes and mozzarella balls. I love using fresh mozzarella because it brings a creamy texture. Add in chopped basil leaves for a burst of flavor. Then, drizzle the olive oil and balsamic glaze over the mix. This adds a sweet tanginess to the dish. Sprinkle in some salt and pepper to taste. Gently toss everything together until it’s well mixed. - Fill each avocado half with the tomato mixture. - Drizzle any remaining glaze on top. Time to stuff those avocados! Spoon the tomato mixture into each avocado half. Press it down lightly to ensure it fits well. This part is fun and makes your dish look colorful. Finally, take any leftover balsamic glaze and drizzle it on top. This extra touch enhances the flavor. Serve your Caprese stuffed avocados right away for the best taste. You can find the full recipe [here](#). To make your Caprese stuffed avocado shine, serve it on a rustic wooden board. This adds charm and warmth to your dish. Garnish the avocados with extra fresh basil leaves. A drizzle of balsamic glaze on top creates an eye-catching finish. It makes your meal look just as good as it tastes. Want to take your dish to the next level? Try using flavored balsamic vinegar. It adds a unique twist that will surprise your taste buds. You can also experiment with other herbs like oregano or thyme. They can bring new layers of flavor to your Caprese stuffed avocado. Don't be afraid to mix things up and find your favorite combination! {{image_2}} You can easily change up the flavors here. For a twist, try using roasted red peppers instead of cherry tomatoes. Roasted red peppers offer a sweet and smoky taste. They pair well with the creamy avocado and fresh cheese. Another fun swap is using feta cheese in place of mozzarella. Feta brings a tangy and salty kick that enhances the dish's overall flavor. If you're looking to make a vegan version, simply skip the cheese. You can also use plant-based cheese for a similar taste. This keeps the dish light yet still tasty. For those who want more protein, grilled chicken is a great option. It makes the avocado even more filling and hearty. With these swaps, you can enjoy Caprese stuffed avocado in many different ways! You can store your stuffed avocados in an airtight container in the fridge. This keeps them fresh and tasty. The best time to eat them is within 1-2 days. After that, they may lose their flavor and texture. Keep an eye on them, and enjoy them quickly! Freezing avocados is not a good idea. When you freeze them, their texture changes. They become mushy and less enjoyable. If you want to keep your stuffed avocados fresh, stick to the fridge. Enjoy the flavors of this dish while they are at their best! For the full recipe, check out the Caprese Stuffed Avocado. Caprese Stuffed Avocado is a fresh dish that combines avocado with classic Caprese flavors. You start with ripe avocados, which are creamy and rich. Then, you fill them with juicy cherry tomatoes, soft mozzarella balls, and fragrant basil. A drizzle of balsamic glaze adds a sweet touch. It’s a simple yet delicious way to enjoy a healthy meal. This dish is quick to make! You need about 10 minutes to prep and 10 minutes to finish. So, in just 20 minutes, you can have a tasty meal ready. This makes it perfect for a quick lunch or a light dinner. Yes, you can prep some parts ahead of time. You can chop the tomatoes and basil or mix them with the mozzarella a few hours before. Just keep them in the fridge. Cut the avocados close to serving time to keep them fresh and green. This way, you save time during busy days. Caprese Stuffed Avocado pairs well with many sides. A simple green salad is a great choice. You can also serve it with crusty bread or grilled chicken for a heartier meal. For a fun twist, try it with a refreshing fruit salad. This adds a nice contrast to the savory flavors. Caprese stuffed avocados combine fresh flavors and simple preparation. The creamy avocado pairs well with cherry tomatoes, mozzarella, and basil. You learned how to prepare this colorful dish and keep it fresh. Feel free to experiment with swaps and variations. Enjoy the ease and taste this recipe brings to your meals. This nutritious dish is a delight for any table. Try it for lunch or dinner and impress your guests. Your taste buds will thank you for this easy win!

Caprese Stuffed Avocado Flavorful and Fresh Treat

If you’re looking for a fresh and tasty dish, try Caprese Stuffed Avocado. This delightful recipe combines creamy avocado, juicy

- Chickpeas and Seasonings - 1 can (15 oz) chickpeas, drained and rinsed - 2 tablespoons olive oil - 1 teaspoon smoked paprika - 1 teaspoon garlic powder - ½ teaspoon cumin - Salt and pepper to taste - Base Ingredients (Quinoa and Greens) - 2 cups cooked quinoa - 1 cup cherry tomatoes, halved - 1 avocado, sliced - 1 cup mixed greens (spinach, arugula, etc.) - 1 small cucumber, diced - Toppings and Sauces - ¼ cup tahini - 2 tablespoons lemon juice - Water, as needed for tahini sauce These ingredients make the crispy chickpea Buddha bowl both tasty and healthy. The chickpeas add protein and crunch. The quinoa serves as a lovely base that fills you up. Fresh veggies like cherry tomatoes, cucumber, and greens bring color and nutrients. The tahini sauce ties everything together with a creamy and tangy flavor. For the full recipe, follow the steps laid out in the instructions. You’ll enjoy creating this delightful dish packed with textures and flavors! 1. Preheat the Oven: Start by preheating your oven to 400°F (200°C). This heat makes the chickpeas crispy. 2. Prepare the Chickpeas: Take a can of chickpeas, drain, and rinse them well. Spread them on a baking sheet. Drizzle two tablespoons of olive oil over the chickpeas. Then, sprinkle one teaspoon each of smoked paprika and garlic powder. Add half a teaspoon of cumin, plus salt and pepper to taste. Toss everything to coat the chickpeas evenly. 3. Roast the Chickpeas: Place the baking sheet in the oven. Roast the chickpeas for 25-30 minutes. Shake the pan halfway through to help them cook evenly. They should turn golden and crispy. 4. Cook the Quinoa: While the chickpeas roast, cook two cups of quinoa. Follow the package instructions. Once done, fluff it with a fork and set it aside. 5. Prepare Vegetables: Now, chop one cup of cherry tomatoes in half. Dice one small cucumber. Slice one avocado. Set these aside for the bowl. 6. Make the Tahini Sauce: In a small bowl, whisk together a quarter cup of tahini, two tablespoons of lemon juice, and some water. Add enough water to make it smooth and pourable but not too thin. 7. Assemble the Bowl: Take a serving bowl and layer it. Start with the cooked quinoa, then add mixed greens. Top with the halved cherry tomatoes, diced cucumber, and sliced avocado. Finally, add the crispy chickpeas on top. 8. Drizzle and Serve: Drizzle the tahini sauce over the assembled Buddha bowl. Finish with extra salt or pepper if you like. For the full recipe, check out the Crispy Chickpea Buddha Bowl 🥗. Achieving the Right Crispy Texture To get your chickpeas crispy, make sure they are dry. After rinsing, pat them with a towel. This removes extra moisture. Then, toss them with olive oil and spices. Bake them at 400°F for 25 to 30 minutes. Shake the pan halfway through to cook them evenly. You want them golden and crunchy. Adjusting Seasoning to Taste Seasoning is key. Start with the basics: smoked paprika, garlic powder, cumin, salt, and pepper. Taste your chickpeas before you take them out of the oven. If they need more flavor, sprinkle a bit more salt or spices. Remember, you can always add more but can’t take it away! Timing the Roasting with Other Preparations Timing is important. While your chickpeas roast, you can cook the quinoa and chop your veggies. This saves time. You’ll have a full, delicious meal ready without any fuss. Just keep an eye on the chickpeas as they roast! Making the Tahini Sauce Creamier To make a creamier tahini sauce, add water slowly. Start with a tablespoon and mix. Keep adding until it reaches your desired thickness. The sauce should be thick but pourable. A squeeze of lemon juice adds brightness. Alternative Dressings for Variety If tahini isn’t your favorite, try other dressings. A simple lemon vinaigrette works well. Mix olive oil, lemon juice, and a dash of mustard. For a spicy kick, add sriracha or chili flakes. These dressings can change the flavor and keep meals exciting! For more details on this dish, check the Full Recipe. {{image_2}} Gluten-Free Alternatives If you want a gluten-free Buddha bowl, use quinoa. Quinoa is naturally gluten-free and packed with protein. You can also try brown rice or millet. Both options work well and add unique flavors. Vegan Options This recipe is already vegan, but you can add more plant-based protein. Try adding tofu or tempeh for extra texture and nutrition. These options blend well with the chickpeas. Add Protein Variations If you want more protein, consider adding grilled chicken or shrimp. These will make the dish heartier and more filling. Just ensure they are seasoned well to match the bowl's flavors. Different Grains or Greens Feel free to swap the quinoa for other grains. Barley or farro give a nice chew. For greens, you can use kale or romaine instead of mixed greens. Each has a different taste and texture. Seasonal Vegetable Options You can use seasonal veggies to keep it fresh. In summer, add zucchini or bell peppers. In fall, try roasted sweet potatoes or Brussels sprouts. This not only changes the look but also the taste of your bowl. These variations allow you to customize your Crispy Chickpea Buddha Bowl. Explore different flavors and textures while enjoying a nourishing meal. For the full recipe, check out the Crispy Chickpea Buddha Bowl section above. To store your delicious crispy chickpea Buddha bowl, use an airtight container. This keeps the flavors fresh and prevents sogginess. Separate the chickpeas and veggies from the quinoa if possible. This will help maintain their textures. In the fridge, your leftovers will last about 3-4 days. This gives you a chance to enjoy this tasty meal again later in the week. Just remember to check for any signs of spoilage before eating. When reheating your Buddha bowl, the oven is your best friend. Preheat it to 350°F (175°C). Place your bowl on a baking sheet and warm it for about 10-15 minutes. This helps keep the chickpeas crispy. If you're in a rush, you can use the microwave. Just make sure to cover your bowl to keep moisture in. Heat in short bursts of 30 seconds, stirring in between. To keep it fresh, add any remaining veggies after reheating. This will help them stay crisp and vibrant. Enjoy your tasty, easy-to-make meal with confidence! For the full recipe, check the detailed instructions above. Can I use canned chickpeas or dried? You can use both! Canned chickpeas are quick and easy. Just drain and rinse them. Dried chickpeas need soaking and cooking first. This takes more time but can have a fresher taste. What can I substitute for tahini? If you don’t have tahini, try peanut butter or almond butter. You can also use sunflower seed butter. These options add creaminess and flavor, but the taste will change slightly. Is this recipe suitable for meal prep? Yes, this recipe is great for meal prep! You can cook extra quinoa and chickpeas. Store them in containers. Keep the tahini sauce separate to avoid sogginess. This way, you can enjoy fresh bowls throughout the week. How can I make it spicier? To add heat, use cayenne pepper or red pepper flakes. You can also add hot sauce to the tahini sauce. Adjust the amount based on your spice level. Enjoy the kick! Caloric Content Each serving of the crispy chickpea Buddha bowl has about 450 calories. This number can change based on your toppings and portion sizes. Macronutrient Breakdown The bowl mainly consists of: - Protein: Chickpeas and quinoa provide good protein. - Carbohydrates: Quinoa offers complex carbs for energy. - Fats: Olive oil and tahini add healthy fats. This meal is balanced and keeps you full! You learned how to make a delicious Buddha bowl with crispy chickpeas and tasty toppings. We covered each ingredient, from quinoa to tahini sauce. The tips will help you perfect your dish and store leftovers well. You even explored dietary swaps to fit your needs. Now, you have all the tools to create this healthy meal. Enjoy your cooking journey and share your tasty creations!

Crispy Chickpea Buddha Bowl Delightful and Nourishing

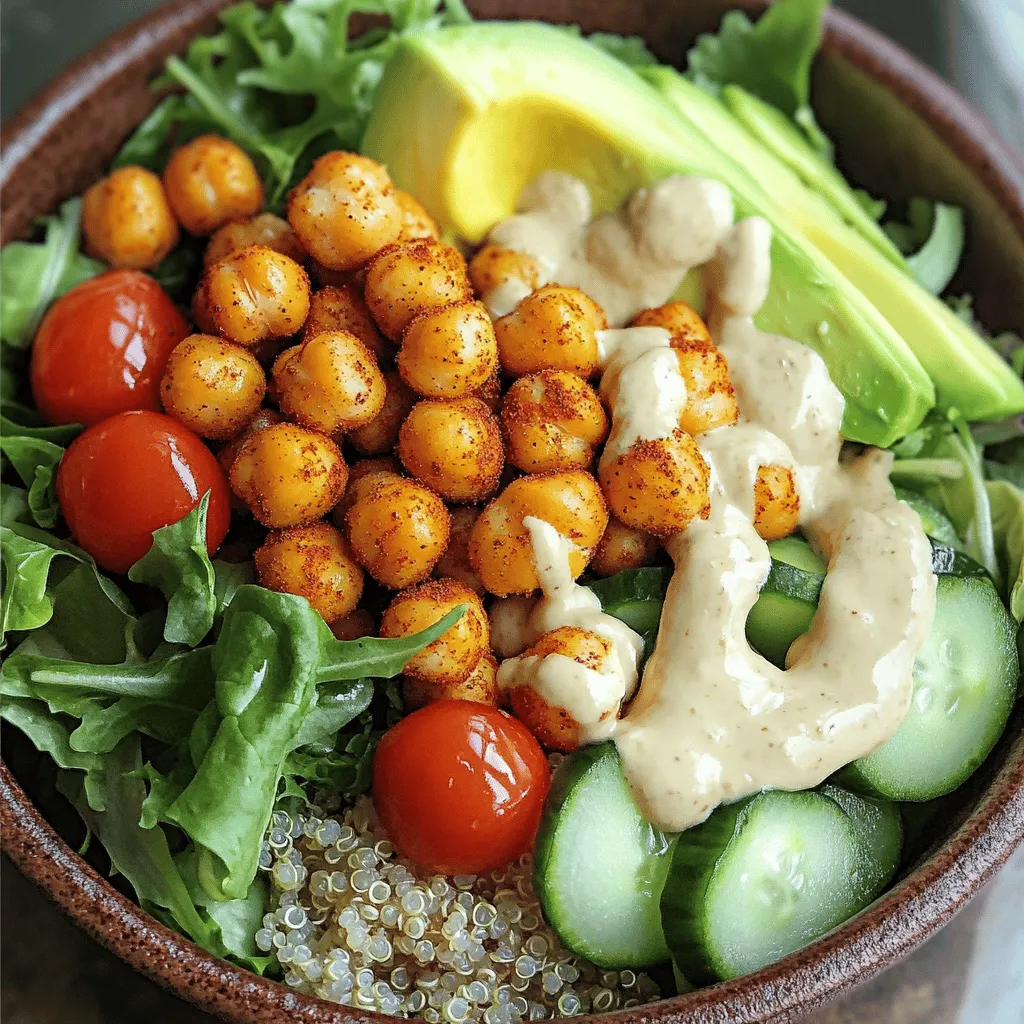
Craving a meal that’s both tasty and good for you? This Crispy Chickpea Buddha Bowl is the answer! Packed with

- 1 lb large shrimp, peeled and deveined - 1/4 cup honey - 1/4 cup soy sauce (low sodium preferred) - 3 cloves garlic, minced - 1 tablespoon fresh ginger, grated - 1 tablespoon sesame oil - 1 teaspoon crushed red pepper flakes (adjust to taste) - 1 bell pepper, cut into chunks - 1 onion, cut into chunks - Wooden or metal skewers (if using wooden, soak in water for 30 minutes) The main ingredients for honey garlic shrimp skewers are simple yet full of flavor. The shrimp is the star of the dish. I like to use large shrimp since they hold up well on the skewers. The honey adds a sweet touch that balances the salty soy sauce. Garlic and ginger give a nice kick to the marinade. You can adjust the crushed red pepper flakes to your liking if you want some heat. The bell pepper and onion not only add color but also great flavor. - Sesame seeds - Fresh cilantro or parsley For garnishes, sesame seeds offer a nice crunch. They also look beautiful on the skewers. Fresh cilantro or parsley can brighten the dish and add a fresh taste. You can choose one or both based on your preference. - Wooden vs. metal skewers - Soaking wooden skewers When choosing skewers, you can use either wooden or metal. Metal skewers are sturdy and reusable. Wooden skewers are great for grilling but need soaking. Soak wooden skewers in water for 30 minutes before using. This step helps prevent burning on the grill. It also keeps your shrimp juicy. Make sure to keep these tips in mind. They will help you create a delicious and fun dish that everyone will love. For the full recipe, check out the details above. To start, you need to mix the marinade. In a bowl, combine honey, soy sauce, minced garlic, grated ginger, sesame oil, and crushed red pepper flakes. This mix is the key to flavor. After you mix it, add the shrimp. Make sure each shrimp gets coated well. Let them marinate for at least 30 minutes. If you have time, up to 2 hours in the fridge gives great taste. Next, it’s time to assemble the skewers. Grab your skewers and start by alternating shrimp with chunks of bell pepper and onion. This not only looks good but adds flavor too. For a pretty presentation, try to keep the colors bright. This makes your dish pop and looks great on the grill. Now, let’s get grilling. Preheat your grill or grill pan over medium-high heat. If using a grill, oil the grates lightly. This helps prevent sticking. Grill the skewers for about 2-3 minutes per side. You want the shrimp to turn pink and opaque. Baste with leftover marinade for extra flavor. Just remember to discard any marinade that touched raw shrimp. Once done, let the skewers rest for a few minutes. Garnish with sesame seeds and fresh cilantro or parsley for a tasty finish. Enjoy your honey garlic shrimp skewers! You can find the [Full Recipe] for more details. To make a great marinade, mix honey, soy sauce, garlic, ginger, and sesame oil. You can adjust the flavors to your taste. If you like it sweeter, add more honey. If you want it saltier, add more soy sauce. For a kick, increase the crushed red pepper flakes. I often recommend fresh herbs like cilantro or parsley to brighten the dish. Grilling shrimp skewers can be tricky. One common mistake is grilling on too high heat. It can burn the shrimp quickly. Aim for medium-high heat instead. Lightly oil the grates to prevent sticking. Grill the skewers for about 2-3 minutes on each side. Look for the shrimp to turn pink and opaque. This shows they are done. A nice char adds flavor and texture. These skewers pair well with various sides. Try a fresh salad or grilled vegetables. Rice or quinoa also complements the shrimp. For a fun twist, serve them in tacos with slaw. You can garnish with sesame seeds and fresh herbs for a pop of color. {{image_2}} You can easily swap out shrimp for other proteins. Chicken works well, too. Cut it into cubes and marinate just like shrimp. Tofu is another great option for a plant-based dish. Just remember to press it first to remove excess moisture. For vegetables, you can mix it up. Try zucchini, mushrooms, or cherry tomatoes. They all add great flavor and color. Just make sure to cut them into similar sizes for even cooking. Want more heat? Add sriracha or diced jalapeños to your marinade. This will give your skewers a spicy kick. If you prefer sweeter flavors, try using maple syrup or agave instead of honey. These options can add a unique twist to your dish. You can make these skewers in the oven if you don’t have a grill. Preheat your oven to 400°F (204°C). Place the skewers on a baking sheet lined with foil. Bake for about 10-12 minutes, turning halfway through. Another option is to use a skillet. Heat some oil over medium-high heat. Cook the skewers for about 2-3 minutes on each side. This method gives a nice sear and is quick. Using these variations, you can customize your honey garlic shrimp skewers. Enjoy experimenting with flavors! For the full recipe, check out the detailed instructions above. To keep your honey garlic shrimp skewers fresh, store them in the fridge. Place leftovers in an airtight container. They will stay good for about three days. If you want to save them longer, freezing is a great option. Wrap the skewers tightly in plastic wrap or foil. Then, place them in a freezer bag. They can last up to three months in the freezer. When you want to eat your leftovers, reheat them gently. Avoid high heat to keep the shrimp juicy. The best methods are using the oven or skillet. For the oven, preheat to 350°F. Bake the skewers for about 10 minutes. If using a skillet, heat it on low and add a splash of water. Cover it and warm for about 5 minutes. This helps steam the shrimp without drying them out. Leftover honey garlic shrimp skewers last about three days in the fridge. After that, check for signs of spoilage. Look for any off smells or changes in color. If the shrimp feels slimy or sticky, it’s time to toss it. Always trust your nose and eyes to keep your meals safe. Yes, you can prepare these skewers ahead of time. I recommend marinating the shrimp for up to two hours. This way, they soak up all the tasty flavors. You can also assemble the skewers and store them in the fridge. Just make sure to cover them well. When you are ready to cook, simply grill them straight from the fridge. This saves you time and adds to the fun! For skewers, I like using large shrimp. They stay juicy and cook evenly. You can find them fresh or frozen at your local market. If you use frozen shrimp, thaw them in the fridge overnight. Look for shrimp that are peeled and deveined to make prep easy. Buying wild-caught shrimp is a great choice for taste and sustainability. You can tell shrimp are done when they turn pink and opaque. They will curl slightly when cooked. A good rule is to cook them for 2-3 minutes on each side. If you have a meat thermometer, the internal temp should reach 120°F. Avoid overcooking, as they can become tough. Enjoy your perfectly grilled honey garlic shrimp skewers! For the full recipe, check out Honey Garlic Shrimp Skewers. This blog post shared everything you need for tasty honey garlic shrimp skewers. We covered key ingredients, including shrimp, honey, soy sauce, and optional garnishes. You learned simple steps for marinating and grilling. I also shared tips for perfecting flavor and grilling methods. With these insights, you can easily whip up delicious skewers. Enjoy experimenting with variations and serving them alongside your favorite dishes. Each bite will surely impress everyone around your table.

Honey Garlic Shrimp Skewers Tasty Grilling Delight

Are you ready to elevate your grilling game? Honey Garlic Shrimp Skewers are a delicious way to impress friends and

To make a zesty quinoa black bean salad, you need a mix of fresh ingredients. Here is the complete list: - 1 cup quinoa, rinsed and drained - 2 cups water - 1 can (15 oz) black beans, rinsed and drained - 1 cup cherry tomatoes, halved - 1 red bell pepper, diced - 1 avocado, diced - 1/4 cup red onion, finely chopped - 1/2 cup corn (fresh or canned) - 1/4 cup fresh cilantro, chopped - 2 tablespoons olive oil - 2 tablespoons lime juice - 1 teaspoon cumin - Salt and pepper to taste These ingredients work together to create a colorful, healthy dish. The quinoa brings protein and fiber. Black beans add heartiness. Fresh veggies like tomatoes and bell peppers give crunch and color. The lime juice and cilantro add freshness and zest. You can find the full recipe to guide you through the steps. Each bite will be a burst of flavor! - Bring 2 cups of water to a boil in a medium saucepan. - Add 1 cup of rinsed quinoa to the boiling water. Reduce the heat to low. Cover and simmer for 15 minutes. The quinoa will absorb water and become fluffy. - In a large mixing bowl, combine these chopped vegetables: - 1 can (15 oz) black beans, rinsed and drained - 1 cup cherry tomatoes, halved - 1 red bell pepper, diced - 1 avocado, diced - 1/4 cup red onion, finely chopped - 1/2 cup corn (fresh or canned) - 1/4 cup fresh cilantro, chopped - In a small bowl, whisk together: - 2 tablespoons olive oil - 2 tablespoons lime juice - 1 teaspoon cumin - Salt and pepper to taste - Once the quinoa cools, fluff it with a fork. - Add the quinoa to the vegetable mixture in the large bowl. - Pour the dressing over the salad. Gently toss until everything is well combined. - Taste the salad and adjust the seasoning if needed. This Zesty Quinoa Black Bean Salad is fresh and full of flavor. For the full recipe, visit the recipe section. To cook fluffy quinoa, rinse it well before cooking. Rinsing removes a bitter coating called saponin. Use two parts water for one part quinoa. Boil the water, then add the quinoa. Lower the heat and cover the pot. Let it simmer for about 15 minutes. When done, let it sit for another 10 minutes. Fluff it with a fork to separate the grains. To avoid bitter flavors, always rinse your quinoa. This step is key. If you skip it, you might taste a musty flavor. A good rinse will help you enjoy the true nutty taste of quinoa. Try different dressings to change the salad's taste. You can use tahini or yogurt for a creamy texture. A touch of honey adds sweetness, while balsamic vinegar brings a tangy kick. Adding spices can make your dressing pop. Cumin and chili powder give it warmth. If you like heat, add a pinch of cayenne pepper. These spices can make the salad even more exciting. For a great look, serve the salad in a large bowl. Add extra cilantro on top for color. A lime wedge on the side adds a fresh touch. This makes the salad more inviting. Pair this salad with grilled chicken or fish for a full meal. You can also enjoy it with tortilla chips for a fun crunch. Each bite bursts with flavor and freshness. Enjoy this zesty quinoa black bean salad your way! For the complete recipe, check the Full Recipe section. {{image_2}} You can make this salad even better with more veggies. Spinach adds a nice crunch. Cucumber adds a fresh, cool touch. You can also add protein like grilled chicken or feta cheese for more flavor. These extras make the dish heartier and more satisfying. This salad is easy to adapt for different diets. It’s vegan and gluten-free as it is. For low-carb versions, skip the corn and avocado. You can replace quinoa with cauliflower rice for fewer carbs. This way, everyone can enjoy it! Using seasonal produce can make this salad shine. In summer, add fresh berries for sweetness. In fall, try roasted squash for a warm touch. Adjusting flavors helps keep the dish exciting throughout the year. Experiment with spices and herbs based on what's fresh. For the full recipe, check out the detailed steps above! After making your zesty quinoa black bean salad, you will want to store it well. First, let the salad cool down at room temperature. Then, place it in an airtight container. This will keep it fresh longer. You can store it in the fridge for up to three days. If you want to keep it longer, you can freeze it. Just make sure to pack it tightly in a freezer-safe container. It will last for about three months in the freezer. The best containers for storing your salad are glass or BPA-free plastic. Glass containers are great because they do not stain or hold odors. If you use plastic, make sure it is labeled as food safe. Portioning your salad into smaller containers helps with meal prep. This way, you can grab a single serving when you need it. Your zesty quinoa black bean salad stays fresh for about three days in the fridge. If you see any brown spots on the avocado or the vegetables look wilted, it's time to toss it. If you freeze the salad, it can last up to three months, but the texture might change. Always look for signs of spoilage before eating. If you need a substitute for quinoa, try these gluten-free grains: - Brown rice - Millet - Buckwheat - Wild rice These grains have similar textures and can work well in this salad. They also add unique flavors. Each choice brings its own taste and health benefits. Brown rice offers fiber, while millet is rich in minerals. Yes, you can make this salad in advance. To keep it fresh, follow these tips: - Prepare the quinoa and veggies separately. - Store the dressing in a jar. - Combine everything just before serving. This way, the salad stays crisp and colorful. Prepping ahead saves time on busy days. Enjoy fresh flavors even when you plan ahead! Absolutely! This salad is great for meal prep. Here’s how to do it right: - Portion the salad into containers. - Keep the dressing separate until serving. - Use airtight containers to maintain freshness. This method makes it easy to grab a healthy meal. You can enjoy it throughout the week with no hassle. Try to mix in different veggies for variety! This blog post shared a simple and tasty quinoa salad recipe. You learned about ingredients, cooking steps, and storage tips. We discussed variations to suit your taste and dietary needs. Remember, you can mix it up with new veggies and proteins. Enjoy this dish fresh, or store leftovers for later. Keep exploring flavors to make this salad your own. It’s healthy, easy, and fun to prepare. Enjoy every bite!

Zesty Quinoa Black Bean Salad Fresh and Flavorful Meal

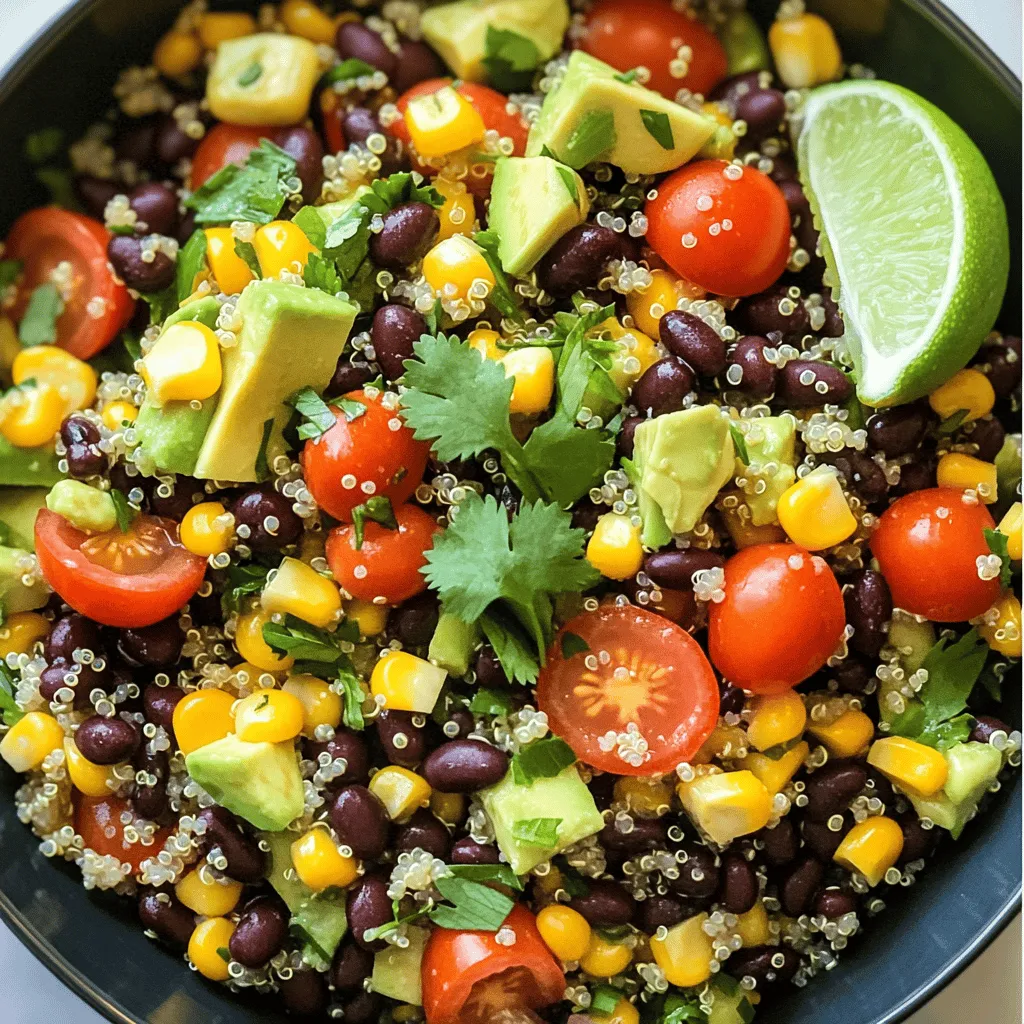
Looking for a fresh and tasty meal that’s easy to make? Let me introduce you to my Zesty Quinoa Black

- Ripe mango - 2 avocados - 1 small red onion - 1 jalapeño - 1/4 cup fresh cilantro - 2 tablespoons lime juice - Zest of 1 lime - Salt and pepper The key to great Mango Avocado Salsa is the freshness of the ingredients. Each one brings unique flavors and textures. Ripe mango adds sweetness and a bright color. Choose a mango that feels slightly soft when you press it. Avocados provide a creamy base. Look for avocados that yield to gentle pressure. Red onion gives a nice crunch and a mild bite. Finely chop it for the best results. Jalapeño adds heat. Take out the seeds if you prefer less spice. Fresh cilantro brings a burst of flavor. Make sure to chop it finely so it mixes well. Lime juice and zest provide acidity. This balances the sweetness of the mango and richness of the avocado. Salt and pepper enhance all the flavors. Adjust to your taste. - Calories per serving: Approximately 120 - Macronutrients breakdown: - Carbohydrates: 15g - Protein: 2g - Fat: 6g Each ingredient offers health benefits. Mango is rich in vitamins A and C. It helps with immune function and skin health. Avocado is full of healthy fats. These fats support heart health and improve nutrient absorption. Red onion has antioxidants. These can help reduce inflammation in the body. Jalapeño may boost metabolism. It can also help with digestion. Cilantro is full of vitamins K and A. It may also help detoxify the body. Lime juice is a great source of vitamin C. It helps with iron absorption and skin health. Using fresh, wholesome ingredients makes this salsa not just tasty but healthy too! If you're eager to try making it, check out the Full Recipe for all the steps. How to dice a mango and avocado First, grab a ripe mango. Cut off the sides, avoiding the pit. Then, make small cuts in the flesh to create cubes. Use a spoon to scoop them out. For the avocado, cut it in half and remove the pit. Use a spoon to scoop the flesh, then dice it into small pieces. Chopping tips for onion and jalapeño For the red onion, peel away the outer layer. Cut it in half, then slice it thinly. Aim for small pieces to mix well. For the jalapeño, slice it in half and remove the seeds. Mince it finely if you want more heat. Use gloves if you prefer to avoid the spice on your hands. Mixing and seasoning the salsa In a large bowl, combine the diced mango and avocado. Add the chopped onion and minced jalapeño. Toss in the fresh cilantro. Squeeze lime juice over everything, and add lime zest. Gently mix to combine, taking care not to mash the avocado. Finally, season with salt and pepper to your taste. Best ways to serve Mango Avocado Salsa Serve the salsa in a colorful bowl. This makes it look fresh and inviting. Garnish with extra cilantro leaves on top for a pop of color. Pairing ideas with chips, chicken, or fish This salsa shines with tortilla chips as a tasty snack. You can also spoon it over grilled chicken or fish for a bright, fresh flavor. It adds a wonderful twist to any meal. Preparation time Getting everything ready takes about 15 minutes. You will enjoy the quick and easy prep. Total time for making the salsa From start to finish, making this salsa takes around 25 minutes. It's fast, fresh, and full of flavor. To boost the flavor of your mango avocado salsa, try adding fresh herbs. You can use basil or mint for a new twist. They add a bright taste that pairs well with mango. Adjust the heat by adding jalapeño. If you want milder salsa, remove the seeds. For more spice, keep some seeds in. This simple change can make a big difference. Prevent avocado browning by using lime juice right away. The acid in lime helps keep avocados green and fresh. Another trick is to store them in water until you are ready to mix. To keep your mango fresh longer, store it at room temperature until ripe. Once ripe, you can refrigerate it. This slows down the oxidation process and keeps it sweet. Store leftover salsa in an airtight container. This helps keep the flavors intact. If you have a lot left, divide it into smaller portions. Use glass containers for storing salsa. They help keep flavors fresh and do not absorb odors. Plus, they are easy to clean and reuse. For the full recipe, check the section above. Enjoy making and sharing your mango avocado salsa! {{image_2}} You can make Mango Avocado Salsa your own. Try adding other fruits like pineapple or peach. These fruits add sweetness and a fun twist. You can also mix in different herbs, like mint or parsley. Each herb brings a new flavor. Don’t be afraid to experiment with what you like. This salsa fits many diets. It is vegan, so anyone can enjoy it. You can also make low-carb versions. Use less mango or skip it to cut carbs. This way, you still get great taste without the extra sugars. Using seasonal ingredients keeps salsa fresh and bright. In summer, add fresh tomatoes or bell peppers. In the fall, try using diced apples for crunch. Adjust flavors to fit the season. For a winter touch, use pomegranate seeds for color and sweetness. Each season offers new tastes to explore. For the full recipe, check out the detailed instructions above! Can I make Mango Avocado Salsa ahead of time? Yes, you can make this salsa ahead of time. It tastes great when chilled. However, the avocados may brown. To slow this, add lime juice and store in an airtight container. How long does Mango Avocado Salsa last in the fridge? This salsa lasts about 2 days in the fridge. After that, the flavors may fade. If you notice browning, just mix it up again to refresh the look. What can I substitute for lime juice? You can use lemon juice if you don’t have lime juice. It gives a similar tangy taste. Another option is vinegar, like apple cider vinegar, but use less. Alternatives for avocado or mango? If you can’t find avocados, try using diced cucumbers. They add crunch. For mango, use diced peaches or nectarines. They offer a sweet, juicy flavor. What dishes pair well with this salsa? This salsa is perfect with tortilla chips. It also goes well on grilled chicken or fish. You can even use it as a topping for tacos or burritos. How spicy is this salsa, and can I adjust it? The spice level depends on the jalapeño used. If you prefer less heat, remove the seeds. For more spice, add a pinch of crushed red pepper or use a spicier pepper. - Ingredients list recap: - 1 ripe mango, diced - 2 avocados, diced - 1 small red onion, finely chopped - 1 jalapeño, deseeded and minced - 1/4 cup fresh cilantro, chopped - 2 tablespoons lime juice - Zest of 1 lime - Salt and pepper to taste To make Mango Avocado Salsa, start by gathering all the fresh ingredients. Each one plays a key role. The ripe mango gives sweetness, while the avocado adds creaminess. The red onion brings a nice crunch and bite. The jalapeño adds heat, but you can adjust it to your taste. Fresh cilantro provides a bright flavor. Lime juice and zest add citrus notes, tying everything together. - Step-by-step instructions summary: 1. Begin by dicing the ripe mango and avocados into small, even pieces. Place them in a large mixing bowl. 2. Finely chop the red onion and add it to the mixing bowl with the mango and avocado. 3. Carefully deseed and mince the jalapeño. Adjust the amount based on how spicy you like it, then add it. 4. Chop the fresh cilantro and mix it in for a burst of flavor. 5. Squeeze lime juice over the mixture and add the lime zest for a fresh kick. 6. Gently toss all the ingredients together. Be careful not to mash the avocados. 7. Season with salt and pepper to taste. Mix again lightly to combine everything evenly. 8. Let the salsa sit for at least 10 minutes. This allows the flavors to meld beautifully. This recipe takes only about 15 minutes to prep. The total time is around 25 minutes. You’ll have a fresh and colorful dish ready to enjoy. Serve it in a lovely bowl with extra cilantro on top. Pair it with tortilla chips or use it as a topping for grilled chicken or fish. This salsa is a fresh delight! You can find the Full Recipe for more detailed steps. Mango Avocado Salsa is fresh, tasty, and easy to make. We explored ingredients, preparation, and serving suggestions. You can add your twist with different fruits or herbs. This salsa suits various diets and is perfect for any season. Remember to store leftovers properly to keep them fresh. Enjoy this vibrant dish with chips or as a topping on your meals. Your friends and family will love it. Dive into making this salsa today!

Mango Avocado Salsa Fresh and Flavorful Delight

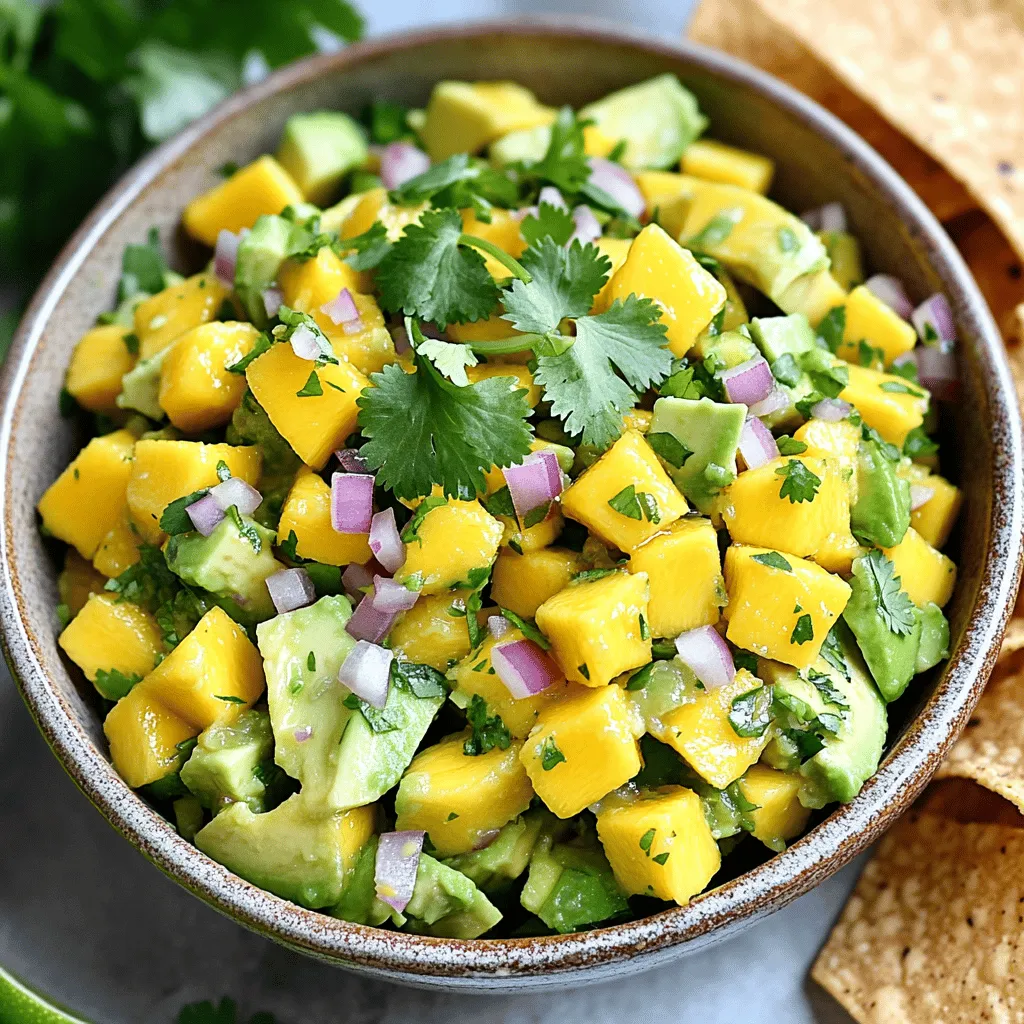
Get ready to elevate your snack game with my Mango Avocado Salsa! This fresh and flavorful delight combines ripe mango

- Fresh strawberries - Dark chocolate (60-70% cocoa) - White chocolate - Coconut oil (optional) - Sea salt flakes - Optional decorations (crushed nuts or sprinkles) Choosing the right ingredients is key. I love using fresh strawberries for their sweet and juicy taste. Make sure they are ripe and firm. Dark chocolate is my go-to for dipping. A cocoa content of 60-70% gives a rich flavor. You can also add white chocolate for a nice drizzle. Coconut oil is optional, but it helps the chocolate melt smoothly. Sea salt flakes add a touch of contrast to the sweetness. If you want, decorate with crushed nuts or colorful sprinkles. These additions make your strawberries look even more appealing. With this simple list, you can create a stunning treat that impresses everyone. For the full recipe, check out the detailed steps in the next section. 1. Preparing the strawberries Wash the strawberries gently and hull them. Make sure they are fully dry. Water will ruin the chocolate coating. 2. Setting up the double boiler Take a heatproof bowl and place it over a pot of simmering water. This setup helps melt the chocolate evenly. 3. Melting the dark chocolate Chop the dark chocolate into small pieces. Add it to the bowl. Stir often until it melts smoothly. You can add coconut oil for a smoother texture. 1. Dipping the strawberries Hold a strawberry by the stem. Dip it into the melted dark chocolate. Swirl it to coat evenly. Let the excess chocolate drip off. 2. Setting up on the baking sheet Place the dipped strawberries on a baking sheet lined with parchment paper. This way, they won’t stick. 3. Drizzling with white chocolate Melt the white chocolate the same way as the dark chocolate. Use a fork or piping bag to drizzle it over the dark chocolate. Get creative with your patterns! 1. Adding garnishes While the chocolate is still warm, sprinkle sea salt flakes, crushed nuts, or sprinkles on top. This adds flavor and looks nice. 2. Refrigerating to set Put the baking sheet in the fridge. Let the chocolate set for about 30 minutes. This will harden the chocolate, making it ready to enjoy! For the complete guide with all the details, check out the Full Recipe. To get the best chocolate coating, start by making sure your strawberries are dry. Any water can make the chocolate clump. After washing, let them air dry completely. This step is key for a great finish. Next, choose quality chocolate. I recommend using dark chocolate with 60-70% cocoa. It has a rich taste and melts smoothly. You can also mix in a bit of coconut oil for a silkier texture. For melting, use a double boiler. Place a heatproof bowl over simmering water. This gentle heat helps the chocolate melt evenly. Stir gently until it becomes smooth. Avoid overheating, as this can ruin the chocolate. Get creative with toppings! You can add crushed nuts, sprinkles, or even shredded coconut. These add flavor and texture. Use white chocolate to drizzle over dark chocolate. This contrast looks stunning and tastes great. Think about color themes when decorating. You can match colors for holidays or special events. For example, pink sprinkles for Valentine’s Day or green for St. Patrick’s Day. This makes your treat even more fun and festive! For presentation, place your chocolate-covered strawberries on a nice platter. You can arrange them in a circle or in rows. This makes them look inviting and delicious. Serve them chilled for the best taste. The chocolate should be firm but not too cold. If you want, you can let them sit at room temperature for a few minutes. This will enhance their flavor and make them even more enjoyable. For a special touch, consider packaging them as gifts. A simple box or a clear bag with a ribbon can make a lovely present. Chocolate-covered strawberries are sure to impress anyone! For the full recipe, check out the Full Recipe link. {{image_2}} You can make chocolate-covered strawberries even more exciting. Try using milk chocolate or white chocolate instead of dark chocolate. Milk chocolate gives a sweeter taste, while white chocolate adds a creamy flavor. These options let you mix things up and suit different tastes. Adding flavor extracts can also enhance your treats. A drop of vanilla or mint extract can create a unique twist. Just a little goes a long way! These simple changes will make your chocolate-covered strawberries truly special. If you need sugar-free options, use sugar-free chocolate. Many brands offer delicious sugar-free chocolate that melts well. This way, you can enjoy chocolate-covered strawberries without the added sugar. For vegan chocolate alternatives, look for dark chocolate labeled as dairy-free. Make sure to read the labels to ensure it fits your diet. These options help everyone enjoy these tasty treats. Make your chocolate-covered strawberries fit the season with fun decorations. For holidays, add colors that match the theme. Red and green for Christmas, or pastels for Easter, can make them festive. You can also pair strawberries with other fruits for variety. Slice bananas or use pineapple for fun combinations. Mixing fruits adds flavor and a pop of color to your plate. For more ideas, check out the Full Recipe. Store chocolate-covered strawberries in the fridge. Use an airtight container to keep them fresh. A single layer works best. If stacking, add parchment paper between layers to avoid sticking. This helps keep the chocolate from getting damaged. You can freeze chocolate-covered strawberries for longer storage. Place them on a baking sheet and freeze until solid. After freezing, transfer them to a freezer-safe bag. This helps prevent freezer burn. When you want to enjoy them, take them out and let them thaw in the fridge. Avoid thawing at room temperature, as this can cause sogginess. To prevent chocolate bloom, make sure your chocolate is properly tempered. This means melting it at the right temperature and cooling it slowly. Temperature changes can also affect the chocolate. Keep your strawberries cool and avoid heat sources. If they get too warm, the chocolate can lose its shine and texture. Chocolate-covered strawberries can last about 1 to 2 days in the fridge. To keep them fresh, store them in a single layer. If you stack them, the chocolate might get ruined. Yes, you can use milk chocolate or white chocolate for dipping. Each type gives a different taste. You can even mix chocolates for a fun twist! The best way to melt chocolate is using a double boiler. Place chocolate in a heatproof bowl over simmering water. Stir gently until it’s smooth. This method helps prevent burning. Yes, you can make them a few hours ahead. Just keep them in the fridge until ready to serve. They taste best when fresh, so avoid making them too far in advance. Chocolate-covered strawberries can be a healthy treat. Strawberries are full of vitamins, and dark chocolate has antioxidants. Enjoy them in moderation for a sweet yet wholesome snack. For a detailed guide on making these delicious treats, check out the Full Recipe! You learned how to make delicious chocolate-covered strawberries. We covered each step, from choosing fresh strawberries to melting chocolate. Remember to dry your strawberries well for the best coating. Explore fun toppings and variations to make them unique. Store them properly to keep them fresh and tasty. Safety and quality matter, so use good ingredients. Enjoy making these treats at home, and share them with friends and family. These strawberries will surely impress!

Chocolate Covered Strawberries Delightful and Easy Treat

Welcome to a sweet adventure! Chocolate covered strawberries are a simple and delightful treat you can whip up at home.

Older posts
Newer posts
← Previous Page1 … Page63 Page64 Page65 … Page127 Next →

dsad

© 2025 Southern Dishes • Built with GeneratePress

Our Policies

  • Copyright Policy
  • Cookie Policy
  • GDPR Policy
  • Privacy Policy
  • Disclaimer
  • Terms Of Use

More Information

  • Home
  • About
  • Contact
  • Appetizers
  • Dessert
  • Dinner
  • Drinks
©2025, Southern Dishes About Back To Top