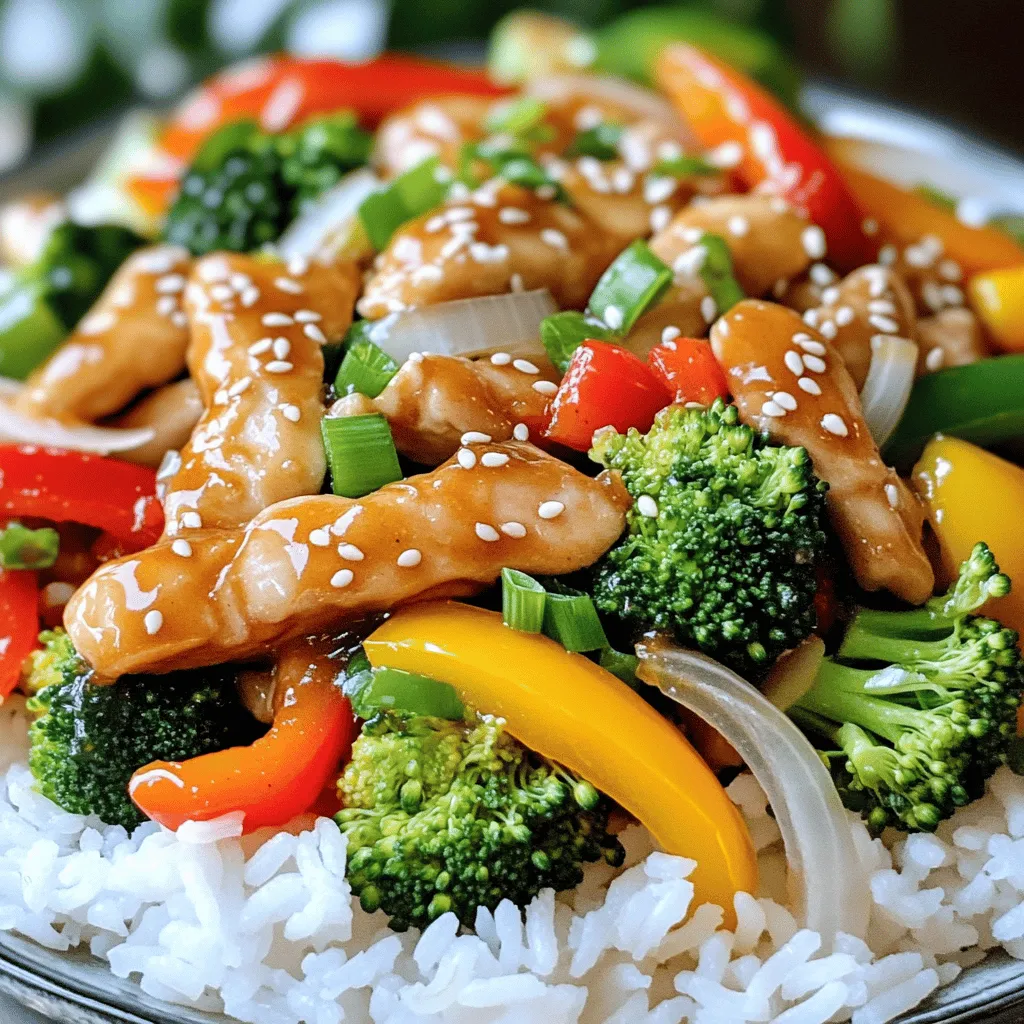
Skip to content
DisclaimerTerms Of UseGDPR PolicyCookie Policy

Southern Dishes

  • Home
  • Drinks
  • Appetizers
  • Dinner
  • Dessert
  • About
  • Contact
  • Privacy Policy
DisclaimerTerms Of UseGDPR PolicyCookie Policy

Isabella

- 1 lb boneless chicken thighs, sliced into strips - 2 tablespoons honey - 3 tablespoons soy sauce - 3 cloves garlic, minced - 1 tablespoon fresh ginger, grated - 2 tablespoons vegetable oil - 1 red bell pepper, sliced - 1 cup broccoli florets - 1 cup snap peas The main ingredients in honey garlic chicken stir fry form the heart of this dish. Boneless chicken thighs give a juicy base and soak up the flavor well. The honey and soy sauce make a sweet and savory blend. The garlic and ginger add depth to the sauce, making it aromatic and tasty. Fresh vegetables like bell pepper, broccoli, and snap peas add color and crunch. - 2 green onions, chopped - Sesame seeds for garnish Garnishing adds a special touch. The green onions give a fresh burst of flavor. Sesame seeds add a nutty crunch and look great on top. These finishing touches make the dish feel complete and inviting. - Salt and pepper to taste - Additional herbs or spices You can adjust the taste with salt and pepper. Feel free to add your favorite herbs or spices. Experimenting with seasonings can give your stir fry a unique twist. Try a pinch of chili flakes for heat or a dash of lemon for brightness. Using fresh, quality ingredients ensures a delicious meal. For the full recipe, click here. To start, slice the chicken into strips. Use boneless, skinless chicken thighs for juiciness. A sharp knife helps make clean cuts. Next, slice the vegetables. Cut the red bell pepper into thin strips. For the broccoli, break it into small florets. Finally, prepare the snap peas by trimming the ends. Now, let’s make the honey garlic sauce. In a small bowl, whisk together the honey, soy sauce, minced garlic, and grated ginger. This sauce gives the stir fry its sweet and savory kick. Set this mix aside while you cook. Heat a large skillet or wok over medium-high heat. Add 1 tablespoon of vegetable oil. Once the oil is hot, add the sliced chicken. Season it with salt and pepper for flavor. Cook for about 5-7 minutes. Stir occasionally to avoid burning. You want the chicken to turn golden brown and cook through. When the chicken looks good, take it out of the skillet. Set it aside on a plate. This helps keep it juicy and tender while you stir-fry the veggies. In the same skillet, add the remaining tablespoon of vegetable oil. Now, toss in the broccoli, bell pepper, and snap peas. Stir-fry the vegetables for about 3-4 minutes. You want them to be tender but still crunchy. This gives a great texture to the dish. Next, return the cooked chicken to the skillet. Pour the honey garlic sauce over the chicken and veggies. Stir everything together. Cook for another 2-3 minutes. This allows the sauce to coat the chicken and vegetables nicely. When everything is hot and mixed well, remove the skillet from the heat. Stir in the chopped green onions for a fresh taste. You can find the full recipe at the beginning if you need more details. Stir-frying is quick and fun. Use a large skillet or wok. Heat your oil well before adding food. This helps the chicken cook evenly. Keep the chicken in a single layer. Don’t crowd the pan. Cook it for about 5 to 7 minutes. You want it golden brown and juicy. To keep your veggies crisp, cook them last. Stir-fry them for just a few minutes. You want a bright color and crunch. Add them after the chicken. This way, they stay fresh and vibrant. The honey garlic sauce is key to this dish. You can adjust the sweetness or saltiness to your taste. If you like it sweeter, add more honey. For saltiness, add a bit more soy sauce. Taste as you go. To thicken the sauce, let it simmer. This helps it coat your chicken and veggies better. You can also mix a little cornstarch with water. Add this mixture to the sauce for a quick thickening trick. For a complete meal, serve this stir fry with rice or noodles. Both soak up the sauce well. You can also try it with quinoa for a healthy twist. Presentation matters! Use a nice bowl. Sprinkle sesame seeds and green onions on top. This makes the dish look colorful and tasty. Enjoy every bite! For the full recipe, check out the section below. {{image_2}} You can switch up the protein in this dish. Try tofu for a vegetarian option. Firm tofu works best. Just press it to remove extra water. Slice it into bite-sized pieces and cook it like chicken. If you prefer shrimp, they are a great choice too. Use medium or large shrimp. Add them to the pan after cooking the garlic for a quick stir-fry. Shrimp cooks fast, so be careful not to overdo it. Feel free to mix in seasonal vegetables. Carrots, zucchini, or snap peas add color and nutrition. You can use what you have on hand. Just make sure to cut the veggies into similar sizes. This helps them cook evenly. If you want to add more greens, bok choy or spinach are great options. Toss them in at the end. They will wilt nicely without losing their bright color. Want a fresh twist? Add citrus! A squeeze of lime or lemon brightens the dish. It adds a zesty flavor that pairs well with honey. You can also try different sauces. Swap soy sauce for teriyaki or hoisin sauce. Each sauce gives a unique taste. Don't hesitate to mix flavors. It's a fun way to make this dish your own. For the full recipe, check out the [Full Recipe]. To store leftover honey garlic chicken stir fry, place it in an airtight container. Make sure it has cooled to room temperature first. This helps keep the food fresh and safe. In the fridge, it lasts for about three to four days. If you want to enjoy it later, this is the best way to keep it tasty. When you reheat your stir fry, I recommend using a skillet or a wok. Heat it on medium until warm. Stir the dish often to keep it from sticking. This method helps retain the nice texture of the chicken and veggies. Avoid using high heat, as that can overcook the chicken. Yes, you can freeze honey garlic chicken stir fry! To freeze it, let it cool down completely. Then, transfer it to freezer-safe bags or containers. Make sure to remove as much air as possible. It can last for up to three months in the freezer. When you’re ready to eat it, thaw it in the fridge overnight. After that, reheat it in a skillet for the best taste. You can find the full recipe [here](Full Recipe). This dish is quick to prepare. The total time is about 30 minutes. You will spend around 15 minutes getting ready. This includes slicing chicken and veggies. Cooking takes another 15 minutes. It is perfect for busy weeknights! Yes, you can use various types of chicken. Boneless, skinless chicken thighs work great. They stay juicy and tender. You can also use chicken breasts if you prefer. Just remember, bone-in chicken takes longer to cook. It’s best to stick with boneless cuts for this stir fry. Pair this stir fry with simple sides. Steamed rice or noodles work well. They soak up the tasty sauce. You can also add a light salad with a citrus dressing. This adds a fresh touch. Another option is to serve with egg rolls for crunch. Enjoying these together makes a lovely meal! In this blog post, we explored how to make a tasty honey garlic chicken stir fry. You learned about the main and garnishing ingredients, plus optional seasonings for added flavor. The step-by-step guide gave you tips for preparing, cooking, and combining chicken and vegetables. Remember to play around with different proteins and vegetables for variety. Follow storage tips to keep leftovers fresh. With practice, you can master this dish and impress your family. Enjoy your cooking adventure!

Honey Garlic Chicken Stir Fry Tasty Weeknight Meal

Looking for a quick and tasty weeknight meal? Honey Garlic Chicken Stir Fry is your answer! With tender chicken, fresh

- 1 cup silken tofu, drained - 1/2 cup dairy-free dark chocolate chips - 1/4 cup maple syrup - 1 tablespoon vanilla extract - 1 pinch of sea salt - 1 tablespoon cocoa powder (optional) - Fresh berries and mint leaves for garnishing 1. Silken Tofu: This soft tofu is rich in protein and low in calories. It helps create a smooth texture. 2. Dairy-Free Dark Chocolate Chips: These chips add antioxidants and healthy fats. They also provide a rich chocolate flavor. 3. Maple Syrup: A natural sweetener that contains minerals like manganese and zinc. It gives the mousse a nice sweetness. 4. Vanilla Extract: Adds flavor and may have antioxidant properties. It enhances the taste of chocolate. 5. Sea Salt: A pinch of salt helps balance sweetness and brings out the chocolate flavor. 6. Cocoa Powder: This optional ingredient boosts chocolate flavor and adds fiber. It may also provide antioxidants. 7. Fresh Berries and Mint: These toppings add vitamins, minerals, and freshness to your dessert. - Tofu: Use avocado for a creamy texture if you cannot have soy. - Chocolate Chips: Look for carob chips if you have a chocolate allergy. - Maple Syrup: Agave syrup or brown rice syrup can replace maple syrup. - Vanilla Extract: If allergic, try using an equal amount of almond extract. - Cocoa Powder: Unsweetened carob powder can be a good substitute for cocoa. For the full recipe, check out the [Full Recipe]. To make vegan chocolate mousse, start with melting the dairy-free dark chocolate chips. You can use a microwave or a double boiler. If using the microwave, heat the chips in short bursts of 30 seconds. Stir between heats to prevent burning. For the double boiler, fill a pot with water and place a bowl on top. Heat until the chocolate melts slowly. Once the chocolate is melted, let it cool a bit. In a blender, add the drained silken tofu, melted chocolate, maple syrup, vanilla extract, sea salt, and cocoa powder if you want more depth. Blend on high for 1-2 minutes. Scrape the sides of the bowl to mix well. The goal is a smooth, creamy texture. After blending, taste the mousse. If you want it sweeter, add more maple syrup, then blend briefly to mix. Spoon the mousse into serving glasses. Chill these in the fridge for at least 30 minutes. It will set better the longer it chills. When melting chocolate, the key is low heat. Too much heat can burn the chocolate. If using the microwave, stir often. This helps distribute the heat evenly. If you see any lumps, keep stirring. For the double boiler, keep the water simmering, not boiling. Boiling can splash water into the chocolate, which ruins its texture. For the best mousse, blend until smooth. If your blender struggles, add a splash of plant milk to help it along. This will make it easier to blend. Scrape down the sides often to ensure even mixing. The mousse should be light and fluffy at the end. If you want to make it extra creamy, blend a little longer. To get that perfect, creamy texture, start with silken tofu. It blends smoothly and gives the mousse a rich mouthfeel. After melting the chocolate, let it cool slightly before adding it to the blender. If the chocolate is too hot, it can cook the tofu, leading to a grainy texture. Blend the mixture until it is silky and lump-free. If it seems too thick, add a splash of plant milk for a lighter mousse. One common mistake is not draining the tofu well. Extra water can make the mousse runny. Always press the tofu gently to remove excess liquid. Another mistake is overheating the chocolate. If you melt it too quickly, it can burn and lose flavor. Stir often during melting to keep it smooth. Lastly, remember to taste your mousse before chilling it. You can adjust the sweetness with more maple syrup if needed. You can make this mousse even more exciting! Try adding a spoonful of espresso or a dash of cinnamon for depth. Want more chocolate flavor? Add cocoa powder to the mix. Fresh fruit like raspberries or strawberries can brighten the taste. Use vanilla bean for a richer aroma. Don't forget to top your mousse with berries or mint for a beautiful finish. For the full recipe, check the earlier section. {{image_2}} You can swap maple syrup with other sweeteners. Agave syrup works well and is light. Coconut sugar offers a caramel-like taste. Both options blend in easily for sweetness. Get creative with flavors in your mousse. Adding a shot of espresso boosts the chocolate taste. Vanilla bean brings a warm, rich flavor. You can also try a hint of almond extract for a nutty twist. The type of chocolate changes your mousse. Dairy-free dark chocolate gives a rich taste. White chocolate offers a sweeter, creamier option. You can even mix dark and milk chocolate for balance. For the full recipe, check out the complete guide to Vegan Chocolate Mousse. To keep your vegan chocolate mousse fresh, store it in an airtight container. This helps prevent any odors from the fridge from affecting the taste. Make sure to chill it right after you prepare it. Avoid leaving it out at room temperature for too long. Your mousse will last about 3 to 5 days in the fridge. The longer it sits, the firmer it may get. I recommend checking the texture each day. If it seems too firm, you can give it a quick stir before serving. You can freeze vegan chocolate mousse for up to 2 months. Use a freezer-safe container for storage. When you want to eat it, thaw it in the fridge overnight. Avoid using a microwave, as it can change the texture. For best results, enjoy the mousse fresh! For the full recipe, check out the section above. Vegan chocolate mousse is made from simple, plant-based ingredients. The main ingredient is silken tofu, which gives the mousse its creamy texture. You will also need dairy-free dark chocolate chips for rich flavor. Maple syrup adds sweetness, while vanilla extract enhances the taste. A pinch of sea salt balances the flavors, and cocoa powder adds extra richness if you like. Yes, vegan chocolate mousse can be a healthy dessert option. It uses whole ingredients, which provide nutrients. Silken tofu is high in protein and low in calories. Dark chocolate contains antioxidants, which are good for your heart. Maple syrup has some vitamins and minerals, making it a better option than refined sugar. While it's still a treat, it offers some health benefits compared to traditional mousse. You can make vegan chocolate mousse without tofu by using avocados instead. Avocados provide creaminess and healthy fats. Simply blend ripe avocados with melted dark chocolate, maple syrup, and vanilla extract. Adjust the sweetness to your taste. This version is rich and creamy, just like the original. Yes, you can definitely make vegan chocolate mousse ahead of time. It needs to chill for at least 30 minutes to set properly. You can prepare it the day before and store it in the fridge. Just cover the serving glasses or bowls with plastic wrap to keep them fresh. You can serve vegan chocolate mousse with a variety of toppings. Fresh berries like raspberries or strawberries add a nice burst of flavor. Mint leaves also provide a refreshing touch. Whipped coconut cream can add extra creaminess. You can even add crushed nuts for a bit of crunch. Check the Full Recipe for more ideas! This blog post covers everything you need for vegan chocolate mousse. You learned about the key ingredients and their health benefits. You also found tips for cooking, blending, and avoiding common mistakes. We explored variations with sweeteners and flavors, plus how to store your mousse properly. In the end, enjoy experimenting with this creamy treat. Its flexibility allows you to tailor it to your taste. Get ready to impress with your delicious and healthy dessert!

Vegan Chocolate Mousse Decadent and Easy Dessert

If you’re craving a rich, creamy treat that’s also plant-based, you’re in the right place! My Vegan Chocolate Mousse is

To make Spicy Cajun Chicken Pasta, gather these simple ingredients: - 2 boneless, skinless chicken breasts, sliced - 8 oz fettuccine pasta - 2 tablespoons Cajun seasoning - 1 tablespoon olive oil - 1 red bell pepper, sliced - 1 green bell pepper, sliced - 1 small onion, diced - 3 cloves garlic, minced - 1 cup heavy cream - 1 cup chicken broth - Salt and pepper to taste - Fresh parsley, chopped (for garnish) - Grated Parmesan cheese (for serving) These ingredients combine to create a dish full of flavor. The chicken gives protein, while the peppers add crunch. The heavy cream and chicken broth create a rich sauce. Cajun seasoning brings the spice and warmth that makes this dish stand out. When you cook this dish, use fresh ingredients for the best taste. The colors of the peppers make the pasta look great, too. You can find all these items at your local grocery store. For the full recipe, check out the details above! First, boil water in a large pot. Add a pinch of salt to the water. Once boiling, add 8 oz of fettuccine pasta. Cook it according to the package directions, usually around 8-10 minutes. Stir the pasta occasionally to prevent sticking. Check for doneness by tasting a piece. When it's al dente, drain the pasta in a colander and set it aside. While the pasta cooks, grab a large skillet. Heat 1 tablespoon of olive oil over medium heat. Add 2 sliced boneless, skinless chicken breasts to the skillet. Sprinkle 2 tablespoons of Cajun seasoning, salt, and pepper onto the chicken. Cook for about 6-7 minutes until the chicken is browned and cooked through. Make sure to stir occasionally. Once done, remove the chicken from the skillet and set it aside. In the same skillet, add 1 diced onion. Sauté it for 3 minutes until it turns translucent. Then, toss in 3 minced garlic cloves and cook for 1 minute until fragrant. Next, add 1 sliced red bell pepper and 1 sliced green bell pepper. Cook them for about 5 minutes until they soften. Pour in 1 cup of chicken broth, bringing it to a simmer for 3-4 minutes. This will reduce the broth slightly. Stir in 1 cup of heavy cream and let it simmer for 2-3 minutes, stirring often until it thickens a bit. Now, return the cooked chicken to the skillet. Mix everything well to heat through. Finally, add the drained fettuccine to the skillet. Toss all the ingredients together until the pasta is coated in the sauce. Adjust the taste with salt and pepper if needed. For a beautiful finish, serve the dish with freshly chopped parsley and a sprinkle of grated Parmesan cheese. For extra zest, add a slice of lemon on the side. Enjoy this delightful Spicy Cajun Chicken Pasta! For the complete recipe, check the Full Recipe section above. To get the best Cajun flavor, use quality Cajun seasoning. You can make your own by mixing paprika, cayenne, garlic powder, and oregano. Adjust the heat to fit your taste. Remember to season the chicken well. It should be coated evenly. When you sauté the veggies, let them get a bit charred. This adds depth to the flavor. Spicy Cajun chicken pasta is great on its own, but you can change it up. Serve it with garlic bread for a comforting meal. A simple side salad can brighten up the dish. You can even use it as a filling for tacos. Just skip the pasta, and add the mix to warm tortillas. Having the right tools makes cooking easier. Use a large skillet that heats evenly. A good knife helps slice the chicken and veggies. A pot for boiling pasta is a must. Don't forget a wooden spoon for stirring. A strainer helps drain the pasta quickly. These tools make the cooking process smooth and fun. For the full recipe, refer back to the beginning of this article. {{image_2}} To make a vegetarian version of Spicy Cajun Chicken Pasta, swap the chicken for veggies. You can use mushrooms, zucchini, or eggplant. These ingredients add texture and flavor. Keep the Cajun seasoning for that spicy kick. Use vegetable broth instead of chicken broth. This keeps the dish rich and tasty without meat. If you love heat, add more spice! Try using extra Cajun seasoning. You can also add red pepper flakes or diced jalapeños. These will give your dish a fiery kick. For a smoky flavor, add smoked paprika. Adjust the spice to your taste, but be careful not to overpower the other flavors. You can substitute chicken with shrimp or sausage. Shrimp cooks quickly and adds a nice touch. Sausage gives a hearty flavor. If you use sausage, slice it and cook it before the vegetables. This helps release its fat and flavor into the dish. You can even mix different proteins for a fun twist! After enjoying your spicy Cajun chicken pasta, let the leftovers cool down. Use an airtight container to keep them fresh. Store the pasta in the fridge for up to three days. Make sure to cover it well to avoid drying out. To reheat, you can use a microwave or a skillet. If using a microwave, place the pasta in a bowl and cover it with a damp paper towel. Heat it for 1-2 minutes, stirring halfway. In a skillet, add a little olive oil over medium heat. Toss the pasta in the skillet for about 5 minutes. This method brings back the creamy sauce and keeps the flavors alive. If you want to save some for later, freezing is a great option. Place the cooled pasta in a freezer-safe container. You can also use freezer bags for easy storage. Make sure to remove as much air as possible. The pasta can stay in the freezer for up to three months. To thaw, move it to the fridge overnight before reheating. For the complete recipe, check out the Full Recipe section. Cajun seasoning is a mix of spices. It usually has paprika, cayenne, garlic powder, and onion powder. This blend gives dishes a warm, spicy flavor. You can buy it or make your own. Making your own lets you adjust the heat. Use the spices you love for a personal touch. Yes, you can use any pasta you like. Fettuccine works well, but penne or rigatoni are great too. Just remember to cook it according to the package instructions. Your pasta choice can change the dish's texture. Try whole wheat or gluten-free pasta for a healthier option. To make Spicy Cajun Chicken Pasta gluten-free, swap regular pasta for gluten-free pasta. Many brands offer gluten-free options, like rice or quinoa pasta. Double-check the Cajun seasoning too. Some blends may contain gluten. Look for a certified gluten-free label to be safe. Enjoy this dish without worry! In this post, I shared how to make a tasty Cajun chicken fettuccine. We covered the needed ingredients, steps for cooking, and tips for perfect flavor. I also suggested variations to suit different diets and showed you how to store leftovers. Cajun chicken fettuccine is simple yet satisfying. This dish brings bold flavors to any meal. Enjoy making it your own!

Spicy Cajun Chicken Pasta Flavorful and Easy Recipe

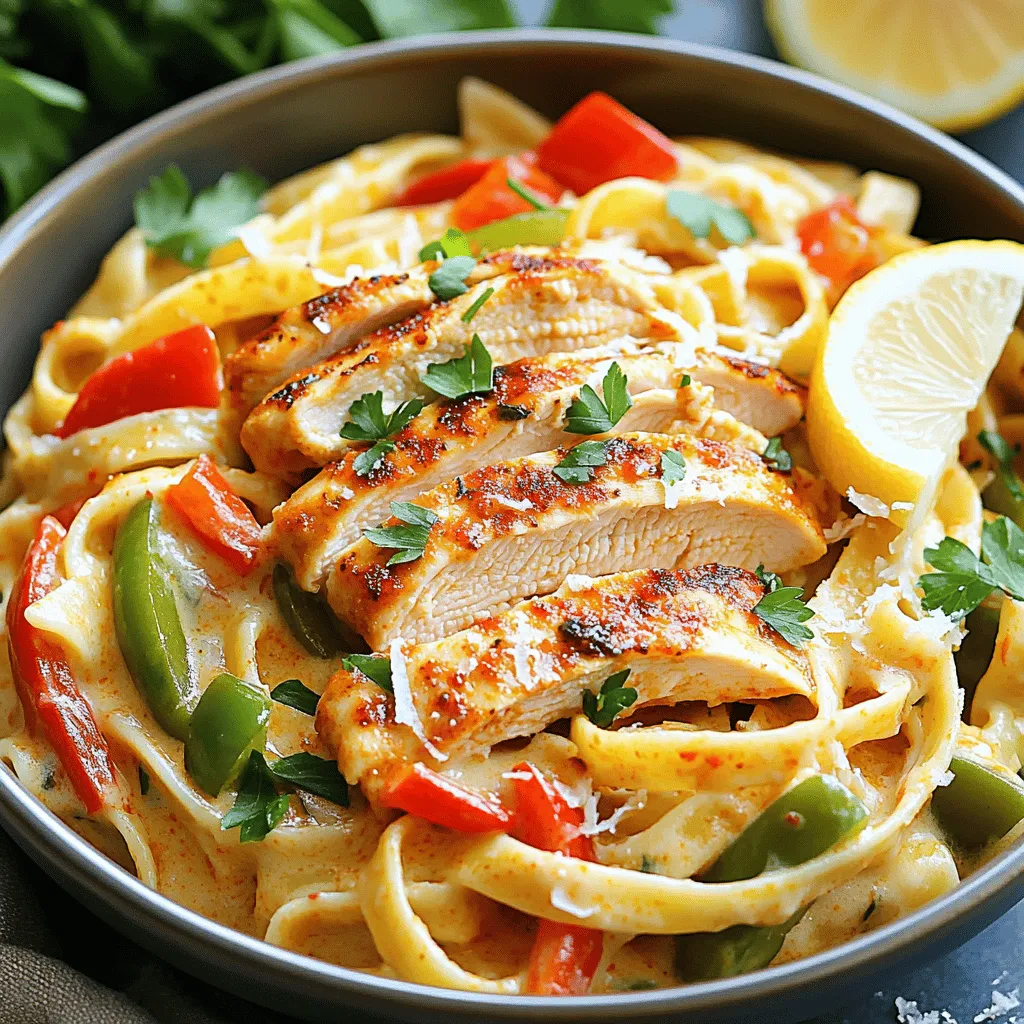
Are you ready to heat up your dinner plans? My Spicy Cajun Chicken Pasta is packed with flavor and super

To make One Pan Lemon Garlic Salmon, you need a few fresh and simple items. Here’s the list of ingredients: - 2 salmon fillets, skin-on - 2 tablespoons olive oil - 4 cloves garlic, minced - 1 lemon, sliced - 1 cup cherry tomatoes, halved - 1/2 cup green beans, trimmed - Salt and pepper to taste - Fresh parsley, chopped (for garnish) Each ingredient adds its own flavor to the dish. Salmon gives you healthy fats and protein. Olive oil keeps everything moist and tasty. Garlic adds a nice kick. Lemon brightens the dish with its tang. Cherry tomatoes bring sweetness, while green beans add crunch. Salt and pepper are key for seasoning. Fresh parsley not only looks nice but also adds freshness. Using quality ingredients makes a big difference. I always recommend using fresh salmon and seasonal veggies. This dish is simple but packs a punch. You can find the full recipe easily to help you get started. Set your oven temperature to 400°F (200°C). This step is key for even cooking. Start by mincing the garlic. You want small pieces for great flavor. Next, slice the lemon into thin rounds. Fresh lemon adds brightness to the dish. In a large oven-safe skillet, heat two tablespoons of olive oil over medium heat. Once hot, add the minced garlic. Sauté it for about one minute until fragrant. Don’t let it burn! Now, lay the salmon fillets in the skillet with the skin-side down. Season them generously with salt and pepper. This adds flavor. Place the lemon slices on top of the salmon. Then, tuck the halved cherry tomatoes and green beans around the fish. Squeeze half of the lemon juice over everything for extra zest. Now, carefully transfer the skillet to your preheated oven. Bake for 12 to 15 minutes. The salmon should be cooked through and flake easily with a fork. After baking, remove the skillet from the oven. Let it rest for a couple of minutes. This helps the juices settle. Garnish with fresh parsley and enjoy your meal! For the complete details, check out the Full Recipe. To know when your salmon is done, look for a few signs. First, the color should change from bright pink to a pale pink. Next, the fish should feel firm to the touch. You can also do the flaking test. Gently press a fork into the salmon. If it flakes easily, it is ready. If it resists, let it cook a bit longer. To boost the taste, you can add fresh herbs. Dill, thyme, or basil work well with salmon. You might also try spices like paprika or cumin for a unique twist. A pinch of red pepper flakes can add a nice kick. Don’t hesitate to experiment with your favorites! Using the right skillet can make a big difference. A cast-iron skillet gives great heat and cooks evenly. A non-stick skillet also works well, making it easier to remove the salmon. Avoid thin pans that can warp in the oven. A heavy bottom is best for even cooking. For the full recipe, check out the [Full Recipe]. {{image_2}} If you don’t have green beans or cherry tomatoes, don't worry! You can swap in other veggies. Try zucchini or bell peppers for a fresh twist. Broccoli or asparagus also work well. Just cut them into bite-sized pieces to cook evenly. These swaps keep the dish colorful and tasty. This recipe loves to play with proteins. You can use other fish like trout or cod. They work great with the lemon and garlic. If you prefer chicken, use boneless, skinless chicken breasts. Just adjust the cooking time. Chicken may need a bit longer to cook through. Aim for an internal temp of 165°F to ensure it's safe to eat. Making this dish gluten-free is easy. The original recipe is naturally gluten-free. Just check that your olive oil is pure and safe. For dairy-free needs, you're all set! The recipe doesn’t use any dairy products. You can enjoy this dish without any worry. Feel free to add some dairy-free butter for extra richness if desired. For more details, check out the Full Recipe. To store leftovers of your one pan lemon garlic salmon, let it cool first. Place the salmon in an airtight container. Store it in the fridge for up to three days. This keeps it fresh and safe to eat. When reheating, keep the salmon moist. Use your oven or a pan. Preheat your oven to 350°F (175°C). Warm the salmon for about 10 minutes. If using a pan, add a splash of water and cover it. This helps keep it juicy. You can freeze your one pan lemon garlic salmon too. Wrap it tightly in plastic wrap. Then, place it in a freezer bag. It can stay in the freezer for up to three months. Thaw it in the fridge overnight before reheating. This keeps the flavor and texture nice. You should bake salmon at 400°F for about 12 to 15 minutes. The thickness of your salmon fillets can affect the cooking time. Thicker pieces may need a bit longer. Always check if the salmon flakes easily with a fork. This test shows it is done. Yes, you can use frozen salmon. If using frozen salmon, thaw it first. You can do this in the fridge overnight or by running it under cold water. Make sure it is fully thawed before cooking. This ensures even cooking and great flavor. I recommend serving your salmon with a fresh salad or rice. Quinoa also pairs well and adds nutrients. Roasted vegetables make a nice side, too. You can use whatever you have on hand. These sides complete your meal and add color to your plate. For the full recipe, check out the detailed steps and ingredients. You learned how to make a tasty One Pan Lemon Garlic Salmon. We covered the key ingredients, step-by-step cooking, and useful tips. Remember, the best way to know if salmon is done is when it flakes easily. You can even switch out vegetables or proteins for variety. Store leftovers properly and reheat gently. This dish is simple, healthy, and delicious! Try it today and impress your family and friends with your cooking skills. Enjoy your new meal!

One Pan Lemon Garlic Salmon Fresh and Flavorful Dish

Looking for a quick and tasty meal? One Pan Lemon Garlic Salmon is a must-try! This dish pairs fresh salmon

- 8 oz. pasta (suggestions: fusilli or bowtie) - 1 cup cherry tomatoes, halved - 1 cup fresh mozzarella balls (bocconcini) - 1/2 cup fresh basil leaves, chopped - 1/4 cup extra virgin olive oil - 2 tablespoons balsamic glaze - 1 clove garlic, minced - Salt and pepper to taste - 1/4 teaspoon red pepper flakes (optional) When making Caprese Pasta Salad, I focus on fresh, simple ingredients. You start with 8 ounces of pasta, like fusilli or bowtie. These shapes hold the dressing well and look great on the plate. Next, I add 1 cup of halved cherry tomatoes. Their sweetness pairs perfectly with the creamy mozzarella. Speaking of mozzarella, I use 1 cup of fresh mozzarella balls, known as bocconcini. They are soft and add a lovely texture. For flavor, I chop 1/2 cup of fresh basil leaves. Basil is key to this dish, giving it a fresh taste. I mix in 1/4 cup of extra virgin olive oil. This oil brings richness and helps the flavors blend. I also drizzle in 2 tablespoons of balsamic glaze. This adds a sweet tang that ties everything together. To season, I mince 1 clove of garlic. Garlic adds depth to the salad. I finish with salt and pepper to taste, plus a pinch of red pepper flakes if you like some heat. These ingredients create a bright, colorful salad. The full recipe brings all these elements together in a delicious way! 1. Start by boiling a large pot of water. 2. Add a good amount of salt to the water. 3. Once boiling, add 8 oz. of pasta. Fusilli or bowtie works best. 4. Cook it until al dente, about 8-10 minutes. 5. Drain the pasta in a colander and rinse it under cold water. 6. This stops the cooking and cools it down. Set the pasta aside. 1. In a small bowl, whisk together the following: - 1/4 cup extra virgin olive oil - 1 clove garlic, minced - 2 tablespoons balsamic glaze - Salt and pepper to taste - Optional: 1/4 teaspoon red pepper flakes for some heat 2. Mix well until it becomes smooth. 1. In a large mixing bowl, add the cooled pasta. 2. Toss in 1 cup of halved cherry tomatoes and 1 cup of mozzarella balls. 3. Add 1/2 cup of roughly chopped fresh basil leaves. 4. Pour the dressing over the mixture. 5. Gently toss everything together until well coated. 6. Taste and adjust the seasoning if needed. 7. If you prefer, chill the salad in the fridge for at least 30 minutes. 8. Serve in a large bowl and enjoy your Caprese Pasta Salad! For the detailed method, check the Full Recipe. To achieve the best flavor balance in your Caprese Pasta Salad, use fresh, high-quality ingredients. The cherry tomatoes should be ripe and sweet. Look for mozzarella that is soft and creamy. The basil should be fresh and fragrant. Combine these with a good olive oil and balsamic glaze for a rich taste. Choosing the right pasta shape is key to a great salad. I recommend fusilli or bowtie pasta. These shapes hold the dressing well and catch bits of tomato and cheese. They also add a fun texture, making each bite delightful. Presentation matters! Serve your salad in a large, colorful bowl. This draws the eye and makes the dish more inviting. Garnish with extra basil leaves on top. You can also drizzle a bit more balsamic glaze over the salad before serving. This adds a nice shine and extra flavor. To keep your salad fresh, store it in an airtight container in the fridge. This helps preserve the flavors and textures. If you want the best taste, chill the salad for at least 30 minutes before serving. This allows the flavors to meld together beautifully. {{image_2}} For those who need gluten-free options, you can use gluten-free pasta. It tastes great and fits well in this salad. There are many brands that offer gluten-free shapes, like rotini or penne. If you want to make this dish vegan, you can skip the mozzarella. Instead, consider using tofu or vegan cheese. They add creaminess and flavor without dairy. You can switch up the tomatoes, too! Heirloom tomatoes add a pop of color and sweetness. You may also try different cheeses like burrata or feta for a twist. Adding protein is an easy way to make this salad a meal. Grilled chicken or shrimp works well. You can toss them in with the pasta for extra flavor and nutrition. While the classic dressing is delicious, you can try different ones for a new taste. A lemon vinaigrette can brighten the salad. You can mix olive oil, lemon juice, and a pinch of salt for a refreshing change. Using fresh herbs is another way to enhance the flavor. You might add parsley or chives for an extra burst. They can bring new layers to your Caprese Pasta Salad. To keep your Caprese Pasta Salad fresh, store it in an airtight container. This method helps prevent moisture loss and keeps the flavors intact. Place the salad in the fridge right after serving. If you store it correctly, it can last for 3 to 5 days. I do not recommend freezing Caprese Pasta Salad. Freezing changes the texture of the tomatoes and mozzarella. If you must freeze it, try separating the dressing from the salad. Thaw it in the fridge overnight, then add the dressing before serving. When you take the salad out of the fridge, it might look a bit sad. To revive it, add a splash of olive oil and a bit more balsamic glaze. Toss it gently to mix everything again. For the best taste, serve it cold. Keep the salad fresh by storing it in the fridge until you're ready to eat. To make Caprese Pasta Salad, follow these steps: 1. Cook the Pasta: Boil water, add salt, and cook 8 oz. pasta until al dente. Drain and rinse with cold water. 2. Prepare the Dressing: In a bowl, mix 1/4 cup extra virgin olive oil, 1 clove minced garlic, 2 tablespoons balsamic glaze, salt, and pepper. 3. Combine Ingredients: In a large bowl, mix the cooked pasta, 1 cup halved cherry tomatoes, 1 cup mozzarella balls, and 1/2 cup roughly chopped basil. 4. Dress the Salad: Pour the dressing over the pasta mix and toss until well coated. 5. Taste and Adjust: Taste the salad and add more salt, pepper, or balsamic glaze as needed. 6. Chill (Optional): Let the salad sit in the fridge for 30 minutes for better flavor. 7. Serve: Toss again before serving and enjoy your Caprese Pasta Salad. Yes, you can make Caprese Pasta Salad ahead of time. Here are some tips: - Prep Pasta and Dressing: Cook the pasta and make the dressing a day before serving. - Store Separately: Keep the pasta, dressing, and fresh ingredients in separate containers. This helps maintain the salad's freshness. - Combine Before Serving: When ready, mix everything together. This ensures the pasta and veggies stay crisp. If you need a mozzarella substitute, consider these options: - Feta Cheese: Adds a tangy flavor and creamy texture. - Ricotta Cheese: A softer choice that blends well. - Vegan Cheese: Great for plant-based diets; choose a flavor you enjoy. - Cottage Cheese: A lighter option that works well with the salad. For the best dressing results, follow these tips: - Timing: Dress the salad just before serving. This keeps the ingredients fresh. - Mix Well: Ensure all ingredients are evenly coated with the dressing. - Taste Test: Adjust flavors before serving. Add salt or balsamic glaze if needed. For more details, check the Full Recipe for Caprese Pasta Salad. This blog post covers how to create a delicious Caprese Pasta Salad. We explored the main ingredients, like pasta, fresh tomatoes, and mozzarella. You learned step-by-step instructions, seasoning tips, and ways to store your salad. We also discussed variations and substitutions for different diets. In wrapping up, this salad is bright, fresh, and easy to make. Enjoy customizing it to fit your tastes. Be bold in mixing flavors and have fun!

Caprese Pasta Salad Fresh and Flavorful Dish

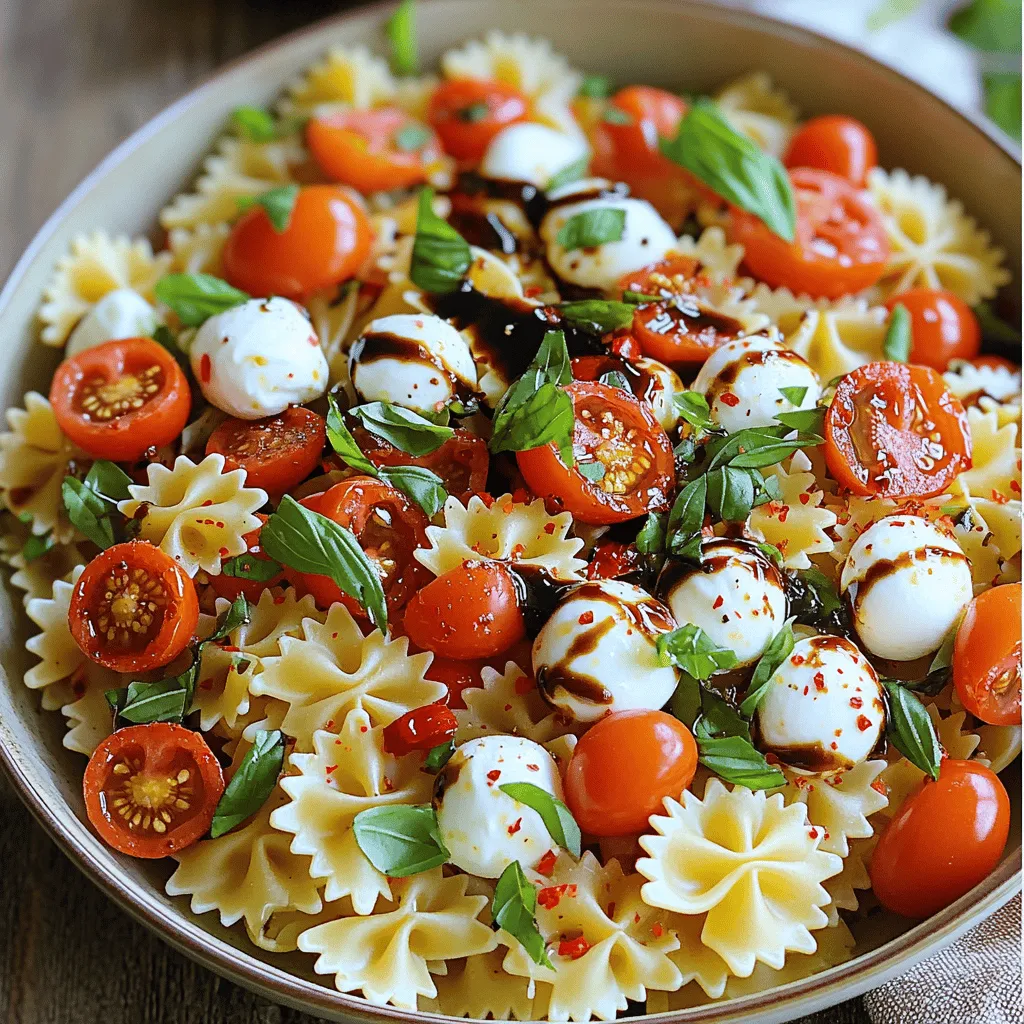
Looking to spice up your meal? Let’s dive into the world of Caprese Pasta Salad. This fresh and flavorful dish

- 2 cups rolled oats - 1 cup creamy almond butter - 1/2 cup honey or maple syrup - 1/2 cup unsweetened cocoa powder The main ingredients for No-Bake Chocolate Oat Bars are simple yet satisfying. Rolled oats form the base, providing a hearty texture. Almond butter adds creaminess and healthy fat. Honey or maple syrup gives natural sweetness and binds the mixture. Unsweetened cocoa powder brings rich chocolate flavor without extra sugar. This combo creates a fantastic foundation for tasty bars. - 1/4 cup dark chocolate chips - 1/4 cup shredded coconut (unsweetened) - 1 teaspoon vanilla extract - A pinch of salt While the main ingredients shine, optional ingredients can enhance your bars. Dark chocolate chips add extra sweetness and chocolatey goodness. Shredded coconut gives a tropical twist and chewy texture. A teaspoon of vanilla extract boosts flavor depth, while a pinch of salt balances sweetness. Feel free to mix and match these options to suit your taste. For the full recipe, check out the detailed instructions to make your own No-Bake Chocolate Oat Bars! Start by gathering your dry ingredients. In a large mixing bowl, combine: - 2 cups rolled oats - 1/2 cup unsweetened cocoa powder - 1/4 cup shredded coconut (unsweetened) - A pinch of salt Mix these well. You want everything to blend nicely. The cocoa gives a rich taste, while the oats add texture. Next, focus on the wet mix. In a microwave-safe bowl, add: - 1 cup creamy almond butter - 1/2 cup honey or maple syrup Heat this mixture in the microwave for about 30-45 seconds. This step makes it easier to stir. Once warm, take it out and mix until smooth. Add in 1 teaspoon of vanilla extract and stir again. This adds a lovely flavor. Now, it’s time to bring everything together. Pour the warm almond butter mix over your dry ingredients. Stir well until all the dry ingredients are coated. This step is key for flavor. Next, fold in: - 1/4 cup dark chocolate chips Make sure they are evenly spread throughout the mix. Line an 8x8 inch baking dish with parchment paper. Leave some paper hanging over the sides for easy removal. Press the mixture firmly into the dish. Use a spatula or your hands to make it even. Once it is all in, refrigerate for at least 2 hours. This helps the mixture set and hold its shape. After it firms up, lift it out using the parchment paper, and cut it into squares or rectangles. For the full recipe, you can find it in the ingredients section. Enjoy your delicious no-bake chocolate oat bars! To make the best no-bake chocolate oat bars, focus on two key areas: consistency and cooling. - Ensuring the right consistency: Mix the dry ingredients well. This helps all flavors blend. When you add the wet mix, it should be sticky but not too runny. If it feels too dry, add a bit more almond butter. If it’s too wet, add extra oats. You want a thick, moldable mixture. - Cooling and setting times: Chill the bars for at least two hours. This helps them firm up nicely. If you leave them longer, they will be even easier to cut. Make sure to cover them to keep them fresh in the fridge. How you serve your no-bake bars can elevate their appeal. Here are some fun tips: - Serving suggestions with melted chocolate and coconut: Drizzle melted chocolate over the cut bars. Then, sprinkle some shredded coconut on top. This adds a nice touch and makes them look fancy. - Garnishing for visual appeal: Use fresh berries or nuts as a garnish. They add color and texture. You can also serve the bars on a nice plate. Arrange them with a few extra chocolate chips around for a fun, inviting look. For a complete guide, check the Full Recipe. {{image_2}} If you want to enjoy these bars but need some tweaks, you can make easy changes. - Gluten-free alternatives: Use certified gluten-free oats. This keeps your bars safe for those with gluten issues. - Nut-free options: Switch almond butter for sunflower seed butter. This keeps the bars nut-free while still being tasty. Want to change up the flavor? Here are some fun ideas to try. - Adding different nut butters: You can use cashew or peanut butter instead of almond butter. Each nut butter gives a unique taste. - Incorporating dried fruits or seeds: Mix in raisins, cranberries, or pumpkin seeds for added texture and flavor. These extras add sweetness and chewiness to your bars. Feel free to explore these variations to make your no-bake chocolate oat bars even more delicious. Check the Full Recipe for the base to start from! To keep your no-bake chocolate oat bars fresh, store them in the fridge. Use an airtight container to prevent them from drying out. Make sure to place parchment paper between layers if you stack the bars. This helps avoid sticking. These bars will last about one week in the fridge. After that, they may lose their texture and taste. It's best to enjoy them while they are fresh! If you want to keep the bars for longer, freezing is a great option. First, let the bars cool and set completely. Cut them into squares or rectangles as desired. Next, wrap each piece in plastic wrap. Place them in a freezer-safe bag or container. This prevents freezer burn and keeps them tasty. To thaw, simply move the bars to the fridge for a few hours. You can also leave them at room temperature for about 30 minutes before serving. This will restore their soft texture. When you are ready to enjoy, you can drizzle some melted chocolate on top for extra flavor. For the full recipe, check out the detailed steps to make these delicious treats. Can I use other sweeteners instead of honey? Yes, you can use maple syrup or agave syrup. These sweeteners work well in this recipe. They add a nice flavor and help bind the bars together. How long do these bars last? These bars can last up to two weeks in the fridge. Store them in an airtight container to keep them fresh. You can also freeze them for longer storage. Can I substitute almond butter with peanut butter? Absolutely! Peanut butter is a great substitute. It adds a different flavor and gives the bars a nice twist. Just make sure to use creamy peanut butter for the best texture. What can I add to enhance the flavor? You can add ingredients like crushed nuts, dried fruit, or even a pinch of cinnamon. These additions can give your bars extra flavor and texture. Get creative and adjust to your taste! How do I ensure the bars don't crumble when cutting? Press the mixture firmly into the baking dish. Make sure it is compact before refrigerating. After chilling, use a sharp knife to cut clean slices. If they still crumble, try adding a bit more almond butter. For the full recipe, check out the detailed steps to make these delicious bars! You now know how to make delicious no-bake chocolate oat bars. With simple ingredients like oats, almond butter, and cocoa powder, you can create a tasty snack. Don't forget to try variations and tips for the best results. These bars are easy to store and freeze, so you always have a sweet treat ready. Enjoy experimenting to find your perfect flavor. Now, get started and enjoy your delicious homemade snack!

No-Bake Chocolate Oat Bars Easy and Delicious Treat

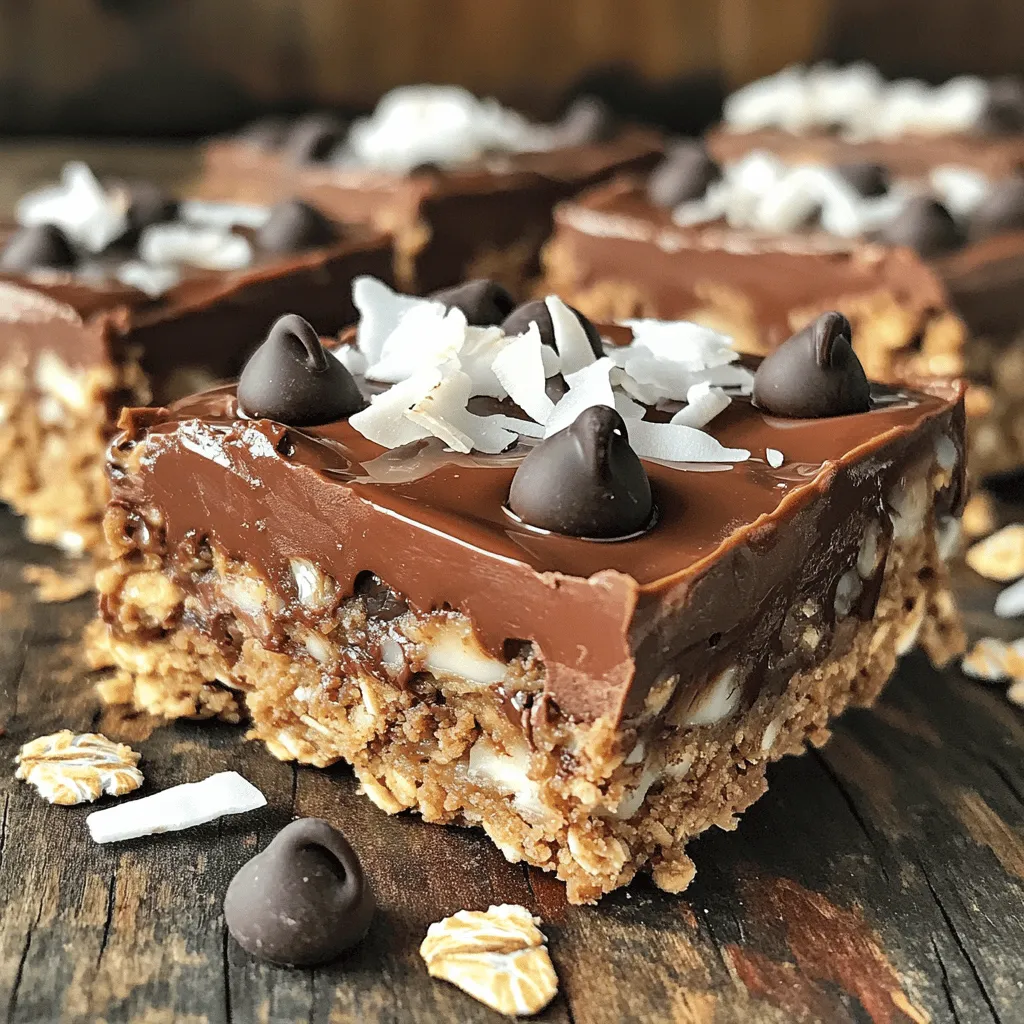
Craving a sweet treat without the oven? I’ve got you covered! These No-Bake Chocolate Oat Bars are quick, easy, and

- 1 lb boneless, skinless chicken breasts - 2 tablespoons honey - 3 tablespoons soy sauce - 2 cups mixed bell peppers - 1 cup broccoli florets - 1 medium onion - 3 cloves garlic - 1 tablespoon fresh ginger - Salt and pepper To make the Honey Garlic Chicken Stir Fry, you need fresh and vibrant ingredients. First, choose 1 pound of boneless, skinless chicken breasts. This cut cooks quickly and stays tender. Next, you’ll need 2 tablespoons of honey and 3 tablespoons of soy sauce. These two create a sweet and salty flavor that makes this dish shine. For the vegetables, I like to use 2 cups of mixed bell peppers, which add color and crunch. The mix can include red, yellow, and green bell peppers. Add in 1 cup of broccoli florets for a nutritious boost, and don’t forget 1 medium onion for extra flavor. You can’t skip the aromatics! Use 3 cloves of garlic, minced, and 1 tablespoon of fresh ginger, grated. They bring warmth and depth to the dish. Don’t forget to season with salt and pepper to taste. With these ingredients, you are ready to create a quick and delicious meal. For the full recipe, check the earlier section! Whisk together honey, soy sauce, minced garlic, and grated ginger in a small bowl. This sauce adds a sweet and savory flavor to the dish. Make sure to combine them well, as this blend is the heart of the stir fry. Heat vegetable oil in a large skillet or wok over medium-high heat. Add the sliced chicken strips and season with a pinch of salt and pepper. Stir-fry the chicken for about 5 to 7 minutes. Cook until the chicken is no longer pink inside. It should be nice and golden on the outside. Next, toss in the sliced onion and cook for 2 to 3 minutes. The onion should turn translucent. Then, add the mixed bell peppers and broccoli florets. Stir-fry these for another 4 to 5 minutes until the veggies are tender yet crisp. This step keeps the stir fry fresh and colorful. Now, pour the honey garlic sauce over the chicken and vegetables. Stir well to coat everything evenly. Cook for 2 more minutes until everything is heated through. This quick cooking helps the flavors meld together beautifully. Cut your chicken and vegetables into uniform pieces. This helps them cook evenly. If they are different sizes, some will be overcooked while others are undercooked. Thin strips work best for chicken. For veggies, aim for bite-sized pieces. This way, you will get nice texture and taste in every bite. Use fresh ingredients for the best taste. Fresh garlic and ginger make a big difference. You can adjust the honey to make it sweeter or less sweet. If you love a rich flavor, add more honey. For a lighter taste, use less. Always taste the sauce before adding it to the stir fry. Consider using a wok for this dish. A wok gets hot quickly and cooks food faster. It also allows for better heat distribution. This helps your chicken and vegetables cook evenly. If you do not have a wok, a large skillet will work too. Just make sure it’s wide enough to stir everything well. {{image_2}} You can swap chicken for shrimp, beef, or tofu. Each option brings a new taste. Shrimp cooks quickly and adds a nice texture. Beef gives a hearty flavor. Tofu is great for a plant-based meal. Just adjust cooking times to ensure everything is cooked properly. Feel free to change the veggies based on what you have. Snap peas add a nice crunch. Carrots bring sweetness and color. Asparagus can add a gourmet touch. Mix and match to keep it interesting. Using seasonal veggies can make this dish even better. Want to try something new? Switch the sauce! Teriyaki sauce gives a rich, sweet flavor. Oyster sauce adds depth and umami. You can also mix sauces for a unique taste. Just remember to balance the flavors so they complement the dish. Store leftovers in an airtight container for up to 3 days. This keeps the chicken moist and tasty. When ready to eat, just open the container and enjoy. You can freeze the stir fry in portions for up to 2 months. This makes it easy to have a quick meal later. To reheat, make sure to warm it thoroughly before serving. This helps keep the chicken and veggies just right. Use a skillet or microwave for even reheating. This way, you maintain the stir fry's texture. In a skillet, heat on medium until warm. If you use a microwave, heat in short bursts. Stir in between to get an even warmth throughout. To add heat, you can mix in red pepper flakes or sriracha into the sauce. Start with a small amount and taste as you go. This way, you can find the perfect level of spice for your taste. Yes, you can use frozen vegetables in this dish. Just remember to adjust the cooking time. Frozen veggies may need a bit longer to heat through. Make sure they are hot all the way before serving. I love serving this stir fry over rice or noodles. It also pairs well with a fresh salad. The crispness of the salad balances the flavors of the stir fry nicely. For detailed instructions, refer to the "Full Recipe" section. This will guide you through every step to make this tasty dish. Now you know how to make a tasty Honey Garlic Chicken Stir Fry. We covered all you need: the main ingredients, how to prep, and cook it right. I shared tips to improve flavor and suggested swaps for proteins and veggies. Remember, storing leftovers well keeps them fresh. Enjoy experimenting with flavors and methods! This dish can fit many tastes and is quick to make. Dive in and make it your own!

Honey Garlic Chicken Stir Fry Flavorful Weeknight Meal

Are you looking for a quick and tasty dinner? Honey Garlic Chicken Stir Fry is your answer! In just one

To make stuffed bell peppers, you need a few key items. Here’s what you will need: - 4 large bell peppers (any color) - 1 cup quinoa, rinsed - 2 cups vegetable broth - 1 can (15 oz) black beans, drained and rinsed - 1 cup corn kernels (fresh, frozen, or canned) - 1 small red onion, finely chopped - 2 cloves garlic, minced - 1 teaspoon cumin - 1 teaspoon smoked paprika - 1 teaspoon chili powder - Salt and pepper to taste - 1 cup diced tomatoes (fresh or canned) - ½ cup shredded cheese (cheddar or mozzarella) - Fresh cilantro or parsley for garnish These ingredients create a flavorful mix that fills the peppers. The quinoa provides protein, while the beans and corn add texture and taste. You can make your stuffed peppers unique by adding different ingredients. Here are some ideas: - Ground meat (like turkey or beef) for a protein boost - Other grains like brown rice or farro - Different cheeses like feta or goat cheese - Spices such as paprika or oregano for extra flavor - Extra veggies like zucchini or spinach for more nutrients Feel free to mix and match to suit your taste. Making your own version adds fun to the cooking process. Stuffed bell peppers are not just tasty; they are also good for you! Here’s a quick look at the nutrition: - High in fiber from quinoa and beans - Rich in vitamins from bell peppers and veggies - Good source of protein, especially if you use quinoa and beans - Low in calories, making this meal great for weight control Each stuffed pepper is packed with nutrients, making it a healthy choice. Plus, they are colorful and appealing on the plate! For the full recipe, check out the Vibrant Veggie Stuffed Bell Peppers. Start by preheating your oven to 375°F (190°C). Next, grab your bell peppers. Cut off the tops and take out the seeds and membranes. This step helps the peppers cook evenly. Lightly brush the outside and inside of each pepper with olive oil. This will add flavor and help them brown. Place the peppers upright in a baking dish, ready for stuffing. In a medium saucepan, bring 2 cups of vegetable broth to a boil. Add 1 cup of rinsed quinoa. Lower the heat, cover, and let it simmer for about 15 minutes. The quinoa will absorb the broth and become fluffy. While the quinoa cooks, heat a drizzle of olive oil in a large skillet over medium heat. Add 1 small chopped red onion and sauté for 3-4 minutes until it turns soft. Then, add 2 minced garlic cloves, 1 teaspoon of cumin, 1 teaspoon of smoked paprika, and 1 teaspoon of chili powder. Stir for about a minute until the spices smell great. Next, mix in the drained black beans, corn, diced tomatoes, and the cooked quinoa. Season with salt and pepper to taste, and give it a good stir. Now, it’s time to fill the peppers! Spoon the quinoa and veggie mixture into each pepper. Pack it gently, but don’t overstuff. Top each pepper with ½ cup of shredded cheese. Cover the baking dish with foil and bake for 25 minutes. After that, remove the foil and bake for another 10-15 minutes. You want the peppers to be tender and the cheese to be bubbly and golden. Once done, let them cool for a few minutes. Garnish with fresh cilantro or parsley before serving. For the full recipe, check the earlier section. Enjoy your vibrant veggie stuffed bell peppers! To cook quinoa well, start with rinsing it. Rinsing removes the bitter coating. Use a 2:1 ratio of liquid to quinoa. I like using vegetable broth for added flavor. Bring the broth to a boil, then stir in the rinsed quinoa. Lower the heat, cover, and let it simmer. Cook for about 15 minutes. You know it’s done when it’s fluffy and the liquid is gone. Want to spice up your filling? Try adding fresh herbs like cilantro or parsley. A squeeze of lime juice can also brighten the flavor. For more heat, toss in diced jalapeños or hot sauce. Consider adding chopped nuts for crunch, or a bit of avocado for creaminess. Each addition makes the dish unique and personal. For perfect bell peppers, choose ones that are firm and bright. Cut the tops off and remove seeds carefully. Brush the inside with olive oil for flavor. Bake them covered for about 25 minutes. This keeps them tender. Remove the foil for the last 10-15 minutes. This step helps the cheese melt nicely and gives a golden finish. Follow these tips, and your peppers will impress! Check out the Full Recipe for all the details. {{image_2}} You can easily make stuffed bell peppers vegetarian or vegan. Use quinoa or brown rice as a base. Mix in beans, lentils, or chickpeas for protein. Instead of cheese, top your peppers with avocado or a sprinkle of nutritional yeast. This adds a cheesy flavor without dairy. You can also use a mix of fresh herbs like basil or parsley for added taste. If you prefer meat, ground turkey or beef works well. Cook the meat in a skillet before adding it to the filling. Mix in onions, garlic, and spices to boost the flavor. You can also add diced mushrooms for extra texture. For a twist, use sausage for a spicy kick. Just remember to drain excess fat before mixing it all together. Quinoa is great, but other grains can work too. Try brown rice, farro, or barley. Each grain brings a different taste and texture to your dish. If you're short on time, instant rice or couscous can also be used. Just adjust the cooking time based on the grain you choose. This way, you can customize your stuffed peppers to fit your taste and what you have on hand. For the full recipe, click here. To store leftover stuffed peppers, let them cool first. Place them in an airtight container. You can keep them in the fridge for up to 4 days. Make sure to label the container with the date. This helps you track how long they have been stored. You can freeze stuffed peppers for later meals. Start by wrapping each pepper in plastic wrap. Then, place them in a freezer-safe bag or container. They can last for about 3 months in the freezer. When you are ready to eat, simply thaw them overnight in the fridge. To reheat your stuffed peppers, you have a few options. You can use the oven, microwave, or stovetop. For the oven, preheat it to 350°F (175°C). Place the peppers in a baking dish and cover with foil. Heat for about 20 minutes. If using the microwave, place the pepper on a microwave-safe plate and heat for 2-4 minutes. Just make sure they are hot inside before serving. Enjoy your flavorful meal again! Yes, you can prep stuffed peppers in advance. Just prepare the filling and stuff the peppers. Then, cover and store them in the fridge for up to 24 hours. When ready, simply bake them as directed. This makes dinner easy on busy days. Stuffed bell peppers are great on their own, but side dishes can enhance your meal. Here are some ideas: - Simple green salad - Garlic bread for a crunchy side - Rice or quinoa for a filling addition - Roasted vegetables for more flavor These sides add variety and balance to your plate. To ensure your stuffed peppers are gluten-free, choose gluten-free grains. Quinoa is a great option. Make sure any canned goods, like beans and tomatoes, are labeled gluten-free. This way, everyone can enjoy them without worries. You can find the full recipe for a gluten-free version above. Stuffed bell peppers are a delicious and fun meal. We covered the main ingredients, how to prepare them, and tasty variations. I shared tips to improve your cooking and how to store leftovers. Remember, you can customize the filling to match your tastes or diet. Try different grains or flavors for a twist. With a bit of practice, you'll make perfect stuffed peppers every time. Enjoy creating your own tasty dishes!

Stuffed Bell Peppers Flavorful and Easy Recipe

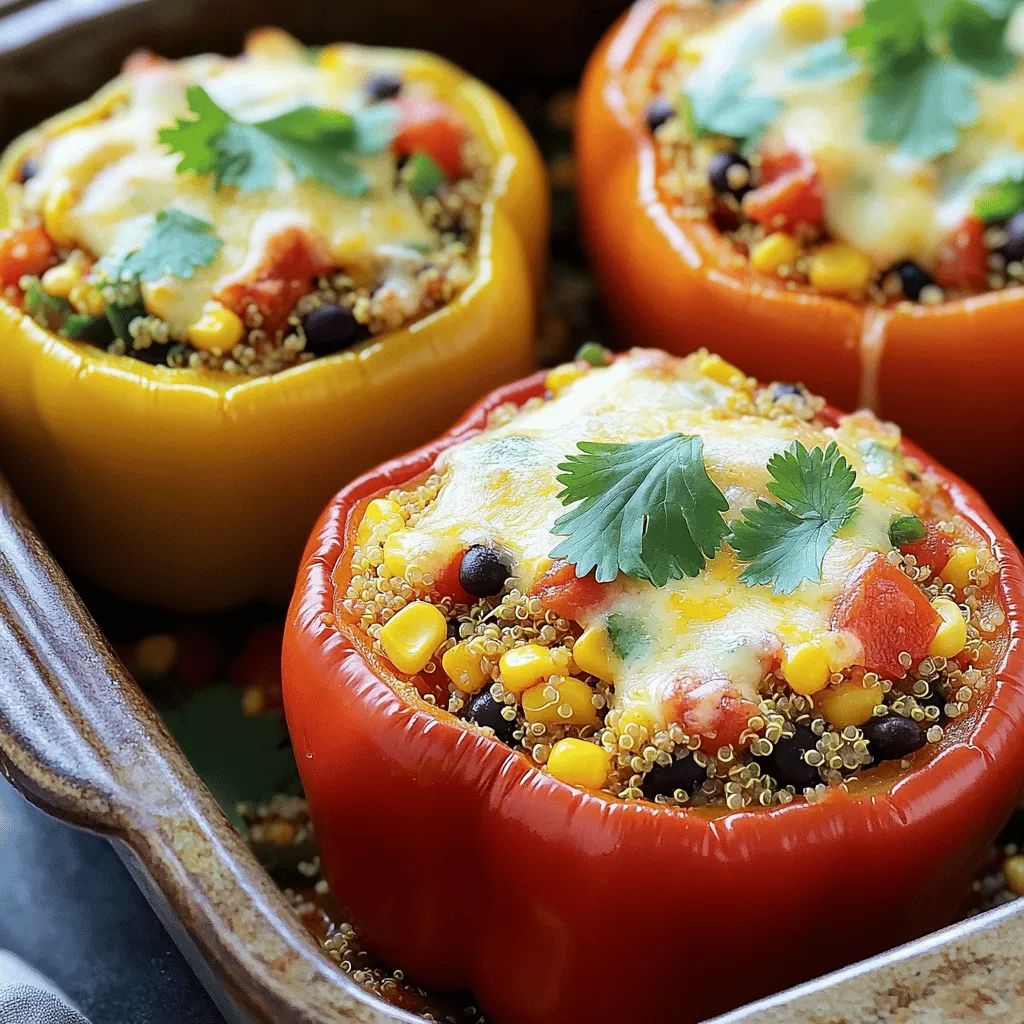
Stuffed bell peppers are a tasty and easy meal for everyone. They are colorful, healthy, and packed with flavor. I’ll

- 1 pound large shrimp, peeled and deveined - 4 tablespoons unsalted butter - 6 cloves garlic, minced - 1 teaspoon red pepper flakes - 1 lemon, juiced and zested - Salt and pepper to taste - 1/4 cup fresh parsley, chopped - 1 cup cherry tomatoes, halved - 2 cups baby spinach - 1 tablespoon olive oil When making garlic butter shrimp, the right ingredients matter a lot. The main star of this dish is the shrimp. I prefer large shrimp, as they are juicy and tender. The butter adds richness, and garlic gives it that bold flavor. Don't skip the garlic—it brings everything together! For seasoning, I add red pepper flakes. They give a nice kick but can be adjusted based on your taste. The lemon adds a fresh zing and brightens up the dish. Salt and pepper are essential for enhancing the flavors. Fresh ingredients like parsley, cherry tomatoes, and baby spinach are key. They not only add color but also nutrients. The tomatoes burst with flavor when cooked. Spinach wilts down and adds a lovely green touch. Olive oil is used to sauté the garlic and shrimp, giving a nice base for cooking. I recommend using the full recipe to get the perfect balance of flavors. With these ingredients, you’re set for a quick and tasty meal! - First, prepare the shrimp. Make sure they are peeled and deveined. - Next, chop the cherry tomatoes and baby spinach. - Gather all your ingredients and tools. You will need a large skillet, a spatula, and measuring spoons. - Start by heating your skillet over medium heat. Add 2 tablespoons of butter and 1 tablespoon of olive oil. - Once the butter melts, add the minced garlic and red pepper flakes. Sauté for about 1-2 minutes. You want the garlic fragrant but not browned. - Now, add the shrimp to the skillet. Season with salt and pepper. Cook for about 2-3 minutes on one side until they turn pink. Then, flip them over. - Next, add the halved cherry tomatoes and baby spinach to the skillet. Cook for an additional 2 minutes. The spinach should wilt, and the tomatoes should soften. - Squeeze the lemon juice over the shrimp. Also, add the zest. Then, add the remaining 2 tablespoons of butter. Stir until everything is well coated. - Finally, remove from heat and sprinkle the chopped parsley on top for a fresh finish. For a complete guide, check out the Full Recipe. To avoid overcooking shrimp, watch the color closely. Shrimp turn pink when cooked. Cook them for just 2-3 minutes on each side. If they curl tightly, they may be overdone. Using fresh ingredients makes a big difference in flavor. Choose plump shrimp with no strong smell. Fresh garlic adds a nice kick. Look for bright, firm tomatoes and vibrant spinach. This ensures your dish shines. You can add herbs or spices to boost the taste. Try fresh basil or cilantro for a twist. A pinch of smoked paprika can also bring depth. Using different types of shrimp can change the game. Jumbo shrimp give a hearty bite. Smaller shrimp can cook faster, making them great for quick meals. To serve a beautiful plate, use a large platter. Arrange the shrimp, tomatoes, and spinach nicely. A pop of color makes the dish stand out. Garnish with lemon wedges and chopped parsley. The lemon adds brightness, and the parsley adds freshness. These touches make your meal look as good as it tastes. For the full recipe, check out the instructions above. {{image_2}} You can change the vegetables in the garlic butter shrimp skillet. Try adding bell peppers, zucchini, or asparagus for extra crunch and color. These swaps can make your dish fun and unique. If you want a dairy-free option, swap the butter for olive oil or coconut oil. Both oils add great flavor and keep the dish light. To give the dish a new twist, think about adding coconut milk. This gives a tropical taste that pairs well with shrimp. You can also try adding lime juice for a zesty kick. Adjust spice levels by using different peppers. If you like heat, try jalapeños or serranos. For a milder taste, use sweet bell peppers. The garlic butter shrimp skillet is great over pasta or rice. This makes it a filling meal. Just spoon the shrimp mix on top and enjoy! You can also serve it as an appetizer. Pair it with crusty bread for dipping. This makes it easy to share with friends or family. For the full recipe, click here to explore more delicious ideas! To store leftovers, let them cool first. Place shrimp in an airtight container. Glass or plastic containers work well. Make sure to seal them tightly to keep air out. This way, the shrimp stays fresh longer. To freeze cooked shrimp, let it cool completely. Then, place it in a freezer-safe bag or container. Remove as much air as you can to prevent freezer burn. When you're ready to eat, thaw the shrimp in the fridge overnight. This keeps the texture nice. In the fridge, cooked shrimp lasts about three to four days. Always check for signs of spoilage. If the shrimp smells off or looks discolored, it’s best to toss it. Fresh shrimp should smell like the ocean, not fishy. Keeping an eye on your food helps ensure you enjoy it at its best. For the full recipe, check the link above. For this dish, I recommend using large shrimp. They have a nice size and cook quickly. Look for shrimp that are already peeled and deveined. This saves you time and effort. Fresh shrimp is best, but frozen shrimp works too. Just make sure to thaw them properly before cooking. The size should be 16-20 shrimp per pound for the best results. Yes, you can prepare this meal ahead of time. Cook the shrimp and store it in the fridge for up to two days. To reheat, place it in a skillet over low heat. Add a splash of water or broth to keep it moist. This dish is quick, so I recommend making it fresh when you can. But if you need to prep, it’s still tasty later on. This shrimp dish pairs well with many sides. Here are some great options: - Steamed rice or quinoa for a filling meal - Fresh salad with greens and lemon dressing - Crusty bread to soak up the garlic butter sauce - Pasta tossed with olive oil and herbs for a comforting touch For more ideas, check out the Full Recipe to see how to make a complete meal. This blog post covered how to make a delicious garlic butter shrimp dish. You learned about the key ingredients, tips for cooking, and creative variations. Remember to use fresh shrimp and vegetables for the best taste. Don’t hesitate to experiment with flavors or serving styles. This dish is quick to make and fills your table with color and taste. Enjoy trying out this recipe and making it your own!

Garlic Butter Shrimp Skillet Quick and Tasty Meal

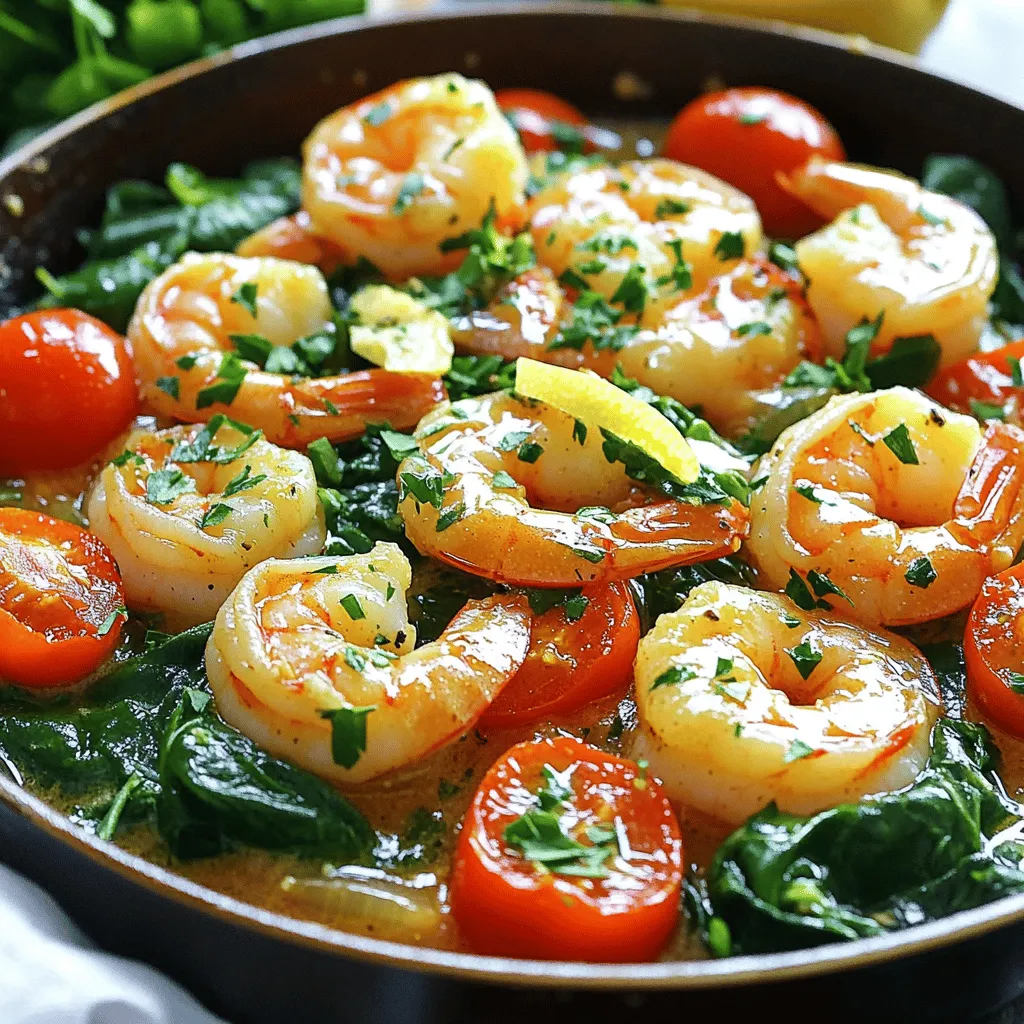
If you’re looking for a quick and tasty meal, the Garlic Butter Shrimp Skillet is your answer! With just a

To make tasty Buffalo Cauliflower Bites, you need a few key ingredients: - 1 medium head of cauliflower, cut into bite-sized florets - 1 cup all-purpose flour - 1 cup water - 1 teaspoon garlic powder - 1 teaspoon onion powder - 1 teaspoon smoked paprika - 1/2 teaspoon salt - 1/2 teaspoon black pepper - 1 cup buffalo sauce (store-bought or homemade) - 2 tablespoons olive oil - Fresh parsley, chopped (for garnish) These ingredients work together to make crispy, flavorful bites that are perfect for snacking. You can add a few optional ingredients for more flavor: - 1 teaspoon cayenne pepper for heat - 1 teaspoon nutritional yeast for a cheesy taste - 1 tablespoon lemon juice for brightness - Your favorite herbs like thyme or oregano These extras can give your Buffalo Cauliflower Bites a unique twist and enhance their taste. Pair your Buffalo Cauliflower Bites with these delicious dipping sauces: - Vegan ranch dressing for a creamy contrast - Blue cheese dressing for classic flavor - Hummus for a healthy option - BBQ sauce for a sweet and tangy kick Using the right dipping sauce can make your snack even more enjoyable. For the full recipe, check out the detailed cooking instructions! Start with a medium head of cauliflower. Cut it into bite-sized florets. Make sure they are even in size. This helps them cook at the same rate. Rinse the florets in cold water. Pat them dry with a towel to remove excess moisture. Dry florets help the batter stick better. In a large bowl, combine 1 cup of flour, 1 cup of water, and spices. The spices include 1 teaspoon of garlic powder, 1 teaspoon of onion powder, 1 teaspoon of smoked paprika, 1/2 teaspoon of salt, and 1/2 teaspoon of black pepper. Whisk the mixture until it is smooth. The batter should be thick but pourable. This consistency allows the batter to coat the cauliflower well. Preheat your oven to 450°F (230°C) and line a baking sheet with parchment paper. Dip each cauliflower floret into the batter. Ensure it is fully coated. Place the coated florets on the baking sheet in a single layer. Bake for 20-25 minutes until they are golden and crispy. Flip them halfway to ensure even cooking. While the cauliflower bakes, mix 1 cup of buffalo sauce with 2 tablespoons of olive oil. Once the florets are done, toss them in the buffalo sauce mixture. Return them to the baking sheet and bake for an additional 10-15 minutes. This step caramelizes the sauce and adds flavor. Remove them from the oven and let them cool briefly. Garnish with chopped parsley before serving. Enjoy your Buffalo Cauliflower Bites! For the full recipe, check out the section above. To get your Buffalo Cauliflower Bites crispy, follow these tips: - Use a hot oven. Preheat it to 450°F (230°C). - Don’t crowd the pan. Place florets in a single layer. - Flip halfway through. This helps them cook evenly and stay crispy. - Bake twice. First, bake them plain, then toss them in sauce and bake again. Each step helps create a crunchy texture that you will love. If you want to change the heat, here’s how: - Use less sauce. Start with a smaller amount and add more later. - Mix in honey. Adding a bit of honey can balance the heat. - Add spices. Try cayenne pepper for more heat or smoked paprika for flavor. These tips allow you to find the right spice level for your taste. Buffalo Cauliflower Bites taste great with many sides: - Celery sticks provide a nice crunch. - Vegan ranch dressing cools the spice. - Carrot sticks add sweetness and color. - Chipotle sauce can add a smoky flavor. Feel free to mix and match these options for a fun meal. Enjoy these bites with your favorite sides for a great snack experience! {{image_2}} You can easily make these bites vegan. Just swap regular flour with chickpea flour. This adds protein and flavor. You can also use plant-based milk instead of water. This will keep the batter thick and tasty. The key is to ensure all the ingredients are vegan-friendly. For a gluten-free option, replace all-purpose flour with gluten-free flour. Many brands offer good blends for baking. Just make sure to check the labels for safety. This will give you the same crispy texture without gluten. Enjoy all the flavors without worry! Buffalo sauce is great, but you can mix it up. Try BBQ sauce for a sweet twist. Sweet chili sauce adds a nice kick and sweetness. You can also mix sauces! This lets you create a unique flavor every time. Experimenting with different sauces makes this snack fun and exciting. For more details, check the Full Recipe. To store your Buffalo Cauliflower Bites, let them cool first. Place them in an airtight container. You can keep them in the fridge for up to three days. Make sure to separate layers with parchment paper to avoid sticking. Reheat these bites in the oven for best results. Preheat your oven to 375°F (190°C). Spread the bites on a baking sheet in a single layer. Heat for about 10-15 minutes. This keeps them crispy and flavorful. You can also use an air fryer at 350°F (175°C) for about 5-7 minutes. You can freeze Buffalo Cauliflower Bites for later use. After baking, let them cool completely. Place them in a freezer-safe bag or container. They can last up to three months in the freezer. To cook from frozen, reheat in the oven at 375°F (190°C) for 15-20 minutes. This will help keep them crispy. For the full recipe, check out the complete instructions above. To add heat to your Buffalo Cauliflower Bites, try using extra hot buffalo sauce. You can also mix in cayenne pepper or crushed red pepper flakes into the batter. Start with a small amount and taste as you go. This way, you can find the perfect level of spice for your taste. If you want more flavor, add some hot sauce to the dipping sauce too. Yes, you can use frozen cauliflower. Just make sure to thaw it first. Pat the florets dry to remove excess moisture. This step helps the batter stick better and keeps the bites crispy. Cooking time may vary slightly, so check them as they bake. Buffalo Cauliflower Bites pair well with several side dishes. Here are some tasty options: - Celery sticks - Carrot sticks - Cucumber slices - A fresh salad - Sweet potato fries - Chips and guacamole These sides balance the heat and flavor of the bites. They also add freshness and crunch. For a complete meal, consider serving them with a light dip like vegan ranch dressing. For the full recipe, check out the ingredients and instructions above. Buffalo cauliflower bites turn simple ingredients into a tasty treat. We covered the best ingredients, step-by-step instructions, and tips for perfect crunch. You now have options for spice and sauces. Remember to store leftovers properly for later fun. Enjoy experimenting with flavors and pairings. These bites are a great addition to any meal or snack time. Have fun in your kitchen!

Buffalo Cauliflower Bites Crispy and Flavorful Snack

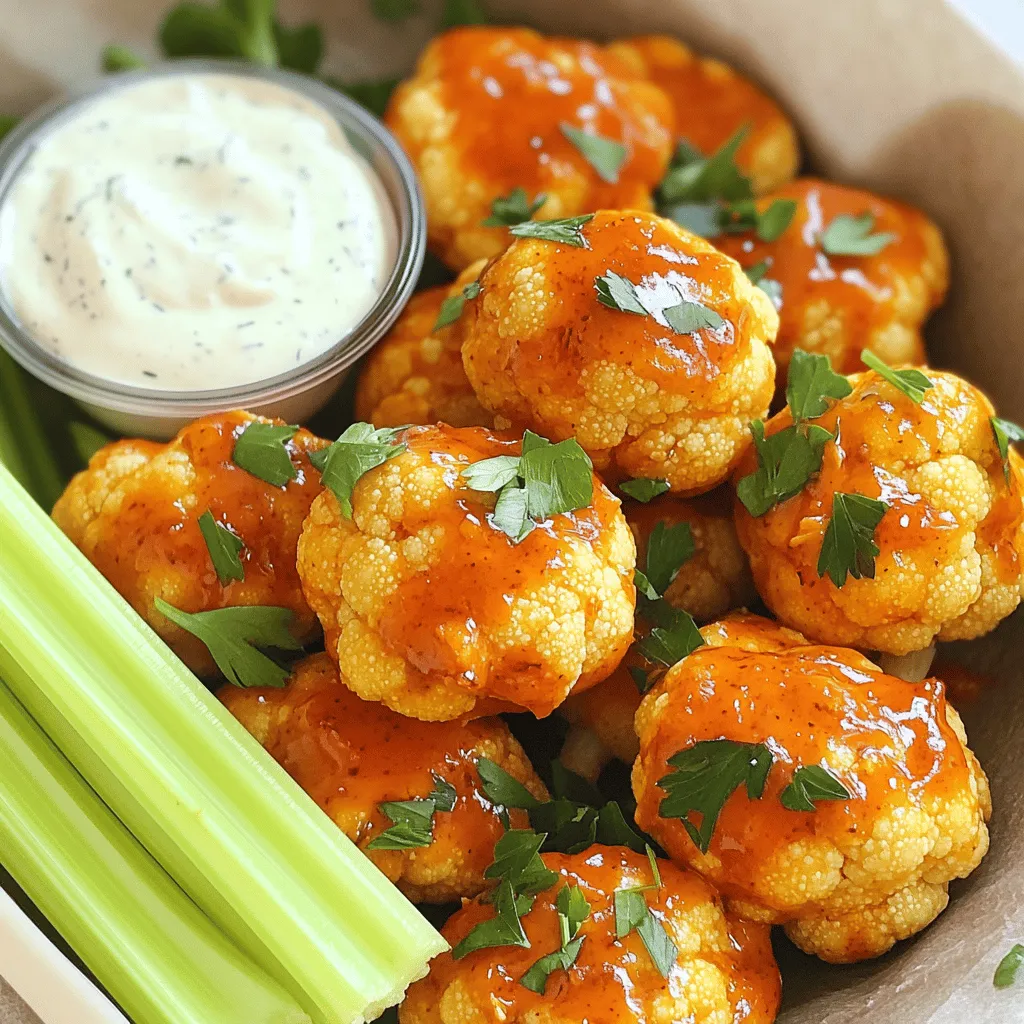
If you’re craving a tasty snack that is both crispy and packed with flavor, Buffalo Cauliflower Bites are the perfect

Older posts
Newer posts
← Previous Page1 … Page61 Page62 Page63 … Page127 Next →

dsad

© 2025 Southern Dishes • Built with GeneratePress

Our Policies

  • Copyright Policy
  • Cookie Policy
  • GDPR Policy
  • Privacy Policy
  • Disclaimer
  • Terms Of Use

More Information

  • Home
  • About
  • Contact
  • Appetizers
  • Dessert
  • Dinner
  • Drinks
©2025, Southern Dishes About Back To Top