Skip to content
DisclaimerTerms Of UseGDPR PolicyCookie Policy

Southern Dishes

  • Home
  • Drinks
  • Appetizers
  • Dinner
  • Dessert
  • About
  • Contact
  • Privacy Policy
DisclaimerTerms Of UseGDPR PolicyCookie Policy

Isabella

- 4 boneless, skinless chicken thighs - 2 cups Brussels sprouts, trimmed and halved - 2 tablespoons Dijon mustard - 3 tablespoons pure maple syrup - 2 tablespoons olive oil - 1 teaspoon garlic powder - 1 teaspoon onion powder - Salt and pepper to taste - Fresh thyme leaves, for garnish I use boneless, skinless chicken thighs for their flavor and tenderness. You can swap these for chicken breasts if you prefer. Just remember, breasts may dry out more easily. For the Brussels sprouts, look for firm, green ones. If you can’t find them, use green beans or broccoli as a substitute. Dijon mustard adds a nice tang. You can use yellow mustard, but it won’t have the same bite. Pure maple syrup gives sweetness. If you want, honey can be a good choice, too. To make this dish shine, keep a few staples on hand: - Olive oil: for healthy fats and flavor. - Garlic powder: it adds depth without the fuss of fresh garlic. - Onion powder: it enhances the overall taste. - Fresh thyme: it gives a fragrant touch and brightens the dish. With these ingredients ready, you can create a meal that is delicious and easy to make. Enjoy this delightful dish with your loved ones! First, you need to preheat your oven. Set it to 425°F (220°C). This high heat helps cook the chicken and sprouts quickly. Next, grab a large baking sheet. Line it with parchment paper. This makes cleanup a lot easier later. In a small bowl, combine the Dijon mustard and pure maple syrup. Add olive oil, garlic powder, onion powder, salt, and pepper too. Whisk all these ingredients together until they mix well. This sauce adds a sweet and tangy flavor to your dish. Place the chicken thighs on the baking sheet. Brush a good amount of the maple Dijon sauce on each thigh. Don't waste any sauce! Next, add the halved Brussels sprouts to the sheet. Drizzle the rest of the sauce over them. Toss the sprouts so they get coated evenly. Make sure everything spreads out in one layer. This helps it cook evenly. Now, you are ready to roast! Pop the baking sheet into the oven for 25 to 30 minutes. Check that the chicken reaches 165°F (75°C) inside. The Brussels sprouts should also be tender and caramelized. Once done, let it rest for a few minutes. Garnish with fresh thyme leaves for a nice touch. To make juicy chicken thighs, start with fresh meat. Use bone-in thighs for even more flavor. When you marinate, let them soak in the maple Dijon sauce for at least 30 minutes. This helps the flavors sink in. Cook the chicken until it reaches 165°F. This keeps the meat moist and tender. For roasted Brussels sprouts, trim and halve them before cooking. This helps them cook evenly. Toss them in the maple Dijon sauce, ensuring they are well coated. Spread them out on the baking sheet in a single layer. This allows them to roast nicely and develop a caramelized crust. Don't overcrowd the pan, as this can lead to steaming instead of roasting. Feel free to change the spices in this recipe. For a kick, add a pinch of red pepper flakes. You can also swap garlic powder for fresh minced garlic for a stronger flavor. Experiment with herbs like rosemary or oregano. This way, you can make the dish uniquely yours! {{image_2}} You can switch the chicken for other proteins. Try using turkey thighs for a leaner option. Pork tenderloin also works well, giving a different flavor. Firm tofu is a great plant-based choice. Just ensure you adjust the cooking time. Aim for a nice golden crust on each protein. Brussels sprouts are great, but you can add more veggies. Carrots bring a sweet touch, while bell peppers add color. Sweet potatoes give a hearty feel and work well with the sauce. Just cut them into even pieces. Mix them in with the chicken and Brussels sprouts for a colorful plate. The maple Dijon sauce is tasty, but you can try others. A honey garlic sauce adds a nice sweetness. Soy sauce mixed with sesame oil gives an Asian twist. For a kick, add some hot sauce to your mix. Experimenting with flavors can make this dish your own! To store leftovers, let the chicken and sprouts cool completely. Place them in an airtight container. You can keep them in the fridge for up to three days. Make sure to separate the chicken from the sprouts, if possible. This helps keep each item fresh. When you're ready to eat, preheat your oven to 350°F (175°C). Place the chicken and sprouts on a baking sheet. Cover them with foil to keep them moist. Heat for about 15-20 minutes. You can also use a microwave for quick reheating. Just make sure to cover the food to avoid drying it out. To freeze leftovers, place the chicken and sprouts in freezer-safe bags. Be sure to remove as much air as possible. Label the bags with the date. You can freeze them for up to three months. When ready to enjoy, thaw overnight in the fridge before reheating. Yes, you can use chicken breasts instead of thighs. Chicken breasts are leaner. They cook a bit faster, so check them early. The flavor will still be great. Just make sure to brush them well with the sauce. You can serve this dish with rice or quinoa. Both add a nice texture. A fresh salad also pairs well. You might enjoy a side of mashed potatoes for comfort. Consider crusty bread to soak up the sauce too. Leftovers will last about three to four days in the fridge. Store them in an airtight container. Make sure to keep the chicken and sprouts together. This keeps the flavors nice and strong. If you want, you can also freeze them for up to three months. This blog post covered how to make a tasty sheet-pan meal. We discussed the best ingredients, including useful pantry items. I provided clear steps for cooking and making good sauce. You also learned tips for juicy chicken and perfect veggies. I shared easy ways to add your twist and how to store leftovers. In summary, this dish is simple and flexible. You can create your own version with the helpful ideas given. Enjoy cooking and have fun experimenting!

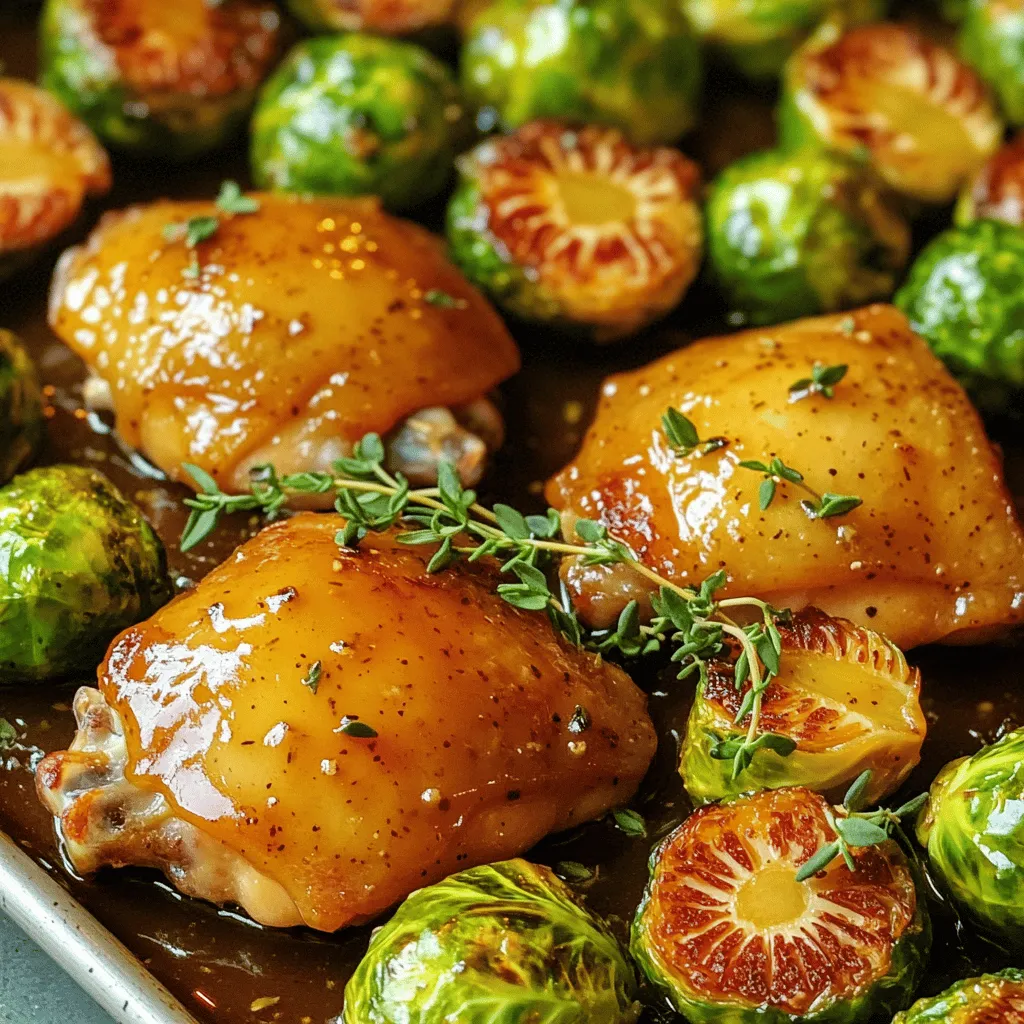
Sheet-Pan Maple Dijon Chicken & Sprouts Delight

Get ready to enjoy a dinner that’s simple and packed with flavor! In this post, I’ll guide you through making

To make Creamy Tomato Basil Gnocchi Soup, gather these simple ingredients: - 1 tablespoon olive oil - 1 medium onion, diced - 3 cloves garlic, minced - 2 cups diced tomatoes (canned or fresh) - 4 cups vegetable broth - 1 teaspoon dried oregano - 1 teaspoon sugar (to balance acidity) - 250g potato gnocchi (store-bought or homemade) - 1 cup heavy cream (or coconut cream for dairy-free) - 1 cup fresh basil leaves, chopped - Salt and pepper to taste - Grated Parmesan cheese (optional, for serving) You can swap some ingredients if needed. Use canola oil instead of olive oil. Yellow onions work well if you can’t find a medium onion. For the tomatoes, any canned variety is fine. You could also use tomato sauce if you prefer. Vegetable broth can be replaced with chicken broth for a non-vegetarian option. If you want a lighter soup, use milk instead of heavy cream. Coconut cream is great for a dairy-free version. Fresh basil is best, but dried basil can work in a pinch. Using fresh ingredients makes a big difference in this soup. Fresh basil adds a vibrant flavor that dried herbs cannot match. Good-quality olive oil enhances the overall taste. If you use fresh tomatoes, they should be ripe for the best results. Quality gnocchi is also important; it should be soft and not too chewy. When you focus on quality, the flavors will shine through, making your soup a hit! First, gather your ingredients. You need olive oil, onion, garlic, tomatoes, vegetable broth, oregano, sugar, gnocchi, heavy cream, basil, salt, and pepper. Make sure everything is ready. This will help you cook faster. Start by heating one tablespoon of olive oil in a large pot over medium heat. Next, add the diced onion and sauté for about five minutes. You want the onion to become soft and clear. Then, add three cloves of minced garlic and cook for another one to two minutes. This will bring out the garlic's nice smell. Now, add two cups of diced tomatoes and four cups of vegetable broth to the pot. Also, stir in one teaspoon of dried oregano and one teaspoon of sugar. The sugar helps balance the tomato's acidity. Bring the mixture to a simmer and let it cook for about ten minutes. Once it simmers, use an immersion blender to blend the soup until it is smooth. If you don't have one, carefully transfer the soup to a blender in batches. After blending, return the soup to the pot. Next, add 250 grams of potato gnocchi. Cook them for three to five minutes. You'll know they are done when they float to the top. Lower the heat and stir in one cup of heavy cream. Let it warm through, but don’t boil it. Finally, add one cup of chopped fresh basil and season with salt and pepper. Stir everything well to combine. Your soup is now ready to serve! To boost flavor in your creamy tomato basil gnocchi soup, use fresh herbs. Fresh basil adds a bright taste that dried herbs can’t match. You can also try adding a pinch of red pepper flakes for a gentle kick. A splash of balsamic vinegar can add depth, too. Another tip is to roast your tomatoes before adding them. This step brings out their sweetness and enhances the overall flavor. Many people skip sautéing the onion and garlic. Don't rush this step! Cooking them until soft builds a great flavor base. Also, avoid boiling the soup after adding cream. High heat can curdle the cream, ruining its smooth texture. Lastly, be careful with seasoning. Taste your soup before adding more salt and pepper. The broth can vary in saltiness, so adjust accordingly. Making this soup ahead is easy! Cook the soup up to the point before you add the gnocchi. Let it cool, then store it in the fridge for up to three days. When you’re ready to eat, just reheat it and add the gnocchi. They will cook perfectly in the warm soup. For freezing, do not add the gnocchi. Freeze the soup base and add fresh gnocchi when you reheat. This keeps everything fresh and tasty! {{image_2}} You can easily make this soup vegetarian or vegan. For a vegetarian version, just stick with the heavy cream. If you want it vegan, use coconut cream instead. It gives a lovely taste and keeps it creamy. You can also add more veggies like carrots or spinach. These add nutrients and make the soup heartier. While gnocchi is great, you can use other pasta types too. Try small shapes like shells or elbows. Cook them separately and add to the soup. You can even use gluten-free pasta if needed. Just ensure they are cooked al dente, so they don’t get too soft in the soup. Feel free to switch up the ingredients based on the season. In the fall, add roasted pumpkin or butternut squash for a sweet touch. In the summer, use fresh corn or zucchini for a light flavor. These changes give a new twist to the classic soup, keeping it exciting all year round! After making this creamy tomato basil gnocchi soup, let it cool down. Pour the soup into an airtight container. Store it in the fridge. It will stay fresh for about three days. This way, you can enjoy it later without losing its flavor. To freeze the soup, use a freezer-safe container. Leave some space at the top for expansion. The soup can last up to three months in the freezer. When you are ready to eat it, thaw it overnight in the fridge. This helps keep the texture nice. Reheat the soup on the stove over medium heat. Stir it often so it warms up evenly. If you find it too thick, add a splash of vegetable broth or water. You can also microwave it. Use a microwave-safe bowl and cover it with a lid. Heat it in short bursts, stirring in between. This keeps the soup warm and tasty. Creamy Tomato Basil Gnocchi Soup lasts about 3 to 4 days in the fridge. Store it in an airtight container. Make sure to cool it down before you put it in the fridge. If you notice any change in color or smell, it is best to throw it out. Yes, you can use frozen gnocchi. Just add them directly to the soup without thawing. The cooking time may be a bit longer, so check them after 5 to 7 minutes. They are done when they float to the top of the soup. This soup pairs well with crusty bread or a fresh salad. You can also serve it with grilled cheese for a classic combo. If you want to keep it light, a simple green salad adds a nice touch. Enjoy your meal with a sprinkle of Parmesan on top for extra flavor! In this article, we explored every aspect of making Creamy Tomato Basil Gnocchi Soup. We covered the essential ingredients, how to prepare and cook, and tips to enhance flavor. We also discussed variations, storage methods, and common FAQs. Remember, the right ingredients make a big difference. Avoid common mistakes, and don’t hesitate to make this dish your own. Enjoy your cooking journey and savor every bite of your creation!

Creamy Tomato Basil Gnocchi Soup Tasty and Simple Meal

If you’re craving a warm hug in a bowl, look no further than my Creamy Tomato Basil Gnocchi Soup. This

- 1 cup rolled oats - 1/2 cup natural peanut butter - 1/3 cup honey or maple syrup - 1/4 cup mini chocolate chips - 1/4 cup ground flaxseed - 1 tsp vanilla extract - A pinch of salt These ingredients come together to create energy bites that satisfy your sweet tooth and fuel your day. The rolled oats provide a great base, while the peanut butter adds creamy richness. The honey or maple syrup brings sweetness, and mini chocolate chips make everything more fun. Ground flaxseed adds nutrition and a slight nutty taste, and the vanilla extract elevates the flavor profile. - Additional add-ins (nuts, seeds, dried fruit) - Alternative sweeteners (agave, coconut sugar) - Different nut butters (almond, cashew) Feel free to get creative! You can add nuts for crunch or dried fruit for extra sweetness. If you want a different flavor, try using agave or coconut sugar instead of honey. You can even swap out peanut butter for almond or cashew butter. This way, you can tailor your energy bites to your taste and dietary needs. 1. Combine dry ingredients in a mixing bowl: Start by adding 1 cup of rolled oats, 1/4 cup of ground flaxseed, and a pinch of salt into a large mixing bowl. Stir them together until they're mixed well. This mix gives your bites a good base. 2. Mix peanut butter and sweeteners: In another bowl, add 1/2 cup of natural peanut butter, 1/3 cup of honey or maple syrup, and 1 teaspoon of vanilla extract. Stir these until smooth and well mixed. This mixture brings sweetness and creaminess to the bites. 3. Combine wet and dry ingredients: Pour the peanut butter mix into the dry ingredients. Stir until everything is coated evenly. This step is key for flavor. 1. Rolling the mixture into balls: Take a small amount of the mixture and roll it into a ball about 1 inch in diameter. Use your hands to shape it. This part can be fun! 2. Placement on parchment-lined baking sheet: Place each ball on a baking sheet lined with parchment paper. Make sure they are spaced apart so they don’t stick together. 1. Importance of refrigeration for firmness: Refrigeration is key for making the bites firm. Chilling helps them hold their shape and makes them easier to eat. 2. Recommended chilling duration: Put the baking sheet in the fridge for about 30 minutes. This will give you the perfect bite-sized treat that’s ready to enjoy. To get the texture just right, think about how chewy or firm you want your bites. If you like them chewy, stick with the original recipe. For a firmer bite, add a bit more ground flaxseed. This helps bind everything better. When it comes to rolling, the mixture can be sticky. To avoid this, wet your hands slightly before rolling. This simple trick makes it much easier to shape the bites without the mixture clinging to your fingers. To present your energy bites nicely, place them on a colorful plate. You can sprinkle a few extra chocolate chips around them for a fun touch. For an added splash of color, serve with fresh fruit like berries or banana slices. This not only looks great but also makes for a tasty pairing. Want to switch up the flavor? You can add cocoa powder for a richer chocolate taste. A dash of cinnamon adds warmth and depth, too. Also, try using dark chocolate chips or even white chocolate chips instead. Each option gives a unique twist to your energy bites. {{image_2}} You can change the flavors of your energy bites to keep things fun. Here are two tasty options: - Chocolate Coconut Energy Bites: Add 1/3 cup of unsweetened shredded coconut. This gives a tropical twist. The coconut pairs well with chocolate. - Peanut Butter Banana Energy Bites: Mash one ripe banana and mix it in. The banana adds natural sweetness. It also makes the bites soft and flavorful. You can easily adapt these bites to fit different diets: - Vegan-friendly substitutes: Use maple syrup instead of honey. Choose a plant-based peanut butter for a vegan treat. - Gluten-free options for oats: Make sure to use certified gluten-free rolled oats. This way, everyone can enjoy them. You can make energy bites that fit the season: - Holiday-themed energy bites: Add peppermint extract for a minty flavor or pumpkin spice for fall. These flavors make your bites festive and special. - Fruit-infused energy bites for summer snacking: Mix in dried fruits like cranberries or apricots. They add color and a burst of sweetness, perfect for hot days. Experiment with these variations to keep your energy bites exciting and delicious! To keep your No-Bake Chocolate Peanut Butter Energy Bites fresh, use airtight containers. Glass jars or plastic containers work well. Store them in the fridge or freezer. Refrigeration is best for short-term use, while freezing is great for long-term storage. In the fridge, energy bites last about one week. They stay fresh and tasty. If you freeze them, they can last up to three months. Just make sure to store them in airtight containers to avoid freezer burn. When you want to eat frozen energy bites, let them thaw in the fridge. This keeps their texture and flavor intact. Avoid thawing at room temperature, as it can make them too soft. Enjoy them cold or at room temp for the best taste! Yes, you can easily swap out ingredients. For peanut butter, try almond or sunflower seed butter. If you need a sweetener, agave syrup or coconut sugar works well. You can also use any nut butter you like. Just be aware that this will slightly change the flavor and texture. These energy bites last about one week in the fridge. Store them in an airtight container to keep them fresh. If you want to keep them longer, freeze them. They can last up to three months in the freezer. Absolutely! Use sunflower seed butter or soy nut butter instead of peanut butter. Make sure to check that your other ingredients are also nut-free. This way, you can enjoy the bites without worry. If the mixture feels too crumbly, add a little more peanut butter or honey. Mix well until it all sticks together. You can also add a splash of water or milk to help bind it. These energy bites combine simple, wholesome ingredients for tasty snacks. You learned how to make energy bites using oats, peanut butter, and honey, while exploring customization options. I shared tips for texture and storage to keep them fresh. These bites are versatile and fun. You can change flavors for different occasions. Get creative with your ingredients and share these treats with friends. Enjoy making and munching on your tasty energy bites!

No-Bake Chocolate Peanut Butter Energy Bites Recipe

Looking for a quick and tasty snack that fuels your energy? You’ll love these No-Bake Chocolate Peanut Butter Energy Bites!

- 2 cups cooked chicken, shredded - 1 cup BBQ sauce (your favorite brand) - 1 cup shredded cheddar cheese - 1 cup shredded mozzarella cheese - 4 large flour tortillas - 1/2 red onion, thinly sliced - 1/4 cup fresh cilantro, chopped - Olive oil for cooking - Sour cream for serving - Lime wedges for serving For BBQ chicken quesadillas, start with shredded chicken and your favorite BBQ sauce. This combo adds flavor and moisture. Next, cheese is key. I use cheddar and mozzarella for a great melt. Flour tortillas hold everything together. Then, add fresh toppings like red onion and cilantro. They add crunch and brightness. I love the balance they give to the rich BBQ flavor. - Alternative cheeses: gouda, pepper jack - Types of BBQ sauce: sweet, smoky, or spicy Feel free to switch cheeses for a twist. Gouda gives a nice creamy touch, while pepper jack adds heat. You can also explore different BBQ sauces. Sweet sauces can work well for kids. Smoky ones add depth, and spicy sauces make it exciting. - Cooking oil choices: olive oil, vegetable oil, or butter - Serving suggestions: sour cream, guacamole, or salsa Use olive oil for a tasty, healthy choice. You can also use vegetable oil or butter if you prefer. For serving, I recommend sour cream or guacamole. They cool down the heat and add creaminess. Salsa can give a fresh kick too. {{ingredient_image_1}} First, you need to mix the chicken and BBQ sauce. In a large bowl, add 2 cups of shredded chicken. Pour in 1 cup of your favorite BBQ sauce. Mix it well until the chicken is coated. This step is key for flavor. Next, preheat your skillet. Set it on medium heat and add a drizzle of olive oil. This will help the quesadilla get crispy. Let the skillet warm up while you prepare the quesadilla. Now it’s time to layer the quesadilla. Take one flour tortilla and place it in the skillet. Sprinkle a mix of 1 cup of cheddar cheese and 1 cup of mozzarella cheese over half of the tortilla. Then, spoon some BBQ chicken on top. Add a few thin slices of red onion and a sprinkle of chopped cilantro. Fold the tortilla in half and cook it for about 3-5 minutes. Check the bottom; it should be golden brown and crispy. Carefully flip the quesadilla. Cook the other side for another 3-5 minutes. The cheese should melt, and the quesadilla will be golden. Repeat this process with the remaining tortillas and filling. Make sure to keep an eye on the heat. You want them crispy but not burned. Once cooked, remove the quesadilla from the skillet. Slice each one into wedges. This makes it easier to serve and eat. For presentation, place the quesadilla wedges on a plate. Serve them warm with sour cream and lime wedges on the side. The sour cream adds creaminess, while the lime gives a nice zing. Enjoy your BBQ chicken quesadillas! - To achieve the perfect crispiness, heat your skillet to medium. Use olive oil for a golden-brown finish. - For evenly melting cheese, sprinkle cheese on the bottom and top of the fillings. This helps bind everything together. - You can add spices or hot sauce for an extra kick. Try cayenne or chili powder for heat. - Choosing the right BBQ sauce is key. Go for a sauce that matches your taste. Sweet, tangy, or smoky flavors work well. - A non-stick skillet is best for quesadillas. It helps prevent sticking and makes cleaning easier. - Use a large spatula for easy flipping. A thin, wide spatula lets you slide under the quesadilla smoothly. Pro Tips Use Leftover Chicken: Shredded rotisserie chicken works great for this recipe and saves you time. Cheese Variations: Feel free to mix in other cheeses like pepper jack or gouda for added flavor. Perfectly Crispy Quesadillas: Make sure to cook on medium heat to achieve a golden-brown exterior without burning. Serving Suggestions: Pair with guacamole or salsa for an extra burst of flavor! {{image_2}} To make your BBQ chicken quesadillas a bit healthier, you can swap out some ingredients. - Substituting for low-fat cheese: You can use low-fat cheese to cut calories. This change still keeps the cheesy goodness. - Using whole wheat or gluten-free tortillas: Whole wheat tortillas add fiber. Gluten-free tortillas work for those with gluten issues. You can also change up the main ingredients for a fresh twist. - Different proteins: Try pulled pork for a smoky taste. Tofu is a great option for a vegetarian dish. - Unique additions: Add jalapeños for some heat. Bell peppers give extra crunch and color. Mixing flavors can create a unique dish. - Southwest style: Black beans and corn give a hearty feel. These ingredients add protein and fiber. - Italian twist: Use pesto and sundried tomatoes for a fun blend. This mix gives a bright, herby flavor. Feel free to get creative with your BBQ chicken quesadillas! You can store cooked quesadillas easily. First, let them cool down to room temperature. Then, wrap each quesadilla in plastic wrap or foil. This keeps them fresh and prevents sticking. Place the wrapped quesadillas in an airtight container or a zip-top bag. Store them in the fridge for up to three days. When you want to reheat, use a skillet over medium heat. This keeps the quesadilla crispy. Heat each side for about 2-3 minutes. You can also use the microwave, but it may make them soggy. If you opt for the microwave, heat for about 30 seconds, then check. You can freeze quesadillas for later use. First, follow the same steps to cool and wrap them. Place the wrapped quesadillas in a freezer-safe bag. Remove as much air as you can. This helps prevent freezer burn. You can keep them in the freezer for up to three months. To reheat frozen quesadillas, take them out of the freezer and let them thaw in the fridge overnight. Then, follow the same reheating steps as before. In the fridge, cooked quesadillas stay fresh for about three days. If you freeze them, they can last up to three months without losing flavor. Always check for any signs of spoilage before eating. Enjoy your BBQ chicken quesadillas fresh and tasty! How can I make BBQ Chicken Quesadillas spicier? You can add diced jalapeños or hot sauce to the chicken mix. Mix these in with the BBQ sauce. You can also use spicy BBQ sauce for more heat. Spicy seasonings like cayenne or chili powder work well too. Can I use leftover rotisserie chicken? Yes, leftover rotisserie chicken is great for this recipe. Shred the chicken and mix it with BBQ sauce. This saves time and adds flavor. You will get a tasty meal in no time. What can I use instead of BBQ sauce? You can use salsa or hot sauce as a substitute. For a twist, try using teriyaki sauce or a homemade honey mustard. Each will change the taste, but they will still be delicious. Are there vegetarian options for this recipe? Yes, you can use black beans or mushrooms as a meat substitute. Toss them in BBQ sauce for flavor. You can also add more veggies, like bell peppers or zucchini, to create a hearty filling. How do I know when the quesadilla is done? The quesadilla is done when both sides are golden brown. The cheese will melt and start to ooze out. Look for a crispy texture on the outside. Can I make these quesadillas in the oven instead? Yes, you can bake the quesadillas in the oven. Preheat to 400°F (200°C). Place the filled quesadillas on a baking sheet. Bake for about 10-12 minutes, flipping halfway through. This gives a nice, even crisp. BBQ Chicken Quesadillas are fun and easy to make. You can mix shredded chicken with BBQ sauce, cheese, and any tortillas you like. I shared tips for perfect crunch and flavor boosts. You can also swap ingredients to fit your tastes. For storage, freezing keeps them fresh for later. Experiment and enjoy all the fun variations. Dive in and make your perfect quesadilla today!

BBQ Chicken Quesadillas Tasty and Simple Recipe

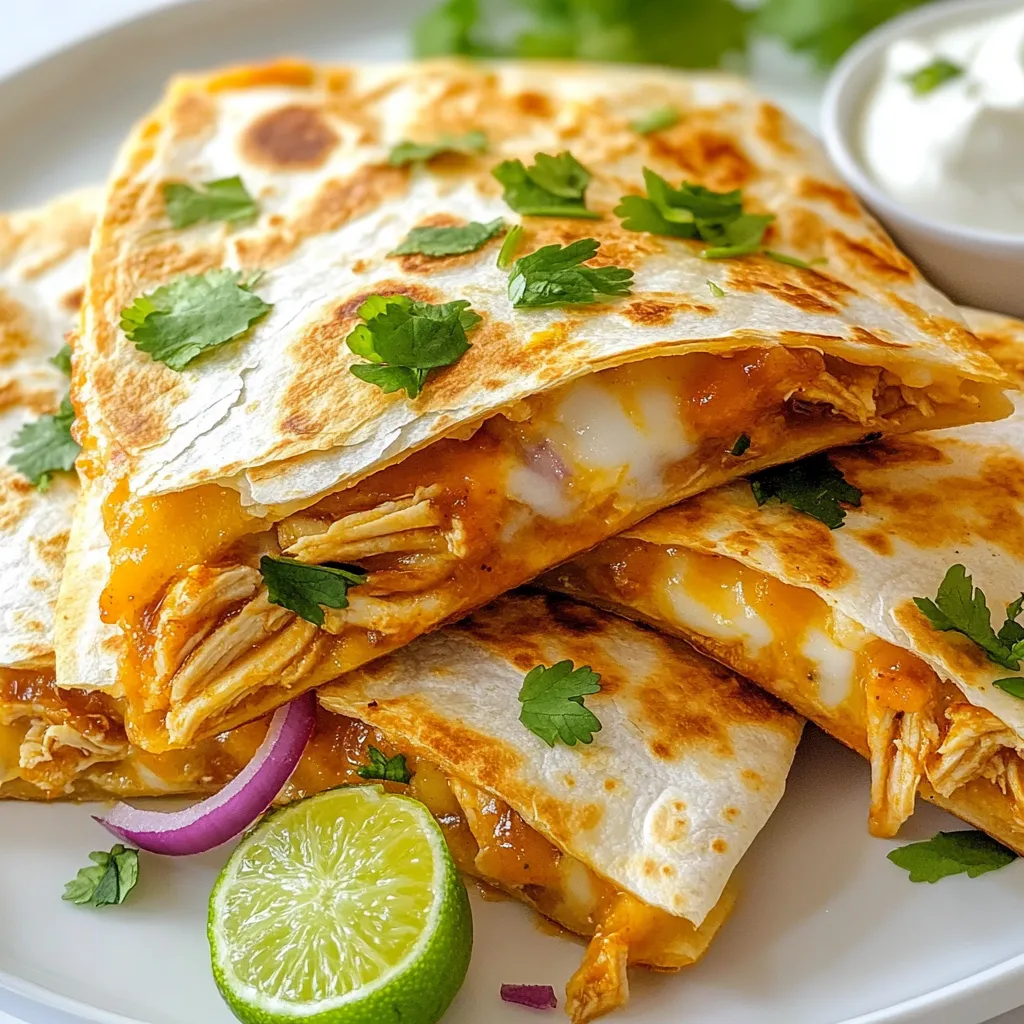
Are you ready to spice up your mealtime with a quick and tasty dish? BBQ Chicken Quesadillas are an easy

- 1 medium head of cauliflower, cut into bite-sized florets - 1 cup all-purpose flour - 1 cup water - 1 teaspoon garlic powder - 1 teaspoon onion powder - 1 teaspoon smoked paprika - Salt and pepper to taste - 1 cup buffalo sauce (store-bought or homemade) - 2 tablespoons olive oil - Fresh parsley, chopped (for garnish) To make these bites, choose a fresh cauliflower head. Cut it into small pieces. This helps them cook evenly and get crispy. The batter combines flour and spices. It gives a nice coating that sticks well to the cauliflower. - 1 cup sour cream - 1/2 cup mayonnaise - 1 tablespoon lemon juice - 1 teaspoon dried dill - 1 teaspoon garlic powder - Salt and pepper to taste For the ranch dip, you want creamy and tangy flavors. Sour cream and mayonnaise form the base. Adding lemon juice brightens the taste. Dill and garlic powder add extra flavor. Mix it well for a smooth dip. You can switch out some ingredients if needed. For gluten-free bites, use almond flour or chickpea flour. You can also use hot sauce instead of buffalo sauce for more heat. If you like a thicker ranch dip, add more sour cream. Try fresh herbs too, like chives or cilantro, for a unique twist. Start by preheating your oven to 450°F (230°C). This high heat helps make the bites crispy. Line a baking sheet with parchment paper to prevent sticking. While the oven heats, cut one medium head of cauliflower into bite-sized florets. Make sure they are all about the same size for even cooking. In a large bowl, whisk together one cup of all-purpose flour, one cup of water, one teaspoon of garlic powder, one teaspoon of onion powder, and one teaspoon of smoked paprika. Add salt and pepper to taste. Mix until smooth. This batter will coat the cauliflower. Dip each floret in the batter, covering it well. Shake off any extra batter. Place the florets on the baking sheet in a single layer. Drizzle two tablespoons of olive oil on top. Bake them for 20 to 25 minutes. Flip halfway through to get an even golden color. While they bake, prepare the buffalo sauce. If you use homemade sauce, heat it gently in a saucepan. If you have store-bought sauce, keep it ready. When the cauliflower bites are crispy, take them out of the oven. Toss the hot bites in a large bowl with one cup of buffalo sauce until they are coated. Return the coated bites to the baking sheet. Bake for another 10 minutes to let the sauce set and caramelize slightly. To make the ranch dip, mix together one cup of sour cream, half a cup of mayonnaise, one tablespoon of lemon juice, one teaspoon of dried dill, and one teaspoon of garlic powder in a separate bowl. Add salt and pepper to taste. Stir until smooth. When the cauliflower bites are done, take them out of the oven. Garnish with fresh chopped parsley. Serve them hot with the ranch dip on the side. Enjoy the crunch and flavor! To make your cauliflower bites crispy, start with a dry cauliflower. Pat the florets with a paper towel to remove moisture. The batter needs a good grip on the cauliflower. Use a thick batter made from flour and water, adding garlic powder, onion powder, and smoked paprika for flavor. When baking, drizzle a bit of olive oil over the bites. This helps them crisp up nicely. Bake at 450°F for 20-25 minutes. Flip them halfway to ensure even browning. For extra crispiness, bake them for an additional 10 minutes after coating in buffalo sauce. When it comes to dipping, flavor is key. Serve your buffalo cauliflower bites with ranch dip for a cool contrast. To enhance the ranch dip, mix in fresh herbs like dill or chives. For a twist, add some hot sauce to the ranch for extra heat. Dip the cauliflower bites right before eating for the best flavor. You can also try pairing them with blue cheese dip. The creaminess of the dip balances the heat of the buffalo sauce. To store leftover cauliflower bites, let them cool completely. Place them in an airtight container in the fridge. They last about 3-4 days. When you want to reheat them, use the oven rather than the microwave. Preheat the oven to 350°F and bake for 10-15 minutes. This keeps them crispy. If you have leftover ranch dip, store it in a sealed container in the fridge. It stays fresh for about a week. Always check for freshness before using. {{image_2}} If you like heat, you can add more spice. Use hot sauce with a higher Scoville rating. Chipotle sauce brings a smoky heat, too. Mix cayenne pepper into the batter for a kick. You can also add crushed red pepper flakes for extra spice. Just remember, start small! You can always add more. If you need a gluten-free option, replace all-purpose flour with gluten-free flour. Almond flour or chickpea flour works well. For an even lighter option, use cornstarch. Mix it with water and spices just like the original. This keeps the flavor and the crunch. You can make your ranch dip even more exciting. Add fresh herbs like chives or cilantro for a fresh twist. A splash of hot sauce gives it a nice zing. Try mixing in some crumbled blue cheese for a classic taste. You can also use Greek yogurt instead of sour cream. This adds creaminess and a bit of tang. Each serving of Buffalo Cauliflower Bites has about 150 calories. These bites are lower in calories than traditional wings. You get around 5 grams of protein, 7 grams of fat, and 20 grams of carbs per serving. Cauliflower is a superfood. It's low in calories and high in fiber. This helps with digestion and keeps you full. Cauliflower is rich in vitamins C and K. These vitamins boost your immune system and support bone health. The ranch dip packs a flavor punch but can be rich. Sour cream and mayonnaise add fat. However, they also offer protein and some vitamins. Using fresh herbs like dill adds nutrients and flavor without extra calories. Buffalo cauliflower bites are a great swap for wings. Traditional wings can have over 400 calories per serving. They are often fried and high in fat. Cauliflower bites are baked, not fried. This method cuts down on fat and calories. Plus, cauliflower bites offer a tasty way to enjoy flavor without guilt. Whether you want a snack or a party treat, these bites shine. You can enjoy all the flavor of buffalo wings but with added health benefits. Yes, you can use frozen cauliflower. Just thaw it first. Pat it dry to remove excess moisture. This helps the batter stick better. Make sure to coat the florets well. Frozen cauliflower may take a bit longer to bake. Check for crispiness before serving. To make homemade buffalo sauce, you need just a few ingredients. Mix together: - 1 cup hot sauce - 1/2 cup melted butter - 1 tablespoon vinegar - 1 teaspoon garlic powder Whisk these ingredients until they blend well. You can adjust the heat by adding more hot sauce or butter. This sauce adds a fresh flavor to your cauliflower bites. Serve buffalo cauliflower bites hot and crispy. Place them on a platter with a bowl of ranch dip in the center. Garnish with chopped fresh parsley for color. You can also add celery sticks or carrot sticks as a crunchy side. This makes it fun for sharing. Enjoy your tasty bites! In this article, we explored how to make tasty buffalo cauliflower bites and a homemade ranch dip. We covered the main ingredients, cooking steps, and helpful tips to get them crispy. You can even try different flavors or heat levels. These bites are a healthy choice compared to wings, packed with flavor and fun. I hope you feel confident to create and enjoy this dish, whether you are sharing with friends or treating yourself. Dive into this tasty experience!

Buffalo Cauliflower Bites with Ranch Dip Delight

If you crave a tasty snack that’s both healthy and fun, Buffalo Cauliflower Bites with Ranch Dip is the perfect

- 2 medium sweet potatoes, spiralized - 1 tablespoon coconut oil - 1 red bell pepper, thinly sliced - 1 cup snap peas, trimmed - 1 cup broccoli florets - 2 cloves garlic, minced - 1 tablespoon freshly grated ginger - 1/4 cup creamy peanut butter - 2 tablespoons soy sauce (or tamari for gluten-free) - 2 tablespoons lime juice - 1 tablespoon maple syrup - 1 teaspoon sriracha (adjust to taste) - Chopped cilantro - Crushed peanuts - Salt and pepper to taste When I make this dish, I love using sweet potatoes. Their natural sweetness pairs perfectly with the salty sauce. I spiralize the sweet potatoes into noodles. It gives a fun twist to the dish. A spiralizer works best, but you can use a peeler if needed. Coconut oil adds a nice flavor. It works well for cooking at high heat. I add garlic and ginger for a fragrant base. The red bell pepper, snap peas, and broccoli add crunch and color. You can change these veggies if you prefer others. For the sauce, I mix creamy peanut butter with soy sauce. Lime juice adds a zesty kick. Maple syrup brings a hint of sweetness, while sriracha gives it some heat. You can adjust the spice to your liking. Finally, I garnish the stir fry with cilantro and crushed peanuts. They add freshness and crunch. Don't forget to season with salt and pepper. Enjoy this colorful, tasty meal! To start, you need to spiralize the sweet potatoes. This makes long, fun noodles. Use a spiralizer to get perfect shapes. If you don’t have a spiralizer, don’t worry! You can use a vegetable peeler. Just peel the sweet potatoes into thin ribbons. Set your noodles aside when finished. Now, let’s make that tasty peanut sauce. In a small bowl, whisk together these ingredients: - 1/4 cup creamy peanut butter - 2 tablespoons soy sauce (or tamari for gluten-free) - 2 tablespoons lime juice - 1 tablespoon maple syrup - 1 teaspoon sriracha Whisk until it’s smooth. You can adjust the spice by adding more sriracha if you like it hot. Set the sauce aside for later. First, heat the coconut oil in a large skillet or wok. Use medium-high heat until the oil looks shiny. Next, add minced garlic and grated ginger. Sauté these for about 30 seconds. This will make your kitchen smell amazing! Then, throw in the sliced red bell pepper, snap peas, and broccoli florets. Stir-fry the veggies for 3-4 minutes. You want them tender but still crisp. Now it’s time for the sweet potato noodles. Add them to the skillet and pour the peanut sauce over everything. Stir well to coat the noodles and veggies. Cook for an additional 3-5 minutes. You want the sweet potato noodles to be tender, but don’t let them get mushy. Finally, taste your dish. Adjust the seasoning with salt and pepper if needed. Remove it from the heat and toss in sliced green onions for a fresh touch. To serve, plate your stir fry. Garnish it with chopped cilantro and crushed peanuts. This adds a nice crunch and flavor! To make the best stir fry, timing is key. Cook your veggies just right. I usually sauté bell peppers, snap peas, and broccoli for about 3-4 minutes. This keeps them crisp and colorful. Sweet potato noodles can turn mushy fast. To avoid this, cook them for only 3-5 minutes. Stir them gently with the sauce until they are just tender. Not a fan of certain veggies? No problem! You can use carrots, zucchini, or even bok choy. Each brings its own flavor and color. If you have a peanut allergy, try sunflower seed butter or almond butter. They work well and taste great too. Want to boost your meal? Adding protein can make it heartier. You can toss in tofu, chicken, or shrimp. Cook them first, then set aside before adding the veggies. Feeling adventurous? Swap the sauce! Try hoisin sauce or teriyaki for a different taste. Just keep the balance of flavors in mind for a tasty dish. {{image_2}} To make this dish gluten-free, use gluten-free soy sauce or tamari. These options give the same great flavor without gluten. You can also swap out regular peanut butter for a gluten-free brand. Check labels to ensure all ingredients fit your needs. To keep this recipe vegan, ensure all your ingredients are plant-based. Use maple syrup instead of honey. Double-check your peanut butter, as some brands may contain animal products. This way, you’ll enjoy a tasty meal that fits a vegan diet. If you like spice, adjust the heat with more sriracha. You can also try chili paste or hot sauce for a different kick. Fresh herbs like cilantro can add a burst of flavor. For even more depth, consider adding crushed red pepper or a dash of curry powder. To keep your Thai peanut sweet potato noodle stir fry fresh, store it in an airtight container. Place the container in the fridge. This dish stays good for about 3 to 5 days. If you want to keep it longer, consider freezing it. When reheating, the goal is to keep the noodles tender and the veggies crisp. For best results, use the stovetop. Heat a bit of oil in a pan, add the stir fry, and toss until warm. If you choose the microwave, heat in short bursts. Stir in between to avoid sogginess. You can freeze sweet potato noodles, but be careful. They can become mushy once thawed. To freeze, place your stir fry in a freezer-safe bag. Remove as much air as possible. For thawing, take it out the night before and leave it in the fridge. When ready to eat, reheat on the stovetop for the best taste and texture. Sweet potato noodles cook faster than regular pasta. They usually take about 3-5 minutes. If you cook them too long, they can turn mushy. Keep an eye on them while cooking. They should be tender but firm. This quick cooking time makes them perfect for stir-fries. Just add them to the pan after the veggies are almost done. Yes, you can use regular pasta. However, there are pros and cons. Regular pasta has a different taste and texture. It also takes longer to cook, about 8-12 minutes. Sweet potato noodles add more nutrition and a slight sweetness. If you need a gluten-free option, sweet potato noodles are great. Think about your dietary needs before choosing. The best way to spiralize sweet potatoes is with a spiralizer. Choose firm sweet potatoes for the best noodles. Cut off the ends to make them easier to spiralize. If you don't have a spiralizer, you can use a vegetable peeler. This will make thin ribbons. Just make sure to cut them evenly for even cooking. You learned how to make a tasty stir-fry using sweet potato noodles and a creamy peanut sauce. We covered the main ingredients, step-by-step cooking instructions, and tips for perfecting your dish. Remember, you can easily swap ingredients to fit your diet or taste. Whether you want a vegan or gluten-free meal, this recipe works well. Enjoy your stir-fry, and don’t be afraid to get creative! Cooking should be fun and tasty for everyone.

Thai Peanut Sweet Potato Noodle Stir Fry Recipe

Ready for a delicious twist on dinner? This Thai Peanut Sweet Potato Noodle Stir Fry is packed with flavor and

- 1 package (15 Oreos), crushed - 4 tablespoons unsalted butter, melted - 8 ounces cream cheese, softened - ½ cup powdered sugar - 1 teaspoon vanilla extract - 1 cup heavy whipping cream - 1 cup mini chocolate chips (optional for topping) - Extra crushed Oreos for garnish You can swap Oreos with any chocolate cookie. Use margarine instead of butter if needed. For a lighter option, try low-fat cream cheese. If you want a dairy-free treat, use a plant-based cream cheese. You could also use a whipped topping instead of heavy cream, but the texture may change. Start by crushing the Oreos. Place them in a zip-top bag and crush with a rolling pin. For precise measuring, use a kitchen scale for the cream cheese and powdered sugar. Soften cream cheese by leaving it out for 30 minutes. Melt the butter in the microwave in short bursts to avoid burning. Whip the heavy cream until you see stiff peaks. This helps create a light, airy cheesecake. First, take a medium bowl. Add the crushed Oreos and melted butter. Mix them well. You want this to look like wet sand. This is your crust. Now, divide this mixture into your serving cups. Press it down firmly. This helps form a solid base. Set the cups aside while you prepare the filling. Grab a large bowl. Beat the softened cream cheese with the powdered sugar and vanilla extract. Mix until it is smooth and creamy. In another bowl, whip the heavy cream. Whip it until stiff peaks form. This step is key for a light filling. Gently fold the whipped cream into the cream cheese mixture. Do this carefully to keep the air in. Now, spoon the cream cheese filling over the Oreo crust. Fill each cup about three-quarters full. This gives you room for toppings later. If you like, add mini chocolate chips on top. You can also sprinkle extra crushed Oreos for some crunch. Once your cups are assembled, it’s chilling time! Place them in the fridge. Leave them to set for at least 2 hours. This helps the flavors mix and the filling to firm up. After chilling, they are ready to serve. Enjoy your delicious Oreo Bliss Cheesecake Cups! To get a smooth cheesecake, start with soft cream cheese. Cold cream cheese can make lumps. Beat it well with sugar and vanilla until creamy. This helps mix air into the batter. When you add whipped cream, be gentle while folding. This keeps the mix light and fluffy. Chilling the cups is key. It helps the cheesecake firm up nicely. Chill your mixing bowl and beaters before whipping cream. Cold tools help the cream whip better. Start mixing on low speed, then increase to high. Stop once you see stiff peaks. Over-mixing can turn cream into butter, so watch closely. Add it slowly to the cream cheese mix to keep it light. One mistake is skipping the chill time. If you don’t let them set, they won’t hold shape. Another mistake is not pressing the crust firmly. A loose crust can crumble when you serve it. Also, don’t rush the mixing. Take your time to combine each step well. These tips will help you make perfect Oreo cheesecake cups every time! {{image_2}} You can change the flavor of your cheesecake cups easily. For a mint twist, add 1 teaspoon of mint extract to the cream cheese mix. This gives a fresh and cool taste. If you love peanut butter, mix in 1/2 cup of smooth peanut butter with the cream cheese. This adds a nutty richness to each bite. You can also try other flavors like chocolate or caramel. Just swap out some cream cheese for your favorite spread. Toppings can make your cheesecake cups extra special. Try adding fresh fruit like strawberries or raspberries on top. They add color and a touch of sweetness. Mini chocolate chips give a nice crunch too. You can sprinkle more crushed Oreos on top for extra texture. Whipped cream is another great choice. It makes your cups look fancy and adds a light feel. Serve the cheesecake cups cold for the best taste. They are perfect for parties or family gatherings. You can place them on a nice tray to show them off. For a fun twist, give each guest their own cup. This makes it easy to enjoy and share. You can also pair them with a hot drink, like coffee or tea. The flavors work well together and will impress everyone. Store your Oreo cheesecake cups in an airtight container. This keeps them fresh and tasty. If you made several cups, layer them with parchment paper. This helps prevent sticking. Keep them in the fridge for the best taste. Avoid leaving them out at room temperature for long. Oreo cheesecake cups stay good in the fridge for about five days. After that, they may lose their flavor and texture. If you notice any changes in smell or appearance, it's best to throw them away. Always check before you enjoy your treat! You can freeze these cheesecake cups too! Just cover each cup with plastic wrap. Then, place them in a freezer-safe container. They will last for up to three months in the freezer. When you want to eat them, thaw them in the fridge overnight. Enjoy your sweet treat any time! Yes, you can use whipped topping instead of heavy cream. However, keep in mind that the texture will change. Whipped topping adds a lighter feel but may lack the rich taste of heavy cream. If you choose this option, use about 2 cups of whipped topping to replace the heavy cream. To make this recipe gluten-free, use gluten-free Oreos. Check labels to ensure they meet your needs. You can also use a gluten-free cookie for the crust. Most gluten-free cookies work well in this recipe. Yes, you can prepare these cups in advance. They stay fresh in the fridge for up to three days. Just make sure to cover them well. This makes them a great choice for parties or gatherings. If you need a substitute for cream cheese, try mascarpone cheese. It has a similar texture and flavor. You can also use Greek yogurt for a lighter option. Just remember, the taste will change a bit. To check if the cheesecake has set, gently shake the cup. If the center is firm and does not jiggle, it’s ready. Refrigerate for at least two hours to ensure proper setting. The cheesecake should feel cool and firm when you touch it. We explored the key ingredients and their roles in making Oreo cheesecake cups. I shared steps for preparing the crust, filling, and putting it all together. You learned tips for perfect texture and common mistakes to avoid. We discussed variations like flavors and toppings, along with storage methods. These cheesecake cups are fun and simple. With practice, you can impress friends and family. Enjoy creating your own delicious versions!

No Bake Oreo Cheesecake Cups Easy and Delicious Treat

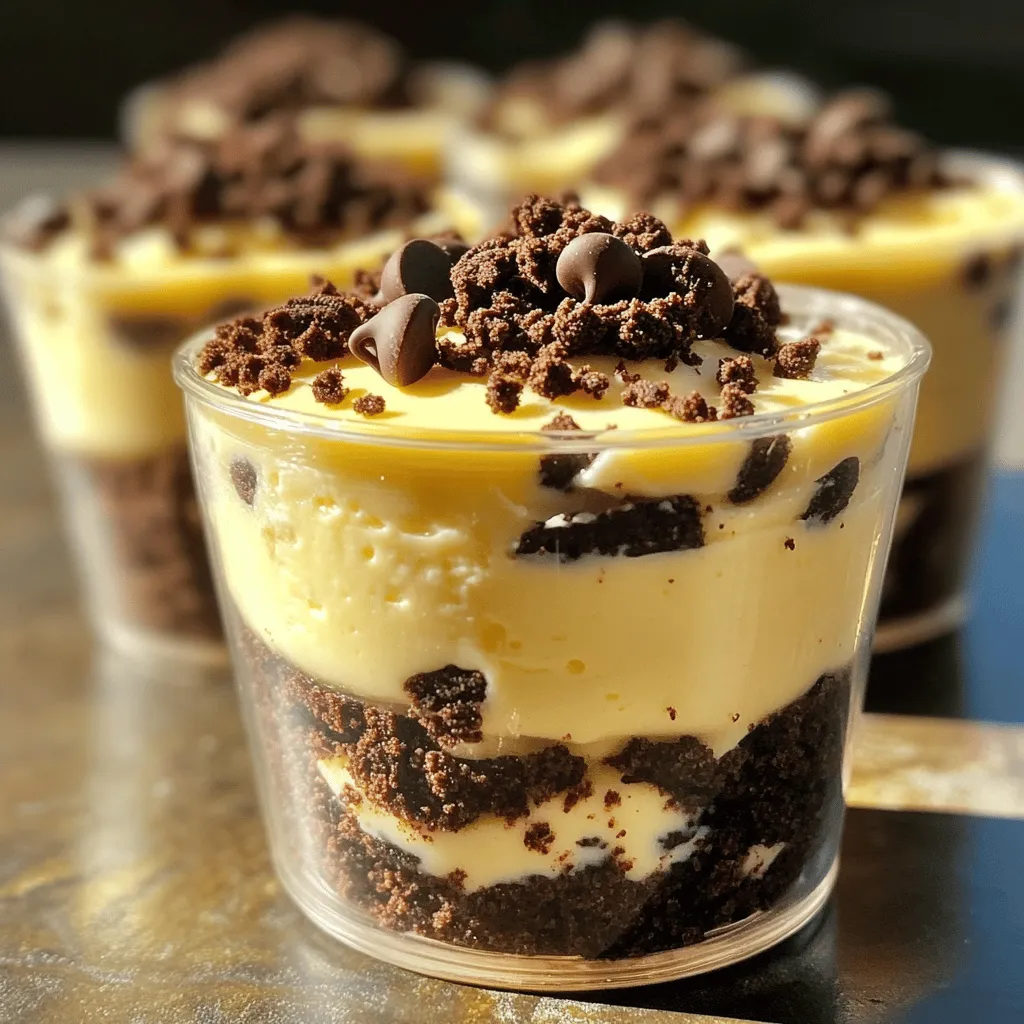
Love desserts but short on time? You’re in for a treat! This No Bake Oreo Cheesecake Cups recipe is simple,

For the beef barbacoa, you will need: - 2 lbs beef chuck roast, cut into large chunks - 1 medium onion, chopped - 4 cloves garlic, minced - 1/4 cup lime juice (about 2-3 limes) - 1 cup beef broth To build your burrito bowls, gather: - 2 cups cooked rice or quinoa - 1 can (15 oz) black beans, rinsed and drained - 1 cup corn, fresh or frozen - 1 cup diced tomatoes - 1 avocado, sliced - Fresh cilantro, for garnish - Sour cream or Greek yogurt, for serving - Lime wedges, for serving These seasonings will boost the taste: - 2 tablespoons apple cider vinegar - 2 tablespoons chipotle peppers in adobo sauce, minced - 1 tablespoon ground cumin - 1 tablespoon dried oregano - 1 teaspoon ground black pepper - 1 teaspoon salt Each ingredient plays a key role. The beef chuck adds rich flavor. The lime juice brightens the dish. The spices create depth and warmth. The beans and rice provide a hearty base. Toppings like avocado and cilantro add freshness. These layers make the burrito bowl a delight! To start, cut the beef chuck roast into large chunks. This helps it cook evenly. Next, set your Instant Pot to the Sauté function. Add some olive oil to the pot. Once hot, sear the beef chunks on all sides. This should take about 3-4 minutes per side. Browning adds great flavor. If you have a lot of beef, do it in batches. After browning, remove the beef and set it aside. In the same pot, add the chopped onion. Cook for about 2-3 minutes until it turns translucent. Then, stir in the minced garlic. Cook for another minute until it smells great. This step builds a strong flavor base for your beef barbacoa. Now, add lime juice, apple cider vinegar, minced chipotle peppers, cumin, oregano, black pepper, salt, and beef broth. Mix everything well to combine. Return the browned beef to the pot. Close the lid and seal the valve. Set the Instant Pot to Manual mode and cook on high pressure for 60 minutes. After cooking, let the pressure release naturally for 10 minutes. Then, do a quick release to let out any extra pressure. Carefully take the beef out of the pot. Use two forks to shred it into bite-sized pieces. Return the beef to the pot and mix it with the sauce. Now your beef barbacoa is ready to build delicious burrito bowls! To get the best flavor in your beef barbacoa, focus on a few key steps. First, sear the beef well. This step adds depth and richness. Use a good amount of olive oil to prevent sticking. Next, use fresh lime juice for brightness. The acidity balances the spices well. Chipotle peppers in adobo sauce give a smoky kick. Adjust the amount based on your spice level. Don't forget to mix your spices evenly. This ensures every bite is bursting with flavor. Lastly, let the beef rest before shredding. This helps keep it juicy. Using the Instant Pot can be a game changer in your kitchen. Always remember to seal the valve before cooking. This is key for pressure to build. Don't skip the natural pressure release. It tenderizes the beef even more. If you're in a hurry, you can do a quick release after 10 minutes. Just be careful. Keep your hands away from the steam. For best results, avoid overfilling the pot. Follow the max fill line to prevent spills. Presentation makes your meal more inviting. Start with a base of rice or quinoa in a colorful bowl. Layer your ingredients for visual appeal. Place the beef on top, then add a scoop of black beans. Follow with corn and diced tomatoes. Arrange avocado slices neatly for a pop of color. Finish with a dollop of sour cream or Greek yogurt. Sprinkle fresh cilantro on top for a fresh touch. Serve lime wedges on the side for an extra burst of flavor. This makes your burrito bowls look as good as they taste! {{image_2}} If you want to change the meat, you can use pork. Pork shoulder works well. It cooks down nicely and gives a great taste. You can also try chicken thighs. They are juicy and will absorb the flavors well. Just adjust the cooking time to 25 minutes for chicken in the Instant Pot. To make a vegetarian burrito bowl, skip the meat and use jackfruit. Jackfruit mimics the texture of shredded meat. You can also use lentils or chickpeas for protein. Both options are hearty and filling. Add some extra spices to boost the flavor. Use the same sauce to keep that rich taste. For more depth, add more spices like smoked paprika or chili powder. These spices give a warm flavor. You can also toss in fresh herbs like oregano or thyme. Fresh herbs brighten the dish. For a tangy kick, add more lime juice or a splash of vinegar. This lifts the flavors and makes every bite exciting. To store leftover beef barbacoa, let it cool first. Place it in an airtight container. This keeps flavors fresh and prevents spills. You can store it in the fridge for up to 4 days. If you want to keep it longer, freezing is a great option. Reheat your beef barbacoa on the stove or in the microwave. If using the stove, warm it over low heat. Stir often to make sure it heats evenly. In the microwave, place it in a microwave-safe bowl. Cover it with a lid or microwave-safe wrap. Heat for 1-2 minutes, stirring halfway through. Always check that it is hot all the way through before serving. To freeze beef barbacoa, use freezer-safe bags or containers. Portion out servings to make it easy to thaw later. Label each bag with the date. You can freeze it for up to 3 months. When ready to eat, thaw it in the fridge overnight. Reheat it as mentioned above. This method helps you enjoy your leftovers without waste. To make this recipe gluten-free, use gluten-free beef broth. Ensure that the chipotle peppers in adobo sauce are also gluten-free. Most brands are safe, but check the label. Serve the burrito bowls over quinoa instead of rice, as it is naturally gluten-free. You can serve your burrito bowls with a variety of toppings. Some great options include: - Shredded lettuce - Sliced jalapeños - Diced red onions - Fresh lime wedges - Crumbled queso fresco These add flavor and texture to your meal. The beef needs to cook in the Instant Pot for 60 minutes on high pressure. This time allows the beef to become tender and soak up the flavors. After cooking, let the pressure release naturally for 10 minutes before doing a quick release. Yes, you can use different cuts like brisket or flank steak. Both will give you tasty results. However, cooking times may vary slightly. Always check for tenderness. Store any leftovers in an airtight container in the fridge. They will stay fresh for up to three days. You can also freeze them for longer storage, up to three months. Yes, you can prepare the beef barbacoa a day ahead. Just reheat the beef in the Instant Pot or on the stove when ready to serve. The flavors will deepen overnight. If you don’t have an Instant Pot, you can use a slow cooker. Cook the beef on low for 8 hours or high for 4 hours. The result will still be delicious and tender. Absolutely! Feel free to add bell peppers, zucchini, or any veggies you enjoy. Just sauté them along with the onions for added flavor. The spice level comes from the chipotle peppers. If you prefer less heat, use fewer peppers or substitute them with mild chilies. This way, the dish remains flavorful without too much spice. Beef barbacoa is a simple dish full of flavor. We covered the main ingredients, cooking steps, and tips to perfect it. You can also explore variations like vegetarian options and storage methods. When you try this recipe, enjoy your tasty burrito bowls with family and friends. Take pride in your cooking skills and share your delicious results. Homemade barbacoa brings excitement to any meal.

Instant Pot Beef Barbacoa Burrito Bowls Delight

Welcome to a flavor fiesta with my Instant Pot Beef Barbacoa Burrito Bowls! If you crave tender, juicy beef with

For these tasty tacos, you'll need: - 1 can (15 oz) chickpeas, drained and rinsed - 1 tablespoon olive oil - 1 teaspoon smoked paprika - 1 teaspoon garlic powder - 1 teaspoon cumin - ½ teaspoon chili powder - Salt and pepper to taste - 8 small corn or flour tortillas These ingredients create a great base for the dish. The chickpeas give a nice crunch. The spices add flavor that makes these tacos shine. You can customize your tacos with these tasty toppings: - 1 cup shredded lettuce - 1 cup diced tomatoes - ½ cup diced red onion - ½ avocado, sliced - Fresh cilantro for garnish - Lime wedges for serving These toppings add freshness and color to your tacos. You can mix and match to suit your taste. The lime juice will give a nice zing. You will need a few tools to make these tacos: - Air fryer - Medium bowl - Towel for drying chickpeas - Skillet for warming tortillas Using an air fryer helps achieve that perfect crispy texture. A skillet warms the tortillas quickly, making them soft and easy to fill. First, grab a can of chickpeas. Drain and rinse them well under cold water. This step removes extra salt and makes them taste fresh. Use a towel to pat them dry. This helps them get crispy later. Next, place the chickpeas in a bowl. Drizzle one tablespoon of olive oil over them. Then, add one teaspoon each of smoked paprika, garlic powder, and cumin. Include half a teaspoon of chili powder, plus salt and pepper to your taste. Toss the chickpeas until they are well-coated with the spices. Now, it’s time to air fry! Preheat your air fryer to 400°F (200°C). Once it’s ready, spread the seasoned chickpeas in a single layer in the basket. Cook them for 15 to 18 minutes. Halfway through, shake the basket. This helps the chickpeas cook evenly. They should turn golden brown and crispy when done. While the chickpeas cook, warm your tortillas. Use a dry skillet over medium heat. Heat each tortilla for about 30 seconds on each side. This makes them soft and easy to fold. Once the chickpeas are crispy, it’s time to build your tacos. Place a generous amount of chickpeas on each tortilla. Top with shredded lettuce, diced tomatoes, diced red onion, and slices of avocado. Don’t forget to garnish with fresh cilantro. Serve with lime wedges for a zesty kick. Enjoy your tasty, quick meal! To get crispy chickpeas, start by drying them well. Use a towel to pat them until no moisture remains. This step helps them crisp up in the air fryer. Next, coat them evenly with olive oil and spices. Use smoked paprika, garlic powder, cumin, and chili powder for flavor. Mix them well to ensure every chickpea gets seasoning. When you air fry, spread them out in a single layer. This helps them cook evenly. Shake the basket halfway through cooking. This action helps them crisp on all sides. Warming tortillas is key for soft and tasty tacos. Use a dry skillet over medium heat. Place each tortilla in the skillet for about 30 seconds. Flip it over and warm for another 30 seconds. You want them pliable but not crispy. If you have a large batch, wrap warmed tortillas in a clean towel. This keeps them warm until you are ready to serve. You can easily change the spice levels to fit your taste. If you like it hot, add more chili powder or a splash of hot sauce. For a milder flavor, cut back on the chili powder. You can also mix in fresh herbs like cilantro for added flavor without heat. Always taste your chickpeas before serving. This way, you can adjust the seasoning to your liking. {{image_2}} You can swap chickpeas for other beans. Black beans work well in tacos. They add a rich flavor. Pinto beans are another choice. They are soft and creamy. Kidney beans also taste great. Each bean gives a different texture. Feel free to mix and match to find your favorite. These tacos are already vegan. You can make them gluten-free by using corn tortillas. Check the label to ensure no gluten sneaks in. For a protein boost, add some quinoa or lentils. They are both tasty and healthy. This way, everyone can enjoy the meal. To spice things up, add herbs and spices. Try fresh cilantro or parsley for a fresh taste. A squeeze of lime adds zest. You can also use taco seasoning for a quick fix. If you like heat, add some cayenne pepper or jalapeños. Mix and match to create your perfect taco flavor! To store leftover chickpeas, first let them cool completely. Place them in an airtight container. Refrigerate them for up to three days. You can also freeze chickpeas for longer storage. They will last for about three months in the freezer. When ready to use, just thaw them overnight in the fridge. Assembled tacos do not store well. The tortillas can get soggy. If you have leftover tacos, separate the chickpeas and toppings from the tortillas. Store the chickpeas and toppings in airtight containers. You can keep them in the fridge for up to three days. To enjoy the tacos again, reheat the chickpeas and fill fresh tortillas. Reheat the chickpeas in an air fryer or skillet. For the air fryer, set it to 350°F (175°C) and heat for 5-7 minutes. If using a skillet, heat them over medium heat for 3-4 minutes. Warm tortillas in a dry skillet for about 30 seconds on each side. This will help them become soft and pliable again. Enjoy your tacos fresh and crispy! Yes, you can use canned chickpeas. They save time and still taste great. Just drain and rinse them well. This removes the extra salt and helps with texture. Canned chickpeas work perfectly in this recipe, making it quick and easy. To get chickpeas extra crispy, start by drying them well. Use a towel to pat them dry after rinsing. The less moisture, the crispier they get. Also, make sure to space them out in the air fryer. This allows hot air to circulate. Cook them at 400°F for 15-18 minutes. Shake the basket halfway through for even cooking. If you need substitutes for tortillas, consider lettuce wraps or cabbage leaves. These keep the meal low-carb. You can also try whole-grain or gluten-free tortillas. They work well and still taste great. Pita bread or naan can also be fun alternatives. These tacos are best eaten fresh. However, if you have leftovers, store them in an airtight container. They can last about 2-3 days in the fridge. Keep the chickpeas and toppings separate. This helps maintain the texture. When ready to eat, reheat the chickpeas in the air fryer for a few minutes. Crispy chickpea tacos are not just fun to make; they're tasty too. You learned about key ingredients, optional toppings, and equipment needed. I shared simple steps to prep, air fry, and assemble your tacos. Tips helped you achieve perfect crispiness and flavor. You can even explore fun variations with beans and spice levels. Lastly, I covered how to store and reheat leftovers. Now, you're ready to enjoy delicious tacos anytime!

Air Fryer Crispy Chickpea Tacos Tasty and Quick Meal

Looking for a quick and tasty meal? Air Fryer Crispy Chickpea Tacos deliver crunch and flavor in every bite. You’ll

To make this dish, gather these simple items: - 1 pound large shrimp, peeled and deveined - 1 bunch asparagus, trimmed - 3 tablespoons olive oil - 3 cloves garlic, minced - Zest and juice of 1 lemon - 1 teaspoon dried oregano - 1 teaspoon paprika - Salt and pepper to taste - Fresh parsley, chopped (for garnish) You can swap ingredients to fit your taste. If you don't have shrimp, try chicken or tofu. Asparagus can be replaced with green beans or broccoli. For olive oil, you can use avocado oil. If you want a different flavor, try fresh herbs like basil or thyme instead of dried oregano. You can also change the spice level by adding chili flakes or cayenne pepper. When picking shrimp, look for ones that smell fresh, not fishy. The shells should be shiny and firm. Choose shrimp that are pink or gray, with a smooth texture. For asparagus, select bright green stalks. They should be firm, not limp. Avoid any with soft tips or blemishes. Fresh asparagus often has a sweet smell, which is a good sign of quality. First, you need to preheat your oven to 425°F (220°C). This high heat helps the shrimp and asparagus cook nicely. While the oven warms up, grab a large baking sheet. You can line it with parchment paper or lightly grease it. This will prevent sticking and make cleanup easier. In a large bowl, mix together three tablespoons of olive oil, three minced garlic cloves, the juice and zest of one lemon, one teaspoon of dried oregano, one teaspoon of paprika, and some salt and pepper. Stir this well to combine all the flavors. Add in one pound of peeled and deveined shrimp. Toss the shrimp in the marinade until they are fully coated. Let them sit for about 15 minutes. This step is crucial. It helps the shrimp soak up all that zesty flavor. While the shrimp marinates, prepare the asparagus. Trim the ends and spread them on one side of the baking sheet. Season with a little salt, pepper, and a drizzle of olive oil. After the shrimp has marinated, place them on the other side of the baking sheet in a single layer. Bake everything in the preheated oven for 10 to 12 minutes. The shrimp should turn pink and opaque, while the asparagus should be tender yet crisp. Once done, remove the pan from the oven. You can garnish with fresh chopped parsley for a lovely finish. To avoid overcooking shrimp, keep a close eye on them. Shrimp cook fast. They turn pink and opaque in about 10 to 12 minutes. If you cook them too long, they become rubbery. A good tip is to stop cooking when they curl into a C shape. This shows they are just right. Always check them a minute or two early. For tender asparagus, start with fresh stalks. Look for bright green color and firm texture. Trim the ends before cooking. This helps them absorb the marinade better. When baking, place them on one side of the sheet pan. This gives them room to cook evenly. Bake until they are crisp but tender, about 10 to 12 minutes. To boost the flavor, try adding fresh herbs. Basil, thyme, or dill work well with shrimp. You can also add a pinch of red pepper flakes for some heat. Lemon zest adds brightness, too. If you love garlic, add more minced cloves to the marinade. Experiment with your favorite spices to make this dish your own. {{image_2}} You can easily change this dish by adding other veggies. Bell peppers add a sweet crunch. Zucchini brings a nice, soft texture. Just chop them up and toss them with the shrimp and asparagus. They will soak up the lemon herb flavors. You can use any vegetables you like. Carrots, broccoli, or cherry tomatoes also work well. Make it colorful and fun! Want to make this meal heartier? Try adding quinoa or rice. Cook the grains separately first. Then, spread them on the baking sheet. Place the shrimp and asparagus on top. The shrimp juices will mix with the grains. This adds flavor and makes it filling. It’s a great way to enjoy a complete meal in one pan. You can spice up your dish with different seasonings. If you love heat, add some cayenne pepper or red pepper flakes. For a smoky flavor, use smoked paprika instead of regular. You can also try fresh herbs like basil or cilantro for a twist. Experiment with flavors to find what you love best. Each change makes this dish unique and exciting! After enjoying your meal, let leftovers cool down. Place them in an airtight container. This keeps shrimp and asparagus fresh. Store the container in the fridge. Your leftovers will last for up to three days. When it's time to eat again, reheating is easy. Use a skillet on low heat for the best results. This warms the shrimp without overcooking. Stir gently to heat evenly. You can also use the microwave. Heat in short bursts to avoid rubbery shrimp. Freezing shrimp and asparagus is simple. First, let them cool completely. Then, place them in freezer-safe bags. Remove as much air as possible. This helps prevent freezer burn. They can stay frozen for up to three months. When ready to eat, thaw in the fridge overnight before reheating. Yes, you can use frozen shrimp. Just make sure to thaw them first. Place them in the fridge overnight or run them under cold water for quick thawing. Once thawed, pat them dry with a paper towel. This step helps the shrimp absorb the marinade better. You can serve this dish with many sides. Here are some ideas: - Rice: White or brown rice pairs well. - Quinoa: A healthy grain option that adds protein. - Salad: A fresh green salad adds crunch. - Bread: Garlic bread or crusty rolls can soak up the juices. Feel free to mix and match based on what you like. To keep shrimp juicy, follow these tips: - Marinate properly: Let the shrimp soak in the marinade for at least 15 minutes. - Don’t overcook: Bake them just until they turn pink and opaque. - Use high heat: Cooking at 425°F (220°C) helps lock in moisture fast. By using these steps, you will enjoy perfectly tender shrimp every time. This blog post covered how to make a delicious sheet pan meal with shrimp and asparagus. We talked about the best ingredients, how to marinate shrimp, and tips for keeping it tender. I shared ways to add flavors, vary the dish, and store leftovers. Remember, fresh veggies and good seasoning make your meal great. With these tips, you will impress everyone at the table. Enjoy cooking and experimenting with flavors in your kitchen!

Sheet Pan Lemon Herb Shrimp & Asparagus Delight

If you’re craving a quick and tasty meal, look no further! My Sheet Pan Lemon Herb Shrimp & Asparagus Delight

Older posts
Newer posts
← Previous Page1 … Page29 Page30 Page31 … Page123 Next →

dsad

© 2025 Southern Dishes • Built with GeneratePress

Our Policies

  • Copyright Policy
  • Cookie Policy
  • GDPR Policy
  • Privacy Policy
  • Disclaimer
  • Terms Of Use

More Information

  • Home
  • About
  • Contact
  • Appetizers
  • Dessert
  • Dinner
  • Drinks
©2025, Southern Dishes About Back To Top