Skip to content
DisclaimerTerms Of UseGDPR PolicyCookie Policy

Southern Dishes

  • Home
  • Drinks
  • Appetizers
  • Dinner
  • Dessert
  • About
  • Contact
  • Privacy Policy
DisclaimerTerms Of UseGDPR PolicyCookie Policy

Isabella

- 1 medium butternut squash, peeled and cubed - 1 tablespoon olive oil - 1 medium onion, chopped - 2 garlic cloves, minced - 4 cups vegetable broth - 1 cup coconut milk (or heavy cream) In this creamy butternut squash soup, the main stars are the butternut squash and onion. The squash gives a sweet and smooth taste. The onion adds depth and flavor. Garlic brings a lovely aroma, making each spoonful delightful. Vegetable broth makes the base rich and warm. You can use coconut milk for a touch of sweetness or heavy cream for extra richness. - 1 teaspoon ground cumin - 1/2 teaspoon nutmeg - Salt and pepper to taste Spices help enhance the flavors in the soup. Ground cumin adds a warm earthiness. Nutmeg adds a hint of sweetness. Salt and pepper are essential for balancing all the tastes. Adjust these spices to fit your preference. - 10 fresh sage leaves - 1 tablespoon butter (or vegan alternative) For garnish, fresh sage leaves become crispy and add a special touch. The butter or vegan option helps fry the sage perfectly. This crispiness contrasts nicely with the creamy soup. It not only looks good but also tastes amazing. To start, you need to prepare the squash. First, peel the butternut squash. Use a sharp knife to slice it, then scoop out the seeds. Next, cube the squash into small pieces. This helps it cook faster and blend smoothly. Next, chop the onion. Dice it finely so it cooks well. After that, mince the garlic cloves. This adds a great flavor to the soup. Now, it’s time to cook the soup. In a large pot, heat the olive oil over medium heat. Add the chopped onion and sauté until it turns translucent, about 5 minutes. Then, stir in the minced garlic and cook for another minute. You want to smell the garlic’s aroma! Add the cubed butternut squash to the pot. Stir everything together. Sprinkle in the ground cumin and nutmeg. This adds warmth and depth to the soup. Cook this mixture for about 3-4 minutes. This step helps the spices bloom and release their flavors. Pour in the vegetable broth next. Bring the soup to a boil. Once it boils, reduce the heat to a simmer. Cook until the squash is tender, which takes about 15-20 minutes. Once the squash is tender, it’s time to blend the soup. If you have a blender, carefully transfer the soup in batches. Fill the blender halfway, and hold the lid down with a kitchen towel. This prevents splatters. Blend until the soup is smooth and creamy. Return the blended soup to the pot. Stir in the coconut milk or heavy cream. This step adds richness to the soup. Season with salt and pepper to taste. Heat it gently over low heat until warmed through. For the crispy sage, melt the butter in a small pan over medium heat. Add the fresh sage leaves. Fry them until they are crispy and golden, about 2-3 minutes. Remove the crispy sage from the pan. Place it on a paper towel to drain any excess oil. Your soup is now ready to serve! Ladle it into bowls and garnish each serving with a few crispy sage leaves on top. Optionally, drizzle a bit more coconut milk or heavy cream for an extra touch. Enjoy your creamy butternut squash soup with crispy sage! For that rich, creamy texture, use coconut milk or heavy cream. Coconut milk adds a nutty taste. Heavy cream gives a smooth finish. Both options work well. When blending, make sure to blend until smooth. If using a blender, fill it halfway. This prevents splattering. A stick blender also does a great job. Frying fresh sage leaves adds a lovely crunch. Start with medium heat and melt butter in a small pan. Add the sage leaves and watch them closely. Fry until they turn crispy and golden, about 2-3 minutes. Drain them on a paper towel to remove extra oil. If you want more flavor, try crispy garlic or fried shallots as garnishes. If you follow a vegan diet, swap heavy cream for coconut milk. This keeps the soup creamy and delicious. For gluten-free options, check the vegetable broth. Most are gluten-free, but always read the label. You can enjoy this soup in many ways! {{image_2}} You can easily make this soup vegan. Simply substitute coconut milk for heavy cream. This keeps the soup rich and creamy without using dairy. Use a good vegetable broth to enhance the flavors. This swap makes it friendly for those avoiding animal products. To make the soup heartier, consider adding protein. Lentils or beans can boost the nutrition and keep you full. They also add texture and flavor. Serve this soup with crusty bread or sprinkle toasted seeds on top. Both options add crunch and make the meal more satisfying. Want to add some heat? Try adding a touch of chili. A small amount can transform the soup into a spicy delight. You can also explore different herbs. Fresh thyme or rosemary can add unique flavors. Each option will keep your soup exciting and new. To keep your creamy butternut squash soup fresh, store it in an airtight container. This will help keep moisture and odors out. You can enjoy the soup for up to five days in the fridge. If you want to save leftovers, let the soup cool before sealing it. This keeps the soup from getting soggy. Freezing the soup is a great option for later meals. To do this, pour the cooled soup into freezer-safe bags or containers. Leave some space at the top, as liquids expand when frozen. When you’re ready to enjoy it, thaw the soup in your fridge overnight. Reheat it gently on the stove over low heat. Make sure to stir often to keep it smooth. You can prepare ingredients ahead of time for an easy cooking day. Chop the onion and garlic, and cube the butternut squash. Store these in the fridge for up to three days. When you’re ready to cook, just follow the steps. This way, you can enjoy a hearty meal even on busy days! Yes, you can make this soup ahead of time. Here are some best practices: - Cool and Store: Let the soup cool completely before storing. - Use Airtight Containers: Transfer the soup to airtight containers. This keeps it fresh. - Refrigerate: The soup lasts for about 4-5 days in the fridge. - Reheat Gently: When ready to eat, reheat on low heat. Stir often to prevent sticking. If you don't have butternut squash, try these options: - Pumpkin: It has a similar texture and taste. - Sweet Potato: This adds a sweet flavor and creamy texture. - Acorn Squash: Another great alternative with a mild taste. - Carrots: They can add sweetness and a nice color. To add some heat to your soup, consider these suggestions: - Chili Powder: Add a teaspoon for a mild kick. - Cayenne Pepper: A small pinch will spice things up. - Fresh Jalapeños: Chop and sauté them with the onion for fresh heat. - Hot Sauce: Drizzle some in just before serving for an extra punch. This blog post shared how to make a creamy butternut squash soup. We covered the key ingredients, spices, and garnishes. The step-by-step instructions made it easy to prepare, cook, and blend the soup. Tips helped you achieve a creamy texture and offered variations for dietary needs. Finally, we discussed storage and meal prep ideas. Making this soup is simple, rewarding, and delicious. Enjoy your cooking adventure and share this tasty recipe with others!

Creamy Butternut Squash Soup With Crispy Sage Delight

Welcome to the world of creamy butternut squash soup! This dish combines the sweet taste of butternut squash with crispy

To make Fluffy Lemon Ricotta Pancakes, gather these ingredients: - 1 cup ricotta cheese - 2 large eggs - 1/4 cup granulated sugar - 1/2 cup milk - Zest of 1 lemon - 2 tablespoons fresh lemon juice - 1 cup all-purpose flour - 1 tablespoon baking powder - 1/2 teaspoon salt - Butter or oil for cooking You can swap some ingredients if needed. If you don’t have ricotta, try cottage cheese. It gives a similar taste and texture. For a dairy-free option, use almond milk or oat milk instead of regular milk. You can also use a sugar substitute if you want to cut calories. Just make sure it works for baking. Fresh ingredients make a big difference. Use fresh lemons for the zest and juice. They add bright flavor to the pancakes. Check your eggs; they should be fresh for the best rise. When using flour, make sure it’s not expired. This helps your pancakes stay fluffy and light. Always measure your ingredients carefully for the best results. Start by taking a large mixing bowl. Add 1 cup of ricotta cheese, 2 large eggs, and 1/4 cup of granulated sugar. Pour in 1/2 cup of milk. Then, zest one lemon and squeeze 2 tablespoons of fresh lemon juice into the bowl. Whisk all these ingredients together. Make sure the mixture is smooth and well-blended. This step gives the pancakes their creamy texture. In a separate bowl, take 1 cup of all-purpose flour, 1 tablespoon of baking powder, and 1/2 teaspoon of salt. Use a sifter to combine these dry ingredients. Sifting helps to mix them well and aerate the flour. This step is key for fluffy pancakes. Now, heat a non-stick skillet or griddle over medium heat. Add a small amount of butter or oil to coat the surface. Pour about 1/4 cup of batter for each pancake onto the skillet. Cook until bubbles form on top, which takes about 2-3 minutes. When you see bubbles, flip the pancakes. Cook for another 2 minutes, or until they turn golden brown. Repeat this with the rest of the batter, adding more butter or oil as needed. Enjoy these fluffy lemon ricotta pancakes warm, with your favorite toppings! To make your pancakes fluffy, use fresh ricotta cheese. It adds moisture and air. Mix the wet ingredients well, but do not overmix with the dry flour. A few lumps are okay. This helps keep the batter light. Let the batter rest for a few minutes before cooking. This allows the baking powder to activate, creating a rise. One big mistake is overmixing the batter. This can lead to tough pancakes. Another common error is cooking at too high a temperature. If your skillet is too hot, the outside burns while the inside stays raw. Flip the pancakes when bubbles form on top. This shows they are ready to turn. Use a non-stick skillet or griddle to avoid sticking. Serve your lemon ricotta pancakes warm for the best taste. A dusting of powdered sugar makes them look great. Fresh berries add color and flavor. You can also drizzle maple syrup for sweetness. For a twist, try a dollop of Greek yogurt on top. This adds creaminess and a nice tang. Enjoy your pancakes with a cup of tea or coffee. {{image_2}} You can make these pancakes even more tasty! Try adding different flavors to the batter. Here are some ideas: - Vanilla extract: Add one teaspoon for a sweet note. - Blueberries: Toss in half a cup for a fruity twist. - Lemon thyme: Mix in a teaspoon for herby flair. - Almond milk: Use this instead of regular milk for a nutty taste. These simple changes can bring a new life to your pancakes! If you need a gluten-free option, swap the all-purpose flour for a gluten-free blend. Many brands work well in pancakes. Just check the package for the right amount to use. For a dairy-free option, use a plant-based ricotta. You can also replace the milk with almond milk or oat milk. These swaps keep your pancakes light and fluffy without dairy. While maple syrup is great, there are many other toppings to try! Here are some of my favorites: - Fresh berries: Strawberries, blueberries, or raspberries add color and taste. - Greek yogurt: A dollop gives creaminess and protein. - Honey or agave: Drizzle for a natural sweetness. - Chopped nuts: Almonds or walnuts add crunch and nutrition. Experiment with these toppings to find what you love best! To keep your fluffy lemon ricotta pancakes fresh, stack them with parchment paper between each pancake. This helps prevent them from sticking together. Place the stack in an airtight container. Store it in the fridge if you plan to eat them in a few days. They will stay good for about three days. When it's time to enjoy your leftovers, you can reheat them easily. The best way is to use a skillet. Heat the skillet over low heat and add a tiny bit of butter. Place the pancakes in the skillet and warm them for about one minute on each side. You can also use a microwave. Just cover them with a damp paper towel and heat for 20-30 seconds. If you want to save pancakes for later, freezing is a great option. First, let them cool completely. Then, stack them with parchment paper in between. Wrap the stack tightly in plastic wrap or foil. Place the wrapped pancakes into a freezer bag. They will last for up to two months in the freezer. When you’re ready to eat, just follow the reheating tips above! Yes, you can make pancakes ahead of time. Cook them and let them cool. Place them in an airtight container. You can store them in the fridge for up to three days. They still taste great even after being made in advance. The best way to reheat pancakes is in the microwave. Place them on a microwave-safe plate. Heat them for about 20-30 seconds. If you want them crispy, use a skillet. Heat the skillet over medium heat and warm the pancakes for a minute on each side. You can tell pancakes are done when they are golden brown. Look for bubbles forming on the surface. When the bubbles pop, it’s time to flip them. Cook the other side until it is also golden. Using these signs will help you make perfect, fluffy pancakes every time. This guide covered all you need for perfect pancakes. We explored essential ingredients, cooking methods, and tips to avoid mistakes. You learned about ingredient swaps and creative ways to serve pancakes. Remember, practice makes perfect. Each pancake can be a little different, so don’t be afraid to experiment. Store any leftovers properly to enjoy them later. The more you try, the better they get. Happy cooking!

Fluffy Lemon Ricotta Pancakes Simple and Light Delight

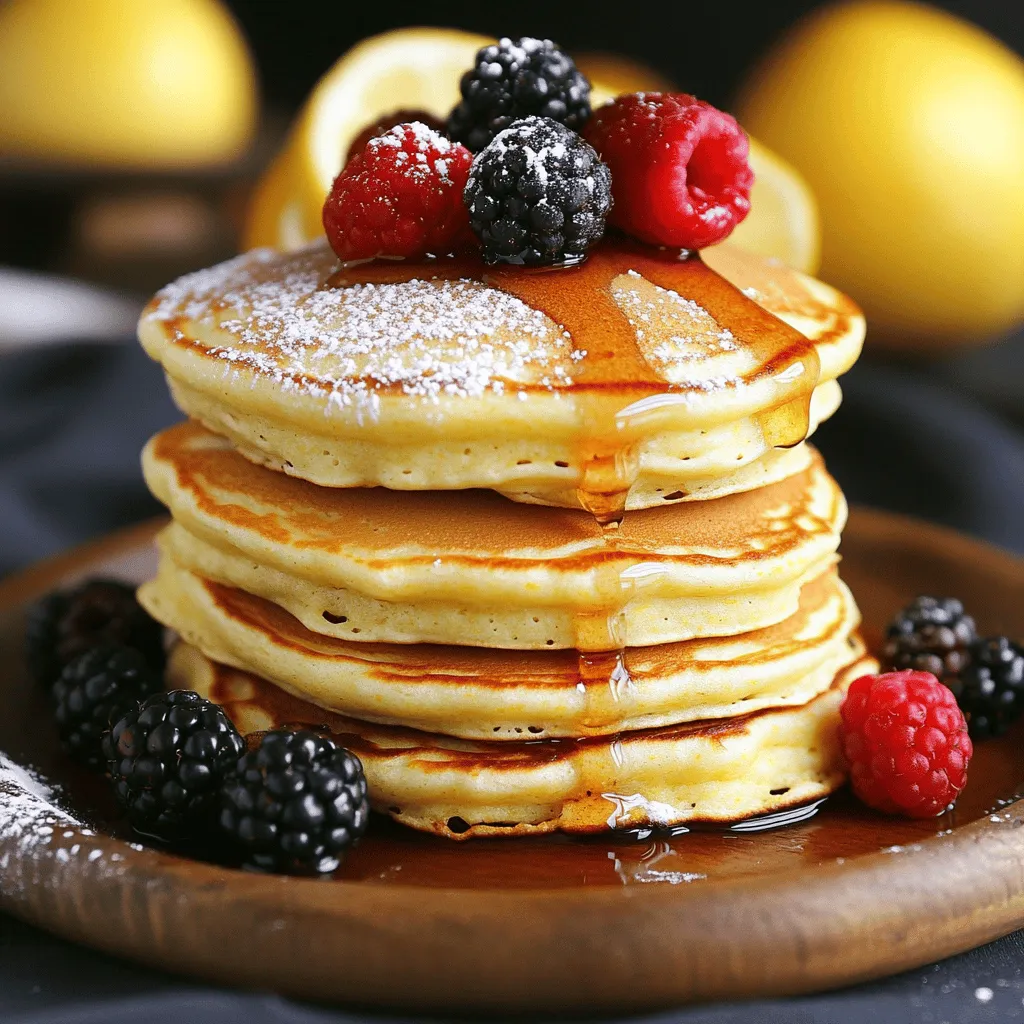
Get ready to elevate your breakfast game with my Fluffy Lemon Ricotta Pancakes! These delightful pancakes are simple to make

- 2 lobster tails - 4 tablespoons unsalted butter, melted - 4 cloves garlic, minced - 1 tablespoon fresh lemon juice - 1 teaspoon paprika - Salt and pepper to taste - Fresh parsley, chopped (for garnish) You can swap unsalted butter with olive oil or vegan butter for a lighter option. For seasoning, try adding cayenne pepper for heat or dill for a fresh taste. If you don’t have parsley, chives or cilantro work well too. Using these options can still give you a tasty dish. Remember, cooking is about making it your own! 1. Preheating the air fryer Start by preheating your air fryer to 380°F (190°C). This takes about 5 minutes. Preheating ensures even cooking. 2. Cutting and preparing lobster tails Use kitchen scissors to cut the top of the lobster shells lengthwise. Be careful as you do this. Next, gently pull the lobster meat out. Place it on top of the shell. This creates a nice “butterfly” effect that looks beautiful. 1. Mixing the garlic butter In a small bowl, combine the melted butter, minced garlic, fresh lemon juice, paprika, salt, and pepper. Mix until it’s well blended. This garlic butter will add a rich flavor to the lobster. 2. Cooking times and temperature settings Brush the garlic butter mixture over the lobster meat. Make sure it's coated well. Place the lobster tails in the air fryer basket, meat side up. Cook at 380°F (190°C) for about 8-10 minutes. The lobster is done when the meat is opaque and reaches an internal temperature of 145°F (63°C). 1. Drizzling remaining garlic butter After cooking, carefully remove the lobster tails from the air fryer. Drizzle any leftover garlic butter over the top. This adds extra flavor and makes it look appealing. 2. Garnishing the dish Finally, sprinkle chopped fresh parsley over the lobster tails. This adds a pop of color and freshness. Your air fryer garlic butter lobster tails are now ready to enjoy! To cook lobster tails well, you must check the internal temperature. Aim for 145°F (63°C). This ensures the meat is safe to eat and has a great texture. To avoid overcooking, set a timer for 8-10 minutes. Check the lobster often to see if it turns opaque. If it does, it’s ready! To boost the flavor, try adding fresh herbs like thyme or tarragon. A pinch of cayenne pepper gives a nice kick. For sides, serve with garlic bread or a fresh salad. A light lemon vinaigrette pairs well, too. You can also enjoy a crisp white wine, like Sauvignon Blanc, to complement the dish. After cooking, let your air fryer cool down. Use warm, soapy water and a soft cloth to clean the basket. Avoid harsh scrubbers to keep it nice. To maintain performance, check the heating element for grease. Regularly clean it to ensure even cooking and a longer lifespan. {{image_2}} You can add your twist to the garlic butter lobster tails. Here are some ideas: - Fresh Herbs: Try adding fresh thyme or dill to the butter mix. These herbs add a lovely aroma. - Spices: A pinch of cayenne pepper can give a nice kick. Or, use Old Bay seasoning for a classic seafood flavor. - Citrus Zest: Grate some lemon or lime zest into the butter. This adds a bright, fresh taste. You can also mix in other ingredients. For example, add a bit of Parmesan cheese to the garlic butter. This adds a rich, nutty flavor that pairs great with lobster. When serving lobster tails, side dishes can enhance the meal. Here are some tasty ideas: - Garlic Mashed Potatoes: Creamy and rich, they balance the dish perfectly. - Grilled Asparagus: This adds a nice crunch and fresh taste. - Corn on the Cob: Sweet corn is a classic pairing with seafood. For drinks, a chilled white wine works well. Consider a crisp Sauvignon Blanc or a buttery Chardonnay. These wines complement the rich flavors of the lobster. You can also cook lobster tails in the oven. Here’s how: 1. Preheat the oven to 425°F (220°C). 2. Prepare the lobster tails as you would for the air fryer. 3. Place them on a baking tray and bake for about 12-15 minutes. Another option is using a grill. - Preheat the grill to medium-high heat. - Cook the lobster tails on the grill for about 6-8 minutes, meat side down. - Then, flip and brush with garlic butter for another 4-6 minutes. Each method gives a unique taste, so feel free to try them all! To keep your leftover lobster tails fresh, follow these easy steps: - Refrigerate: Place leftover lobster tails in an airtight container. Make sure they're covered well to avoid drying out. Store them in the fridge for up to two days. - Freeze: For longer storage, you can freeze the lobster tails. Wrap each tail tightly in plastic wrap, then put them in a freezer bag. This keeps them fresh for up to three months. To enjoy your lobster tails again, reheating is key. Here’s how: - Air Fryer Method: Preheat your air fryer to 350°F (175°C). Place the lobster tails in the basket. Heat for about 5-6 minutes until warmed through. This method keeps the meat tender and juicy. - Other Methods: You can also reheat in the oven. Wrap the tails in foil to keep moisture in. Bake at 350°F (175°C) for about 10 minutes. You can use a microwave, but it may dry out the meat. Knowing how long your lobster tails last is important: - Cooked lobster tails can last in the fridge for 2 days. If frozen, they can be good for 3 months. - Signs of spoilage include a strong fishy smell, slimy texture, or discoloration. If you notice any of these, it’s best to toss them out. You should cook lobster tails in the air fryer for about 8-10 minutes. Set the air fryer to 380°F (190°C). Check the lobster meat to see if it turns opaque. This means it is done. The meat should also reach an internal temperature of 145°F (63°C). Yes, you can use frozen lobster tails. Just make sure to thaw them first. Place them in the fridge overnight or run them under cold water for about 30 minutes. This will help them cook evenly. The best way to tell if lobster is cooked is by its color. The meat should turn from translucent to opaque. You can also check the internal temperature. It should reach 145°F (63°C). If the meat is firm to the touch, it's ready! Butterflying the lobster tails is not strictly necessary but highly recommended. This technique helps the lobster cook evenly. It also allows the garlic butter to soak in better. Plus, it looks pretty when served! Use kitchen scissors to cut the shell and pull the meat up. You learned how to cook lobster tails in an air fryer with simple steps. We discussed key ingredients and some easy swaps, like butter alternatives. Tips helped you avoid overcooking and enhance flavors. We explored variations for flavors and sides that pair well. Remember to store your leftovers correctly for the best taste. Cooking lobster can be fun and rewarding. You can impress your family and friends with this tasty dish! Enjoy your culinary journey with lobster.

Air Fryer Garlic Butter Lobster Tails Flavorful Delight

Ready to indulge in a seafood delight? My Air Fryer Garlic Butter Lobster Tails recipe brings you rich flavors and

To make One-Pot Spinach and Artichoke Pasta, gather these key items: - 12 ounces pasta (fusilli or penne) - 1 can (14 ounces) artichoke hearts, drained and quartered - 4 cups fresh spinach, roughly chopped - 3 cloves garlic, minced - 1 cup vegetable broth - 1 cup heavy cream or coconut milk - 1 cup grated Parmesan cheese (plus extra for serving) - 1 teaspoon lemon juice - 1 teaspoon dried oregano - Salt and pepper to taste - Olive oil for drizzling You can add extra flavor with these optional items: - Crushed red pepper flakes for heat - Fresh herbs like parsley or basil for garnish - Additional cheese types, like feta or mozzarella This dish serves four people. Each serving contains: - Calories: Approximately 550 - Protein: 20 grams - Carbohydrates: 65 grams - Fat: 25 grams - Fiber: 3 grams - Sodium: Varies with added salt and broth This meal offers a great mix of nutrients. The spinach provides vitamins, while the artichokes add fiber. Enjoy every bite! First, gather all your ingredients. You need 12 ounces of pasta, artichoke hearts, fresh spinach, garlic, vegetable broth, and heavy cream. You also need Parmesan cheese, lemon juice, dried oregano, salt, and pepper. Start by draining and quartering the artichoke hearts. Next, chop the fresh spinach roughly. Finally, mince the garlic cloves. In a large pot, heat one tablespoon of olive oil over medium heat. Add the minced garlic and sauté it for about one minute. You want it to smell great but not brown. Then, pour in the pasta, vegetable broth, and heavy cream. Stir everything together. Bring this mix to a gentle boil. Make sure the liquid covers the pasta. Once it boils, lower the heat and cover the pot. Cook for 10 to 12 minutes. Stir occasionally. The pasta should be al dente, and most of the liquid will absorb. Next, stir in the quartered artichoke hearts and chopped spinach. Cook for another two to three minutes. The spinach needs to wilt, and everything should heat through. After that, remove the pot from the heat. Stir in the grated Parmesan cheese, lemon juice, dried oregano, salt, and pepper. If the cheese doesn’t melt well, return the pot to low heat. Taste the pasta and adjust the seasoning as you like. Serve the pasta hot, topped with extra Parmesan and a sprinkle of fresh oregano or parsley. You can swap some items in this dish. If you want a lighter option, use coconut milk instead of heavy cream. For vegan meals, skip the cheese and use nutritional yeast for a cheesy taste. If you can't find artichoke hearts, try using mushrooms. They add a nice texture and flavor. Cook the pasta until it is al dente. Start checking it after about 10 minutes. If you use a different pasta, check the package for the right cooking time. Stir often to keep the pasta from sticking. If needed, add a bit more broth or water. This keeps the pasta moist and tasty. To make your pasta creamy, add the cheese slowly. Stir it in well for the best results. If your dish is too thick, add more broth or cream. Fresh spinach will wilt down, adding to the creaminess. A squeeze of lemon juice brightens the flavor and enhances the creaminess too. {{image_2}} You can easily make this dish vegan. Just swap heavy cream for coconut milk or cashew cream. Use nutritional yeast instead of Parmesan cheese. This gives a cheesy flavor without dairy. You can also add more veggies like mushrooms or zucchini for extra nutrients. To make this dish gluten-free, pick a gluten-free pasta. Options like rice or chickpea pasta work well. They cook similarly to regular pasta. Just watch the cooking time, as it may vary. The taste and texture will still be great! Want to add protein? You can toss in cooked chicken, shrimp, or beans. They will add extra flavor and make the meal heartier. If you like, add more vegetables like bell peppers or broccoli. This will make the dish colorful and healthy. Just cook them along with the spinach for best results. Store any leftover One-Pot Spinach and Artichoke Pasta in an airtight container. It stays fresh in the fridge for up to three days. Make sure to let it cool down before sealing. This helps keep the pasta from getting soggy. When ready to eat, check for any off odors. If it smells fine, enjoy! You can freeze this pasta dish too. First, let it cool completely. Then, place it in a freezer-safe container. It can last about two months in the freezer. To prevent freezer burn, use a tight lid or wrap it well in plastic wrap. When you’re ready to eat, thaw it in the fridge overnight. Reheating is simple. You can use the microwave or the stove. If using the microwave, place it in a bowl and cover it. Heat it in short bursts, stirring in between. If using the stove, add a splash of vegetable broth or cream to help it heat evenly. Stir it often to keep it creamy and delicious! It takes about 30 minutes to make One-Pot Spinach and Artichoke Pasta. You spend 10 minutes prepping the ingredients. The cooking time is around 20 minutes. This makes it a quick meal for busy days. Yes, you can use different types of pasta. Fusilli or penne are great choices. You can also try rotini or farfalle. Just ensure the pasta cooks well in the broth and cream. Adjust the cooking time if you switch to a larger or smaller pasta shape. You can serve this pasta with a simple salad or garlic bread. A side of roasted vegetables pairs well too. You could also add grilled chicken or shrimp for extra protein. This meal is versatile and goes well with many options. We explored the key ingredients and steps for making One-Pot Spinach and Artichoke Pasta. You learned about ingredient choices, cooking methods, and tips for the best texture. With options for vegan or gluten-free pasta, there's something for everyone. Remember to follow the storage tips to keep leftovers fresh. Cook it your way and share it with friends. Enjoy the taste of your creation!

One-Pot Spinach and Artichoke Pasta Delightful Meal

Get ready to savor a delicious meal with my One-Pot Spinach and Artichoke Pasta! This simple dish combines rich flavors,

- 1 cup unsalted butter, softened - 1 cup brown sugar, packed - 1/2 cup granulated sugar - 2 large eggs - 1 teaspoon vanilla extract - 1 1/2 cups all-purpose flour - 1/2 teaspoon baking soda - 1/2 teaspoon salt - 2 cups rolled oats - 1 cup dark chocolate chunks - 1/2 cup chopped walnuts (optional) When choosing butter, always go for unsalted. This gives you control over the salt level. Softened butter mixes well, so let it sit out before you start. For sugar, brown sugar adds moisture and a nice flavor. Dark chocolate chunks provide a rich taste that pairs well with oats. You can use semi-sweet chocolate if you prefer a sweeter cookie. If you want a nut-free option, skip the walnuts. You can replace them with more oats or chocolate chunks. For a gluten-free version, use a gluten-free flour blend. You can also swap butter for coconut oil or nut butter for a different taste. First, preheat your oven to 350°F (175°C). This step is key for even baking. Next, line two baking sheets with parchment paper. This will help the cookies not stick. Make sure you have enough space for all the dough balls. In a large bowl, start with the softened butter. Cream it with brown sugar and granulated sugar until it’s light and fluffy. This may take a few minutes. Next, add the eggs one by one. Mix in the vanilla extract too. In another bowl, whisk together flour, baking soda, and salt. Gradually add this dry mixture to the wet one. Stir until just combined. Finally, fold in rolled oats, dark chocolate chunks, and walnuts if you like. This creates a tasty dough. Using a cookie scoop or tablespoon, drop rounded balls of dough on the prepared sheets. Space them about 2 inches apart. Bake in the oven for 10-12 minutes. The edges should look lightly golden, but the center should stay soft. Be careful not to overbake! After baking, let the cookies cool on the sheet for 5 minutes. Then, transfer them to a wire rack to cool completely. Enjoy the delightful aroma! To make chewy cookies, start with room temperature butter. This helps create a light texture. Cream the butter and sugars until fluffy. This step adds air, making cookies soft. Add eggs one by one and mix well. This ensures even blending. When adding dry ingredients, stir gently. Overmixing can lead to tough cookies. Finally, use dark chocolate chunks for rich flavor. Avoid overmixing your dough. Overmixing can make cookies hard. Also, do not bake too long. Cookies should be soft in the center when you take them out. Keep an eye on the edges. They should be golden brown but not dark. If you see browning on the bottom, they are done. To keep your cookies fresh, store them in an airtight container. This helps maintain their chewy texture. You can also add a slice of bread to keep cookies soft. The bread adds moisture to the container. If you want to save them for later, freeze the cookies. Just place them in a freezer bag. They can last up to three months. When ready to eat, thaw them at room temperature. {{image_2}} You can have fun with flavors in these cookies. Try using milk chocolate instead of dark chocolate. It gives a sweeter taste. You can also add spices like cinnamon or nutmeg for warmth. A pinch of sea salt on top enhances the chocolate flavor. For a vegan version, swap the butter for coconut oil. Use flax eggs made from ground flaxseed and water instead of regular eggs. Choose dark chocolate that is dairy-free. If you need a nut-free option, leave out the walnuts. Your cookies will still taste great! Add-ins can make your cookies even more tasty. Dried fruits like cranberries or raisins bring sweetness. Shredded coconut adds a nice chewiness. You can also mix in seeds like pumpkin or sunflower seeds for crunch. Each add-in offers a new twist to your chewy oatmeal chocolate chunk cookies! To keep your chewy oatmeal chocolate chunk cookies fresh, store them in an airtight container. This helps keep moisture in. You can also layer parchment paper between cookies to prevent sticking. If you want to keep them longer, freeze the cookies. Just place them in a freezer-safe bag or container. Make sure to remove as much air as possible to avoid freezer burn. When stored properly, these cookies can last about one week at room temperature. If you freeze them, they stay fresh for up to three months. Just remember to label the bags with the date. This way, you won't forget how long they've been in there. If you want to enjoy your cookies warm, you can reheat them easily. Place a cookie on a microwave-safe plate. Heat it for about 10-15 seconds. Check if it's warm enough; if not, add a few more seconds. This method keeps the cookie chewy and tasty without drying it out. Enjoy your delicious treat! To make chewy cookies, focus on the moisture. Use more brown sugar than white sugar. Brown sugar keeps cookies soft. Also, do not overbake them. Bake until the edges are golden but the center stays soft. This ensures a chewy texture. You can use quick oats, but the texture will change. Quick oats cook faster and may make your cookies softer. Rolled oats provide a heartier chew. If you choose quick oats, reduce the baking time slightly. To freeze cookie dough, scoop the dough into balls. Place them on a baking sheet and freeze until firm. After they are frozen, transfer them to a freezer-safe bag. Label the bag with the date and type of cookie. This way, you can enjoy fresh cookies anytime! In this blog, we explored cookie-making from ingredients to storage. We covered essential tips for choosing the best ingredients and how to mix them right. You learned about common mistakes and easy fixes for chewy cookies. Plus, we shared fun variations and storage tips to keep your treats fresh. Baking cookies should be fun and delicious. With these guidelines, you're set for tasty results every time. Enjoy your baking journey!

Chewy Oatmeal Chocolate Chunk Cookies Delightful Treat

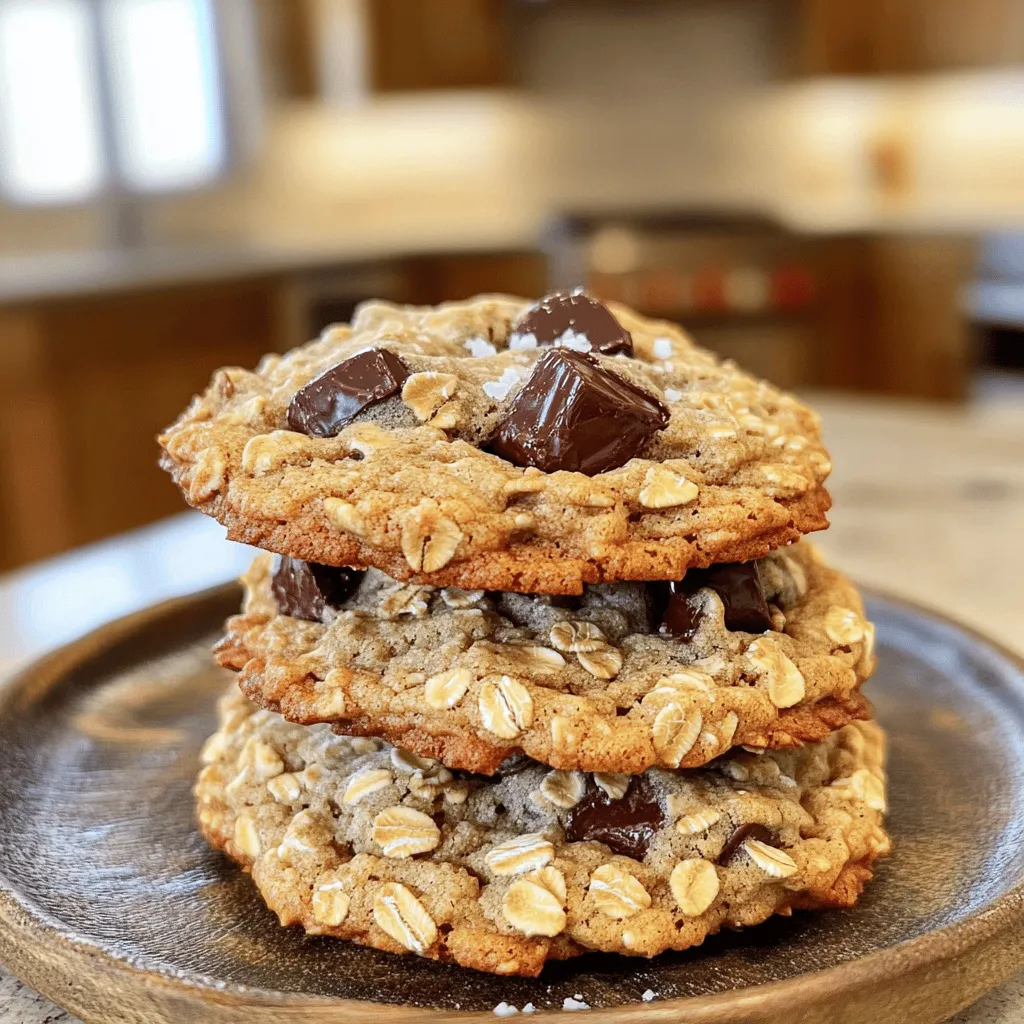
Are you ready to bake the perfect chewy oatmeal chocolate chunk cookies? These delightful treats combine a warm, soft texture

To make bakery-style cinnamon swirl quick bread, you need the following ingredients: - 2 cups all-purpose flour - 1 cup granulated sugar - 1 tablespoon baking powder - 1 teaspoon baking soda - 1/2 teaspoon salt - 1 teaspoon ground cinnamon - 1/2 cup unsalted butter, melted - 1 large egg - 1 cup buttermilk (or milk with 1 tablespoon vinegar added) - 1 teaspoon vanilla extract - 1/2 cup brown sugar, packed - 1 tablespoon ground cinnamon (for swirl) You can swap some ingredients if needed: - All-purpose flour: Use whole wheat flour for a nuttier taste. - Granulated sugar: Coconut sugar or honey works well as a sweetener. - Buttermilk: If you don’t have buttermilk, mix regular milk with vinegar. - Unsalted butter: Can be replaced with vegetable oil or melted coconut oil. To ensure the best flavor and texture: - Use fresh baking powder and baking soda. Old leavening agents can cause flat bread. - Choose high-quality vanilla extract for a richer taste. - For the best cinnamon flavor, buy ground cinnamon from a spice shop or grind your own. Fresh spices can elevate the taste. - Ensure your butter is unsalted, as salted butter can alter the bread’s balance. First, set your oven to 350°F (175°C). This is the perfect heat for baking. Next, grab a 9x5-inch loaf pan and grease it well. I like to use butter or cooking spray. This step helps the bread come out easily after baking. In a large bowl, whisk together the dry ingredients. You need 2 cups of all-purpose flour, 1 cup of granulated sugar, 1 tablespoon of baking powder, 1 teaspoon of baking soda, 1/2 teaspoon of salt, and 1 teaspoon of ground cinnamon. Make sure to mix them well. This creates a nice base for your bread. Now, take another bowl and mix the wet ingredients. Combine 1/2 cup of melted unsalted butter, 1 large egg, 1 cup of buttermilk (or milk with vinegar), and 1 teaspoon of vanilla extract. Whisk this mixture until it is smooth. This blend adds moisture and flavor to your bread. Pour the wet mix into the dry mix. Stir them together gently. You want to combine them without overmixing; a few lumps are perfectly fine. In a small bowl, mix 1/2 cup of packed brown sugar with 1 tablespoon of ground cinnamon for the swirl. Spread half of the batter into the loaf pan. Next, sprinkle half of the cinnamon-brown sugar mix on top. Add the rest of the batter over this layer. Finally, swirl the remaining cinnamon mixture into the top layer with a knife. This creates a beautiful marbled effect. Place the loaf pan in the oven and bake for 50-60 minutes. Check the bread by inserting a toothpick in the center. It should come out clean. Once baked, let the bread cool in the pan for about 10 minutes. Then, transfer it to a wire rack to cool completely. This cooling step helps the texture develop perfectly. When making cinnamon swirl bread, avoid overmixing the batter. This can lead to a dense loaf. Mix just until the dry and wet ingredients combine. Another mistake is using too much flour. Always spoon flour into your measuring cup and level it off. Too much flour can make the bread dry. Make sure to measure your ingredients carefully. To get a beautiful swirl, use a knife or skewer. After you layer the batter in the pan, sprinkle half of the cinnamon mixture. Then, add the rest of the batter. Top it with the remaining cinnamon-sugar mix. Gently swirl with the knife, but don’t overdo it. You want a marbled look, not a mixed one. To keep your bread moist, use buttermilk instead of regular milk. Buttermilk adds richness and moisture. You can also add a little extra butter for a softer texture. Avoid opening the oven door while baking. This keeps the heat steady and helps the bread rise well. Let the bread cool in the pan for about 10 minutes. This helps it stay moist before moving it to a wire rack. {{image_2}} You can add nuts or dried fruits to your bread. Walnuts or pecans give a nice crunch. Chopped apples or dried cranberries add a sweet touch. Mix them into the batter before baking. Use about half a cup of nuts or fruits. This makes your bread even more tasty and fun! To make this bread gluten-free, use a gluten-free flour blend. Look for one that works well for baking. You can also add a bit of xanthan gum for better texture. Use the same amount of flour as the recipe states. This way, you still get that soft and fluffy bread. Enjoy your treat without the gluten! For a fun twist, try adding pumpkin spice. Just mix in a teaspoon of pumpkin pie spice. This gives a warm, cozy flavor. Alternatively, you can stir in chocolate chips. About half a cup will do. This adds a sweet surprise in every bite. Your bread will be a hit with these fun flavors! To keep your cinnamon swirl quick bread fresh, wrap it well. Use plastic wrap or foil. Store it at room temperature for up to three days. If you want to keep it longer, place it in the fridge for up to a week. This will help maintain its flavor and softness. When you want to enjoy your bread again, reheat it gently. Preheat your oven to 350°F (175°C). Place the slice on a baking sheet. Heat for about 10 minutes or until warm. If you prefer a quicker method, use the microwave. Heat for about 15-20 seconds per slice. Avoid overheating, as it can make the bread dry. Freezing is a great way to save extra bread. First, let it cool completely. Wrap it tightly in plastic wrap, then in foil. This helps prevent freezer burn. Store it in the freezer for up to three months. When you’re ready to eat it, thaw it in the fridge overnight. For a warm treat, reheat it in the oven. Enjoy your delicious cinnamon bread anytime! Yes, you can use regular milk. If you do this, add 1 tablespoon of vinegar. This will mimic the tangy taste of buttermilk. It helps the bread rise and keeps it moist. Check the bread with a toothpick. Insert it into the center of the loaf. If it comes out clean, your bread is done. If it has wet batter, bake it a bit longer. The edges should also pull away from the pan. Yes, you can double the recipe. Just use a larger mixing bowl and pan. Make sure to adjust the baking time if you use a bigger pan. Keep an eye on it while it bakes. Enjoy twice the deliciousness! You learned about key ingredients and their substitutes for baking bread. I shared step-by-step instructions, tips, and common mistakes to avoid. You can make fun variations, like adding nuts or going gluten-free. Storing leftovers properly keeps your bread fresh, and I answered frequent questions. Baking bread is an art you can master. Use these tips to create your perfect loaf. Happy baking!

Bakery-Style Cinnamon Swirl Quick Bread Delight

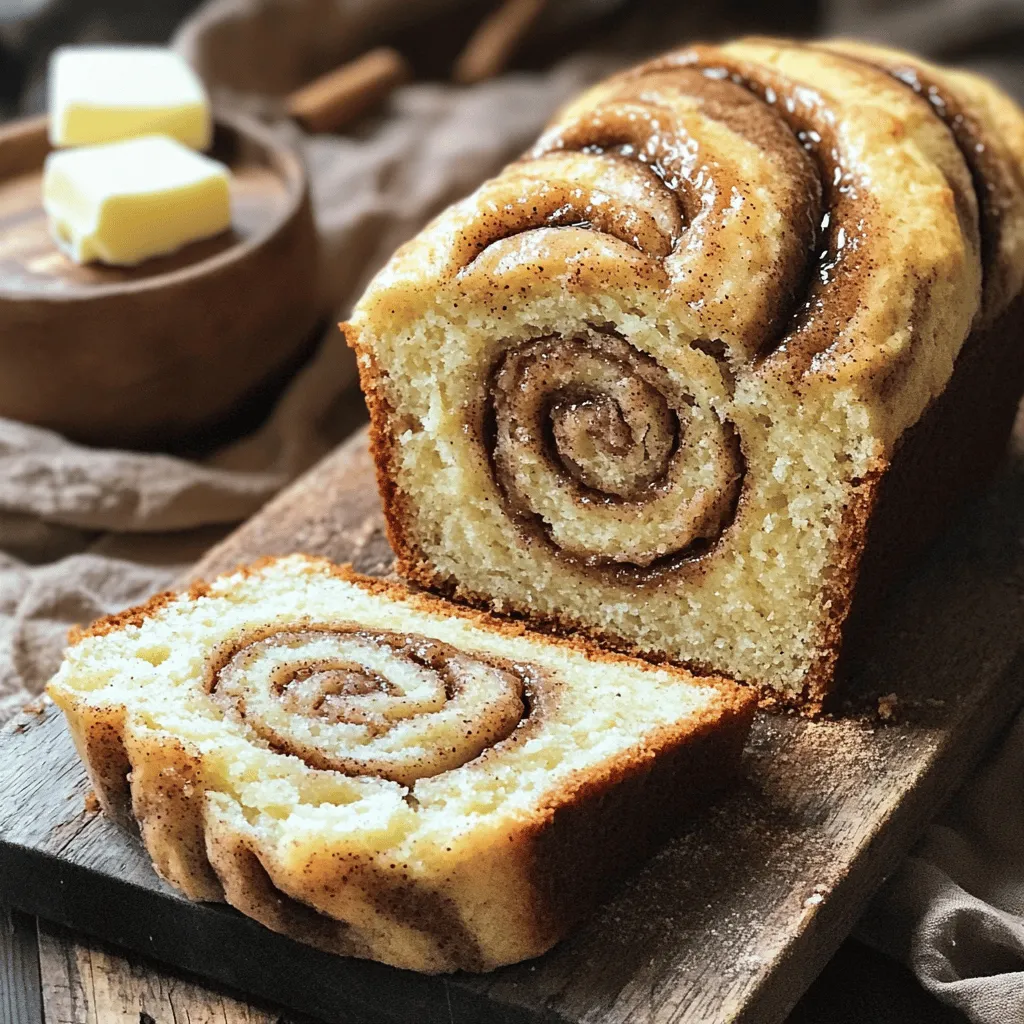
Craving a warm slice of cinnamon swirl bread that tastes just like you bought it from a bakery? You’re in

To make this delicious Apple Cider Caramel Bundt Cake, gather these items: - 2 cups all-purpose flour - 1 teaspoon baking powder - 1 teaspoon baking soda - 1/2 teaspoon salt - 1 teaspoon cinnamon - 1/2 teaspoon nutmeg - 1/2 cup unsalted butter, softened - 1 cup granulated sugar - 1/2 cup packed brown sugar - 3 large eggs - 1 cup apple cider - 1 teaspoon vanilla extract - 1 cup diced apples (like Granny Smith) - 1/2 cup caramel sauce (store-bought or homemade) - Optional: extra caramel for drizzling If you need to make swaps, here are some ideas: - You can use whole wheat flour instead of all-purpose flour for a nutty taste. - If you don’t have apple cider, use apple juice. Keep the flavor strong! - Swap granulated sugar for coconut sugar for a hint of caramel. - You can replace the butter with coconut oil for a dairy-free option. - For eggs, use flaxseed meal mixed with water as a vegan choice. Using fresh ingredients makes a big difference. Fresh apples bring a crisp crunch and vibrant flavor. Fresh spices enhance the cake's warmth and aroma. Fresh butter gives a rich taste, making the cake moist. Always check your pantry for the freshest items. This simple step ensures your cake tastes amazing and looks great. Fresh ingredients lead to a better end result, making each slice of your Apple Cider Caramel Bundt Cake an irresistible delight! Start by preheating your oven to 350°F (175°C). Next, grab your Bundt pan. Spray it with non-stick cooking spray. Then, lightly coat it with flour. This helps the cake come out easily after baking. In a medium bowl, whisk together these dry ingredients: - 2 cups all-purpose flour - 1 teaspoon baking powder - 1 teaspoon baking soda - 1/2 teaspoon salt - 1 teaspoon cinnamon - 1/2 teaspoon nutmeg Set this bowl aside. In a large bowl, cream together: - 1/2 cup unsalted butter - 1 cup granulated sugar - 1/2 cup packed brown sugar Use an electric mixer for about 3-4 minutes. Beat until the mix is light and fluffy. Next, add in 3 large eggs, one at a time. Mix well after each egg. Pour in 1 cup of apple cider and 1 teaspoon of vanilla extract. Mix until combined. Gradually add the dry mix to the wet mix. Stir just until combined. Be careful not to over-mix. Finally, gently fold in 1 cup of diced apples. Pour the batter into your prepared Bundt pan. Smooth the top with a spatula. Bake in the oven for 45-55 minutes. To check if it’s done, insert a toothpick into the center. If it comes out clean, your cake is ready. Once baked, let it cool in the pan for 10-15 minutes. Then, transfer it to a wire rack. Let it cool completely before adding caramel sauce. To keep your cake moist, use fresh apple cider. It adds flavor and moisture. Be sure to mix the wet and dry ingredients quickly. Over-mixing can lead to a dry cake. Fold in the diced apples gently. They add texture and moisture. Let the cake cool in the pan for a bit. This helps it stay moist. To stop the cake from sticking, grease the Bundt pan well. Use non-stick spray and dust it with flour. Make sure to coat all the nooks and crannies. After baking, let the cake cool for about 10-15 minutes. This time allows it to set before removing it. Use a knife to gently loosen the edges. Then, flip it onto a wire rack carefully. Serve slices of the cake on dessert plates. Add a thin apple slice on top for color. A dollop of whipped cream makes it feel special. Drizzle extra caramel sauce over the cake. This adds a rich flavor and looks great too. You can also sprinkle some cinnamon on top for a lovely touch. {{image_2}} You can use many apple types for your cake. Granny Smith apples add a tart taste. Honeycrisp apples bring a sweet crunch. Fuji apples are juicy and flavorful. Try a mix of these apples for more depth. Each variety adds its own twist to the cake's flavor. Adding nuts can give your cake a nice crunch. Chopped walnuts or pecans work well. You can also add spices for more flavor. Try ginger or allspice for a warm touch. If you want a sweet note, mix in some raisins or dried cranberries. These small changes can make your cake unique. You can make this cake gluten-free. Swap all-purpose flour for a gluten-free blend. Make sure your baking powder is also gluten-free. Check labels on your caramel sauce too. This way, everyone can enjoy this tasty treat. Simple swaps can help you cater to different diets. To keep your Apple Cider Caramel Bundt Cake fresh, store it in an airtight container. This helps lock in moisture and flavor. Place the cake at room temperature for up to three days. If you live in a hot area, keep it in the fridge to prevent spoilage. Just remember, cold air can dry out the cake. When it's time to enjoy leftover cake, reheating is easy. Preheat your oven to 350°F (175°C). Wrap a slice in foil to keep it moist. Heat for about 10-15 minutes. Check to see if it's warm enough. You can also use a microwave. Place a slice on a microwave-safe plate and heat for 10-15 seconds. This warms the cake without drying it out. If you want to save some cake for later, freezing is a great option. First, let the cake cool completely. Then, wrap it tightly in plastic wrap, followed by aluminum foil. This keeps out air and prevents freezer burn. You can freeze the cake for up to three months. When ready to eat, thaw it in the fridge overnight. Enjoy your delicious cake whenever you like! Yes, you can use apple juice. Apple juice will make the cake sweeter and less tangy. Cider adds depth and a spiced flavor. If you use juice, consider adding a bit of lemon juice to mimic cider's tartness. This small change can enhance the flavor and keep the cake balanced. To make a simple caramel sauce, you need sugar, water, and cream. - Combine 1 cup of sugar and 1/4 cup of water in a pan. - Heat over medium heat until it melts and turns golden. - Remove from heat and stir in 1/2 cup of heavy cream slowly. - Be careful; it may bubble up! - Let it cool before using. Homemade caramel is rich and full of flavor. Serve the cake warm or at room temperature. Slice it into even pieces for easy serving. Drizzle extra caramel sauce on top for a sweet touch. Add thin apple slices and a dollop of whipped cream for a pretty presentation. This makes every slice look delightful and taste even better! Enjoy it with a cup of tea or coffee for a cozy treat. This post covered key points for baking an apple cider caramel Bundt cake. We talked about fresh ingredients and how to swap them if needed. You learned step-by-step how to prep your pan and mix your batter. I shared tips for a moist cake and how to avoid sticking issues. We explored variations, storage tips, and answered common questions. Baking can be fun and rewarding. With these steps, you can create a delicious cake any time. Enjoy the process and happy baking!

Apple Cider Caramel Bundt Cake Irresistible Delight

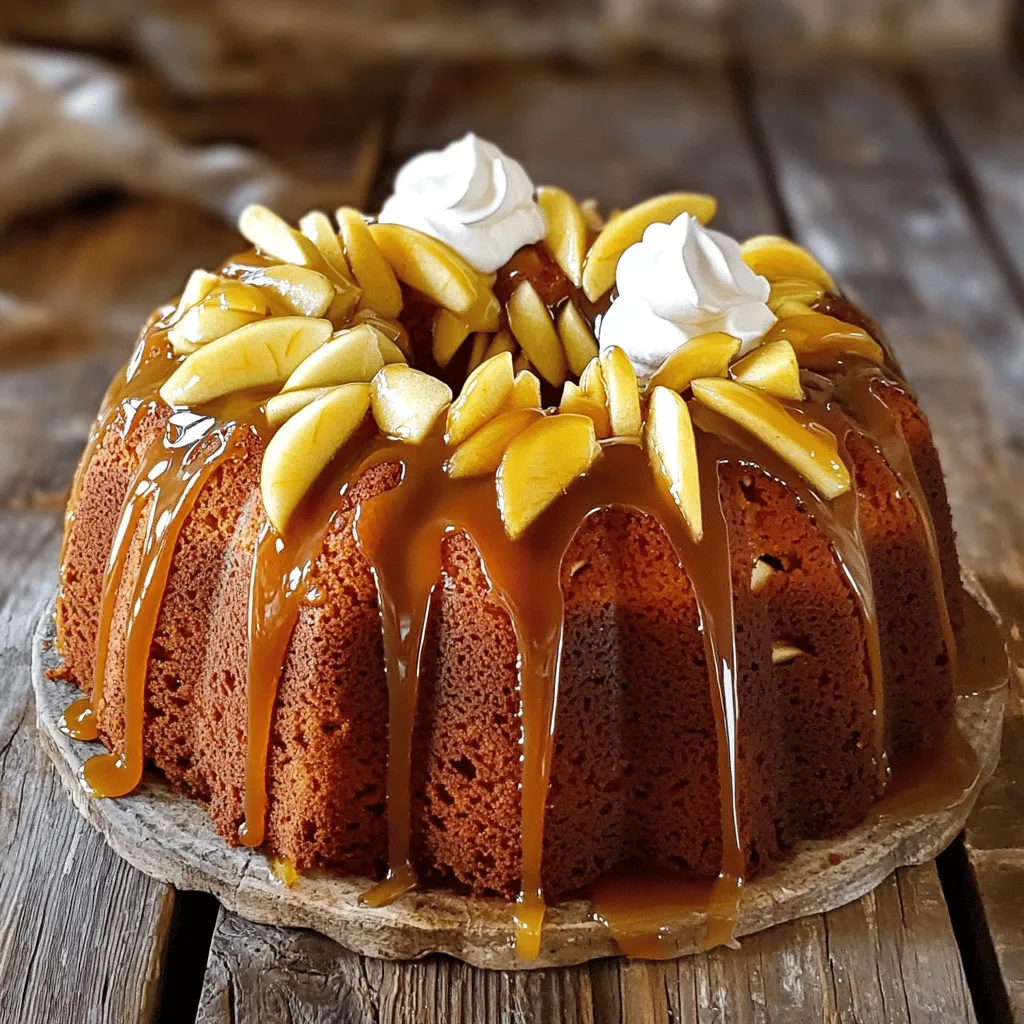
Are you ready to dive into a sweet adventure? This Apple Cider Caramel Bundt Cake is the perfect treat for

- 1 lb fresh Brussels sprouts, trimmed and halved - 3 tablespoons honey - 2 tablespoons soy sauce - 3 cloves garlic, minced - 2 tablespoons olive oil - Salt and pepper to taste - 1 teaspoon sesame seeds - Fresh parsley, chopped (for garnish) These ingredients come together to make a tasty dish. Each one plays an important role. The Brussels sprouts give a crunchy base. Honey adds sweetness, while soy sauce brings a savory touch. Garlic adds a strong flavor that makes the dish pop. Olive oil helps everything cook well in the air fryer. When you add salt and pepper, it enhances the taste. Sesame seeds give a nice crunch on top. Finally, parsley adds a fresh look and flavor. Gather these items before you start cooking. You’ll be amazed at how simple it is to make this dish shine! Start by preheating your air fryer to 375°F (190°C). This step is crucial. A hot air fryer cooks the Brussels sprouts evenly. It helps achieve that perfect crispiness. In a large bowl, whisk together three tablespoons of honey, two tablespoons of soy sauce, three minced garlic cloves, and two tablespoons of olive oil. Mix until it’s smooth and well combined. This honey garlic mixture gives the sprouts their sweet and savory flavor. Next, add one pound of trimmed and halved Brussels sprouts to the bowl. Toss them well in the honey garlic mixture. Make sure each piece gets coated. Let the sprouts marinate for about ten minutes. This step enhances their taste. Place the marinated Brussels sprouts in the air fryer basket. Arrange them in a single layer for even cooking. Air fry for 12 to 15 minutes. Shake the basket halfway through. This will help them cook evenly and get crispy. Once they are crispy and tender, take them out. Season with salt and pepper to taste. For a finishing touch, sprinkle one teaspoon of sesame seeds on top. You can also garnish with chopped fresh parsley. Serve them in a colorful bowl for a great look. To make your honey garlic Brussels sprouts pop, use fresh ingredients. Fresh Brussels sprouts give the best taste. For the sauce, mix honey, soy sauce, and garlic well. Let the sprouts marinate for 10 minutes. This step allows the flavors to soak in. You can also adjust the honey for sweetness. If you like it spicy, add chili flakes to the mix. To cook the Brussels sprouts evenly, arrange them in a single layer in the air fryer. Avoid overcrowding the basket. Shaking the basket halfway through helps them cook better. Check for doneness around 12 minutes. They should be crispy and tender. If you want more crunch, cook them a bit longer. Garnishing adds a nice touch to your dish. Besides sesame seeds, try chopped nuts for crunch. You could also use sliced green onions for a fresh taste. Another option is crumbled feta cheese for a tangy kick. Experiment with different toppings to find your favorite! {{image_2}} If you like heat, add some chili flakes. Just sprinkle a teaspoon or two into the honey garlic mix. You can also use Sriracha for a bolder kick. Mix it in with the honey and soy sauce. This small change makes a big impact on flavor. Your taste buds will thank you! Want to take your Brussels sprouts to the next level? Add crispy bacon! Cook the bacon until crisp, then chop it into bits. Toss the bacon with the sprouts right before cooking. The salty, smoky taste enhances the sweet honey garlic sauce. It’s a perfect match that makes this dish even better. You can easily make this dish vegetarian or vegan. Swap honey for maple syrup or agave for a plant-based sweetener. Use tamari instead of soy sauce if you need it gluten-free. This keeps the dish delicious while meeting dietary needs. Everyone can enjoy these tasty Brussels sprouts! After making your Air Fryer Honey Garlic Brussels Sprouts, let them cool. Store them in an airtight container. They stay fresh for up to three days in the fridge. Keeping them sealed helps to lock in the flavors. Make sure to place a piece of parchment paper between layers if stacking. This will stop them from getting soggy. Reheating is easy. You can use the air fryer again. Set it to 350°F (175°C). Place the Brussels sprouts in the basket. Heat for about 5-7 minutes, shaking halfway through. This will make them crispy again. You can also reheat them in the microwave. Just use a microwave-safe dish and cover it. Heat in 30-second bursts until hot. If you want to keep them longer, freezing works well. First, cool the Brussels sprouts completely. Spread them out on a baking sheet in a single layer. Freeze for about 1 hour until firm. Then, transfer them to a freezer bag. Remove as much air as possible. They can last for up to three months in the freezer. When ready to eat, reheat directly from frozen in the air fryer. You should air fry Brussels sprouts for 12 to 15 minutes. Start at 375°F (190°C). Shake the basket halfway through. This helps them cook evenly. You want them crispy on the outside and tender inside. Yes, you can make the honey garlic sauce ahead of time. Mix honey, soy sauce, minced garlic, and olive oil in a bowl. Store it in the fridge for up to three days. This saves time on busy days. Many vegetables work great in the air fryer. Some of my favorites include: - Broccoli - Cauliflower - Carrots - Zucchini You can season them just like Brussels sprouts for tasty results. To reduce bitterness, try these tips: - Trim off the ends and remove any yellow leaves. - Marinate them well in the honey garlic sauce. - Roast or air fry until they are crispy. These methods help balance their natural flavor. This blog post covered how to make tasty air-fried Brussels sprouts. We explored essential ingredients, a simple step-by-step guide, and tips to boost flavor. I shared variations like adding spice or bacon for extra taste. You can also find storage tips to keep your sprouts fresh. In summary, enjoy experimenting with this dish. It is a great way to eat your veggies!

Air Fryer Honey Garlic Brussels Sprouts Delight

Looking for a tasty side dish that’s easy to make? You’ve come to the right place! My Air Fryer Honey

- 2 pounds boneless, skinless chicken breasts - 1 cup BBQ sauce - 1/2 cup chicken broth - 1 tablespoon apple cider vinegar - 1 tablespoon brown sugar - 1 teaspoon garlic powder - 1 teaspoon onion powder - 1/2 teaspoon smoked paprika - Salt and pepper to taste - 12 slider buns - Coleslaw (optional, for topping) - Pickles (optional, for garnish) The key to great Slow Cooker BBQ Chicken Sliders lies in the right ingredients. Start with 2 pounds of boneless, skinless chicken breasts. This choice ensures that the chicken stays tender and juicy. Add 1 cup of your favorite BBQ sauce to give it that classic, tangy flavor. I like to use a sauce that balances sweetness with a bit of spice. Next, mix in 1/2 cup of chicken broth. This keeps the chicken moist during cooking and enhances the sauce’s depth. Now for the seasonings! Use 1 tablespoon of apple cider vinegar. It adds a lovely zing. The brown sugar, at 1 tablespoon, sweetens the mix just right. Garlic powder and onion powder (1 teaspoon each) offer savory notes that blend perfectly. Smoked paprika, at 1/2 teaspoon, gives a hint of smokiness. Don’t forget to season with salt and pepper to taste. For slider assembly, you’ll need 12 slider buns. Toasting them lightly adds a nice crunch. You can top your sliders with coleslaw for a creamy texture and pickles for a tangy bite. These extras make your sliders even better! - Step 1: Place the chicken in the slow cooker. Make sure to use boneless and skinless chicken breasts. This keeps the dish tender and easy to shred. - Step 2: Prepare the BBQ sauce mixture. In a bowl, combine 1 cup of BBQ sauce, 1/2 cup of chicken broth, 1 tablespoon of apple cider vinegar, 1 tablespoon of brown sugar, 1 teaspoon of garlic powder, 1 teaspoon of onion powder, and 1/2 teaspoon of smoked paprika. Add salt and pepper to taste. Stir well until everything blends smoothly. - Step 3: Pour the mixture over the chicken. Ensure all pieces are covered well. This helps infuse the flavors during cooking. - Step 4: Cook settings and times. Cover the slow cooker, set it to low for 6-8 hours or high for 3-4 hours. The chicken should be fully cooked and tender when done. - Step 5: Shred the cooked chicken. Use two forks to pull apart the chicken into bite-sized pieces. Return the shredded chicken to the slow cooker, mixing it in the sauce. - Step 6: Toast slider buns and assemble. Lightly toast the buns for added crunch. Place a generous amount of BBQ chicken on the bottom half of each bun. If you like, add coleslaw and pickles before covering with the top half. These steps will guide you to create tasty BBQ chicken sliders your friends and family will love! - Choosing the right BBQ sauce: Pick a sauce that you love. Each brand has a unique taste. Try a sweet one or a spicy one based on your mood. A good sauce makes all the difference. - Adjusting cook times for different slow cookers: Not all slow cookers cook the same. If yours runs hot, check the chicken at 5 hours. If it runs cool, you may need the full 8 hours. Always check the meat's doneness to ensure it is safe to eat. - Adding extra spices: You can boost flavor with more spices. Try adding chili powder for heat or cumin for warmth. Even a pinch of cinnamon can offer a sweet twist. - Incorporating toppings for added texture: Toppings can change the game. Add crunchy coleslaw for freshness. Pickles give a nice tang that balances the sauce. You can also try sliced jalapeños for extra spice. - Best practices for presenting sliders: Serve sliders on a big platter. Use parchment paper to keep it tidy. Arrange some extra coleslaw and pickles on the side. This way, guests can customize their sliders. - Pairing ideas with sides and beverages: Pair your sliders with crispy fries or a fresh salad. A cold drink like iced tea or lemonade works well. These choices make the meal feel complete and satisfying. {{image_2}} You can switch up the BBQ sauce for exciting new tastes. Try a homemade sauce by mixing ketchup, brown sugar, apple cider vinegar, and spices. You can also explore flavors like honey mustard or teriyaki. Each sauce gives a unique twist to the sliders. If you want to try something new, swap chicken for pulled pork or turkey. These options still work well in sliders. For a vegan take, use jackfruit or tempeh. Both soak up flavors and create a delicious plant-based slider. Top your sliders with extra goodies like avocado, jalapeños, or crispy onions. For a fun twist, create themed sliders for parties. Think spicy buffalo chicken or tangy Hawaiian sliders. Get creative and let your guests build their own! To keep your leftover sliders fresh, follow these steps: - Refrigerating: Place the sliders in an airtight container. You can also wrap them in plastic wrap. This helps keep them moist. Store them in the fridge for up to 3 days. - Freezing: For longer storage, freeze the BBQ chicken separately from the buns. Use freezer bags or containers. The chicken can stay fresh for up to 3 months. Remember to label your bags with dates. When it's time to enjoy your leftovers, here’s how to reheat them: - Methods for Reheating: The best way to reheat is in the oven. Preheat it to 350°F (175°C) and bake the sliders for about 10-15 minutes. You can also use a microwave. Heat on medium for 1-2 minutes, but this may make the buns soggy. - Tips on Keeping the Chicken Moist: To keep the chicken juicy, add a splash of chicken broth when reheating. Cover with foil to trap steam. This helps maintain moisture. Knowing how long your leftovers last is key: - Duration for Refrigerated Leftovers: Leftover sliders can last in the fridge for about 3 days. Always check for freshness before eating. - Signs of Spoilage: Look for changes in smell or color. If the chicken smells off or looks dry, it’s best to throw it away. Always trust your nose and eyes! How long can I keep the sliders in the fridge? You can keep the sliders in the fridge for about three to four days. Make sure they are in an airtight container to stay fresh. Can I make this recipe in advance? Yes, you can make this recipe in advance. Cook the chicken and store it in the fridge. Assemble the sliders just before serving. What can I use instead of chicken breasts? You can use chicken thighs for a richer flavor. You could also try shredded pork for a different twist. Can I cook the chicken on high speed? Yes, you can cook the chicken on high heat. It will take about three to four hours instead of six to eight. What's the best way to shred chicken? The best way to shred chicken is with two forks. Pull the chicken apart gently until you have nice, bite-sized pieces. How many sliders does this recipe make? This recipe makes about twelve sliders. Each slider is perfect for a bite-sized treat. Can I scale the recipe up or down? Yes, you can easily scale the recipe. Just adjust the amount of chicken and sauce based on how many sliders you need. This blog post has guided you through crafting delicious slow cooker BBQ chicken sliders. We covered essential ingredients, detailed cooking steps, and tips for the best flavor. Remember, you can customize these sliders with sauces, proteins, and toppings to suit your taste. Whether for a party or a family dinner, these sliders are sure to please. Enjoy the satisfaction of a tasty meal without the fuss! Your perfect BBQ experience starts here.

Slow Cooker BBQ Chicken Sliders Irresistible Delight

Get ready to enjoy a mouthwatering treat with my Slow Cooker BBQ Chicken Sliders! This simple recipe combines juicy chicken,

- 2 cups cottage cheese - 1 cup cream cheese, softened - 1/2 cup Greek yogurt The main ingredients create a creamy base for the parfait. Cottage cheese is the star. It gives a rich and smooth texture. Cream cheese adds a lovely creaminess, while Greek yogurt brings tang and a slight tartness. This trio makes the parfait a true delight. - 1/2 cup honey or maple syrup - 1 teaspoon vanilla extract - Zest of 1 lemon Sweeteners bring balance to the creamy base. You can use honey or maple syrup, depending on your taste. Honey adds floral notes, while maple syrup gives a warm flavor. The vanilla extract adds depth, and the lemon zest brightens everything. This combination makes your parfait sing. - 1 cup granola - 1 cup fresh mixed berries (strawberries, blueberries, raspberries) Toppings add texture and flavor to the parfait. Granola gives a satisfying crunch. Choose your favorite mix, or try different varieties. Fresh mixed berries bring sweetness and a pop of color. The berries also add vitamins and nutrients, making this dessert a bit healthier. First, grab a mixing bowl. Add 2 cups of cottage cheese, 1 cup of softened cream cheese, and 1/2 cup of Greek yogurt. Next, pour in 1/2 cup of honey or maple syrup, 1 teaspoon of vanilla extract, and the zest of 1 lemon. Use a hand mixer or blender to blend the mix until it is smooth and creamy. This step is key. You want a texture that is rich but airy. Taste the mixture and adjust the sweetness if needed. You can add a little more honey or maple syrup for extra sweetness. Now, it’s time to build your parfait. Start with the creamy mixture. Scoop a generous layer into the bottom of your serving glasses. Next, add a layer of granola on top of the creamy layer; about 1/4 cup works well. After that, add a layer of fresh mixed berries. You can use strawberries, blueberries, and raspberries. Repeat the layers until you fill the glasses. Make sure to finish with a layer of berries and a sprinkle of granola on top for a nice look. Once your parfaits are layered, it’s time to chill them. Place the glasses in the refrigerator for at least 30 minutes. This chilling time is important. It helps the flavors blend together and improves the taste. Enjoy the wait, as you’ll soon have a delicious treat ready to serve! To make your creamy mixture just right, start with the sweetness. You can taste it after blending. If it needs more sweetness, add honey or maple syrup. Just a little bit can make a big difference. This way, you can adjust it to your taste. For a smooth texture, blend your ingredients well. Use a hand mixer or blender. Blend until it looks creamy and fluffy. You want to avoid any lumps. A smooth mixture makes the parfait taste better. Layering is key to a great parfait. Start with a scoop of the creamy mixture at the bottom. Next, add a layer of granola. Use about 1/4 cup of granola for each layer. Then, pile on fresh mixed berries. Use a mix of strawberries, blueberries, and raspberries for color and flavor. Repeat these layers until you reach the top. Make sure each layer is visible. This adds to the look of your parfait. You want it to be a feast for the eyes as well as the stomach. Presentation makes a big impact. Drizzle honey on top for shine. Add a sprig of mint for a pop of color. This simple touch can elevate your parfait's look. Use clear glasses for serving. These showcase the beautiful layers. When guests see the layers of creamy mixture, granola, and berries, their mouths will water. A beautiful presentation makes every bite even more enjoyable. {{image_2}} You can change the taste of your parfait with fun fruit choices. Try bananas, peaches, or mangoes for a tropical twist. You can also mix berries for a colorful blend. If you want to swap sweeteners, use agave syrup or stevia. Each option can change the taste in a big way. The crunch factor is key. Try different types of granola, like maple or almond. This adds a new flavor and texture. You can also mix in nuts or seeds, like walnuts or chia seeds. They add a nice crunch and boost nutrition. If you want a dairy-free version, use almond or coconut yogurt instead of dairy. For a vegan treat, swap cream cheese for a plant-based option. You can also lower the calories by using low-fat cottage cheese and reducing sweetener. These changes keep the parfait tasty and fun for everyone. To keep your parfait fresh, use airtight containers. Glass jars or plastic containers work well. You can store your parfait in the fridge for up to three days. After that, it may lose its taste and texture. Yes, you can freeze the parfait! However, keep in mind that the texture may change. To freeze, layer the parfait in freezer-friendly containers. Use plastic wrap or foil to cover it well. When you want to eat it, thaw it in the fridge overnight. Avoid microwaving, as this can ruin the layers. Let the parfait chill for at least 30 minutes before serving. This helps the flavors blend well. When you take it out of the fridge, give it a gentle stir. This can help restore the creamy texture before you serve. Yes, you can make this parfait ahead of time. I suggest preparing it a day before serving. This allows the flavors to blend well. Store it in the fridge in an airtight container. It will stay fresh and tasty for up to three days. If you need a substitute for cottage cheese, try ricotta cheese. It has a similar texture and flavor. You can also use silken tofu for a dairy-free option. Cream cheese can work too, but it will change the taste a bit. Yes, this recipe is great for meal prep. You can easily portion it into jars. Layer the ingredients in advance. Just keep the granola separate until you're ready to eat. This way, it will stay crunchy and fresh. You now have a simple and tasty Cottage Cheese Cheesecake Parfait recipe. We covered the key ingredients, step-by-step instructions, and helpful tips. Remember to chill your parfait for the best flavor. Explore variations to match your taste. Store leftovers properly for freshness. Enjoy impressing friends with your delicious creation. You can even make it in advance for easy serving. Get creative and have fun with it!

Cottage Cheese Cheesecake Parfait Decadent Delight

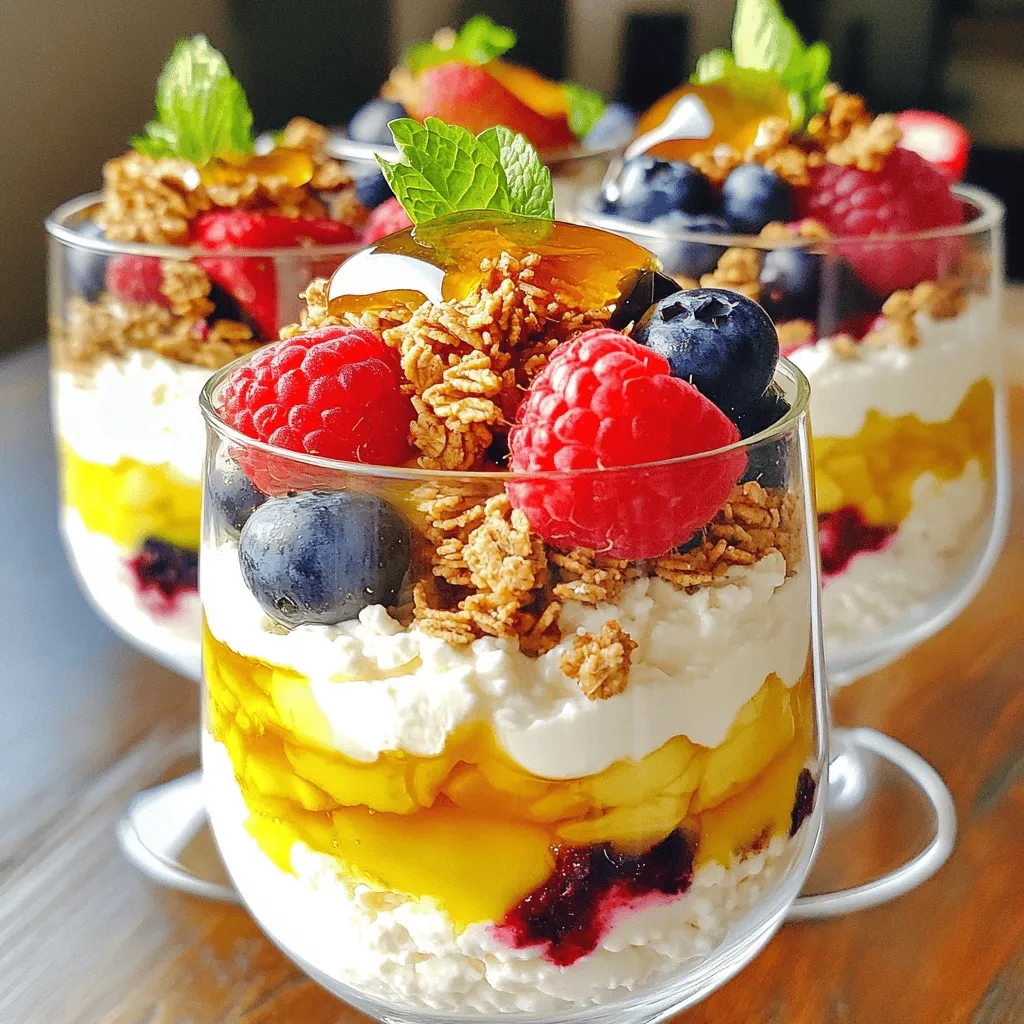
Craving a sweet treat that feels indulgent but is actually healthy? Look no further! My Cottage Cheese Cheesecake Parfait is

Older posts
Newer posts
← Previous Page1 … Page28 Page29 Page30 … Page123 Next →

dsad

© 2025 Southern Dishes • Built with GeneratePress

Our Policies

  • Copyright Policy
  • Cookie Policy
  • GDPR Policy
  • Privacy Policy
  • Disclaimer
  • Terms Of Use

More Information

  • Home
  • About
  • Contact
  • Appetizers
  • Dessert
  • Dinner
  • Drinks
©2025, Southern Dishes About Back To Top