Skip to content
DisclaimerTerms Of UseGDPR PolicyCookie Policy

Southern Dishes

  • Home
  • Drinks
  • Appetizers
  • Dinner
  • Dessert
  • About
  • Contact
  • Privacy Policy
DisclaimerTerms Of UseGDPR PolicyCookie Policy

Isabella

- 1 cup unsalted butter - 2 cups granulated sugar - 4 large eggs - 1 teaspoon vanilla extract - 1 cup all-purpose flour - 1 cup unsweetened cocoa powder - 1/2 teaspoon salt - 1 cup semi-sweet chocolate chips - 1/2 cup crushed peppermint candies or candy canes - 1/2 cup white chocolate chips Gathering the right ingredients is key to making these brownies. The butter gives them richness, while sugar adds sweetness. Four large eggs help bind everything together, creating a moist texture. Vanilla extract adds a lovely flavor that pairs well with chocolate. You’ll need flour and cocoa powder to create the brownie base. The salt helps balance the sweetness of the sugar and chocolate. Semi-sweet chocolate chips give extra chocolate flavor. The crushed peppermint candies add a festive crunch and refreshing taste. Finally, the white chocolate chips create a beautiful drizzle on top. - Additional holiday-themed toppings Feel free to get creative! You can add festive toppings like sprinkles or even more crushed peppermint. These extras make the brownies look even more appealing during the holidays. {{ingredient_image_1}} - Preheat your oven to 350°F (175°C). - Grease and line a 9x13-inch baking pan with parchment paper. - In a medium saucepan, melt 1 cup of unsalted butter over low heat. - Once melted, stir in 2 cups of granulated sugar until well blended. - Let the mixture cool slightly. - Whisk in 4 large eggs, one at a time. - Add 1 teaspoon of vanilla extract and stir well. - In a separate bowl, sift together 1 cup of all-purpose flour, 1 cup of cocoa powder, and 1/2 teaspoon of salt. - Gradually add the dry mix into the wet mixture. Stir until just combined. - Fold in 1 cup of semi-sweet chocolate chips and half of the crushed peppermint candies. - Pour the batter into the prepared pan, spreading it evenly. - Bake in the preheated oven for about 25-30 minutes. - Check for doneness by inserting a toothpick into the center. It should come out with a few moist crumbs. - While the brownies bake, melt 1/2 cup of white chocolate chips in a microwave-safe bowl. - Drizzle the melted white chocolate over the baked brownies. - Sprinkle the remaining crushed peppermint candies on top. - Allow the brownies to cool in the pan for at least 30 minutes. - Lift them out using the parchment overhang and cut into squares. To bake the best brownies, measuring and mixing matter. Use a kitchen scale for accuracy. It helps ensure you get the right texture. Mix until the ingredients just combine. This keeps them fudgy, which is key. Don't overmix; it can make your brownies tough. Baking times can vary. Start with the suggested time of 25 to 30 minutes. Check with a toothpick. If it comes out with moist crumbs, they are ready. You may need to adjust the time based on your oven. Every oven can be a bit different. Presentation makes a big difference. Serve your brownies on a colorful platter. Add whole peppermint candies around them. It creates a festive look. Lightly dusting with powdered sugar also makes them pop. You can even personalize them for different occasions. For seasonal themes, try adding colored sprinkles or themed toppings. Red and green sprinkles work great for holidays. You can also use chocolate shavings for a rich touch. Get creative with your flavors and colors! One common mistake is overmixing the batter. This can lead to dry brownies. Always mix gently until just combined. Another issue is underbaking. Make sure you check the brownies with a toothpick. If it comes out clean or with a few crumbs, they are done. If it's too wet, give them a few more minutes. You want that perfect, gooey center! Pro Tips Cool Before Cutting: Allow the brownies to cool completely before cutting. This ensures cleaner edges and a better texture. Use High-Quality Chocolate: For the best flavor, use high-quality semi-sweet and white chocolate chips. It makes a noticeable difference in taste. Adjust Peppermint Intensity: If you prefer a milder peppermint flavor, reduce the amount of crushed candies. Start with 1/3 cup and adjust according to taste. Store Properly: Keep the brownies in an airtight container at room temperature for up to a week, or refrigerate for longer freshness. {{image_2}} You can switch up the chocolate in your brownies. Use dark chocolate for a rich taste. Milk chocolate gives a sweeter twist. You can also try flavored candy canes. Peppermint, wintergreen, or chocolate mint can change your treat. Top your brownies with crushed cookies for extra crunch. If you need gluten-free brownies, use almond or coconut flour. These flours keep the taste great. You can also make these brownies vegan. Replace eggs with applesauce or flaxseed meal. Use a dairy-free butter and choose dark chocolate without milk. Want to add a fun twist? Toss in chopped nuts or dried fruit. Walnuts or cranberries can give a nice texture. For a stronger mint flavor, swirl in peppermint extract. Just a teaspoon can really enhance the minty taste. These simple changes make your brownies even more special. To store your brownies, keep them in an airtight container. This keeps them fresh. You can store them at room temperature for up to four days. If you want them to last longer, put them in the fridge. However, the cold may change their texture. To freeze your brownies, first let them cool completely. Then, cut them into squares. Wrap each square tightly in plastic wrap. Place the wrapped brownies in a freezer-safe bag. They can freeze well for up to three months. When you want to enjoy them, take them out and let them thaw at room temperature. This helps them taste fresh. These brownies taste best within the first week. After that, they may start to dry out. You will notice a change if they smell off or look hard. If you see any mold, discard them right away. Always check for these signs to ensure you enjoy every bite! To check if your brownies are done, use a toothpick. Insert it into the center. If it comes out with a few moist crumbs, they are ready. If it comes out wet, bake for a few more minutes. Yes, you can use different chocolates. Dark chocolate adds richness. Milk chocolate gives a sweeter taste. You can also mix types for fun flavors. To boost the mint flavor, add peppermint extract. Start with half a teaspoon and taste. You can also use peppermint essential oils, but be careful with the amount. You can make these brownies dairy-free. Use coconut oil instead of butter. For chocolate chips, find dairy-free brands. Almond or oat milk can replace regular milk if needed. Yes, you can prepare these brownies ahead. Bake and let them cool completely. Store them in an airtight container. They will stay fresh for about three days at room temperature. This blog post guides you through making delicious brownies with peppermint. You learned the key ingredients, step-by-step instructions, and tips for perfect texture. Explore flavor variations and storage tips for long-lasting treats. Remember, cooking is fun, so feel free to get creative. Whether for holidays or everyday snacks, these brownies will impress. Enjoy your baking journey and share these delights with others!

Chocolate Peppermint Bark Brownies Irresistible Treat

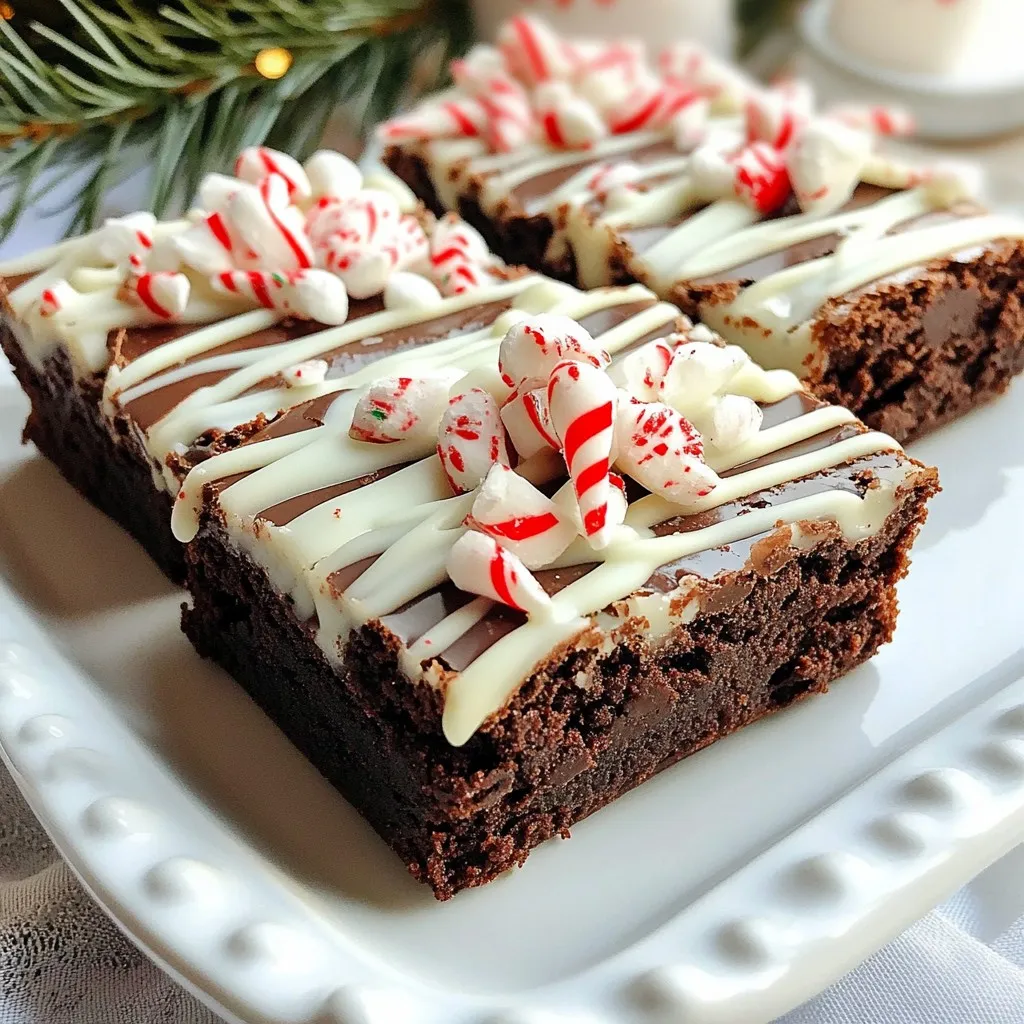
Get ready to indulge in a festive favorite: Chocolate Peppermint Bark Brownies! These rich, fudgy treats combine chocolate and peppermint

- 200g Lotus Biscoff biscuits, crushed - 100g unsalted butter, melted - 150g Biscoff spread - 100g cream cheese, softened - 100g dark chocolate, chopped - Sea salt flakes for garnish To make No-Bake Lotus Biscoff Bars, you need simple yet flavorful ingredients. The star of this treat is the Lotus Biscoff biscuits. Their unique caramel flavor gives the bars a delightful base. The unsalted butter helps bind the crushed biscuits together. You'll also need Biscoff spread. This rich spread adds creaminess and enhances the Biscoff flavor. Cream cheese brings a smooth texture and balances the sweet notes. Dark chocolate is essential for topping the bars. It adds a rich contrast to the sweetness. Finally, sprinkle some sea salt flakes on top. This little touch brings out all the flavors and adds a nice crunch. Gather these ingredients, and you're ready to create a delicious treat that everyone will love! {{ingredient_image_1}} To start, take your crushed Lotus Biscoff biscuits and put them in a bowl. Add melted butter to the crushed biscuits. Mix well until it looks like wet sand. This is key for a nice base. Next, take a lined 8-inch baking pan and press the mixture into the bottom. Use a spatula to pack it tightly. Make sure it is even across the bottom. Now, grab another bowl. In this bowl, mix the Biscoff spread and softened cream cheese. Stir until it becomes smooth and creamy. This mix will add great flavor. Once it’s ready, spread it over the biscuit base. Use your spatula to level it out nicely. Next, it’s time for the chocolate. Take dark chocolate and chop it into small pieces. Melt it in a microwave-safe bowl. Heat it in 30-second bursts, stirring each time until smooth. Once melted, pour the chocolate over the Biscoff layer. Spread it evenly across the top for a nice finish. Now, let the bars set. Place the pan in the fridge for at least 2 hours. This will help the bars firm up. After they are set, take them out. Use the lining paper to lift them from the pan. Cut into squares or rectangles with a sharp knife. Enjoy your no-bake Lotus Biscoff bars! To ensure your no-bake Lotus Biscoff bars set perfectly, use these tips: - Chill for longer: If the bars do not feel firm after two hours, leave them in the fridge longer. They need to be cold to hold their shape. - Pack it tight: When pressing the biscuit mixture into the pan, use a spatula to compress it firmly. This step is key for a solid base. Mixing the layers correctly also affects texture: - Mix well: When blending the Biscoff spread and cream cheese, ensure there are no lumps. A smooth mixture leads to a creamier bar. - Gradual melting: Melt the dark chocolate slowly. Stir every 30 seconds. This method helps avoid burning and ensures a silky finish. Elevate your Lotus Biscoff bars with simple additions: - Toppings: Try adding crushed nuts, chocolate chips, or even drizzles of caramel. These toppings add texture and flavor. - Serving ideas: Serve the bars on a nice platter. Drizzle extra melted Biscoff spread on top for a touch of elegance. Pair them with tea or coffee for a delightful treat. These tips will help you make your no-bake Lotus Biscoff bars not only tasty but also visually appealing. Enjoy experimenting! Pro Tips Use Room Temperature Ingredients: Make sure your cream cheese is at room temperature for a smoother mixture that blends easily with the Biscoff spread. Chill for Best Results: Allow the bars to chill for the full 2 hours to ensure they set properly, making them easier to cut into neat squares. Experiment with Toppings: Feel free to add crushed nuts, drizzled caramel, or even a sprinkle of cocoa powder on top for added flavor and texture. Store Properly: Keep the bars in an airtight container in the fridge for up to a week to maintain freshness and prevent them from becoming too soft. {{image_2}} You can change the flavor of your bars easily. Try using flavored cream cheese. Options like vanilla or strawberry add a fun twist. You could also mix in some peanut butter for a rich taste. For chocolate, dark chocolate works well, but you can switch it up. Milk chocolate or white chocolate adds sweetness. Just melt and pour as usual. Each swap offers a new taste adventure. If you need gluten-free options, swap the Lotus Biscoff biscuits. Use gluten-free cookies that you love. Just make sure they crush well. For a vegan version, replace the butter and cream cheese. Use a plant-based butter and vegan cream cheese. You can also choose dairy-free chocolate. These changes keep the bars tasty for everyone. To keep your no-bake Lotus Biscoff bars fresh, store them in the fridge. Place the bars in an airtight container. This keeps them from drying out and helps maintain their flavor. Always separate layers with parchment paper to avoid sticking. If you want to keep them longer, you can freeze the bars. Wrap them tightly in plastic wrap, then place them in a freezer-safe bag. This way, they will stay fresh for up to three months. These bars stay fresh for about one week in the fridge. You will know they are fresh if they still look shiny and smell sweet. If you see any mold or if the chocolate looks dull, it’s time to throw them out. Always check for changes in color or texture. If the bars smell sour, do not eat them. Enjoy your delicious treats while they are at their best! - Preparation time: 15 minutes - Total time: 2 hours 15 minutes Making these bars is quick and easy. You need just 15 minutes to prep. The total time, including chilling, is 2 hours and 15 minutes. This includes time for the bars to set in the fridge. - Alternatives to Lotus Biscoff biscuits Yes, you can use other biscuits. Try digestives, graham crackers, or even Oreos for a twist. Each choice will change the taste a little. Just make sure the texture is similar to the Lotus Biscoff biscuits. - Tips for achieving the desired texture To make the bars firmer, you can try a couple of things. First, use less cream cheese or add more crushed biscuits to the base. Press the biscuit layer down firmly when you pack it. Chilling them longer in the fridge can also help. If you want a richer chocolate layer, use more chocolate to cover the top. This recipe blends Lotus Biscoff biscuits, cream cheese, and chocolate for a tasty treat. You mix the biscuit base, layer it with Biscoff, and top it with melted chocolate. Remember to refrigerate the bars for the best flavor and texture. You can try variations or store them perfectly for later. Enjoy making these delicious bars! They will impress your friends and family. Get ready to savor every bite of your creation!

No-Bake Lotus Biscoff Bars Easy and Tasty Treat

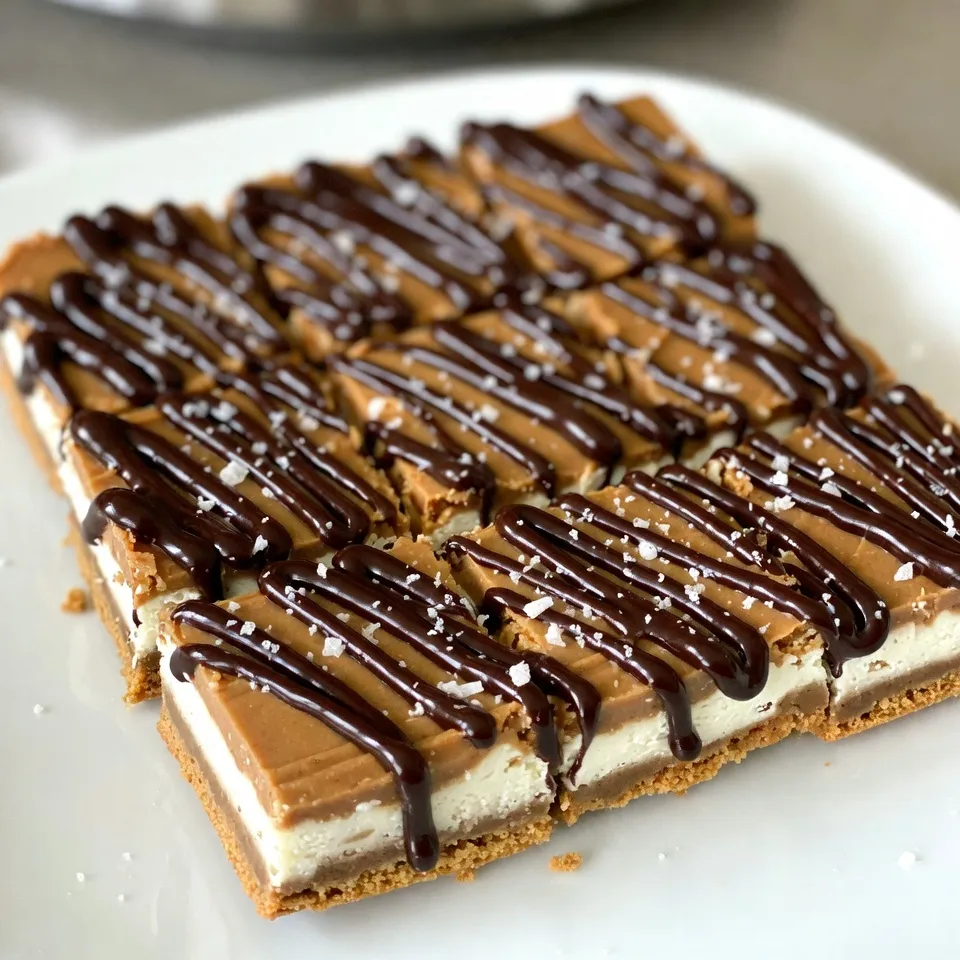
Do you crave a sweet treat that’s easy to make? You’re in the right place! These No-Bake Lotus Biscoff Bars

- 2 cups cooked brown rice - 3 cups fresh broccoli florets - 1 cup shredded cheddar cheese - 1 cup cream of mushroom soup - ½ cup milk - 1 teaspoon garlic powder - 1 teaspoon onion powder - ½ teaspoon black pepper - ½ teaspoon salt - 1 cup breadcrumbs (for topping) - 2 tablespoons olive oil - 1 cup grated Parmesan cheese In this dish, the main ingredients create a warm and filling meal. The cooked brown rice gives a nice base. Fresh broccoli florets add color and crunch. Shredded cheddar cheese melts into gooey goodness. Cream of mushroom soup binds everything together. Milk makes the mix creamy and smooth. The seasonings enhance the flavor. Garlic powder and onion powder add depth. Black pepper and salt bring balance. For the topping, breadcrumbs add a lovely crunch. Olive oil helps them crisp up in the oven. Grated Parmesan cheese adds a salty kick on top. Each bite is a burst of flavor and comfort! {{ingredient_image_1}} - Preheat the Oven: Set your oven to 350°F (175°C). This is the perfect temp for baking. - Blanch the Broccoli: Bring a pot of salted water to a boil. Add the fresh broccoli florets. Cook them for 2-3 minutes until they turn bright green. After that, drain the broccoli and move it to a bowl with ice water. This stops the cooking. Once it cools, drain it well and set aside. - Mix the Base: In a large bowl, combine the cooked brown rice, cream of mushroom soup, and milk. Add the garlic powder, onion powder, salt, and pepper. Mix until it is all well combined. - Incorporate Broccoli & Cheese: Now, add the blanched broccoli and 1 cup of shredded cheddar cheese into the rice mix. Stir gently to combine everything. Ensure the broccoli is evenly spread throughout. - Prepare for Baking: Transfer the mixture into a greased 9x13 inch baking dish. Spread it out evenly so it cooks well. - Add Toppings: In another small bowl, mix the breadcrumbs with olive oil. Sprinkle this mixture evenly over the casserole. Then, top it with the remaining cheddar cheese and the grated Parmesan cheese for a tasty finish. - Bake: Place the casserole in the preheated oven. Bake it for 25-30 minutes. The top should turn golden brown, and the casserole will be bubbly. - Serve: Once baked, remove it from the oven. Allow it to cool slightly before you serve it. Enjoy your cheesy broccoli rice casserole! To get the best rice texture, always use cooked brown rice. It should be fluffy, not sticky. If you want to cook it fresh, follow the package instructions closely. When cooking broccoli, avoid mushiness by blanching. Boil the florets for just 2-3 minutes. After that, quickly cool them in ice water. This stops the cooking and keeps the bright green color. Cheese makes this dish shine. While cheddar is classic, you can try other types too. Gouda or Monterey Jack add a nice twist. You might also think about adding some spice. A pinch of cayenne pepper or paprika can give it a kick. Fresh herbs like parsley or thyme can brighten the flavor too. Pair this casserole with simple sides for a great meal. A crisp salad or roasted chicken works well. For a fun twist, serve it in individual ramekins. This makes it feel special and easy to handle. You can also top it with extra cheese or herbs for a nice finish. Pro Tips Perfectly Cooked Rice: Use leftover brown rice or cook it a day ahead. This enhances the flavor and texture of the casserole. Fresh Broccoli Flavor: Blanching the broccoli not only preserves its bright color but also enhances its flavor and texture in the casserole. Cheese Variations: Experiment with different cheese combinations like Monterey Jack or Gruyère for added depth of flavor. Crunchy Topping: For an extra crunch, you can add crushed nuts or seeds to the breadcrumb mixture before baking. {{image_2}} You can make this casserole fit your diet easily. For gluten-free options, use gluten-free breadcrumbs. This keeps the dish safe for those with gluten issues. Check labels to ensure they are certified gluten-free. If you want a vegan version, swap out the cheese and milk for plant-based options. Try using almond milk or oat milk. Nutritional yeast can add a cheesy flavor without dairy. There are also great vegan cheese blends available. They melt well and taste great in this dish. Feel free to get creative with veggies. Instead of just broccoli, try adding spinach or bell peppers. You can also mix in some peas for a pop of color and flavor. These swaps make the dish more vibrant and packed with nutrients. You might want to change the rice too. While brown rice is full of fiber, white rice works just as well. Quinoa can also be a great choice for a protein boost. Each option brings its own unique taste and texture. Scaling the recipe is simple. If you need to feed a crowd, double the recipe. Just use a larger baking dish. Add a few extra minutes to the baking time to ensure everything heats through. For smaller servings, you can cut the recipe in half. Use an 8x8 inch dish instead. This is perfect for a small family meal or a cozy dinner for two. Adjust the baking time slightly to avoid overcooking. To store leftovers, let the casserole cool first. Place it in an airtight container. You can keep it in the fridge for up to four days. If you want to enjoy it later, make sure to cover it well. This helps keep the flavors fresh and tasty. For freezing, let the casserole cool completely. Then, wrap it tightly in plastic wrap or foil. You can also use a freezer-safe container. It will stay good for about three months in the freezer. When you are ready to eat it, thaw it overnight in the fridge. Reheating it can be easy if you follow a few tips. To refresh and reheat, you can add a splash of milk before warming it up. This adds moisture back into the dish. Heat it in the oven at 350°F (175°C) until it's hot, about 15-20 minutes. If you want to get creative, use leftovers for a new meal. You can mix it into a soup or make a wrap with it. Can I use frozen broccoli instead of fresh? Yes, you can use frozen broccoli. Just thaw it first and drain any excess water. This saves time and works well in the casserole. How to make homemade cream of mushroom soup? To make homemade cream of mushroom soup, sauté chopped mushrooms in butter. Add flour to make a roux. Slowly whisk in chicken or vegetable broth, then add cream. Stir until thickened. Can I prepare the casserole in advance? Absolutely! You can mix all the ingredients and store them in the fridge. Just bake it when you're ready to eat. This makes meal prep easy and quick. What can I serve with Cheesy Broccoli Rice Casserole? This casserole pairs well with grilled chicken or a fresh salad. You could also serve it alongside roasted veggies for a balanced meal. Enjoy the flavors together! This blog post detailed how to make a delicious Cheesy Broccoli Rice Casserole. We covered the key ingredients and easy steps for preparation and baking. You learned about tips for perfect texture and flavor, along with variations for dietary needs. Storing leftovers and reheating them was also discussed to ensure you enjoy this dish later. I hope you feel ready to try this recipe and make it your own. Enjoy the comfort and joy this casserole brings to your table!

Cheesy Broccoli Rice Casserole Comforting Family Dish

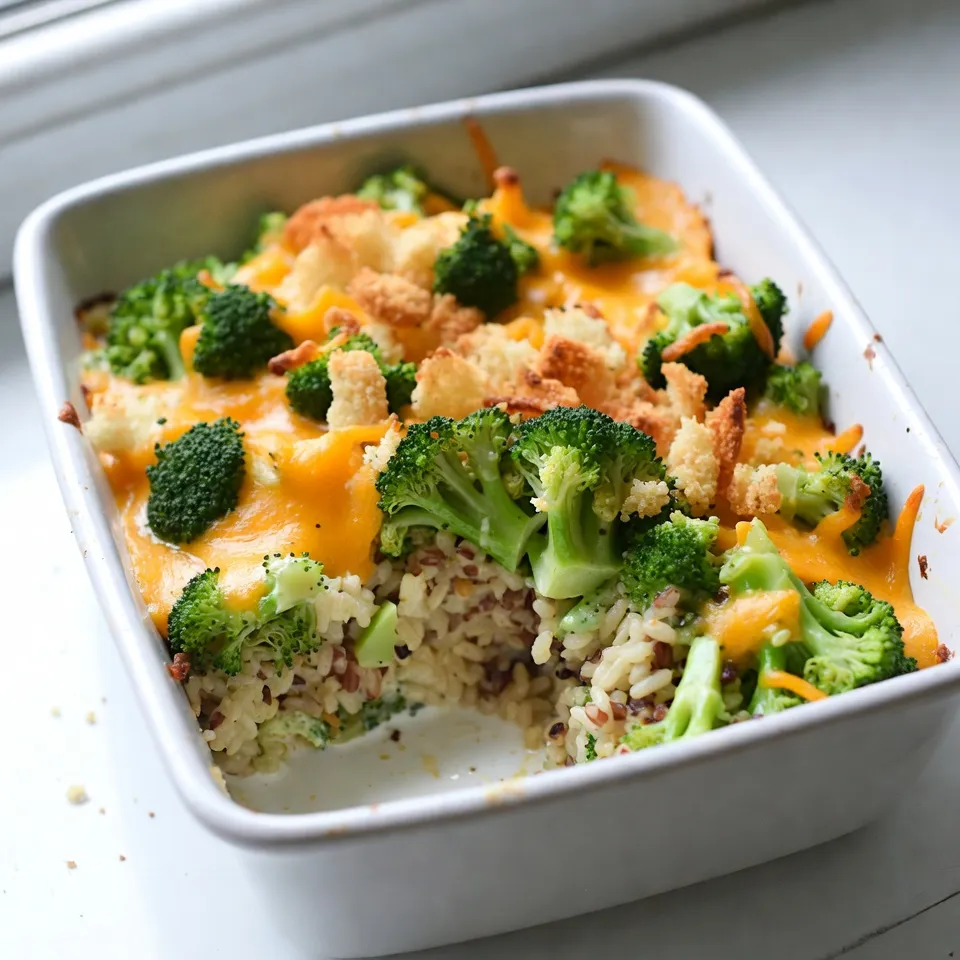
Looking for a dish that warms your heart and fills your belly? Cheesy Broccoli Rice Casserole is just what you

- 1 cup unsalted butter (2 sticks) - 1 cup granulated sugar - 1 cup brown sugar, packed - 4 large eggs - 1 teaspoon vanilla extract - 1 cup all-purpose flour - 1 cup cocoa powder - 1 teaspoon baking powder - 1/2 teaspoon salt - 1 cup crushed pretzels - 1 cup salted caramel sauce (store-bought or homemade) - Flaky sea salt, for topping For the best flavor, use high-quality unsalted butter. It gives the brownies a rich taste. Brown sugar adds moisture, while granulated sugar helps with the crust. Use fresh eggs for a fluffy texture. The cocoa powder should be unsweetened for a deep chocolate flavor. - For sugar, you can use coconut sugar or honey. Adjust the amounts as honey is sweeter. - For gluten-free options, replace all-purpose flour with almond flour or a gluten-free blend. This change may alter texture, but the flavor stays great. - A 9x13 inch baking pan is ideal for these brownies. - You will need mixing bowls for wet and dry ingredients. - A whisk for mixing eggs, and measuring cups for precise amounts. - A spatula helps to fold in ingredients smoothly. This equipment makes baking easier and ensures your brownies come out just right. {{ingredient_image_1}} Set your oven to 350°F (175°C). This helps the brownies bake evenly. Grease a 9x13 inch baking pan. You can also line it with parchment paper. This makes removal easy later. 1. Start by melting the unsalted butter. Use the microwave or stovetop. Let it cool for a bit. 2. In a large bowl, whisk the cooled butter with granulated and brown sugar. Mix until smooth. 3. Add the eggs one by one. Mix well after each egg. Then, stir in the vanilla extract. 4. In another bowl, sift flour, cocoa powder, baking powder, and salt. 5. Gradually mix the dry ingredients into the wet mixture. Stir gently. Do not overmix. 6. Fold in the crushed pretzels. Save some pretzels for topping later. 1. Pour half of the brownie batter into the prepared pan. Spread it evenly. 2. Drizzle half of the salted caramel sauce over the batter. 3. Add the rest of the brownie batter on top. Spread it to cover the caramel. 4. Drizzle the remaining salted caramel sauce over this layer. 5. Sprinkle the reserved pretzel pieces on top. 6. Use a knife or toothpick to swirl the caramel into the brownie batter. This creates a marbled effect. 7. Bake for 25-30 minutes. Check for doneness with a toothpick. It should come out with moist crumbs. 8. After baking, sprinkle flaky sea salt over the brownies while they are warm. 9. Let the brownies cool in the pan for at least 30 minutes before cutting. - To check for doneness, poke the center with a toothpick. It should have moist crumbs. - Avoid overbaking by setting a timer for 25 minutes. Check early to be safe. - Try adding chocolate chips or nuts for extra texture. - Explore flavored caramel sauces, like vanilla or chocolate, for a twist. - Serve the brownies warm for the best taste. - Pair them with coffee, vanilla ice cream, or whipped cream for a treat. Pro Tips Use Room Temperature Eggs: Allow your eggs to sit at room temperature for about 30 minutes before mixing them into the batter. This helps create a smoother and more uniform mixture, resulting in fudgier brownies. Don’t Overmix: When combining your dry and wet ingredients, mix until just combined. Overmixing can lead to tough brownies, so a few lumps are perfectly fine! Swirl with Care: When swirling the caramel into the brownie batter, use a gentle hand to create a marbled effect without completely blending it in. This will enhance both the flavor and appearance of your brownies. Cool Before Cutting: Allow the brownies to cool completely in the pan before cutting into squares. This helps them set properly and makes for cleaner cuts. {{image_2}} You can make these brownies your own by adding fun ingredients. Try mixing in chopped nuts like walnuts or pecans. They give a nice crunch. You could also add chocolate chips for extra sweetness. Dark chocolate chips work well if you like a richer taste. For seasonal flavors, think about using peppermint extract in winter. In summer, add fresh berries for a fruity touch. You can even switch the caramel for a fruity sauce, like raspberry or strawberry. If you're looking to cut calories, you can reduce the sugar. Use half the amount of granulated sugar and brown sugar. You can also swap out some butter for unsweetened applesauce. This helps keep the brownies moist without all the calories. For those who want vegan options, replace the eggs with flaxseed meal or applesauce. Use coconut oil instead of butter. Make sure to choose a dairy-free caramel sauce for a fully plant-based treat. Want more or fewer brownies? You can easily scale this recipe. Simply double the ingredients for a big batch. You could also cut the recipe in half for a smaller treat. Mini brownies are another fun idea. Use a mini muffin pan to bake bite-sized brownies. Just watch the time and check for doneness. They will bake faster than regular brownies. Enjoy experimenting with these variations! To keep your salted caramel pretzel brownies fresh, store them in an airtight container. This helps prevent them from drying out. Place parchment paper between layers if you stack them. This way, they stay soft and tasty. You can freeze brownies for later enjoyment. First, let them cool completely. Then, wrap each brownie in plastic wrap. Place the wrapped brownies in a freezer-safe bag. For thawing, leave them in the fridge overnight or at room temperature for a few hours. This keeps their nice, chewy texture. At room temperature, your brownies last about four to five days. If you keep them in the fridge, they last longer but can lose some flavor and texture. Enjoy them fresh for the best taste! Yes, you can make these brownies ahead of time. Here are some tips: - Bake the brownies and let them cool completely. - Cut them into squares for easy serving. - Store them in an airtight container at room temperature. - If you want them to stay fresh longer, refrigerate them for up to a week. If you don't have salted caramel sauce, you can make your own. Here are some options: - Homemade Caramel Sauce: Use 1 cup of sugar, 6 tablespoons of butter, and 1/2 cup of cream. Heat sugar until it melts and turns golden. Add butter and cream slowly, stirring well. - Chocolate Sauce: Melt dark chocolate with a bit of butter for a rich alternative. - Peanut Butter Sauce: Mix peanut butter with a bit of honey for a sweet and salty twist. Yes, you can make these brownies gluten-free. Here’s how: - Use gluten-free all-purpose flour instead of regular flour. - Check that your pretzels are labeled gluten-free. - Ensure all other ingredients, like baking powder, are gluten-free. This way, you can still enjoy these delicious brownies! You can create delicious brownies by following the steps outlined above. We covered essential ingredients, mixing methods, and tips to enhance flavor. Always choose quality ingredients for the best results. Remember, baking is all about practice and personal touch. If you want to impress, try the variations or serve them creatively. Enjoy your baking journey! Your brownies could soon be a favorite for everyone!

Salted Caramel Pretzel Brownies Irresistible Treat

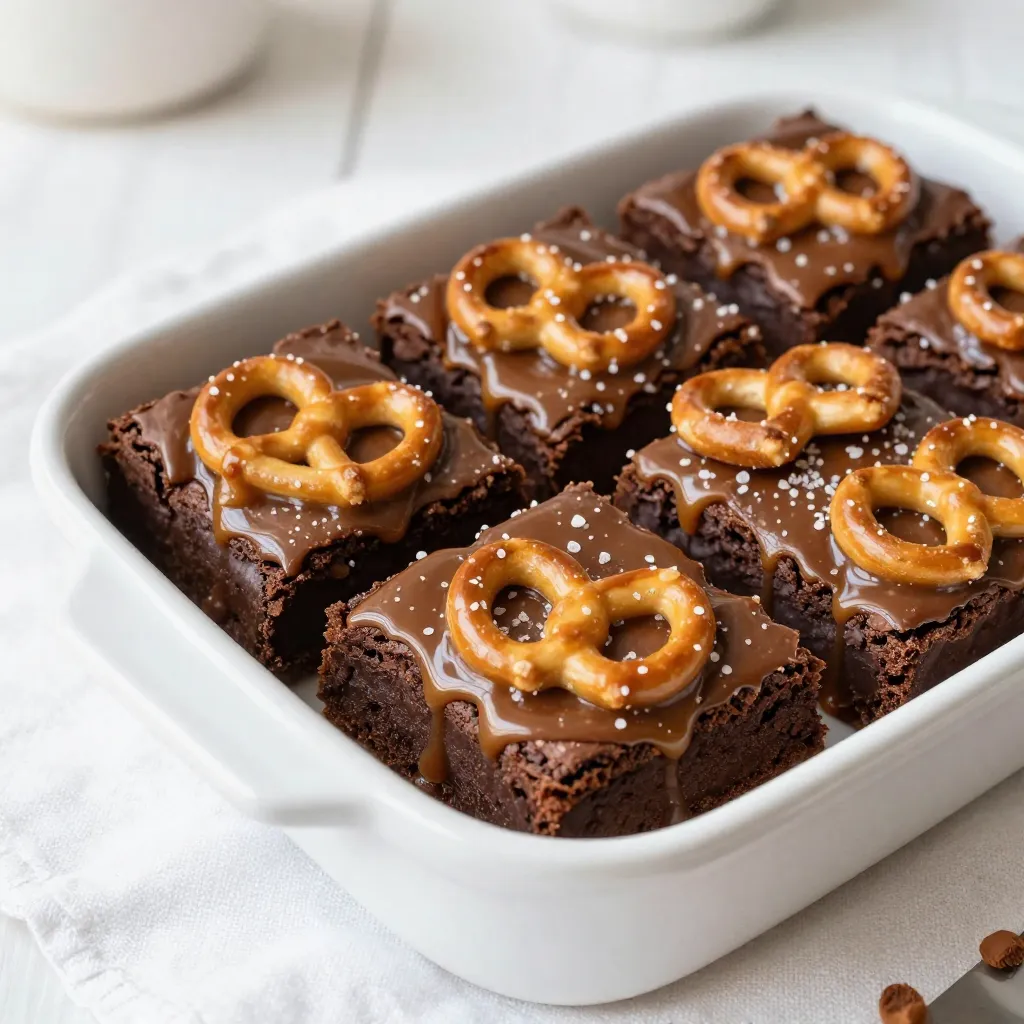
If you crave a dessert that strikes the perfect balance between sweet and salty, you’re in for a treat! My

- 1 package (15.25 oz) Pumpkin Spice Oreo cookies - 8 oz cream cheese, softened - 1 teaspoon vanilla extract - 1 cup white chocolate chips - 1 tablespoon coconut oil (optional, for smoother coating) - 1 teaspoon ground cinnamon - Pinch of nutmeg - Pinch of ginger To create these truffles, start with Pumpkin Spice Oreo cookies. They bring the fall flavor to your treat. Next, soften the cream cheese. This helps in mixing it well with the Oreos. A teaspoon of vanilla extract adds a nice touch of sweetness. For the coating, you need white chocolate chips. They melt into a smooth layer. Adding coconut oil is optional but helps the chocolate coat better. Ground cinnamon, nutmeg, and ginger add warmth and spice to the mixture. - Sprinkles - Crushed nuts You can make your truffles even more fun with garnishes. Use colorful sprinkles for a festive look. Crushed nuts add crunch and flavor. Both options are great ways to make your truffles stand out. {{ingredient_image_1}} - Crushing the Oreo cookies: Start by taking your Pumpkin Spice Oreo cookies. Place them in a food processor. Pulse them until they turn into fine crumbs. This step is key for the texture. It helps the truffles hold together well. If you don’t have a processor, you can use a bag and a rolling pin to crush them. - Mixing the filling ingredients: In a large bowl, combine the crushed Oreos with softened cream cheese and vanilla extract. Use a spatula or your hands to mix everything together. Aim for a dough-like consistency. This mixture should be smooth and easy to shape. The cream cheese gives it a rich flavor. - Importance of refrigeration: Chilling the mixture helps it firm up. This makes it easier to roll into balls. It also enhances the flavors, allowing them to meld together. - Time guidelines for chilling: Cover the bowl with plastic wrap. Refrigerate it for about 30 minutes. This is the perfect time to make sure everything holds its shape. - Rolling into balls: Once the mixture is chilled, take about a tablespoon of it. Roll this into a ball about one inch in diameter. Place each ball on a lined baking sheet. Repeat this until all the mixture is used. You should get around 20 truffles. - Melting the chocolate: In a microwave-safe bowl, combine the white chocolate chips and coconut oil if you choose to use it. Microwave in 30-second intervals. Stir in between until smooth. This melted mixture will coat the truffles perfectly. - Coating truffles: Dip each truffle into the melted chocolate. Use a fork to help coat them fully. Let any excess chocolate drip off before placing them back on the baking sheet. - Adding garnishes before chocolate sets: While the chocolate is still wet, sprinkle a little ground cinnamon, nutmeg, or crushed nuts on top. This adds flavor and a nice touch. It makes your truffles look even better. After coating, place the truffles back in the refrigerator. Let them chill for at least 30 minutes. This helps the chocolate harden completely. Enjoy your delightful no-bake treats! To get the right texture, your mixture should feel like dough. If it’s too wet, add more crushed Oreos. If it feels too dry, mix in a bit more cream cheese. When melting the chocolate, work in short bursts. Microwave in 30-second intervals and stir in between. This helps keep the chocolate smooth and prevents it from burning. Garnishing adds fun! Try using colored sprinkles for a festive look. You can also sprinkle a bit of cinnamon or nutmeg on top. For seasonal flair, serve these truffles on a pumpkin-themed platter. You can even put them in cute gift boxes for friends. Don't over-mix your filling. This can make the truffles too soft. Mix just until combined. Chilling is key! Make sure to refrigerate the mixture long enough before forming the truffles. This helps them hold their shape when coated. Pro Tips Chill Your Hands: If the mixture starts to get too sticky while rolling the truffles, chill your hands in cold water for a minute to make rolling easier. Use Quality Chocolate: For the best flavor, choose high-quality white chocolate. It will make a significant difference in the overall taste of your truffles. Experiment with Coatings: Don’t be afraid to get creative! Try coating your truffles in crushed graham crackers, cocoa powder, or even colored sprinkles for a fun twist. Store Properly: Keep the truffles in an airtight container in the refrigerator to maintain their freshness and prevent them from getting too soft. {{image_2}} You can use different Oreo flavors for fun twists. Try chocolate, vanilla, or mint Oreos. Each choice brings a new taste to the truffles. Adding extracts can also change the flavor. For a winter treat, a drop of peppermint extract adds a nice touch. Almond extract provides a lovely nutty flavor. Experiment with what you love! Making these truffles vegan is easy. Use vegan cream cheese and dark chocolate. Many brands offer tasty options. For gluten-free truffles, choose gluten-free Oreos. Always check the labels to be sure. These small swaps help everyone enjoy the treat. Pair these truffles with hot drinks like coffee or tea. They make great gifts, too! Put them in a cute box with a ribbon. Serve them at parties for a sweet surprise. People will love the unique flavors and creamy texture. Store your Pumpkin Oreo truffles in an airtight container. This keeps them fresh and tasty. You can use a plastic or glass container with a tight lid. Layer the truffles between sheets of parchment paper to prevent sticking. Keep the truffles in the fridge. The cool temperature helps them stay firm. It’s best to keep them at about 35°F to 40°F. Avoid leaving them at room temperature for too long. These truffles last about one week in the fridge. After that, they may lose their great taste and texture. Always check for freshness before eating. Signs that the truffles are no longer good include a change in smell or a dry texture. If they look dull or have spots, it’s best to toss them out. Enjoy your treats while they're fresh! You can make these truffles a day or two before you plan to serve them. Just follow the recipe until you coat them in chocolate. Chill them as directed, then store them in an airtight container in the fridge. This way, they stay fresh and tasty for your guests. Yes, you can freeze these truffles! Place them in a single layer on a baking sheet and freeze them until solid. Then, transfer them to a freezer-safe bag or container. They can last up to three months in the freezer. Thaw them in the fridge before serving. If you need a cream cheese substitute, try using mascarpone cheese or Greek yogurt. Both will give you a creamy texture. You can also use vegan cream cheese if you want a dairy-free option. Adjust the sweetness as needed when using yogurt. To add flavor to your white chocolate, mix in extracts like vanilla or almond. You can also stir in a pinch of cinnamon or a splash of orange zest for a fun twist. Experiment with your favorite flavors to make them unique! Aim for about one inch in diameter for each truffle. This size is perfect for popping in your mouth. It allows the right balance of flavors and makes them easy to eat. Use a tablespoon to help you scoop the mixture evenly. These Pumpkin Oreo Truffles are easy and fun to make. You start with key ingredients like Oreo cookies and cream cheese, then follow simple steps to create tasty treats. Remember to chill the mixture well for the best results. Keep these tips in mind to avoid common mistakes. Try different flavors or dietary options to make these truffles your own. With proper storage, they will stay fresh and delicious. Enjoy sharing these sweet bites at your next celebration or as a gift.

Pumpkin Oreo Truffles Delightful No-Bake Treat

Get ready for a sweet treat that screams fall! These Pumpkin Oreo Truffles are a no-bake delight that’s easy to

- 200g digestive biscuits, crushed - 100g unsalted butter, melted - 300g cream cheese, softened - 200g Nutella - 100g powdered sugar - 1 teaspoon vanilla extract - 200ml heavy whipping cream - A pinch of salt To make a delicious no-bake Nutella cheesecake, you need a few simple items. First, the base is made from digestive biscuits. These biscuits add a nice crunch and sweetness. You will also need unsalted butter, which helps hold the crust together. Next, the filling shines with cream cheese and Nutella. Cream cheese gives the cheesecake its creamy texture, while Nutella adds rich chocolate flavor. A bit of powdered sugar sweetens the mix, and vanilla extract brings out the flavors. A small pinch of salt balances the sweetness. Finally, heavy whipping cream is essential. Whipping it creates a light and airy filling. It transforms the cheesecake into a smooth delight that melts in your mouth. - Extra Nutella - Crushed hazelnuts When it comes to toppings, you can get creative. If you love Nutella, spread extra on top. This adds a glossy finish and extra flavor. You can also sprinkle crushed hazelnuts for some crunch. They add a nice texture and enhance the Nutella taste. These toppings make the cheesecake even more appealing and tasty. {{ingredient_image_1}} 1. In a mixing bowl, combine the crushed digestive biscuits with the melted butter. 2. Mix until all the biscuits are coated well. This forms a tasty base. 3. Next, press the biscuit mixture into the bottom of a 9-inch springform pan. 4. Use the back of a measuring cup to smooth it out evenly. This ensures a firm crust. 1. In a large bowl, combine softened cream cheese and Nutella. 2. Add powdered sugar, vanilla extract, and a pinch of salt. 3. Beat with an electric mixer until the mixture is smooth and creamy. 4. In another bowl, whip the heavy cream until stiff peaks form. 5. Carefully fold the whipped cream into the Nutella cream cheese mixture until fully incorporated. This adds lightness to the filling. 1. Pour the Nutella cheesecake filling over the prepared crust in the springform pan. 2. Use a spatula to smooth the top. This makes it look nice and even. 1. Refrigerate the cheesecake for at least 4 hours. This helps it set and firm up. 2. For the best results, let it chill overnight. This allows the flavors to blend well and gives you a better texture. To make your cheesecake smooth, beat the cream cheese well. Start with softened cream cheese. This helps avoid lumps. Use an electric mixer for best results. Mix until the cream cheese is creamy and fluffy. Next, when you fold in the whipped cream, do it gently. Use a spatula and scoop from the bottom. This keeps the air in the whipped cream. Avoid stirring too hard. You want a light and airy texture for your cheesecake. For a great presentation, remove the cheesecake from the springform pan carefully. Use a spatula to lift it out. Spread extra Nutella on top. Sprinkle crushed hazelnuts for a nice crunch. This adds both flavor and looks. Pair this dessert with coffee or tea. A hot drink balances the sweetness. You could also serve it with fresh berries. Their tartness complements the rich Nutella. One mistake is overmixing the cheesecake filling. Mixing too much can make it dense. Mix just until combined for a light texture. Another mistake is not chilling long enough. You need to refrigerate for at least four hours. For the best taste, chill it overnight. This helps the flavors blend and the cheesecake set properly. Pro Tips Chill Your Tools: Before whipping the cream, chill your mixing bowl and beaters in the freezer for about 10 minutes. This helps the cream whip faster and achieve stiff peaks. Use Room Temperature Ingredients: Ensure your cream cheese is at room temperature before mixing. This prevents lumps and helps create a smooth filling. Enhance Flavor with Salt: A pinch of salt can enhance the sweetness of desserts. Don’t skip it, as it balances the flavors beautifully. Proper Setting Time: For the best texture, let your cheesecake set overnight. This ensures a firmer texture and allows the flavors to meld perfectly. {{image_2}} You can switch up your no-bake Nutella cheesecake easily. Try using different chocolate spreads. Each spread brings a unique taste. For example, try dark chocolate or white chocolate spread. Both add a fun twist to your cheesecake. You can also add fruit or liqueur. Fresh strawberries or raspberries create a bright flavor. You can swirl in some raspberry jam for extra sweetness. If you like adult flavors, a splash of coffee liqueur can enhance the chocolate taste. It’s all about what you enjoy! Need gluten-free options? Use gluten-free biscuits instead of regular ones. Brands like almond or rice-based biscuits work well. They still give you a nice crust without the gluten. For dairy-free choices, look for vegan cream cheese and coconut cream. These options keep the cheesecake creamy and rich. You won’t miss the dairy at all! Just make sure to check labels for any hidden dairy. These substitutions help everyone enjoy this tasty dessert. To store leftover no-bake Nutella cheesecake, cover it with plastic wrap. This keeps it fresh and prevents it from drying out. You can also use a cake dome for better coverage. The cheesecake lasts up to five days in the fridge. Enjoy it within this time for the best taste and texture. Yes, you can freeze no-bake cheesecake! It freezes well, so it’s a great option for meal prep. To freeze, wrap the cheesecake tightly in plastic wrap, then place it in an airtight container. This prevents freezer burn. To thaw, move the cheesecake to the fridge for about eight hours. You can also let it sit on the counter for about an hour if you're in a hurry. Enjoy your cheesecake any time! Yes, you can make this cheesecake a day before. It tastes better after resting. Just chill it in the fridge. This helps the flavors blend well. Plus, it saves you time on serving day. If you don’t have digestive biscuits, use graham crackers. They work great as a crust. You can also try vanilla wafers for a sweet twist. Just crush them the same way. The texture will still be nice and crunchy. You can tell the cheesecake is set when it feels firm to the touch. Stick a toothpick in the center. If it comes out clean, it’s ready. A slight jiggle is okay, but it shouldn’t be runny. Refrigerating it overnight is best for a perfect set. Decorate your cheesecake with extra Nutella on top. Spread it evenly for a glossy look. Then, sprinkle crushed hazelnuts for crunch. You can also add chocolate shavings or fresh berries for color. This not only makes it pretty but adds more flavor. This no-bake Nutella cheesecake is simple and fun to make with each step. We explored the key ingredients, from digestive biscuits to cream cheese. You learned how to make a smooth filling and perfect crust, plus tips for avoiding common mistakes. Remember, chilling overnight makes a big difference in taste. With some easy variations, you can customize your cheesecake to fit your style. Enjoy a slice with coffee or tea. Now, it's time to create your delicious masterpiece!

No-Bake Nutella Cheesecake Easy and Delicious Dessert

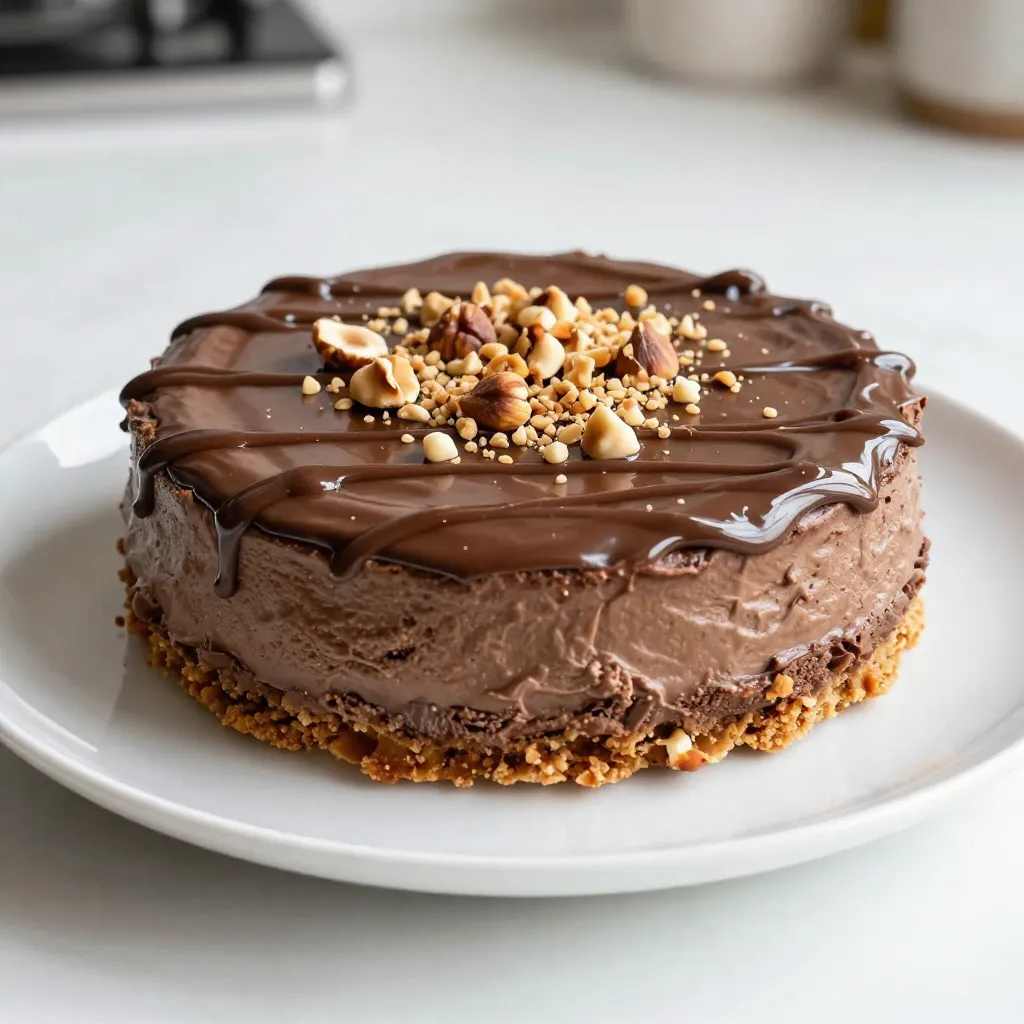
Craving a sweet treat that’s simple and delicious? Look no further! This No-Bake Nutella Cheesecake hits all the right notes.

To make a delicious pumpkin spice crumble cake, you will need: - 2 cups all-purpose flour - 1 cup granulated sugar - 1/2 cup brown sugar, packed - 1 cup canned pure pumpkin puree - 1/2 cup vegetable oil - 3 large eggs - 1/2 teaspoon vanilla extract - 1 teaspoon baking powder - 1 teaspoon baking soda - 1 teaspoon pumpkin pie spice - 1/2 teaspoon salt For a tasty crumble topping, gather these ingredients: - 1/2 cup rolled oats - 1/3 cup all-purpose flour - 1/3 cup brown sugar, packed - 1 teaspoon cinnamon - 1/4 cup cold unsalted butter, cubed You can swap ingredients for this recipe based on what you have. Here are some ideas: - Use whole wheat flour instead of all-purpose flour for a nuttier taste. - Substitute coconut oil for vegetable oil for a hint of coconut flavor. - If you don’t have brown sugar, use granulated sugar with a bit of molasses. - Replace eggs with unsweetened applesauce for a vegan option. - Use gluten-free flour blends for a gluten-free cake. These swaps still keep the cake tasty and enjoyable. Feel free to get creative! {{ingredient_image_1}} To make the batter, start by preheating your oven to 350°F (175°C). Grease a 9-inch round cake pan. In a large bowl, whisk together 2 cups of all-purpose flour, 1 cup of granulated sugar, and 1/2 cup of brown sugar. Add in 1 teaspoon of baking powder, 1 teaspoon of baking soda, 1 teaspoon of pumpkin pie spice, and 1/2 teaspoon of salt. Mix well until combined. In another bowl, mix 1 cup of canned pumpkin puree, 1/2 cup of vegetable oil, 3 large eggs, and 1/2 teaspoon of vanilla extract until smooth. Slowly pour the wet mix into the dry ingredients. Stir gently until just combined. Be careful not to overmix. Pour this batter into the prepared cake pan, spreading it evenly. For the crumble topping, take a medium bowl. Combine 1/2 cup of rolled oats, 1/3 cup of all-purpose flour, and 1/3 cup of brown sugar. Then, add 1 teaspoon of cinnamon. Mix these dry ingredients well. Next, cut in 1/4 cup of cold unsalted butter, cubed. Use your fingers or a pastry cutter to blend until it becomes crumbly. This will add a lovely texture to your cake. Now it’s time to bake. Sprinkle the crumble topping evenly over the cake batter in the pan. Place the pan in your preheated oven. Bake for 35 to 40 minutes. You’ll know it’s ready when a toothpick inserted in the center comes out clean. Once done, let the cake cool in the pan for about 10 minutes. After that, transfer it to a wire rack to cool completely. Enjoy the sweet aroma filling your kitchen! To make a moist cake, use canned pumpkin puree. This adds moisture and flavor. Also, do not overmix the batter. Mix just until ingredients blend. Overmixing makes the cake tough. Use oil instead of butter for moisture. Vegetable oil keeps the cake soft. Let the eggs sit at room temperature too. Room temperature eggs mix better and help with texture. Enhance the flavor by adding extra spices. Consider using nutmeg or ginger for warmth. You can also add a splash of maple syrup for sweetness. If you want a deeper flavor, try using dark brown sugar instead of light. Don't forget to taste the batter. Adjust spices based on your preference. This way, you’ll create a cake that truly shines. For the best crumble, use cold butter. Cold butter creates a nice, flaky texture. Cut the butter into small cubes and mix it into the dry ingredients. Use your fingers or a pastry cutter to combine. You want the mixture to be crumbly but not too fine. A mix of larger and smaller bits gives the topping a nice crunch. Finally, sprinkle the crumble evenly over the batter. This ensures every bite has that delicious topping. Pro Tips Use Fresh Pumpkin Pie Spice: For the best flavor, consider making your own pumpkin pie spice blend using cinnamon, nutmeg, ginger, and allspice. Don’t Overmix: When combining wet and dry ingredients, mix until just combined to keep the cake light and fluffy. Chill the Butter: Ensure your butter for the crumble topping is cold to create a better texture; it will help achieve that perfect crumbly topping. Check for Doneness: Insert a toothpick into the center of the cake; if it comes out clean or with a few moist crumbs, it’s ready to come out of the oven. {{image_2}} You can make this cake gluten-free. Use a gluten-free flour blend instead of all-purpose flour. Look for blends that contain xanthan gum for the best texture. This switch keeps the cake fluffy and moist. Your guests will love it, and they won't even know it's gluten-free! To make a vegan version, replace the eggs with flax eggs. Mix one tablespoon of ground flaxseed with three tablespoons of water. Let it sit for five minutes to thicken. Use coconut oil instead of vegetable oil for a nut-free option. This keeps the cake moist and adds a hint of coconut flavor. You can add your favorite flavors to this cake. For a chocolate twist, fold in half a cup of chocolate chips. If you want some crunch, add chopped nuts like walnuts or pecans. For a fruity touch, mix in half a cup of diced apples or pears. Each option gives a new layer of flavor and a special twist to the classic recipe. To keep your pumpkin spice crumble cake fresh, store it in an airtight container. This method helps maintain its moistness and flavor. You can leave the cake at room temperature for up to three days. If you want to save it longer, refrigeration is best. Just remember to wrap the cake tightly in plastic wrap first. You can freeze this cake if you want to keep it for later. First, let the cake cool completely. Then, wrap it in plastic wrap and aluminum foil. This double layer prevents freezer burn. You can freeze the cake for up to three months. When ready to enjoy, just thaw it in the fridge overnight. To reheat your pumpkin spice crumble cake, preheat your oven to 350°F (175°C). Place the cake in the oven for about 10-15 minutes. This will warm it up without drying it out. You can also use the microwave if you need a quicker option. Heat a slice for about 10-15 seconds, checking to prevent overheating. Enjoy it warm, maybe with a dollop of whipped cream! Yes, you can use fresh pumpkin. Just cook and puree it first. Cut a pumpkin in half, remove the seeds, and roast it until soft. Then, scoop out the flesh and blend it until smooth. Fresh pumpkin may give a lighter flavor. To prevent sticking, grease the pan well with butter or non-stick spray. You can also dust the greased pan with flour. This creates a barrier between the cake and the pan. Allow the cake to cool for about 10 minutes before removing it. You can serve this cake with a dollop of whipped cream. A sprinkle of cinnamon on top adds extra flavor. Vanilla ice cream pairs nicely too. You can also enjoy it with a cup of coffee or tea for a cozy treat. You learned about making a delicious Pumpkin Spice Crumble Cake. We covered all the ingredients, from the cake to the crumble. You now know how to tweak the recipe for different diets and flavors. Proper storage tips keep the cake fresh longer. Remember, using fresh pumpkin can add a tasty twist. With these steps, your cake will be moist and flavorful. Enjoy baking and sharing this treat with friends and family!

Pumpkin Spice Crumble Cake Perfect for Fall Gatherings

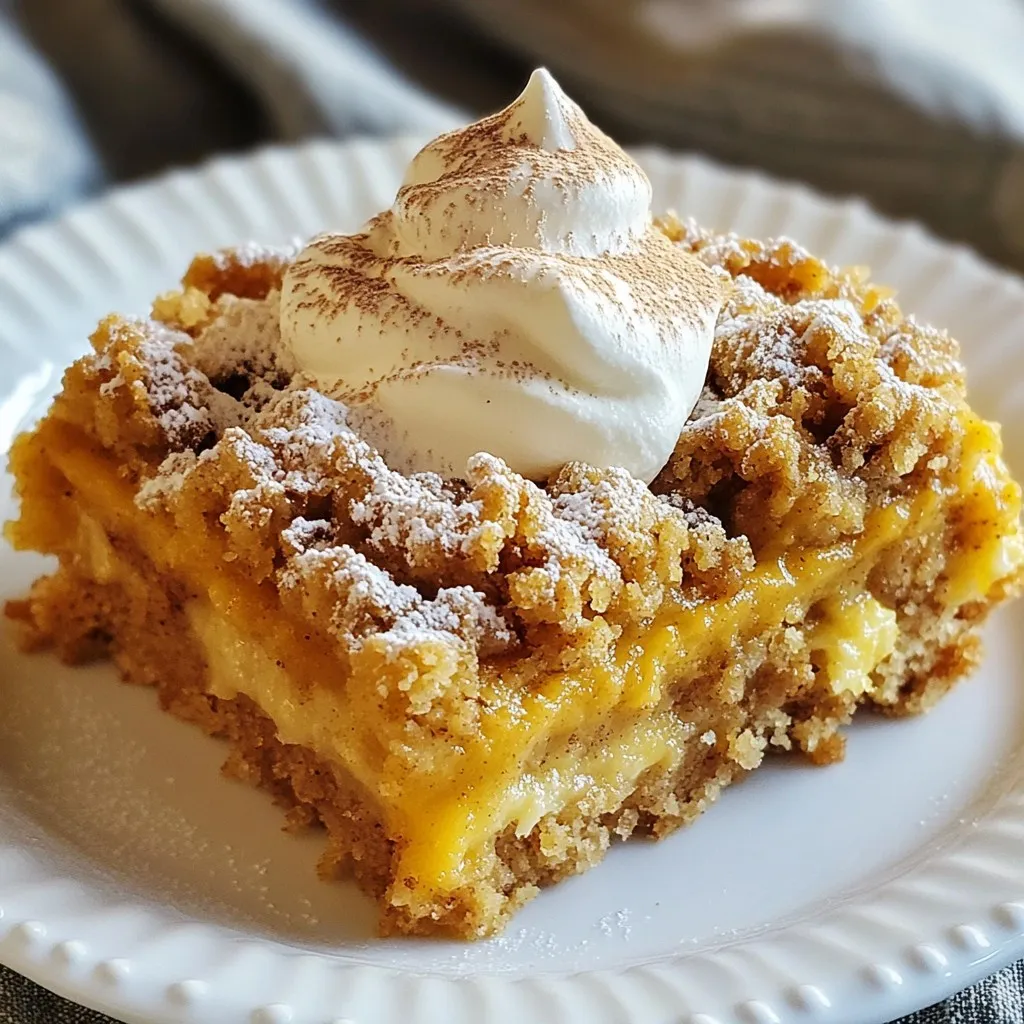
Fall is here, and it’s time to savor the flavors of the season! If you love the warm, cozy taste

To make these delightful cookies, you need a few key ingredients. Here’s what you’ll need: - 1 cup rolled oats - 1 cup whole wheat flour - 1/2 teaspoon baking soda - 1/2 teaspoon baking powder - 1 teaspoon ground cinnamon - 1/4 teaspoon nutmeg - 1/4 teaspoon salt - 1/2 cup brown sugar - 1/4 cup granulated sugar - 1/2 cup coconut oil, melted (or unsalted butter) - 1 large egg - 1 teaspoon vanilla extract - 1 cup grated carrots (fresh) - 1/2 cup crushed pineapple, drained These ingredients come together to create a chewy cookie with a great flavor. Adding some optional ingredients can elevate your cookies even more. Consider these: - 1/2 cup walnuts or pecans, chopped - 1/4 cup raisins or currants Nuts and dried fruits add texture and sweetness. You might want to make some swaps based on what you have. Here are a few ideas: - Flour: Use all-purpose flour if you don’t have whole wheat. - Sweeteners: Maple syrup or honey can replace the sugar, but adjust the liquid. - Fats: Use butter instead of coconut oil for a richer taste. These substitutions can help you customize the recipe to fit your pantry. Enjoy your baking! {{ingredient_image_1}} First, set your oven to 350°F (175°C). This heat will make your cookies soft and chewy. As the oven warms up, line two baking sheets with parchment paper. This will keep cookies from sticking and make cleanup easy. In a large bowl, combine the rolled oats, whole wheat flour, baking soda, and baking powder. Add the ground cinnamon, nutmeg, and salt. Whisk them together until mixed well. This step ensures your cookies have the right texture and flavor. In another bowl, beat the melted coconut oil, brown sugar, and granulated sugar. Mix until it looks creamy. Then, add the large egg and vanilla extract. Stir well. Next, fold in the grated carrots and drained crushed pineapple. This mixture gives your cookies moisture and sweetness. Now, slowly add the dry mixture to the wet one. Stir gently until just combined. If you want, fold in chopped walnuts or pecans and raisins or currants. Using a spoon or cookie scoop, drop heaping tablespoons of dough onto the baking sheets. Leave space between each cookie, as they will spread while baking. Bake the cookies in your preheated oven for 12 to 15 minutes. Watch for the edges to turn golden and the centers to look set. Once done, take them out and let them cool on the baking sheets for 5 minutes. Then, transfer the cookies to wire racks to cool completely. This cooling time helps them firm up and makes them easier to eat. To get the best texture in your cookies, use rolled oats. They add a chewy bite. Whole wheat flour gives a nice, hearty feel. Make sure to measure your ingredients correctly. Too much flour can make cookies dry. Also, avoid overmixing the dough; this keeps them soft. Bake until the edges are golden but the centers are still soft. Letting them cool on the baking sheet helps them firm up without getting hard. Here are some tools I find useful for baking these cookies: - Mixing bowls: Use two separate bowls for dry and wet ingredients. - Whisk: A good whisk helps mix the dry ingredients well. - Cookie scoop: This tool makes it easy to portion the dough evenly. - Baking sheets: Choose sheets that are flat and sturdy. - Parchment paper: It prevents sticking and makes cleanup easy. - Cooling rack: This helps cookies cool evenly. Having these tools will make your baking process smooth and fun. To store your leftover cookies, place them in an airtight container. They stay fresh for about a week at room temperature. If you want them to last longer, put them in the fridge. Just remember to bring them back to room temp before eating. You can also freeze cookies for up to three months. Just make sure to wrap them well in plastic wrap. Thaw them at room temperature, and you’ll enjoy them just like fresh! Pro Tips Use Fresh Carrots: For the best flavor and texture, always use fresh, grated carrots instead of pre-packaged ones. Drain Pineapple Well: Ensure the crushed pineapple is well-drained to prevent the cookies from becoming too wet and soggy. Experiment with Spices: Feel free to add other spices like ginger or allspice to enhance the flavor profile of the cookies. Store Properly: Keep cookies in an airtight container at room temperature for up to a week, or freeze for longer storage. {{image_2}} You can easily tweak this recipe to fit your needs. To make it nut-free, skip the walnuts or pecans. You can replace them with seeds, like sunflower seeds or pumpkin seeds. For a gluten-free version, use gluten-free rolled oats and flour. This way, you keep the great taste while making it safe for everyone. Want to boost the flavor? Add more spices! Try a bit of ginger or allspice for a warm kick. You can also add a splash of almond or orange extract. These small changes make the cookies even tastier and more unique. For a fun twist, add chocolate chips or dried fruits. Dark chocolate chips pair well with the carrot flavor. You can also mix in dried cranberries or apricots for a burst of sweetness. Adding these extras makes each bite exciting and delicious. Each cookie has about 120 calories. You get around 4 grams of protein and 6 grams of fat. It also has about 16 grams of carbs. The fiber content is around 1.5 grams. This makes them a decent snack option. - Carrots: Rich in beta-carotene, carrots boost eye health. They also add natural sweetness and moisture to the cookies. - Oats: Full of fiber, oats help you feel full. They can lower cholesterol levels too. - Whole Wheat Flour: This flour gives more nutrients than white flour. It helps with digestion. - Coconut Oil: It can support heart health when used in moderation. It also adds a nice flavor. - Pineapple: Pineapple adds natural sugars and vitamin C. It also keeps the cookies moist. If you want fewer calories, use less sugar. You can also swap coconut oil for a lighter oil. For higher protein, add more nuts or seeds. If you need gluten-free cookies, use oat flour instead of whole wheat flour. Yes, you can freeze these cookies. To do this, let them cool completely. Place them in a single layer in an airtight container. You can also use freezer bags. They will stay fresh for up to three months. When you're ready to eat them, just thaw at room temperature. To make these cookies vegan, swap the egg for a flax egg. Mix one tablespoon of ground flaxseed with three tablespoons of water. Let it sit for a few minutes until it thickens. You can also use vegan butter instead of coconut oil. This keeps all the flavors while making it plant-based. The best way to store these cookies is in an airtight container. Keep them at room temperature, away from heat and light. For longer freshness, you can also refrigerate them. Make sure to place parchment paper between layers to prevent sticking. You’ve learned about key ingredients for the best cookies. We covered essential and optional items, plus easy swaps. I walked you through simple steps for mixing, baking, and cooling. With tips, tricks, and variations, you can customize these treats to suit your taste. Lastly, we explored nutritional info and addressed common questions. Remember, baking cookies is fun and creative. Enjoy the process, and happy baking!

Carrot Cake Oatmeal Cookies Tasty and Easy Recipe

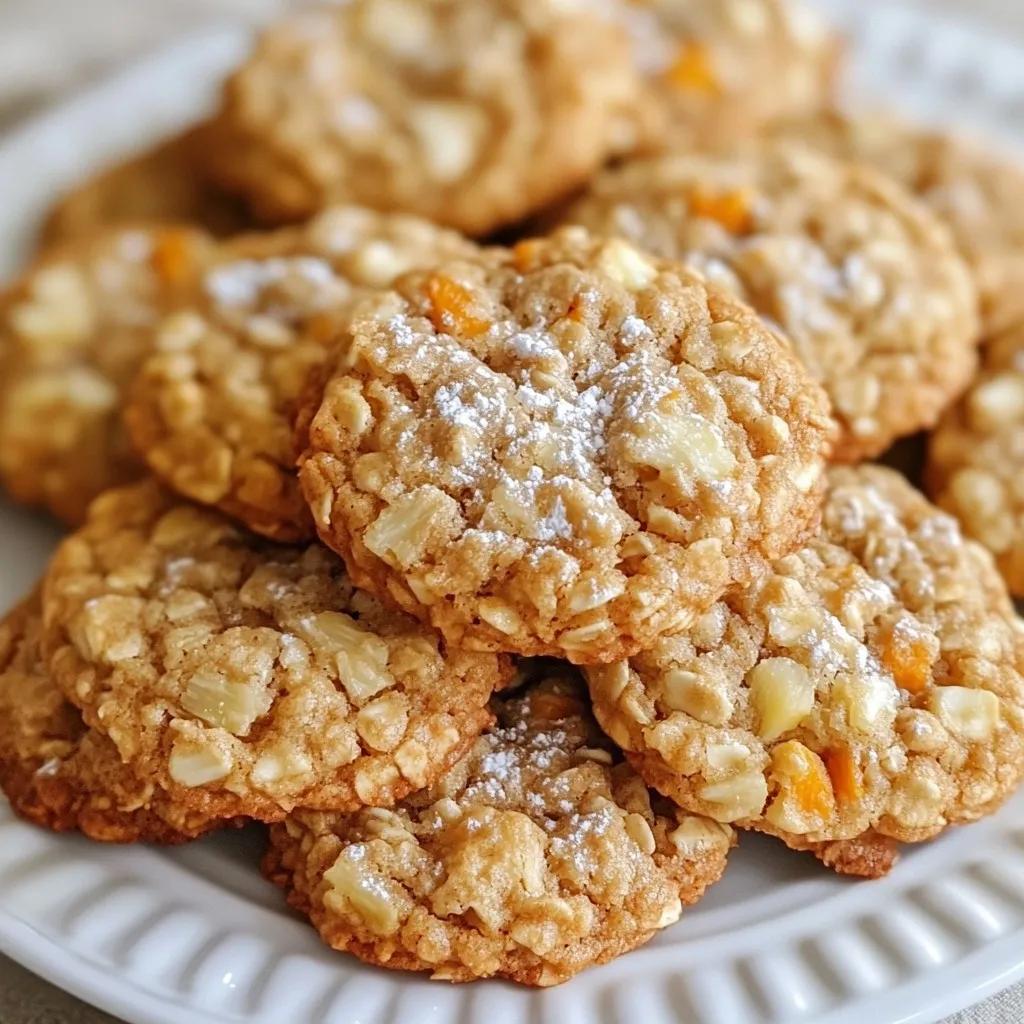
Craving a sweet treat that’s both tasty and healthy? You’re in for a delight with my Carrot Cake Oatmeal Cookies!

- 1 cup cream cheese, softened - 1/2 cup unsalted butter, softened - 1 cup granulated sugar - 1/2 cup brown sugar, packed - 1 large egg - 2 teaspoons vanilla extract - Zest of 1 lemon - 2 tablespoons lemon juice - 2 cups all-purpose flour - 1 teaspoon baking powder - 1/2 teaspoon baking soda - 1/4 teaspoon salt - 1 cup fresh blueberries (or frozen, if out of season) - 1/2 cup white chocolate chips (optional) When making Lemon Blueberry Cheesecake Cookies, choose good quality cream cheese and butter. This choice makes a big difference in taste. If you want a lighter cookie, use less sugar or a sugar substitute. For a dairy-free option, try using vegan cream cheese and butter. They work well and still taste great. If you can't find fresh blueberries, frozen ones are a good option. Just make sure to thaw and drain them first. This helps keep the dough from getting too wet. You can also replace white chocolate chips with dark chocolate if you prefer a richer flavor. Feel free to get creative with your cookies! You can add in different fruits like raspberries or strawberries for a twist. Chopped nuts, like walnuts or pecans, can also add a nice crunch. If you want a little more zing, consider adding ground ginger or a pinch of cinnamon to the dough. These small changes can make your cookies even more delightful! {{ingredient_image_1}} To start, gather all your ingredients. You need cream cheese, butter, sugars, an egg, and lemon juice. Also, get your flour, baking powder, baking soda, and salt. Finally, have fresh blueberries ready. Preheat your oven to 350°F (175°C) and line a baking sheet with parchment paper. In a large bowl, mix the softened cream cheese and butter. Beat them together until smooth and creamy. This takes about 2-3 minutes. Next, add the granulated sugar and brown sugar. Mix for another 2 minutes until fluffy. Now, add the egg, vanilla extract, lemon zest, and lemon juice. Mix until everything is well combined. In another bowl, whisk together the flour, baking powder, baking soda, and salt. Gradually add this dry mix to the wet mix. Stir just until combined; don’t overmix. Gently fold in the blueberries and white chocolate chips. Be careful not to break the blueberries. Use a cookie scoop or a spoon to drop rounded tablespoons of dough onto your baking sheet. Make sure to leave space between each cookie. Bake in the preheated oven for 12-15 minutes. The edges should be lightly golden. The centers will be soft but will firm up as they cool. Let the cookies cool on the baking sheet for 5 minutes. Then, transfer them to a wire rack to cool completely. Enjoy these delightful treats! To get the best texture, start with soft cream cheese and butter. This helps blend them well. Beat them together until they are smooth and creamy. This step is key to fluffy cookies. Use a gentle hand when mixing in the flour. Overmixing can make cookies tough. You want a soft dough that holds its shape. Adding lemon zest brings a bright taste to your cookies. Consider using a mix of lemon juice and zest for more flavor. If you want extra sweetness, add white chocolate chips. They pair well with blueberries. You can also try a pinch of salt to boost the flavors. It balances the sweetness and enhances the lemon taste. To impress your guests, display cookies on a nice platter. Drizzle a simple lemon glaze on top. Mix powdered sugar with lemon juice for a shiny look. You can also add fresh blueberries or lemon zest on the platter. This makes your cookies look even more appealing. A touch of color always catches the eye. Pro Tips Chill the Dough: For a firmer texture, chill the cookie dough for at least 30 minutes before baking. This helps the cookies maintain their shape and prevents spreading. Use Fresh Blueberries: Fresh blueberries provide the best flavor and texture. If using frozen, ensure they are thawed and drained to avoid excess moisture in the dough. Don’t Overmix: When adding the dry ingredients, mix until just combined. Overmixing can lead to tough cookies. Experiment with Flavors: Feel free to add a pinch of cinnamon or substitute lemon zest with orange zest for a different flavor profile. {{image_2}} You can switch up the fruit based on the season. Try fresh strawberries or raspberries in spring. In summer, opt for peaches or cherries. In fall, consider chopped apples or pears. Each fruit adds its own flavor and fun color. This keeps your cookies exciting all year long. To make these cookies gluten-free, use a gluten-free flour blend. For a dairy-free option, substitute the cream cheese and butter with dairy-free versions. Many brands now offer cream cheese made from nuts or soy. This will help you enjoy the taste without dairy. Want a twist? Swap out the lemon zest for orange or lime zest. You can also use dark chocolate chips instead of white. This adds a rich flavor that pairs well with the fruit. Mixing in some chopped nuts can also add a nice crunch. Each option gives your cookies a new taste. To keep your lemon blueberry cheesecake cookies fresh, store them in an airtight container. Place a piece of parchment paper between layers to avoid sticking. They stay good for about one week at room temperature. If it’s hot or humid, consider placing them in the fridge. This will help maintain their texture. You can freeze these cookies for later enjoyment. First, let the cookies cool completely. Then, place them in a single layer on a baking sheet. Freeze for about one hour until solid. After that, transfer the cookies to a freezer bag. They can last up to three months in the freezer. Just make sure to label the bag with the date. When you're ready to enjoy your frozen cookies, take them out and let them thaw at room temperature. To warm them, preheat your oven to 350°F (175°C). Place the cookies on a baking sheet and heat them for about 5 to 10 minutes. This step makes them soft and melty. You can also serve them with a drizzle of lemon glaze for extra flavor. To make Lemon Blueberry Cheesecake Cookies from scratch, follow these steps: 1. Preheat your oven to 350°F (175°C) and line a baking sheet with parchment paper. 2. In a large bowl, beat 1 cup of softened cream cheese and 1/2 cup of softened unsalted butter until smooth. 3. Add 1 cup of granulated sugar and 1/2 cup of brown sugar. Mix until fluffy. 4. Blend in 1 large egg, 2 teaspoons of vanilla extract, the zest of 1 lemon, and 2 tablespoons of lemon juice. 5. In another bowl, whisk together 2 cups of all-purpose flour, 1 teaspoon of baking powder, 1/2 teaspoon of baking soda, and 1/4 teaspoon of salt. 6. Gradually mix the dry ingredients into the wet mixture until just combined. 7. Gently fold in 1 cup of fresh blueberries, taking care not to break them. 8. Use a cookie scoop to drop rounded tablespoons of dough onto the prepared sheet. 9. Bake for 12-15 minutes, until the edges are golden. Let them cool for 5 minutes before moving them to a wire rack. Yes, you can use frozen blueberries instead of fresh ones. Frozen blueberries work well in cookies. They may release more juice, which can change the look of your cookies. I suggest using them straight from the freezer. Do not thaw them first. This helps keep your cookies from turning too blue. To prevent your cookies from spreading too much, chill the dough for at least 30 minutes before baking. Cold dough holds its shape better. Also, make sure your butter and cream cheese are softened, not melted. Overmixing the dough can also cause spreading, so mix it gently. Using parchment paper on your baking sheet helps as well. Making Lemon Blueberry Cheesecake Cookies is fun and easy. We covered the key ingredients, step-by-step instructions, and helpful tips to perfect these cookies. You can even customize them to fit your taste or dietary needs. Remember, storing these treats properly keeps them fresh longer. Enjoy experimenting with flavors and make these cookies your own. Happy baking!

Lemon Blueberry Cheesecake Cookies Delightful Treat

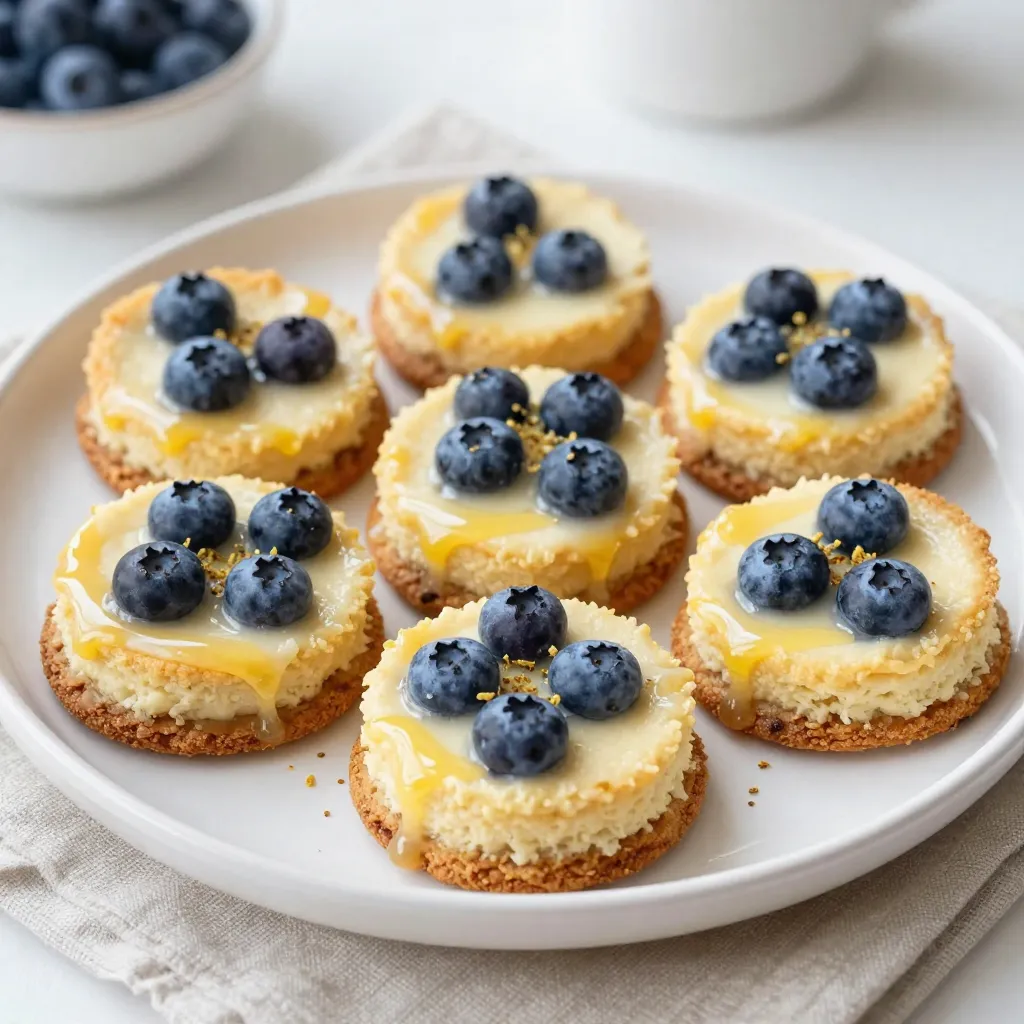
Get ready to treat your taste buds! Lemon Blueberry Cheesecake Cookies blend bright lemon with sweet blueberries for a bite-sized

- 200g pasta (penne or fusilli) - 200g feta cheese - 500g cherry tomatoes, halved - 3 cloves garlic, minced - 4 tablespoons olive oil - 1 teaspoon dried oregano - 1/2 teaspoon red pepper flakes (optional) - Salt and pepper to taste - Fresh basil leaves, for garnish - Grated Parmesan cheese, for serving (optional) - Pasta: I like penne or fusilli for this dish. They hold sauce well. - Feta Cheese: This creamy cheese adds a rich flavor. It melts nicely when baked. - Cherry Tomatoes: I choose ripe cherry tomatoes for sweetness. They burst with flavor when cooked. - Garlic: Minced garlic gives a strong, savory taste. It pairs well with tomatoes. - Olive Oil: This oil adds richness and helps cook the ingredients evenly. - Dried Oregano: Oregano is fragrant and adds a classic Italian taste. - Red Pepper Flakes: These add a hint of heat. Use them if you like spicy food. - Salt and Pepper: I use these to enhance all the flavors in the dish. - Fresh Basil Leaves: Basil adds freshness and color to the plate. - Grated Parmesan Cheese: This cheese is optional, but it adds a nice salty touch. You can add more ingredients to make this dish your own. Here are a few ideas: - Spinach: Adding fresh spinach boosts nutrition and color. - Mushrooms: Sautéed mushrooms bring a nice earthy flavor. - Olives: Chopped olives can add a briny taste. - Chicken or Shrimp: Add cooked protein for a heartier meal. Feel free to mix and match these options for a unique dish! {{ingredient_image_1}} Start by preheating your oven to 200°C (400°F). This step is key for getting the perfect bake. A hot oven helps the feta cheese turn golden and the tomatoes to blister. Next, grab a baking dish. Add the halved cherry tomatoes and minced garlic. Drizzle in 2 tablespoons of olive oil. Now, sprinkle salt, pepper, oregano, and red pepper flakes over the top. Toss everything well so the tomatoes are coated in the flavors. Place the feta cheese in the middle of the dish. This cheese will get soft and creamy. Drizzle the remaining olive oil over the feta. This will add more flavor as it bakes. While your feta and tomatoes bake, cook the pasta. Boil a large pot of salted water. Add 200g of pasta, like penne or fusilli. Follow the package instructions for timing. Once cooked, drain the pasta and set it aside. After baking for 25-30 minutes, take the dish out of the oven. The feta should look golden, and the tomatoes should be blistered. Use a fork to mash the feta and mix it with the tomatoes. This creates a creamy sauce. Now, add the cooked pasta to the baking dish. Toss everything together so the pasta is well coated with the creamy mixture. Serve hot, topped with fresh basil leaves and grated Parmesan cheese if you like. Enjoy your delicious Baked Feta Tomato Pasta! To get the best bake, keep an eye on the feta. You want it golden, not burnt. The tomatoes should be blistered and juicy. Baking at 200°C (400°F) works great. This heat allows the flavors to blend. The garlic also adds a nice touch of sweetness. For this dish, penne or fusilli are my favorites. They hold the creamy sauce well. Other pasta shapes like rigatoni can work too. Just ensure you cook the pasta until al dente. This gives it a nice bite and helps it mix well with the sauce. Serve this pasta hot for the best taste. Fresh basil leaves add a pop of color and flavor. If you like cheese, sprinkle grated Parmesan on top. You can also pair it with a simple salad or garlic bread. This adds a nice crunch and balances the meal. Pro Tips Choose the Right Pasta: Opt for pasta shapes like penne or fusilli that can hold onto the creamy sauce effectively. Feta Cheese Quality Matters: Use high-quality feta cheese for a creamier texture and richer flavor in the dish. Customize Your Veggies: Feel free to add other vegetables like bell peppers or spinach for additional flavor and nutrition. Make Ahead for Easy Meals: This dish can be prepared ahead of time; just reheat and enjoy for a quick weeknight dinner. {{image_2}} You can make this dish even more veggie-friendly. Try adding spinach or kale. Both greens cook down well. You can also toss in bell peppers or zucchini. These veggies add color and nutrition. For a richer flavor, use sun-dried tomatoes. They give a sweet, tangy taste that complements the feta. Want to make your meal heartier? Add protein! Cooked chicken or shrimp works great. If you choose chicken, grill or roast it first. For shrimp, sauté them quickly in olive oil. Mix them in after baking the feta and tomatoes. This keeps them juicy and tasty. You can also use canned chickpeas for a plant-based protein boost. If you need a gluten-free option, swap the pasta. Use gluten-free penne or fusilli. Zoodles, or zucchini noodles, are another fun choice. They are low-carb and add a fresh twist. Just remember to sauté them lightly before mixing. This keeps them from getting too soggy. Enjoy your delicious twist on baked feta tomato pasta! After you enjoy your baked feta tomato pasta, store any leftovers in an airtight container. Make sure to let it cool down first. Keep it in the fridge. It will last for about 3 to 4 days. If you want to keep it longer, freezing is a good option. When you’re ready to eat the leftovers, reheating is simple. You can use the microwave or the oven. For the microwave, heat it in 30-second bursts. Stir in between to ensure it heats evenly. If using the oven, preheat it to 180°C (350°F). Place the pasta in an oven-safe dish. Cover it with foil to prevent drying out. Heat for about 15-20 minutes. Check if it’s hot enough before serving. If you want to freeze the pasta, do it right after cooking. Let it cool completely, then portion it into freezer-safe bags. Squeeze out as much air as possible before sealing. This helps prevent freezer burn. Your baked feta tomato pasta can last up to 3 months in the freezer. When you’re ready to eat, thaw it in the fridge overnight before reheating. You can use ricotta or goat cheese instead of feta. Both give a creamy texture. If you want a stronger flavor, try blue cheese. Each choice changes the taste a bit, so pick what you like best. Yes, you can use Roma or beefsteak tomatoes. Just chop them into small pieces. If you like a sweeter taste, use sun-dried tomatoes. They add a nice flavor boost too. Baked Feta Tomato Pasta lasts about three to five days in the fridge. Store it in an airtight container. Make sure it cools down before you put it in the fridge to keep it fresh. Yes, you can prep it a day ahead. Cook the pasta and bake the feta and tomatoes. Mix them together when you're ready to serve. This saves time on busy nights. This post covers everything you need for Baked Feta Tomato Pasta. We discussed the best ingredients and their roles. I walked you through each step to ensure a perfect bake. You learned tips for choosing pasta and serving ideas. Variations let you customize the dish to your taste. Plus, I shared how to store and reheat leftovers. Baked Feta Tomato Pasta is simple and delicious, perfect for any meal. Enjoy cooking this dish and share your results!

Baked Feta Tomato Pasta Tasty and Quick Weeknight Dish

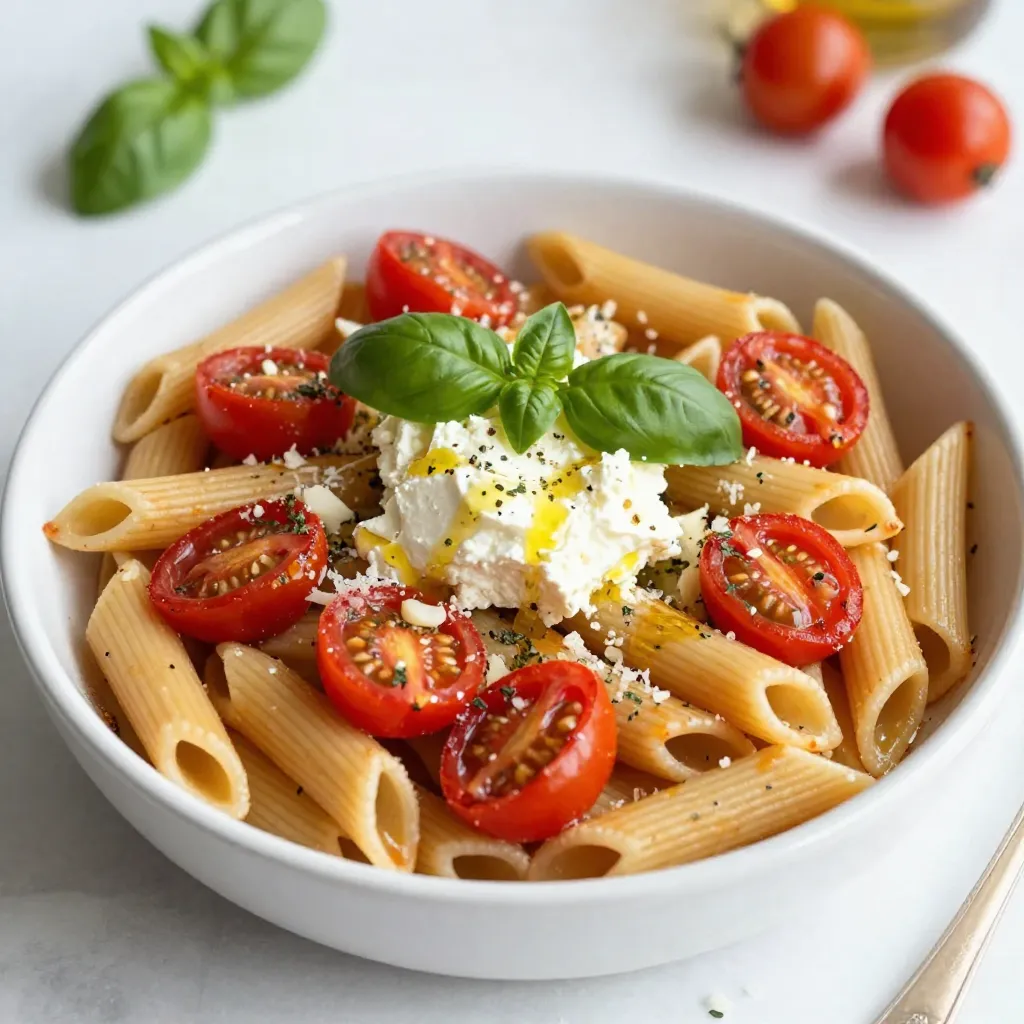
Looking for a quick and tasty dinner idea? Baked Feta Tomato Pasta is your answer! This dish is easy to

Older posts
Newer posts
← Previous Page1 Page2 Page3 … Page166 Next →

dsad

© 2026 Southern Dishes • Built with GeneratePress

Our Policies

  • Copyright Policy
  • Cookie Policy
  • GDPR Policy
  • Privacy Policy
  • Disclaimer
  • Terms Of Use

More Information

  • Home
  • About
  • Contact
  • Appetizers
  • Dessert
  • Dinner
  • Drinks
©2026, Southern Dishes About Back To Top