Skip to content
DisclaimerTerms Of UseGDPR PolicyCookie Policy

Southern Dishes

  • Home
  • Drinks
  • Appetizers
  • Dinner
  • Dessert
  • About
  • Contact
  • Privacy Policy
DisclaimerTerms Of UseGDPR PolicyCookie Policy

Isabella

- 1 cup long-grain rice (white or brown) - 1 can (15 oz) black beans, rinsed and drained - 1 cup corn kernels (fresh, frozen, or canned) - 1 lb ground turkey or beef - 1 packet taco seasoning - 1 cup diced tomatoes (fresh or canned) - 1 avocado, diced - 1 cup shredded cheese (cheddar or Mexican blend) - 1/2 cup sour cream - Fresh cilantro, for garnish - Lime wedges, for serving - Salt and pepper to taste I love using simple, fresh ingredients for my Easy Taco Rice Bowls. This mix packs a punch of flavor and color. First, you need rice. I prefer long-grain rice, either white or brown, for a nice texture. Next, I always add black beans. They are rich in protein and fiber. Corn kernels boost sweetness and crunch. I often use fresh, frozen, or canned corn—whatever I have handy. For the meat, I choose ground turkey or beef. Both work great, but turkey is lighter. Taco seasoning adds that classic taste. I use a packet for ease, but you can mix your own spices if you like. Diced tomatoes bring freshness and moisture. Avocado adds creaminess and healthy fats. Shredded cheese gives that melty goodness. I usually go for cheddar or a Mexican blend. Sour cream adds a tangy kick. Fresh cilantro brightens the whole dish. Lastly, lime wedges give a zesty finish. Each ingredient plays a key role, making this dish simple yet flavorful. You can mix and match based on your preferences, too! {{ingredient_image_1}} To start, cook your long-grain rice. You can use either white or brown rice. Follow the package instructions for the best results. Bring water to a boil, add the rice, and cover. Let it simmer until tender. After cooking, fluff the rice with a fork. This helps separate the grains. Set the rice aside for later use. Next, take a large skillet and heat it over medium heat. Add the ground turkey or beef to the skillet. Cook the meat until it is browned and fully cooked. This should take about 6 to 8 minutes. If needed, drain any excess fat. Once the meat is ready, add the taco seasoning. Mix in 1/4 cup of water according to the packet instructions. Simmer the mixture for 5 minutes until it thickens. Now, it’s time to bring everything together. Stir in the black beans and corn into the skillet. Mix well and heat for another 2 to 3 minutes until warmed through. In serving bowls, start with a layer of the cooked rice. Then, add the seasoned meat mixture on top. Finish by adding diced tomatoes, avocado, and a sprinkle of shredded cheese. Top each bowl with a dollop of sour cream. Don’t forget to garnish with fresh cilantro. Serve lime wedges on the side for extra flavor. To get the best flavor from taco seasoning, use it wisely. Mix it with the meat and let it cook well. Adding a splash of water helps the spices blend in. Always taste as you go. This way, you can adjust the seasoning if needed. When browning meat, keep the heat at medium. Don't crowd the pan. This helps the meat brown nicely. Stir it often to cook evenly. If you see too much fat, drain it. This keeps your dish from being too greasy. For taco rice bowls, serve with fresh sides. Lime wedges add a zesty kick. A simple green salad pairs well too. You can also add tortilla chips for crunch and fun. You can customize toppings based on your taste. Love heat? Try jalapeños or hot sauce. Want more veggies? Add sliced bell peppers or corn. Go wild with your choices! Get creative when you serve taco rice bowls. Use clear bowls to show off the colors. Layer the ingredients for a nice view. It makes the dish look even more inviting. Garnish with fresh cilantro for a pop of green. A sprinkle of cheese on top looks great too. Don't forget the lime wedges on the side. They make your dish bright and cheerful! Pro Tips Use Fresh Ingredients: Fresh tomatoes and ripe avocados will elevate the flavor and freshness of your Taco Fiesta Rice Bowls. Customize Your Proteins: Feel free to substitute ground turkey or beef with shredded chicken, tofu, or even a plant-based meat alternative for a different twist. Spice It Up: Add jalapeños or hot sauce for a spicy kick that complements the other flavors in the bowl. Meal Prep Friendly: This recipe is great for meal prepping! Cook a larger batch and store components separately in the fridge for quick lunches or dinners throughout the week. {{image_2}} You can easily swap proteins in this dish. Ground turkey is great, but chicken works too. If you want a meatless option, try tofu or tempeh. Both add good protein and flavor. For beans, black beans are classic, but you can use pinto or kidney beans. Each type brings its own taste. If you want a heartier base, consider using quinoa or farro instead of rice. These grains add texture and nutrition. Spices can change the whole taste of your taco rice bowl. If you like heat, add chili powder or cayenne pepper. You can also mix in smoked paprika for a rich flavor. Hot sauce is a fun way to kick things up. Try salsa for a fresh twist too. For a vegetarian or vegan version, skip the meat and cheese. Use more beans or add veggies like bell peppers and zucchini. Nutritional yeast can replace cheese and give a cheesy flavor without dairy. Taco rice bowls are easy to change into other forms. You can make burritos using the same filling. Just wrap everything in a tortilla for a hand-held meal. If nachos sound good, layer tortilla chips with the meat mixture and toppings. Add melted cheese on top and serve with salsa and sour cream. This is a fun way to share with friends! To keep your taco rice bowls fresh, place them in an airtight container. This helps prevent moisture loss. Add a layer of plastic wrap if you want extra protection. Taco rice bowls can last in the fridge for up to three days. If you notice any off odors or changes in texture, it’s best to toss them out. If you want to save your taco rice bowls for later, you can freeze them. Start by separating the ingredients. Freeze the rice, meat mixture, and toppings in different containers. This way, you can mix and match later. Taco rice bowls can be frozen for up to three months. To reheat from frozen, take the components out the night before. Let them thaw in the fridge. When ready to eat, warm the rice and meat in a skillet over low heat. Stir often to heat evenly. You can microwave the toppings for a quick option. Enjoy your meal without losing flavor! It takes about 30 minutes to make Easy Taco Rice Bowls. You will spend about 10 minutes prepping the ingredients. Cooking the rice and meat mixture takes around 20 minutes. Start by cooking the rice according to the package. While the rice cooks, brown the ground turkey or beef. This timing keeps everything fresh and hot for serving. Yes, you can make taco rice bowls ahead of time. Cook the rice and meat mixture in advance. Store them in separate containers in the fridge. Keep the toppings like cheese, tomatoes, and avocado fresh until you serve. This way, you can enjoy a quick meal on busy days. Just reheat the rice and meat before serving. Taco rice bowls pair well with many side dishes. Here are some great ideas: - Simple side salad with lettuce, tomatoes, and lime dressing - Tortilla chips with salsa or guacamole - Grilled corn on the cob - Mexican-style street corn (Elote) - A refreshing fruit salad with lime juice These sides add fun and flavor to your meal! You can create tasty taco rice bowls easily. We covered key ingredients, from long-grain rice to fresh cilantro. I shared simple instructions for cooking rice and preparing meat. Mix it all together for a fun dish. Don’t forget the tips for flavor and storage. Customize it with your favorite toppings or proteins. These bowls are quick, tasty, and make great leftovers. You can enjoy this meal with friends or family. Try it today and make your dinner special!

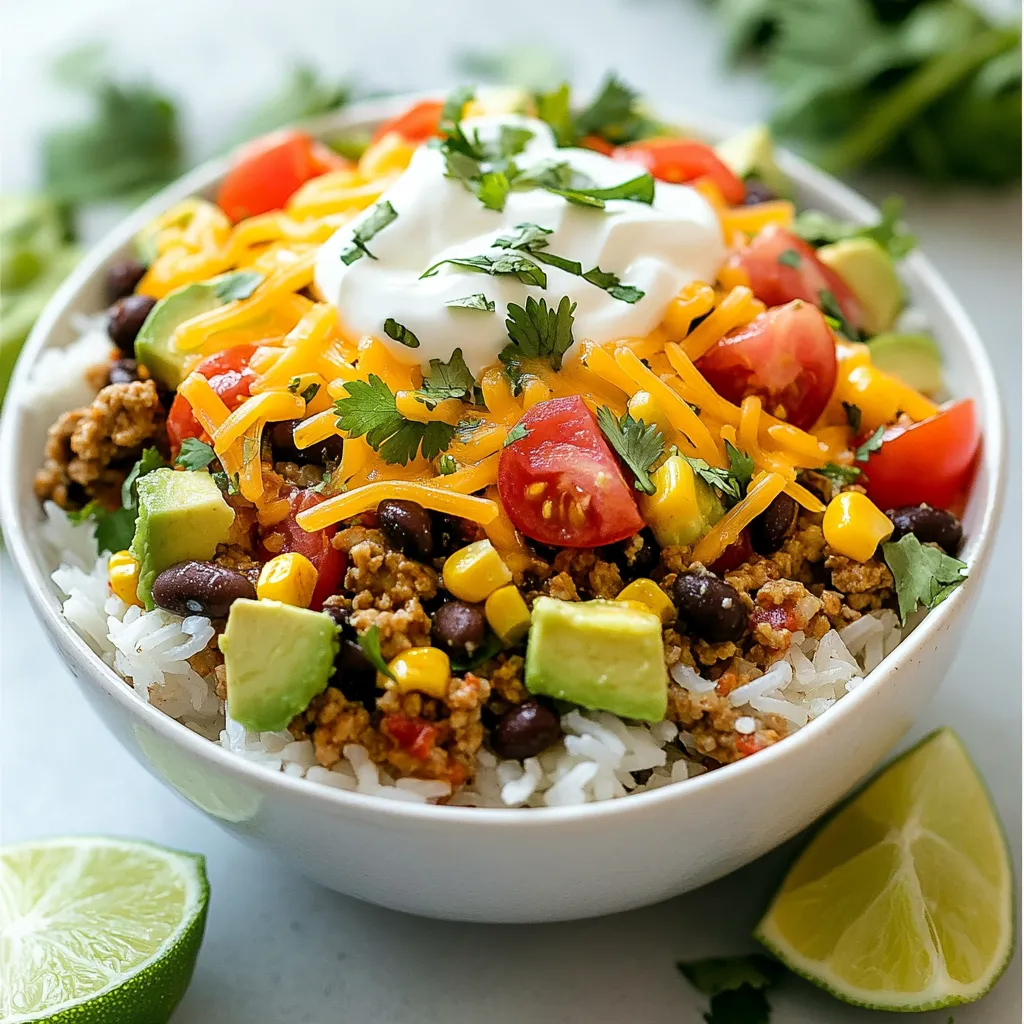
Easy Taco Rice Bowls Simple and Flavorful Meal

Ready for a dinner that’s quick, tasty, and crowd-pleasing? Easy Taco Rice Bowls are your answer! With simple ingredients and

To make herb roasted potatoes, carrots, and zucchini, gather these simple items: - 4 medium potatoes, cubed - 3 large carrots, sliced - 2 medium zucchinis, cut into half-moons - 3 tablespoons olive oil - 2 teaspoons dried rosemary - 1 teaspoon dried thyme - 1 teaspoon garlic powder - Salt and pepper to taste - Fresh parsley, chopped (for garnish) Choose fresh vegetables for the best taste. Look for potatoes that are firm and smooth. Avoid any with green spots or sprouts. Select carrots that are bright and crisp. They should feel heavy for their size. Zucchini should be shiny and firm. If it feels soft, skip it. Fresh herbs add a lovely touch. Look for parsley that is bright green and fragrant. To add more depth to your dish, consider these optional ingredients: - 1 onion, chopped for sweetness - 1 bell pepper, cut into strips for color - 1 teaspoon paprika for a smoky flavor - A splash of balsamic vinegar for tang These extras can take your herb roasted vegetables to a new level. Mix and match based on what you enjoy! {{ingredient_image_1}} First, gather all your ingredients. You need potatoes, carrots, and zucchini. Cut the potatoes into cubes. Slice the carrots into rounds. Cut the zucchini into half-moons. This shape helps them cook evenly. Place all the chopped veggies in a large mixing bowl. Next, drizzle 3 tablespoons of olive oil over the vegetables. Toss them gently to coat each piece. This oil helps the veggies roast well and adds flavor. In a small bowl, mix 2 teaspoons of dried rosemary, 1 teaspoon of dried thyme, 1 teaspoon of garlic powder, and salt and pepper. Sprinkle this herb blend over the vegetables. Toss again to ensure even seasoning. Now, preheat your oven to 425°F (220°C). Spread the seasoned vegetables on a large baking sheet. Make sure they lay in a single layer. This helps them roast evenly. Place the sheet in the oven and set a timer for 25 to 30 minutes. Halfway through, stir the veggies to promote even cooking. Check the veggies after 25 minutes. They should be golden brown and tender. You can test them with a fork. If it goes in easily, they are done. If not, roast for another few minutes. Once ready, remove them from the oven and let cool slightly. Garnish with fresh parsley for a pop of color. Enjoy your flavorful dish! To get the best roast, keep these tips in mind: - Cut veggies into equal sizes. This helps them cook evenly. - Use enough oil to coat each piece. It adds flavor and helps them brown. - Spread veggies out in one layer. This prevents steaming and makes them crispy. - Stir halfway through cooking. This ensures even browning and crispness on all sides. Here are some mistakes that can ruin your dish: - Overcrowding the baking sheet. This steams the veggies instead of roasting them. - Not preheating the oven. This can lead to uneven cooking. - Skipping the seasoning. Herbs and spices enhance the flavor of the veggies. - Not checking for doneness. Use a fork to test if they are tender. Having the right tools makes cooking easier: - A sharp knife for cutting veggies. This saves time and effort. - A large mixing bowl for tossing ingredients. It helps mix everything well. - A baking sheet with edges. This keeps the oil and juices contained. - A spatula for stirring the veggies. This ensures even cooking and easy serving. Pro Tips Use Fresh Herbs: Whenever possible, opt for fresh herbs instead of dried for a more vibrant flavor. Cut Uniformly: Ensure all vegetables are cut to similar sizes for even cooking and roasting. Don't Overcrowd the Pan: Give the vegetables room on the baking sheet; overcrowding can lead to steaming instead of roasting. Experiment with Spices: Feel free to mix in your favorite spices or add a pinch of cayenne for some heat! {{image_2}} You can change the veggies in this dish. Try bell peppers, sweet potatoes, or broccoli. Each veggie adds its own flavor. For instance, sweet potatoes bring a hint of sweetness. Bell peppers add a nice crunch. Just cut them into similar sizes for even cooking. Herbs and spices can change the taste a lot. Instead of rosemary, try oregano or basil. A little cumin adds warmth, while smoked paprika gives a nice kick. Mix and match to find your favorite combination. Just remember to keep the balance right so one flavor doesn't overpower the others. This dish is naturally vegan and gluten-free. Use more vegetables for a heartier meal. You can also add chickpeas for protein. They roast well and add a nice texture. If you need a richer flavor, drizzle with balsamic glaze after roasting. This gives it a sweet and tangy finish that everyone will love. To keep your herb roasted potatoes, carrots, and zucchini fresh, let them cool first. Place the veggies in an airtight container. Store them in the fridge. They will stay good for about 3 to 5 days. If you want to keep them longer, freezing is a great option. When it's time to eat the leftovers, you can reheat them in a few ways. The oven works best. Preheat it to 350°F (175°C). Spread the veggies on a baking sheet and heat for 10-15 minutes until warm. You can also use a microwave. Just place them in a bowl and cover. Heat for 1-2 minutes, stirring halfway. If you want to freeze your herb roasted veggies, follow these steps. First, let them cool completely. Then, spread them out on a baking sheet in a single layer. Freeze for about 1-2 hours. Once frozen, transfer them to a freezer-safe bag or container. Label it with the date. They can last up to 3 months. When you’re ready to eat, just reheat straight from the freezer. To make herb roasted potatoes, carrots, and zucchini, start by preheating your oven to 425°F (220°C). Cube four medium potatoes, slice three large carrots, and cut two medium zucchinis into half-moons. In a large bowl, mix these vegetables. Drizzle three tablespoons of olive oil over them, ensuring they are well-coated. In a small bowl, mix two teaspoons of dried rosemary, one teaspoon of dried thyme, one teaspoon of garlic powder, salt, and pepper. Sprinkle this herb mixture over the veggies and toss well. Spread everything on a baking sheet in a single layer. Roast for 25-30 minutes until they are golden and tender. Stir halfway through cooking. After done, let them cool a bit and garnish with fresh parsley before serving. Yes, you can use fresh herbs instead of dried. Fresh herbs add a bright flavor to your dish. If you choose fresh rosemary or thyme, use about three times more than dried. Chop them finely and add them when mixing the vegetables. This swap brings a lively taste to herb roasted potatoes, carrots, and zucchini. Herb roasted vegetables pair well with many dishes. They complement grilled chicken, fish, or steak beautifully. You can serve them alongside pasta, rice, or quinoa for a hearty meal. They also work well in salads. Toss them in a green salad or serve them as a warm side dish. Their rich flavors enhance any meal. Yes, you can make this recipe in an air fryer. Preheat the air fryer to 400°F (200°C). Prepare the vegetables as you would for the oven. Toss them with oil and herbs. Place them in the air fryer basket in a single layer. Cook for about 15-20 minutes, shaking the basket halfway through. This method gives you crispy edges while keeping the inside tender. In this article, we covered the key steps for making herb-roasted vegetables. You learned about the right ingredients, tips for fresh produce, and optional flavors. We went through simple roasting steps and how to tell when your veggies are done. I shared tools, common mistakes, and ways to tweak the recipe. Finally, you now know how to store leftovers and answer common questions. Embrace these tips to make delicious meals with ease. Enjoy your cooking journey!

Herb Roasted Potatoes Carrots Zucchini Flavorful Dish

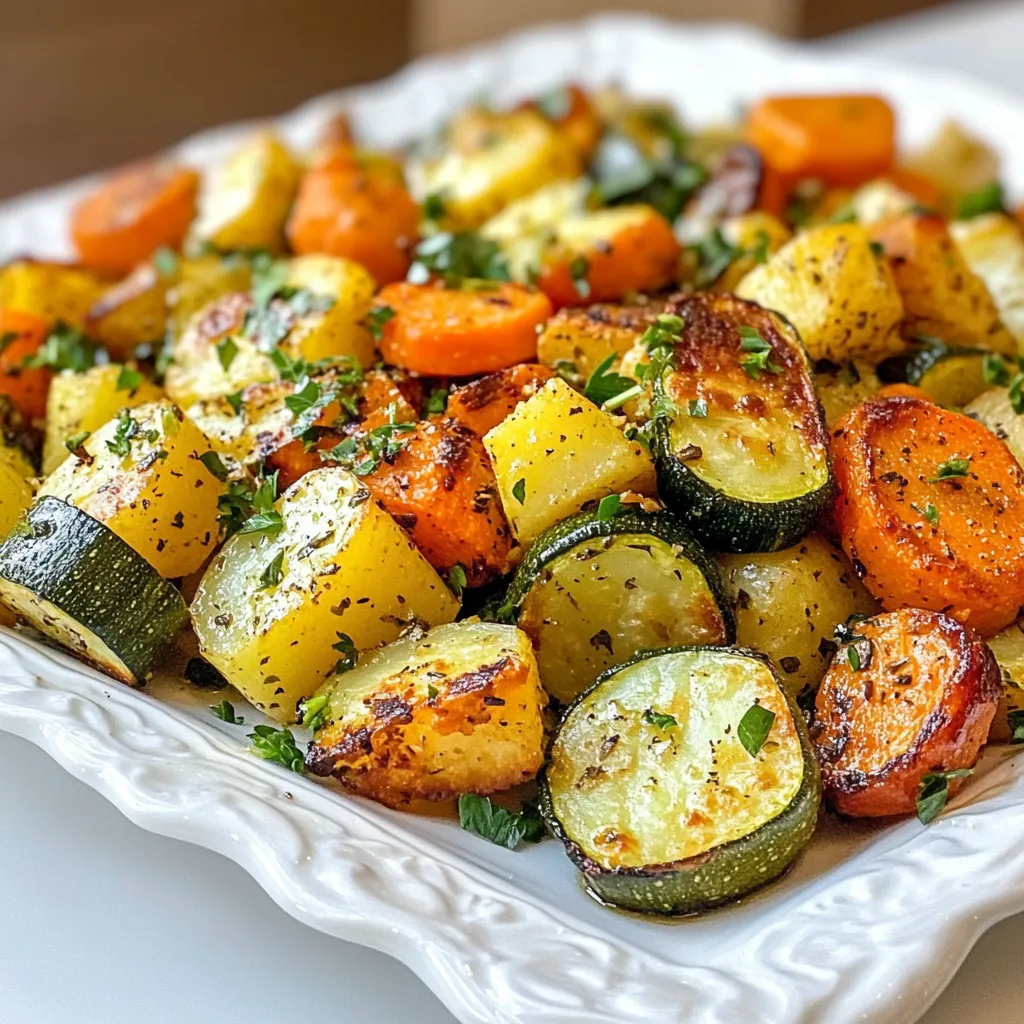
If you’re searching for a simple yet delicious side dish, look no further! Herb roasted potatoes, carrots, and zucchini are

- 4 chicken thighs, skin-on and bone-in - 1 cup sugar-free BBQ sauce - 2 tablespoons olive oil - 1 tablespoon smoked paprika - 1 teaspoon garlic powder - 1 teaspoon onion powder - 1/2 teaspoon cayenne pepper (optional) - Salt and pepper to taste - Fresh parsley, chopped These ingredients are the stars of your low carb BBQ chicken thighs. Chicken thighs are juicy and full of flavor. They stay tender when cooked, making them perfect for this recipe. The sugar-free BBQ sauce adds a sweet and tangy kick without the carbs. Olive oil helps the spices stick and adds richness. For seasoning, smoked paprika gives a nice depth. Garlic powder and onion powder add savory notes. Cayenne pepper brings heat, but it’s optional. Salt and pepper round out the flavors. Finally, fresh parsley adds a pop of color and freshness. It makes your dish look great and tastes bright. This simple list makes a delicious meal. Enjoy the process as you prepare these tasty thighs! {{ingredient_image_1}} - Preheating the oven First, preheat your oven to 400°F (200°C). This ensures even cooking and crispy skin. - Preparing the marinade In a small bowl, mix 2 tablespoons of olive oil, 1 tablespoon of smoked paprika, 1 teaspoon of garlic powder, and 1 teaspoon of onion powder. Add 1/2 teaspoon of cayenne pepper if you like it spicy. Then, season with salt and pepper to taste. This mix gives your chicken a smoky and savory flavor. - Applying the marinade Rub the marinade all over the chicken thighs. Make sure to coat both sides well. This step is key for juicy, flavorful meat. - Placing chicken in the baking dish Place the marinated chicken thighs in a baking dish, skin side up. This will help the skin get crispy while baking. - Baking time and temperature Bake the chicken in the preheated oven for 25-30 minutes. The chicken should reach an internal temperature of 165°F (75°C) when done. The skin should look crispy and caramelized. - Glazing with BBQ sauce In the last 5 minutes of baking, brush the chicken with sugar-free BBQ sauce. Save some sauce for this step to add more flavor and create a nice glaze. Using skin-on chicken thighs gives you great flavor and texture. The skin helps keep the meat juicy. It also becomes crispy when cooked right. To achieve that perfect crispiness, bake the thighs at a high temperature. This method renders the fat and crisps the skin. Make sure to place the thighs skin side up in the baking dish. This allows the heat to circulate evenly. To amp up the flavor, consider adding more spices. You can mix in onion powder, garlic powder, or even dried herbs. Try adding some cumin or chili powder for a kick. Fresh herbs like thyme or rosemary can add a nice touch, too. For sides, think about serving with grilled vegetables or a fresh salad. Both complement the chicken well and keep it low-carb. If you prefer a quick sugar-free BBQ sauce, here’s a simple recipe. Mix 1 cup of tomato sauce, 2 tablespoons of apple cider vinegar, and your favorite spices. This gives you a sweet and tangy taste without added sugars. Using homemade sauce allows you to control the ingredients. You can adjust flavors to suit your taste. Plus, it feels great to make your own! Pro Tips Marinate for Maximum Flavor: Allow the chicken thighs to marinate for at least 30 minutes, or even overnight, to enhance the flavor and tenderness. Check for Doneness: Always use a meat thermometer to ensure the chicken reaches an internal temperature of 165°F (75°C) for safe consumption. Skin Crispy Tip: For extra crispy skin, broil the chicken for the last 2-3 minutes of cooking, keeping a close watch to prevent burning. Serving Suggestion: Serve with a side of roasted vegetables or a fresh salad for a complete low-carb meal. {{image_2}} You can switch chicken thighs for turkey or pork. Turkey thighs work great and have a similar texture. They are juicy and soak up flavors well. For pork, try using pork chops or ribs. Adjust the cooking time based on the size. Always check the internal temperature. Turkey should reach 165°F (75°C). Pork needs to hit 145°F (63°C). Pair your BBQ chicken with tasty veggie sides. Grilled zucchini or asparagus add crunch and flavor. Roasted broccoli or cauliflower are also great options. They keep the meal low in carbs. Salads are another excellent choice. A simple mixed green salad balances the rich chicken. Add cucumbers and cherry tomatoes for freshness. Drizzle with olive oil and lemon juice for a light dressing. Grilling brings out a smoky flavor in the chicken. To grill, preheat your grill to medium-high heat. Brush the grates with oil to prevent sticking. Place the marinated chicken on the grill, skin side down. Cook for about 6-8 minutes per side. This will give you a nice char and keep the meat juicy. Use a meat thermometer to ensure they reach 165°F (75°C). Adjust time if your chicken thighs are larger or smaller. Enjoy this smoky treat outdoors! After cooking, let the chicken cool down for a bit. Store the leftovers in an airtight container. This keeps them fresh for up to four days. Glass or plastic containers work well. Make sure to seal them tightly to avoid spills and smells. If you want to save your chicken for later, freezing is a great option. Wrap each thigh in plastic wrap, then place them in a freezer bag. Squeeze out as much air as you can. This helps prevent freezer burn. You can freeze them for up to three months. To thaw, move the chicken to the fridge overnight. For quick thawing, place the bag in cold water. When you're ready to eat, reheat the thighs in the oven at 350°F (175°C) until they are warm throughout. This usually takes about 20 minutes. Leftover chicken is very versatile. You can shred it and add it to salads or wraps. It also makes a great topping for pizzas or flatbreads. Mix it with some cheese and veggies for a tasty quesadilla. Another idea is to chop it into bite-sized pieces and stir it into a soup. The options are endless! You can use several tasty options. Try mixing tomato paste with vinegar and spices. This gives a tangy flavor. Another choice is mustard mixed with sweeteners like erythritol. You can also use hot sauce for a spicy kick. Just ensure your choices fit your low-carb plan. To check if chicken is done, use a meat thermometer. Insert it into the thickest part. It should read 165°F (75°C). You can also cut into the chicken. The juices should run clear, not pink. Let the chicken rest for a few minutes after cooking. This helps keep it juicy. Yes, you can use boneless chicken thighs. They cook faster than bone-in thighs. Reduce the baking time to about 20-25 minutes. Check for doneness as before, using a thermometer. Boneless thighs absorb flavors well, so you’ll still enjoy great taste! In this post, I covered how to make tasty chicken thighs using simple ingredients. You learned about the marinade, baking methods, and tips for perfect crispiness. Remember, skin-on thighs give great texture. You can even switch proteins or try a grill. Keep leftovers in the fridge or freezer for later. Enjoy exploring flavors and new meals with this recipe!

Low Carb BBQ Chicken Thighs Simple and Savory Recipe

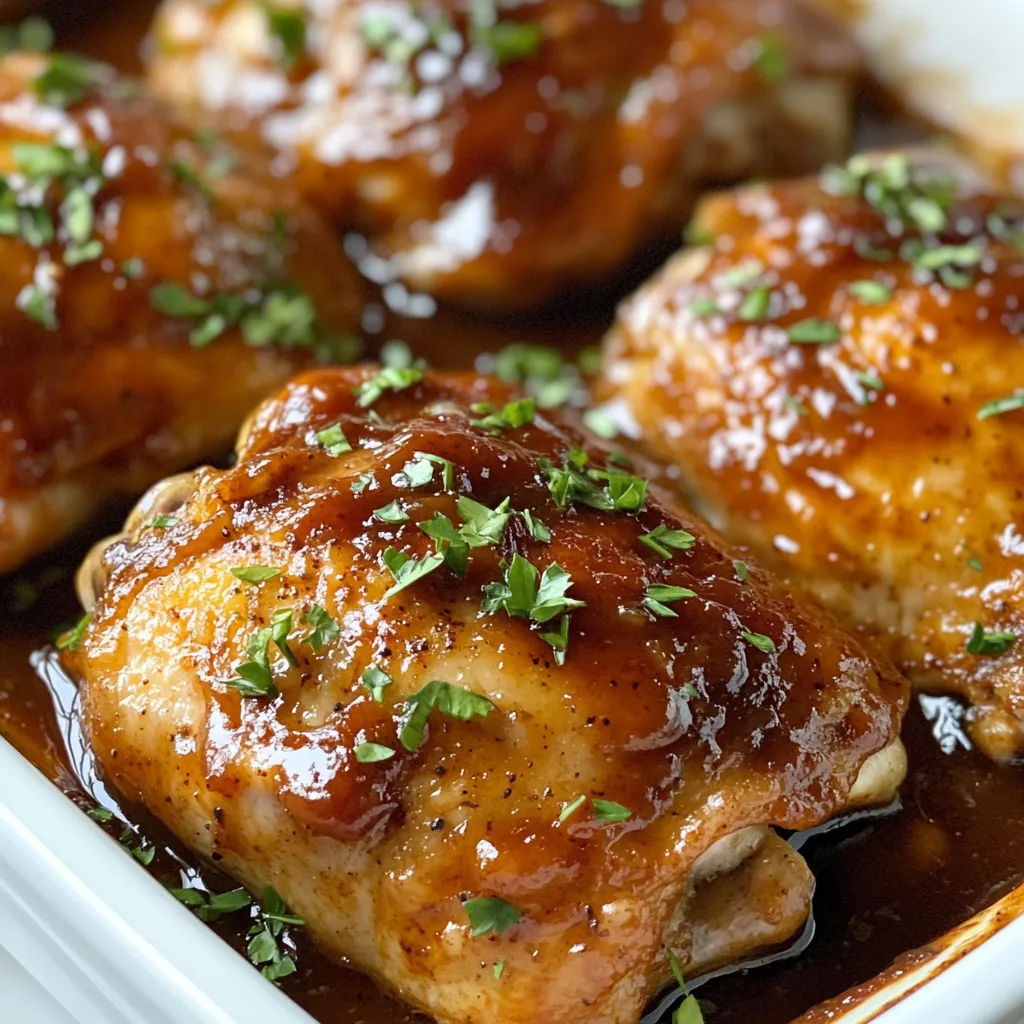
Are you craving a flavorful dish that fits your low-carb lifestyle? Look no further! I’m excited to share my simple

- 12 oz rigatoni pasta - 2 tablespoons olive oil - 1 medium onion, finely chopped - 3 garlic cloves, minced - 1 can (28 oz) crushed tomatoes - 1 teaspoon dried basil - 1 teaspoon dried oregano - ½ teaspoon red pepper flakes (optional) - Salt and pepper to taste - Fresh basil leaves, for garnish - Grated Parmesan cheese, for serving The main ingredients for this dish are simple yet flavorful. Rigatoni pasta is the star. It holds sauce well and gives a nice bite. Olive oil adds richness, while onion and garlic bring great aroma. Crushed tomatoes form the base of the marinara sauce. Dried basil and oregano add classic Italian flavor. You can adjust the salt and pepper to your taste. - ½ teaspoon red pepper flakes - Fresh basil leaves - Grated Parmesan cheese Optional ingredients can elevate your dish. Red pepper flakes add heat if you like spice. Fresh basil leaves give a burst of fresh flavor. Grated Parmesan cheese adds a salty finish and creaminess. You can mix and match these toppings based on what you enjoy. {{ingredient_image_1}} To start, fill a large pot with water and add a generous amount of salt. This makes the pasta taste better. Bring the water to a rolling boil. Once it boils, add 12 ounces of rigatoni pasta. Cook it according to the package instructions. Aim for al dente, which means the pasta should still have a slight bite. This usually takes about 10-12 minutes. When ready, drain the pasta and save about 1 cup of the water. Set the pasta aside for later. Next, grab a large skillet and heat it over medium heat. Pour in 2 tablespoons of olive oil. Wait until the oil is hot, then add the finely chopped onion. Sauté the onion for about 4-5 minutes. You want it to become soft and a bit transparent. After that, stir in 3 minced garlic cloves. Cook for just 1 more minute. You should smell the garlic's rich aroma. Now, it’s time for the marinara sauce. Pour in one 28-ounce can of crushed tomatoes. Stir well to combine. Next, add 1 teaspoon of dried basil, 1 teaspoon of dried oregano, and ½ teaspoon of red pepper flakes if you like a bit of heat. Bring the sauce to a gentle simmer. Let it cook for 10-15 minutes, stirring every few minutes. At the end of this time, season with salt and pepper to your taste. Once the sauce is ready, add the cooked rigatoni to the skillet. Toss the pasta gently with the sauce, ensuring every piece gets coated. If the sauce seems thick, add some of the reserved pasta water. This helps thin it out to your desired consistency. Cook everything together for 2-3 minutes. This allows the pasta to soak up the sauce's flavors. - Salt Tips for Boiling Water: Always add salt to your boiling water. This step enhances the pasta's flavor. Use about 1 tablespoon of salt for every 4 quarts of water. It is key for great-tasting pasta. - How to Achieve Al Dente: Cook your rigatoni until it is firm but not hard. This is called al dente. Check the package for the cooking time. Start tasting it a minute or two before the time is up. - Tips for Fresh Herbs Usage: Fresh basil adds a nice touch. Chop it and add it at the end for a bright flavor. This keeps the herb fresh and aromatic. You can also use dried herbs if fresh ones are not available. - Secrets for a Richer Marinara Flavor: For a deeper taste, let your sauce simmer longer. This helps all the flavors mix well. A bit of sugar can balance the acidity from the tomatoes too. - Best Pairings with Rigatoni Marinara: Serve your rigatoni with a side salad or garlic bread. These sides complement the meal perfectly. A light red wine can also enhance your dining experience. - Plating Ideas for Presentation: Use a large bowl for family style or individual plates for a special touch. Top with fresh basil and a sprinkle of Parmesan cheese. It makes the dish look as good as it tastes! Pro Tips Use High-Quality Tomatoes: Opt for San Marzano or other high-quality canned tomatoes for a richer flavor in your marinara sauce. Don't Skip the Pasta Water: The starchy pasta water helps to bind the sauce and pasta, giving it a silky texture. Adjust Spice Levels: Feel free to modify the red pepper flakes according to your heat preference; start with a small amount and add more if desired. Fresh Herbs Make a Difference: Add fresh basil just before serving for a burst of flavor that elevates the entire dish. {{image_2}} Adding vegetables can make your rigatoni marinara more colorful and healthy. You can use classic vegetables like bell peppers, zucchini, or mushrooms. If you want fresh flavors, try seasonal veggies like asparagus in spring or spinach in winter. Just chop them up and toss them in with the onion and garlic. This will add taste and texture to your meal. If you want to make your dish heartier, consider adding protein. Cooked chicken or Italian sausage works well with marinara sauce. Just slice or crumble the meat and sauté it with the onions. This not only adds flavor but also makes the meal more filling. You can also use shrimp for a twist on this classic dish. While marinara is a classic, you can explore other sauces too. Try a creamy Alfredo for a rich taste or a pesto for a fresh vibe. Both pair well with rigatoni. You can even mix sauces, like combining marinara with pesto for a unique flavor. Experimenting with sauces can lead to exciting new meals! To keep your rigatoni marinara fresh, store it in an airtight container. Make sure to cool it down first. Leftovers last up to four days in the fridge. Label the container with the date. This helps you remember when you made it. You can freeze rigatoni marinara for up to three months. Divide it into portions for easy thawing. Use freezer-safe bags or containers. To freeze, let it cool completely before sealing. To thaw, place it in the fridge overnight. For best flavor and texture, reheat on the stove. Add a splash of water or extra olive oil while warming. Stir often to heat evenly. You can also microwave it, but check every minute to avoid overcooking. Enjoy your meal just like when you first made it! To make this dish gluten-free, choose gluten-free rigatoni. Many brands offer pasta made from rice or corn. These options cook well and taste great. Just follow the package instructions for cooking times. This way, you can enjoy rigatoni marinara without gluten. Yes, you can use other pasta types. Penne, farfalle, or even spaghetti work well. Each shape offers a unique texture. Just make sure to adjust the cooking time based on the pasta you choose. This keeps your meal tasty and fun. If you lack crushed tomatoes, try using diced tomatoes or tomato puree. Both options provide a similar flavor. You can also blend whole tomatoes for a smooth texture. This keeps your marinara sauce rich and delicious. Leftovers will last about three to five days in the fridge. Store them in an airtight container. To enjoy the meal later, reheat on the stove or in the microwave. This keeps the flavors fresh and enjoyable. This blog post covered all aspects of making rigatoni with marinara sauce. You learned about the key ingredients, step-by-step preparation, and helpful tips to enhance the dish. Variations allow you to customize your meal, while storage info ensures your leftovers stay fresh. Experiment with different herbs, proteins, or sauces to find your favorite twist. Cooking should be fun and flavorful, so enjoy every step in the process! With practice and creativity, you can create a delicious meal every time.

Weeknight Rigatoni Marinara Simple and Tasty Meal

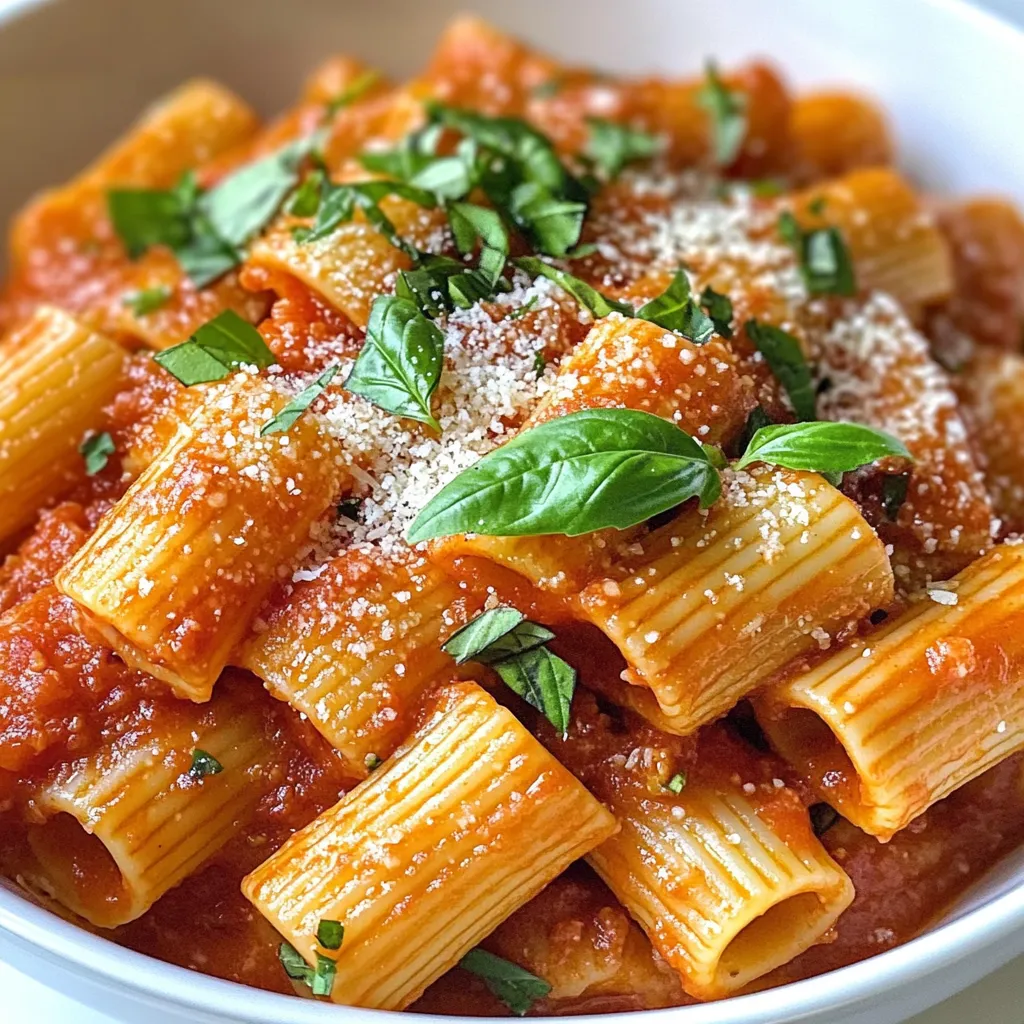
Busy weeknights don’t have to mean bland dinners! With my simple Weeknight Rigatoni Marinara recipe, you can whip up a

Newer posts
← Previous Page1 … Page165 Page166

dsad

© 2026 Southern Dishes • Built with GeneratePress

Our Policies

  • Copyright Policy
  • Cookie Policy
  • GDPR Policy
  • Privacy Policy
  • Disclaimer
  • Terms Of Use

More Information

  • Home
  • About
  • Contact
  • Appetizers
  • Dessert
  • Dinner
  • Drinks
©2026, Southern Dishes About Back To Top