Skip to content
DisclaimerTerms Of UseGDPR PolicyCookie Policy

Southern Dishes

  • Home
  • Drinks
  • Appetizers
  • Dinner
  • Dessert
  • About
  • Contact
  • Privacy Policy
DisclaimerTerms Of UseGDPR PolicyCookie Policy

Isabella

- Flatbreads: You can choose store-bought or make your own. Store-bought saves time. Homemade gives a fresh taste. - Protein: Use cooked chicken breast for the best flavor. Shredded chicken works great. You can also use rotisserie chicken for ease. - Pesto: You can buy pesto or make your own. Store-bought is quick, while homemade has a fresh flavor. - Cheese: Use fresh mozzarella for creamy goodness. You can also try burrata for a richer taste. - Vegetables: Fresh spinach and tomatoes add color and nutrition. They keep the flatbread light and fresh. With these ingredients, you set the stage for a delicious Pesto Chicken Flatbread. Each element adds to the flavor and texture, making it a crowd-pleaser. {{ingredient_image_1}} 1. Start by preheating your oven to 400°F (200°C). This step ensures your flatbreads cook evenly. 2. Line a baking sheet with parchment paper. This makes cleanup easier and helps the flatbreads cook nicely. 3. Brush each flatbread lightly with olive oil. A thin layer gives a crispy base. Use a brush or a spoon to spread the oil evenly. 1. Spread a nice layer of pesto on each flatbread. Leave a small space at the edges for a crust. 2. In a mixing bowl, combine the shredded chicken with salt, pepper, and half of the grated Parmesan cheese. Mix well. 3. Evenly distribute this chicken mixture over the pesto. Make sure every bite has some chicken. 4. Scatter halved cherry tomatoes and diced mozzarella over the chicken. This adds color and flavor. 5. Pile fresh spinach on top. It gives a nice crunch and freshness. 6. Finish by sprinkling the rest of the Parmesan cheese on top for extra flavor. 1. Place the baking sheet in the oven and bake for 12-15 minutes. This time is perfect for melting the cheese. 2. Check for doneness by looking for bubbling cheese and golden-brown edges. If it looks good, it’s ready! 3. Once out of the oven, let the flatbreads cool for a minute. This helps the cheese set a bit before slicing. To boost flavor, add spices or herbs to your chicken. A sprinkle of garlic powder or paprika can add a nice kick. Fresh herbs like thyme or oregano also work well. If you want to experiment, mix in some red pepper flakes for heat. Changing up the cheese can make a huge difference. Try using gouda for a rich taste. You could also blend mozzarella with sharp cheddar for a new twist. Each cheese brings its own charm to the flatbread. For crispy flatbread, make sure to brush the base with olive oil. This step helps create a nice crunch. If you prefer a softer flatbread, you can skip the oil. Just keep in mind, it won’t be as crispy. When baking, ensure even cooking of toppings. Spread them out well. If you pile them high, some parts may not cook fully. Keep an eye on the edges to avoid burning while the middle cooks. Pesto Chicken Flatbread pairs well with simple side dishes. A fresh salad with lemon dressing adds a bright touch. You could also serve it with roasted vegetables for a hearty meal. Dips can elevate your dining experience. Consider a tangy yogurt sauce or a classic balsamic glaze. These options complement the flavors of the flatbread nicely. Pro Tips Use Fresh Ingredients: Always opt for fresh basil and ripe cherry tomatoes to enhance the flavor of your flatbreads. Customize Your Toppings: Feel free to add other toppings like olives, artichokes, or bell peppers for extra flavor and nutrition. Make It Your Own: Try different types of cheese, like goat cheese or feta, for a unique twist on the classic recipe. Serve Immediately: Enjoy your flatbreads fresh out of the oven for the best taste and texture; they are best served warm! {{image_2}} You can easily switch the chicken in this recipe. Grilled shrimp works great and adds a nice twist. You can also try other proteins like turkey or beef, depending on your taste. If you want a vegetarian option, mushrooms and tofu are excellent choices. They soak up flavors well and give a hearty bite. Changing toppings with the seasons makes this dish fun. In summer, add fresh zucchini or bell peppers for a bright touch. These veggies add crunch and color. In winter, think about using spinach and heavier cheeses. The richness of cheese like gouda or fontina warms up the dish nicely. If you need gluten-free options, many brands offer gluten-free flatbreads. They taste great and hold the toppings well. For low-carb diets, consider using a cauliflower crust. It’s lighter and still very tasty. These options let everyone enjoy pesto chicken flatbread. Adjust it to fit your needs! To keep your Pesto Chicken Flatbread fresh, store it in an airtight container. This helps lock in moisture and flavor. Place the flatbread in the fridge within two hours of cooking. If you stack pieces, use parchment paper between them to avoid sticking. When it's time to reheat, use the oven. Preheat it to 350°F (175°C). Place the flatbread on a baking sheet and heat for about 10 minutes. This keeps the flatbread crispy and warms the toppings nicely. You can freeze leftover flatbread for later. Wrap each piece tightly in plastic wrap. Then, place them in a freezer bag. Remove as much air as possible. This prevents freezer burn. To thaw, move the flatbread to the fridge overnight. For reheating, use the oven again. Preheat to 350°F (175°C) and bake for 15 minutes. This will bring back the original taste. In the fridge, your leftover Pesto Chicken Flatbread lasts about 3-4 days. In the freezer, it stays good for up to 2-3 months. Mark your containers with the date to keep track. Always check for signs of spoilage before eating. If it looks or smells off, it’s best to toss it. You can use any flatbread you like. Store-bought flatbreads work well. I often choose whole wheat for more texture. Homemade flatbread adds a personal touch. A thicker flatbread gives a heartier bite. A thinner one lets the toppings shine. Yes, rotisserie chicken is a great choice. It saves you time and effort. The chicken is already cooked and seasoned well. Just shred it and mix with spices. This makes the recipe even easier. Plus, it adds great flavor to your flatbread. You can get creative with toppings. Try adding bell peppers for crunch. Olives add a nice salty punch. Artichokes bring a unique taste too. You can even sprinkle some red pepper flakes for heat. Fresh herbs like cilantro or dill can lift the dish. Don't hesitate to mix flavors to make it your own! You learned how to create a tasty Pesto Chicken Flatbread with easy steps. We explored ingredients like fresh veggies, flavorful proteins, and the right cheeses. I shared tips for great texture and storage options, ensuring your leftovers stay fresh. Try different toppings and variations to make this dish your own. Enjoy every bite and make it a family favorite!

Pesto Chicken Flatbread Flavorful and Easy Recipe

Get ready to elevate your weeknight dinners with my easy and flavorful Pesto Chicken Flatbread recipe! This dish combines crispy

- 1 ½ cups cottage cheese - 1 cup Greek yogurt - 2 tablespoons honey or maple syrup - 1 teaspoon vanilla extract - 2 teaspoons lemon juice - ¼ cup protein powder (vanilla or unflavored) - 2 tablespoons cornstarch - 2 large eggs - 1 cup almond flour (for the crust) - 2 tablespoons coconut oil, melted - 1 tablespoon sweetener (optional, adjust to taste) - Pinch of salt High-protein ingredients make this cheesecake healthy and filling. Cottage cheese packs in protein, calcium, and vitamins. Greek yogurt adds more protein and probiotics. These good bacteria help your gut. Eggs are a complete protein and provide healthy fats. Almond flour has healthy fats and fiber. It also keeps the crust gluten-free. Using protein powder boosts protein even more. You can swap ingredients easily for your needs. Use ricotta cheese if you don't like cottage cheese. Any yogurt works if Greek is not available. For sweeteners, use agave nectar or stevia. You can also try oat flour instead of almond flour for the crust. If you want a dairy-free option, use silken tofu instead of cottage cheese and yogurt. These swaps keep the recipe tasty and healthy. {{ingredient_image_1}} To make the g Protein Cheesecake, you need to gather your ingredients first. This recipe takes about 20 minutes to prep. You will also need time for baking and chilling. Plan for a total of 3 hours to enjoy this tasty dish. 1. Preheat the Oven: Start by setting your oven to 325°F (160°C). 2. Prepare the Crust: In a bowl, mix the almond flour, melted coconut oil, and a pinch of salt. Stir until it looks like wet sand. Press this mix into the bottom of a greased 9-inch springform pan. Bake it for 10-12 minutes until it turns slightly golden. Once done, let it cool. 3. Make the Filling: In a blender or food processor, add the cottage cheese, Greek yogurt, honey (or maple syrup), vanilla extract, lemon juice, protein powder, cornstarch, and eggs. Blend until smooth. Scrape down the sides if needed. 4. Combine: Pour the filling over the cooled crust. Smooth the top with a spatula. 5. Bake: Place the cheesecake in the oven. Bake for about 30-35 minutes. The edges should be set, but the center can jiggle a bit. 6. Cool Down: Turn off the oven and slightly open the door. Let the cheesecake cool inside for about 1 hour. This helps to avoid cracks. Afterward, move it to the fridge to chill for at least 2 hours or overnight for the best texture. 7. Serve: Once chilled, carefully take the cheesecake out of the springform pan. Slice it up and serve it plain or with fresh berries and a drizzle of honey for extra sweetness. - Blend Well: Make sure to blend the filling until it is very smooth. This helps create a creamy texture. - Don't Overbake: Keep an eye on the time. Overbaking can lead to cracks. - Cool Slowly: Allowing the cheesecake to cool slowly in the oven helps maintain its texture. To avoid cracks in your cheesecake, keep a few things in mind. First, don’t overmix the filling. Blend until smooth, but stop once it’s creamy. Second, bake at a low temperature. I recommend 325°F (160°C). This helps the cheesecake cook evenly. Lastly, let the cheesecake cool slowly. After baking, crack the oven door. This prevents sudden temperature changes that cause cracks. Chilling is key for a nice texture. After you bake the cheesecake, let it cool in the oven for one hour. This helps it set. Then, transfer it to the fridge. Chill for at least two hours, but overnight is best. This allows the flavors to meld. If you’re in a hurry, a quick chill in the freezer for 30 minutes can help, but it’s not as effective. For serving, keep it simple yet tasty. You can enjoy the cheesecake plain, or add toppings. Fresh berries like strawberries or blueberries add a bright flavor. Drizzle some honey or maple syrup for extra sweetness. If you want a creamy touch, add a dollop of Greek yogurt on top. These small additions can elevate your dessert and make it even more delicious! Pro Tips Choose the Right Sweetener: For a more natural taste, use honey or maple syrup. If you want to keep it low-calorie, opt for a low-calorie sweetener. Prevent Cracking: Cooling the cheesecake in the oven with the door ajar helps to prevent cracks on the surface. This gradual temperature change is essential. Texture Tip: Ensure all your ingredients, especially the cottage cheese and eggs, are at room temperature before blending for a smoother filling. Chill Time Matters: For the best flavor and texture, allow the cheesecake to chill overnight. This helps the flavors meld beautifully. {{image_2}} You can change the flavor of your cheesecake easily. Try adding cocoa powder for chocolate cheesecake. Mix in some fresh berries for a fruity twist. Just blend the berries into the filling before baking. You can also add a bit of almond extract for a nutty flavor. Each variation lets you create a new taste. If you need a gluten-free crust, use ground oats or almond flour. Almond flour works great for a nutty taste. You can also use crushed gluten-free cookies for a sweet base. Just mix them with melted coconut oil. Press the mixture into your pan as you would with regular crust. Toppings can make your cheesecake even better. For a fresh taste, add a dollop of Greek yogurt on top. You can also drizzle honey or maple syrup for sweetness. Fresh fruit like strawberries or blueberries adds color and flavor. Try a fruit sauce for a fun finish. These toppings let you customize each slice to your liking. To store leftover cheesecake, place it in an airtight container. Keep it in the fridge. This helps keep it fresh and tasty. Make sure to cover the cheesecake well. You can also use plastic wrap if you prefer. Store it for up to 5 days. You can freeze cheesecake for later. First, let it cool completely. Then, slice it into pieces. Wrap each slice in plastic wrap tightly. Place the wrapped slices in a freezer-safe bag or container. This helps prevent freezer burn. You can freeze it for up to 3 months. To eat, thaw it in the fridge overnight. The cheesecake lasts about 5 days in the fridge. After that, it may lose flavor and texture. For the best taste, eat it fresh. When freezing, ensure the cheesecake is well-wrapped. This keeps it tasting great when you thaw it. Always check for any signs of spoilage before enjoying your leftovers. The G Protein Cheesecake has about 150 calories per slice. This is based on cutting it into eight slices. Each slice gives you a healthy treat without too many calories. The lower calorie count comes from using cottage cheese and Greek yogurt instead of cream cheese. These ingredients add protein while keeping calories low. Yes, you can use different protein powders. Whether you prefer whey, plant-based, or pea protein, all work well. Just make sure the flavor matches your taste. Vanilla or unflavored protein powders are best for this recipe. They help keep the cheesecake tasting fresh and light. You can keep the cheesecake in the fridge for up to five days. Store it in an airtight container to keep it fresh. If you have any leftovers, this is a great way to enjoy more treats later. Just remember, the longer it sits, the softer the texture may become. This blog post covered the essential ingredients for a high-protein cheesecake. You learned about their benefits, common substitutions, and how they contribute to better health. We also explored detailed baking steps and key tips to ensure perfect texture. Enjoy a variety of flavors, crust options, and toppings to enhance your cheesecake. Plus, I shared the best ways to store leftovers and answered common questions. With these insights, you can create a delicious and nutritious treat that fits your needs. Enjoy baking and sharing your high-protein cheesecake!

g Protein Cheesecake Simple and Delicious Recipe

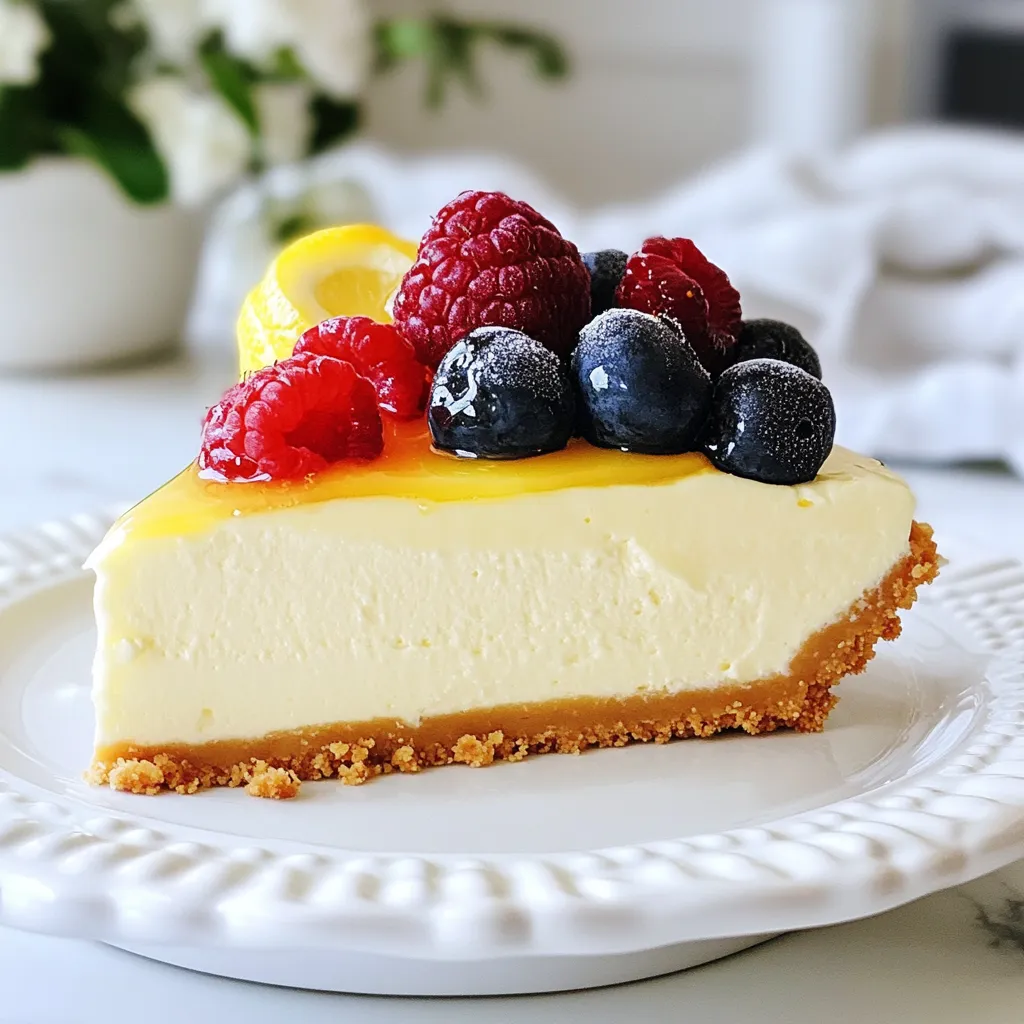
Are you ready to indulge in a dessert that’s both simple and packed with protein? This g Protein Cheesecake recipe

- 1.5 lbs boneless, skinless chicken thighs - 3 tablespoons olive oil - 2 tablespoons plain Greek yogurt - 4 cloves garlic, minced - 2 teaspoons ground cumin - 2 teaspoons ground coriander - 1 teaspoon ground turmeric - 1 teaspoon paprika - 1 teaspoon cinnamon - 1 teaspoon black pepper - 1 teaspoon salt - Juice of 1 lemon - 1 cup cooked quinoa - 1 cup cucumber, diced - 1 cup cherry tomatoes, halved - 1/2 red onion, thinly sliced - 1/2 cup fresh parsley, chopped - Tahini sauce (for drizzling) - Pita bread (for serving) Gather these ingredients to create a delicious Chicken Shawarma Bowl. Each item plays a key role in building flavor and texture. The chicken thighs marinate to soak up spices, while the fresh veggies and grains add crunch and nutrition. Don’t forget the tahini sauce for a creamy finish. Enjoy your cooking! {{ingredient_image_1}} Preparing the Marinade To start, gather your ingredients for the marinade. In a large bowl, mix together: - 3 tablespoons olive oil - 2 tablespoons plain Greek yogurt - 4 cloves garlic, minced - 2 teaspoons ground cumin - 2 teaspoons ground coriander - 1 teaspoon ground turmeric - 1 teaspoon paprika - 1 teaspoon cinnamon - 1 teaspoon black pepper - 1 teaspoon salt - Juice of 1 lemon Stir until all the ingredients blend well. Coating the Chicken Take 1.5 pounds of boneless, skinless chicken thighs and add them to the marinade. Make sure each piece is fully covered. This step is key for flavor. Marination Time Cover the bowl and refrigerate the chicken for at least 1 hour. For the best taste, marinate overnight. The longer it sits, the more flavor it absorbs. Preheating the Grill Before grilling, preheat your grill or stovetop grill pan to medium-high heat. This ensures a good sear on the chicken. Cooking Time and Temperature Remove the chicken from the marinade. Place it on the grill. Grill for 6 to 7 minutes on each side. The chicken is done when it reaches an internal temperature of 165°F (75°C). Resting the Chicken After grilling, let the chicken rest for 5 minutes. This helps keep it juicy. Then, slice it into strips for serving. Layering the Base Ingredients Start building your bowls with a scoop of cooked quinoa. Place it at the bottom of each bowl. Adding the Grilled Chicken Next, add the sliced grilled chicken on top of the quinoa. This creates a hearty base. Final Touches and Serving Now, add the fresh toppings. Include: - 1 cup cucumber, diced - 1 cup cherry tomatoes, halved - 1/2 red onion, thinly sliced - 1/2 cup fresh parsley, chopped Finally, drizzle with tahini sauce. Serve with warm pita bread on the side. Enjoy your flavorful and wholesome meal! Ingredient Substitutions You can change the yogurt to sour cream if needed. This still gives a creamy taste. For spices, feel free to mix cumin and coriander with other favorites. Try adding allspice for a unique twist. If you want a kick, add some cayenne pepper. Marination Duration Tips Marinate the chicken for at least one hour. This makes the chicken flavorful and tender. If time allows, marinate overnight. The chicken will soak up all the spices and taste amazing. Ensuring Juicy Chicken Always check the chicken's temperature. It should reach 165°F (75°C) to be safe. Let the chicken rest for five minutes after grilling. This helps keep the juices inside, making each bite delicious. Alternative Cooking Methods If you can’t grill, use a stovetop grill pan or bake the chicken. Bake at 400°F (200°C) for about 25-30 minutes. Just make sure to flip it halfway through for even cooking. Presentation Tips Serve the shawarma bowls in clear bowls to show off the colors. Top with fresh parsley for a pop of green. Add lemon wedges for a fresh touch and extra flavor. Pairing with Side Dishes Pair these bowls with warm pita bread or a fresh salad. A simple yogurt sauce can also be a tasty dip. This adds more texture and flavor to your meal. Pro Tips Marinate for Maximum Flavor: For the best taste, marinate the chicken thighs overnight. This allows the spices to penetrate deeper into the meat, resulting in a more flavorful dish. Grilling Temperature Matters: Make sure your grill is preheated to medium-high heat. This ensures a nice sear on the chicken, locking in juices and flavor. Let it Rest: After grilling, let the chicken rest for 5 minutes before slicing. This helps the juices redistribute, making the chicken more tender and juicy. Customize Your Bowls: Feel free to customize your bowls with additional toppings like feta cheese, olives, or avocado to add extra flavor and texture. {{image_2}} You can switch up the protein in your Chicken Shawarma Bowl. Beef or lamb works great. Both meats soak up the spice mix well. You will get a rich and savory taste. For a vegetarian option, try marinated chickpeas or grilled mushrooms. They add flavor and texture. Switching your grain can add new flavors. Brown rice or couscous are both tasty choices. Brown rice has a nutty taste and chewy texture. Couscous cooks fast and absorbs flavors well. You can even mix grains for extra variety. The sauce you choose can change the whole dish. Try garlic sauce, yogurt sauce, or a spicy harissa blend. Each sauce brings its own unique taste. Homemade sauces are often fresher and tastier. You can easily whip up a garlic sauce with yogurt and garlic. Store-bought options save time but may lack freshness. Experiment with both to find your favorite! After enjoying your Chicken Shawarma Bowls, store any leftovers properly. - Refrigeration Guidelines: Place leftovers in an airtight container. These can stay fresh in the fridge for up to 3 days. Make sure to cool the chicken and veggies before sealing them to prevent moisture buildup. - Freezing for Future Meals: If you want to save your meal longer, freeze the leftovers. Use freezer-safe bags or containers. They can last for up to 3 months. When you're ready to eat, just thaw them overnight in the fridge. To enjoy your Chicken Shawarma Bowls again, follow these simple steps. - Best Practices for Maintaining Flavor and Texture: For the best flavor, reheat the chicken in a skillet over medium heat. Add a splash of water or broth to keep it moist. Heat until warm. For veggies, you can microwave them in short bursts, checking often. Avoid overcooking. Keeping your ingredients fresh matters for great taste. - Freshness Tips for Vegetables and Proteins: Store vegetables like cucumbers and tomatoes in the fridge. Use them within a week for the best flavor. For chicken, buy fresh and use it within 2 days of purchase. If you can't use it right away, freeze it. For shawarma, I prefer chicken thighs. They stay juicy and tender when cooked. Chicken breasts can dry out, so they’re not my top choice. Thighs have more fat, which adds flavor. If you want a healthier option, you can use breasts, but be careful not to overcook them. Yes, you can make this recipe ahead of time. Marinate the chicken the night before for more flavor. You can also cook the quinoa and chop the veggies in advance. Store everything separately in the fridge. This way, you can quickly assemble your bowls when you’re ready to eat. To make a simple tahini sauce, you need: - 1/2 cup tahini - 1/4 cup water - 1 tablespoon lemon juice - 1 garlic clove, minced - Salt to taste Mix all the ingredients in a bowl until smooth. If it’s too thick, add more water. This sauce adds a creamy touch to your shawarma bowls. This guide covered everything you need to know about making chicken shawarma bowls. We explored essential ingredients, marinating and grilling instructions, and tasty tips. You learned how to assemble the perfect bowl and variations to make it your own. Remember, practice will help you get better. Enjoy your delicious creations, and share them with others. They’ll love it as much as you do!

Chicken Shawarma Bowls Flavorful and Wholesome Meal

Are you ready to dive into a delicious and healthy meal? Chicken Shawarma Bowls are flavorful, wholesome, and easy to

- 4 colorful bell peppers (red, yellow, green), diced - 1 lb ground turkey or beef - 1 can (15 oz) diced tomatoes - 4 cups chicken or vegetable broth The main ingredients create a vibrant and hearty soup. The bell peppers are colorful and sweet. Ground turkey or beef brings rich flavor and protein. Diced tomatoes add texture and tang. Broth provides a warm base for the soup. - 1 cup cooked rice (white or brown) - 1 cup shredded cheese (cheddar or mozzarella) Adding rice makes the soup more filling and hearty. Cheese on top adds creaminess and flavor. You can use white or brown rice based on your taste. - 1 tablespoon Italian seasoning - 1 teaspoon smoked paprika - Fresh parsley or cilantro for garnish Seasonings like Italian seasoning and smoked paprika boost the soup’s taste. Fresh herbs like parsley or cilantro add a pop of color and freshness. These garnishes make each bowl look lovely and inviting. {{ingredient_image_1}} - Start by dicing your colorful bell peppers. Use red, yellow, and green for a vibrant look. - Chop one medium onion and mince three cloves of garlic. - In a large pot, add a drizzle of olive oil. Heat it over medium heat. - Once hot, add the chopped onion and minced garlic. Sauté until the onion looks clear, about three to four minutes. - Increase the heat to medium-high. - Add one pound of ground turkey or beef. Cook until it browns and breaks apart easily. - Stir in the diced bell peppers and cook for five more minutes. They should start to soften. - Add one can of diced tomatoes, four cups of chicken or vegetable broth, and one cup of cooked rice. - Mix in one tablespoon of Italian seasoning and one teaspoon of smoked paprika. - Add salt and pepper to taste. Stir well. - Bring the soup to a boil, then lower the heat. Let it simmer for about 20 to 25 minutes. This helps the flavors mix and the peppers soften. - Taste the soup. Adjust the seasoning if needed for more flavor. - Serve the soup hot. Top each bowl with shredded cheese like cheddar or mozzarella. - Garnish with chopped fresh parsley or cilantro for added color and taste. How to cut bell peppers for optimal flavor Cut bell peppers by first slicing off the top and bottom. Remove the seeds and inner ribs. Then, slice the peppers into strips and dice them into small pieces. This method helps release their sweet flavor into the soup. Best practices for browning ground meat Use a large pot over medium-high heat. Add a bit of oil before the meat goes in. Break the meat into small pieces as it cooks. This helps it brown evenly and adds a nice depth of flavor. Adding extra spices or vegetables Feel free to add more spices like cumin or chili powder for a kick. You can also throw in veggies like corn or zucchini to boost nutrition and taste. Suggested cheese types for topping I recommend using shredded cheddar or mozzarella. Both melt well and add richness to your soup. You can also try pepper jack for a spicy twist! Preparing ingredients in advance Chop your veggies and meat the night before. Store them in the fridge. This cuts down on prep time during cooking and makes the process smoother. Using a slow cooker for easy meal prep You can easily make this soup in a slow cooker. Just add all your ingredients in the morning. Set it on low and let it simmer all day. You'll come home to a warm, hearty meal! Pro Tips Choose Colorful Peppers: Using a mix of red, yellow, and green bell peppers not only enhances the flavor but also adds a vibrant color to your soup, making it more visually appealing. Enhance the Flavor: For an extra depth of flavor, consider adding a splash of Worcestershire sauce or a bay leaf while simmering the soup. Make it Gluten-Free: To keep this soup gluten-free, ensure that your broth is labeled as such and opt for rice that is certified gluten-free. Customize Your Protein: This recipe is versatile; feel free to swap the ground turkey for ground chicken, sausage, or even a plant-based protein for a healthier or vegetarian option. {{image_2}} You can easily make this soup gluten-free. Just use gluten-free broth and rice. For a vegetarian option, swap the ground turkey for plant-based meat or beans. This keeps the taste great while meeting dietary needs. Feel free to use different meats. Ground chicken or sausage works well. If you want more protein, try lentils or chickpeas. For vegetables, you can add corn, zucchini, or carrots. These swaps boost nutrition and flavor. To bring Mediterranean flavors, add olives, feta cheese, and oregano. This gives the soup a fresh twist. For a Mexican flair, use black beans and add cumin and chili powder. Top with avocado and cilantro for a fun change. To keep your stuffed pepper soup fresh, store it in an airtight container. This method helps lock in flavor. Place it in the fridge. Your soup will last about three to four days. If you want to enjoy it later, freezing is a great option. For freezing, let the soup cool completely first. Then, pour it into freezer-safe containers. Leave some space at the top to allow for expansion. Seal tightly and label with the date. It can last up to three months in the freezer. When you’re ready to eat it, thaw the soup in the fridge overnight for best results. Reheat your soup on the stove for best flavor and texture. Pour it into a pot over low heat, stirring often. If you prefer the microwave, use a microwave-safe bowl. Heat in short bursts, stirring in between. This helps keep the soup from getting too hot too fast. Always taste before serving to ensure the flavors are just right. Can I use other types of meat? Yes, you can use various meats. Ground beef, chicken, or pork work well. Each adds a different taste. Just cook it until browned. You can also mix meats for added flavor. How can I make this soup vegan? To make it vegan, replace the meat with lentils or mushrooms. Use vegetable broth instead of chicken broth. You can skip the cheese or use a plant-based option. This will keep it hearty and tasty. What if I don’t have cooked rice? If you lack cooked rice, try using quinoa or couscous. You can also cook rice during the soup prep. Just add it uncooked and increase the broth. This will create a creamy texture. Can I use fresh tomatoes instead of canned? Yes, fresh tomatoes are great. Use about four medium tomatoes. Dice them and add with the broth. They will add a bright, fresh flavor to your soup. What to serve with stuffed pepper soup? This soup pairs well with crusty bread or a fresh salad. A simple green salad enhances the meal. You can serve it with garlic bread for extra comfort. How to elevate the meal with sides or salads? To elevate the meal, add a side of roasted veggies. A colorful vegetable medley adds nutrition and flair. You can also serve it with a creamy coleslaw for crunch. This blog post covered how to make stuffed pepper soup. You learned about key ingredients, like colorful bell peppers, ground turkey, and tomatoes. We walked through the cooking steps, from preparing your ingredients to the final touches. I also shared tips for saving time and customizing the dish. Whether you are a seasoned cook or just starting, this soup offers great taste and flexibility. Enjoy trying different flavors and wow your family or friends. Simple ingredients can lead to delicious meals. Get cooking and have fun with it!

Stuffed Pepper Soup Savory and Flavorful Dish

Looking for a hearty meal that bursts with flavor? Stuffed pepper soup is your answer! This dish combines colorful bell

To make a great baked ziti, you need a few key items: - 12 oz ziti pasta - 2 cups marinara sauce - 1 cup ricotta cheese - 2 cups shredded mozzarella cheese - 1 cup grated Parmesan cheese - 1 large egg - 1 tablespoon olive oil - 1 teaspoon garlic powder - 1 teaspoon dried oregano - Salt and pepper to taste These ingredients come together to create a rich and creamy dish that warms the heart. You can easily change baked ziti to fit your tastes. Here are some fun options: - 1/2 teaspoon crushed red pepper flakes for a spicy kick - Extra veggies like spinach or mushrooms for added nutrition - Ground beef, turkey, or sausage for a meatier dish - A dash of Italian seasoning for more flavor These choices let you make baked ziti just how you like it. The right cheese makes baked ziti shine. I suggest: - Whole milk mozzarella for the best melt - Fontina cheese for a creamy texture - Pecorino Romano for a salty bite Mix and match cheese to make your baked ziti truly special. Each cheese adds its own flavor and richness. {{ingredient_image_1}} Start by preheating your oven to 375°F (190°C). This step is key. It ensures your ziti bakes evenly. While the oven heats, gather your ingredients. You will need ziti pasta, marinara sauce, ricotta cheese, mozzarella cheese, Parmesan cheese, an egg, olive oil, garlic powder, oregano, and seasonings. Make sure everything is ready before cooking. Now, cook 12 oz of ziti pasta. Follow the package instructions closely. Aim for al dente texture, which means firm but not hard. This helps keep the pasta from becoming mushy in the oven. Once done, drain the pasta and set it aside. In a large bowl, mix together 1 cup of ricotta cheese, half of the mozzarella cheese, 1 large egg, and 1 tablespoon of olive oil. Add 1 teaspoon of garlic powder, 1 teaspoon of dried oregano, and salt and pepper to taste. Stir until everything blends well. The mixture will be creamy and cheesy. Now, gently fold in the cooked ziti. This step helps coat every piece with cheesy goodness. Grab a 9x13-inch baking dish. Start by spreading half of the marinara sauce at the bottom. This sauce keeps the ziti moist while baking. Next, pour the ziti and cheese mixture on top. Spread it evenly. Pour the rest of the marinara sauce over the ziti. Sprinkle the remaining mozzarella cheese and 1 cup of grated Parmesan cheese on top. For an extra kick, add crushed red pepper flakes if you like a bit of heat. Cover the dish with aluminum foil and place it in the oven. Bake for 25 minutes. After that, remove the foil and bake for another 15 minutes. This step allows the cheese to become bubbly and golden. Once it’s ready, let it cool for a few minutes before serving. Don’t forget to garnish with fresh basil leaves for a nice touch. To get that dreamy cheese melt, use a mix of mozzarella and Parmesan. Mozzarella gives you stretch, while Parmesan adds flavor. Make sure you layer the cheese well. Add half during mixing and the rest on top. This method helps it melt evenly. Bake covered for the first 25 minutes. Then, uncover it to let the cheese brown. To keep your baked ziti moist, use enough sauce. The marinara sauce needs to coat the pasta well. If it seems dry, add a splash of water to the baking dish. Covering the dish with foil for part of the bake also helps. It traps steam and keeps the dish juicy. Letting it rest after baking keeps the moisture in, too. Serve your baked ziti hot from the oven. Garnish with fresh basil for color and taste. A sprinkle of extra Parmesan can elevate the dish. Pair it with a simple salad or garlic bread for a full meal. For a fun twist, add a drizzle of olive oil or a splash of balsamic vinegar before serving. Enjoy your delicious creation! Pro Tips Cook Pasta Al Dente: Ensure you cook the ziti pasta just until al dente, as it will continue to cook while baking and absorb some of the sauce. Mix Cheeses for Flavor: For a richer flavor, consider mixing different types of cheeses, such as adding provolone or mozzarella di bufala to the mix. Layering Technique: Layer your dish carefully; ensure sauce is at the bottom and top to prevent the pasta from drying out during baking. Rest Before Serving: Allow the baked ziti to rest for about 10 minutes after baking. This helps it set up and makes for cleaner slices. {{image_2}} You can make baked ziti without meat. Use more veggies instead. Spinach, mushrooms, and zucchini work well. Just chop them up and add to your cheese mix. This adds flavor and nutrients. You can also use a mix of fresh herbs. Basil and parsley give a lovely taste. This option is great for family dinners or potlucks. Want to add some meat? Ground beef, turkey, or sausage are great choices. Cook the meat in a skillet first. Drain any fat before adding it to your cheese and ziti mix. This makes the dish heartier and adds protein. For a spicy kick, use Italian sausage. It pairs well with marinara sauce. If you need a gluten-free option, there are choices. Look for gluten-free ziti pasta made from rice or corn. They cook similarly to regular pasta. Follow the package instructions to get the right texture. You can also use spiralized vegetables, like zucchini or sweet potato, as a base. This makes the dish lighter but still tasty. To keep your baked ziti fresh, let it cool first. Place leftovers in an airtight container. You can store them in the fridge for up to four days. Make sure to cover the dish well if you keep it in the baking dish. This helps prevent drying out. Label your container with the date for easy reference. When you are ready to enjoy leftovers, preheat your oven to 350°F (175°C). Place the ziti in an oven-safe dish. Cover it with foil to keep moisture in. Bake for about 20 minutes or until hot. You can also reheat individual servings in the microwave. Just heat on medium power for 2-3 minutes, stirring halfway through for even warming. If you want to freeze baked ziti, it’s best to do this before baking. Assemble the dish but do not bake it. Cover it tightly with foil or plastic wrap, then freeze. It can last up to three months. When you're ready to enjoy it, thaw it in the fridge overnight. Bake it at 375°F (190°C) for about 45 minutes, covered, then remove the foil and bake until bubbly. The best way to reheat baked ziti is in the oven. Preheat the oven to 350°F (175°C). Place the ziti in a baking dish. Add a splash of marinara sauce to keep it moist. Cover with foil to avoid drying out. Heat for about 20 minutes or until warm. You can also use the microwave. Just heat in a safe dish for 2-3 minutes. Stir halfway to heat evenly. Yes, you can make baked ziti in advance. Prepare the dish as usual. Instead of baking it, cover it tightly with foil. Store it in the fridge for up to two days. When ready to bake, preheat the oven to 375°F (190°C). Bake for 25-30 minutes. If it’s frozen, let it thaw overnight before baking. To prevent watery baked ziti, use less marinara sauce. Drain the pasta well after cooking. You can also add the cheese mixture before mixing in the sauce. This helps absorb some moisture. If you notice excess liquid, you can bake it a bit longer. This helps to evaporate any extra water. This article covered how to make baked ziti, from selecting ingredients to baking it. We explored essential and optional ingredients, recommended cheese, and detailed step-by-step instructions. I shared tips for perfect cheese melt and ways to avoid dryness. Plus, we discussed variations like vegetarian and gluten-free options. In the end, you can create a delicious dish tailored to your tastes. Enjoy your baked ziti, and remember to store leftovers properly for future meals!

Baked Ziti Dinner Delight Simple and Satisfying Meal

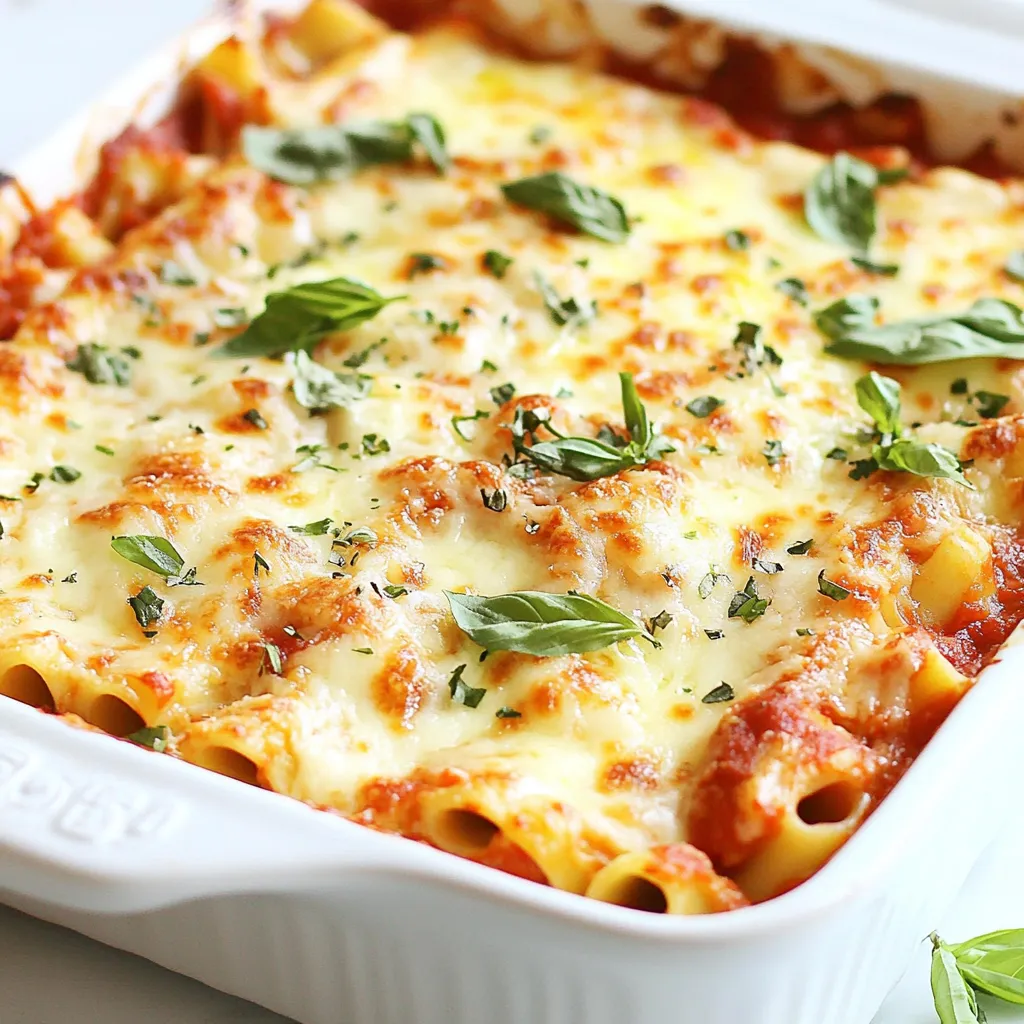
When you crave a hearty meal that everyone loves, baked ziti is the answer. This dish is simple to make

- 1 cup pure pumpkin puree Pumpkin is rich in vitamins A and C. It helps boost your immune system. Its fiber content supports digestion and keeps you full. - 1 cup chilled coconut cream Coconut cream adds creaminess and healthy fats. It can help improve heart health and offers a dairy-free option. - 1/4 cup maple syrup or honey Both sweeteners provide natural sugars. They add flavor and some nutrients, like antioxidants. - 1 teaspoon vanilla extract Vanilla enhances the flavor. It also has calming effects that can help reduce stress. - 1 teaspoon pumpkin spice This spice mix adds warmth and depth. It brings out the pumpkin flavor beautifully. - 1 tablespoon chia seeds Chia seeds add texture and nutrients. They offer fiber, omega-3s, and protein. - Whipped coconut cream for topping This topping adds extra creaminess. It makes your dessert more indulgent and delicious. - Crushed graham crackers or nuts for garnish These add crunch and texture. They make the mousse more fun to eat. {{ingredient_image_1}} In a bowl, combine the following ingredients: - 1 cup pure pumpkin puree - 1/4 cup maple syrup (or honey) - 1 teaspoon vanilla extract - 1 teaspoon pumpkin spice - 1/4 teaspoon sea salt Mix these well. Blend until smooth and creamy. You want a nice texture for the mousse. Chill 1 cup of coconut cream before using it. This step helps it whip better. Use a hand mixer or a whisk. Whip it until soft peaks form. This should take a few minutes. The cream should be light and fluffy. Gently fold the whipped coconut cream into the pumpkin mixture. Do this carefully to keep the cream airy. If you want, stir in 1 tablespoon of chia seeds for texture. Spoon the mousse into individual serving glasses or a big bowl. Refrigerate for at least 1 hour. This helps the flavors blend and the mousse to firm up. Enjoy it topped with whipped coconut cream and a sprinkle of crushed graham crackers or nuts! To get the right texture for your mousse, you need to blend well. Start with smooth pumpkin puree. Mix it with maple syrup, vanilla, pumpkin spice, and sea salt. Use a whisk or mixer for a creamy base. Next, whip the chilled coconut cream in a separate bowl. Whip until soft peaks form. This step is key for a light and fluffy mousse. Gently fold the whipped cream into the pumpkin mix. Be careful not to deflate the cream. If you want a bit more texture, add chia seeds. To adjust sweetness, taste the mousse as you go. If it needs more sweetness, slowly add maple syrup. Mix it in and taste again until it’s just right. Serving your mousse in elegant glassware adds a special touch. The bright orange color looks stunning in clear cups. You can also use a large bowl for a family-style serving. For garnish, add whipped coconut cream on top. Then sprinkle crushed graham crackers or nuts for crunch. A cinnamon stick makes a fun stirrer and adds a warm aroma. These small details make your dessert look extra inviting. Pro Tips Chill Your Coconut Cream: For the best texture, make sure your coconut cream is chilled before whipping. This will help it achieve soft peaks and a fluffy consistency. Adjust Sweetness to Taste: Everyone’s palate is different, so feel free to taste your pumpkin mixture and adjust the sweetness by adding more maple syrup or honey as needed. Experiment with Flavors: If you love spices, consider adding a pinch of nutmeg or ginger to the pumpkin mixture for an extra flavor kick. Garnish Creatively: Besides crushed graham crackers or nuts, try topping the mousse with toasted coconut flakes or a sprinkle of cinnamon for a delightful finishing touch. {{image_2}} You can swap maple syrup or honey for stevia or agave syrup. These options have fewer calories. Stevia is a plant-based sweetener. Agave syrup has a lower glycemic index. Both can add sweetness without extra sugars. Just use them in smaller amounts. Taste as you go to get it right. Want to change the taste? Try adding dark chocolate or nutmeg. Dark chocolate gives a rich twist. You can mix in cocoa powder or chocolate chips. Nutmeg adds warmth and spice. Just a pinch can elevate the flavor. Experiment to find your favorite mix! If you want a non-dairy topping, try almond cream or cashew cream. Both provide a rich, creamy texture. You can whip them like coconut cream. This makes a great topping too. For extra crunch, try using crushed nuts or seeds on top. Enjoy your creamy pumpkin mousse in a new way! To store your pumpkin mousse, use airtight containers. Glass containers work best because they help keep the flavor fresh. Make sure the mousse is cool before you seal it. You can also cover the mousse with plastic wrap if you do not have a lid. Keep it in the fridge to maintain its creamy texture. The mousse lasts about 3 to 5 days in the refrigerator. Keep an eye on it, though. If you see any changes in color or smell, it is best to toss it. Always check for freshness before serving leftovers. If you want to freeze the mousse, first store it in a freezer-safe container. Leave some space at the top for expansion. To keep it creamy, defrost it in the fridge, not at room temperature. This helps maintain its texture. Stir it well after thawing to bring back its fluffiness. Enjoy your healthy treat later! For a creamy texture, you can use a few great options. Full-fat Greek yogurt works well if you want a tangy taste. Silken tofu is another good choice for a vegan option. You can also try cashew cream, which is smooth and rich. All these substitutes give a nice texture to your mousse. Yes, you can make this mousse vegan! Just use maple syrup instead of honey. For the coconut cream, you can stick with it or try silken tofu. Both options will keep your mousse plant-based and yummy. To check if your pumpkin puree is fresh, look for a bright orange color. Fresh puree should smell sweet and earthy. If you use canned puree, check the expiration date. Homemade puree should have a smooth texture without lumps. This blog post covers how to make a healthy pumpkin mousse. You learned about key ingredients like pumpkin puree and coconut cream. I shared tips on mixing and refrigerating for the best texture. Plus, I included ideas for presentation and variations to enhance flavor. In conclusion, this mousse is simple, tasty, and good for you. Enjoy making it your own with different flavors and toppings!

Healthy Pumpkin Mousse Delightful and Simple Recipe

Looking for a sweet treat that won’t derail your healthy eating goals? Try my Healthy Pumpkin Mousse! This delightful recipe

To make Cajun Dirty Rice with Shrimp and Sausage, gather these ingredients: - 1 cup long-grain rice - 2 cups chicken broth - 1/2 pound andouille sausage, sliced - 1/2 pound shrimp, peeled and deveined - 1 bell pepper, diced (red or green) - 1 small onion, diced - 2 cloves garlic, minced - 2 stalks celery, diced - 2 tablespoons Cajun seasoning - 1 tablespoon olive oil - Salt and black pepper to taste - 2 green onions, sliced (for garnish) - 1 tablespoon fresh parsley, chopped (for garnish) If you can't find andouille sausage, you can use kielbasa or chorizo. For shrimp, you can swap it with chicken if you prefer. You can also use vegetable broth instead of chicken broth for a vegetarian option. Don’t worry if you don’t have a bell pepper; any color will do, or you can skip it altogether. When picking your shrimp, look for ones that smell fresh and have a firm texture. The shells should be clean and shiny. For the sausage, choose one that feels firm and has a bright color. Fresh vegetables should be crisp. Check for any soft spots or discoloration. When buying rice, long-grain is key for the best texture. Always check the expiration date to make sure it’s fresh. {{ingredient_image_1}} Start by rinsing the long-grain rice under cold water. Rinse until the water runs clear. This step removes extra starch and helps keep the rice fluffy. Next, bring 2 cups of chicken broth to a boil in a medium saucepan. Add in the rinsed rice. Lower the heat to low, cover, and let it simmer for 18-20 minutes. The rice should be tender and absorb the broth completely. While the rice cooks, heat 1 tablespoon of olive oil in a large skillet over medium heat. Add 1/2 pound of sliced andouille sausage. Sauté for about 5 minutes until it gets a nice brown color. Next, toss in 1 diced onion, 1 diced bell pepper, and 2 diced celery stalks. Cook these for another 5 minutes until they soften. Stir in 2 minced garlic cloves and 2 tablespoons of Cajun seasoning. Cook for 1 minute to let the flavors mix well. Now, add 1/2 pound of peeled and deveined shrimp to the skillet. Cook them for about 3-4 minutes until they turn pink and opaque. Once your rice is ready, fluff it with a fork. Then, add the rice to the skillet with the sausage and shrimp. Stir everything to mix well and heat it through. Season with salt and black pepper to taste. Serve hot, garnished with sliced green onions and chopped parsley. Enjoy your delicious Cajun dirty rice! To make your dirty rice truly Cajun, use bold spices. Cajun seasoning is key. It usually has paprika, garlic powder, and cayenne. You can find it at most stores. Feel free to add more or less based on your taste. If you like heat, sprinkle in some extra cayenne. Fresh herbs can also boost flavor. Try adding thyme or bay leaves while cooking. For perfect rice, rinse it well. This removes extra starch and keeps it fluffy. Use long-grain rice for the best texture. Cook it in chicken broth for added flavor. Once the rice is done, fluff it with a fork. This step helps separate the grains. Letting it sit for a few minutes after cooking also improves texture. Garnishes make your dish pop. Green onions add a nice crunch and color. Chopped parsley brings a fresh taste. You can sprinkle these on top right before serving. For extra flair, serve with lemon wedges. A squeeze of lemon brightens the dish. This adds a nice touch to your Cajun dirty rice. Pro Tips Rinse Your Rice: Rinsing the rice before cooking helps to remove excess starch, resulting in fluffier and less sticky rice. Perfectly Cooked Shrimp: Be careful not to overcook the shrimp; they should only take about 3-4 minutes until they turn pink and opaque. Adjust the Spice Level: If you prefer a milder dish, reduce the Cajun seasoning or serve with a side of hot sauce for those who like it spicy. Garnish for Freshness: Fresh herbs like parsley and green onions not only add color but also enhance the flavors of the dish. {{image_2}} You can make dirty rice without meat. Use mushrooms instead of sausage. They add great flavor. For shrimp, try using tofu or tempeh. Both soak up spices well. Add more veggies like zucchini or carrots for extra nutrition. Use vegetable broth instead of chicken broth. This keeps the dish tasty and plant-based. If you want a different protein, chicken works great. Use diced chicken breast or thighs. Cook them until brown, then add veggies. Crawfish is another fun choice. Toss in cooked crawfish when you add the shrimp. It brings a unique Cajun taste. Both options give the dish a new twist. To spice things up, add hot sauce while cooking. This gives a nice kick. You can also mix in fresh herbs. Chopped thyme or bay leaves add depth. Consider topping your dish with fresh cilantro for a fresh taste. These simple changes enhance the flavors and make each bite exciting. After enjoying your Cajun dirty rice, let it cool. Place leftovers in an airtight container. This keeps the dish fresh. Store it in the fridge. It will last for about 3 to 4 days. If you have more than one serving, divide it into smaller portions. This makes it easier to reheat later. To reheat, use the microwave or stove. For the microwave, place the rice in a bowl. Add a splash of chicken broth or water to keep it moist. Cover the bowl with a lid or plastic wrap. Heat for 1-2 minutes, stirring halfway through. On the stove, add the rice to a skillet. Heat over medium-low heat, stirring often. Add a little broth or water if it seems dry. You can freeze Cajun dirty rice too. Place cooled rice in a freezer-safe container. Make sure to seal it tightly. It will last for up to 3 months in the freezer. When ready to eat, thaw it overnight in the fridge. Reheat it using the methods above. This way, you can enjoy that tasty dish anytime! Cooking Cajun Dirty Rice takes about 40 minutes. This includes 15 minutes to prep and 25 minutes to cook. You start by rinsing the rice. Then, cook the rice in chicken broth for about 18-20 minutes. While the rice cooks, prepare the sausage, shrimp, and veggies. Yes, you can make Cajun Dirty Rice ahead of time. It stores well in the fridge for up to 3 days. Just let it cool before storing it in an airtight container. This makes it easy for meal prep. You can simply reheat it when you are ready to eat. The best way to reheat Cajun Dirty Rice is on the stove. Place it in a skillet over low heat. Add a splash of chicken broth or water to keep it moist. Stir it often until heated through. You can also use the microwave if you prefer. Just cover it to keep the moisture in. This blog post covered how to make tasty Cajun Dirty Rice. We explored the important ingredients and helpful substitutions. I shared step-by-step instructions to prepare and combine the rice with sausage and shrimp. We discussed tips for perfect cooking and even ways to adapt the dish. Lastly, we looked at storage and reheating methods. Enjoy your cooking adventure! Cajun Dirty Rice is fun and brings so much flavor to your table.

Cajun Dirty Rice with Shrimp and Sausage Delight

Welcome to my kitchen! Today, we’re diving into the mouth-watering world of Cajun Dirty Rice with Shrimp and Sausage. This

- 1 package (16 oz) potato gnocchi - 1 cup sun-dried tomatoes, packed in oil, drained and chopped - 1 cup heavy cream - 1 cup vegetable broth - 1 teaspoon garlic, minced - 1 teaspoon onion powder - 1 teaspoon dried basil - ½ teaspoon red pepper flakes (optional, for heat) - 1 cup spinach, fresh - ½ cup grated Parmesan cheese - Salt and pepper to taste - Olive oil for cooking - Fresh basil leaves for garnish When you pick ingredients, look for fresh and high-quality products. For gnocchi, choose a brand that feels light and fluffy. Check sun-dried tomatoes; they should be vibrant and packed in oil for best flavor. Heavy cream needs to be fresh, so check the date. Fresh spinach should be bright green and crisp. Parmesan cheese should be finely grated for easy melting. If you can't find gnocchi, you can use other pasta like penne or fettuccine. For a lighter option, swap heavy cream with coconut milk or cashew cream. If you want less salt, use low-sodium vegetable broth. You can replace Parmesan with nutritional yeast for a vegan twist. If you don’t like spinach, try kale or arugula for a different taste. {{ingredient_image_1}} Start by filling a large pot with salted water. Bring it to a boil. Once boiling, add the potato gnocchi. Cook them as per the package instructions. When they float to the top, they are ready. This usually takes about 2-3 minutes. After that, drain the gnocchi and set them aside. Make sure they are dry and not sticking together. In a large skillet, heat a tablespoon of olive oil over medium heat. Add one teaspoon of minced garlic and sauté it for one minute. This step releases a nice aroma. Next, add one cup of chopped sun-dried tomatoes, one teaspoon of onion powder, and one teaspoon of dried basil. Cook this mixture for 2-3 minutes. This helps the flavors blend well. Now, pour in one cup of heavy cream and one cup of vegetable broth. Stir everything together. Bring this sauce to a gentle simmer for about five minutes. It should thicken slightly. Now it’s time to add the cooked gnocchi to the skillet. Toss them well in the creamy sauce so they are covered. Add one cup of fresh spinach. Let it cook for about two minutes, just until it wilts. Then, stir in half a cup of grated Parmesan cheese. Season with salt, pepper, and red pepper flakes if you like some heat. Cook for another minute until the cheese melts and the sauce becomes creamy. Finally, remove the skillet from heat. Serve the dish hot. Garnish with fresh basil leaves and extra Parmesan if you wish. Enjoy your creamy sun-dried tomato gnocchi! To cook gnocchi, start with a big pot of salted water. Bring it to a boil. Add the gnocchi and watch them closely. They float when they are done. This usually takes about 2-3 minutes. Drain them gently, and set them aside. This helps keep them soft. For extra flavor, use fresh garlic and herbs. Mince the garlic finely to release its strong taste. Add onion powder and dried basil for depth. If you like heat, sprinkle in red pepper flakes. This gives a nice kick to the dish. Don’t forget to season with salt and pepper. Taste as you go to get it just right. If your sauce is too thick, add more vegetable broth. This will lighten it up. If it’s too thin, let it simmer longer. It will thicken as it cooks. For clumpy sauce, whisk it well before adding cheese. Always stir well after adding ingredients to keep it smooth. If your gnocchi stick together, toss them with a bit of olive oil. This keeps them separate. Pro Tips Use Fresh Gnocchi: For the best texture and flavor, opt for freshly made gnocchi if possible. It absorbs the sauce beautifully and makes for a delightful meal. Customize the Creaminess: Adjust the creaminess of the sauce by adding more or less heavy cream. For a lighter option, you can substitute half-and-half or cashew cream. Add Protein: To make this dish more filling, consider adding grilled chicken, shrimp, or chickpeas. They complement the creamy sauce well and add nutritional value. Save Some Pasta Water: If the sauce is too thick, reserve a bit of the pasta cooking water and stir it in. This will help achieve the perfect creamy consistency. {{image_2}} You can up the protein in your creamy sun-dried tomato gnocchi by adding chicken or shrimp. For chicken, use boneless, skinless breasts. Cut them into small pieces and cook them in the skillet before adding garlic. For shrimp, toss them in right after the sauce starts to simmer. Cook until the shrimp turn pink. Both options will make your dish heartier and more satisfying. If you want a vegan version, swap the heavy cream with coconut cream or cashew cream. You can also use a plant-based broth. For the cheese, try a dairy-free Parmesan or nutritional yeast. These swaps keep the dish creamy while making it plant-based. Mix up the veggies in your gnocchi for added flavor and nutrition. Try adding mushrooms, bell peppers, or zucchini. Sauté them with the garlic for best results. You can also toss in some frozen peas or asparagus during the last few minutes of cooking. This not only enhances the taste but also adds beautiful colors to your dish. After you enjoy your creamy sun-dried tomato gnocchi, store any leftovers in an airtight container. Keep it in the fridge for up to three days. Make sure it cools down to room temperature before sealing it. This helps keep the flavors fresh. To reheat, place the gnocchi in a skillet over low heat. Add a splash of vegetable broth or cream to keep it moist. Stir gently until it heats through. You can also microwave it in short bursts. Cover it with a damp paper towel to avoid drying out. If you want to freeze it, place the cooled gnocchi in a freezer-safe container. It can last for up to three months. When ready to eat, thaw it overnight in the fridge. Reheat it on the stove with a little extra cream or broth to bring back its creamy texture. Yes, you can make creamy sun-dried tomato gnocchi in advance. Cook the gnocchi and sauce separately. Store them in airtight containers in the fridge. When you are ready to eat, reheat them in a pan. Add a splash of cream or broth to help the sauce blend smoothly. Creamy sun-dried tomato gnocchi pairs well with many sides. Try a simple green salad with lemon dressing. Garlic bread is another great choice for a cozy meal. You can also serve it with grilled vegetables or roasted asparagus for a healthy touch. To make this dish lighter, swap heavy cream for half-and-half or a plant-based milk. Use less cheese or omit it entirely for reduced calories. Adding more fresh spinach or other veggies boosts nutrition without adding many calories. Consider whole wheat gnocchi for added fiber. This post explored all you need for a creamy sun-dried tomato gnocchi dish. You learned about selecting quality ingredients, step-by-step cooking, and useful tips for success. We also covered tasty variations and storage methods to keep your meal fresh. You can create a delicious, satisfying dish for any occasion. Enjoy the cooking and the flavors! Now, it’s time to gather your ingredients and delight in your culinary skills. Happy cooking!

Creamy Sun-Dried Tomato Gnocchi Delightful Recipe

If you love rich flavors and filling meals, you’ll enjoy my Creamy Sun-Dried Tomato Gnocchi. This dish offers a perfect

- 8 oz rotini pasta - 1 lb flank steak, sliced thin against the grain - 1/4 cup honey - 3 cloves garlic, minced - 1/4 cup soy sauce (low sodium) - 1 tablespoon sesame oil - 1 teaspoon freshly grated ginger - 1 bell pepper, sliced (any color) - 1 cup broccoli florets - Chopped green onions, for garnish - Sesame seeds, for garnish Gather these fresh ingredients before you start cooking. The rotini pasta is the base of this dish. Its twisty shape holds onto the sauce well. The flank steak offers rich flavor and tender bites. Honey brings a sweet touch that balances the savory notes. The marinade shines with garlic, soy sauce, sesame oil, and ginger. This mix adds depth to the steak. Marinating it helps the flavors soak in. For the vegetables, bell pepper adds crunch and color. Broccoli florets bring a healthy boost. Finally, green onions and sesame seeds make great garnishes. They add flavor and visual appeal to your meal. With these ingredients, you create a dish that is both tasty and pleasing. Enjoy cooking this delightful meal! {{ingredient_image_1}} To start, bring a large pot of water to a boil. Add salt to the water. Salt helps the pasta taste better. Once boiling, add 8 oz of rotini pasta. Cook it until it’s al dente. This usually takes about 8-10 minutes. After that, drain the pasta and set it aside. Next, let’s make the marinade. In a bowl, mix together 1/4 cup honey, 3 minced cloves of garlic, 1/4 cup low-sodium soy sauce, 1 tablespoon sesame oil, and 1 teaspoon grated ginger. This mix gives the steak a sweet and savory flavor. Place 1 lb of thinly sliced flank steak in a resealable bag. Pour the marinade over the steak. Make sure it’s well-coated. Let it marinate for at least 30 minutes. For stronger flavor, marinate up to 2 hours in the fridge. While the steak marinates, let’s sauté the veggies. Heat 2 tablespoons of olive oil in a large skillet over medium-high heat. Add sliced bell pepper and 1 cup of broccoli florets. Sauté for about 3-4 minutes. You want them to soften but still be crisp. Remove them from the skillet and set aside. Now, it’s time to cook the steak. In the same skillet, add the marinated steak and the leftover marinade. Cook for about 4-6 minutes. Stir it continuously for even cooking. Check for your desired doneness. For medium-rare, aim for an internal temperature of 135°F. Once the steak is done, add the sautéed vegetables back to the skillet. Toss in the cooked rotini. Mix everything well, making sure the pasta gets coated with the honey garlic sauce. Season with salt and pepper to taste. For serving, divide the Honey Garlic Steak Rotini into plates or bowls. To make it look nice, garnish with chopped green onions and sesame seeds. This adds a pop of color and extra crunch. Enjoy your meal! To enhance the flavor of the marinade, you can add a splash of rice vinegar or a pinch of red pepper flakes for a little kick. These extras add depth and balance to the sweet and savory notes. Marinating the steak is key. I recommend marinating for at least 30 minutes but try to go for 2 hours if you can. This lets the flavors soak in well and makes the meat tender. Use a heavy, non-stick skillet for best results. This type of pan helps distribute heat evenly and prevents sticking. When sautéing, keep an eye on the heat. Start at medium and adjust as needed. Stir often to avoid burning. If things start to brown too quickly, lower the heat a bit. It’s all about getting that perfect golden color without char. Feel free to customize your dish with extra vegetables. Snap peas, carrots, or zucchini can brighten it up. You can also adjust the sweetness by adding more honey or a splash of soy sauce for saltiness. If you want more heat, a dash of chili sauce or fresh jalapeños can elevate the dish. Enjoy making it your own! Pro Tips Rest the Steak: After cooking, let the steak rest for a few minutes before slicing. This allows the juices to redistribute, resulting in a more tender and flavorful meat. Customize the Veggies: Feel free to swap the bell peppers and broccoli for your favorite vegetables. Zucchini, snap peas, or carrots would also work well in this dish. Marination Time: For the best flavor, marinate the steak for at least 1 hour, but if time allows, letting it sit overnight in the fridge will enhance the taste even more. Leftover Storage: Store any leftovers in an airtight container in the fridge for up to 3 days. Reheat gently to avoid overcooking the steak. {{image_2}} You can easily swap out flank steak for chicken. Just cut the chicken into thin strips. The marinade works well with chicken, too. Cook it until it’s no longer pink, just like the steak. If you’re looking for plant-based options, try tofu. Firm tofu absorbs flavors well. Press it to remove extra water, then marinate it like the steak. Sauté the tofu until it’s golden brown. This gives a nice texture. Rotini is great, but you can use other types of pasta. Whole grain rotini adds fiber and a nutty flavor. Gluten-free rotini is also a good choice for those with dietary needs. Other pasta shapes like penne or fusilli can work too. Each shape holds sauce differently, so choose what you like best. Want to add depth? Try some spices like crushed red pepper for heat or smoked paprika for a rich flavor. A splash of rice vinegar can brighten the dish. You can also add citrus elements. Squeeze fresh lime or lemon juice over the dish before serving. This adds a nice zing and fresh taste. To keep your Honey Garlic Steak Rotini fresh, store leftovers in the fridge. Use airtight containers to prevent moisture loss. This keeps your pasta tasty for up to three days. Make sure the pasta cools down before sealing. This helps avoid condensation inside the container. To reheat your pasta, use a skillet over low heat. Add a splash of water or broth to keep it moist. Stir gently to warm it up evenly. If you use a microwave, cover it loosely to avoid drying out. Aim for just a few minutes to maintain the flavor and texture. This will help you avoid soggy pasta. If you want to freeze your Honey Garlic Steak Rotini, divide it into portions. Place each portion in a freezer-safe container. You can also use heavy-duty freezer bags for easy storage. Squeeze out as much air as you can before sealing. To thaw, place the container in the fridge overnight. Reheat on the stove or in the microwave, adding a little water as needed. I suggest marinating the steak for at least 30 minutes. If you have more time, you can marinate it for up to 2 hours. This helps the meat soak up all the flavors from the marinade. Yes, you can switch the rotini for other pasta types. Penne or fusilli work well too. If you want a healthier choice, try whole grain or gluten-free pasta. Great side dishes include a fresh salad or garlic bread. You can also serve steamed vegetables for extra nutrition. These sides balance the hearty flavors of the pasta and steak. Absolutely! You can make this dish in advance and store it in the fridge. Just keep it in an airtight container. Reheat it on the stove for the best taste. This makes it easy to enjoy your meal during busy days. This blog post covers how to make a delicious Honey Garlic Steak Rotini. We discussed the main ingredients like rotini pasta, flank steak, and honey, along with marinade components. I shared steps on cooking pasta, marinating steak, sautéing veggies, and serving tips. You can customize this dish with different proteins and pasta types. Remember to store leftovers properly to enjoy more later. With these tips, you can create a tasty meal that impresses everyone. Dive in, and enjoy cooking this flavorful dish!

Honey Garlic Steak Rotini Flavorful Pasta Delight

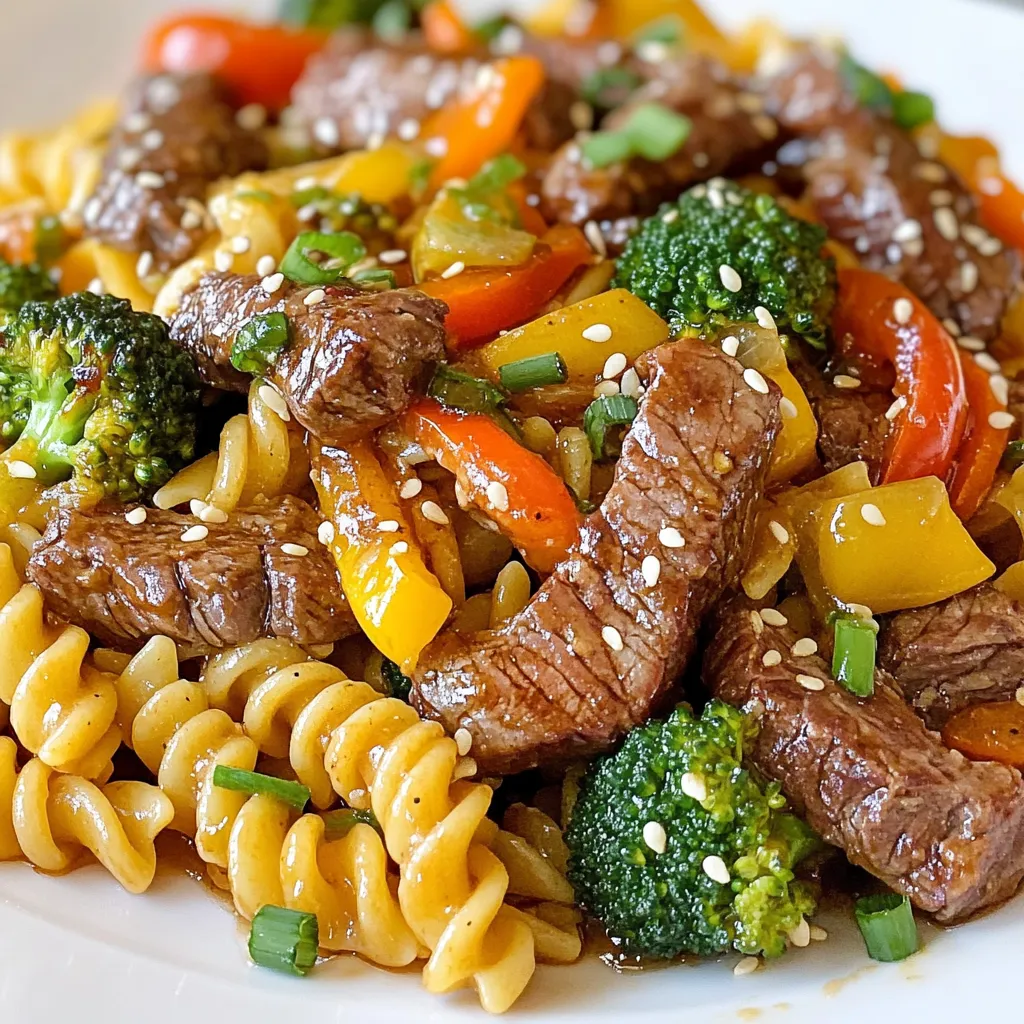
Looking for a dinner that packs a punch in flavor? You’re in the right place! This Honey Garlic Steak Rotini

- 1 lb lean ground turkey or chicken - 1 can (15 oz) black beans, rinsed and drained - 1 can (15 oz) kidney beans, rinsed and drained - 1 can (15 oz) corn, drained - 1 can (10 oz) diced tomatoes with green chilies - 1 packet taco seasoning (or homemade equivalent) - 1 cup low-sodium chicken broth The main ingredients give this soup its hearty base. Lean ground turkey or chicken adds protein without excess fat. Black and kidney beans boost fiber and flavor. Corn adds a sweet crunch, while diced tomatoes bring a hint of spice. Taco seasoning is key for that classic taco taste. Chicken broth ties everything together and adds depth. - 1 cup unsweetened almond milk (or other milk of choice) - 1/2 cup Greek yogurt (for creaminess) - 1 cup shredded cheddar cheese (plus more for topping) Dairy adds richness to the soup. Unsweetened almond milk keeps it light and creamy. Greek yogurt is a game changer for texture. It gives a nice tang and thickens the soup. Shredded cheddar cheese melts in, creating a comforting finish. Don’t forget to sprinkle extra cheese on top for a tasty touch! - 1/2 onion, diced - 2 cloves garlic, minced - Fresh cilantro, chopped (for garnish) - Lime wedges (for serving) Fresh ingredients brighten the flavor. Diced onion and minced garlic provide a savory base. Cilantro adds a fresh, herbal note that lifts the soup. Lime wedges serve to brighten everything up even more. A squeeze of lime right before eating makes all the flavors pop! {{ingredient_image_1}} 1. Sautéing onions and garlic: Start by heating 1 tablespoon of olive oil in a large pot over medium heat. Add 1/2 diced onion and cook for 3–4 minutes until it turns soft and clear. Then, stir in 2 minced garlic cloves and cook for about 1 minute. You want the garlic to smell great but not burn. 2. Browning the ground meat: Next, add 1 pound of lean ground turkey or chicken. Use a spatula to break it into small pieces. Cook it for 5–7 minutes. You want it to be brown and fully cooked. This step adds great flavor to your soup. 3. Adding taco seasoning and broth: Once the meat is cooked, sprinkle in a packet of taco seasoning. Stir it well so that the meat gets coated. Then, pour in 1 cup of low-sodium chicken broth. This adds depth to your soup. 4. Stirring in beans, corn, and tomatoes: Now, add 1 can of black beans, 1 can of kidney beans, 1 can of corn, and 1 can of diced tomatoes with green chilies. Stir everything together. Let the mixture come to a gentle simmer. This helps all the flavors mix nicely. 5. Mixing in almond milk and Greek yogurt: After simmering for a bit, reduce the heat to low. Stir in 1 cup of unsweetened almond milk and 1/2 cup of Greek yogurt. Mix until everything is smooth and creamy. This is key for that delicious texture. 6. Folding in cheddar cheese: Finally, gradually fold in 1 cup of shredded cheddar cheese. Allow it to melt into the soup. Taste and add salt and pepper as needed. Let it simmer for another 10 minutes. Stir occasionally to keep the creaminess. Serve hot, and enjoy your creamy taco soup! To get the best taste, I suggest using homemade taco seasoning. It lets you control the spices. You can mix chili powder, cumin, garlic powder, and paprika. This blend adds depth to your soup. For beans, I recommend using both black beans and kidney beans. This combo gives great texture and flavor. For cooking, let your soup simmer for about ten minutes. Keep the heat low to ensure it stays creamy. Stir occasionally to keep it from sticking. The longer you let it simmer, the more the flavors blend. Mix in the almond milk and Greek yogurt slowly. This helps you achieve that rich, creamy base. When serving, top your soup with shredded cheddar cheese. Fresh cilantro brightens the dish. Squeeze lime over the soup for a fresh kick. You can also serve it with tortilla chips for crunch. Pair it with a simple salad for a complete meal. Enjoy every bite! Pro Tips Use Lean Proteins: Opt for lean ground turkey or chicken to keep the soup healthy while still packing in the protein. Customize Your Spice Level: Adjust the amount of taco seasoning based on your preference for spice; for a milder soup, use less or choose a mild seasoning. Add Fresh Vegetables: Enhance the nutrition and flavor by adding fresh bell peppers or zucchini to the pot along with the onions and garlic. Garnish for Flavor: Don't skip the fresh cilantro and lime wedges; they add a zesty freshness that elevates the overall dish. {{image_2}} You can easily make this soup your own by swapping ingredients. If you want a plant-based option, use lentils or tempeh instead of meat. You can also use chickpeas or black-eyed peas for a different flavor. For beans, you can try pinto beans or garbanzo beans. If you want more veggies, add diced bell peppers or zucchini. These swaps keep the soup hearty and tasty. To kick up the flavor, try adding spices. A pinch of cayenne pepper adds heat, while cumin gives a warm touch. You can also add a splash of hot sauce for extra zing. For toppings, consider crushed tortilla chips for crunch. Sour cream or avocado adds creaminess, while sliced jalapeños can bring the heat. Fresh lime juice adds a burst of freshness that brightens up each bite. If you need the soup to be gluten-free, check your taco seasoning. Some brands may contain gluten. You can also use cornstarch instead of flour for thickening. For a dairy-free version, skip the cheese and yogurt and use coconut milk. To make it low-carb, use cauliflower rice instead of beans. This keeps the soup filling without the extra carbs, perfect for a lighter meal. To store leftovers properly, let the soup cool first. Use airtight containers to keep it fresh. I recommend glass containers, as they do not absorb odors. Make sure to seal them tightly. This way, you can enjoy your soup later without losing flavor. For freezing the soup, use freezer-safe containers. Leave some space at the top for expansion. I like to portion out servings so I can thaw only what I need. When reheating, use low heat on the stove. Stir often to maintain that creamy texture. In the fridge, the soup keeps for about 3 to 4 days. In the freezer, it lasts up to 3 months. Watch for signs of spoilage, like a sour smell or changes in color. If you see any of these signs, it’s best to throw it away. You can easily make this soup vegetarian. Just swap the ground turkey or chicken for plant-based protein. Here are some great options: - Crumbled tempeh - Cooked lentils - Chopped mushrooms - Black beans or chickpeas These choices add protein and flavor. You can also use vegetable broth instead of chicken broth for a full plant-based dish. Yes, you can use regular milk in this soup. It will add creaminess but may change the flavor slightly. Other milk alternatives are also great. Here are a few: - Soy milk - Oat milk - Coconut milk Each brings its own taste and texture. Almond milk is a good choice for lower calories. Experiment to find what you like best! Reheating creamy soups needs some care. Here are my tips: - Use low heat on the stove. This helps keep the soup creamy. - Stir often to avoid sticking. - You can add a splash of milk or broth to help with texture. If using a microwave, heat in short bursts. Stir in between to warm evenly. Enjoy every creamy spoonful! This blog post covered a tasty creamy taco soup. We explored key ingredients like lean meat, beans, and fresh veggies. You learned how to prepare the base, combine flavors, and create creaminess with almond milk and Greek yogurt. We shared tips for flavor, serving suggestions, and variations for different diets. Remember, this soup is easy to customize for your taste. Enjoy cooking and sharing this meal with others. It’s sure to be a hit!

Creamy Taco Soup High Protein Flavorful and Filling

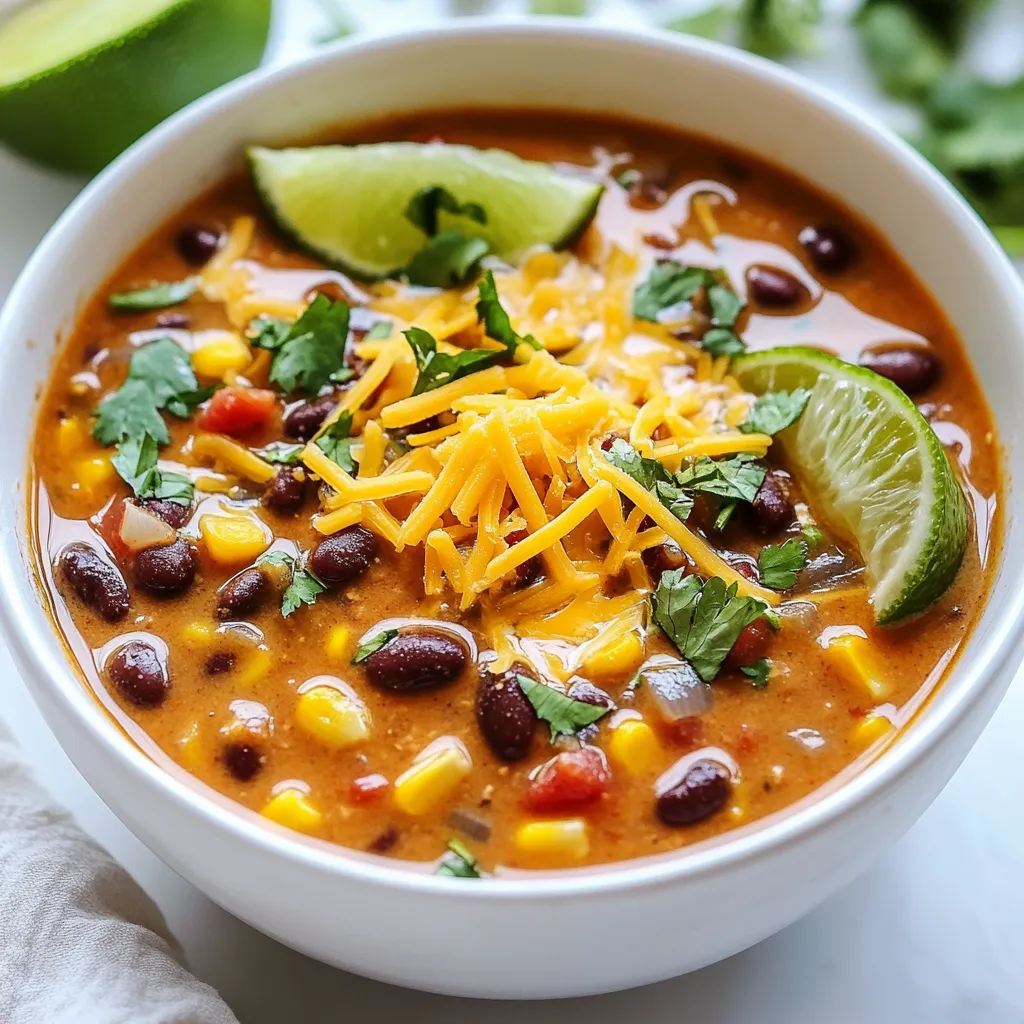
Are you ready to enjoy a delicious, creamy taco soup that’s packed with protein? This flavorful dish combines lean turkey,

Older posts
Newer posts
← Previous Page1 … Page139 Page140 Page141 … Page143 Next →

dsad

© 2025 Southern Dishes • Built with GeneratePress

Our Policies

  • Copyright Policy
  • Cookie Policy
  • GDPR Policy
  • Privacy Policy
  • Disclaimer
  • Terms Of Use

More Information

  • Home
  • About
  • Contact
  • Appetizers
  • Dessert
  • Dinner
  • Drinks
©2025, Southern Dishes About Back To Top