Skip to content
DisclaimerTerms Of UseGDPR PolicyCookie Policy

Southern Dishes

  • Home
  • Drinks
  • Appetizers
  • Dinner
  • Dessert
  • About
  • Contact
  • Privacy Policy
DisclaimerTerms Of UseGDPR PolicyCookie Policy

Isabella

- Shrimp and Sausage You need 1 pound of shrimp, peeled and deveined. Choose medium or large shrimp for best results. For sausage, 1 pound of smoked sausage works great. Andouille or kielbasa adds a nice smoky flavor. - Rice and Liquids Use 1 cup of long-grain rice. The rice absorbs all the flavors well. For liquids, you’ll need 4 cups of chicken broth. This gives your jambalaya a rich taste. Don't forget 1 can of diced tomatoes with their juices. - Vegetables and Seasonings Chop 1 onion, 1 green bell pepper, and 2 celery stalks. These veggies add crunch and sweetness. You will also need 3 cloves of minced garlic for aroma. For seasonings, 2 teaspoons of Cajun seasoning and 1 teaspoon of dried thyme are key. A bay leaf adds depth. Finally, season with salt and pepper to taste. This mix of ingredients creates a hearty dish packed with flavor. Each bite gives you a taste of the South. {{ingredient_image_1}} First, get your large pot or Dutch oven ready. Pour in two tablespoons of olive oil over medium heat. Once the oil is hot, add the sliced sausage. You can use andouille or kielbasa for great flavor. Cook the sausage for about 5 to 7 minutes. You want it browned and a bit crispy. After that, take it out and set it aside. Next, in the same pot with the leftover oil, add the diced onion, green bell pepper, and celery. Stir these veggies for around 5 minutes. You want them soft and smelling good. Then, add three minced garlic cloves. Cook for one more minute until the garlic is fragrant. This mix gives a nice base flavor. Now, it’s time to bring it all together. Return the cooked sausage to the pot. Add in one cup of long-grain rice, two teaspoons of Cajun seasoning, one teaspoon of dried thyme, and one bay leaf. Stir everything well to mix the flavors. Pour in one can of diced tomatoes with their juices and four cups of chicken broth. Bring this mixture to a boil. Once boiling, turn down the heat to low. Cover the pot and let it simmer. You need to cook it for about 20 minutes. This lets the rice soak up all those good flavors and become tender. After 20 minutes, check your rice. It should be almost done! Gently fold in the one pound of shrimp. Cover the pot again and cook for an extra 5 minutes. The shrimp will turn pink and opaque when they are ready. Season your jambalaya with salt and pepper to taste. After that, turn off the heat and let it sit for about 5 minutes. This helps the flavors blend. Don’t forget to take out the bay leaf before you serve. Now, you can dish it up! Achieving the Right Flavor To boost the flavor, use fresh ingredients. Fresh shrimp adds a sweet taste. Smoked sausage brings a rich, savory element. Don’t forget the Cajun seasoning. It gives that classic kick. A bay leaf adds depth to the dish. Always taste as you cook. Adjust seasonings to your liking. Optimal Cooking Times for Ingredients Start by cooking the sausage for about 5-7 minutes. This browns it and enhances the taste. After that, sauté the vegetables for 5 minutes. You want them soft but not mushy. Add the garlic last to keep its strong flavor. When the rice is added, let it cook for 20 minutes. Then, add the shrimp for another 5 minutes. This timing ensures tender shrimp and perfectly cooked rice. Overcooking the Shrimp Shrimp cooks fast. If you cook it too long, it turns rubbery. Always add shrimp at the end of cooking. Let it sit just until it turns pink. This keeps it juicy and tender. Skipping the Bay Leaf A bay leaf adds a subtle flavor. It enhances the taste without being too strong. If you forget it, your jambalaya lacks depth. Always remember to add it in. Just don’t forget to take it out before serving! Pro Tips Use Fresh Shrimp: For the best flavor and texture, opt for fresh shrimp rather than frozen. If using frozen shrimp, make sure to thaw them completely before cooking. Adjust the Spice Level: If you prefer a milder dish, reduce the amount of Cajun seasoning or use a mild sausage. Conversely, you can add a pinch of cayenne pepper for extra heat. Let It Rest: Allowing the jambalaya to sit for a few minutes after cooking helps the flavors meld together. This resting period can enhance the overall taste of the dish. Customize with Veggies: Feel free to add other vegetables like okra or diced zucchini for extra nutrition and flavor. Just be sure to adjust the cooking time accordingly. {{image_2}} You can switch the sausage for different flavors. Andouille adds a spicy kick. Kielbasa offers a milder taste. You can also try chicken sausage for a lighter option. Each choice brings its unique flavor. For a vegetarian jambalaya, skip the sausage and shrimp. Use mushrooms and zucchini instead. They add texture and taste. For seafood lovers, swap shrimp for crab or scallops. They cook quickly and add a sweet flavor. Want to spice it up? Consider adding cayenne pepper or smoked paprika. They deepen the flavor and heat. A dash of oregano or cumin can create a warm taste. Experiment to find what you love best! You can add more vegetables to boost nutrition and flavor. Try diced carrots, peas, or okra. These veggies add color and texture. Just remember to adjust cooking time to ensure everything cooks evenly. After enjoying your jambalaya, let leftovers cool first. This step helps avoid soggy rice. Spread the dish out on a plate for faster cooling. Once cool, store in the fridge. Use airtight containers for best results. This keeps flavors fresh. Your jambalaya can last up to three days in the fridge. To reheat jambalaya, the best method is the stovetop. Add a splash of broth to a pan. Heat over medium until warm. Stir often to keep the rice from sticking. You can also use the microwave. Place in a safe dish, cover, and heat in short bursts. This method helps keep the shrimp tender. Avoid overheating, or the shrimp may get tough. Enjoy your flavorful leftovers with ease! Can I make this dish ahead of time? Yes, you can prepare this dish in advance. Cook the jambalaya, then let it cool. Store it in the fridge for up to three days. When ready, reheat it on the stove. Add a little broth to keep it moist. How can I make it spicier? To add more heat, you can use extra Cajun seasoning. You can also add chopped jalapeños or a pinch of cayenne pepper. Stir these in when you add the vegetables for the best flavor. Is it possible to use brown rice instead? Yes, you can use brown rice, but it needs more cooking time. Add an extra cup of broth and simmer a bit longer. Check the rice for doneness before adding the shrimp. Brown rice gives a nice nutty flavor. One Pot Shrimp and Sausage Jambalaya is a simple and tasty dish. We covered the main ingredients, cooking steps, and tips to perfect your meal. Remember, avoid overcooking shrimp and always add a bay leaf for depth. Feel free to get creative with different proteins or spices. Storing leftovers properly keeps flavors fresh. This dish can be made ahead, making weeknight dinners easy and delightful. Enjoy making your jambalaya, and share your own twists on this classic recipe!

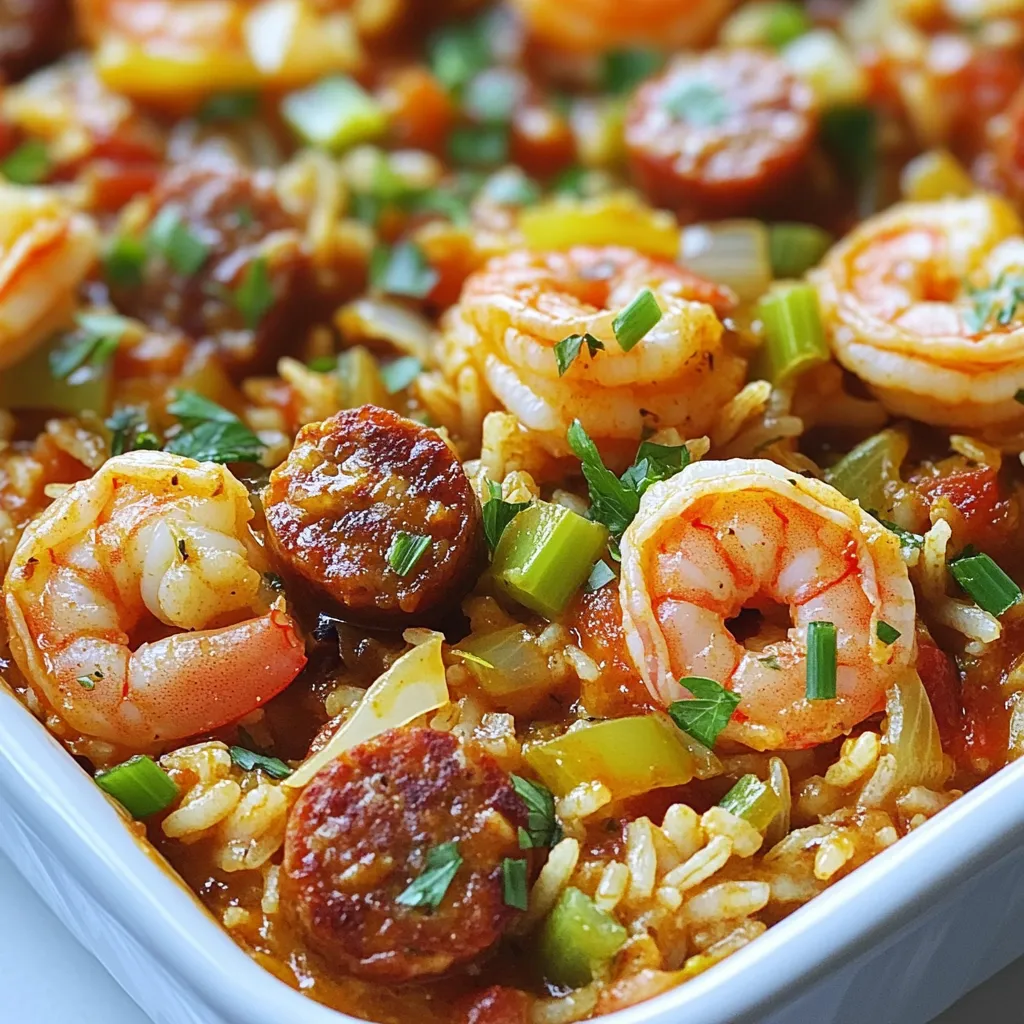
One Pot Shrimp and Sausage Jambalaya Flavor Boost

Ready to dive into a bowl of rich, flavorful One Pot Shrimp and Sausage Jambalaya? This dish packs bold taste

- 12 oz linguine or spaghetti - 1 pound shrimp, peeled and deveined - 1 pound mussels, cleaned - 1 cup scallops - 4 garlic cloves, minced - 1 medium onion, chopped - 1 bell pepper (red or green), diced - 1 cup cherry tomatoes, halved The base of this dish starts with pasta. You can use linguine or spaghetti. I prefer linguine for its shape. Next, choose your seafood. I like a mix of shrimp, mussels, and scallops. This mix gives great taste and texture. Don’t forget the fresh produce! Garlic adds depth. Onion and bell pepper bring sweetness. Cherry tomatoes add a burst of freshness. - 1 tablespoon Cajun seasoning - 1 teaspoon smoked paprika - Salt and pepper to taste Cajun seasoning packs a punch. It brings warmth and flavor. I always add smoked paprika for a hint of smoke. Salt and pepper balance the dish. - Fresh parsley - Lemon wedges Garnishing your plate makes it pop. Fresh parsley adds color and freshness. Lemon wedges give a zesty touch. Squeeze them on right before you eat! {{ingredient_image_1}} - Boil 12 oz of linguine or spaghetti in salted water. - Cook until al dente, about 8-10 minutes. - Drain the pasta and set it aside. - Heat 3 tablespoons of olive oil in a large skillet over medium heat. - Add 1 medium chopped onion and 1 diced bell pepper. - Sauté for 3-4 minutes until softened. - Stir in 4 minced garlic cloves and cook for 1 more minute. - Add 1 pound of shrimp, 1 pound of cleaned mussels, and 1 cup of scallops to the skillet. - Sprinkle with 1 tablespoon of Cajun seasoning and 1 teaspoon of smoked paprika. - Season with salt and pepper to taste. - Pour in 2 cups of vegetable broth and add 1 cup of halved cherry tomatoes. - Bring to a simmer. Cook until mussels open and shrimp turn pink, about 5-7 minutes. - Toss the cooked pasta into the skillet with the seafood mixture. - Gently combine everything for 2-3 minutes to heat through. - Remove from heat and garnish with fresh chopped parsley. - Serve with lemon wedges for a zesty touch. Timing for Shellfish Cooking seafood, like shrimp and mussels, is quick. Shrimp cooks in about 2-3 minutes. Mussels take around 5-7 minutes. Watch closely. They are done when shrimp turns pink and mussels open. How to Avoid Overcooking Overcooked seafood gets rubbery. To prevent this, take it off heat as soon as it’s done. A quick stir and a taste test help. Pull it from the pan while it’s still tender. Additional Seasonings to Try Cajun seasoning adds a kick. For more depth, try adding a pinch of cayenne or oregano. Fresh herbs like basil or thyme can brighten the dish too. A splash of lemon juice adds freshness. Alternative Ingredients for Customization You can swap seafood. Try crab or lobster for a richer dish. For a vegetarian twist, use mushrooms or zucchini. Adding spinach or kale makes it even healthier. Best Side Dishes for Mardi Gras Seafood Pasta Garlic bread pairs well. A light salad with citrus dressing contrasts the rich pasta. Roasted vegetables can add color and flavor too. Pairing with Wine or Drinks White wine, like Sauvignon Blanc, works well. Its crispness balances the dish's richness. For non-alcoholic options, a sparkling water with lime is refreshing. Pro Tips Fresh Seafood: Always opt for fresh seafood to enhance the flavor and texture of your dish. Check for a mild ocean scent and firm texture when selecting shrimp, mussels, and scallops. Don't Overcook: Keep a close eye on your seafood while cooking. Shrimp should be pink and opaque, while mussels should open up. Overcooking can lead to a rubbery texture. Adjust Spice Levels: Feel free to adjust the amount of Cajun seasoning and smoked paprika according to your spice tolerance. Start with less and add more to taste. Garnish for Freshness: A sprinkle of fresh parsley not only adds color but also enhances the dish's flavor. Pair it with lemon wedges for a zesty kick. {{image_2}} To make your Mardi Gras seafood pasta spicy, you can add red pepper flakes or hot sauce. Start with a small amount, like half a teaspoon of red pepper flakes. Stir it in with the seafood for a nice kick. If you love heat, feel free to add more. Hot sauce can also work well. Just drizzle some on your finished dish. This gives you control over the spice level. If you want a vegetarian twist, skip the seafood. Instead, use a mix of colorful veggies. Bell peppers, zucchini, and mushrooms are great options. You can sauté them just like the seafood. Add the Cajun seasoning to keep the flavor bold. This way, you still enjoy the festive taste of Mardi Gras. For a gluten-free version, choose gluten-free pasta. Many brands offer good options that taste great. Cook the gluten-free pasta just like regular pasta. Follow the package instructions for the best results. The rest of the recipe stays the same. You can enjoy this flavorful dish without any gluten. To store your Mardi Gras seafood pasta, let it cool first. Then, place it in an airtight container. This helps keep the dish fresh. Store it in the fridge for up to three days. When you reheat, check it to ensure it’s safe to eat. You can reheat seafood pasta in a few ways. A microwave works well; just cover it to keep moisture in. Stir it halfway through to heat evenly. You can also reheat it on the stove. Add a splash of broth or water for moisture. Heat it over medium until warm. To freeze, pack the pasta in a freezer-safe container. Leave some space at the top for expansion. It will last up to three months in the freezer. To thaw, place it in the fridge overnight. For quick thawing, use the microwave on the defrost setting. After thawing, reheat as described above. To add spice, use red pepper flakes. Start with a teaspoon. Taste and add more if needed. You can also use hot sauce or Cajun seasoning for extra heat. These options give a nice kick without losing flavor. Yes, you can use frozen seafood. It saves time and is often just as good. Make sure to thaw it first. Pat it dry to avoid extra water in your dish. This keeps the pasta from becoming watery. Cooking time may change slightly, so keep an eye on it. Good sides include garlic bread and a fresh salad. Both complement the pasta well. You can also serve it with coleslaw for a crunchy texture. These options balance the rich seafood flavors and make your meal special. Yes, this dish is great for meal prep. It holds up well in the fridge. Just store it in airtight containers. Reheat it on the stove or in the microwave. You can also freeze it for later. Just remember to add fresh parsley after reheating for the best taste. Mardi Gras Seafood Pasta combines fresh seafood and vibrant flavors. This dish is not just tasty; it's fun to make. Use linguine, shrimp, and spices to create a feast. Follow the steps for a perfect outcome, and don't forget the optional garnishes. For spice lovers, try adding red pepper flakes. You can even customize it with veggies for a vegetarian option. Enjoying this meal can bring the spirit of Mardi Gras right to your kitchen. With the tips and tricks provided, you can impress anyone at your table.

Mardi Gras Seafood Pasta Flavorful and Simple Dish

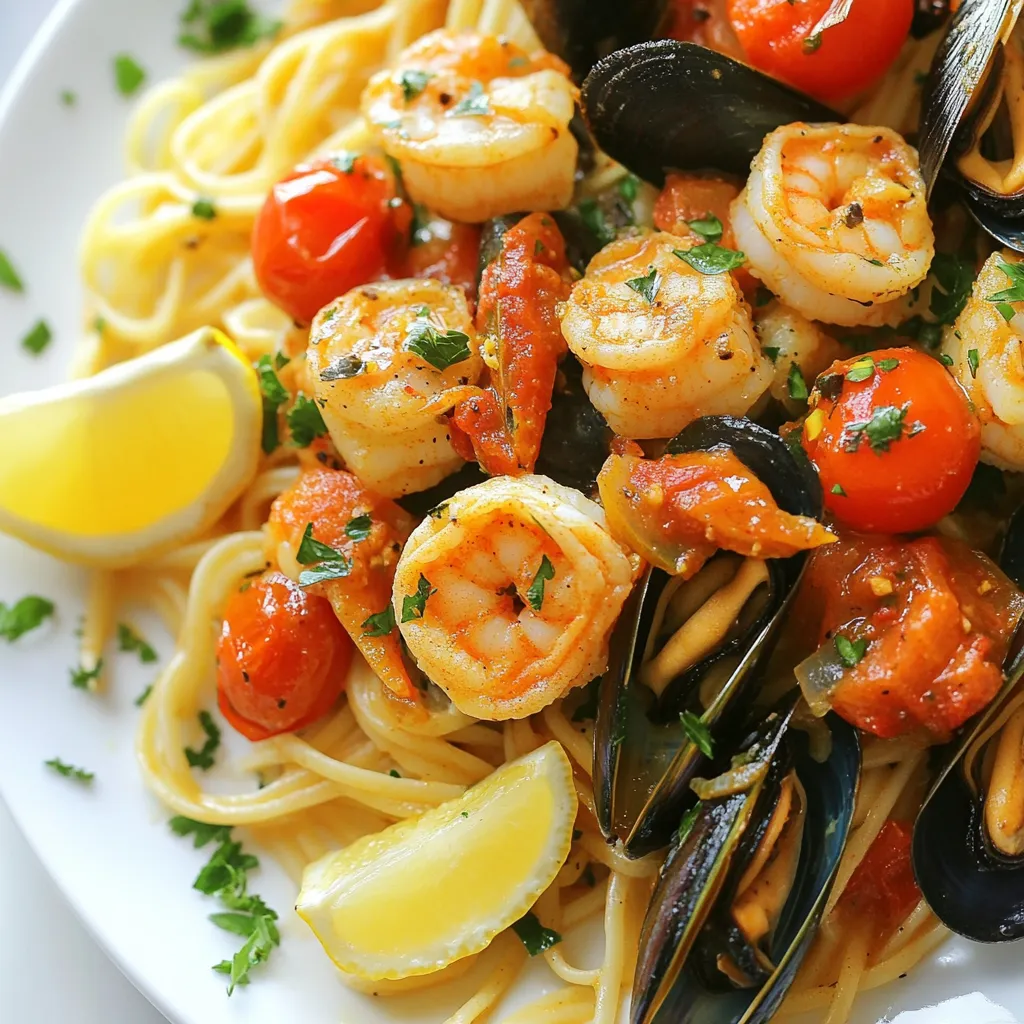
Are you ready to bring the vibrant flavors of Mardi Gras to your dinner table? This flavorful and simple Mardi

- 1 cup pure pumpkin puree - 1/2 cup granulated sugar - 1/2 cup brown sugar, packed - 1/2 cup vegetable oil - 3 large eggs - 1 1/2 cups all-purpose flour - 1 teaspoon baking soda - 1/2 teaspoon baking powder - 1 teaspoon ground cinnamon - 1/2 teaspoon ground nutmeg - 1/4 teaspoon ground ginger - 1/4 teaspoon ground cloves - 1/2 teaspoon salt - 1/2 cup chopped walnuts or pecans (optional) - 1/2 cup chocolate chips (optional) To make classic pumpkin bread, you need a few key ingredients. First, pure pumpkin puree gives the bread its rich flavor and moist texture. You can use canned puree or make it fresh. Sweetness comes from granulated sugar and brown sugar, which adds depth. Next, vegetable oil helps keep the bread moist. You’ll also use three large eggs, which add structure and richness. All-purpose flour acts as the base, while baking soda and baking powder help the bread rise. Spices make this bread special. Ground cinnamon, nutmeg, ginger, and cloves create that warm, cozy taste. Don’t forget the salt; it balances the sweetness. For extra crunch, consider adding walnuts or pecans. You can also mix in chocolate chips for a sweet twist. These optional additions can make your pumpkin bread even more delightful. {{ingredient_image_1}} First, preheat your oven to 350°F (175°C). This helps your pumpkin bread bake evenly. While the oven heats, grease a 9x5 inch loaf pan. You can also line it with parchment paper. This makes it easy to remove the bread later. In a large bowl, combine 1 cup of pure pumpkin puree, 1/2 cup of granulated sugar, 1/2 cup of brown sugar, and 1/2 cup of vegetable oil. Mix until smooth. Then, add 3 large eggs one at a time. Beat well after each egg. This helps the batter become light and fluffy. In another bowl, whisk together 1 1/2 cups of all-purpose flour, 1 teaspoon of baking soda, and 1/2 teaspoon of baking powder. Add 1 teaspoon of ground cinnamon, 1/2 teaspoon of ground nutmeg, 1/4 teaspoon of ground ginger, 1/4 teaspoon of ground cloves, and 1/2 teaspoon of salt. Mixing these dry ingredients well ensures they blend evenly into the batter. Gradually add the dry mixture to the pumpkin mixture. Stir gently until just combined. Be careful not to overmix, as this can make the bread tough. If you want to add some texture, fold in 1/2 cup of chopped walnuts or pecans, and 1/2 cup of chocolate chips, if you like. Pour the batter into your prepared loaf pan. Smooth the top with a spatula for a nice finish. Bake in the preheated oven for 55-65 minutes. To check if it’s done, insert a toothpick into the center. If it comes out clean, your bread is ready. Once baked, remove the pumpkin bread from the oven. Let it cool in the pan for 10 minutes. Then, transfer it to a wire rack to cool completely. For a lovely presentation, slice the bread and serve it on a wooden board. You can dust it with powdered sugar or drizzle a cream cheese glaze for extra sweetness. Avoiding overmixing When making pumpkin bread, mix gently. Overmixing can make the bread tough. You want a soft, moist bread. Stir until just blended. A few lumps are okay. Ensuring even baking To bake evenly, place your loaf pan in the center of the oven. This allows hot air to circulate around the pan. Also, check the bread near the end of baking. Each oven is different. Use a toothpick to test for doneness. Spice variations and additions Pumpkin bread shines with spices. You can change the flavor by using more or less. Try adding allspice or cardamom for a twist. You can also mix in some vanilla extract. This adds warmth to the flavor profile. Ideal pairings and garnishing ideas Pumpkin bread tastes great on its own, but you can make it even better. Serve warm with butter or cream cheese. You can also sprinkle powdered sugar on top. For a special touch, drizzle a cream cheese glaze. It adds sweetness and looks lovely on a plate. Pro Tips Perfect Pumpkin Puree: Use pure pumpkin puree, not pumpkin pie filling, for the best flavor and consistency in your bread. Don't Overmix: Gently fold the dry ingredients into the wet ingredients to avoid a dense loaf. Overmixing can lead to tough bread. Cool Completely: Allow the bread to cool completely on a wire rack before slicing to ensure clean cuts and prevent it from becoming gummy. Add Spice to Taste: Feel free to adjust the spices according to your preference; adding more cinnamon or nutmeg can enhance the flavor profile. {{image_2}} You can make pumpkin bread healthier with a few smart swaps. Consider using alternative sweeteners. Instead of granulated sugar, try using honey, maple syrup, or stevia. These options can cut down on calories and add unique flavors. For gluten-free options, use almond flour or a gluten-free blend. This keeps the bread soft while making it safe for those with gluten sensitivities. Always check if your chosen flour works as a one-to-one substitute. Want to add a twist? Try making pumpkin spice latte bread. Just mix in a splash of brewed coffee and a little espresso powder. This gives your bread a rich, coffee flavor. You can also add dried fruits or zests. Chopped cranberries or raisins bring sweetness and texture. For a citrusy kick, mix in lemon or orange zest. These fruits make every bite bright and exciting. Pumpkin bread is perfect for the holidays. For Thanksgiving, add a touch of nutmeg and cloves to enhance the warm flavors. You can even top it with a cream cheese frosting for extra sweetness. At Christmas, try mixing in peppermint extract or crushed candy canes. This gives a festive flair that delights everyone. Each season offers a chance to create new, delicious flavors in your pumpkin bread. Store your pumpkin bread at room temperature for the best taste. Wrap it tightly in plastic wrap or foil. This keeps it fresh for a few days. If you live in a warm place, store it in the fridge. The cold can help prevent mold. Just remember, the bread may lose some of its soft texture in the fridge. To freeze pumpkin bread, first cool it completely. Wrap it in plastic wrap, then in aluminum foil. This stops freezer burn. Place it in a freezer bag for extra protection. You can freeze it for up to three months. When you're ready, take it out and thaw it in the fridge overnight. For a quick thaw, leave it at room temperature for a few hours. Pumpkin bread lasts about 3 to 5 days at room temperature. In the fridge, it lasts about a week. Look for signs of spoilage. If you see mold or if it smells sour, it’s time to toss it. A fresh loaf feels soft and moist. If it gets hard or dry, it’s no longer good. Enjoy your pumpkin bread while it's fresh! To keep pumpkin bread moist, use these tips: - Add an extra egg for richness. - Use oil instead of butter for moisture. - Mix in yogurt or sour cream for added softness. - Avoid overmixing the batter to keep the air in. - Bake at the right temperature for the right time. Yes, you can use fresh pumpkin. Here’s how: - Pick a sugar pumpkin for the best flavor. - Cut it in half and scoop out the seeds. - Roast it in the oven until soft, about 45 minutes. - Blend the cooked pumpkin until smooth. - Use this fresh pumpkin in place of the puree. If you want a vegan option, try these substitutes: - 1/4 cup applesauce for each egg. - 1/4 cup mashed banana works well too. - Use 1 tablespoon ground flaxseed mixed with 3 tablespoons water. - Silken tofu blended until smooth can also replace eggs. To check if your bread is ready, use the toothpick test: - Insert a toothpick into the center of the bread. - If it comes out clean or with a few crumbs, it’s done. - If it has wet batter on it, bake for a few more minutes. In this article, we explored the key ingredients and steps for making pumpkin bread. We covered everything from prepping your oven to mixing wet and dry ingredients. I shared tips to enhance texture and flavor, plus variations for every season. With the right storage practices, your bread will stay fresh longer. Overall, making pumpkin bread is fun and rewarding. Use this guide to create your own tasty loaf, and enjoy it with friends and family. You now have the tools for delicious success!

Classic Pumpkin Bread Tasty and Easy Recipe Guide

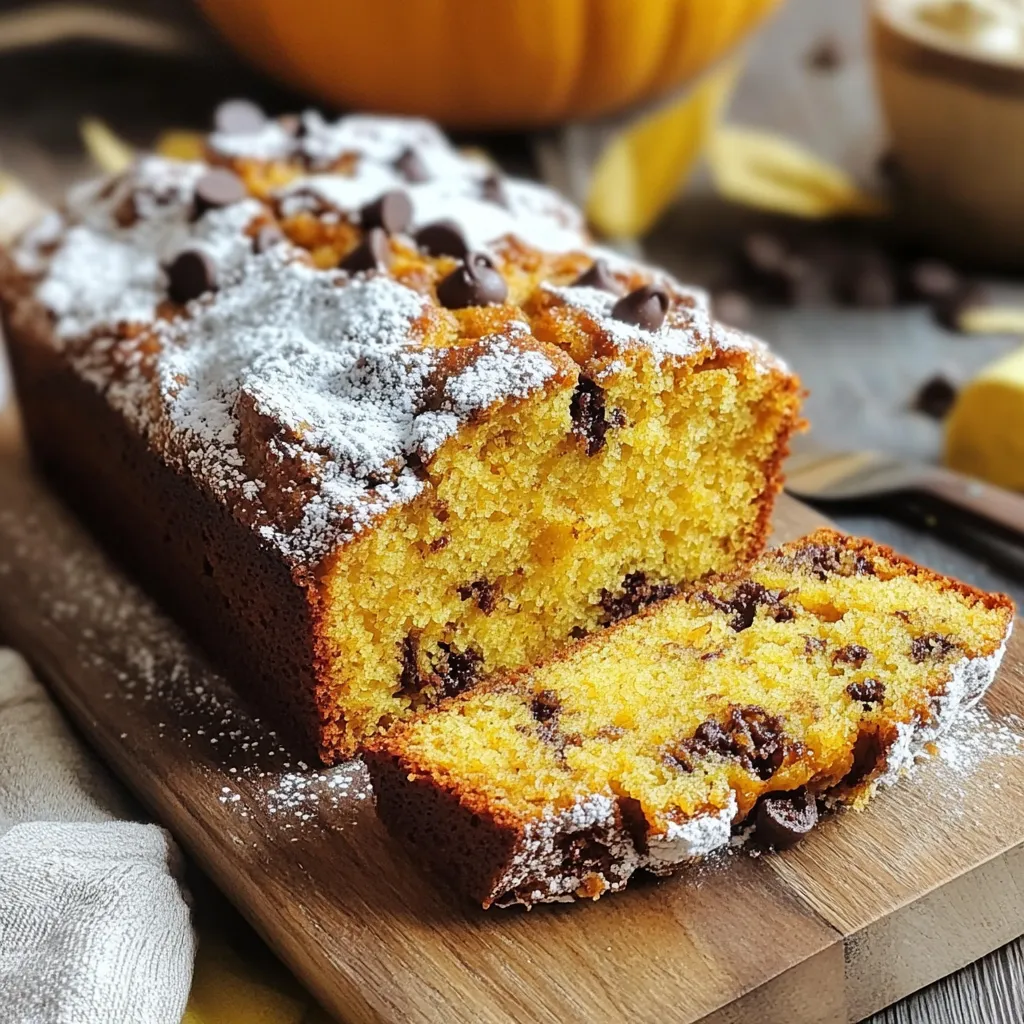
Fall is here, and what better way to celebrate than with a warm loaf of classic pumpkin bread? In this

To make Zucchini Lemon Orzo, you will need these fresh and simple ingredients: - Orzo pasta - Zucchini - Olive oil - Garlic - Vegetable broth - Lemon - Parmesan cheese (optional) - Seasonings - Garnish Each ingredient plays a key role in creating a flavorful dish. The orzo pasta gives you a nice bite, while zucchini adds texture and freshness. Olive oil brings richness, and garlic adds depth to the flavor. The vegetable broth keeps it light yet savory. The lemon brings a bright zing, balancing the dish perfectly. If you choose to add Parmesan cheese, it melts in beautifully, providing a creamy finish. You can season with salt and pepper to taste, and fresh herbs or a pinch of red pepper flakes can add a touch of flair. With these ingredients ready, you can create a dish that is not only delicious but also visually appealing. Remember, fresh ingredients make all the difference in this recipe! {{ingredient_image_1}} 1. Start by bringing a large pot of salted water to a boil. 2. Once the water boils, add 1 cup of orzo pasta. Cook it according to the package instructions until it is al dente. This usually takes about 8 to 10 minutes. 3. After cooking, drain the orzo in a colander. Set it aside while you prepare the other ingredients. 1. In a large skillet, heat 1 tablespoon of olive oil over medium heat. 2. When the oil is hot, add 2 cloves of minced garlic. Sauté it for about 1 minute until it smells great. 3. Next, add 2 medium zucchinis, diced into small pieces. Cook these for 3 to 4 minutes. Stir them occasionally until they are tender but still crisp. 4. Pour in 1 cup of vegetable broth. Bring it to a gentle simmer and let it reduce for about 2 to 3 minutes. 1. Add the drained orzo back into the skillet with the zucchini and broth mixture. 2. Squeeze in the juice of 1 lemon and add the lemon zest. If you like some heat, add a pinch of red pepper flakes. 3. Stir everything well to mix the flavors. 4. Remove the skillet from heat. If you want, toss in ¼ cup of grated Parmesan cheese. Stir until it melts and makes the dish creamy. 5. Season with salt and pepper to taste. Your Zucchini Lemon Orzo is now ready to enjoy! To make your zucchini tender, cook it just right. You want it soft but still crisp. This keeps the flavor bright. Cook the zucchini for about 3-4 minutes. Stir it often while it cooks. This way, it won’t get mushy. For the orzo, you want it al dente. This means it should have a little bite to it. Follow the cooking time on the package. After cooking, drain the orzo and set it aside. This helps keep it from getting too soft. To boost flavor, use fresh herbs like basil or parsley. You can also add a pinch of red pepper flakes for heat. Fresh lemon juice is the best choice. It gives a bright taste. Bottled lemon juice lacks the same zing. Zest the lemon for even more flavor. The zest adds a nice aroma. Pair this dish with grilled chicken or shrimp for protein. It makes a great meal. You can also serve it as a side dish. For a fun twist, try it in a lettuce wrap. Just scoop the orzo into the leaves. Top it with fresh herbs for a colorful look. This adds a nice crunch! Pro Tips Tip on Zucchini Prep: For the best texture, choose medium-sized zucchinis and avoid overcooking them; they should be tender yet crisp. Tip for Orzo Cooking: Make sure to salt your water generously when cooking orzo; it adds flavor to the pasta during cooking. Lemon Zest Usage: Use a microplane to zest the lemon, which gives you a finer texture and more intense flavor without the bitter pith. Garnishing Tips: Add fresh basil leaves just before serving to maintain their vibrant color and fresh aroma, enhancing the dish visually and in flavor. {{image_2}} You can customize this dish with various vegetables. Try adding bell peppers, cherry tomatoes, or spinach. These veggies will add color and flavor. You can also use seasonal veggies like asparagus in spring or squash in fall. The key is to keep the cooking time in mind. Softer veggies need less cooking time than the zucchini. Want to make this dish heartier? Add protein! Grilled chicken or shrimp pairs well with the fresh flavors. Simply cook the protein separately and mix it in at the end. For a vegetarian option, consider chickpeas or white beans. They add protein and a nice texture. If you're looking for a vegan version, it's simple! Omit the Parmesan cheese or use a vegan substitute. Nutritional yeast is a great option for a cheesy flavor without dairy. Also, replace the vegetable broth with water or a homemade vegetable stock. This keeps the dish light and fresh while staying vegan-friendly. Store your Zucchini Lemon Orzo in a tight container. Glass or plastic containers work well. Make sure the dish is cool before sealing. It will stay fresh in the fridge for about 3 to 4 days. Check for any signs of spoilage before eating. You can freeze Zucchini Lemon Orzo for longer storage. Let the dish cool completely before freezing. Scoop it into freezer-safe bags or containers. Flatten the bags to save space. It can last up to 2 months in the freezer. To reheat, thaw it in the fridge overnight. Warm it on the stovetop with a splash of broth. Zucchini Lemon Orzo is great for meal prep. Cook a big batch and store it for the week. You can mix it with grilled chicken or shrimp for added protein. Divide it into portions for easy lunches or dinners. Add fresh herbs or a squeeze of lemon before serving for extra flavor. Yes, you can use other pasta types. Try using penne, fusilli, or even spaghetti. Cook these according to their package instructions. Adjust the cooking time as needed. This way, you can enjoy the same great flavors with your favorite pasta shape. To make this dish gluten-free, swap out orzo for gluten-free pasta. Many brands offer great alternatives made from rice or corn. Just follow the cooking time on the package. This keeps the dish tasty and safe for those with gluten sensitivities. Leftovers are a great way to get creative! Try mixing Zucchini Lemon Orzo into a salad. You can also use it as a filling for wraps or stuffed peppers. Reheat it with a bit of broth for a quick soup. The options are endless, and it’s just as delicious the next day! This blog post covered a simple and tasty Zucchini Lemon Orzo recipe. We explored each ingredient, ensuring you have everything you need. You learned how to cook orzo and sauté zucchini, then combine them for a delicious dish. Tips and tricks helped you perfect texture and flavor, while variations opened up creative possibilities. Lastly, we discussed storage and meal prep to make your cooking life easier. Embrace these ideas and enjoy your cooking adventures!

Zucchini Lemon Orzo Flavorful and Fresh Recipe

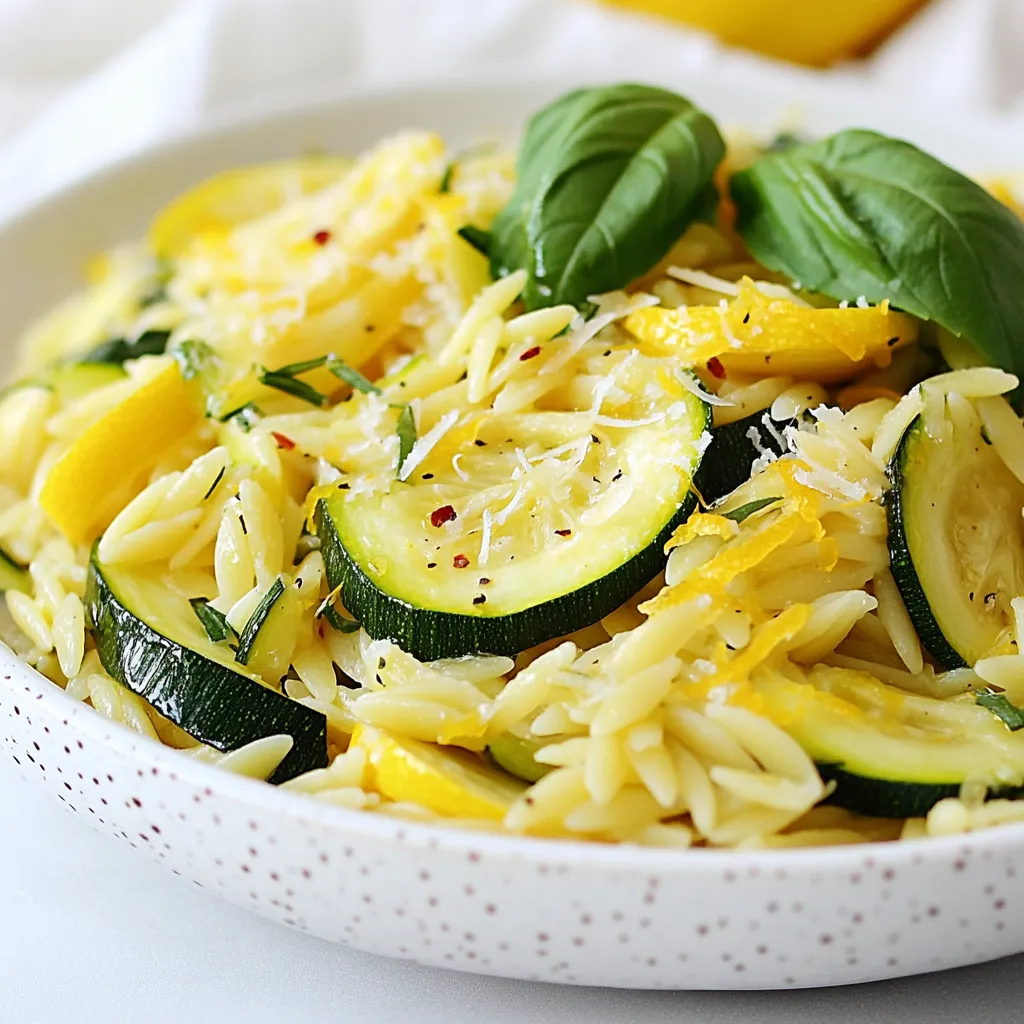
Get ready to enjoy a dish that bursts with flavor! This Zucchini Lemon Orzo recipe is fresh, easy, and perfect

- 12 oz. penne pasta - 1 lb. Italian sausage (mild or spicy) - 1 tablespoon olive oil - 1 onion, chopped - 3 cloves garlic, minced - 1 bell pepper (red or green), diced - 1 can (14 oz.) diced tomatoes (with juices) - 2 cups chicken broth - 1 teaspoon dried Italian herbs (oregano, basil, or thyme) - 1 teaspoon red pepper flakes (adjust for spiciness) - 1 cup spinach, roughly chopped - 1/2 cup grated Parmesan cheese - Salt and pepper to taste - Fresh basil for garnish (optional) Using fresh ingredients makes a big difference. For the sausage, choose a flavor you love. Spicy sausage gives a nice kick, while mild offers a gentler taste. Fresh garlic and onion add depth to the dish. When picking tomatoes, go for high-quality canned ones. They pack flavor and save time. Dried herbs work well, but fresh herbs elevate the taste. Lastly, use fresh spinach for a vibrant color and healthy boost. If you want a lighter option, swap the sausage for turkey or chicken sausage. For a vegetarian twist, use mushrooms or lentils instead of meat. You can also use vegetable broth instead of chicken broth for a plant-based dish. If you don't have penne, any pasta like fusilli or rotini works great. For a dairy-free option, omit the Parmesan or use nutritional yeast for a cheesy flavor. {{ingredient_image_1}} Making One-Skillet Sausage Pasta is easy. You need to gather all your ingredients first. This helps keep things organized. You will cook everything in one skillet, making clean-up simple. Here are the key steps before cooking: - Chop the onion and bell pepper. - Mince the garlic. - Measure out the broth and diced tomatoes. - Gather your spices and cheese. 1. Heat the Skillet: Start by heating the olive oil in a large skillet over medium heat. This takes about one minute. 2. Cook the Veggies: Add the chopped onion and bell pepper. Sauté them for about 5 minutes. You want them soft and fragrant. 3. Brown the Sausage: Push the veggies to the side. Add the Italian sausage to the skillet. Cook for 5 to 7 minutes. Break it into small pieces as it cooks. 4. Add Garlic: Stir in the minced garlic and cook for another 1 to 2 minutes. The garlic should smell great. 5. Combine Ingredients: Now, add the diced tomatoes, chicken broth, dried herbs, and red pepper flakes. Bring this mix to a gentle simmer. 6. Cook the Pasta: Stir in the penne pasta. Make sure it’s under the liquid. Cover the skillet and cook for about 12 to 15 minutes. Stir occasionally until the pasta is al dente. 7. Add Spinach: Mix in the chopped spinach and cook for 2 more minutes. This will wilt the spinach. 8. Finish the Dish: Remove the skillet from heat. Stir in the grated Parmesan cheese. Add salt and pepper to taste. Let it sit for a few minutes to thicken. To help you follow along, I suggest taking pictures at each step. This way, you can see how the dish transforms. You could also record a short video of your cooking process. This makes it fun and helps others learn too. Share your results online! To cook pasta just right, follow these simple steps: - Use a large pot with plenty of water. - Add a pinch of salt to the boiling water. - Stir the pasta often to prevent sticking. - Taste a piece a minute before the time is up. It should be firm but not hard. For this dish, use penne pasta. It holds sauce well and cooks evenly. To make your dish extra tasty, try these tips: - Use fresh garlic instead of minced. It gives a strong flavor. - Add a splash of white wine when cooking the sausage. This adds depth. - Top with fresh basil and extra Parmesan cheese before serving. You can also mix in your favorite vegetables, like zucchini or mushrooms, for added flavor. Sometimes things don't go as planned. Here are quick fixes: - If the pasta is too dry, add more chicken broth. Stir well. - If it's too soggy, remove the lid and let it cook longer. - For a spicier kick, add more red pepper flakes slowly. These tips will help you fix small problems and keep your dish delicious. Pro Tips Fresh Ingredients: Using fresh vegetables and herbs can significantly enhance the flavor of your dish. Opt for fresh garlic, spinach, and basil when possible. Adjusting Spice Level: If you're not sure about the spiciness, start with less red pepper flakes. You can always add more later to suit your taste. One-Pot Cooking: This recipe is designed to be made in one skillet, which makes cleanup easier. Just ensure you stir occasionally to prevent sticking. Perfect Pasta: To achieve al dente pasta, taste it a minute or two before the recommended time. It should be firm but not hard. {{image_2}} You can make this dish lighter with easy swaps. Use whole grain penne for more fiber. Swap the Italian sausage for turkey or chicken sausage. You can also use low-sodium chicken broth to cut salt. Fresh spinach adds vitamins, but you can use kale instead for a deeper flavor. For a meatless version, skip the sausage entirely. Try adding more veggies like mushrooms, zucchini, or eggplant. You can use a plant-based sausage for a similar taste. Toss in extra garlic and herbs to boost flavor. Use vegetable broth instead of chicken broth for depth. If you want to change up the protein, shrimp or chicken work well. Cook shrimp until pink, then add them in the last few minutes. For chicken, cube and sauté it until cooked through. Adjust cooking time based on your protein choice. Both options give a fresh twist to the dish. Store your One-Skillet Sausage Pasta in an airtight container. Let it cool to room temperature first. Then, place it in the fridge. It will stay fresh for up to three days. Make sure to label the container with the date. This way, you won’t forget when you made it. Reheat your pasta on the stove for the best taste. Add a splash of chicken broth or water. This helps to keep it moist. Heat over medium heat, stirring often. You can also use a microwave. Place it in a microwave-safe bowl and cover it with a lid. Heat in short bursts, stirring in between. This keeps it from drying out. You can freeze One-Skillet Sausage Pasta too! Portion it into freezer-safe bags or containers. Remove as much air as possible. Label the bags with the date. When you want to eat it, thaw it overnight in the fridge. Reheat as described above. It can last in the freezer for up to three months. Enjoy your easy dinner later! You can use ground turkey or chicken instead of sausage. For a plant-based option, try lentils or a meat substitute like tempeh. These options give you a similar texture and flavor. Just season them well with herbs and spices to keep the dish tasty. Yes, you can use any pasta you like. Bow tie, rotini, or macaroni work great here. Just remember to adjust cooking times based on the pasta shape. Make sure the pasta cooks until it is tender but still firm. One-Skillet Sausage Pasta lasts about 3 to 4 days in the fridge. Store it in an airtight container for best results. When you're ready to eat, simply reheat it on the stove or in the microwave until warm. Enjoy it again! In this post, I outlined key ingredients and provided cooking steps for your pasta dish. I shared tips to enhance flavor and offered easy substitutions. You learned how to store leftovers and reheat them properly. My final thought is that cooking pasta can be simple and fun. With the right ingredients and a few tricks, you can enjoy a tasty meal any day. Enjoy experimenting and making this dish your own!

One-Skillet Sausage Pasta Quick and Easy Dinner

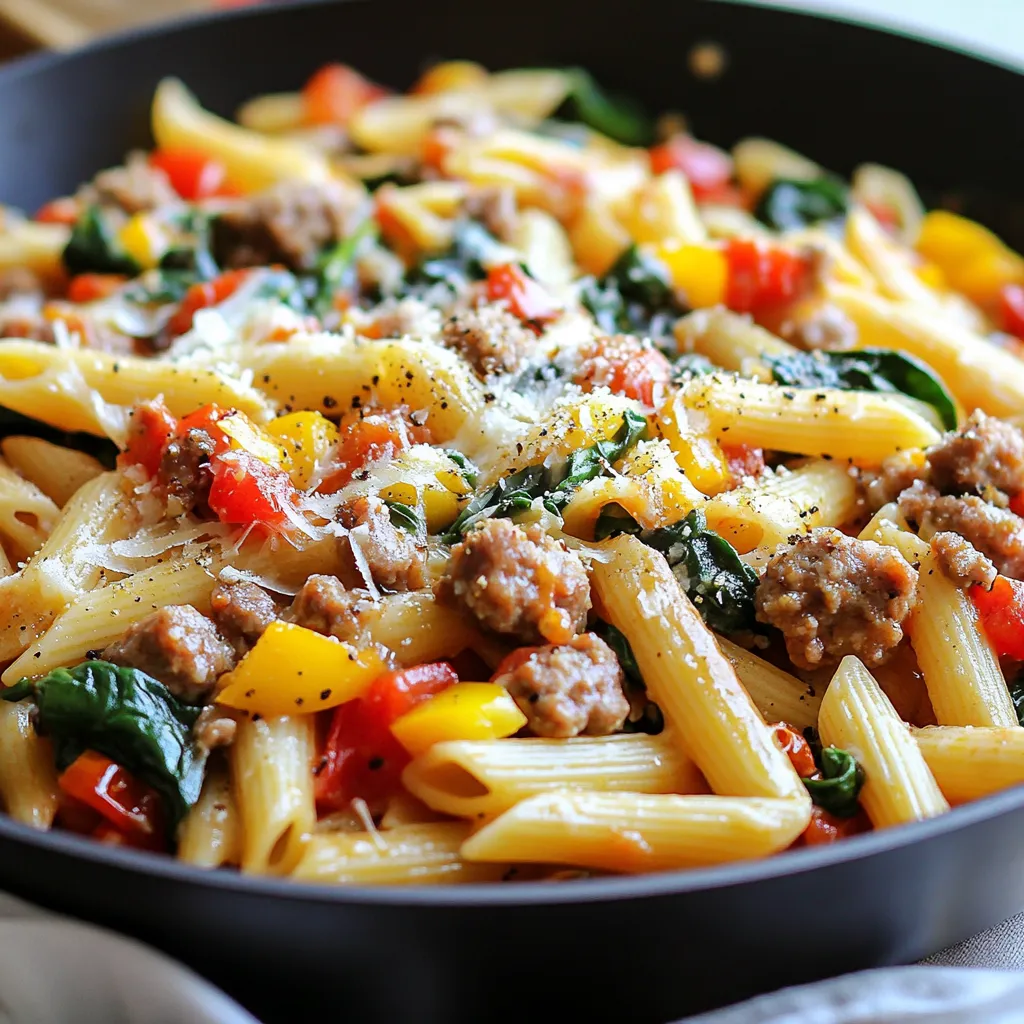
Looking for a quick and easy dinner that packs flavor? One-Skillet Sausage Pasta is your answer! This dish combines juicy

- 2 cups cooked shredded chicken - 1 cup cream cheese, softened - 1 cup shredded cheddar cheese - 1/2 cup green onions, diced - 1 tablespoon garlic powder - 1 teaspoon cumin - 1 teaspoon chili powder - Salt and pepper to taste - 10-12 small flour tortillas - Cooking spray - Fresh cilantro, for garnish When I think of Baked Cream Cheese Chicken Taquitos, I think of comfort. The first thing you need is cooked shredded chicken. This makes it fast and easy. You can use leftover chicken or buy a rotisserie chicken. The choice is yours! Next is cream cheese. Softened cream cheese gives a nice, creamy texture. It blends well with the chicken and cheese. Then, add cheddar cheese for a rich flavor. Shredded cheddar adds a nice bite to the mix. Diced green onions bring freshness and a little crunch. They add color and taste to the taquitos. Now let’s talk spices. Garlic powder is a must. It adds a punch of flavor. Cumin and chili powder give a warm and earthy touch. Don't forget salt and pepper. They bring all the flavors together. For the wrap, you will need small flour tortillas. They are soft and easy to roll. A quick spray of cooking spray helps the taquitos get crispy in the oven. Finally, fresh cilantro is for garnish. It adds a beautiful touch to your dish. Each ingredient plays a role in making these taquitos a simple delight. {{ingredient_image_1}} - Preheat the oven to 400°F (200°C). - Line a baking sheet with parchment paper. - In a bowl, combine 2 cups of shredded chicken, 1 cup of softened cream cheese, 1 cup of shredded cheddar cheese, and 1/2 cup of diced green onions. - Add 1 tablespoon of garlic powder, 1 teaspoon of cumin, 1 teaspoon of chili powder, and salt and pepper to taste. - Mix until the filling is well combined. - Warm 10-12 small flour tortillas in the microwave for about 30 seconds to make them easy to roll. - Place about 2 tablespoons of the chicken mixture onto the lower third of each tortilla. - Roll the tortillas tightly around the mixture, tucking in the sides as you go. - Place the rolled taquitos seam-side down on the prepared baking sheet. - Lightly spray the tops of the taquitos with cooking spray. - Bake in the preheated oven for 20-25 minutes, or until golden brown and crispy. To prevent filling from spilling out, place it on the lower third of the tortilla. Roll it tightly but gently, tucking in the sides as you go. This tactic keeps your filling secure. To keep tortillas pliable, warm them in the microwave for about 30 seconds. This small step makes a big difference when rolling. To get that perfect crunch, adjust your baking times. Each oven is different, so keep an eye on your taquitos. Start checking them around the 20-minute mark. For even crispiness, use cooking spray on the tops before baking. A light coat helps achieve a golden brown finish. For dips, I love pairing taquitos with guacamole or sour cream. These creamy options balance the crunch. You can also serve them with salsa for a fresh kick. As for sides, think about adding a simple salad or some black beans. These pair well with the flavors of the taquitos and round out your meal. Pro Tips Warm the Tortillas: Warming the tortillas before rolling makes them more pliable and less likely to crack. Don't Overfill: Be generous but avoid overfilling the taquitos to prevent them from bursting while baking. Use Parchment Paper: Lining the baking sheet with parchment paper ensures easy cleanup and prevents sticking. Experiment with Spices: Feel free to customize the spice blend based on your taste preferences for a unique flavor profile. {{image_2}} You can change the filling based on your taste. Want some heat? Add spicy jalapeños! Just chop them finely and mix them in with the chicken and cream cheese. You’ll get a kick with every bite! For a vegetarian option, swap the chicken for black beans or lentils. Mix these with the cream cheese and some diced bell peppers. It’s creamy, tasty, and still filling! When it comes to tortillas, you have options. Flour tortillas are soft and easy to roll. They hold the filling well. If you prefer a crunchier texture, corn tortillas work great too. Just warm them first to prevent cracking. For those who need gluten-free options, look for gluten-free tortillas. They are widely available and work just as well. You won’t miss out on flavor! A good dipping sauce makes your taquitos even better. Salsa is a classic choice. You can make it fresh by mixing chopped tomatoes, onions, cilantro, lime juice, and salt. Guacamole is another favorite. Just mash ripe avocados, add lime juice, and mix in some diced onions and salt. Both pair perfectly with your taquitos! To keep your baked cream cheese chicken taquitos fresh, store them in the fridge. Place them in an airtight container. They stay good for about three days. To avoid sogginess, let them cool down before sealing. You can also use parchment paper between layers for extra protection. If you want to save some for later, freezing is the best option. Wrap each taquito tightly in plastic wrap. Then, place them in a freezer bag. They can last up to three months in the freezer. When you're ready to eat, remove them from the freezer. Preheat your oven to 400°F (200°C). Bake them for about 25-30 minutes, until they are hot and crispy. To avoid sogginess, do not store them while still warm. Always cool them first. When reheating, place them on a baking sheet in a single layer. This helps restore their crispiness. If you plan to eat them later, consider saving the garnish for when you serve them. This keeps your taquitos looking fresh and tasty. Yes, you can use rotisserie chicken. It saves time and adds flavor. Rotisserie chicken is already cooked, so you skip the cooking step. Just shred the chicken before using it. This makes your taquitos quick and easy to prepare. Frozen taquitos take longer to cook. Bake them at 400°F (200°C) for about 25-30 minutes. You may need to add a few extra minutes. Check for a golden brown color to know they are done. Baking time can change based on your oven. You can swap some ingredients for healthier options. Use low-fat cream cheese or Greek yogurt instead. Choose whole wheat tortillas for added fiber. For less fat, reduce the amount of cheese. You can also add more veggies, like spinach or bell peppers, to boost nutrition. You now have a complete guide for making tasty taquitos. We covered the key ingredients, step-by-step instructions, and helpful tips for success. You can explore fun variations and smart storage methods, too. Taquitos offer a great way to enjoy snacks or meals. With these simple recipes and ideas, you can impress friends and family. Enjoy your cooking and savor every bite!

Baked Cream Cheese Chicken Taquitos Simple Delight

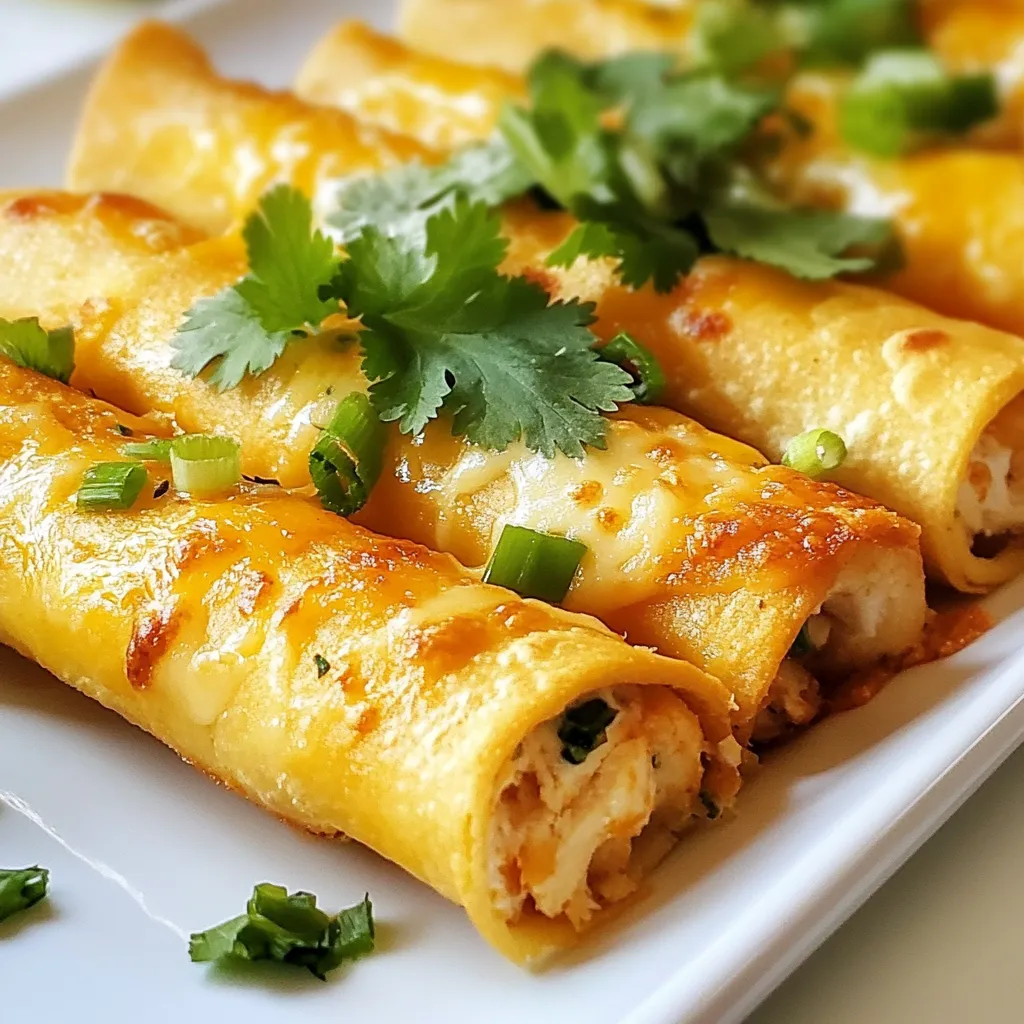
Craving a delicious snack that’s easy to make? Baked Cream Cheese Chicken Taquitos are your answer! With creamy filling and

- 4 medium russet potatoes - 1 lb ground turkey or beef - 1 packet taco seasoning - 1 cup black beans, drained and rinsed - 1 cup corn (fresh, frozen or canned) - 1 cup diced tomatoes - ½ cup red onion, finely chopped - 1 avocado, diced - 1 cup shredded cheese (cheddar or Mexican blend) - ½ cup sour cream or Greek yogurt - 2 tablespoons olive oil - Fresh cilantro for garnish - Salt and pepper to taste Creating a Southwest Taco Loaded Potato Bowl starts with these fresh ingredients. I love russet potatoes for their fluffy texture. Ground turkey or beef offers a tasty protein base. Taco seasoning adds zing, while black beans and corn bring texture. Diced tomatoes and red onion add fresh flavor. For toppings, I choose creamy avocado and cheese. Sour cream or Greek yogurt gives it a nice tang. Fresh cilantro brightens the dish. Don’t forget salt and pepper to balance it all out. This combo makes a hearty meal that’s fun to eat! Make sure to have everything ready before you start cooking. It helps keep the process smooth and easy. I always recommend using fresh ingredients for the best flavor. Happy cooking! {{ingredient_image_1}} - Preheat your oven to 400°F (200°C). - Scrub the russet potatoes under running water. - Pierce each potato a few times with a fork. - Rub them with olive oil and sprinkle with salt. - Place the potatoes on a baking sheet. - Bake for 45-60 minutes until tender. - Heat 2 tablespoons of olive oil in a large skillet. - Add 1 pound of ground turkey or beef to the skillet. - Cook until browned, breaking it apart with a spatula. - Drain excess fat if needed. - Stir in 1 packet of taco seasoning and ¼ cup of water. - Simmer for 5 minutes until well coated. - Let the potatoes cool for a few minutes. - Cut each potato in half lengthwise. - Scoop out a small portion from the center. - Fill each potato with seasoned meat. - Layer in black beans, corn, diced tomatoes, and red onion. - Top with 1 cup of shredded cheese. - Return to the oven for 5-7 minutes to melt cheese. - Remove and add diced avocado and sour cream. - Garnish with fresh cilantro, salt, and pepper. - Serve immediately for a hearty meal. To tell when potatoes are done, insert a knife. If it slides in easily, they are ready. You can also check by squeezing them gently; they should feel soft. If you want an alternative to roasting, try microwaving the potatoes. Cook them for about 10-12 minutes, turning halfway through. This saves time and gives you tender potatoes. Adjust the seasoning to your taste. Try adding more taco seasoning for a bolder flavor. You can also mix in garlic powder or onion powder for extra depth. Optional spices include cumin for warmth and smoked paprika for a hint of smokiness. These additions can make your dish pop with flavor. Pair your loaded potato bowl with a fresh salad or tortilla chips. This adds crunch and balance to your meal. For creative plating, use a deep bowl to show off the layers. You can also sprinkle extra cilantro on top for a bright finish. This makes each serving look beautiful and appetizing. Pro Tips Choose the Right Potatoes: For the best texture and flavor, use medium russet potatoes, as they are fluffy and perfect for baking. Customize Your Protein: Feel free to swap out ground turkey or beef for other proteins like shredded chicken or plant-based alternatives for a different flavor profile. Layering is Key: When filling your potatoes, layer the ingredients for better flavor distribution and to prevent sogginess. Make Ahead: You can prepare the meat and toppings in advance, storing them separately, and assemble the bowls right before serving for a quick meal. {{image_2}} You can easily make this dish vegetarian. Simply swap the ground turkey or beef for plant-based proteins. - Use lentils, black beans, or crumbled tofu as your meat substitute. - Top with more veggies like bell peppers, zucchini, or mushrooms. - Add a generous scoop of guacamole for creaminess and flavor. These choices give you a hearty meal while keeping it meat-free. You won’t miss the meat at all! If you love heat, try a spicy version of the loaded potato bowl. - Add sliced jalapeños or a splash of hot sauce to the meat mixture. - For cheese, look for spicy varieties like pepper jack or chipotle cheddar. These spicy additions kick up the flavor and give your bowl a fun twist! Cheese can change the whole taste of your dish. Explore different cheese options for your toppings. - Try queso fresco, gouda, or a sharp cheddar for unique flavors. - Each cheese brings its own taste and texture to the bowl. Using different cheeses keeps your meals exciting and delicious. Enjoy the journey of flavor! To keep your loaded potato bowls fresh, use airtight containers. Let them cool before sealing. This helps keep moisture in check. Store them in the fridge for up to three days. If you want to save them longer, consider freezing them. In the freezer, they last up to three months. When you’re ready to eat leftovers, the oven is your best friend. Preheat it to 350°F (175°C). Place the potato bowls on a baking sheet. Heat for about 15-20 minutes. This keeps the potatoes crispy and the filling warm. If you’re in a hurry, the microwave works too. Just cover the bowl with a damp paper towel. Heat in 30-second intervals until warm. This method helps maintain moisture. To freeze loaded potato bowls, prepare them as usual but don’t bake them right away. After filling the potatoes, wrap each one tightly in foil or plastic wrap. Place them in a freezer-safe bag. When you want to cook a frozen bowl, thaw it in the fridge overnight. Bake as usual, adding a few extra minutes for cooking time. You can easily swap ground turkey or beef with other proteins. Here are some tasty options: - Chicken: Ground chicken works well for a lighter dish. - Tofu: Crumbled firm tofu is a great plant-based choice. - Beans: Black beans or pinto beans add protein and fiber. These swaps keep the flavor and texture you'll love. Making this dish gluten-free is simple. Here’s how: - Choose gluten-free taco seasoning. Many brands offer this option. - Use gluten-free sauces, like hot sauce or salsa. - Always check labels to ensure all ingredients are safe. This way, everyone can enjoy the meal without worry. Yes, you can prep this dish in advance. Here are some tips: - Cook the potatoes and meat the day before. - Store them separately in the fridge. - Assemble the bowls just before serving. This saves time and makes meal prep a breeze! This blog post covers all you need for a tasty loaded potato bowl. You learned about key ingredients like russet potatoes, ground turkey, and fresh toppings. The step-by-step guide walks you through cooking and assembly. You also discovered tips for perfect potatoes, variations like vegetarian options, and how to store leftovers. In the end, this dish is fun to make and share. It’s tasty and fills you up. Get creative with your toppings and enjoy every bite.

Savory Southwest Taco Loaded Potato Bowl Recipe

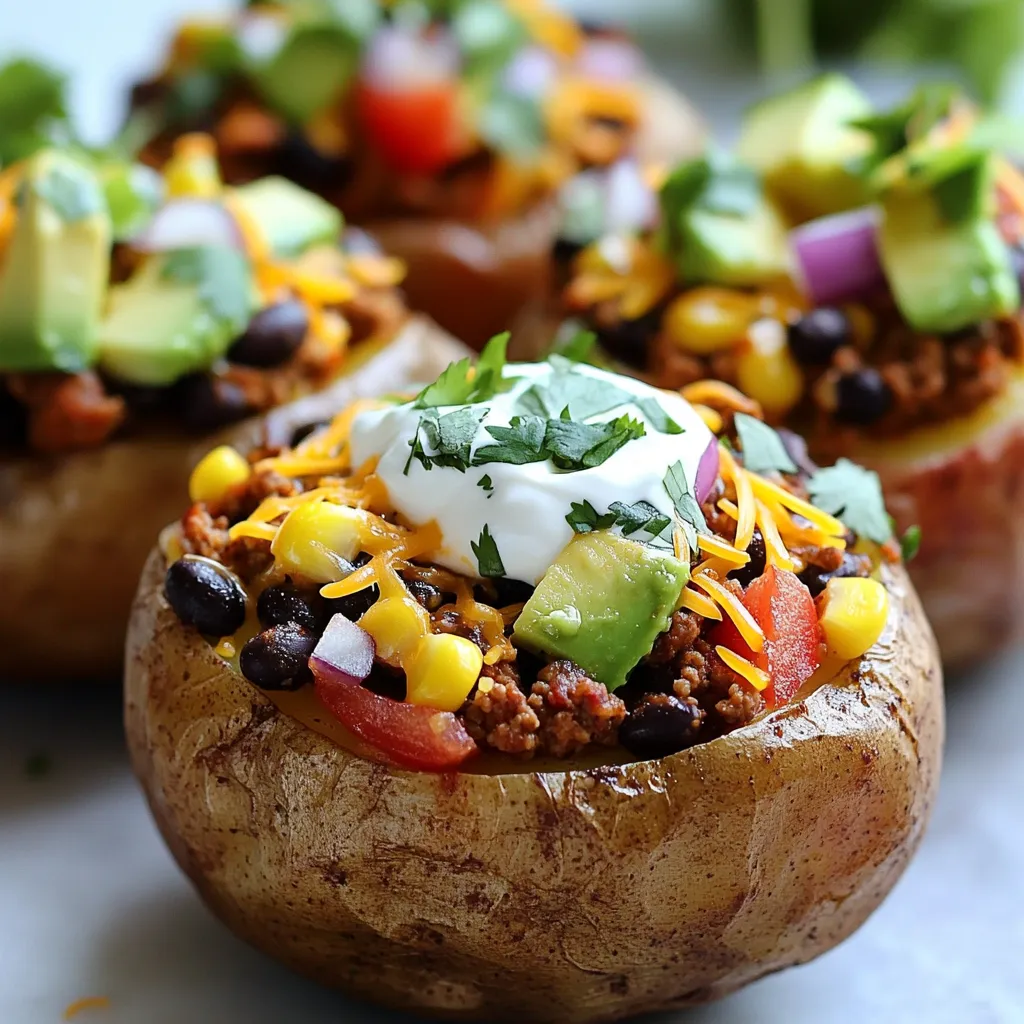
If you love bold flavors and comforting meals, my Savory Southwest Taco Loaded Potato Bowl recipe is perfect for you!

- 300g spaghetti or fettuccine - 4 ripe tomatoes, diced - 4 cloves garlic, minced - 3 tablespoons olive oil - 1 teaspoon red pepper flakes - Salt and pepper to taste - 1 tablespoon balsamic vinegar - Fresh basil leaves - Grated Parmesan cheese (optional) The main ingredients make this pasta vibrant and flavorful. I love ripe tomatoes for their sweet taste. Fresh garlic adds a fragrant kick. You can choose between spaghetti or fettuccine for the pasta. Both work well in this dish. The essential seasonings bring depth to your meal. Olive oil gives a rich base for the sauce. Red pepper flakes add just the right amount of heat. Balsamic vinegar enhances the flavor with a tangy twist. Don't forget to season with salt and pepper to balance the dish. Garnishes make your pasta look and taste amazing. Fresh basil leaves bring a burst of color and flavor. If you want extra creaminess, sprinkle some grated Parmesan cheese on top. This easy combination of ingredients creates a quick and tasty meal. {{ingredient_image_1}} 1. First, fill a large pot with water and add salt. 2. Bring the water to a boil. This helps flavor the pasta. 3. Add your spaghetti or fettuccine. 4. Cook according to the package instructions until al dente. This usually takes about 8 to 10 minutes. 5. Save one cup of pasta water, then drain the pasta. Set it aside. 1. In a large skillet, heat three tablespoons of olive oil over medium heat. 2. Add the minced garlic and one teaspoon of red pepper flakes. 3. Sauté for about 1-2 minutes. The garlic should smell good and turn a light gold. 4. Next, add the four diced tomatoes to the skillet. 5. Stir everything together and let it cook for about 5-7 minutes. The tomatoes will soften and release their juices. 1. Add the drained pasta to the skillet with the sauce. 2. Toss the pasta gently to mix it with the tomato mixture. 3. If the pasta looks dry, pour in some reserved pasta water. 4. Continue to toss until you achieve a silky consistency. 5. Finally, drizzle one tablespoon of balsamic vinegar over the dish. Season with salt and pepper to taste. Toss again to coat everything well. To make a silky sauce, reserve pasta water. This water is starchy and helps bind the sauce. When you mix in your cooked pasta, add some of this water. It helps create a smooth blend. If your sauce seems too thick, add a little more water. If it’s too thin, let it cook longer to thicken up. You can boost the taste with extra seasonings. Try adding herbs like oregano or thyme. For a bit more heat, toss in more red pepper flakes. If you want a tangy kick, use vinegar. Instead of balsamic, try red wine vinegar for a different flavor. This gives your dish a fresh twist. Sauté garlic gently to avoid burning. Start with medium heat and add olive oil. Add minced garlic when the oil is hot. Cook for just 1-2 minutes until golden and fragrant. Don’t rush this step! Timing is key. Add your tomatoes right after the garlic. This keeps the garlic flavor fresh and bright. Pro Tips Use Fresh Tomatoes: Fresh, ripe tomatoes will enhance the flavor of your sauce far more than canned varieties. Look for tomatoes that feel heavy for their size and have a rich color. Adjust the Spice: If you prefer a milder dish, reduce the amount of red pepper flakes. You can always add more at the table if desired. Reserve Pasta Water: Always save some pasta water before draining. This starchy water is perfect for adjusting the consistency of your sauce and helps it adhere better to the pasta. Garnish for Flavor: Fresh basil not only adds a pop of color but also intensifies the dish's flavor. Don't skip this step for an aromatic finish! {{image_2}} You can add protein to make this dish heartier. Chicken works well. Just cook it first, then add it to the sauce. Shrimp also makes a great choice. Cook the shrimp until pink, then toss it in. If you prefer a vegetarian option, try chickpeas or lentils. Both add great texture and protein. Tofu is another good choice. Just sauté it until golden, then mix it in. Adding vegetables can boost flavor and nutrition. Spinach is an easy option. Toss it in at the end until it wilts. Bell peppers add color and crunch, too. Just sauté them with the garlic. Seasonal veggies are fantastic. In summer, use zucchini or eggplant. In winter, think about roasted carrots or Brussels sprouts. Fresh seasonal ingredients make the dish bright and tasty. If you need gluten-free options, there are many choices. Brown rice pasta works well and has a nice flavor. Quinoa pasta is another good option. It’s high in protein and gluten-free. You might also try whole grain pasta. This adds fiber and nutrients. For something different, look for vegetable-based pasta, like spinach or beet. These add color and a unique taste to your meal. To keep your Silky Tomato Garlic Pasta fresh, follow these steps: - Refrigeration: Place leftovers in the fridge right away. This keeps harmful bacteria away. - Containers: Use airtight containers to prevent moisture loss. Glass or plastic containers work well. When you're ready to enjoy your pasta again, here’s how to reheat it: - Methods: You can use a microwave or a skillet. Both work great for warming pasta. - Silkiness: To maintain that silky sauce, add a splash of reserved pasta water while reheating. This keeps it creamy and smooth. If you want to save your pasta for later, freezing is a good choice: - Freezing: Place the cooled pasta in airtight freezer bags. Remove as much air as possible. - Thawing and Reheating: Thaw overnight in the fridge. Reheat in a skillet with a little water or oil to keep it silky. You can use canned tomatoes if you lack fresh ones. Look for whole or diced canned tomatoes. They give a great flavor. Another option is tomato paste or sauce. Use about 2-3 tablespoons of paste for a rich taste. Mix it with some water to reach the right consistency. Yes, you can make this dish vegan easily. Omit the Parmesan cheese for a tasty option. For protein, consider adding chickpeas or lentils. They boost flavor and nutrition. You could also use vegan cheese to keep that creamy texture. This pasta lasts for about 3-5 days in the fridge. Store it in an airtight container to keep it fresh. Watch for signs of spoilage, like off smells or mold. If it smells funny or looks odd, throw it away. This blog post covered all you need to create a tasty Silky Tomato Garlic Pasta. We discussed key ingredients, cooking methods, and helpful tips. Remember to use reserved pasta water for the best sauce. You can add proteins and veggies to fit your taste. Store and reheat leftovers wisely to keep them fresh. Enjoy making this dish your own, and don’t hesitate to experiment with flavors and ingredients. Cooking is fun, so let your creativity shine in the kitchen!

Silky Tomato Garlic Pasta Quick and Tasty Meal

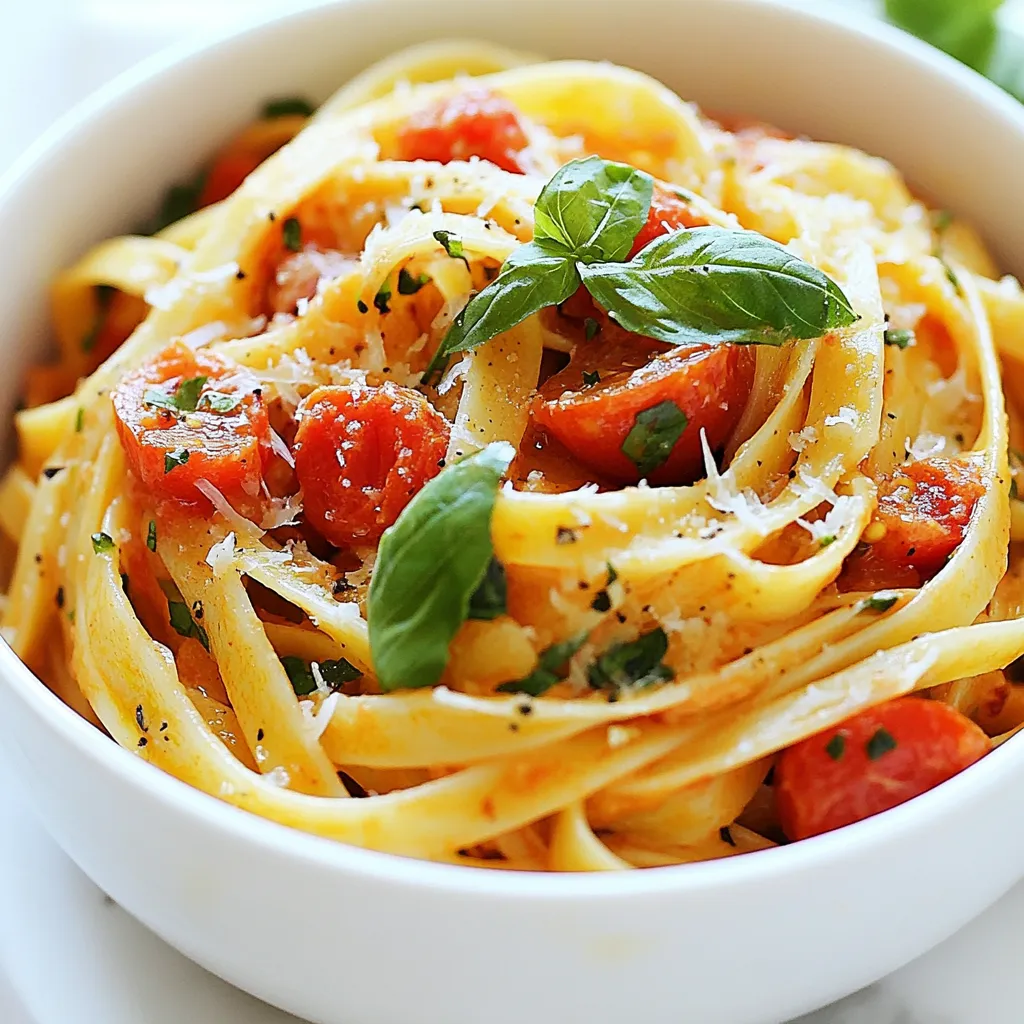
Looking for a quick dinner that’s packed with flavor? My Silky Tomato Garlic Pasta is just the meal you need!

The Firecracker Ground Chicken Bowl is simple to make with fresh and tasty ingredients. Here’s what you need: - 1 pound ground chicken - 2 tablespoons soy sauce - 1 tablespoon hoisin sauce - 1 tablespoon Sriracha (adjust to taste) - 1 teaspoon sesame oil - 1 red bell pepper, diced - 1 cup snap peas, trimmed - 3 green onions, chopped (white and green parts separated) - 1 clove garlic, minced - 1 tablespoon fresh ginger, minced - 1 cup cooked jasmine rice or quinoa - 2 tablespoons sesame seeds - Fresh cilantro for garnish (optional) - Salt and pepper to taste Each ingredient plays a key role. Ground chicken gives protein and flavor. Soy sauce and hoisin sauce add depth and sweetness. Sriracha brings heat; you can adjust it based on your spice preference. The vegetables add color and crunch. Red bell pepper and snap peas provide vitamins. Green onions add a mild bite. Garlic and ginger give a fresh aroma that wakes up the dish. You can serve the chicken over cooked jasmine rice or quinoa. Both options soak up the sauce well. Lastly, the sesame seeds and cilantro make the dish pop with texture and freshness. Make sure to gather all these ingredients before you start cooking. They make the Firecracker Ground Chicken Bowl a delightful meal! {{ingredient_image_1}} To make the Firecracker Ground Chicken Bowl, gather your ingredients first. You will need: - 1 pound ground chicken - 2 tablespoons soy sauce - 1 tablespoon hoisin sauce - 1 tablespoon Sriracha (adjust to taste) - 1 teaspoon sesame oil - 1 red bell pepper, diced - 1 cup snap peas, trimmed - 3 green onions, chopped (white and green parts separated) - 1 clove garlic, minced - 1 tablespoon fresh ginger, minced - 1 cup cooked jasmine rice or quinoa - 2 tablespoons sesame seeds - Fresh cilantro for garnish (optional) - Salt and pepper to taste Make sure you have a large skillet or wok for cooking. 1. Heat the sesame oil in the skillet over medium-high heat. 2. Add the minced garlic and ginger. Sauté for about 30 seconds until you smell the aroma. 3. Move the garlic and ginger to one side of the skillet. Add the ground chicken. Cook it for about 5-7 minutes. Break it apart with a spatula until it’s browned and cooked through. 4. Stir in the diced red bell pepper and snap peas. Cook for another 3-4 minutes. The veggies should be tender but still crisp. 5. In a small bowl, mix soy sauce, hoisin sauce, and Sriracha. Pour this sauce over the chicken and veggies. Stir well to coat everything. Cook for another 2-3 minutes to heat through. 6. Add the white parts of the chopped green onions. Season with salt and pepper to your taste. To serve, place a scoop of jasmine rice or quinoa in a bowl. Top it with the firecracker ground chicken mixture. Garnish with the green parts of the green onions, sesame seeds, and fresh cilantro if you like. Enjoy the flavors! To get the best flavor, use fresh ginger and garlic. These two ingredients make a big difference. The sesame oil adds depth. It gives a nutty taste that blends well with the sauces. Use a balance of soy and hoisin sauce. This mix adds sweetness and salt. Adjust the Sriracha for your spice level. More Sriracha means more heat. Cook ground chicken over medium-high heat. This keeps it juicy and prevents it from drying out. Use a spatula to break it up while cooking. Make sure to brown it evenly for better flavor. If you see any pink, cook it a while longer. It should look golden and cooked through. For the best texture, add veggies at the right time. Start with garlic and ginger, then add the ground chicken. After the chicken is browned, add red bell pepper and snap peas. Cook these for just 3-4 minutes. You want them tender but still crisp. This keeps the bright colors and fresh flavors. Pro Tips Adjust the Heat: If you prefer a milder dish, reduce the Sriracha. Alternatively, add more for an extra kick! Veggie Variations: Feel free to swap snap peas and bell peppers for your favorite vegetables, like broccoli or zucchini, to customize the bowl. Meal Prep Friendly: This recipe is perfect for meal prepping! Make a double batch and store in the fridge for easy lunches all week. Garnish for Flavor: Fresh cilantro and sesame seeds not only add visual appeal but also enhance the flavor of the dish. {{image_2}} If you want a veggie version, use plant-based meat. You can try crumbled tofu or tempeh. Both options will soak up flavors well. Another choice is lentils; they add texture and protein. You can also use chickpeas for a different taste and bite. Just cook them until warm, then mix them with the sauce. While jasmine rice is great, you can switch it up. Quinoa is a healthy choice. It adds a nutty flavor and is packed with protein. Brown rice can also work well; it has a hearty texture. For a low-carb option, try cauliflower rice. It soaks up sauce nicely and keeps the dish light. Not everyone loves heat, and that’s okay! You can reduce the Sriracha. Start with half a tablespoon and taste as you go. For a milder flavor, add more hoisin sauce or soy sauce. If you want a sweet touch, mix in honey or brown sugar. This will balance the heat and make it tasty for everyone. To keep your firecracker ground chicken bowl fresh, let it cool first. Place leftovers in a container. Seal it tightly to keep out air. Store it in the fridge for up to three days. You can also separate the chicken from the rice for better storage. When you're ready to enjoy your leftovers, heat them on the stove or in the microwave. If using a stove, add a splash of water to prevent drying. Heat it on low until warm. For the microwave, cover the bowl with a lid or microwave-safe wrap. Heat for about 1-2 minutes, stirring halfway through. If you want to save your firecracker ground chicken bowl for later, freezing works great. Use an airtight container or freezer bag. Remove as much air as possible before sealing. It can last up to three months in the freezer. When you're ready to eat it, thaw in the fridge overnight before reheating. You can use ground turkey or lean ground beef as a substitute. Both options work well. If you want a plant-based choice, try crumbled tofu or lentils. They add protein and flavor. Each option will change the taste and texture a bit. Yes, you can make this dish ahead of time. Cook and cool the chicken mixture. Store it in an airtight container in the fridge. It will last for up to three days. When you are ready to eat, just reheat it on the stove or in the microwave. Prepare the rice or quinoa fresh for best results. To reduce the spice, use less Sriracha in the sauce. You can also add more soy sauce and hoisin sauce to balance the heat. Mixing in some extra vegetables can help, too. Add more snap peas or bell peppers for a milder taste. Enjoy your meal without the burn! This blog post covered key ingredients, cooking steps, and helpful tips for creating a delicious meal. You learned about ground chicken, sauces, and the best vegetables to use. We explored cooking tricks for great flavor and offered variations for every taste. Additionally, I shared storage tips to keep leftovers fresh. In the end, cooking should be fun and flexible. Feel free to experiment and make it your own. Enjoy your next meal!

Firecracker Ground Chicken Bowl Flavorful and Simple

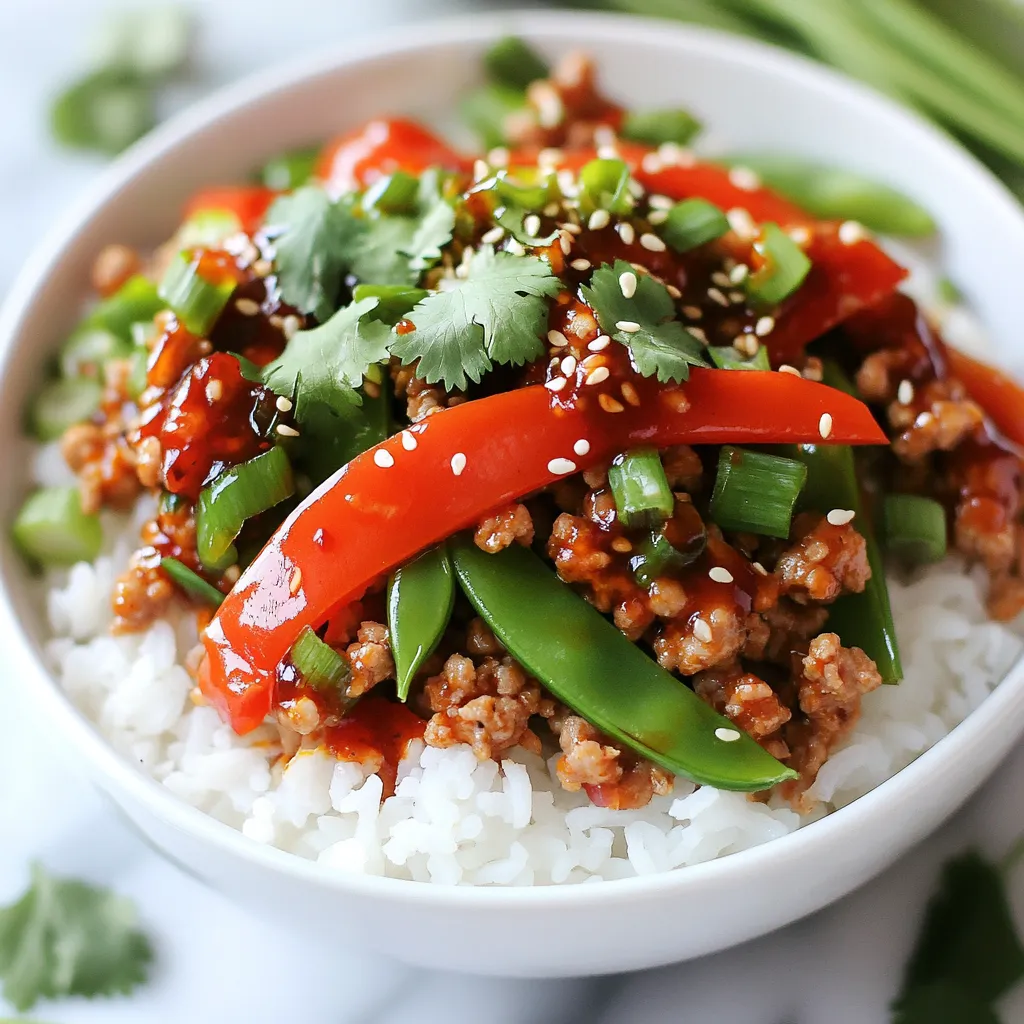
If you’re craving a quick, delicious meal, the Firecracker Ground Chicken Bowl is for you! This dish packs a punch

For tasty ground beef tostadas, you need: - 1 lb ground beef - 1 tablespoon olive oil - 1 small onion, finely chopped - 2 garlic cloves, minced - 1 teaspoon ground cumin - 1 teaspoon chili powder - 1 teaspoon smoked paprika - Salt and pepper to taste - 8 tostada shells - 1 cup refried beans (canned or homemade) These ingredients create a savory base. The ground beef gives the tostadas their heartiness. Each spice adds depth to the flavor. You can elevate your tostadas with these toppings: - 1 cup shredded lettuce - 1 cup diced tomatoes - 1 avocado, sliced - 1/2 cup crumbled queso fresco - Fresh cilantro for garnish - Lime wedges for serving These toppings add freshness and color. They also bring different textures. Avocado lends creaminess, while cilantro adds a burst of flavor. Serve your tostadas with these sides for a complete meal: - Mexican rice - Black beans - Corn salad - Chips and salsa These sides complement the tostadas well. They provide more flavors and make your meal more filling. Enjoy your tasty feast! {{ingredient_image_1}} Start by heating one tablespoon of olive oil in a large skillet over medium heat. Add one small, finely chopped onion. Sauté it until it turns soft and clear, about three minutes. Next, add two minced garlic cloves and cook for one more minute. This will make your kitchen smell great. Now, add one pound of ground beef. Use a wooden spoon to break it into smaller pieces. Cook the beef until it is brown, which should take about five to seven minutes. Season it with one teaspoon each of ground cumin, chili powder, and smoked paprika. Add salt and pepper to taste. Mix everything well and let it cook for another two to three minutes. This will help the flavors blend together. While the beef cooks, it’s time to prepare the tostada shells. Follow the package instructions. You usually need to bake or fry them until they are crispy. Crispy shells hold the toppings well and add a nice crunch. If you want to make homemade tostadas, simply fry corn tortillas in hot oil until they turn golden and crunchy. Let them cool on paper towels to remove excess oil. Now comes the fun part: assembling the tostadas. First, take each crispy tostada shell and spread a layer of refried beans on top. You can use one cup of refried beans, whether canned or homemade. Next, add a generous amount of the seasoned ground beef mixture on top of the beans. Now, it’s time to pile on the fresh toppings. Add shredded lettuce, diced tomatoes, and avocado slices. Finish with half a cup of crumbled queso fresco. This adds creaminess and a nice salty flavor. Finally, sprinkle fresh cilantro on top. Serve your tostadas with lime wedges for squeezing over them. This adds a fresh, tangy touch that brightens up every bite. Enjoy your flavorful and easy ground beef tostadas! Choose 80/20 ground beef for a juicy and tasty result. This means 80% meat and 20% fat. The fat gives flavor and keeps the beef moist. Look for bright red color and a fresh smell. Avoid any beef that looks brown or smells off. You can also pick leaner beef, but it may be less juicy. To get crispy tostadas, bake or fry them until golden. If you bake, preheat your oven to 400°F (200°C). Lay the tostada shells flat on a baking sheet. Bake for about 5-7 minutes. If frying, heat oil in a pan. Fry each shell for about 30 seconds on each side. Let them cool on paper towels to stay crisp. Add extra flavor to the beef by trying different spices. You can mix in some oregano or cayenne pepper for a kick. If you like it mild, stick to cumin and paprika. Taste as you cook to find your perfect mix. Fresh lime juice on top can brighten all the flavors. Experiment with toppings like jalapeños or hot sauce for more heat. Pro Tips Use Fresh Ingredients: Fresh produce enhances the flavor of your tostadas. Always opt for ripe avocados and fresh herbs for the best taste. Customize Your Spice Level: Adjust the chili powder to your preferred heat level. You can also add fresh jalapeños for an extra kick! Perfectly Crisp Tostadas: For the crispiest tostadas, bake them in the oven until golden brown. This method avoids excess oil and maintains crunch. Meal Prep Tip: Prepare the seasoned ground beef and refried beans ahead of time. This allows for quick assembly during busy weeknights. {{image_2}} You can swap ground beef for plant-based options. Use lentils, black beans, or crumbled tofu. These options give great texture and flavor. For lentils, cook them with spices like cumin and chili powder. This adds depth and keeps the taste rich. Black beans can be mashed or left whole for a different bite. Tofu needs seasoning, so be sure to marinate it before cooking for more flavor. Toppings can change your tostadas completely. You can add sliced jalapeños for a kick. If you want crunch, try radishes or pickled onions. For a refreshing twist, use cucumber or corn. You can also add sour cream or Greek yogurt for creaminess. Don't forget about cheese; shredded cheddar or pepper jack works well too. You can mix and match toppings based on what you like. This way, every tostada can be unique. If you enjoy heat, there are many ways to spice up your tostadas. Start with adding diced jalapeños or serrano peppers to the beef mix. For more flavor, try using a spicy salsa on top. You can also drizzle hot sauce over your toppings. Experiment with spicy seasonings like cayenne or chipotle powder in the beef. If you want a real kick, consider adding a layer of spicy guacamole. This will make your tostadas sing with heat! You can store leftover ground beef tostadas in the fridge. Place them in an airtight container. They stay fresh for up to three days. When ready to eat, remove the toppings. This keeps them crisp. Reheat the beef in a skillet over medium heat. Heat it for about five minutes. You can also use the microwave. Just cover it and heat for one to two minutes. Freezing tostadas is a great way to save them. Place the cooked beef in a container. You can also freeze the tostada shells. Wrap each shell in plastic wrap. Place them in a freezer-safe bag. They can last for up to three months. To prepare, thaw them overnight in the fridge. Reheat the beef and assemble fresh tostadas. Tostadas last different times based on storage. In the fridge, they last for three days. In the freezer, they can last up to three months. Always check for any signs of spoilage. This includes off smells or changes in texture. Proper storage keeps your tostadas tasty and safe to eat! For tostadas, I recommend using ground beef with a fat content of 80/20. This mix gives great flavor and moisture. Too lean beef can make the dish dry. You want it juicy and tasty. Feel free to use ground turkey or chicken if you prefer a lighter option. Yes, you can change the toppings to fit your taste. Some great options include: - Sliced jalapeños for heat - Black olives for a briny touch - Sour cream for creaminess - Corn for sweetness - Salsa for extra flavor Mix and match to create your perfect tostada! Making tostadas from scratch is simple. Here’s how: 1. Choose your corn tortillas: Use small or medium-sized ones. 2. Heat oil in a pan: Use enough oil to cover the bottom. 3. Fry the tortillas: Cook each tortilla for about 1-2 minutes on each side. Look for a golden color. 4. Drain on paper towels: Let them cool to become crispy. Now, you're ready to build your delicious tostadas! This blog post covered tasty ground beef tostadas. We looked at main ingredients, toppings, and sides. I shared steps for cooking, assembling, and tips for crispiness. You can try vegetarian options or add heat for extra flavor. Also, I included storage info to keep your tostadas fresh. In summary, tostadas are fun, easy, and customizable. Enjoy making them your way!

Ground Beef Tostadas Flavorful and Easy Recipe

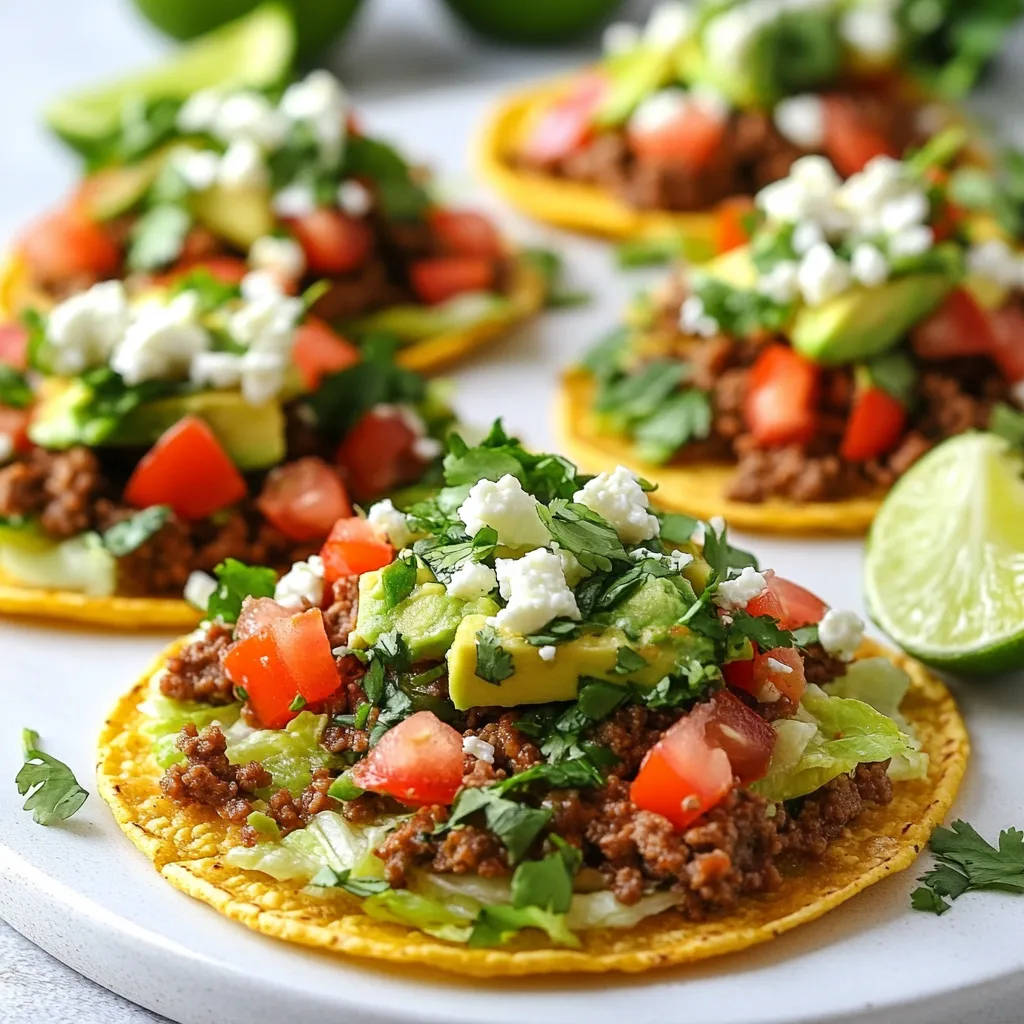
If you’re looking for a quick and tasty meal, you’re in the right place! Ground beef tostadas are simple to

Older posts
Newer posts
← Previous Page1 … Page138 Page139 Page140 … Page143 Next →

dsad

© 2025 Southern Dishes • Built with GeneratePress

Our Policies

  • Copyright Policy
  • Cookie Policy
  • GDPR Policy
  • Privacy Policy
  • Disclaimer
  • Terms Of Use

More Information

  • Home
  • About
  • Contact
  • Appetizers
  • Dessert
  • Dinner
  • Drinks
©2025, Southern Dishes About Back To Top