Skip to content
DisclaimerTerms Of UseGDPR PolicyCookie Policy

Southern Dishes

  • Home
  • Drinks
  • Appetizers
  • Dinner
  • Dessert
  • About
  • Contact
  • Privacy Policy
DisclaimerTerms Of UseGDPR PolicyCookie Policy

Isabella

For Funnel Cake Bites, you need simple ingredients. Here’s what you will gather: - 1 cup all-purpose flour - 2 tablespoons granulated sugar - 2 teaspoons baking powder - 1/4 teaspoon salt - 1 large egg - 1 cup milk - 1 teaspoon vanilla extract - Oil for frying - Powdered sugar for dusting - Optional toppings: chocolate sauce, strawberry syrup, or whipped cream Each ingredient plays a key role. The flour gives the bites their base. The sugar adds sweetness, while the baking powder helps them rise. Salt enhances all the flavors. The egg binds everything together. Milk adds moisture and creaminess. Vanilla extract brings a nice aroma. When you fry these bites, the oil must be hot. This helps them crisp up nicely. Dusting with powdered sugar makes them extra special. You can also add toppings like chocolate sauce or strawberry syrup for a fun twist. Enjoy these sweet treats with family and friends! {{ingredient_image_1}} First, gather your dry ingredients. You need 1 cup of all-purpose flour, 2 tablespoons of granulated sugar, 2 teaspoons of baking powder, and 1/4 teaspoon of salt. In a mixing bowl, add the flour, sugar, baking powder, and salt. Whisk them together until they mix well. This step helps your funnel cake bites rise and become fluffy. Next, let's mix the wet ingredients. In another bowl, crack 1 large egg and add 1 cup of milk and 1 teaspoon of vanilla extract. Use a whisk to blend these together. You want a smooth mixture with no lumps. The vanilla adds a nice flavor to your bites. Now, it’s time for frying. Heat oil in a deep frying pan or pot to about 350°F (175°C). Make sure there is enough oil so the bites can float freely. Take your batter and use a piping bag or squeeze bottle. Squeeze the batter into the hot oil in circular shapes to form bite-sized spirals. Fry them for about 2-3 minutes on each side. They should turn golden brown. Once cooked, carefully remove the bites with a slotted spoon and let them drain on paper towels. Dust the warm bites with powdered sugar. You can also add toppings like chocolate sauce or whipped cream if you like. Enjoy your sweet treats! To get a great batter, use fresh ingredients. Start by mixing the flour, sugar, baking powder, and salt well. This step makes sure your bites rise nicely. Next, whisk the egg, milk, and vanilla together until smooth. Slowly add the wet mix to the dry mix. Stir gently until you see no lumps. The batter should be thick but pourable. If it feels too thick, add a splash of milk. Frying can be fun, but safety is key. Heat your oil to 350°F (175°C) in a deep pot. Use a thermometer to check the oil's heat. Too hot and the bites burn; too cool and they soak up oil. Only fry a few at a time. This keeps the oil temperature steady. Use a slotted spoon to place the batter in the oil. Fry for 2-3 minutes on each side. Look for a golden brown color. After frying, let the bites drain on paper towels to remove excess oil. Serve your funnel cake bites warm. Dust them with powdered sugar for a classic look. You can also add fun toppings. Try chocolate sauce, strawberry syrup, or whipped cream. For a twist, mix and match toppings for a unique treat. Share them at parties or enjoy them as a sweet snack at home! Pro Tips Use a Thermometer: A cooking thermometer helps ensure your oil is at the right temperature for frying, which is crucial for achieving that perfect golden brown color. Don’t Overcrowd the Pan: Fry in small batches to maintain the oil temperature, which helps the funnel cake bites cook evenly and become crispy. Experiment with Flavors: Add spices like cinnamon or nutmeg to the batter for a unique twist, or try different extracts like almond for varied flavor profiles. Serve Immediately: Funnel cake bites are best enjoyed fresh and warm. Serve them right after frying for the ultimate taste experience. {{image_2}} You can easily change up your funnel cake bites! Here are two tasty options: - Chocolate funnel cake bites: Add cocoa powder to the dry ingredients. Use about 1/4 cup. This will give a lovely chocolate flavor. You can also drizzle melted chocolate on top after frying. - Fruit-infused funnel cake bites: Mix in some pureed fruit into the batter. Try using strawberries or bananas. This adds a fresh taste. You can also top them with fruit syrup for an extra burst of flavor. If you want a lighter treat, try these healthy swaps: - Use whole wheat flour instead of all-purpose flour. It adds fiber while keeping the taste. - Replace granulated sugar with honey or maple syrup. This gives sweetness without refined sugar. - For frying, use an air fryer instead. They will be lower in fat and still taste great. You can make these bites gluten-free with a few simple swaps: - Use gluten-free all-purpose flour. Look for one that has xanthan gum for best results. - Ensure all other ingredients are gluten-free. Check labels on baking powder and vanilla extract. - Follow the same mixing and frying steps. You will have delicious gluten-free funnel cake bites! You may have some funnel cake bites left after a tasty treat. To store them, let the bites cool down first. Place them in an airtight container. Keep the container in the fridge. These bites will stay fresh for about 2-3 days. If you want them to last longer, freezing is a great option. When you’re ready to enjoy your leftover funnel cake bites, reheating is easy. You can use an oven or a microwave. For the oven, preheat it to 350°F (175°C). Place the bites on a baking sheet for about 5-8 minutes. This method keeps them crispy. If you use a microwave, heat them for 10-15 seconds. The bites may become soft, so the oven is better. Freezing is a smart way to save funnel cake bites for later. First, let them cool completely. Then, arrange them in a single layer on a baking sheet. Freeze for about 1 hour until firm. After that, move the bites to a freezer-safe bag. Remove any extra air before sealing. These bites can last for up to 2 months in the freezer. When you crave a sweet treat, just reheat them! You can make funnel cake bites in the oven, but they will not be the same. Oven-baked bites will lack the classic texture and flavor. For a crisp bite, frying is best. If you want to try baking, set your oven to 400°F (200°C). Use a baking sheet lined with parchment paper. Drop spoonfuls of batter onto the sheet. Bake for about 10-12 minutes or until golden. They will be less fluffy but still tasty. The best oils for frying funnel cake bites are vegetable oil or canola oil. These oils have a high smoke point. This means they stay stable when heated. Peanut oil is another great option if you like a bit of flavor. Avoid oils like olive oil, as they burn too quickly. Make sure to heat the oil to about 350°F (175°C) for the best results. To prevent greasy funnel cake bites, follow a few key steps. First, use the right amount of oil. Ensure the oil is deep enough to cover the bites. Heat the oil to the right temperature before frying. If the oil is too cool, the bites will absorb more oil. Next, drain the bites well on paper towels after frying. Finally, dust with powdered sugar right before serving. This way, they stay light and tasty. Funnel cake bites are easy and fun to make. We covered the ingredients, mixing steps, and frying methods. I shared tips to achieve the perfect batter and safe frying techniques. You now know different variations and healthy alternatives for these treats. Don't forget how to store and reheat leftovers. With this knowledge, you can enjoy delicious funnel cake bites anytime. So grab your ingredients and start frying today!

Funnel Cake Bites Irresistible Sweet Treat Recipe

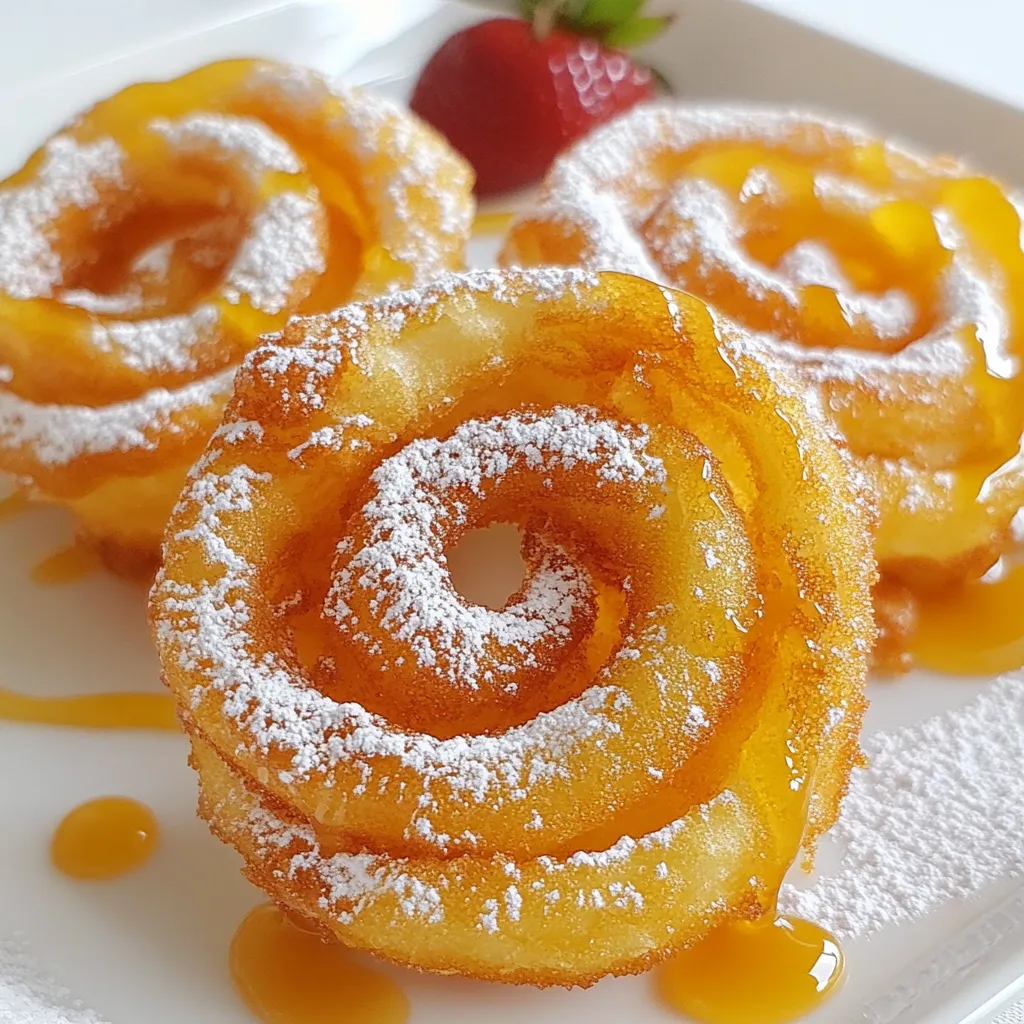
Craving something sweet and fun? Funnel Cake Bites are your answer! With their crispy edges and soft centers, these mini

- 12 oz spaghetti or any pasta of choice - 4 medium ripe tomatoes, chopped - 1/2 cup unsalted butter - 3 cloves garlic, minced - 1 tsp red pepper flakes (adjust to taste) - Salt and pepper to taste - Grated Parmesan cheese for serving - 1/2 cup fresh basil leaves, chopped When making Tomato Butter Pasta, you need fresh ingredients. The tomatoes should be ripe for the best taste. Use good quality unsalted butter to create a rich sauce. Garlic adds a nice flavor, while red pepper flakes give it a little kick. Always taste as you go. This helps you adjust the salt and pepper to your liking. Finally, fresh basil adds brightness to the dish. Don't forget the cheese! It makes a great topping. This combination of flavors makes every bite special. {{ingredient_image_1}} 1. Bring a large pot of salted water to a boil. 2. Add 12 oz of spaghetti or your favorite pasta. 3. Cook according to package instructions until al dente. 4. Reserve about 1 cup of pasta water, then drain the pasta and set it aside. 1. In a large skillet, melt 1/2 cup of unsalted butter over medium heat. 2. Once the butter starts to foam, add 3 cloves of minced garlic. 3. Sauté the garlic for about 1 minute until it smells great, but do not let it brown. 1. Stir in 4 chopped medium ripe tomatoes and 1 tsp of red pepper flakes. 2. Cook for about 5-7 minutes until the tomatoes soften and give off juice. 3. Add the cooked pasta to the skillet. Pour in a splash of reserved pasta water. 4. Toss everything together. If the mix seems dry, add more pasta water as needed. 5. Stir in 1/2 cup of chopped fresh basil and season with salt and pepper to taste. Mix well. 6. Serve the pasta in bowls and add grated Parmesan cheese on top. Optionally, garnish with more basil. To cook pasta just right, aim for al dente. This gives it a nice bite. Usually, it takes about 8 to 10 minutes, but check the package. After cooking, save about 1 cup of that pasta water. It’s like liquid gold for your sauce. Use it to make the sauce smoother and creamier. To spice things up, add red pepper flakes. Start with 1 teaspoon. You can always add more if you like it hot! Fresh basil adds a bright taste. Tear the leaves for more flavor. Season with salt and pepper. Taste as you go to find the perfect balance. Serve the pasta in wide, shallow bowls. This looks nice and rustic. For a pop of color, add a sprig of fresh basil on top. Finally, sprinkle grated Parmesan cheese for a rich finish. This makes your dish look and taste amazing! Pro Tips Use Ripe Tomatoes: The flavor of your tomato butter pasta heavily depends on the tomatoes. Use the ripest, most flavorful tomatoes you can find for the best results. Don't Overcook the Pasta: Make sure to cook the pasta al dente. This will ensure it holds its shape and texture when mixed with the sauce. Adjust Spiciness: Feel free to adjust the amount of red pepper flakes to suit your heat preference. Start with a small amount and add more if you like it spicy! Save Pasta Water: The reserved pasta water is a crucial ingredient for achieving a silky sauce. It helps to bind the sauce to the pasta and can be adjusted for consistency. {{image_2}} You can easily boost the nutrition of your Tomato Butter Pasta. Adding spinach or zucchini works well. Spinach wilts nicely, giving your dish a vibrant green color. Just toss in a couple of handfuls when you add the pasta to the sauce. For zucchini, cut it into thin rounds. Sauté it with the garlic for a few minutes before adding the tomatoes. Both options add great flavor and nutrients. Want a heartier meal? Consider adding grilled chicken or shrimp. Cook the protein separately and slice it before serving. For chicken, season it with salt and pepper, then grill until cooked. For shrimp, just sauté them in a bit of oil until pink. Top your pasta with the protein, and enjoy a filling dish that keeps you satisfied. If you're looking for vegan options, you can swap the butter and cheese. Use vegan butter to keep the creamy texture. For cheese, try a plant-based parmesan or nutritional yeast. These swaps let everyone enjoy Tomato Butter Pasta, while keeping it friendly for all diets. You can still savor the rich flavors without animal products. To store leftovers, let the pasta cool first. Place it in an airtight container. Make sure to cover it well. This helps keep it fresh. You can keep it in the fridge for up to three days. When you’re ready to eat, just reheat it. If you want to save some for later, freezing works great. First, cool the pasta completely. Then, put it in a freezer-safe bag or container. Try to remove as much air as you can. This helps prevent freezer burn. You can freeze it for up to three months. Just remember to label the container with the date. When you’re ready to enjoy your frozen pasta, defrost it in the fridge overnight. For reheating, use a skillet over low heat. Add a splash of water or broth to keep it moist. Stir gently until it’s warmed through. You can also use a microwave, but cover it to hold in moisture. This way, your pasta stays nice and tasty. You can use any pasta shape you like. I recommend spaghetti for its classic appeal. Fettuccine or penne also work well, holding the sauce nicely. If you want something fun, try farfalle or shells. They add a playful twist to your meal. Remember, choose a pasta that can catch the sauce. Yes, you can prepare parts of this dish ahead. Cook the pasta and store it in the fridge. Make the sauce and keep it in a separate container. When you're ready to eat, just heat the sauce and mix with pasta. If the pasta is dry, add a little reserved pasta water. This keeps it fresh and tasty. To add more heat, try fresh chili peppers. Slice them thin and cook with garlic. You can also use hot sauce for a different flavor. Another option is to add crushed black pepper for a warm kick. Experiment with spices like cayenne or sriracha for extra excitement. Adjust based on your taste! In this blog post, we explored how to make a delicious Tomato Butter Pasta. We covered the key ingredients, cooking steps, and tips for perfecting your dish. You can boost flavor with spices and fresh herbs. There are also great variations to try, like adding veggies or protein. Finally, we discussed how to store and reheat leftovers safely. I hope these ideas inspire you to create a tasty meal that suits your taste and style. Enjoy your cooking adventures!

Tomato Butter Pasta Simple and Flavorful Recipe

Are you ready to enjoy a deliciously simple meal? Tomato Butter Pasta is perfect for any night when you want

- 2 boneless, skinless chicken breasts - 2 tablespoons jerk seasoning - 1 tablespoon olive oil - 1 cup quinoa, rinsed - 2 cups chicken broth (or water) To make jerk chicken, you need chicken breasts and jerk seasoning. Jerk seasoning has spices like allspice, thyme, and pepper. It gives the chicken a spicy and smoky flavor. Olive oil helps the seasoning stick and keeps the chicken moist. Rinsed quinoa cooks fluffy and adds a nutty taste. - 1 ripe mango, diced - 1 red bell pepper, diced - 1/2 red onion, finely chopped - 1 jalapeño, deseeded and minced - 1/4 cup fresh cilantro, chopped - 2 tablespoons lime juice - Salt and pepper to taste Mango salsa adds freshness to the dish. The ripe mango gives sweetness. Red bell pepper adds crunch and color. Red onion provides a sharp taste, while jalapeño adds heat. Fresh cilantro, lime juice, and salt balance the flavors. Toss these together for a zesty mix. - 1 avocado, sliced (for topping) - Lime wedges (for garnish) Avocado brings creaminess to the bowl. Lime wedges enhance the dish's brightness. Both toppings make your meal more appealing and delicious. Enjoy customizing your bowl! {{ingredient_image_1}} Start by preheating your grill or grill pan over medium-high heat. This helps achieve a nice char. In a small bowl, mix the jerk seasoning with olive oil. Coat the chicken breasts well with this mixture. Make sure every part is covered. Place the chicken on the grill. Cook for about 6-7 minutes on each side. The chicken should reach 165°F (75°C) inside. After cooking, let it rest for a few minutes before slicing. This keeps it juicy. While the chicken cooks, let’s prepare the quinoa. In a medium saucepan, bring chicken broth or water to a boil. Rinse the quinoa before adding it to the boiling liquid. Once added, reduce the heat to low. Cover the saucepan and let it simmer for about 15 minutes. This will make the quinoa fluffy. After 15 minutes, check to ensure all the liquid is absorbed. Fluff it with a fork to separate the grains. Now, let’s make the mango salsa. In a large bowl, combine the diced mango, red bell pepper, red onion, jalapeño, and fresh cilantro. Squeeze in the lime juice, then add a pinch of salt and pepper. Toss everything gently to mix. This salsa adds a fresh and zesty flavor to your bowls. It’s time to assemble your bowls! Start by placing a generous scoop of quinoa at the bottom of each bowl. Next, add slices of jerk chicken on top. Then, pile on a generous serving of mango salsa. This creates a colorful and tasty dish. Finally, garnish each bowl with sliced avocado and a lime wedge. This adds extra flavor and looks beautiful. Enjoy your vibrant and tasty meal! Grilling the chicken right makes a big difference. Start with a hot grill. Preheat it to medium-high heat. This helps to sear the chicken well. Searing locks in juices and keeps the meat tender. Coat the chicken evenly with olive oil and jerk seasoning. This adds flavor and helps it not stick. Grill each side for 6-7 minutes. Check the internal temperature; it should reach 165°F (75°C). Let the chicken rest after grilling. This allows the juices to settle, making your slices juicy and tasty. To cook fluffy quinoa, rinse it well first. Rinsing removes the bitter outer coating. In a medium pot, bring chicken broth or water to a boil. Add the rinsed quinoa, then reduce the heat. Cover the pot and let it simmer for about 15 minutes. Avoid lifting the lid while cooking; this keeps the steam in. When done, fluff the quinoa with a fork. This will make it light and airy, perfect for your bowls. Marinades are key for great flavor. The jerk seasoning adds spice and depth to your chicken. You can marinate the chicken for a few hours or overnight. This gives the flavors time to soak in. If you want to get creative, try adding lime juice or garlic to the marinade. These ingredients boost the taste even more. Remember, the longer you marinate, the better the flavor. This makes your jerk chicken unforgettable. Pro Tips Marinate for More Flavor: Let the chicken marinate in the jerk seasoning and olive oil for at least an hour or overnight for deeper flavor penetration. Perfectly Cooked Quinoa: To ensure quinoa is perfectly fluffy, remember to rinse it thoroughly before cooking to remove its natural coating, which can make it taste bitter. Customize Your Salsa: Feel free to add other ingredients to your mango salsa like diced cucumber or corn for extra texture and flavor. Serving Suggestions: For a heartier meal, serve the bowls with roasted sweet potatoes or black beans for added nutrition and flavor. {{image_2}} If you want to switch the chicken, consider using turkey. It cooks similarly and absorbs flavors well. You can also use firm tofu. Simply press it to remove excess water. Then, marinate it with jerk seasoning. Grill it just like chicken for a tasty dish. For a vegan option, try using jackfruit. It has a meaty texture and soaks up flavors nicely. Shred it after cooking to mimic pulled chicken. Cauliflower is another great choice. Roast it with jerk seasoning for a spicy, crunchy bite. You can mix up the salsa for variety. Try adding pineapple for a sweet twist. You can also use diced tomatoes for a classic flavor. For a spicier kick, add more jalapeños or some diced habaneros. Explore different herbs too, like mint or basil, for a fresh taste. To store leftovers, let the jerk chicken and mango salsa cool down. Place them in airtight containers. Keep the chicken and salsa separate to maintain freshness. Store them in the fridge for up to three days. If you have quinoa left, store it in a separate container as well. When you are ready to eat leftovers, take them out of the fridge. For the chicken, reheat it in the oven at 350°F for about 10-15 minutes. You can also use a microwave; just heat it in short bursts to avoid drying it out. For quinoa, add a splash of water before reheating to keep it moist. Mango salsa is best served cold, so enjoy it straight from the fridge! You can freeze jerk chicken for up to three months. Wrap it well in plastic wrap and then foil. You can freeze quinoa too; it lasts about two months. However, mango salsa does not freeze well. The texture changes after thawing. It’s best to make fresh salsa when you want to enjoy your bowls again. Jerk seasoning is a mix of bold spices. It often contains allspice, thyme, and chili peppers. You may also find garlic, ginger, and scallions in many recipes. This blend gives jerk chicken its spicy and sweet flavor. Each cook may have their own twist, so flavors can vary. Yes, you can prepare parts of this dish ahead of time. You can marinate the chicken with jerk seasoning a day before cooking. Also, you can make the mango salsa a few hours in advance. Just store it in the fridge until you are ready to serve. The quinoa can be cooked ahead as well. To lower the spice in jerk chicken, use less jerk seasoning. You can also remove the seeds from the jalapeño. If you want more heat, add extra jalapeño or use a spicier jerk blend. The mango salsa adds sweetness, which helps balance the heat. Many sides complement jerk chicken mango salsa bowls. A simple green salad pairs nicely. You can also serve rice and beans for extra texture. Grilled vegetables add a lovely touch too. If you want something light, try serving with a lime wedge or avocado slices. We explored how to make jerk chicken mango salsa bowls. First, we covered key ingredients and step-by-step instructions. Then, we shared tips to perfect your dishes and offered variations for different diets. Finally, I provided storage info and answered common questions. With these insights, you can create tasty, fun meals with ease. Enjoy this flavor-packed dish any time!

Jerk Chicken Mango Salsa Bowls Bursting with Flavor

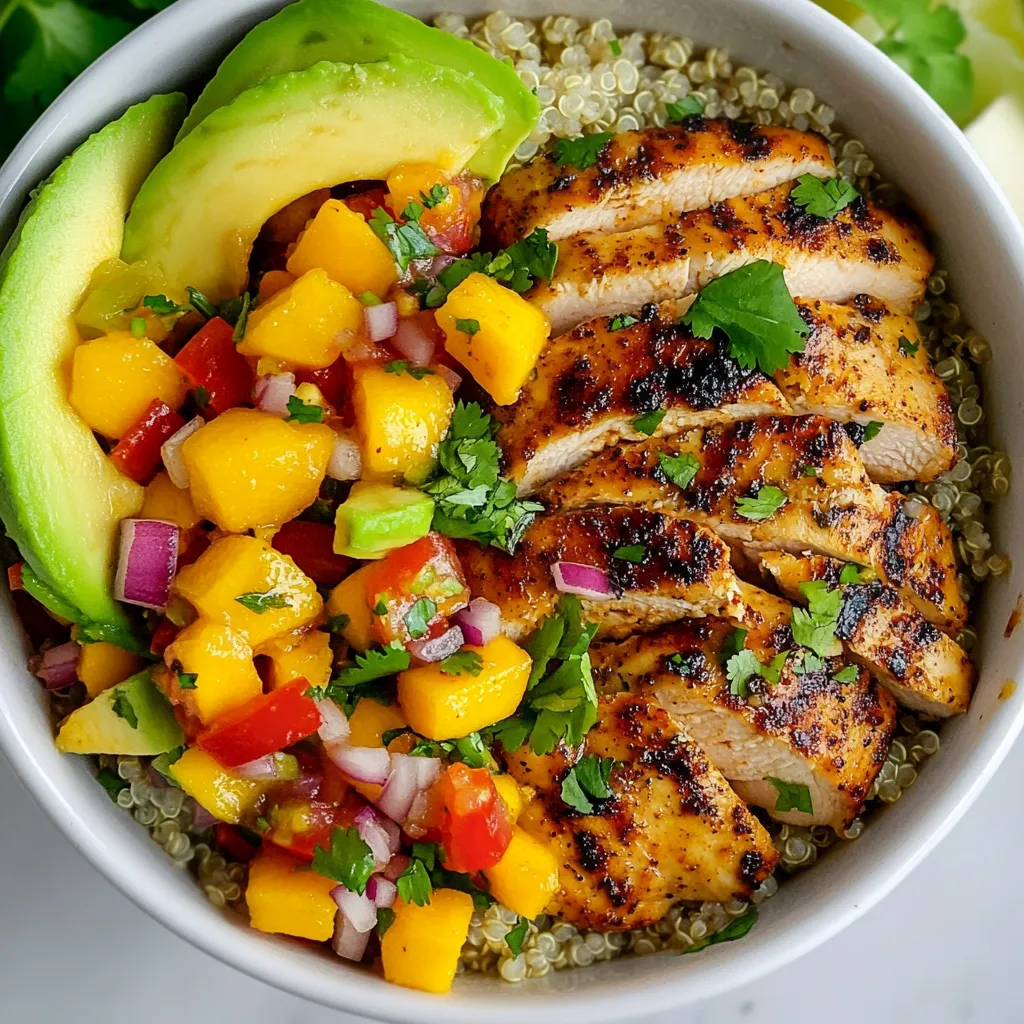
If you want a dish that pops with flavor, you’ve come to the right place! My Jerk Chicken Mango Salsa

For Sweet Potato Black Bean Chili, you will need: - 2 medium sweet potatoes, peeled and diced - 1 can (15 oz) black beans, drained and rinsed - 1 can (14 oz) diced tomatoes, with juices - 1 bell pepper (red or green), diced - 1 medium onion, chopped - 3 cloves garlic, minced - 1 tablespoon chili powder - 1 teaspoon cumin - 1 teaspoon smoked paprika - 1/2 teaspoon cayenne pepper (adjust to taste) - 4 cups vegetable broth - 2 tablespoons olive oil - Salt and pepper to taste - Fresh cilantro for garnish - Lime wedges for serving Using fresh ingredients can enhance flavor. Fresh sweet potatoes, onions, and garlic provide great taste. They also add texture. Canned ingredients, like black beans and tomatoes, save time. They work well in this chili. I like to use canned tomatoes since they are ripe and juicy. Be sure to rinse canned beans to reduce sodium. If you prefer all fresh, you can cook dried beans. Just soak them overnight for best results. You can swap some ingredients for what you have. If you lack sweet potatoes, try regular potatoes or squash. You can also use any beans you like. Kidney beans or pinto beans work well. For spices, if you don’t have smoked paprika, regular paprika is fine. You can also skip cayenne if you want mild chili. Just add more chili powder for flavor. If you need a vegan option, ensure your vegetable broth is vegan. {{ingredient_image_1}} First, gather your ingredients. You will need sweet potatoes, black beans, tomatoes, a bell pepper, an onion, garlic, and spices. Peel and dice the sweet potatoes. Chop the onion and bell pepper into small pieces. Mince the garlic. This prep makes cooking more fun and easy. In a large pot, heat two tablespoons of olive oil over medium heat. Add the chopped onion and bell pepper. Sauté them for about five to seven minutes until they soften. Next, add the minced garlic, chili powder, cumin, smoked paprika, and cayenne pepper. Stir this mix for one to two minutes until it smells amazing. Now, add the diced sweet potatoes to the pot. Stir well to coat them with all those spices. Pour in four cups of vegetable broth, then add the diced tomatoes with their juices and the black beans. Mix everything together. Bring the pot to a boil. Once boiling, reduce the heat to low and let it simmer for about 30 minutes. Stir it occasionally until the sweet potatoes become tender. After 30 minutes, taste the chili. Add salt and pepper to your liking. If you want more heat, add extra cayenne. Serve the chili hot. Garnish it with fresh cilantro for color and flavor. Add lime wedges on the side. Squeezing lime juice over the chili adds a bright taste. Enjoy your delicious Sweet Potato Black Bean Chili! To boost the flavor, use fresh spices. Fresh spices are much stronger than old ones. Toasting spices in a dry pan can also add depth. Just heat them for a minute until they smell great. Lime juice adds brightness too. Squeeze some lime juice right before serving. You can also try adding a splash of hot sauce to kick it up a notch. Fresh cilantro on top adds color and taste. When cooking sweet potatoes, cut them into even pieces. This helps them cook at the same rate. Peel first to remove the tough skin. You can steam or roast them for extra flavor. Roasting brings out their natural sweetness. If you want a soft texture, boil them until tender. Just be careful not to overcook them, or they can get mushy. Store your chili in an airtight container. It will last up to five days in the fridge. For longer storage, freeze it. Just let it cool down first. Use a freezer-safe container or bag. When ready to eat, thaw it in the fridge overnight. Reheat on the stove or in the microwave. Stir it well to heat evenly. Enjoy your leftover chili just as much as the first time! Pro Tips Perfectly Cooked Sweet Potatoes: To ensure your sweet potatoes are perfectly tender, cut them into uniform pieces. This allows them to cook evenly and blend seamlessly into the chili. Spice Adjustment: If you prefer a milder chili, reduce the cayenne pepper and add a bit of sugar to balance the flavors. You can always add more spice later, but it's harder to tone it down. Make It Ahead: Chili tastes even better the next day! Prepare it in advance and store it in the fridge overnight. Reheat before serving to let the flavors meld beautifully. Garnish for Freshness: Always add fresh cilantro and lime wedges just before serving. This brightens up the dish and adds a refreshing contrast to the hearty chili. {{image_2}} You can boost the chili's protein by adding meat. Ground turkey or beef works well. Cook the meat first before adding the other ingredients. For a plant-based option, try adding quinoa or lentils. Both add protein without meat. Just cook them separately and mix them in to save time. This chili is naturally vegetarian since it uses no meat. To make it vegan, ensure your broth is plant-based. Most vegetable broths are vegan, but always check labels. You can add more veggies like zucchini or corn for extra flavor. This keeps your chili hearty without using any animal products. If you love heat, you can add more cayenne pepper. Start with a little, then taste as you go. For milder chili, reduce or skip the cayenne. You can also use sweet paprika instead of smoked paprika for less spice. Remember, you can always adjust the heat to suit your taste! To keep your sweet potato black bean chili fresh, store it in airtight containers. Let it cool before sealing. This step prevents moisture buildup, which can spoil the chili. Place the chili in the fridge if you plan to eat it within a week. It stays fresh for up to five days. For longer storage, freezing is the best choice. Reheat your chili on the stove or in the microwave. If using the stove, pour the chili into a pot. Heat it over medium flame, stirring often. This method ensures even heating. In the microwave, place the chili in a microwave-safe bowl. Cover it loosely with a lid or microwave-safe wrap. Heat it in one-minute intervals, stirring in between until hot. To freeze, use freezer-safe containers or resealable bags. Make sure to leave some space for expansion. Label each container with the date. You can freeze the chili for up to three months. When ready to eat, thaw it overnight in the fridge. You can also use the microwave for a quick thaw. Just remember, the chili may thicken when frozen. Add a splash of broth when reheating to regain its creamy texture. Yes, you can make Sweet Potato Black Bean Chili in a slow cooker. Start by sautéing the onion, bell pepper, and garlic in a pan with olive oil. Then, add all the ingredients to your slow cooker. Set it on low for 6-8 hours or high for 3-4 hours. The slow cooker will make the flavors blend well. You will get a rich and hearty chili. Sweet Potato Black Bean Chili pairs well with many sides. Here are some ideas: - Warm cornbread - Rice or quinoa - Tortilla chips - A fresh green salad - Avocado slices These sides add texture and flavor. You can also serve it with lime wedges and fresh cilantro to enhance the taste. Sweet Potato Black Bean Chili lasts about 3 to 5 days in the fridge. Store it in an airtight container to keep it fresh. If you want to keep it longer, consider freezing it. It can stay good in the freezer for up to 3 months. Just thaw it in the fridge before reheating. This post covers how to make Sweet Potato Black Bean Chili. We discussed ingredients, cooking steps, and storage tips. You can use fresh or canned items and substitute ingredients easily. Enhancing flavor and perfecting sweet potatoes are key. There are options for protein, and you can adjust spice levels. Remember, the best chili comes from your creativity. Enjoy your cooking!

Sweet Potato Black Bean Chili Flavorful Comfort Recipe

Are you ready to spice up your dinner table? My Sweet Potato Black Bean Chili brings warmth and comfort to

- 1 lb chicken thighs, boneless and skinless - 1 cup buttermilk - 1 cup all-purpose flour - 1 tsp paprika - 1/2 tsp cayenne pepper - 1 tsp garlic powder - 1 tsp onion powder - Salt and pepper to taste - 1 cup corn kernels (fresh or frozen) - 1/4 cup mayonnaise - 1/4 cup crumbled cotija cheese - 1 tbsp lime juice - 2 tbsp fresh cilantro, chopped - 4 small corn tortillas - 1 avocado, sliced - Lime wedges for serving For the perfect fried chicken street corn tacos, you need key ingredients. First, marinate the chicken thighs in buttermilk. This step adds moisture and flavor. I suggest marinating for at least one hour or overnight for the best taste. Next, prepare the seasoning and coating. Mix all-purpose flour, paprika, cayenne pepper, garlic powder, onion powder, salt, and pepper. This blend gives the chicken a tasty crunch. Now, focus on toppings. You will use corn kernels, mayonnaise, cotija cheese, lime juice, and fresh cilantro. This mix creates a creamy and zesty topping that pairs well with the fried chicken. Lastly, get some corn tortillas. They are the base for your tacos. Don’t forget avocado slices and lime wedges for serving. All these ingredients make a dish that is fun, fresh, and full of flavor. {{ingredient_image_1}} To start, combine one cup of buttermilk with one pound of boneless, skinless chicken thighs. The buttermilk helps make the chicken juicy and tender. Cover the bowl and place it in the fridge. Marinate the chicken for at least one hour. For the best flavor, let it soak overnight. Grab another bowl and mix one cup of all-purpose flour with one teaspoon of paprika, half a teaspoon of cayenne pepper, one teaspoon of garlic powder, one teaspoon of onion powder, salt, and pepper. This mix gives the chicken its tasty crust. Seasoning is key to getting great flavor. Next, heat about one inch of vegetable oil in a heavy skillet. Use medium-high heat until the oil is hot. Take the chicken out of the buttermilk, letting the excess drip off. Dredge each piece in the seasoned flour until fully coated. Fry the chicken for about six to eight minutes on each side. It should be golden brown and reach an internal temperature of 165°F. While the chicken fries, prepare the street corn topping. In a bowl, mix one cup of corn kernels, a quarter cup of mayonnaise, a quarter cup of crumbled cotija cheese, one tablespoon of lime juice, and two tablespoons of chopped cilantro. Season this mixture with salt to taste. If you want, try adding diced jalapeños for a spicy kick. Once the chicken is cooked, remove it from the oil and let it rest on paper towels to absorb extra oil. Warm four small corn tortillas in a dry skillet over medium heat until they are soft. Slice the fried chicken into strips. Place the chicken on each tortilla, then top with the corn mixture and sliced avocado. For a finishing touch, serve with lime wedges on the side. To make your tacos pop, arrange them on a colorful platter and garnish with extra cilantro. To make the best fried chicken, start with marination. Marinate your chicken thighs in buttermilk for at least one hour, but overnight works best. This helps make the chicken juicy and full of flavor. Next, the frying technique is key for crispiness. Heat your oil in a heavy skillet to the right temperature. You want it hot, around 350°F. This ensures a golden-brown crust. Fry the chicken for 6-8 minutes on each side. Always check that it is cooked through; it should reach an internal temperature of 165°F. Warming your tortillas is simple yet important. Use a dry skillet over medium heat and warm each tortilla for about 30 seconds on each side. This makes them soft and easy to fold. If you need alternatives to corn tortillas, consider flour tortillas. They’re soft and can hold your toppings well. You could also try lettuce wraps for a low-carb option. For added taste, swap the mayonnaise in the street corn topping for Greek yogurt. This gives a creamy texture with a tangy flavor. You can also add smoked paprika for a unique twist. To adjust spiciness levels, use less cayenne pepper in the coating mix. If you like heat, add chopped jalapeños to the corn mixture. Always taste as you go, so you find your perfect balance. Pro Tips Marinate for Maximum Flavor: The longer you marinate the chicken in buttermilk, the more tender and flavorful it will be. Aim for at least 1 hour, but overnight is ideal. Check Oil Temperature: To ensure perfectly fried chicken, use a thermometer to check that the oil is around 350°F before adding the chicken. This helps achieve that crispy golden crust. Rest the Chicken: After frying, let the chicken rest on paper towels for a few minutes. This allows excess oil to drain and keeps the chicken crispy. Serve Warm: Warm your tortillas just before assembling the tacos. This makes them more pliable and enhances the overall texture of your dish. {{image_2}} If you want a vegetarian twist, use plant-based chicken. Brands like Beyond Meat or Gardein work well. These alternatives mimic the taste and texture of fried chicken. Just marinate them in buttermilk like the original recipe. Then, coat them in the seasoned flour and fry until golden. You can enjoy the same crispy flavor without meat. Add local spices to give your tacos a unique taste. For example, a dash of cumin can bring warmth. If you like heat, try adding chipotle powder for a smoky kick. You can also swap cotija cheese with feta or queso fresco for different flavors. Top your tacos with fresh toppings like pickled jalapeños or fresh corn salsa. Each tweak brings a new twist to your meal. Pair your tacos with sides like Mexican rice or black beans. These complement the flavors well. For beverages, try a refreshing margarita or a cold beer. Present your tacos on a colorful platter for a fun look. Garnish with extra cilantro and lime wedges to make it pop. Enjoy the vibrant feast with friends or family! To store leftover Fried Chicken Street Corn Tacos, place them in an airtight container. This keeps them fresh and tasty. If you have extra chicken or toppings, store them separately. You can keep tacos in the fridge for up to three days. When reheating, I suggest using an oven. Preheat it to 350°F (175°C). Place the tacos on a baking sheet. Heat them for about 10-15 minutes. This method helps keep the chicken crispy. If you use a microwave, the tacos may get soggy. Yes, you can freeze fried chicken. To freeze, let it cool completely. Wrap each piece tightly in plastic wrap. Place them in a freezer bag. They can last up to three months. To thaw, move them to the fridge overnight. Then, reheat in the oven for the best texture. To make your fried chicken crispy, start with dry chicken. Pat it with paper towels. Soak it in buttermilk. This adds flavor and moisture. For the coating, mix flour with spices. Dredge the chicken in this mix. When frying, keep the oil hot. This helps form a crunchy crust. Fry the chicken in small batches. This keeps the oil temperature stable. Let the chicken rest on paper towels to soak up extra oil. Yes, you can use different chicken cuts. Chicken breasts work well if you prefer white meat. They may need less cooking time than thighs. For a juicier option, try drumsticks or wings. Each cut offers a unique flavor and texture. Just ensure all pieces cook to 165°F for safety. If you can't find cotija cheese, try feta. Feta adds a similar salty flavor. You can also use queso fresco for a milder taste. Creamy goat cheese is another option. Each cheese brings its own twist to the taco, so feel free to experiment! Yes, you can make this recipe gluten-free. Use gluten-free flour in place of all-purpose flour. Look for a blend that works well for frying. Make sure your buttermilk and corn tortillas are gluten-free too. Always check labels to be sure. You can still enjoy crispy fried chicken tacos without gluten! To find the best Fried Chicken Street Corn Tacos, check local food trucks. Many offer unique takes on tacos. Look for restaurants that focus on street food. Read reviews online to find popular spots. Ask friends for recommendations. They may know hidden gems in your area! This blog post covered everything you need for Fried Chicken Street Corn Tacos. You learned about key ingredients like marinated chicken, spices, and tasty toppings. I shared step-by-step instructions to prepare, fry, and assemble these tacos perfectly. Plus, I offered tips, variations, and storage advice. Now you can enjoy great tacos at home. Don’t hesitate to experiment with flavors and make this dish your own! Happy cooking!

Fried Chicken Street Corn Tacos Delicious and Easy Recipe

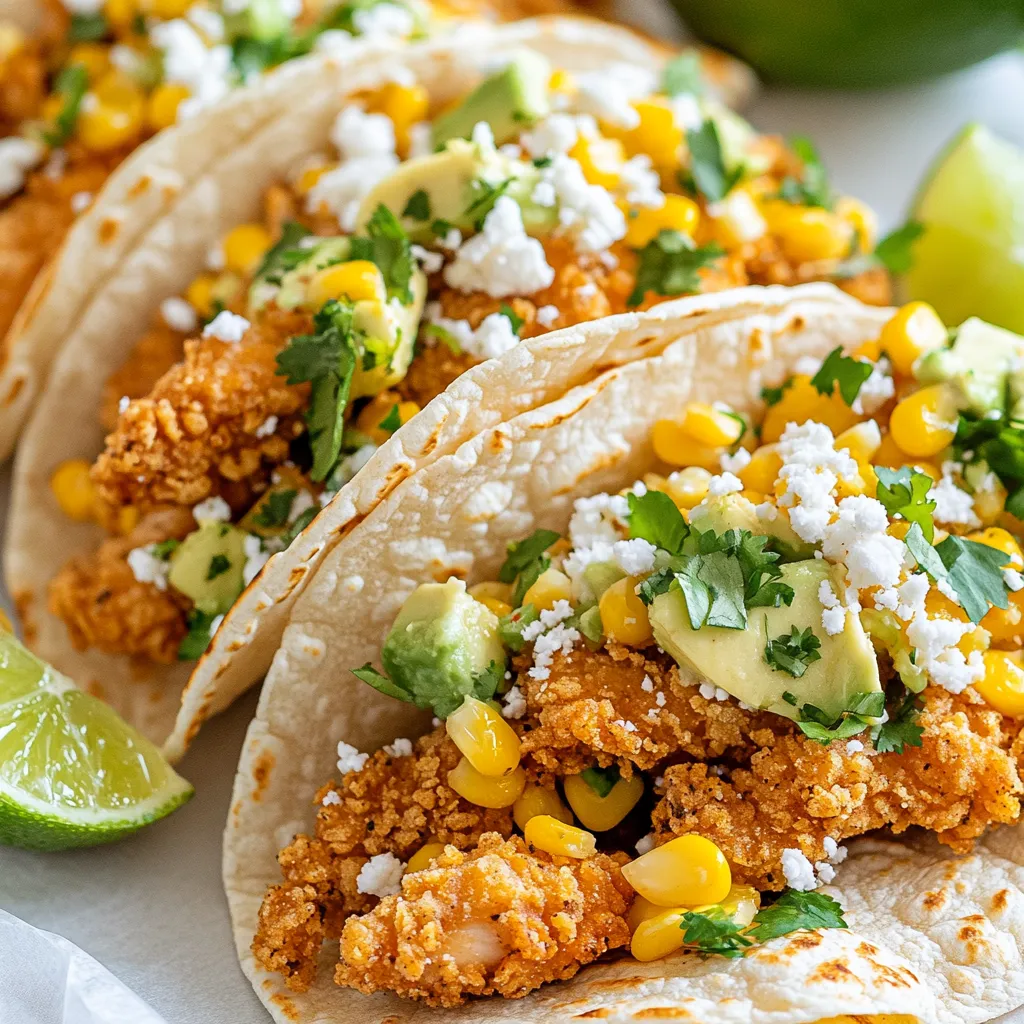
Are you ready to elevate your taco night? My Fried Chicken Street Corn Tacos are a fun twist on two

To make tasty zucchini wraps, gather these simple ingredients: - 2 large zucchinis - 1 cup hummus (store-bought or homemade) - 1 red bell pepper, thinly sliced - 1 carrot, grated - 1 cucumber, thinly sliced - 1/2 cup spinach leaves - 1 tablespoon olive oil - Salt and pepper to taste - Fresh herbs (like dill or parsley) for garnish If you want to mix things up, consider these swaps: - Use eggplant instead of zucchini for a different flavor. - Swap bell peppers for thinly sliced avocado for creaminess. - Try using any leafy green, like arugula, instead of spinach. - Add a layer of cream cheese for extra richness. Choosing the right hummus makes a big difference. Here are some great brands: - Sabra offers a smooth and creamy option. - Tribe has a nice variety, including roasted red pepper. - Cedar's provides a nice organic choice. - Make your own hummus with chickpeas, tahini, and olive oil for a fresh touch. Each of these options will elevate your zucchini wraps. {{ingredient_image_1}} Start with two large zucchinis. Wash them well under cold water and dry them with a towel. Cut off both ends. Use a mandoline or a sharp knife to slice each zucchini lengthwise into thin strips. Aim for strips about 1/8 inch thick. This size will help them roll nicely. Set the strips aside on a plate or cutting board. Next, heat a non-stick skillet over medium heat. Add about one tablespoon of olive oil to the pan. Once the oil is warm, carefully add the zucchini strips. Sauté them for about 2 to 3 minutes on each side. You want them tender yet still crunchy. Season with salt and pepper to taste. After cooking, remove the strips from heat and let them cool on a plate. Once the zucchini strips are cool, lay them flat on a clean surface. Spread a layer of hummus on each strip, leaving a small border at the edges. Add layers of thinly sliced red bell pepper, grated carrot, cucumber slices, and a few spinach leaves on top of the hummus. Now, carefully roll each zucchini strip tightly from one end to the other. Make sure the fillings stay inside. Place the wraps seam side down on a platter. For a nice touch, garnish with fresh herbs like dill or parsley. Enjoy your fresh and flavorful zucchini wraps! When cutting zucchini, use a sharp knife or a mandoline. Aim for thin strips, about 1/8 inch. This helps them cook evenly and stay flexible. Always cut off both ends of the zucchini first. Then, slice lengthwise for uniformity. If you find it tricky, chill the zucchini first. Cold zucchini is firmer and easier to slice. To elevate flavor, add spices to your zucchini. Try garlic powder, smoked paprika, or cumin. Mix these into the salt and pepper you use when sautéing. Fresh herbs like dill or parsley add a burst of flavor too. Don't forget to season your hummus. A dash of lemon juice or a pinch of cayenne can make it pop. For a stunning display, use a wooden board or colorful platter. Lay the wraps seam side down to keep them tight. Drizzle a little olive oil or lemon juice on top for shine. You can also slice the wraps into bite-sized pieces for easy sharing. Garnish with fresh herbs for a touch of green and extra taste. Pro Tips Choose Firm Zucchini: Select zucchinis that are firm and slightly glossy for the best texture and flavor. Customize Your Fillings: Feel free to add other vegetables or proteins like grilled chicken or feta cheese to enhance the wraps. Use Fresh Herbs: Adding fresh herbs like basil or cilantro can elevate the flavor profile of your wraps significantly. Make Ahead: Prepare the zucchini strips and fillings ahead of time, and assemble just before serving for optimal freshness. {{image_2}} You can change the filling to suit your taste. Try adding proteins like grilled chicken, turkey, or tofu. These add a nice texture and flavor. For veggies, consider roasted red peppers, shredded cabbage, or avocado. Each option brings a new taste to your wraps. These wraps are naturally vegan and gluten-free. Use hummus made from chickpeas for a creamy base. You can swap the olive oil with avocado oil for a richer flavor. Always check labels on store-bought items to ensure they meet your diet needs. You can create different flavor profiles with just a few changes. For a Mediterranean twist, add olives and feta cheese. A dash of lemon juice brightens the taste. For an Asian-inspired wrap, use sesame oil and add sliced radishes or scallions. A bit of soy sauce or tamari can enhance the flavor too. Each variation makes these wraps fresh and exciting! To keep your zucchini wraps fresh, store them in an airtight container. Place parchment paper between the wraps to avoid sticking. This method keeps the texture intact and prevents sogginess. You can store them in the fridge for up to 3 days. If you notice any moisture, change the paper to keep them crunchy. You can freeze zucchini wraps for later use. First, wrap each one in plastic wrap. Then, place them in a freezer-safe bag. Remove as much air as possible to prevent freezer burn. When ready to eat, thaw them in the fridge overnight. Reheat in a pan for a few minutes to restore some warmth and crunch. Zucchini wraps taste best when eaten fresh. However, if you have leftovers, store them well. Always keep them in the fridge and consume them within 3 days. If you notice any change in smell or texture, it’s best to discard them. When reheating, avoid microwaves, as they can make wraps soggy. A quick sauté on the stove works better. Yes, you can make zucchini wraps ahead of time. Prepare the wraps and store them in the fridge. They stay fresh for up to two days. Just keep them in an airtight container. This saves time when you want a quick meal. If you need a hummus substitute, try avocado or cream cheese. Both options spread easily on zucchini. You can also use yogurt for a tangy taste. Each option adds a unique flavor to your wraps. Yes, zucchini wraps are very healthy. They are low in calories and high in nutrients. Zucchini provides vitamins and minerals. Plus, they are packed with fresh veggies. This makes them a great choice for a light meal or snack. To keep zucchini wraps from getting soggy, avoid using too much liquid. Sauté the strips just enough to soften them. Let them cool before adding fillings. You can also sprinkle salt on zucchini to draw out moisture before cooking. You learned about making delicious zucchini wraps. We covered key ingredients, step-by-step prep, and storage tips. You can explore many flavors and healthy options. Use these wraps at any meal for a fresh twist. Remember, with the right ingredients and techniques, you can make tasty dishes that keep well, too. Try different fillings and spices to find your favorite combination. Enjoy experimenting with this fun, healthy recipe!

Homemade Zucchini Wraps Fresh and Flavorful Delight

Looking for a fresh and tasty way to enjoy your veggies? Homemade zucchini wraps are your answer! These wraps are

- Chicken breasts: Use 2 boneless, skinless chicken breasts. They cook quickly and stay juicy. - Seasoning components: Season the chicken with 1 tablespoon olive oil, 1 teaspoon garlic powder, 1 teaspoon dried oregano, 1 teaspoon smoked paprika, and salt and pepper to taste. This blend gives great flavor. - Fresh vegetables and toppings: You will need 1 cup mixed greens, 1 cucumber (sliced), 1 red bell pepper (sliced), 1/2 cup cherry tomatoes (halved), 1/2 red onion (thinly sliced), and 1/2 cup feta cheese (crumbled). These add crunch and color to your wraps. - Additional veggies: Consider adding spinach or shredded carrots for extra texture and nutrients. - Alternative sauces or dressings: You can try hummus or a yogurt-based dressing instead of tzatziki. Each adds a unique flavor. - Different types of tortillas: Swap whole wheat for spinach or gluten-free tortillas. This allows you to tailor your wraps to your taste. {{ingredient_image_1}} To start, we need to season the chicken breasts. Drizzle one tablespoon of olive oil over them. Then, sprinkle one teaspoon each of garlic powder, dried oregano, and smoked paprika. Add salt and pepper to taste. Make sure to coat the chicken evenly. Next, heat a grill pan over medium heat. Once it's hot, place the chicken breasts on the pan. Cook each side for about six to seven minutes. You want the chicken to reach an internal temperature of 165°F (75°C). After cooking, let it rest for a few minutes before slicing it into strips. Now, let’s assemble the wraps. Lay out four large tortillas on a clean surface. In the center of each tortilla, add a nice handful of mixed greens. This can be a mix of arugula, spinach, and lettuce. On top of the greens, layer sliced cucumber, red bell pepper, halved cherry tomatoes, and red onion. Next, place the sliced grilled chicken over the veggies. Sprinkle crumbled feta cheese on top. Finally, drizzle tzatziki sauce generously over the fillings. To wrap the tortilla, fold in the sides first. Then, roll it up from the bottom. This keeps all the tasty filling inside. For a great presentation, slice each wrap in half diagonally. Serve them right away while they are fresh. If you want to pack them for lunch, wrap them tightly in foil. A side of fresh fruit or a simple salad makes a perfect pairing. Enjoy these wraps for a quick lunch or a light dinner! To ensure proper doneness, always check the internal temperature of the chicken. It should reach 165°F (75°C). This keeps it safe to eat. I recommend using a meat thermometer for accuracy. For juicy chicken, let it rest after cooking. This step allows the juices to redistribute. Seasoning the chicken with olive oil and spices before cooking also helps keep it moist. Using fresh herbs can make a big difference. I love adding basil or parsley to my wraps for an extra kick. Fresh herbs boost the flavor and add brightness to the dish. You can also enhance the taste by adding spices or marinades. Consider a lemon-garlic marinade for more zest. Smoked paprika adds a nice depth to the flavor profile. For meal prepping, wrap each chicken wrap tightly in foil. This keeps them fresh for lunch or dinner later. Store in an airtight container in the fridge for up to three days. When reheating, avoid the microwave if you can. Instead, use an oven or skillet on low heat. This method keeps the wraps crispy and fresh. Enjoy your Mediterranean chicken wraps just like they were freshly made! Pro Tips Marinate the Chicken: For extra flavor, consider marinating the chicken breasts in the olive oil, garlic powder, oregano, smoked paprika, and seasoning for at least 30 minutes or up to overnight before grilling. Grill Marks: To achieve beautiful grill marks, ensure your grill pan is hot enough before adding the chicken. Avoid flipping too soon; let it sear for maximum caramelization. Fresh Vegetables: Use fresh, crisp vegetables for added crunch. You can also substitute with seasonal veggies like zucchini or bell peppers for a twist. Tzatziki Alternatives: If you want to switch things up, try adding a spicy harissa or a creamy hummus in place of tzatziki for a new flavor profile. {{image_2}} You can make your Mediterranean chicken wraps your own. If you want a vegetarian or vegan option, swap the chicken for grilled veggies or chickpeas. You can also use lentils for protein. These choices add flavor and nutrition. For different protein options, consider using shrimp, turkey, or even falafel. Each protein offers a unique twist. Adjust cooking times based on your protein choice to ensure it cooks just right. If you like spice, add some crushed red pepper or hot sauce to your wrap. This adds heat and excitement to each bite. You can also try harissa, a North African chili paste, for a different kick. For Mediterranean flavor variations, incorporate ingredients like olives, sun-dried tomatoes, or artichoke hearts. These ingredients enhance the traditional flavors and give your wrap a gourmet touch. Wraps are great, but you can try bowl versions too. Layer the greens, veggies, and chicken in a bowl. Top it with feta and tzatziki for a fresh meal. Another fun option is using stuffed pitas. Fill pita pockets with your favorite ingredients. This gives you a new way to enjoy the same great flavors. To store your Mediterranean chicken wraps, wrap them tightly in foil or plastic wrap. This helps keep them fresh and prevents them from drying out. You can also place them in an airtight container. In the fridge, these wraps will last for about 3-4 days. Make sure your fridge is set to a safe temperature to ensure food safety. You can freeze these wraps before or after cooking. If you freeze them uncooked, wrap each one in foil and place them in a freezer bag. They should last for about 2-3 months. If you freeze them after cooking, let them cool first. Then wrap each wrap tightly and store them in a freezer bag. To thaw, place the frozen wrap in the fridge overnight. For best quality, reheat the wrap in an oven or skillet. This keeps the tortilla soft and the filling warm. To make Mediterranean Chicken Wraps healthier, you can use low-calorie alternatives. Try using skinless chicken thighs instead of breasts. You can also replace whole wheat tortillas with lettuce wraps. This cuts carbs and adds more greens. For portion control, fill your wraps with plenty of veggies. Use a mix of arugula, spinach, and lettuce. This adds bulk without many calories. Also, limit high-calorie toppings like cheese. Stick to a small amount of feta for flavor. Yes, you can use different meats in your wraps. Turkey breast works well and cooks quickly. If you prefer beef, use lean cuts like sirloin. Cooking times will vary. Chicken takes about 12-14 minutes, while turkey cooks in 10-12 minutes. Beef will need around 8-10 minutes for thin slices. Some popular side dishes include a simple Greek salad. It pairs well with the wrap's fresh flavors. You can also serve hummus with pita bread. This adds a nice dip option. Complementary flavors include lemon, olives, and herbs. These enhance the overall meal. A light, tangy coleslaw can also add a crunch and balance. To make tzatziki sauce, gather these ingredients: - 1 cup Greek yogurt - 1 cucumber, grated and drained - 2 cloves garlic, minced - 1 tablespoon olive oil - 1 tablespoon fresh dill, chopped - Salt to taste Start by mixing the Greek yogurt with the grated cucumber. Add minced garlic and olive oil for flavor. Stir in fresh dill and salt. Let it chill in the fridge for about 30 minutes to blend the flavors. Enjoy your homemade tzatziki with the wraps! Mediterranean chicken wraps are easy to make and full of flavor. We covered the main ingredients and how to prepare them step by step. You learned tips for perfect chicken and ways to customize your wraps. Remember, these wraps are not just tasty; they can fit any diet. Try different veggies or sauces to find your favorite. Store leftovers correctly to enjoy more later. Enjoy making these wraps often!

Mediterranean Chicken Wraps Tasty and Easy Meal

Craving a quick, tasty meal? Mediterranean chicken wraps are your answer! Packed with seasoned chicken, fresh veggies, and flavorful sauces,

For a tasty Hawaiian BBQ Chicken, you need some key ingredients. Here’s what you will need: - 4 boneless, skinless chicken breasts - 1 cup pineapple juice - 1/2 cup soy sauce - 1/4 cup brown sugar - 1/4 cup ketchup - 2 tablespoons apple cider vinegar - 2 cloves garlic, minced - 1 tablespoon fresh ginger, grated - 1 teaspoon black pepper - 1 teaspoon sesame oil - 1 tablespoon cornstarch mixed with 2 tablespoons water (for thickening) - Fresh cilantro, chopped (for garnish) - Grilled pineapple rings (for serving, optional) These ingredients create a sweet and tangy marinade that makes the chicken juicy and full of flavor. The pineapple juice adds a tropical touch. The soy sauce gives it a nice umami kick. Brown sugar and ketchup balance the flavors perfectly. Garlic and ginger bring warmth, while cilantro adds freshness. Grilled pineapple rings are a fun touch to serve on the side. Gather all these ingredients for a delicious meal that will impress your family and friends! {{ingredient_image_1}} To start, you need to make the marinade. In a medium bowl, whisk together these ingredients: - 1 cup pineapple juice - 1/2 cup soy sauce - 1/4 cup brown sugar - 1/4 cup ketchup - 2 tablespoons apple cider vinegar - 2 cloves garlic, minced - 1 tablespoon fresh ginger, grated - 1 teaspoon black pepper - 1 teaspoon sesame oil Mix well until the sugar dissolves. This marinade is the heart of Hawaiian BBQ chicken. It adds sweetness and tang, making your chicken juicy and full of flavor. After you prepare the marinade, it’s time to marinate the chicken. Take 4 boneless, skinless chicken breasts and place them in a large resealable bag or a shallow dish. Pour the marinade over the chicken. Seal the bag or cover the dish tightly. Refrigerate for at least 2 hours or overnight for the best taste. Marinating allows the chicken to absorb all those lovely flavors. Now, let’s get grilling! Preheat your grill to medium-high heat. Remove the chicken from the marinade, but save the marinade for later. Grill the chicken for about 6-7 minutes on each side. You want the internal temperature to reach 165°F (75°C). While the chicken cooks, pour the reserved marinade into a saucepan and bring it to a boil. Once it boils, reduce the heat and let it simmer for about 5 minutes. Then, stir in 1 tablespoon of cornstarch mixed with 2 tablespoons of water. This will thicken the sauce. Cook for another 2-3 minutes until it looks nice and thick. Once the chicken is fully cooked, brush it with the thickened BBQ sauce. Let it rest for a few minutes before slicing. Serve it on a platter, drizzling any remaining sauce over the top. Garnish with fresh cilantro and grilled pineapple rings if you like. Enjoy your delicious Hawaiian BBQ chicken! To make a tasty marinade, mix pineapple juice, soy sauce, brown sugar, ketchup, apple cider vinegar, minced garlic, grated ginger, black pepper, and sesame oil. Whisk until smooth. The pineapple juice adds sweetness and a fruity kick. Let the chicken soak in this mix for at least two hours. More time means more flavor. For best results, marinate overnight. Preheat your grill to medium-high heat. This step is key for good grilling. Remove the chicken from the marinade and let it drain. Grill the chicken for about 6-7 minutes on each side. Use a meat thermometer to check that the inside reaches 165°F (75°C). This ensures it is safe to eat. Let the chicken rest for a few minutes after grilling. This helps keep it juicy. Slice the grilled chicken and arrange it on a platter. Drizzle the thickened BBQ sauce over the chicken. Garnish with chopped fresh cilantro for a pop of color. Grilled pineapple rings make a fun side. They add sweetness and pair well with the chicken. Serve with rice or a fresh salad for a complete meal. Enjoy your Hawaiian BBQ feast! Pro Tips Marinate Longer for Flavor: For the best flavor, marinate the chicken overnight. This allows the flavors to penetrate the meat thoroughly. Check Grill Temperature: Ensure your grill is preheated to medium-high heat before cooking. This helps to sear the chicken and lock in moisture. Rest the Chicken: After grilling, let the chicken rest for a few minutes before slicing. This helps retain juices, keeping the chicken moist. Use Fresh Ingredients: Whenever possible, use fresh garlic and ginger instead of powdered versions for a more vibrant flavor in your marinade. {{image_2}} To spice things up, add hot sauce to the marinade. You can use your favorite type. Start with a teaspoon and taste. Increase it to your liking. This adds a nice kick. The sweet flavor of the pineapple balances the heat well. Make sure to serve it with cooling sides like coleslaw or rice. Enhance your dish by adding grilled fruits. Pineapple is a classic but try mango or peach too. Slice them thick and place them on the grill. Grill them until they are caramelized and soft. You can serve these fruits on the side or right on top of your chicken. This adds great texture and flavor. If you want a meatless option, tofu works great. Use firm tofu for the best results. Press the tofu to remove excess water. Then, cut it into thick slices. Marinate it just like you would chicken. Grill the tofu for about 5-6 minutes on each side. Brush it with the thickened BBQ sauce for a tasty treat. Serve with rice or a fresh salad. To store your Hawaiian BBQ chicken, let it cool first. Then, place it in an airtight container. Keep the container in the fridge for up to three days. If you have extra sauce, store it in a separate container. This helps keep the chicken juicy when you reheat it. When you're ready to eat your leftovers, reheat them gently. The best way is to use the oven or grill. Preheat your oven to 350°F (175°C). Place the chicken on a baking sheet and cover it with foil. Heat for about 15-20 minutes until warm. If you use a grill, heat it on low. Turn the chicken often to avoid burning. You can also use a microwave for a quick option. Just heat in short bursts to keep it tender. If you want to freeze Hawaiian BBQ chicken, wrap it tightly in plastic wrap. Then, place it in a freezer-safe bag or container. It will last for about three months in the freezer. When you’re ready to eat, move it to the fridge for a night to thaw. You can also thaw it in cold water for faster results. After thawing, reheat it as mentioned above. Hawaiian BBQ Chicken comes from Hawaii. The dish blends Asian and American flavors. It features sweet and tangy tastes, thanks to ingredients like pineapple and soy sauce. The chicken is marinated in this mix, which adds depth to its flavor. Locals often serve it at luaus and family gatherings. The use of fresh tropical fruits is a key part of Hawaiian cuisine. Yes, you can make Hawaiian BBQ Chicken in the oven. Preheat your oven to 375°F (190°C). Place the marinated chicken in a baking dish. Bake it for about 25 to 30 minutes. Make sure the internal temperature hits 165°F (75°C). You can baste the chicken with the thickened sauce during cooking. This will keep it juicy and add more flavor. When serving Hawaiian BBQ Chicken, you have many tasty side options. Here are some great choices: - Coconut rice - Grilled vegetables - Coleslaw - Macaroni salad - Fresh fruit salad These sides balance the sweet and savory notes of the chicken. They also add color and texture to your meal, making it more appealing. This blog post covered the key aspects of making Hawaiian BBQ chicken. We explored the essential ingredients, from chicken breasts to marinade components. I shared step-by-step grilling instructions and helpful tips for the best results. We also discussed tasty variations, including spicy options and a vegetarian choice. In conclusion, following these steps will give you great BBQ chicken. Enjoy experimenting with flavors and serving suggestions. Your next meal will impress everyone at the table. Happy grilling!

Hawaiian BBQ Chicken Flavorful and Easy Recipe Guide

Are you craving a tasty dish that captures the spirit of the islands? In my guide to Hawaiian BBQ Chicken,

To make classic butter chicken, you need these main ingredients: - 500g boneless chicken thighs, cut into bite-sized pieces - 1 cup plain yogurt - 2 tablespoons lemon juice - 2 tablespoons ginger-garlic paste - 4 tablespoons unsalted butter - 1 large onion, finely chopped - 1 can (400g) crushed tomatoes - 1 cup heavy cream - Fresh cilantro, chopped (for garnish) The spices bring flavor and depth to the dish. Here’s what you will need: - 1 teaspoon ground cumin - 1 teaspoon ground coriander - 1 teaspoon turmeric powder - 1 teaspoon garam masala - 1 teaspoon red chili powder (adjust for spice preference) - Salt to taste These ingredients help enhance cooking and final taste: - Butter for sautéing and enriching the sauce - Fresh cilantro for a bright garnish Each ingredient plays a vital role in creating the rich, creamy sauce and tender chicken. Use fresh ingredients for the best flavor. Enjoy the process of making this classic dish! {{ingredient_image_1}} First, mix yogurt, lemon juice, and ginger-garlic paste in a bowl. Add ground cumin, coriander, turmeric, garam masala, red chili powder, and salt. Stir well to combine all the flavors. Next, add the chicken pieces to the bowl. Make sure each piece is fully coated. Cover the bowl and let it sit in the fridge. Marinate for at least one hour or overnight for the best taste. In a large pan, melt two tablespoons of butter over medium heat. Once the butter melts, add the finely chopped onion. Sauté the onion until it turns golden brown. This step adds a deep flavor to your dish. It usually takes about five minutes. Stir occasionally to avoid burning the onions. Now, add the marinated chicken to the pan. Cook it until the chicken is browned on all sides, about five to seven minutes. Then, pour in the crushed tomatoes and stir well. Let it simmer on low heat for ten minutes. This helps the flavors mix together. After that, reduce the heat to low. Add the heavy cream and the rest of the butter. Stir until the sauce is creamy and smooth. Cook for another five minutes, but do not let it boil. Finally, taste and adjust the salt if needed. Remove from heat and garnish with chopped cilantro before serving. To get the real taste of butter chicken, use fresh spices. Ground spices lose flavor over time. Always use plain yogurt for marinating. This keeps the chicken moist and tender. The marination time matters. Aim for at least one hour or overnight if you can. This allows the spices to soak in fully. Use a good mix of spices like cumin, coriander, and garam masala. Adjust the chili powder based on your spice level preference. Cooking chicken properly is key. Sauté it until it’s just browned, about 5-7 minutes. Don't overcook it. Overcooked chicken gets dry and tough. Once you add the tomatoes and cream, let it simmer gently. This keeps the chicken juicy and flavorful. Using thighs instead of breasts makes the dish richer. Thighs are more forgiving when cooked. Sometimes, butter chicken can turn out too thick or too thin. If it's too thick, add a splash of water or more cream. For a runnier sauce, simmer it longer without the lid. If the sauce is too spicy, add more cream or yogurt to balance it out. Taste as you go. Adjust the salt and spices to suit your taste. If your chicken is tough, it might not have marinated long enough. Always check your cooking time to avoid drying out the chicken. Pro Tips Marination Time: For best results, marinate the chicken overnight. This enhances the flavors and tenderness of the meat. Adjusting Spice Levels: Control the heat by adjusting the amount of red chili powder. Start with less and add more to taste. Butter Quality: Use high-quality unsalted butter for a rich flavor in your sauce. It can make a significant difference in the overall taste. Garnishing: Fresh cilantro adds a burst of flavor and color. Make sure to sprinkle it just before serving for maximum freshness. {{image_2}} You can make butter chicken with more than just chicken thighs. Try using chicken breast for a leaner option. You can also use turkey for a twist on the classic dish. If you want seafood, shrimp works well too! Just make sure to adjust cooking times for each protein. For a vegetarian version, use paneer or tofu. Marinate the paneer or tofu just like the chicken. You can also add chickpeas for extra protein. For a vegan option, skip the cream and use coconut milk instead. This gives a rich taste without dairy. You can easily adjust the spice level in butter chicken. For a mild dish, reduce the red chili powder. If you love heat, add more chili powder or fresh chili peppers. Another option is to serve spicy pickles on the side. This way, everyone can enjoy their own level of spice! To keep your butter chicken fresh, let it cool first. Then, place it in an airtight container. Store it in the fridge for up to three days. Make sure to label it with the date. This helps you know when to use it. When you're ready to eat, reheat the butter chicken gently. Use a saucepan over low heat. Stir it often to keep it from sticking. Add a splash of cream or water if it seems thick. This will help keep the sauce smooth and tasty. If you want to save some for later, freezing works great. Place cooled butter chicken in a freezer-safe container. It can last up to three months in the freezer. When you want to eat it, thaw it in the fridge overnight. Then, reheat as mentioned above. Enjoy your meal without any fuss! Butter chicken, or murgh makhani, comes from India. It began in Delhi in the 1950s. A restaurant called Moti Mahal created it. They mixed leftover chicken with a rich sauce of tomatoes and butter. This dish quickly became popular across India and beyond. Its creamy texture and warm spices make it a favorite. Yes, you can use bone-in chicken if you prefer. Bone-in chicken adds more flavor during cooking. However, it may take longer to cook through. Make sure to adjust the cooking time as needed. Remove the bones before serving for easy eating. To make butter chicken dairy-free, swap heavy cream with coconut milk. You can also use dairy-free yogurt for marinating the chicken. This will still give you a creamy texture and delicious taste. Adjust spices to your liking for a great flavor. This blog post covered all you need for making classic butter chicken. We explored main ingredients, spices, and cooking steps. I shared tips for authentic flavors and cooking techniques, plus ideas for variations. You learned how to store leftovers and reheat them without losing taste. Whether you’re a beginner or a pro, these insights will help you create a tasty dish. Enjoy making butter chicken your way and impress your friends and family. Happy cooking!

Classic Butter Chicken Flavorful and Easy Recipe

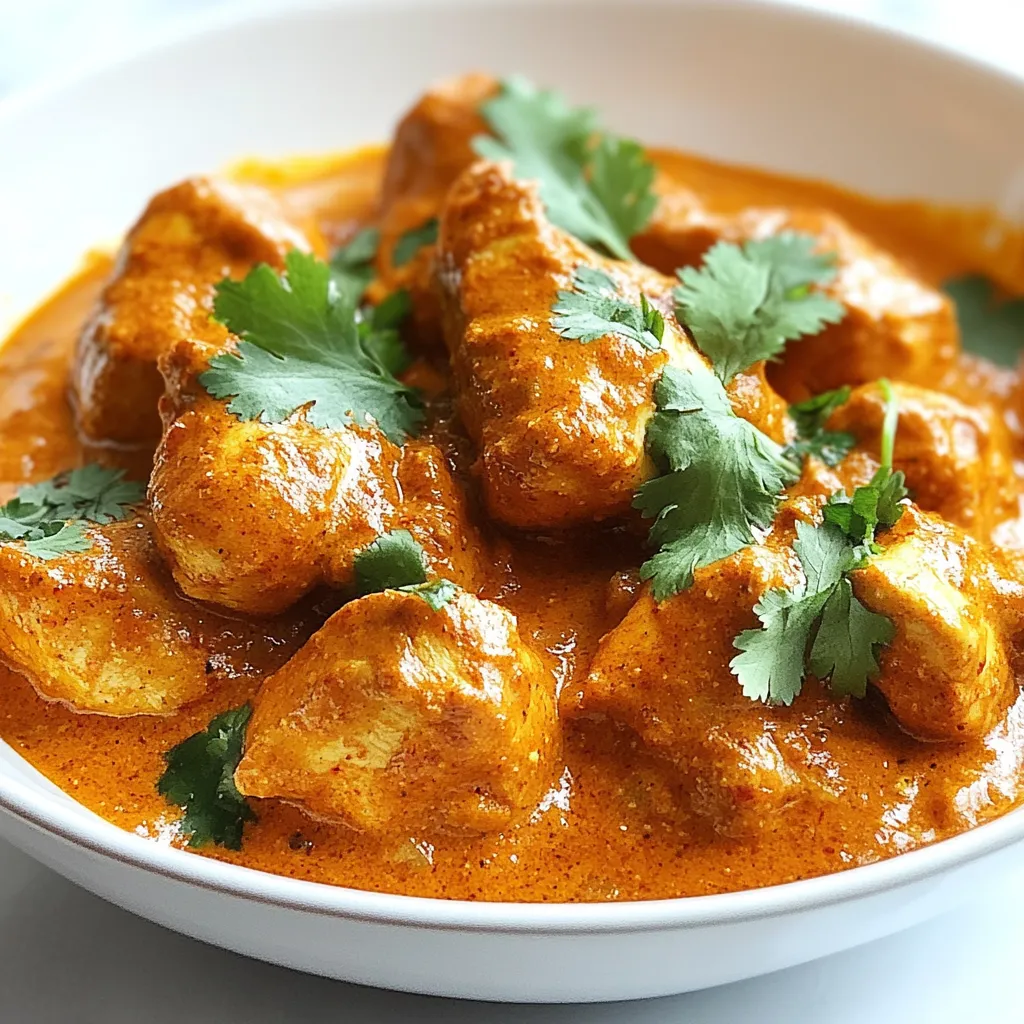
If you’ve ever craved rich, creamy Butter Chicken, you’re in the right place! This classic dish bursts with flavor and

To make garlic herb roasted baby potatoes, you need: - 1.5 pounds baby potatoes, halved - 4 tablespoons olive oil - 6 cloves garlic, minced - 1 tablespoon fresh rosemary, chopped - 1 tablespoon fresh thyme, chopped - 1 teaspoon smoked paprika - Salt and pepper to taste - Fresh parsley, for garnish If you lack any ingredients, don't worry! You can swap out some items. - Baby Potatoes: Use regular potatoes, cut into smaller pieces. - Olive Oil: Any vegetable oil works, like canola or avocado oil. - Fresh Herbs: You can use dried herbs. Use less since dried herbs are stronger. - Smoked Paprika: Regular paprika or chili powder can work instead. Fresh herbs add bright and bold flavors. They give the dish a fresh taste. Use them when you can. Dried herbs are great too! They are handy and last longer. If you use dried, remember they are more potent. Use about one-third of the amount. This helps keep the taste balanced. {{ingredient_image_1}} First, gather your ingredients. You need 1.5 pounds of baby potatoes, halved. Next, get 4 tablespoons of olive oil and 6 cloves of minced garlic. You will also need 1 tablespoon each of chopped rosemary and thyme. Don’t forget 1 teaspoon of smoked paprika, plus salt and pepper. Finally, grab some fresh parsley for a pretty garnish. Now, preheat your oven to 425°F (220°C). This heat will help the potatoes get crispy. In a large bowl, mix the halved potatoes with olive oil, garlic, rosemary, thyme, and smoked paprika. Make sure all the potatoes are well coated. Season with salt and pepper to taste. Toss everything together until it looks good. Spread the seasoned potatoes in a single layer on a baking sheet. Use parchment paper or grease the sheet lightly. This will prevent sticking. Place the baking sheet in the oven and roast for 25-30 minutes. Halfway through, give the potatoes a good toss. This helps them brown evenly and get crispy. Keep an eye on them. You want them golden brown and crispy on the outside. When they are done, take them out of the oven and let them cool a bit. To get the best results, use fresh herbs. They add great flavor. If you want extra crispy potatoes, don’t crowd them on the baking sheet. Give them space to breathe. Also, try to use a good quality olive oil. It makes a big difference in taste. For added flavor, mix in some other herbs like oregano or basil. Lastly, don’t skip the parsley garnish. It adds a nice pop of color and freshness to your dish. Enjoy your garlic herb roasted baby potatoes! To get crispy potatoes, start with dry baby potatoes. After washing them, pat them dry with a towel. This helps them crisp up in the oven. Use enough olive oil to coat each potato. Too little oil can make them soggy. Spread the potatoes out on the baking sheet. They should not touch each other. This allows hot air to circulate around them. Toss them halfway through cooking for even browning. One mistake is not preheating the oven. Always make sure your oven is hot before adding the potatoes. Another common error is overcrowding the pan. If your baking sheet is full, the potatoes will steam instead of roast. Lastly, avoid under-seasoning. Don't be shy with salt and pepper. Proper seasoning enhances the flavors and makes the dish shine. You can boost the flavors of your garlic herb roasted baby potatoes with more herbs. Basil and oregano work great for a different twist. For a fresh taste, try adding dill or chives. Mix and match to find your favorite flavor combo. Adding herbs right before serving adds a burst of freshness. Just sprinkle some fresh herbs on top for a bright finish. Pro Tips Even Cooking: Ensure the baby potatoes are cut into uniform sizes to promote even cooking and browning. Garlic Flavor: For a milder garlic flavor, add the minced garlic halfway through roasting instead of at the beginning. Herb Variations: Feel free to experiment with other herbs like oregano or basil for different flavor profiles. Storage Tips: Store any leftovers in an airtight container in the fridge for up to 3 days; reheat in the oven for best results. {{image_2}} You can add other veggies to the mix. Carrots, bell peppers, or zucchini work well. Cut them into similar sizes as the baby potatoes. This way, they roast evenly and share the yummy flavors. Toss them in the same herb and oil mix for a tasty treat. Want a cheesy kick? Add grated Parmesan cheese before roasting. Sprinkle it on top of the potatoes for a rich flavor. For a spicy twist, try adding red pepper flakes or cayenne pepper. This will give your dish a nice heat. You can also mix in a bit of sour cream after cooking for creamy goodness. While rosemary and thyme are great, feel free to mix it up. Basil and oregano add a fresh taste. Dill brings a unique flavor that pairs well too. Try using a mix of both fresh and dried herbs. This way, you can balance the bold tastes for a perfect dish. To store leftover garlic herb roasted baby potatoes, let them cool first. Place them in an airtight container. Make sure to seal it tightly. Store the container in the fridge. They will stay fresh for about 3 to 5 days. When you want to eat the leftovers, preheat your oven to 350°F (175°C). Spread the potatoes on a baking sheet. Bake them for about 10 to 15 minutes. This method helps keep them crispy. You can also use a microwave, but they may lose some crunch. If you want to save the potatoes longer, freezing is a good option. First, let them cool completely. Then, spread them on a baking sheet in a single layer. Freeze for 1 to 2 hours until they are solid. After that, transfer them to a freezer bag. They can last up to 2 months in the freezer. When you're ready to eat them, thaw overnight in the fridge before reheating. Roast baby potatoes for 25-30 minutes at 425°F (220°C). This time gives you soft, fluffy insides and crispy outsides. Be sure to toss them halfway through. This helps them cook evenly and brown nicely. Keep an eye on them as ovens can vary. They should be golden brown when done. Yes, you can use regular potatoes. Just cut them into smaller pieces. Aim for a similar size to baby potatoes. This helps them roast evenly and cook through. Keep in mind that the cooking time may change. Check for doneness with a fork to make sure they are soft. Many herbs work well with garlic and potatoes. You can try basil, oregano, or dill. Each herb adds a unique flavor. For a citrusy twist, add some lemon zest. You can also mix in fresh chives or sage. Be creative and find what you love best! You now know how to make amazing garlic herb roasted potatoes. We covered the essential ingredients and convenient substitutions. I shared step-by-step directions, tips for crispy results, and ways to enhance flavors. You can also get creative with vegetable additions and spice twists. Remember, storing and reheating leftovers is simple. Keep exploring these techniques. With practice, you will impress everyone at your table. Enjoy your cooking journey!

Garlic Herb Roasted Baby Potatoes Tasty and Easy Dish

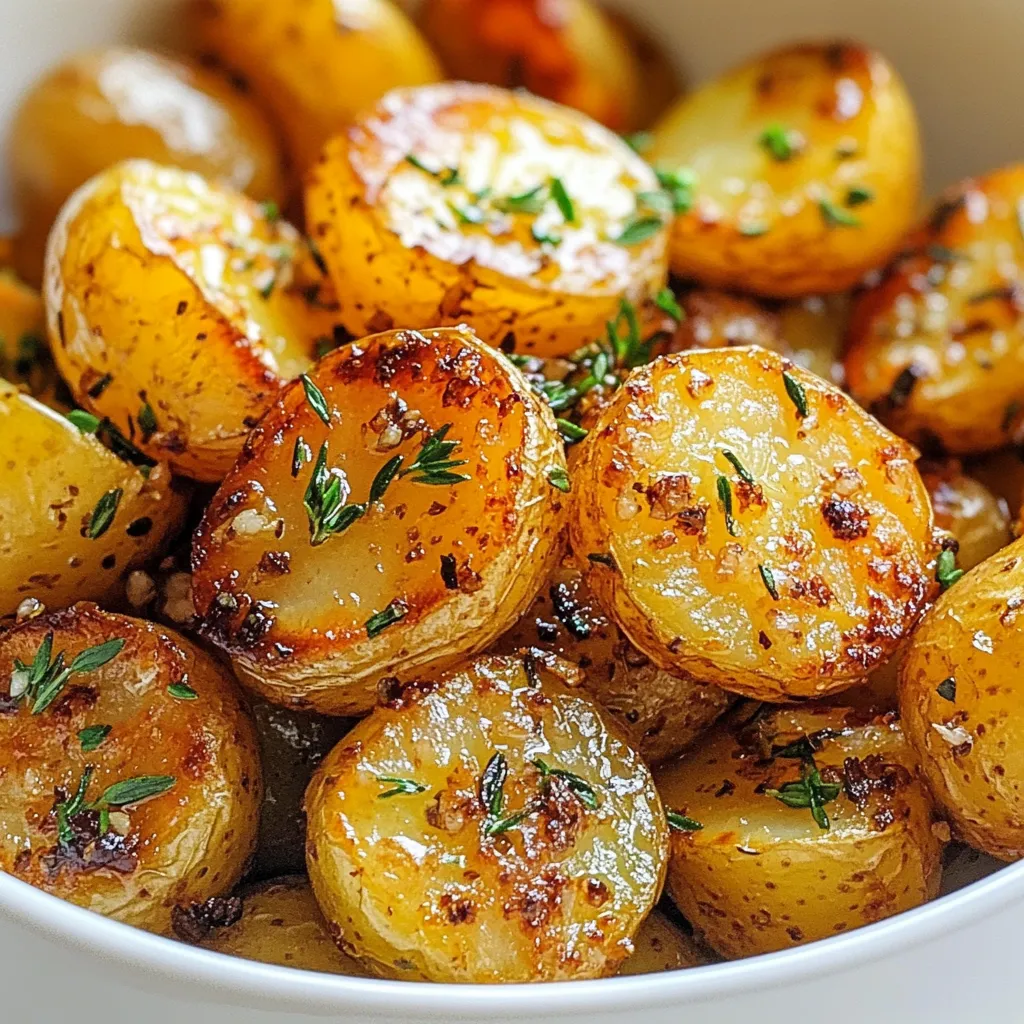
Are you ready to elevate your dinner game with a simple yet delicious side dish? Garlic Herb Roasted Baby Potatoes

Older posts
Newer posts
← Previous Page1 … Page136 Page137 Page138 … Page143 Next →

dsad

© 2025 Southern Dishes • Built with GeneratePress

Our Policies

  • Copyright Policy
  • Cookie Policy
  • GDPR Policy
  • Privacy Policy
  • Disclaimer
  • Terms Of Use

More Information

  • Home
  • About
  • Contact
  • Appetizers
  • Dessert
  • Dinner
  • Drinks
©2025, Southern Dishes About Back To Top