Skip to content
DisclaimerTerms Of UseGDPR PolicyCookie Policy

Southern Dishes

  • Home
  • Drinks
  • Appetizers
  • Dinner
  • Dessert
  • About
  • Contact
  • Privacy Policy
DisclaimerTerms Of UseGDPR PolicyCookie Policy

Isabella

To make this tasty treat, gather these simple ingredients: - 1 package (14 oz) graham crackers - 2 cups heavy cream - 1 cup powdered sugar - 1 teaspoon vanilla extract - 1 package (3.4 oz) instant vanilla pudding mix - 2 cups milk - 2 medium apples, peeled and diced - 1 cup caramel sauce (store-bought or homemade) - 1 teaspoon cinnamon - 1/2 cup chopped nuts (walnuts or pecans, optional) You can switch things up with these fun extras: - Add chocolate chips for a sweet twist. - Use different nuts like almonds or hazelnuts. - Swap apples for pears for a new flavor. If you have dietary needs, here are some easy swaps: - Use dairy-free cream for a vegan option. - Replace milk with almond or oat milk. - Choose gluten-free graham crackers for a gluten-free version. This recipe remains flexible and delicious, allowing you to enjoy it your way! {{ingredient_image_1}} Start by grabbing a large mixing bowl. Pour in two cups of heavy cream. Use a hand mixer to whip the cream until you see soft peaks. Now, add one cup of powdered sugar and one teaspoon of vanilla extract. Keep mixing until stiff peaks form. In another bowl, combine one package of instant vanilla pudding mix with two cups of milk. Whisk this mixture until it is smooth and slightly thick. Next, gently fold the whipped cream into the pudding mixture. Make sure it blends well without losing volume. This cream will be the star of your cake! Now, take a 9x13 inch baking dish. Start with a layer of graham crackers at the bottom. Cover them well, so they form a solid base. On top of the graham crackers, spread half of your cream mixture evenly. Then, sprinkle half of the diced apples across the cream. Drizzle some caramel sauce over the apples. Don't forget a dash of cinnamon for extra flavor! Next, add another layer of graham crackers. Repeat the process with the remaining cream mixture, the rest of the apples, and more caramel sauce. Finish with a final layer of graham crackers on top. Cover your dish tightly with plastic wrap. Place it in the fridge for at least four hours. For the best taste, let it chill overnight. This time helps the flavors blend and the graham crackers soften. When you're ready to serve, drizzle more caramel sauce on top. You can also sprinkle with chopped nuts if you like. This dessert tastes even better when it's cold and the flavors are fully developed! Whipping cream is simple but needs some care. Start with cold heavy cream. Cold cream whips better and faster. Use a large bowl to avoid splatters. Beat the cream with a mixer on medium speed. Gradually add powdered sugar and vanilla. Stop when you see stiff peaks. This means your cream is ready. Don’t overwhip it; it can turn into butter. Choosing apples is key for this dessert. Look for firm apples that are crisp. Granny Smith apples add a nice tartness. Honeycrisp offers sweetness, which balances well. Always peel and dice your apples before adding them. This helps them mix well with the other flavors. Fresh apples give the best taste, so pick ones that are in season. Some things can go wrong when making this cake. If your whipped cream is too runny, it may need more whipping. Check if you added enough sugar. If the layers slide apart, let the cake chill longer. This helps it set up better. If you don’t have enough caramel, add more when serving. A drizzle on top always makes it look great. Pro Tips Use Cold Ingredients: Make sure your heavy cream and milk are cold for better whipping and a creamier texture. Chill Overnight: For the best flavor and texture, allow the cake to chill overnight. This lets the graham crackers soften perfectly. Customize Your Apples: Experiment with different apple varieties like Granny Smith for tartness or Fuji for sweetness to suit your taste. Add a Crunch: For added texture, consider mixing in some crushed nuts into the cream layers or sprinkling them on top before serving. {{image_2}} To make a chocolate version, swap some ingredients. Use chocolate graham crackers instead of regular ones. You can also add chocolate pudding mix in place of vanilla. This gives the dessert a rich, chocolatey twist. Drizzle chocolate sauce along with the caramel. It will be a chocolate lover's dream! For a gluten-free dessert, choose gluten-free graham crackers. Check the label to ensure they fit your needs. You can also use almond flour or coconut flour for a different flavor. This way, everyone can enjoy the cake without worry. The taste remains just as delightful! If you want a vegan option, use plant-based milk, like almond or oat milk. Instead of heavy cream, whip coconut cream for the filling. Replace eggs with a vegan pudding mix. You can also find vegan caramel sauce at stores. These changes keep the dessert creamy and tasty! To keep your Caramel Apple Éclair Cake fresh, cover it tightly with plastic wrap. This helps prevent air from drying it out. Store it in the fridge for up to five days. If you notice any change in texture or smell, it’s best to toss it. You can freeze this cake if you want to prepare it early. Make the cake but skip the final layer of graham crackers and toppings. Wrap the cake well in plastic wrap and foil. Freeze it for up to three months. When ready to eat, thaw it in the fridge overnight. Add the last layer and toppings just before serving. The cake stays fresh in the fridge for about five days. If you freeze it, it keeps for three months. For the best taste, I recommend eating it fresh. Always check for any signs of spoilage before serving. Enjoy your dessert while it’s at its best! Yes, you can make Caramel Apple Éclair Cake a day ahead. In fact, it tastes even better after resting. This allows the flavors to mix well. Just cover it tightly with plastic wrap. Store it in the fridge until you are ready to serve. If you don’t have graham crackers, you can use vanilla wafers or digestive biscuits. Both options work well and provide a nice texture. You can even try shortbread cookies for a richer flavor. Just remember to adjust the sweetness based on your choice. Making homemade caramel sauce is simple and fun! Here’s how: 1. In a saucepan, combine 1 cup of sugar and 1/4 cup of water. 2. Heat over medium heat until the sugar dissolves. 3. Let it boil without stirring until it turns a golden color. 4. Remove it from heat and carefully add 1/2 cup of heavy cream. 5. Stir until smooth. Let it cool before using. This sauce adds a delicious touch to your dessert! You’ve learned how to make a delicious caramel apple éclair cake. We covered ingredients, steps, and various tips to ensure your cake turns out perfectly. You can mix it up with different flavors or dietary options. Remember to store leftovers well to keep them fresh. I hope you feel ready to try this fun recipe. Enjoy baking and sharing this tasty treat!

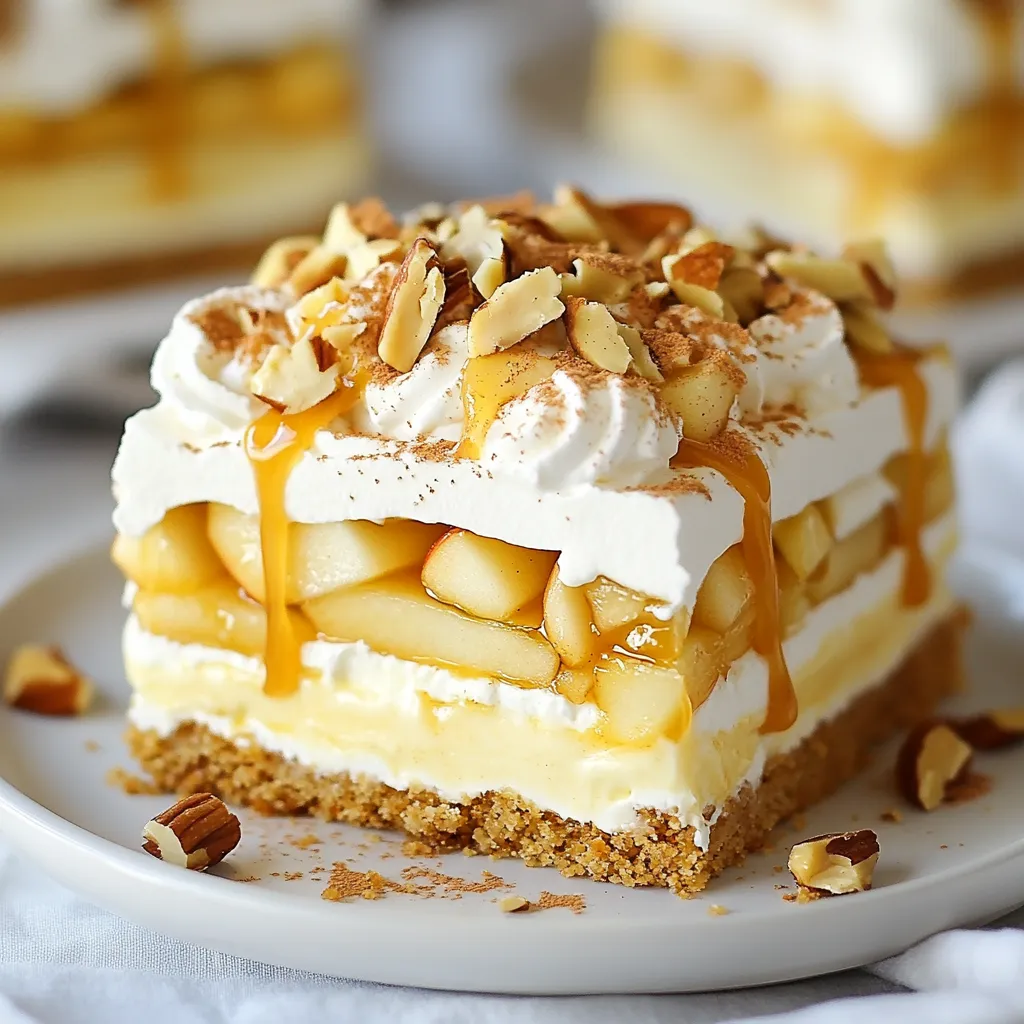
Caramel Apple Eclair Cake Irresistible Dessert Delight

If you crave a dessert that packs a flavor punch, look no further than the Caramel Apple Eclair Cake. This

For this creamy pesto chicken skillet, you will need: - 2 boneless, skinless chicken breasts - 1 tablespoon olive oil - Salt and pepper to taste - 1 cup heavy cream - ½ cup prepared pesto sauce - 1 cup cherry tomatoes, halved - 1 cup fresh spinach - ½ cup grated Parmesan cheese - ½ teaspoon garlic powder - ½ teaspoon Italian seasoning - Fresh basil leaves for garnish This list gives you all you need for a flavorful meal. Each ingredient plays a key role in making the dish rich and tasty. You can use fresh or store-bought pesto. Fresh pesto has bright flavors from basil and garlic. It adds a nice depth to the dish. If time is short, store-bought pesto works well too. Just pick one that has good quality ingredients. Check labels for added preservatives. You can switch out some ingredients if needed. Here are a few ideas: - Use chicken thighs instead of breasts for extra juiciness. - Swap heavy cream for Greek yogurt for a lighter version. - If you don’t have cherry tomatoes, any ripe tomato will do, just chop it up. - For a dairy-free option, use coconut milk and nutritional yeast instead of cheese. Feel free to customize the recipe to your taste! Each change can make this dish your own. {{ingredient_image_1}} Start by seasoning the chicken breasts. Use salt, pepper, garlic powder, and Italian seasoning. Make sure to coat both sides well. This step adds great flavor. Heat a large skillet over medium heat. Add one tablespoon of olive oil. Once the oil is hot, place the seasoned chicken in the skillet. Cook for 5-7 minutes on each side. You want a nice golden brown color. When done, remove the chicken and set it aside. In the same skillet, pour in one cup of heavy cream. Add half a cup of prepared pesto sauce. Stir the mixture well. Let it simmer gently. After a minute, add one cup of halved cherry tomatoes. Cook them for about 2 minutes. They should soften up nicely. Now, stir in one cup of fresh spinach. Cook until the spinach wilts, which takes about 1-2 minutes. Finally, reduce the heat to low. Add half a cup of grated Parmesan cheese. Stir until it melts and blends into the sauce. Return the chicken breasts to the skillet. Spoon the creamy pesto sauce over them. Let everything cook together for another 2-3 minutes. This will heat the chicken through. Once done, remove from heat. Garnish with fresh basil leaves. Serve the creamy pesto chicken on a plate. Drizzle extra sauce on top for added flavor. Enjoy your savory dinner delight! To keep chicken tender, start with fresh meat. Use boneless, skinless chicken breasts for best results. Season the chicken with salt, pepper, garlic powder, and Italian seasoning. Let it rest for a few minutes after seasoning. This helps the flavors soak in. Cook the chicken in a hot skillet with olive oil. This creates a nice sear. Cook for 5-7 minutes on each side. Use a meat thermometer to check for doneness. The internal temperature should reach 165°F. Let the chicken rest for a couple of minutes before slicing. This keeps the juices inside. For a smooth, creamy sauce, use heavy cream. It blends nicely with the pesto. After adding the cream, stir until it simmers. This helps the flavors mix well. Add the grated Parmesan cheese slowly. Stir it in until it melts completely. If the sauce is too thick, you can add a splash of chicken broth. This keeps it creamy without making it too runny. Always taste the sauce before serving. Adjust the seasoning if needed. A beautiful plate makes a meal more inviting. Use fresh basil leaves for a pop of color. Sprinkle extra grated Parmesan on top for richness. For added brightness, toss in some halved cherry tomatoes. This not only looks great but adds flavor too. Serve the creamy pesto chicken on a white plate. This contrast makes the dish stand out. Pair it with garlic bread or pasta for a complete meal. Enjoy your creation and impress your family! Pro Tips Tip Title: Use Fresh Ingredients: For the best flavor, opt for fresh basil and spinach instead of dried. Fresh ingredients elevate the dish and provide a vibrant taste. Tip Title: Adjust the Creaminess: If you prefer a lighter sauce, substitute half of the heavy cream with chicken broth. This will still give you a delicious flavor without being overly rich. Tip Title: Perfectly Cooked Chicken: Use a meat thermometer to ensure your chicken reaches an internal temperature of 165°F (75°C) for safe and juicy results. Tip Title: Leftovers Storage: Store any leftovers in an airtight container in the fridge for up to 3 days. Reheat gently on the stove to maintain the creamy texture. {{image_2}} You can easily add more veggies to your creamy pesto chicken skillet. Veggies boost nutrition and flavor. Consider adding: - Zucchini, sliced thin - Bell peppers, chopped - Broccoli florets These vegetables cook fast and blend well with the creamy sauce. Just toss them into the skillet with the cherry tomatoes. This way, you get a colorful and healthy meal. If you want to switch up the protein, try these options. Each gives a new taste: - Shrimp: Cook for about 3-4 minutes until they turn pink. - Tofu: Use firm tofu, cubed and pan-fried until golden. - Turkey: Substitute turkey cutlets for a leaner option. Adjust the cooking time for each protein type. This keeps your meal exciting and tasty. You can make this dish gluten-free and dairy-free with a few swaps. For a gluten-free meal, use: - Gluten-free pasta or rice as a base. - Check the pesto ingredients for gluten. To make it dairy-free, use: - Coconut cream instead of heavy cream. - Nutritional yeast in place of Parmesan for a cheesy flavor. These options let everyone enjoy this dish, no matter their diet. After enjoying your creamy pesto chicken, let the leftovers cool. Place them in an airtight container. This helps keep the chicken fresh. Make sure to store it in the fridge. Your leftovers will last for about three days. If you want to enjoy it later, freezing is a great option. To reheat, use a skillet over low heat. Add a splash of water or cream to keep it moist. Stir gently to warm it through. You can also microwave it. Place the chicken on a safe dish and cover it. Heat in short bursts, checking often to avoid overcooking. This keeps the chicken juicy and tasty. If you plan to freeze the dish, do it soon after cooking. Let it cool completely first. Use freezer-safe containers or bags, removing as much air as possible. Label the bags with the date. Your creamy pesto chicken can stay frozen for up to three months. When ready to eat, thaw it in the fridge overnight before reheating. You can serve this dish with garlic bread or cooked pasta. Both pair well with the creamy sauce. A fresh salad with mixed greens also makes a nice side. The crunch of the salad balances the creaminess. If you want more veggies, try steamed broccoli or roasted zucchini. Yes, you can use dried pesto. However, the flavor will differ. Fresh pesto has bright, bold notes that dried pesto may lack. If you use dried, add a bit more to get good flavor. You can also mix it with oil or water to create a paste. The chicken is done when it reaches an internal temperature of 165°F. You can use a meat thermometer for an accurate reading. The chicken should be golden brown outside and no longer pink inside. If you cut it, the juices should run clear, not pink. This post covered how to make a creamy pesto chicken skillet. We discussed ingredients, cooking steps, and helpful tips. You can use fresh or store-bought pesto, and I shared great substitutions. You learned how to ensure tender chicken and creamy sauce. Plus, I offered ideas for adding nutrition and storing leftovers. Now, you have all you need to try this dish. I hope you enjoy cooking it as much as I do. Happy cooking!

Creamy Pesto Chicken Skillet Savory Dinner Delight

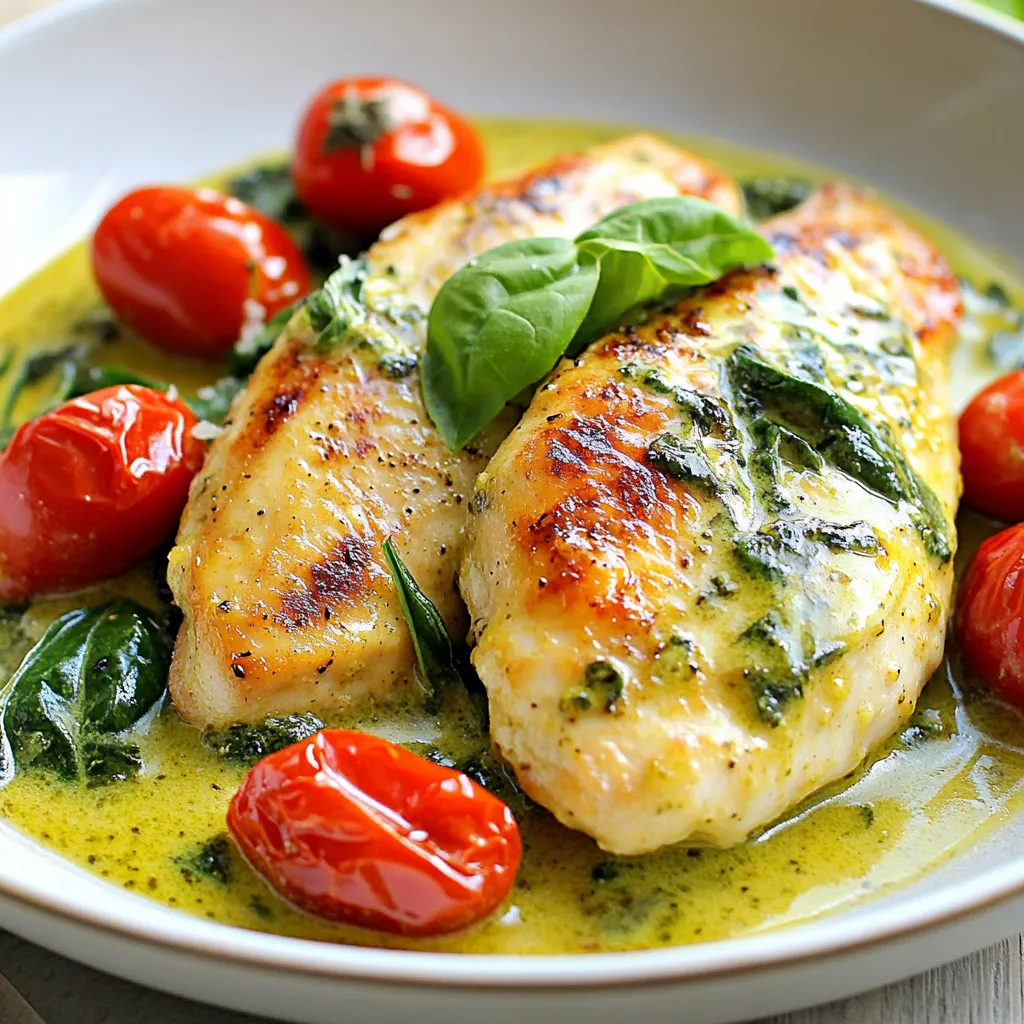
Get ready to wow your taste buds with my Creamy Pesto Chicken Skillet! This dish combines juicy chicken and rich,

To make Butter Chicken with Garlic Sauce, you will need: - 500g boneless chicken thighs, cut into bite-sized pieces - 1 cup plain yogurt - 2 tablespoons tandoori masala - 1 tablespoon ginger-garlic paste - 3 tablespoons butter - 1 large onion, finely chopped - 1 can (400g) crushed tomatoes - 1 teaspoon garam masala - 1 teaspoon ground cumin - 1 teaspoon ground coriander - 1/2 teaspoon turmeric powder - 1/2 cup heavy cream - Salt and pepper to taste - Fresh cilantro, chopped (for garnish) - 6 cloves garlic, minced - 2 tablespoons olive oil If you can't find certain items, there are some easy swaps: - Chicken thighs can be replaced with chicken breast for a leaner option. - Use Greek yogurt instead of plain yogurt for extra creaminess. - If you lack tandoori masala, a mix of cumin, paprika, and chili powder works well. - You can skip heavy cream and use coconut milk for a lighter sauce. Marinating makes chicken tender and flavorful. Here’s how: - Combine chicken, yogurt, tandoori masala, and ginger-garlic paste in a bowl. - Cover it with plastic wrap and refrigerate. - Aim for at least one hour of marinating time. For best results, let it sit overnight. - This allows the spices to infuse deeply into the meat. Marinating is key for great taste in Butter Chicken with Garlic Sauce. {{ingredient_image_1}} Start by taking 500g of boneless chicken thighs. Cut them into bite-sized pieces. In a medium bowl, mix the chicken with 1 cup of plain yogurt, 2 tablespoons of tandoori masala, and 1 tablespoon of ginger-garlic paste. Stir everything well. Cover the bowl with plastic wrap. Place it in the fridge for at least 1 hour. For best results, marinate overnight. This step makes the chicken juicy and flavorful. Next, heat 2 tablespoons of butter in a large skillet over medium heat. Once melted, add 1 large onion, finely chopped. Sauté the onion for about 5-7 minutes until it turns translucent and golden. This adds depth to your dish. Now, add the marinated chicken pieces to the skillet. Cook for 8-10 minutes, stirring occasionally. You want the chicken browned on all sides. After browning the chicken, it’s time to add flavor. Stir in 1 can of crushed tomatoes, along with 1 teaspoon of garam masala, 1 teaspoon of ground cumin, 1 teaspoon of ground coriander, and 1/2 teaspoon of turmeric powder. Season with salt and pepper to taste. Bring this mixture to a gentle simmer. Let it cook for about 15 minutes. This allows the spices to meld and create a rich sauce. In a separate small saucepan, heat 1 tablespoon of butter and 2 tablespoons of olive oil over medium heat. Add 6 cloves of minced garlic. Sauté the garlic for 1-2 minutes until fragrant. Be careful not to burn it, as burnt garlic tastes bitter. This garlic butter sauce adds a wonderful layer to your dish. Once the chicken is cooked through, stir in the garlic butter and 1/2 cup of heavy cream into the skillet. Let it cook for another 5 minutes, stirring gently. This makes the sauce creamy and rich. Taste the dish and adjust the seasoning if needed. Finally, remove from heat and garnish with fresh chopped cilantro before serving. Enjoy your Butter Chicken with Garlic Sauce! The marinade is key for great Butter Chicken. Use plain yogurt to tenderize the chicken. The acid in yogurt breaks down the meat, making it juicy and soft. Mix in tandoori masala and ginger-garlic paste for rich flavor. I recommend marinating for at least one hour, but overnight works best. This gives the spices time to soak in. The sauce should be creamy and smooth. Use heavy cream to get that rich texture. After cooking, adjust the thickness by adding more cream or a little water. If it’s too thick, don’t worry! Just add a splash of water or more cream to reach your desired consistency. Stir gently to blend everything well. Want to elevate your Butter Chicken? Add a pinch of sugar to balance the acidity of the tomatoes. Fresh cilantro adds a bright finish. If you love garlic, use more minced garlic in the sauce. You can also sprinkle in a bit of lemon juice for extra zing. This enhances the flavor and makes each bite pop. Pro Tips Marinate for Maximum Flavor: The longer you marinate the chicken, the more flavorful it will be. Aim for at least 1 hour, but overnight is ideal for deep flavor penetration. Perfectly Sautéed Onions: Ensure your onions are cooked until they are golden brown; this adds a rich sweetness to the dish that enhances the overall flavor. Control the Heat: Adjust the heat while cooking to prevent burning the spices. A gentle simmer allows the spices to release their flavors without scorching. Finish with Freshness: Adding cilantro at the end not only brightens the dish but also adds a fresh aroma. You can also drizzle a little extra cream for a touch of elegance. {{image_2}} You can swap chicken for other proteins. Try shrimp or fish for a fresh twist. Tofu is a great choice for a plant-based dish. Each protein brings its own flavor and texture. Adjust cooking times based on what you choose. Shrimp cooks quickly, while fish may need a bit more time. To make this dish vegetarian, use paneer or chickpeas. Paneer adds a creamy texture, while chickpeas provide protein and fiber. Follow the same cooking steps. Marinate paneer just like chicken for added flavor. Feel free to add more veggies, like bell peppers or spinach. They will add color and nutrition to the dish. If you love spice, add more heat! Use fresh chopped chilies or cayenne pepper. You can also try adding a dash of chili powder to the sauce. Adjust spices to your taste. Start small and increase until it’s just right for you. Serve with cooling yogurt or raita to balance the heat. To keep your Butter Chicken with Garlic Sauce fresh, let it cool down. Store the leftovers in an airtight container. You can keep it in the fridge for up to three days. Make sure to label the container with the date. This helps you remember when you made it. When you’re ready to enjoy your leftovers, reheat them gently. You can use the stove or microwave. If using the stove, heat it over low to medium heat. Stir often to avoid burning. If using a microwave, heat in short bursts. This way, you keep it warm but not overcooked. You can freeze Butter Chicken for later. Place it in a freezer-safe container. It will last up to three months. When you want to eat it, move it to the fridge overnight to thaw. Once thawed, reheat it on the stove. Always check that the chicken is hot all the way through before serving. You can serve Butter Chicken with many tasty sides. Here are some great options: - Steamed basmati rice - Warm naan bread - Roti or chapati - A fresh salad with cucumber and tomatoes - Yogurt raita for a cooling effect These sides balance the rich flavors of the dish. Yes, you can make Butter Chicken without cream. You can use coconut milk or cashew cream as a substitute. These options keep the dish rich while adding unique flavors. You can also use more yogurt for creaminess. To check if the chicken is cooked through, use a meat thermometer. The chicken should reach a safe temperature of 165°F (75°C). You can also cut a piece open. The meat should be white, not pink. If it’s pink, cook it a bit longer. Tandoori masala is a blend of spices used in Indian cooking. It often includes cumin, coriander, and paprika. You can find it in Indian grocery stores or the spice aisle of your local market. You can also make your own by mixing spices like cumin, coriander, and turmeric. Butter Chicken with Garlic Sauce is not very spicy. The dish has warm flavors from spices but not so much heat. If you want more spice, you can add chili powder or fresh green chilies. Adjust to your taste for the perfect level of heat. This blog post covered all you need for a delicious Butter Chicken. We discussed essential ingredients, substitutes, and marinade tips. I shared step-by-step cooking instructions and helpful tips for the best flavor. You learned about variations and storage practices to keep your dish fresh. Now you are well-equipped to make a tasty Butter Chicken. Enjoy experimenting and sharing this classic meal with others.

Butter Chicken with Garlic Sauce Flavorful Recipe Guide

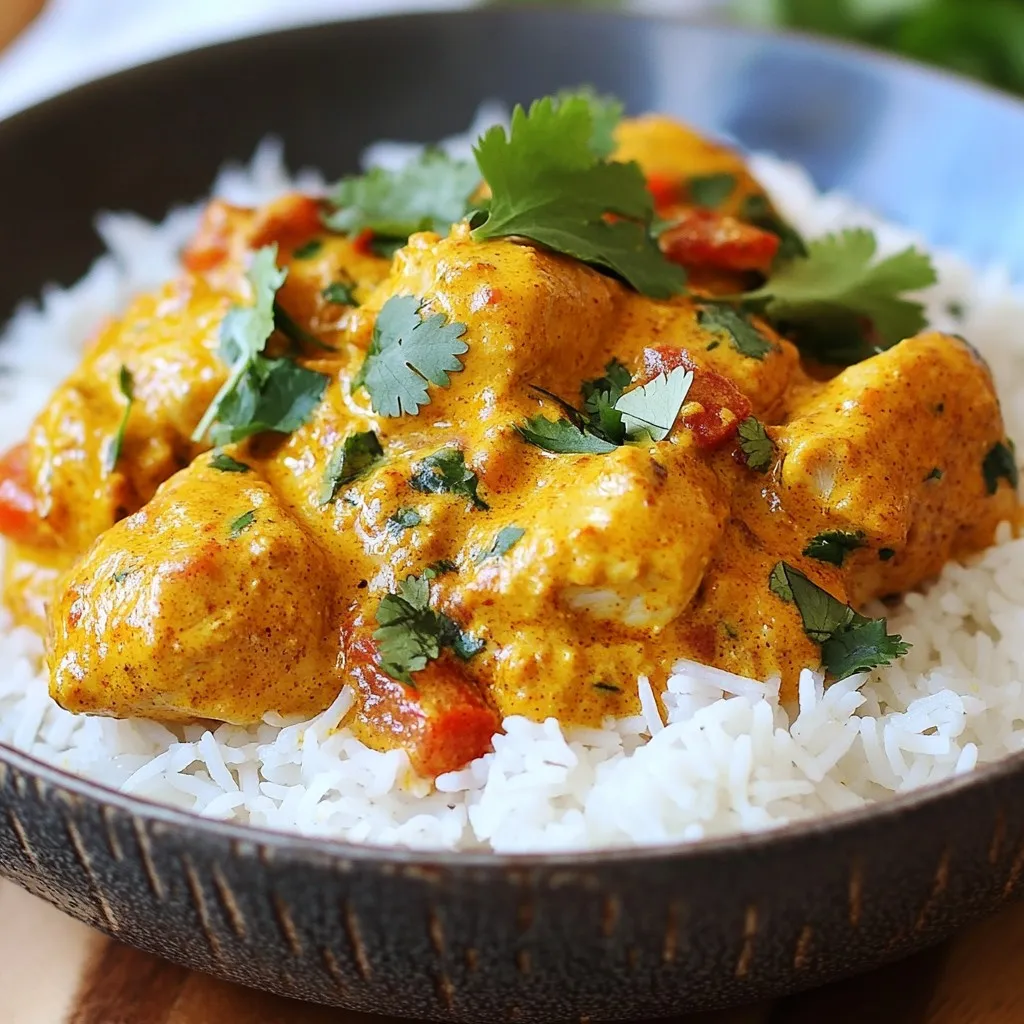
Welcome to my flavorful journey into Butter Chicken with Garlic Sauce! This dish is rich, creamy, and packed with bold

- 1 pound boneless chicken thighs - 1 tablespoon cornstarch - 1 teaspoon garlic powder - 1 teaspoon paprika - Salt and pepper to taste - 1 cup panko breadcrumbs - 1 cup lettuce leaves, shredded - 1/2 cup sliced cucumbers - 1/4 cup sliced green onions - 1/4 cup mayonnaise - 2 tablespoons sweet chili sauce - 6-8 slider buns (mini burger buns) For Bang Bang Chicken Sliders, start with fresh chicken thighs. I like the thighs because they stay juicy. The cornstarch adds crunch. Garlic powder and paprika give great flavor. Salt and pepper are a must for seasoning. Panko breadcrumbs create a crispy outer layer. - Sliced tomatoes - Avocado slices - Pickled jalapeños - Fresh cilantro - Sesame seeds Feel free to add toppings based on your taste. Sliced tomatoes add freshness. Avocado gives creaminess. Pickled jalapeños add heat. Fresh cilantro brings brightness. A sprinkle of sesame seeds adds a nice crunch. - Sweet potato fries - Coleslaw - Corn on the cob - Vegetable sticks with dip - Chips and salsa Pair these sliders with sides that complement their flavor. Sweet potato fries add sweetness. Coleslaw adds crunch and creaminess. Corn on the cob is a fun touch. Vegetable sticks with dip offer a healthy option. Chips and salsa keep things casual. {{ingredient_image_1}} 1. First, preheat your oven to 400°F (200°C). Line a baking sheet with parchment paper. 2. Take 1 pound of boneless chicken thighs and place them in a bowl. 3. Add 1 teaspoon of garlic powder, 1 teaspoon of paprika, and salt and pepper to taste. 4. Toss the chicken until it is well coated with the spices. 5. Sprinkle 1 tablespoon of cornstarch over the chicken. Mix it in until the chicken is covered. 6. Get 1 cup of panko breadcrumbs ready in a plate or shallow dish. 1. Dredge each seasoned chicken thigh in the panko breadcrumbs. Press firmly for a good coating. 2. Place the breaded chicken on the lined baking sheet. 3. Bake in the preheated oven for 20-25 minutes. Flip the chicken halfway through for even cooking. 4. Once they turn golden brown and are cooked through, take them out. Let them rest for a few minutes. 5. Slice the chicken thighs into smaller pieces for your sliders. 1. Take your slider buns and spread a thin layer of Bang Bang sauce on the bottom of each bun. 2. Place a piece of the sliced chicken on top of the sauce. 3. Add a handful of shredded lettuce, a few slices of cucumber, and some green onions. 4. Cap each slider with the top half of the bun. 5. Serve your sliders right away with extra Bang Bang sauce on the side for dipping. This method gives you tasty, quick Bang Bang Chicken Sliders. Enjoy every bite! To get crispy chicken thighs, start with boneless thighs. Pat them dry with paper towels. This helps the coating stick. Season the chicken well with garlic powder, paprika, salt, and pepper. Then, coat them in cornstarch. This will make the chicken extra crispy. Use panko breadcrumbs for the best crunch. Press the breadcrumbs onto the chicken firmly. Bake them at 400°F for 20-25 minutes. Flip them halfway for even browning. Let them rest before slicing. This keeps them juicy. The Bang Bang sauce is simple and tasty. Mix mayonnaise with sweet chili sauce in a bowl. Start with 1/4 cup of mayonnaise and 2 tablespoons of sweet chili sauce. Stir until smooth. Taste it and adjust if needed. You can add more sweet chili sauce for sweetness. If you like heat, add a bit of sriracha. This sauce pairs perfectly with the crispy chicken. It adds a creamy and spicy kick. When assembling sliders, start with a nice base. Spread a thin layer of Bang Bang sauce on the bottom bun. This adds flavor and keeps the slider from getting soggy. Place a piece of crispy chicken on top. Add shredded lettuce for crunch. Then, add cucumber slices for freshness. Top with sliced green onions for a burst of flavor. Cap it with the top bun, and you’re ready to serve. Arrange them on a platter with extra sauce for dipping. Enjoy these sliders fresh for the best taste! Pro Tips Choose the Right Chicken: Boneless chicken thighs are juicy and flavorful, making them perfect for sliders. If you prefer a leaner option, you can substitute with chicken breasts, but be mindful not to overcook them. Ensure a Crisp Coating: Press the panko breadcrumbs firmly onto the chicken for a crunchier texture. For an even crispier finish, you can lightly spray the coated chicken with cooking oil before baking. Customize the Bang Bang Sauce: Feel free to adjust the sweetness and spiciness of the Bang Bang sauce by adding more chili sauce or even a squeeze of lime juice for an extra zing. Assembly Matters: For the best slider experience, layer the ingredients thoughtfully. Start with sauce, then chicken, followed by veggies, ensuring each bite is balanced and flavorful. {{image_2}} To make your Bang Bang Chicken sliders spicy, add some heat to the sauce. Mix in sriracha or a dash of cayenne pepper. You can also use spicy chili sauce instead of sweet chili sauce. This will give your sliders a tasty kick. Adjust the amount of spice to fit your taste. You can switch the chicken for other proteins. For a vegetarian option, use firm tofu. Press and cut the tofu into strips. Marinate it in the same spices. Then, coat it in panko and bake as you would the chicken. For shrimp lovers, use large shrimp. Toss them in the spices and bake until pink and cooked through. To make these sliders gluten-free, use gluten-free breadcrumbs instead of panko. You can also choose gluten-free buns. Make sure to check labels when buying sauces. Many sauces contain gluten, so look for certified gluten-free options. This way, everyone can enjoy these tasty sliders! To store leftover sliders, place them in an airtight container. Keep the sliders in the fridge. Make sure to separate the chicken from the bun if you can. This helps keep the bread from getting soggy. Leftovers are best eaten within two days. Reheat your sliders in the oven for the best taste. Preheat the oven to 350°F (175°C). Place the sliders on a baking sheet. Heat them for about 10-15 minutes. You can also use a microwave. Just warm them for 30-60 seconds. This method may make the bun soft. If you want to freeze the sliders, wrap each one tightly in plastic wrap. Then, place them in a freezer bag. They can last for up to two months. When ready to eat, thaw in the fridge overnight. Then reheat as mentioned above. This keeps the flavors fresh and tasty. Bang Bang sauce is simple yet tasty. It has just two main ingredients: mayonnaise and sweet chili sauce. I mix equal parts of both for a creamy and sweet kick. You can adjust the amount of sweet chili sauce to make it spicier or milder. Yes, you can make the sliders ahead of time! I suggest cooking the chicken and preparing the sauce. Store them separately in the fridge. When you’re ready to serve, just assemble the sliders. They still taste great! To make the chicken less spicy, reduce the sweet chili sauce in the Bang Bang sauce. You could also add more mayonnaise. This will balance the heat and keep it creamy. Mini burger buns work best for sliders. They are soft and hold the filling well. You can also try Hawaiian rolls for a sweeter taste. Just make sure they are sturdy enough to hold all the toppings! In this blog post, we covered all you need for delicious Bang Bang Chicken Sliders. We explored the key ingredients, optional toppings, and the best side dishes. You learned step-by-step how to prepare, cook, and assemble sliders for a tasty meal. We also offered tips for crispy chicken, perfect sauce, and smart assembly. You can customize your sliders with variations like spicy options or gluten-free choices. Finally, we shared storage tips for leftovers. With this guide, you are ready to make sliders that impress!

Bang Bang Chicken Sliders Quick and Tasty Recipe

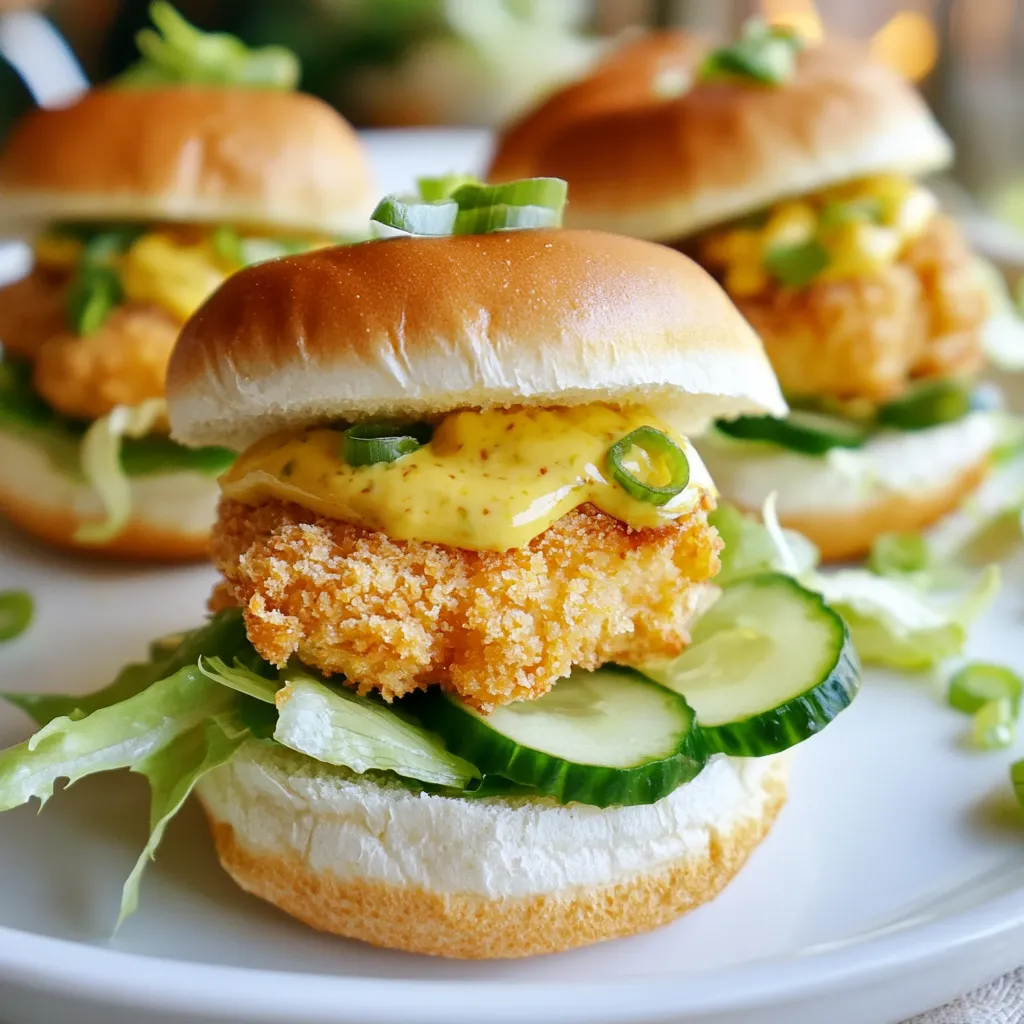
Ready for a treat? Bang Bang Chicken Sliders are quick, tasty, and perfect for any gathering! In this post, I’ll

- 1.5 lbs boneless, skinless chicken thighs - 1 can (14 oz) coconut milk - 1 cup diced tomatoes (canned or fresh) - 1 large onion, finely chopped - 3 cloves garlic, minced - 1 tablespoon ginger, grated - 2 tablespoons garam masala - 1 tablespoon curry powder - 1 teaspoon ground cumin - 1 teaspoon turmeric - 1 teaspoon cayenne pepper - Salt to taste - 1 tablespoon honey or maple syrup (optional) The heart of this dish lies in its rich flavors and simple ingredients. I love using boneless, skinless chicken thighs. They stay juicy during cooking. Coconut milk adds a creamy texture and sweetness. Diced tomatoes bring freshness and acidity, balancing the dish. The aromatics are key to building flavor. I always start with a large onion, finely chopped. It adds depth. Garlic and ginger come next. They create a warm, aromatic base. Garam masala and curry powder give this dish its signature taste. These spices blend beautifully, making each bite a delight. For seasoning, I use ground cumin and turmeric. Cumin adds earthiness, while turmeric gives a lovely color. Cayenne pepper adds heat, but you can adjust it based on your taste. A pinch of salt enhances all the flavors. Sometimes, I add honey or maple syrup for a hint of sweetness. It balances the spices well. Feel free to skip this if you prefer a savory dish. {{ingredient_image_1}} - In a large bowl, combine 1.5 lbs of chicken thighs with spices. - Use 2 tablespoons of garam masala, 1 tablespoon of curry powder, 1 teaspoon of cumin, 1 teaspoon of turmeric, and 1 teaspoon of cayenne pepper. - Add salt to taste. Mix well to coat all the chicken pieces evenly. - Chop one large onion and mince three cloves of garlic. Grate 1 tablespoon of ginger. - Layer the chopped onion, minced garlic, grated ginger, and 1 cup of diced tomatoes in the crockpot. - Place the spiced chicken on top of this mixture. - Pour in one can of coconut milk. Stir gently to mix and ensure the chicken is submerged in the sauce. - Cover the crockpot and cook on low for 6-8 hours or on high for 4-5 hours. - Check for tenderness. The chicken should be soft and cooked through. Marinating the chicken with spices is key. It helps the chicken soak up all the rich flavors. I use garam masala, curry powder, cumin, and turmeric for depth. You can adjust the cayenne pepper for heat. If you like it mild, use less. For more spice, add more cayenne. Experiment until you find your perfect balance. For the best results, cook the chicken on low for 6-8 hours. If you’re short on time, set your crockpot to high for 4-5 hours. Always check for doneness. The chicken should be tender and easily shredded with a fork. If it feels tough, give it more time. This dish pairs well with cooked rice or warm naan. Both options soak up the tasty sauce. For garnish, sprinkle fresh cilantro on top. You can also add a squeeze of lemon for brightness. Serve it hot and enjoy the blend of flavors! Pro Tips Marinate for Flavor: For deeper flavor, marinate the chicken in the spices and coconut milk for at least 1 hour or overnight in the refrigerator. Adjusting Spice Levels: Be mindful of the cayenne pepper; start with less if you're sensitive to spice, and adjust to your taste as it cooks. Thickening the Sauce: If you prefer a thicker sauce, remove the lid during the last hour of cooking to let some moisture evaporate. Serving Suggestions: This dish pairs wonderfully with basmati rice or warm naan; consider adding a side of sautéed greens for a complete meal. {{image_2}} You can make this dish vegetarian by using chickpeas or tofu. For chickpeas, use two cans of drained and rinsed chickpeas. Substitute chicken with 14 ounces of firm tofu. Cut the tofu into cubes, and follow the same steps in the recipe. Both options will soak up the spices well and offer great flavor. Want it milder? Reduce the cayenne pepper to half a teaspoon. You can also skip it altogether. If you like heat, add extra cayenne or even fresh chili peppers. Taste the sauce before serving. This way, you can adjust to your liking. Incorporating seasonal vegetables is easy and fun. Try adding spinach, bell peppers, or zucchini. Chop them into bite-sized pieces and toss them in the crockpot with the other ingredients. This not only adds color but also boosts nutrition and flavor. Enjoy experimenting with what you have on hand! To store your Crockpot Coconut Chicken Tikka Masala, let it cool first. Then, place it in an airtight container. This keeps the dish fresh and tasty. You can refrigerate it for up to 3 days. If you want to save it longer, freeze it. Use freezer-safe bags or containers. It can last up to 3 months in the freezer. For reheating, you have a few options. The best way is to use the stovetop. Heat it in a pan over medium heat. Stir often until it’s hot. If using a microwave, place it in a bowl and cover it. Heat for 1-2 minutes. Stir halfway through to ensure even heating. Do not overheat, as this can dry it out. After cooking, your dish is safe to eat for up to 4 days in the fridge. If frozen, it’s best to eat it within 3 months for the best taste. Always check for signs of spoilage before eating, like off smells or changes in texture. Enjoy your meal safely! You can serve this dish with several tasty sides. Here are some great options: - Cooked rice (white, brown, or basmati) - Warm naan bread - Steamed vegetables (like broccoli or green beans) - A fresh salad with cucumber and tomatoes - Raita (yogurt sauce) to cool things down These sides make for a complete meal. They soak up the delicious sauce and add texture. Yes, you can use different chicken cuts. Here are some ideas: - Chicken breast: Leaner but can dry out. Cook it less time. - Skin-on thighs: Juicy and rich in flavor. They hold moisture well. Each option brings a unique taste. Choose what you prefer or have on hand! You can easily adapt this recipe. Here’s how: - Halve the ingredients for a smaller size. - Use 0.75 lbs of chicken and 7 oz of coconut milk. - Cut the spices and vegetables in half as well. This keeps the flavors balanced. Adjust the cooking time if needed. Check for tenderness after 4 hours on high or 6 hours on low. This blog post shared the key steps to make a delicious Chicken Tikka Masala in a crockpot. You learned about the main ingredients and how to prepare them. I covered cooking times, tips for flavor, and ways to adjust spice levels. Remember, you can add vegetables or switch to a vegetarian option. Proper storage and reheating methods help keep your dish tasty. Follow these steps, and you'll enjoy a warm meal full of flavor, ready anytime. Enjoy cooking and have fun with your meals!

Crockpot Coconut Chicken Tikka Masala Flavors Unleashed

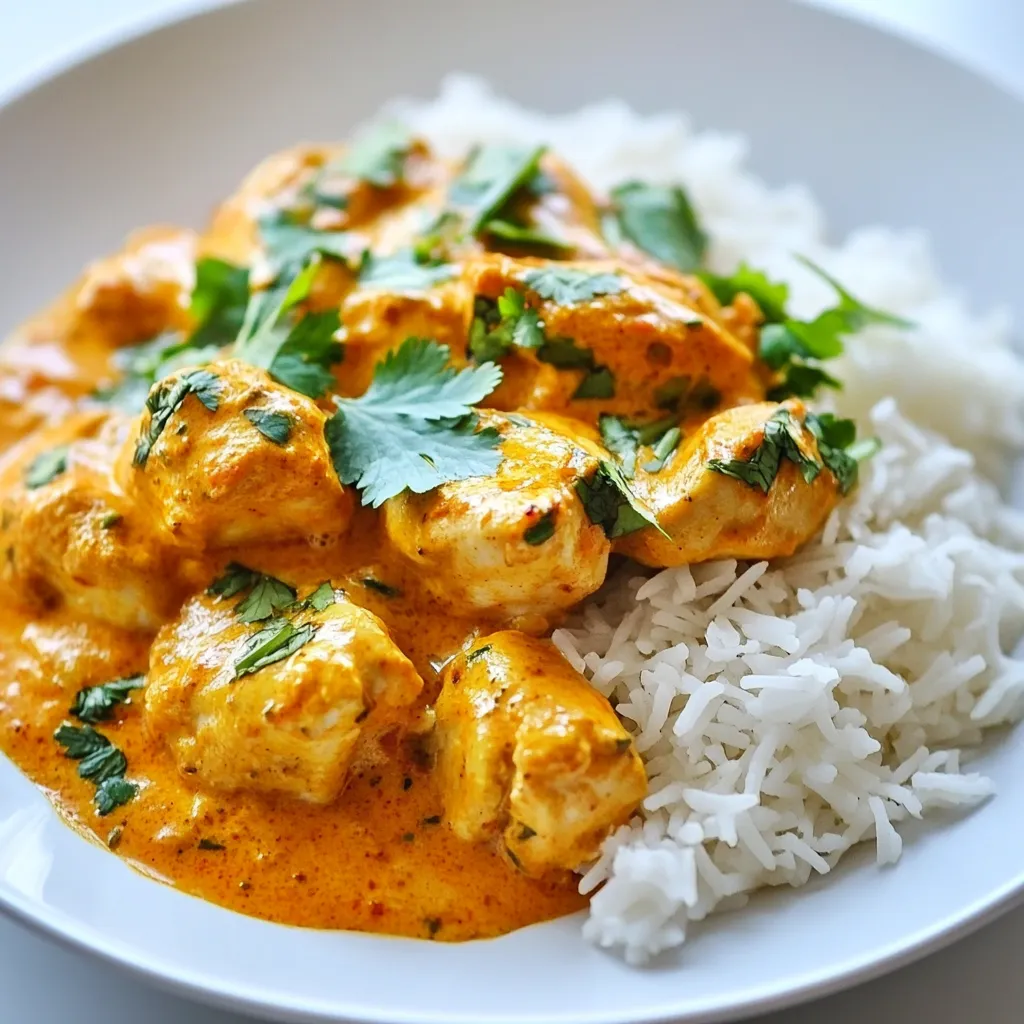
Are you ready to unleash incredible flavors in your kitchen? This Crockpot Coconut Chicken Tikka Masala recipe is your key

- 2 large cucumbers - 1 cup cherry tomatoes - 8 oz mozzarella balls - 1/4 cup fresh basil leaves - 2 tablespoons extra virgin olive oil - 1 tablespoon balsamic glaze - Salt and pepper When making cucumber Caprese salad, fresh ingredients are key. Start with two large cucumbers. They should be firm and crisp. Slice them thinly for the best texture. Next, grab one cup of cherry tomatoes. Halve them to release their juicy flavor. You will also need eight ounces of mozzarella balls. These should be fresh and creamy. Halve them for easy bites. Don’t forget about the basil! Use a quarter cup of fresh basil leaves. Tear them gently to release their aroma. For dressing, use two tablespoons of extra virgin olive oil. This adds richness to the salad. Add one tablespoon of balsamic glaze for a sweet touch. Finally, season with salt and pepper to taste. These little details make a big difference in flavor. {{ingredient_image_1}} - Thinly slice cucumbers. Use a sharp knife for best results. Aim for even rounds. - Arrange the slices on a serving platter. Make sure they fit neatly without overlapping. - Combine the halved cherry tomatoes, mozzarella balls, and torn basil leaves in a mixing bowl. - Add two tablespoons of olive oil, salt, and pepper to taste. Toss gently to mix. - Spoon the tomato and mozzarella mixture onto each cucumber slice. Distribute evenly for a great look. - Drizzle balsamic glaze over the entire salad. This adds a sweet and tangy flavor that pairs well. Enjoy the bright, fresh taste of this salad right away or let it chill for 15 minutes. This helps the flavors blend beautifully. To make your salad look great, slice the cucumbers evenly. Use a sharp knife for clean cuts. Aim for thin rounds, about 1/8 inch thick. This helps each bite feel light and fresh. If you want perfect slices, a mandoline is your best friend. It gives you even cuts quickly. Let your salad sit for about 15 minutes before serving. This resting time helps the flavors mix well. The olive oil coats every piece, while the salt pulls out moisture. Balancing the ingredients is key. Use enough salt and pepper to bring out the taste of each item. The sweet balsamic glaze adds a nice touch that ties everything together. Pro Tips Use Chilled Ingredients: For an extra refreshing salad, chill your cucumbers and mozzarella balls in the refrigerator before assembling the dish. Experiment with Cheese: If you prefer a different cheese, try using feta or burrata for a unique flavor twist. Fresh Herbs Matter: Use fresh basil for the best flavor; dried herbs won't provide the same aromatic punch. Customize the Dressing: Feel free to add minced garlic or a squeeze of lemon juice to the olive oil for an extra layer of flavor. {{image_2}} You can easily switch out the cheese in this salad. Try using goat cheese or feta for a tangy twist. Both add a new flavor that complements the cucumbers and tomatoes. Adding avocados brings creaminess. They enhance the texture and taste of the salad. You can also toss in bell peppers for a crunch. Their sweetness pairs well with the fresh salad base. If you want a different taste, swap the balsamic glaze for a vinaigrette. A simple mix of olive oil, vinegar, and herbs works great. You can also use herb-infused oils for added flavor. These oils bring a savory note that enhances the salad's freshness. Experiment with lemon-infused or garlic-infused oils for a fun twist! To keep your Cucumber Caprese Salad fresh, store it in the fridge. I recommend using an airtight container. This helps prevent moisture loss and keeps the flavors intact. Spread a paper towel inside the container to soak up any extra moisture. This keeps the salad crisp and tasty. You can keep this salad for up to two days in the fridge. After that, the cucumbers become soggy. Look for signs of spoilage like a strong smell or slimy texture. If you see these signs, it’s best to toss the salad. Enjoy it fresh for the best taste! You can store Cucumber Caprese Salad in the fridge for about two days. After that, the cucumbers may get soggy. To keep it fresh, use an airtight container. Yes, you can make this salad ahead of time. Just slice the cucumbers and prepare the tomato mixture. Keep them in separate containers. When ready to serve, simply assemble them together. This keeps everything crisp and fresh. If you need a substitute for mozzarella, try feta cheese or goat cheese. They add a nice tangy flavor. You can also use vegan cheese if you prefer a plant-based option. This blog covers how to make a fresh Cucumber Caprese Salad. We learned the best ingredients, step-by-step prep, and useful tips. You can easily customize this salad with your favorite flavors. Remember, fresh ingredients and proper storage keep it delicious. Enjoy making this healthy dish, and share your twist on it with others!

Cucumber Caprese Salad Fresh and Flavorful Delight

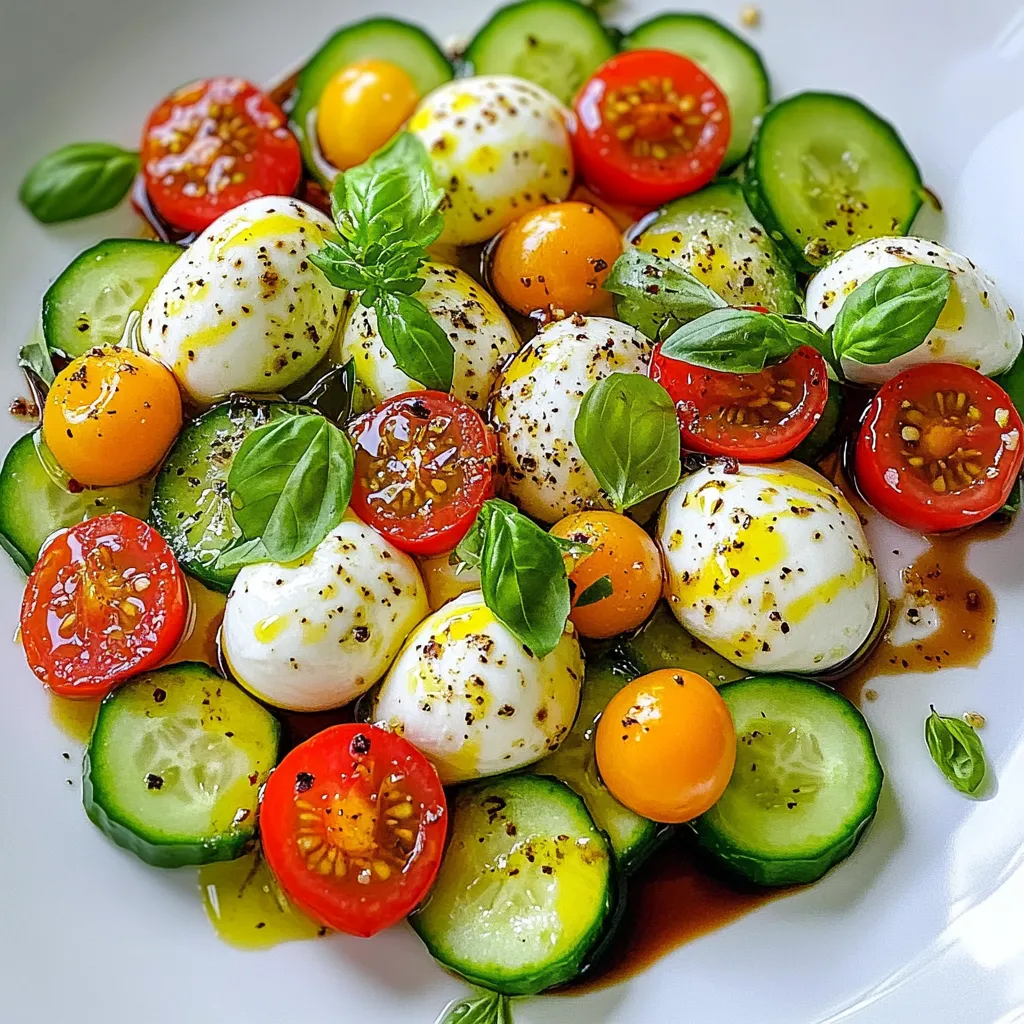
If you want a refreshing and easy dish, try my Cucumber Caprese Salad! This vibrant salad combines crisp cucumbers, juicy

- 12 oz penne pasta (or your choice of pasta) - 1 medium onion, diced - 3 cloves garlic, minced - 1 bell pepper (red or yellow), diced - 1 cup cherry tomatoes, halved - 1 can (15 oz) black beans, drained and rinsed - 1 cup corn (fresh or frozen) - 2 teaspoons Cajun seasoning - 1/2 teaspoon smoked paprika - Salt and pepper to taste - 1 cup coconut milk (or other non-dairy cream) - Fresh parsley, chopped (for garnish) When making Vegan Cajun Pasta, the ingredients shine. Each one adds depth and flavor. First, the penne pasta acts as a base. You can use any pasta you love. The onion and garlic give a strong start. They bring warmth and aroma to the dish. Next, add a bell pepper for color and sweetness. The cherry tomatoes burst with juiciness. They create a lovely sauce when cooked. Black beans add protein and texture. They make the dish hearty. Corn brings a sweet crunch. The Cajun seasoning adds a kick of flavor. Smoked paprika gives a hint of smokiness. Salt and pepper balance everything. Finally, coconut milk creates a creamy sauce. It ties all the ingredients together. Garnish with fresh parsley for a pop of color. This makes your Vegan Cajun Pasta not just tasty but beautiful too. Each ingredient plays a role in making this dish special. {{ingredient_image_1}} Start by boiling a large pot of salted water. This step adds flavor to the pasta. Once it boils, add the penne pasta. Cook it according to the package instructions, usually about 8-10 minutes. You want it al dente, which means it should be firm but not hard. Drain the pasta and set it aside for later. Next, grab a large skillet and heat one tablespoon of olive oil over medium heat. Add the diced onion and sauté it for about 3-4 minutes. You want the onion to soften but not brown. Now, stir in three minced garlic cloves and one diced bell pepper. Cook this mix for another 2-3 minutes. The peppers should soften up nicely. Now, it’s time to add more color and flavor. Toss in one cup of halved cherry tomatoes, one can of drained black beans, and one cup of corn. Stir everything well and let it cook for about 5 minutes. You want the tomatoes to begin softening. This will help create a juicy mix! Next, sprinkle in two teaspoons of Cajun seasoning and a half teaspoon of smoked paprika. Add salt and pepper to taste. Mix it all up so the spices coat the veggies. Pour in one cup of coconut milk. This will make your dish creamy and rich. Stir well and bring it to a simmer. Let it cook for about 5-7 minutes. This simmering helps the flavors blend and the sauce to thicken just right. Now, it’s time to bring everything together! Add the cooked pasta to your skillet. Toss it gently to mix the pasta with the sauce and veggies. Cook for an additional 2 minutes. This final cooking helps all the flavors meld together beautifully. When you’re ready to serve, dish it out into bowls. For a lovely finish, sprinkle some fresh parsley on top. You can also add extra Cajun seasoning for a pop of color. Consider serving a lime wedge on the side for a zesty touch that brightens the dish! - Cook your pasta until al dente. This means it should still have a bit of bite. - Al dente pasta holds its shape better and absorbs the sauce nicely. - Sauté your veggies well to bring out their flavors. Heat your oil, then add the onion. - Cook the onion for 3-4 minutes until it softens. Then, add garlic and bell pepper. - Sauté them for 2-3 minutes to release their taste. This step builds a strong base for your sauce. - Want more heat? Add extra Cajun seasoning or a splash of hot sauce. - You can also mix in some red pepper flakes for a spicy kick. - If you don’t have coconut milk, try almond milk or cashew cream. - These alternatives will keep the dish creamy without losing flavor. - Store leftovers in an airtight container in the fridge. - They should stay fresh for about 3-4 days. - To reheat, use a skillet over low heat. Add a splash of water or broth to keep it moist. - Stir often to prevent sticking and ensure even heating. Pro Tips Perfect Pasta Texture: Ensure your pasta is cooked al dente for the best texture and to prevent it from becoming mushy when combined with the sauce. Customize Your Heat: Adjust the amount of Cajun seasoning based on your spice preference. You can start with less and add more as desired while cooking. Fresh Ingredients Matter: Using fresh vegetables, especially the bell peppers and cherry tomatoes, will enhance the flavor and texture of your dish significantly. Garnish for Flavor: Don’t skip the parsley garnish! It adds a fresh, bright flavor that complements the dish beautifully. {{image_2}} You can switch the black beans for other legumes. Try using chickpeas or lentils. These will add different textures and flavors. If you want to use grains, consider quinoa or brown rice. They will add a nutty taste and more protein. Seasonal veggies can also change your dish. In summer, use zucchini or fresh corn. In fall, add butternut squash or kale. They will add color and vitamins to your meal. For a spicier kick, add cayenne pepper or crushed red pepper flakes. This will make your dish hotter and more exciting. You can also try different Cajun blends or even jerk seasoning. Each mix gives a new twist to the flavor. Adding tofu or tempeh can boost protein. Tofu absorbs flavors well and adds nice texture. Tempeh has a richer taste and is great for heartiness. Both options are simple to add in while cooking. If you need gluten-free options, use gluten-free pasta. Many brands offer tasty choices made from rice or chickpeas. These will cook well and keep the dish tasty. For a nut-free cream, you can replace coconut milk with oat or soy milk. Both options are creamy and will blend nicely. This keeps the dish rich without using nuts. Black beans are rich in protein and fiber. They help keep you full longer. Corn adds sweetness and provides vitamins like B6 and folate. Coconut milk offers healthy fats and adds creaminess to the dish. It also contains iron and magnesium, which are vital for health. This recipe serves four. Each serving has about 400 calories. You get around 15 grams of protein and 8 grams of fiber. The dish has healthy fats from coconut milk, making it a balanced meal. Plant-based meals lower the risk of chronic diseases. They can improve heart health and support weight loss. Vegan cooking is also good for the planet. It uses fewer resources and reduces carbon footprints. Enjoying plant-based meals helps support sustainability and a healthier lifestyle. You can boost the heat in your Vegan Cajun Pasta. Try adding more Cajun seasoning. You can also add cayenne pepper for an extra kick. Hot sauce is another great option. Just a few drops can really spice things up. If you want to mix it up, try a spicy salsa or chipotle sauce. Yes, you can make this dish ahead of time. Cook the pasta and veggies separately. Store them in airtight containers. When you are ready to eat, just combine and heat. This way, the flavors stay fresh. You can also prepare the sauce in advance. Just store it in the fridge until you are ready to use it. This dish pairs well with many sides. A fresh green salad is a great choice. You can also serve it with garlic bread for a nice touch. For something heartier, try roasted veggies. You could add some avocado slices for creaminess too. Yes, this pasta is perfect for meal prep. It stores well in the fridge for about 3-4 days. Make sure to keep the sauce separate if possible. This will help the pasta stay firm. When you want to eat, just heat it up in the microwave or on the stove. You can freeze this dish! First, let it cool completely. Then, store it in freezer-safe containers. Make sure to label them with the date. Thaw it in the fridge overnight before reheating. Reheat it on the stove or in the microwave until hot. This keeps the taste fresh and delicious. This blog post covered how to make a delicious Vegan Cajun Pasta. We explored each ingredient, from penne and fresh veggies to creamy coconut milk. I provided step-by-step cooking instructions and helpful tips for flavor and storage. We also discussed ways to customize this dish with various ingredients. Remember, cooking should be fun and creative! Try different flavors and enjoy this tasty meal. Your kitchen is the perfect place to experiment with flavors and ideas. Enjoy your cooking!

Vegan Cajun Pasta Flavorful Plant-Based Dish

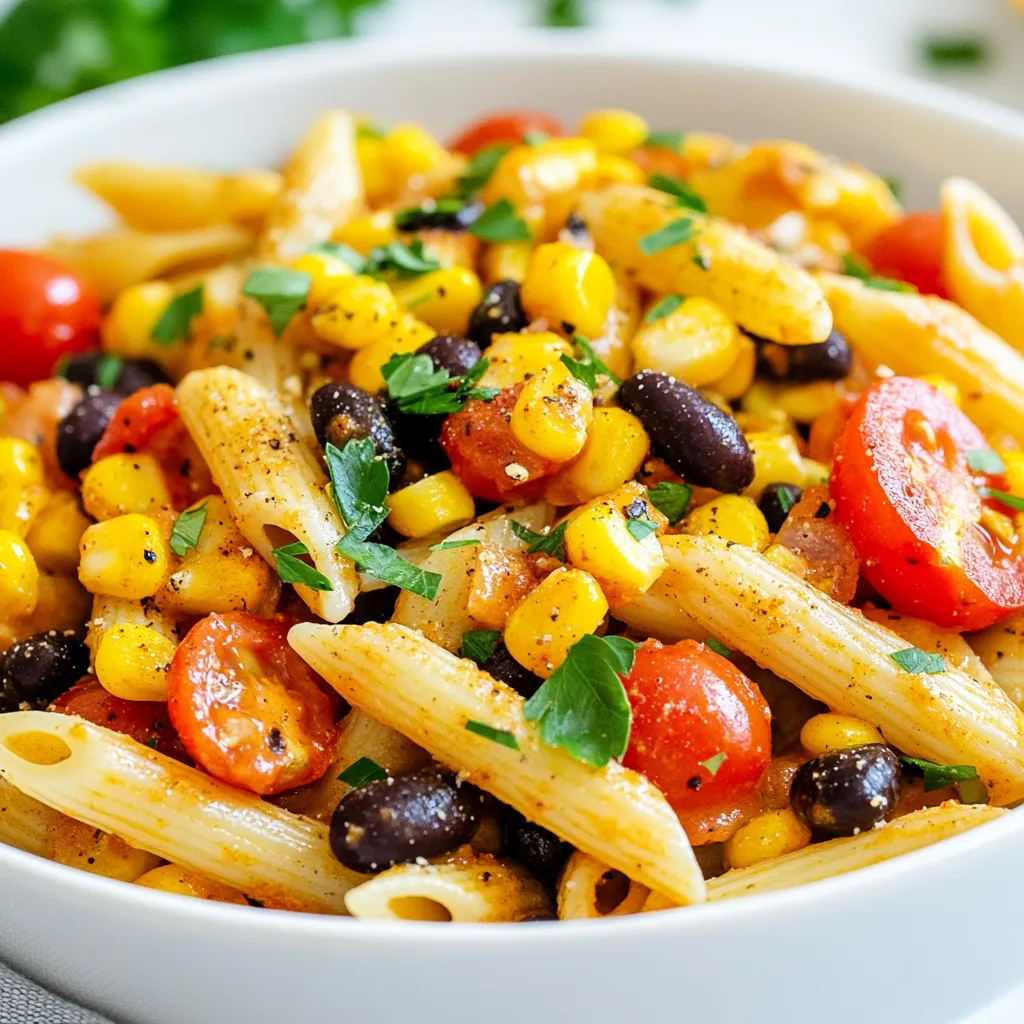
Welcome to my kitchen! Today, I’m excited to share a delightful Vegan Cajun Pasta recipe that’s packed with flavor. This

To make Caprese stuffed Portobello mushrooms, you need: - 4 large Portobello mushrooms - 1 cup cherry tomatoes, halved - 1 cup fresh mozzarella balls, halved - 1 cup fresh basil leaves, torn - 3 tablespoons balsamic glaze - 2 tablespoons olive oil - 2 cloves garlic, minced - Salt and pepper to taste These ingredients combine to create a fresh and tasty dish. The Portobello mushrooms serve as a perfect base. They are meaty and absorb flavors well. The cherry tomatoes add sweetness, while the mozzarella brings creaminess. Fresh basil gives a nice herbal note, and garlic packs a punch. For those wanting more flavor, consider adding: - Parmesan cheese, for topping Parmesan cheese adds a salty and nutty flavor that enhances the dish. You can sprinkle it on top before baking. It melts beautifully and creates a delicious crust. To prepare these stuffed mushrooms, you will need: - Baking sheet - Mixing bowl - Damp cloth (for cleaning mushrooms) - Spoon or spatula (for mixing) Using a baking sheet helps in even cooking. A mixing bowl allows you to combine the stuffing easily. A damp cloth is handy for cleaning the mushrooms without damaging them. {{ingredient_image_1}} First, preheat your oven to 375°F (190°C). This will help cook the mushrooms evenly. Next, take your large Portobello mushrooms. Clean them gently with a damp cloth. This removes dirt without damaging them. Remove the stems and scrape out the gills if you want more room for stuffing. This step is optional, but it helps make space for the filling. Now, grab a mixing bowl. Combine 1 cup of halved cherry tomatoes, 1 cup of halved fresh mozzarella balls, and 1 cup of torn fresh basil leaves. Add 2 cloves of minced garlic and 3 tablespoons of balsamic glaze to the mix. Toss everything gently. You want all the flavors to coat each ingredient evenly. This mixture gives your stuffed mushrooms that classic Caprese taste. Drizzle 2 tablespoons of olive oil over the Portobello caps. Season them with salt and pepper to taste. Place the mushrooms on a baking sheet, gill side up. Next, fill each mushroom cap generously with your tomato and mozzarella mixture. If you like, sprinkle some grated Parmesan cheese on top for extra flavor. Bake them in the preheated oven for 20-25 minutes. The mushrooms will be tender, and the cheese should be melted and bubbly. Once done, let them cool slightly before serving. When picking Portobello mushrooms, look for caps that are firm and smooth. They should be dark brown, not bruised or slimy. Check the gills underneath the cap; they should be clean and dry. Fresh mushrooms smell earthy and pleasant. If they seem too wet or have a strong odor, avoid them. Remember, fresh mushrooms make your dish taste better. Seasoning is key to tasty mushrooms. Start by drizzling olive oil on the caps, then sprinkle salt and pepper. This simple step boosts the mushrooms’ natural flavor. When mixing your stuffing, add minced garlic and balsamic glaze. These ingredients bring bright, bold flavors to the dish. You can also try adding dried herbs like oregano or thyme for extra depth. Taste as you go to find the right balance. Baking the mushrooms properly ensures they turn out great. Preheat your oven to 375°F (190°C) before you begin. This helps the mushrooms cook evenly. Place them gill side up on a baking sheet. This way, the stuffing stays in and doesn’t spill out. Bake for 20 to 25 minutes, or until the mushrooms are tender and the cheese is bubbly. Let them cool a little before serving. This makes for a better taste and easier handling. Pro Tips Use Fresh Ingredients: For the best flavor, use fresh mozzarella, ripe cherry tomatoes, and vibrant basil. Fresh ingredients elevate the dish significantly. Experiment with Cheese: While mozzarella is classic, try different cheeses like goat cheese or feta for a unique twist on the flavor profile. Don't Skip the Gills: Scraping out the gills of the Portobello mushrooms can create more space for stuffing and result in a less earthy flavor. Serve Immediately: These stuffed mushrooms are best enjoyed right out of the oven when they are warm and the cheese is gooey. Serve them fresh for maximum taste. {{image_2}} You can easily switch up the cheese in this dish. Try using goat cheese for a tangy taste. Feta cheese also works well and adds a salty kick. If you love cheese, mix in some sharp cheddar or creamy ricotta. Each cheese brings its own flavor, making the dish special every time. Feel free to add more veggies to the stuffing. Spinach or arugula can add a fresh crunch. You might also like to toss in diced bell peppers for a pop of color. Zucchini or eggplant can be great choices too. Adding these veggies will boost the nutrition and flavor. To make this dish gluten-free, simply ensure all ingredients are gluten-free. Use gluten-free balsamic glaze and check for cheese options. For a vegan version, swap fresh mozzarella for vegan cheese. You can also skip cheese altogether and use extra veggies instead. These options keep the dish tasty and safe for everyone. After enjoying your Caprese stuffed Portobello mushrooms, let them cool. Place leftovers in an airtight container. They will stay fresh in the fridge for up to three days. Make sure to store them without extra sauce to avoid sogginess. Reheating is easy. Preheat your oven to 350°F (175°C). Place the mushrooms on a baking sheet. Heat for about 10-15 minutes until warm. You can also microwave them for about 1-2 minutes. However, the oven keeps them crispy. You can freeze these mushrooms, but it’s best to do it before baking. Wrap each stuffed mushroom tightly in plastic wrap, then place them in a freezer-safe bag. They can stay in the freezer for up to three months. When ready to eat, bake them straight from the freezer. Just add a few extra minutes to the cooking time. Yes, you can prepare these mushrooms ahead of time. Stuff the Portobello caps with the filling. Then, cover them and store in the fridge for up to a day. When ready to bake, just add a few extra minutes to the cooking time. This makes it easy to enjoy a fresh meal without much fuss. You will know the mushrooms are done when they are tender. The cheese should be melted and bubbly. A golden color on the cheese tops shows they are ready to eat. If you poke a fork in the mushroom, it should feel soft. These stuffed mushrooms go great with a fresh salad. A simple green salad with a lemon vinaigrette works well. You can also serve them with garlic bread for a nice crunch. Roasted vegetables bring a colorful touch to your plate, too. Enjoy your meal! In this article, we covered how to make Caprese stuffed Portobello mushrooms. We discussed ingredients, step-by-step instructions, and tips to ensure the best flavor. You learned about variations to suit your taste and how to store leftovers properly. Remember, these mushrooms can be fun and easy to make. Experiment with different flavors and enjoy a tasty dish any night. Now, go ahead and impress your friends and family with this recipe!

Caprese Stuffed Portobello Mushrooms Tasty Recipe

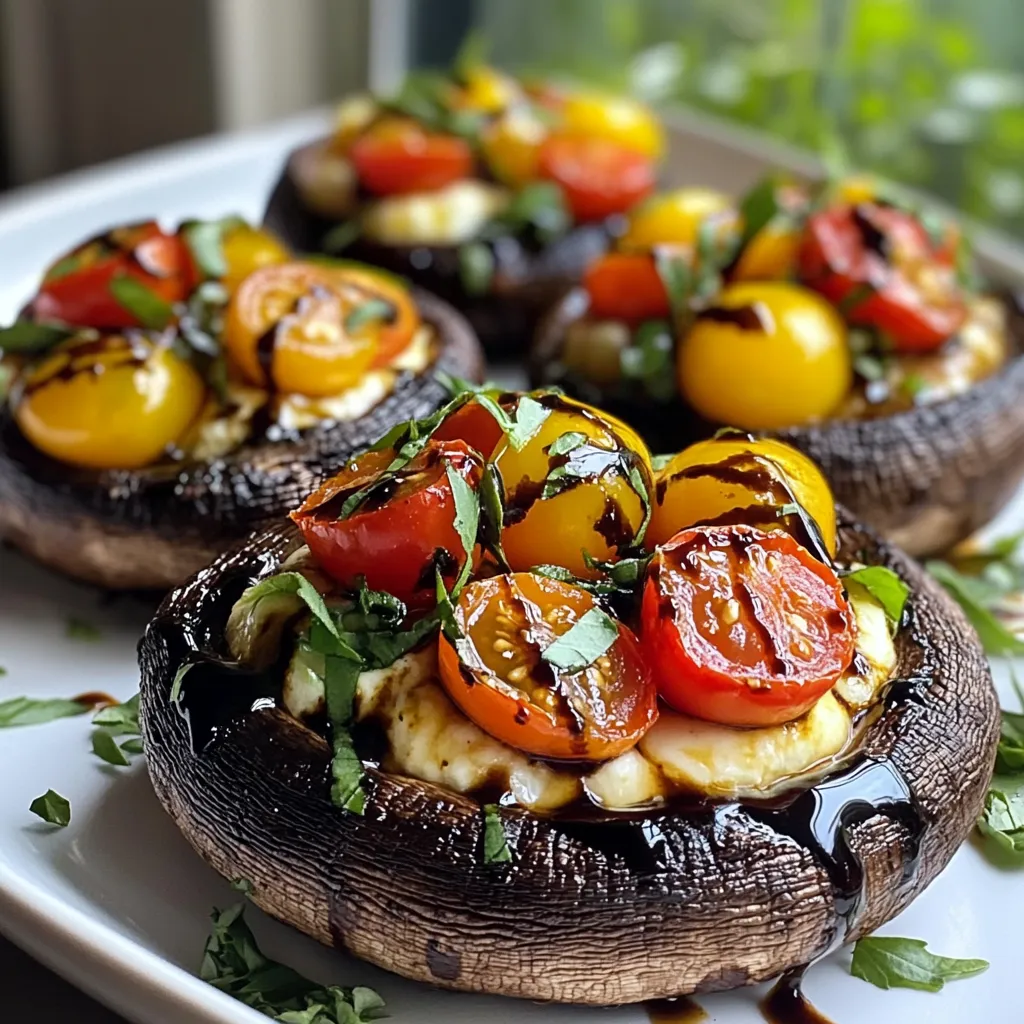
If you’re searching for a delicious and easy meal, look no further! My Caprese Stuffed Portobello Mushrooms will impress your

- 4 chicken thighs (boneless, skinless) - 1/4 cup honey - 3 tablespoons soy sauce (low sodium) - 4 garlic cloves, minced - 1 tablespoon fresh ginger, grated - 1 tablespoon sesame oil - 1 tablespoon rice vinegar - 1/2 teaspoon black pepper The main stars of this dish are the chicken thighs. They stay juicy and tender. Honey gives a sweet touch, while soy sauce adds saltiness. Garlic and ginger bring warmth and depth to the flavor. Together, they create a tasty blend that coats the chicken perfectly. - 1/4 teaspoon red pepper flakes (optional, for heat) - 2 green onions, sliced (for garnish) - Sesame seeds (for garnish) For those who like a bit of spice, red pepper flakes can add heat. Green onions add a fresh crunch. Sesame seeds give a nice look and nutty flavor. These ingredients let you customize your dish to suit your taste. {{ingredient_image_1}} To make the marinade, start by mixing the sauce ingredients. In a medium bowl, whisk together: - 1/4 cup honey - 3 tablespoons low sodium soy sauce - 4 minced garlic cloves - 1 tablespoon grated fresh ginger - 1 tablespoon sesame oil - 1 tablespoon rice vinegar - 1/2 teaspoon black pepper - 1/4 teaspoon red pepper flakes (if you like heat) This mix creates a sweet and savory sauce that brings out the best in chicken. Marinating the chicken is key. I recommend letting it sit for at least 30 minutes. For even more flavor, try marinating for up to 4 hours. The longer it sits, the better it tastes! Next, preheat your oven to 400°F (200°C). Lay the marinated chicken thighs in a baking dish. Bake for about 25 to 30 minutes. Check the internal temperature. It should reach 165°F (74°C). This ensures the chicken is safe to eat and stays juicy. While the chicken bakes, take the leftover marinade and pour it into a small saucepan. Bring it to a boil over medium heat. Then, reduce the heat and let it simmer for about 5 to 10 minutes. This thickens the sauce and intensifies the flavor. Once the chicken is done, brush this thickened marinade on top. For a beautiful finish, garnish with sliced green onions and sesame seeds. This adds color and crunch to your dish! How long should you marinate chicken for the best flavor? I suggest marinating the chicken for at least 30 minutes. This time allows the flavors to soak in. For even more taste, try to marinate for up to 4 hours. The longer you marinate, the more robust the flavors become. To ensure an even coating, I recommend using a resealable plastic bag. This method helps the marinade cover every inch of the chicken. If you use a dish, turn the chicken halfway through marinating. This way, all sides get the yummy sauce. What are some alternative cooking methods for honey garlic chicken? You can grill or pan-fry the chicken if you want a different taste. Grilling gives a smoky flavor, while pan-frying can add a nice crisp. To avoid drying out the chicken, keep an eye on the cooking time. Bake it at 400°F (200°C) for about 25-30 minutes. Use a meat thermometer to check for doneness. The chicken should reach 165°F (74°C) inside. What side dishes pair well with honey garlic chicken? I love serving it with steamed rice or sautéed veggies. Both options balance the sweet and savory flavors. You can also try a simple salad for a fresh touch. For presentation, slice the chicken after resting and arrange it on a plate. Drizzle the thickened marinade over the top. Garnish with sliced green onions and sesame seeds for a colorful finish. This makes your meal look as good as it tastes! Pro Tips Marinate Longer for Depth: For enhanced flavor, marinate the chicken thighs for up to 4 hours. This allows the flavors to penetrate deeply. Use Fresh Ingredients: Always opt for fresh garlic and ginger to maximize flavor. They provide a more vibrant taste compared to dried alternatives. Monitor Oven Temperature: Oven temperatures can vary, so use a meat thermometer to ensure the chicken reaches 165°F (74°C) for safe consumption. Garnish Before Serving: Add green onions and sesame seeds just before serving to maintain their freshness and crunch, enhancing the presentation. {{image_2}} You can make some easy swaps to make Honey Garlic Chicken lighter. First, try using agave syrup instead of honey. Agave syrup has a lower glycemic index and a milder taste. It still gives you that sweet flavor. Another swap is using chicken breasts instead of thighs. Breasts have less fat and are leaner, so they can be a healthier choice. Just keep in mind that they may dry out faster, so watch the cooking time. You can easily change the heat and flavor of this dish. Add spices like cayenne pepper or chili powder for an extra kick. If you like it mild, skip the heat. You can also mix in vegetables for a colorful and tasty meal. Try bell peppers, broccoli, or snap peas. Just toss them in with the chicken during the last 10 minutes of baking. They will add flavor and nutrients. Want to give your Honey Garlic Chicken a global flair? Try an Asian-inspired twist. Add sesame seeds and serve it over rice or noodles. You can also make a fusion dish by using tacos or wraps. Just put the chicken in a tortilla and top with fresh veggies. This gives you a fun and tasty way to enjoy the flavors. There are endless options to explore! To keep your honey garlic chicken fresh, refrigerate it right after serving. Place the chicken in an airtight container. This helps maintain its flavor and texture. You can also use a resealable plastic bag. Make sure to remove as much air as possible before sealing. Leftovers will stay good for about three to four days in the fridge. When it’s time to enjoy your leftovers, you have two main options: the microwave or the oven. For the microwave, place the chicken on a plate and cover it with a damp paper towel. This keeps moisture in while reheating. Heat in short bursts, around 30 seconds at a time, until warmed through. If you prefer the oven, preheat it to 350°F (175°C). Place the chicken in a baking dish and cover it with foil. This helps keep the chicken juicy as it warms. Bake for about 15 to 20 minutes or until it’s hot all the way through. You can freeze honey garlic chicken, both raw and cooked. For raw chicken, place it in a freezer bag. Make sure to remove all air and label the bag with the date. It can last up to six months in the freezer. For cooked chicken, allow it to cool completely before freezing. When you’re ready to use it, thaw raw chicken in the fridge overnight. Cooked chicken can be reheated from frozen. Just add a few extra minutes to your heating time. Always ensure chicken reaches an internal temperature of 165°F (74°C) before eating. You can pair Honey Garlic Chicken with many tasty sides. Here are some great options: - Steamed rice - Roasted vegetables - Mashed potatoes - Green salad - Stir-fried noodles These sides add color and flavor to your meal. They also help balance the sweetness of the chicken. Yes, you can make this dish ahead of time. Here are some tips for meal prep: - Marinate the chicken for up to four hours. - Bake the chicken and let it cool. - Store it in an airtight container in the fridge for up to three days. To reheat, simply warm it in the oven or microwave. Adding a splash of water keeps the chicken moist. To keep your chicken tender, follow these tips: - Use boneless, skinless chicken thighs for juiciness. - Marinate the chicken for at least 30 minutes. - Bake at 400°F (200°C) until the internal temperature reaches 165°F (74°C). These steps help keep the chicken moist and flavorful. If you want to change the sweetness, try these ideas: - Add more soy sauce for a savory taste. - Use less honey if you prefer a less sweet sauce. - Mix in a splash of rice vinegar to balance the flavors. Adjusting these ingredients can create the perfect flavor for your taste. Honey garlic chicken is a simple and tasty dish. We covered main ingredients like chicken thighs, honey, garlic, and soy sauce. Marinating adds great flavor. We discussed cooking techniques to keep the chicken moist. You can also customize with optional ingredients and variations for your taste. Remember, proper cooking and storage will improve your meals. Enjoy this versatile dish that fits many occasions!

Honey Garlic Chicken Flavorful and Easy Weeknight Meal

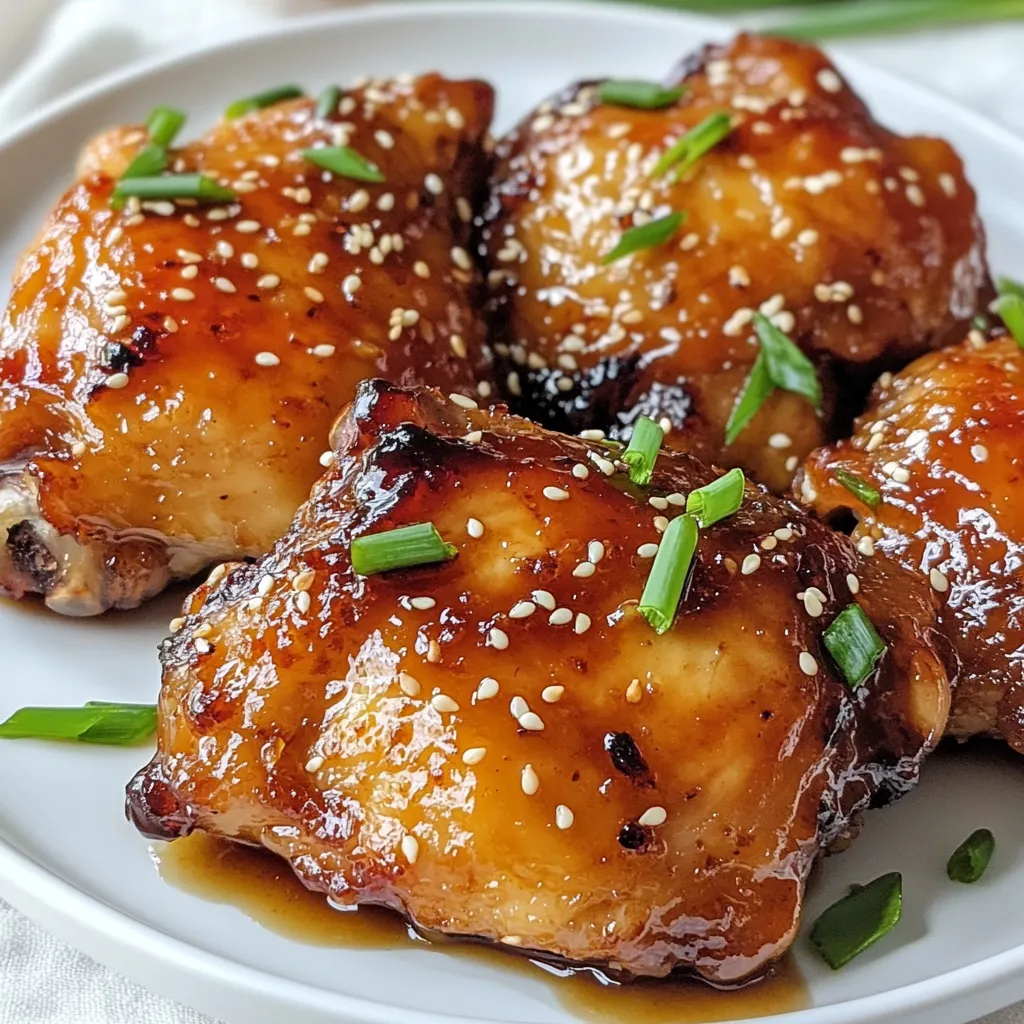
Delicious meals don’t have to take hours. My Honey Garlic Chicken is packed with flavor and super easy to make.

- 8 oz fettuccine pasta - 2 boneless, skinless chicken breasts, sliced into strips - 2 tablespoons olive oil - 3 cloves garlic, minced - 1 cup heavy cream - 1 cup grated Parmesan cheese - 1 cup baby spinach - 1 teaspoon Italian seasoning - Salt and pepper to taste - Fresh parsley, chopped (for garnish) For this recipe, use precise measurements for the best results. The pasta should be 8 ounces, which is about half a package. The chicken breasts should be about 1 pound total. I prefer using fresh garlic, but you can use pre-minced garlic too. The heavy cream adds richness, while the Parmesan cheese gives it that classic flavor. You might want to swap items based on what you have. Here are some swaps: - Use penne or spaghetti if you don’t have fettuccine. - Chicken thighs work well instead of breasts. - For a lighter sauce, try half-and-half instead of heavy cream. - You can use any cheese that melts well, like mozzarella or cheddar. - Spinach can be replaced with kale or arugula for a different taste. These substitutions keep the dish tasty and fun! {{ingredient_image_1}} First, fill a large pot with water. Add a pinch of salt and bring it to a boil. Once boiling, add 8 oz of fettuccine pasta. Cook it according to the package instructions, usually about 8-10 minutes. Stir the pasta occasionally to prevent sticking. When done, drain the pasta in a colander. Make sure to save 1/2 cup of the pasta water for later. Set the drained pasta aside. In a large skillet, pour in 2 tablespoons of olive oil. Heat it over medium heat until hot. While the oil heats, slice 2 boneless, skinless chicken breasts into strips. Once the oil is hot, add the chicken to the skillet. Season the chicken with salt, pepper, and 1 teaspoon of Italian seasoning. Cook the chicken for about 5-7 minutes. Stir it often until it turns golden brown and is fully cooked. Remove the chicken from the skillet and set it aside on a plate. In the same skillet, add 3 minced garlic cloves. Sauté the garlic for about 30 seconds until it smells great. Next, pour in 1 cup of heavy cream. Bring it to a gentle simmer while stirring regularly. Once simmering, reduce the heat to low. Gradually add 1 cup of grated Parmesan cheese. Whisk it until melted and smooth. Now, stir in 1 cup of baby spinach. Let it cook until the spinach wilts down. If the sauce is too thick, add a bit of the reserved pasta water. It helps reach the perfect creamy consistency. Finally, add the cooked chicken and fettuccine to the skillet. Toss everything together to coat in the sauce. Adjust salt and pepper to taste. Let it sit for a minute before serving. To make a smooth cream sauce, use low heat. High heat can cause it to separate. Start with heavy cream. Whisk in the Parmesan cheese slowly. Stir constantly until it melts. This keeps the sauce creamy. If it gets too thick, add some reserved pasta water. This helps to reach the right consistency. The sauce should cling to the pasta, not drip off. Cook the chicken in olive oil for great flavor. Slice the chicken into strips for even cooking. Season it well with salt, pepper, and Italian seasoning. This adds depth to the dish. Cook it until golden brown, about 5-7 minutes. Make sure it is fully cooked. Use a meat thermometer if needed. It should reach 165°F (75°C). This ensures safety and taste. Presentation is key to a great meal. Use a large plate to serve the pasta. This allows the food to shine. Garnish with fresh parsley for color. A sprinkle of extra Parmesan adds a nice touch. For flair, place a few spinach leaves on top. This makes the dish look fresh and inviting. A well-presented dish can enhance the dining experience. Pro Tips Perfectly Cooked Pasta: To ensure your fettuccine is perfectly al dente, cook it just until it's slightly firm to the bite. Remember, it will continue to cook slightly when mixed with the sauce. Seasoning the Chicken: For maximum flavor, let the chicken marinate in olive oil, salt, pepper, and Italian seasoning for 15-30 minutes before cooking. This will enhance its taste and tenderness. Cheese Quality Matters: Use freshly grated Parmesan cheese instead of pre-grated for a creamier sauce. Freshly grated cheese melts better and adds more flavor. Vegetable Variations: Feel free to add other vegetables like sun-dried tomatoes or mushrooms for extra texture and flavor. Just sauté them along with the garlic for the best results. {{image_2}} You can make Parmesan chicken pasta even better by adding vegetables. Veggies boost the flavor and nutrients. Some great options include: - Broccoli: Add it with the pasta in the last few minutes of cooking. - Peas: Stir them into the sauce for a sweet pop. - Bell Peppers: Sauté them with the chicken for extra color. - Zucchini: Slice it thin and add it to the sauce as it cooks. Adding veggies makes the dish colorful and tasty. Feel free to mix and match your favorites! You don’t have to stick to fettuccine. Many pasta types work well in this dish. Here are some alternatives: - Penne: Its shape holds the sauce nicely. - Bowties: They add a fun twist to your plate. - Spaghetti: A classic choice that pairs well with creamy sauce. - Whole Wheat Pasta: This option adds fiber and a nutty taste. Experimenting with different pasta shapes keeps the meal exciting every time! If you want to switch the protein, there are delicious choices. Try these: - Shrimp: Cook them quickly for a seafood twist. - Tofu: A great plant-based option for a hearty meal. - Turkey: Use ground turkey for a leaner choice. - Sausage: Italian sausage adds a spicy kick to the dish. These options let you customize the recipe to fit your taste and dietary needs. Enjoy exploring! After you enjoy your Parmesan chicken pasta, store leftovers in an airtight container. Let the pasta cool before sealing it. This helps keep it fresh. Place it in the fridge for up to three days. The cream sauce may thicken, but it still tastes great. When you are ready to eat the leftovers, reheat them gently. You can use a microwave or a skillet. If using a microwave, cover the dish with a lid. Heat it in short bursts, stirring in between. This keeps the pasta moist. If using a skillet, add a splash of water to help loosen the sauce. Heat on low until warm. You can freeze Parmesan chicken pasta for up to three months. However, the cream sauce may change texture when thawed. To freeze, place the cooled pasta in a freezer-safe container. Label it with the date. When ready to eat, thaw it overnight in the fridge. Then, reheat using the tips above. Enjoy your meal! To make Parmesan Chicken Pasta gluten-free, choose gluten-free fettuccine. Many options are made from rice or corn. Follow the same cooking steps as regular pasta. Check the package for cooking times. You can also use gluten-free flour to thicken your sauce if needed. Yes, you can use low-fat ingredients. Try low-fat cream or milk instead of heavy cream. This change will make the dish lighter. You can also use reduced-fat Parmesan cheese. Keep in mind that the sauce may be less creamy but still tasty. Several sides work great with Parmesan Chicken Pasta. Here are some of my favorites: - Garlic bread - A crisp green salad - Roasted vegetables - Steamed broccoli - Sautéed zucchini These sides add color and flavor to your meal. You learned about key ingredients for the creamy Parmesan chicken pasta. I shared step-by-step cooking tips to ensure success. You also explored ways to customize the dish with variations, plus important storage info. Remember, cooking is about experimenting and having fun. Keep these tips handy as you create your own delicious meals. Enjoy every bite, and don't hesitate to tweak the recipe to fit your taste!

Parmesan Chicken Pasta Quick and Tasty Recipe

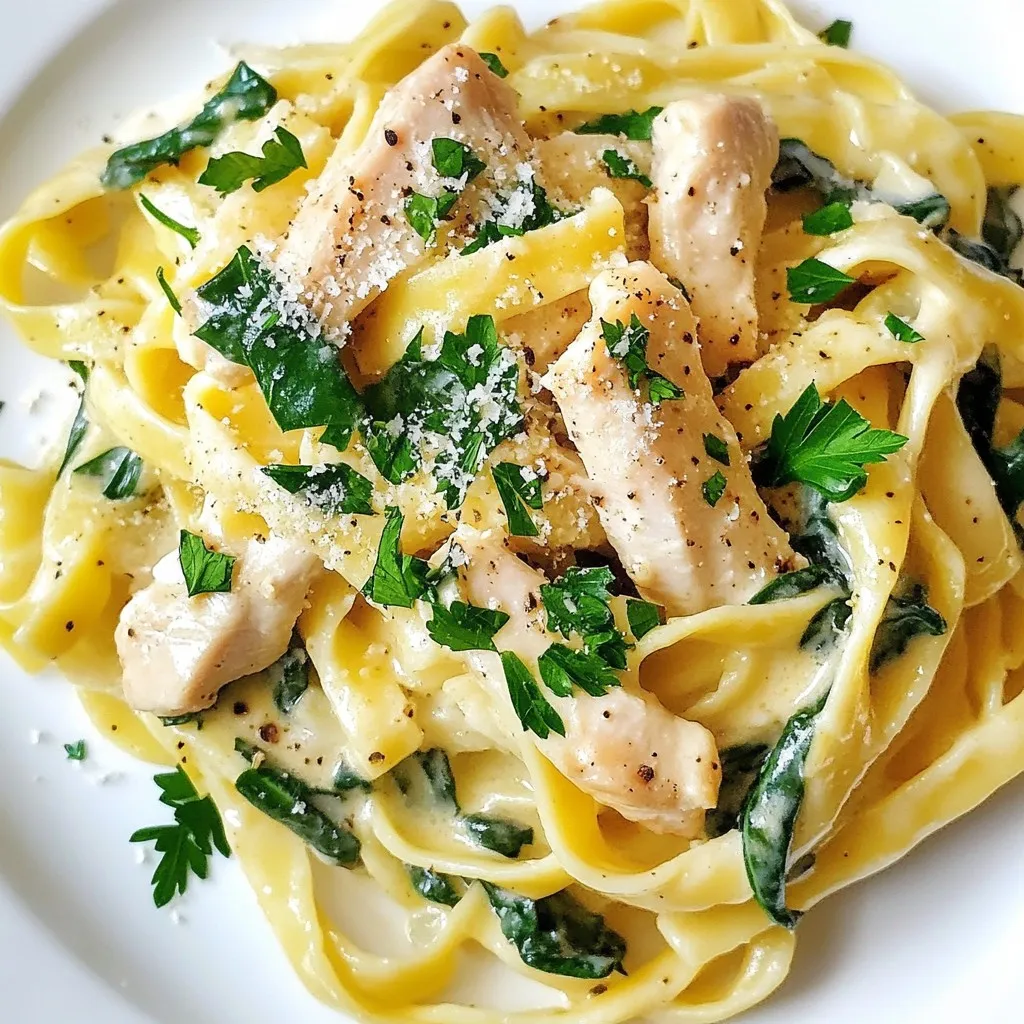
Are you ready to whip up a delicious meal in no time? My Parmesan Chicken Pasta recipe is quick, tasty,

Older posts
Newer posts
← Previous Page1 … Page135 Page136 Page137 … Page143 Next →

dsad

© 2025 Southern Dishes • Built with GeneratePress

Our Policies

  • Copyright Policy
  • Cookie Policy
  • GDPR Policy
  • Privacy Policy
  • Disclaimer
  • Terms Of Use

More Information

  • Home
  • About
  • Contact
  • Appetizers
  • Dessert
  • Dinner
  • Drinks
©2025, Southern Dishes About Back To Top