Skip to content
DisclaimerTerms Of UseGDPR PolicyCookie Policy

Southern Dishes

  • Home
  • Drinks
  • Appetizers
  • Dinner
  • Dessert
  • About
  • Contact
  • Privacy Policy
DisclaimerTerms Of UseGDPR PolicyCookie Policy

Isabella

- 1 lb beef sirloin, thinly sliced - 1 cup jasmine rice - 2 cups beef broth - 1 red bell pepper, sliced - 1 yellow bell pepper, sliced - 1 green bell pepper, sliced - 2 tablespoons soy sauce - 1 tablespoon sesame oil - 1 tablespoon olive oil - 3 cloves garlic, minced - 1 inch fresh ginger, grated - Salt and pepper to taste - 2 green onions, chopped (for garnish) - Sesame seeds (for garnish) These ingredients come together to create a tasty beef and pepper rice bowl. The beef provides rich flavor. The colorful peppers add crunch and sweetness. Jasmine rice serves as a perfect base. - Chopped cilantro - Sliced jalapeños - Lime wedges - Crushed red pepper flakes These garnishes can add freshness and spice. They let you customize each bowl to your taste. - Beef sirloin: Use flank steak or chicken for a lighter option. - Jasmine rice: Brown rice or basmati rice works well too. - Beef broth: Chicken or vegetable broth can be used. - Soy sauce: Tamari or coconut aminos are great gluten-free options. Feel free to swap ingredients based on what you have. This dish remains delicious with different flavors! {{ingredient_image_1}} Start by rinsing the jasmine rice. Place it in a strainer and run cold water over it. Keep rinsing until the water runs clear. This step helps remove excess starch. Next, in a medium saucepan, combine the rinsed rice and 2 cups of beef broth. Bring the mixture to a boil over high heat. Once boiling, cover the pot and lower the heat. Let it simmer for about 15 minutes. The rice should absorb all the liquid. After 15 minutes, turn off the heat and fluff the rice with a fork. Set it aside. While the rice cooks, prepare the beef. Use 1 pound of beef sirloin and slice it thinly. This helps it cook faster and evenly. Heat a large skillet or wok over medium-high heat. Once hot, add 1 tablespoon of olive oil. Allow the oil to heat up. Then, add the sliced beef to the pan in a single layer. Lightly season it with salt and pepper. Let it cook for 3-4 minutes without stirring. This gives the beef a nice sear. After that, stir in 3 minced cloves of garlic and 1 inch of grated ginger. Sauté for another minute until you can smell the aroma. Now, add the sliced peppers to the skillet. Use 1 red, 1 yellow, and 1 green bell pepper, all sliced. Stir the peppers into the beef. Cook for 5-7 minutes, just until the peppers soften but remain crunchy. Next, drizzle 2 tablespoons of soy sauce and 1 tablespoon of sesame oil over the beef and peppers. Toss everything together well. Heat through for an additional 2 minutes. Finally, serve this beef and pepper mix over the fluffy jasmine rice. Enjoy the colorful and tasty meal! To get that perfect sear on your beef, start with a hot skillet. Use medium-high heat and add olive oil. Make sure the beef slices lay flat in a single layer. This way, they will cook evenly. Avoid stirring for the first few minutes. Let them sit to develop a nice crust. After about 3-4 minutes, flip them to sear the other side. This method locks in the juices and enhances flavor. Marinades can make your beef even tastier. I suggest a simple mix of soy sauce, sesame oil, and minced garlic. You can add grated ginger for extra zing. Let the beef soak in the marinade for at least 30 minutes. This step boosts flavor and tenderizes the meat. Just remember to pat the beef dry before cooking. A dry surface helps achieve a better sear. When cooking peppers, timing is key. Start with the red, yellow, and green bell peppers after the beef is nearly done. Cook them for about 5-7 minutes. This keeps them soft yet crunchy. If you like them softer, you can cook them a bit longer. Keep an eye on the color; bright peppers taste fresh and look beautiful in your bowl. Pro Tips Slice Against the Grain: This ensures your beef is tender and easy to chew, enhancing the overall texture of your dish. Prep Ingredients Ahead: Have all your ingredients sliced and measured before you start cooking. This makes the cooking process smoother and quicker. Control the Heat: Adjust the heat as necessary while cooking to prevent burning, especially when searing the beef and sautéing the garlic. Customize Your Veggies: Feel free to substitute or add other vegetables like broccoli or snap peas for added nutrition and color. {{image_2}} You can use many cuts of beef for this dish. Sirloin is great, but flank steak works well too. Flank steak has a nice beefy flavor. You can also try ribeye for a richer taste. Cut the beef thinly for the best results. This way, it cooks fast and stays tender. Want a meat-free option? Use tofu or tempeh instead. Firm tofu absorbs flavors well, making it a great choice. Cut it into cubes and sauté it just like you would the beef. Another option is using jackfruit. It has a unique texture and can soak up the flavors of the sauce. Add your favorite veggies to make it colorful and tasty. Do you like it hot? Add chili flakes or fresh chili to the mix. If you prefer a milder dish, skip the heat. You can also use sweet bell peppers for a different flavor. Want a smoky taste? Try adding smoked paprika. Adjust the spices to suit your taste buds and enjoy a customized meal! To keep your Beef and Pepper Rice Bowl fresh, place leftovers in an airtight container. Make sure to cool the dish before sealing it. This helps prevent sogginess. Store it in the fridge. It will last for 3 to 4 days. If you want to enjoy it later, freezing is a good option. When you're ready to eat, you can reheat the leftovers easily. Put the rice and beef mixture in a microwave-safe bowl. Cover the bowl with a damp paper towel. This keeps moisture in and prevents drying out. Heat on medium power for 2-3 minutes. Stir halfway through for even heating. If you prefer, you can also reheat on the stove. Just add a splash of beef broth to keep it moist. Heat over low until warm. If you have extra Beef and Pepper Rice Bowl, freezing it is simple. First, let the dish cool completely. Then, scoop the mixture into freezer-safe bags or containers. Remove as much air as you can. Label the bags with the date. You can freeze it for up to 3 months. When you want to eat it, thaw the bowl in the fridge overnight. Reheat as described earlier, and enjoy! Yes, you can use brown rice. Brown rice adds a nuttier taste. It also has more fiber. Cooking time will be longer. Use about 40 minutes instead of 15. Add extra water as needed. You can serve many sides with this bowl. A fresh salad adds crunch. Steamed broccoli gives a nice color. You might like pickled vegetables for a tangy touch. A warm tortilla can be a tasty addition. To make it spicy, add chili flakes. You can also use fresh jalapeños or sriracha sauce. Mixing in a spicy sauce at the end gives heat. Adjust the spice to your taste. Enjoy your fiery creation! This blog post covered all the key steps to making a beef and pepper rice bowl. We discussed the best ingredients and helpful tips for cooking. You learned about substitutes, cooking times, and fun flavor variations. Finally, we shared smart storage and reheating tips. In summary, this dish is tasty and easy to make. You can customize it to your liking and keep it fresh for later. Enjoy your cooking journey!

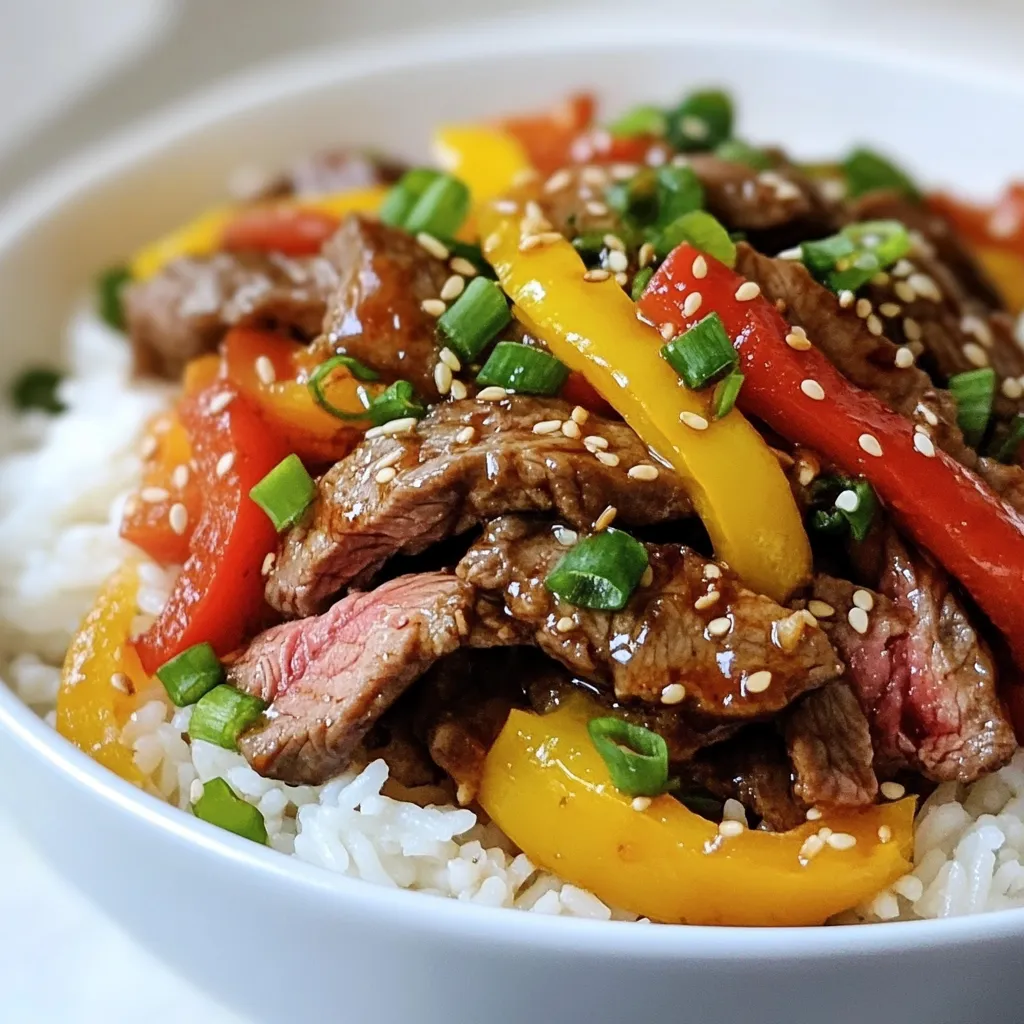
Beef and Pepper Rice Bowl Hearty and Flavorful Meal

When hunger strikes, you’ll want a meal that’s both hearty and full of flavor. The Beef and Pepper Rice Bowl

- 1 cup green or brown lentils, rinsed - 1 medium onion, diced - 2 garlic cloves, minced - 2 carrots, diced - 1 celery stalk, diced - 1 red bell pepper, diced - 1 can (14 oz) diced tomatoes - 4 cups vegetable broth - 1 teaspoon ground cumin - 1 teaspoon smoked paprika - 1 teaspoon dried oregano - Salt and pepper to taste - 2 tablespoons olive oil - Juice of 1 lemon - Fresh parsley, chopped (for garnish) This soup is rich in flavor and nutrients. The lentils add protein and fiber. The onions and garlic build a strong base. Carrots, celery, and bell pepper add sweetness and crunch. The diced tomatoes bring acidity and depth. A mix of cumin, paprika, and oregano gives warmth and earthiness. Olive oil adds richness, while lemon juice brightens the dish. Don't forget fresh parsley for a touch of color and freshness! Gather these ingredients, and you're ready to create a comforting bowl of Vegan Mediterranean Lentil Soup. Enjoy the vibrant flavors as they blend together in the pot. {{ingredient_image_1}} To start, heat 2 tablespoons of olive oil in a large pot over medium heat. Add 1 diced onion and sauté until it becomes translucent, about 5 minutes. This step builds a great flavor base. Next, stir in 2 minced garlic cloves, 2 diced carrots, 1 diced celery stalk, and 1 diced red bell pepper. Cook these veggies for another 5 to 7 minutes. You want them slightly soft. Now it's time to add the heart of the soup. Pour in 1 cup of rinsed green or brown lentils along with 1 can of diced tomatoes and 4 cups of vegetable broth. Sprinkle in 1 teaspoon each of ground cumin, smoked paprika, and dried oregano. Stir everything well to combine. Bring this mixture to a boil. Once it boils, reduce the heat to low, cover the pot, and let it simmer. You want to cook it for about 30 to 35 minutes until the lentils are tender. After simmering, you can blend the soup for a creamier texture. Use an immersion blender to achieve this. If you don’t have one, blend a portion in a regular blender and return it to the pot. Lastly, season your soup with salt, pepper, and the juice of 1 lemon. Stir well and heat through for another 5 minutes. Your Vegan Mediterranean Lentil Soup is ready to serve! Using fresh herbs can elevate your soup's taste. Fresh parsley adds brightness. Dried herbs are handy too. They work well and save time. Adjust the seasoning to fit your taste. Start with a pinch of salt and pepper. Remember, you can always add more later. A splash of lemon juice brightens the flavors, making it fresh and zesty. For a creamier soup, blending is key. You can use an immersion blender for ease. If you prefer, blend part of the soup in a regular blender. Return it to the pot for a chunkier texture. Cooking lentils to the right doneness is important. You want them soft but not mushy. Keep an eye on them as they simmer. This soup pairs well with crusty bread. The bread soaks up the soup's rich flavors. A fresh salad on the side adds crunch. Try a simple green salad with olive oil and vinegar. It complements the soup's warmth perfectly. Don't forget to sprinkle extra parsley on top for a pop of color! Pro Tips Soak Lentils for Better Texture: Soaking lentils for a few hours before cooking can help them cook faster and achieve a better texture. Enhance Flavor with Fresh Herbs: Adding fresh herbs like basil or thyme towards the end of cooking can enhance the flavor profile of your soup. Adjust Consistency: If the soup is too thick, add a little more vegetable broth or water to reach your desired consistency. Make it a Meal: Serve the soup over a bed of cooked quinoa or with crusty bread to make it a more filling dish. {{image_2}} You can add proteins to make your soup heartier. Tofu works well. Just cube it and add it during cooking. Chickpeas are another great choice. They add texture and flavor. You can use canned or cooked chickpeas. This will boost the protein content. Quinoa is a fantastic grain to try, too. It cooks quickly and adds a nutty taste. You can replace some lentils with quinoa. This gives a nice twist to the dish. Other grains like barley or farro also fit well. They add different textures and flavors. Spices can change your soup's flavor. Ground cumin and smoked paprika give warmth. But you can experiment! Try adding cinnamon for a sweet hint. Garlic powder or onion powder can deepen the taste. If you like heat, add chili or cayenne. Start with a small pinch and adjust. This way, you can control the spice level. You can also try fresh herbs like basil or thyme. They can brighten up the soup. Seasonal vegetables bring freshness. In winter, add root vegetables like parsnips or turnips. In summer, zucchini or bell peppers are great. They add color and nutrients. If you want to swap lentils, use other legumes. Black beans or navy beans can work well. They bring a different flavor and texture. Just remember to adjust the cooking time based on your choice. This keeps the soup delicious and exciting. To store your Vegan Mediterranean Lentil Soup, let it cool first. Pour the soup into a container. I prefer glass containers as they keep the soup fresh. Make sure the lid fits tightly. Store it in the fridge for up to five days. To freeze the soup, use a freezer-safe container. Leave some space at the top for expansion. You can also use freezer bags. Just lay them flat for easy stacking. When you are ready to eat, thaw it overnight in the fridge. Reheat on low heat to avoid burning. Stir often for even heating and add a splash of broth if it seems thick. In the fridge, the soup lasts about five days. In the freezer, it can keep for three months. Look for signs of spoilage like an off smell or mold. If you see any, toss it out. Always remember, when in doubt, throw it out! To boost the flavor, try adding fresh herbs like basil or thyme. You can also add a splash of balsamic vinegar for depth. If you like spice, a pinch of red pepper flakes brings warmth. Adjust the salt and pepper to your taste. Lastly, let the soup sit for a bit before serving. This allows the flavors to blend well. Yes, you can use different lentils! Green and brown lentils work best. They hold their shape during cooking. Red lentils cook faster and will make the soup smoother. If using red lentils, reduce the cooking time to about 20 minutes. Experiment with what you have for a unique twist. Absolutely! This soup is great for meal prep. It stores well in the fridge for up to five days. You can freeze it too. Just make sure to cool it first before freezing. When you’re ready to eat, simply thaw and reheat on the stove. This soup is naturally gluten-free! Just ensure that your vegetable broth is gluten-free as well. Most brands are safe, but it's good to check the label. You can enjoy this soup without any gluten concerns. For extra nutrition, consider adding spinach or kale. These greens are packed with vitamins. You can also stir in some cooked quinoa or chickpeas for added protein. Nuts or seeds can provide healthy fats and crunch. Each addition enhances the soup's taste and health benefits. This blog post outlines how to make a delicious Mediterranean lentil soup. You learned about the key ingredients, from lentils to spices. I shared step-by-step instructions to guide you through cooking. I also provided tips on achieving the best flavor and texture. Remember, you can customize this soup with proteins and spices. Store leftovers properly for freshness. Enjoy experimenting with different ingredients to make this recipe your own!

Vegan Mediterranean Lentil Soup Flavorful and Healthy

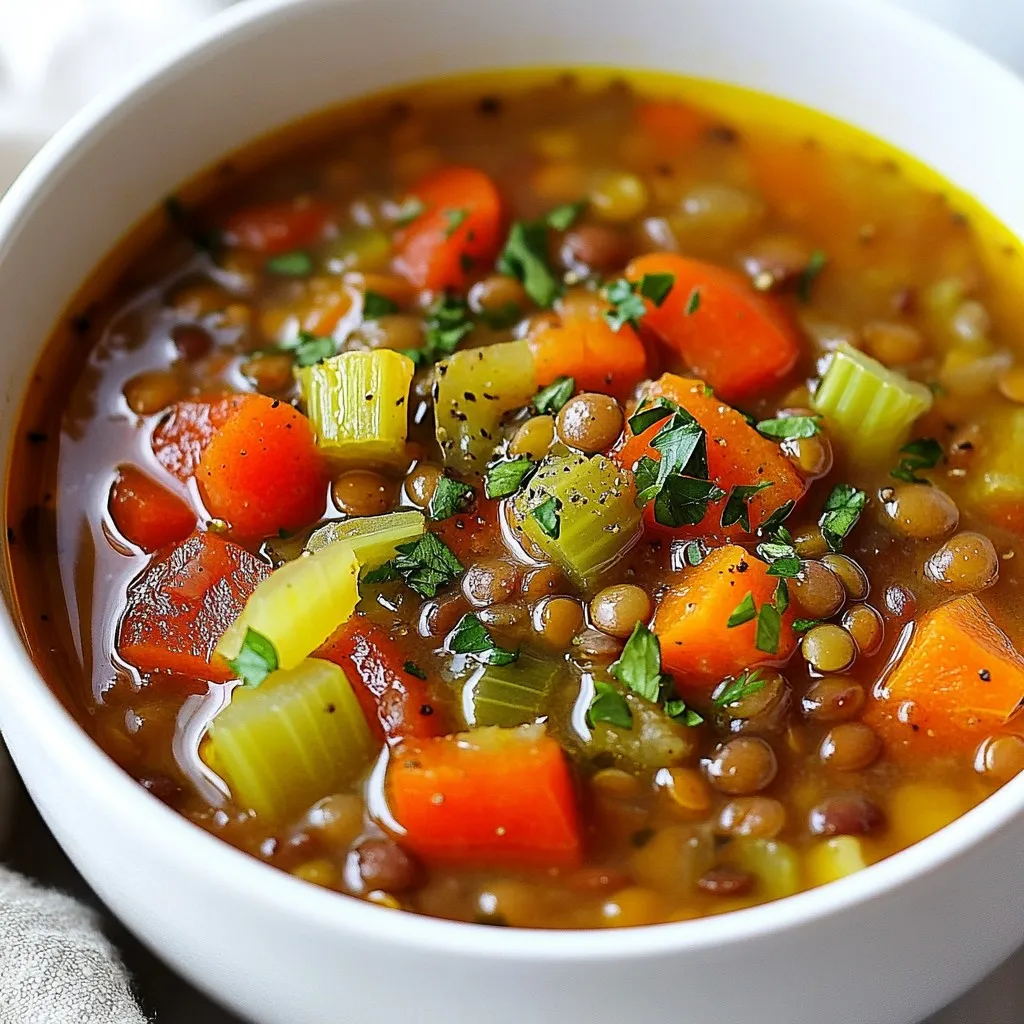
Looking for a warm and hearty dish that’s both flavorful and healthy? You’re in the right place! This Vegan Mediterranean

- 500g boneless chicken breast, thinly sliced - 200g button mushrooms, sliced - 2 tablespoons black pepper, freshly ground - 3 tablespoons soy sauce - 2 tablespoons oyster sauce - 1 tablespoon cornstarch - 2 tablespoons vegetable oil - 4 cloves garlic, minced - 1 tablespoon ginger, minced - 1 red bell pepper, sliced - 1 green bell pepper, sliced - 2 green onions, chopped - Salt to taste For this dish, chicken and mushrooms are your stars. The chicken adds protein, while mushrooms bring umami. Freshly ground black pepper gives it a nice kick. Soy sauce and oyster sauce add depth and richness. Cornstarch helps the chicken stay tender and juicy. Next, the vegetables and aromatics make this dish shine. Garlic and ginger add warmth and fragrance. The colorful bell peppers add crunch and sweetness. Green onions add a fresh touch at the end. You can also think about optional garnishes. Extra black pepper can enhance the heat. A sprinkle of green onions brightens the plate, making it look inviting. Serving this dish over rice or noodles can make it a complete meal. {{ingredient_image_1}} First, marinate the chicken. Take 500 grams of thinly sliced boneless chicken. In a medium bowl, mix it with soy sauce, oyster sauce, black pepper, and cornstarch. Let it sit for at least 20 minutes. This step helps the chicken soak up all the flavors. Using fresh ingredients is key. Fresh chicken tastes better and keeps the dish healthy. Fresh sauces also enhance the overall taste. Now, it's time to cook. Heat 2 tablespoons of vegetable oil in a large pan over medium-high heat. Add minced garlic and ginger. Stir quickly so they don’t burn. You want to smell their lovely aroma. Next, add the marinated chicken to the pan. Stir-fry it until golden brown and cooked through, about 5 to 7 minutes. Once done, remove the chicken and set it aside. In the same pan, toss in the sliced mushrooms and bell peppers. Stir-fry them for about 3 to 4 minutes. You want them to be tender but still crisp. Then, return the cooked chicken to the pan. Mix everything together and adjust the salt if needed. Cook for another 2 minutes to heat it all through. Finally, add chopped green onions and give it a quick stir. Your Black Pepper Chicken and Mushrooms is ready to serve! To bring out the best in your Black Pepper Chicken and Mushrooms, choose quality ingredients. For soy sauce, I recommend Kikkoman or Lee Kum Kee. These brands have a rich flavor that really enhances your dish. For oyster sauce, try Lee Kum Kee again; it adds a nice depth. Adjusting the spice level is easy with black pepper. Start with two tablespoons, but feel free to add more if you love heat. Black pepper not only gives flavor but also adds a bit of warmth. Remember, you can always add more, but you can't take it away! Stir-frying is key for tender chicken. Ensure your pan is hot before adding the chicken. This helps seal in the juices. Slice your chicken thinly for quick cooking. It should only take 5 to 7 minutes to cook through. Keep your vegetables crunchy by not overcooking them. When you add mushrooms and bell peppers, stir-fry them for just 3 to 4 minutes. You want them tender but still crisp. This adds great texture to your dish. Enjoy experimenting with these tips to get the best results! Pro Tips Marinating Time: Allow the chicken to marinate for at least 20 minutes, or even up to an hour for a deeper flavor infusion. Cooking Temperature: Make sure your pan is hot before adding the chicken to achieve a nice sear and prevent sticking. Vegetable Crunch: Stir-fry the vegetables just until tender; they should remain crisp for the best texture and taste. Serving Suggestion: Serve this dish over steamed rice or noodles and garnish with extra black pepper and green onions for added flavor and appeal. {{image_2}} If you want to switch things up, you can change the chicken and mushrooms. For chicken, you could use turkey or pork. They both work well with the same flavor. If you want a meat-free option, try tofu or tempeh. These are great plant-based swaps. For mushrooms, button mushrooms are common, but you can use shiitake or portobello mushrooms. They add a rich, earthy taste. If you prefer a lighter option, zucchini or eggplant can replace mushrooms. They absorb flavors well and give a nice texture. You can also play with sauces and spices to change the flavor. Try adding hoisin sauce for a sweet twist. If you like heat, add chili paste or crushed red pepper flakes. This gives the dish a nice kick. Adding more vegetables can brighten the dish. You can include snap peas, broccoli, or carrots for extra color and crunch. Each addition boosts flavor and nutrition. Use your favorite veggies to make it personal. This dish is flexible, so feel free to experiment. To keep your Black Pepper Chicken and Mushrooms fresh, store it in the fridge. Use an airtight container. This method helps keep the flavors locked in. The dish will stay good for 3 to 4 days. If you want to save it longer, freeze it. Place the cooled meal in a freezer-safe bag. Squeeze out the air before sealing. This way, it can last for up to 3 months. Just remember, the longer it sits, the more flavor it may lose. For reheating, I recommend using a pan over medium heat. This method helps keep the chicken tender and the mushrooms juicy. Add a splash of water or broth if it seems dry. Stir often for even heating. You can also use the microwave, but be careful. Heat in short bursts to avoid overcooking. Always check the temperature. Your leftovers should reach at least 165°F (74°C) for safe eating. Enjoy your delicious meal again without losing its charm! You can add more black pepper for extra heat. Try using 3 tablespoons instead of 2. Another option is to add chili flakes or a chopped fresh chili pepper. This will bring in more spice and warmth. If you like a kick, mix in some sriracha or chili paste. These options will give your dish a nice spicy punch. Yes, you can! While button mushrooms are great, you can also use shiitake or cremini mushrooms. Shiitake mushrooms have a rich flavor and add depth to the dish. Cremini mushrooms have a slightly earthier taste. Both options will work well in this recipe. Mix and match to find your favorite combo! For a complete meal, serve this dish with steamed rice or noodles. The rice will soak up the tasty sauce, while noodles add a fun twist. You can also add a side of stir-fried vegetables for more color and nutrients. A simple green salad with a light dressing pairs well too. Enjoy this flavorful dish with your favorite sides! This article covered how to make Black Pepper Chicken and Mushrooms. We explored the key ingredients, from chicken and mushrooms to fresh vegetables. You learned how to marinate the chicken and cook it perfectly to keep it tender. I shared tips on flavor, cooking techniques, and storage for leftovers. In my view, cooking can be simple and fun. Trying out variations keeps the dish exciting. With practice, you’ll make this meal a favorite. Enjoy your cooking adventure!

Black Pepper Chicken and Mushrooms Flavorful Delight

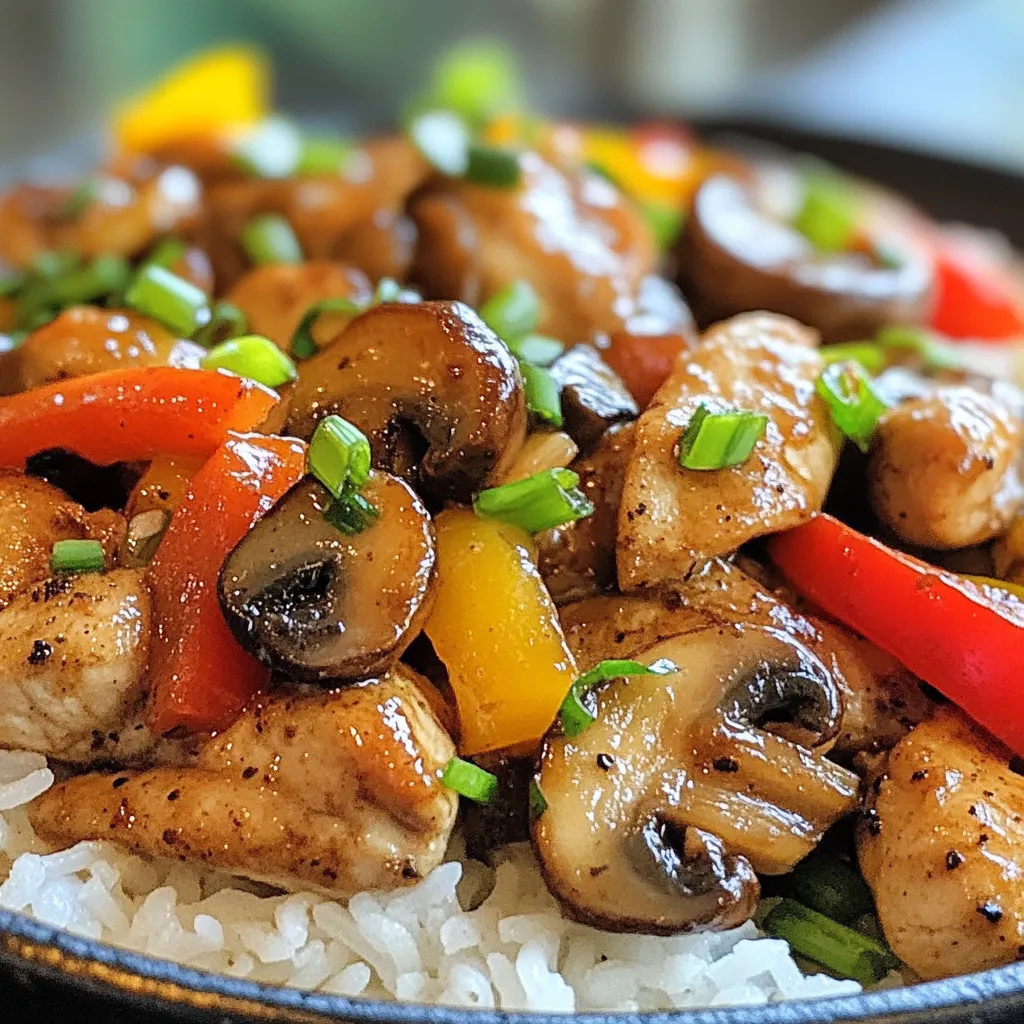
Are you ready to spice up your dinner routine? Black Pepper Chicken and Mushrooms is a flavorful delight that combines

For this easy low carb chicken casserole, you will need: - 2 cups cooked chicken, shredded - 1 cup cauliflower florets (fresh or frozen) - 1 cup broccoli florets (fresh or frozen) - 1 cup cream cheese, softened - 1 cup shredded cheddar cheese - ½ cup grated parmesan cheese - 1 cup chicken broth (low sodium) - 2 cloves garlic, minced - 1 teaspoon onion powder - 1 teaspoon paprika - Salt and pepper to taste - Fresh parsley for garnish (optional) These ingredients come together to create a comforting meal that is both low in carbs and high in flavor. You can customize your casserole by adding or swapping ingredients. Here are some ideas: - Vegetables: Spinach or zucchini add great taste. - Spices: Try adding Italian seasoning or red pepper flakes for a kick. - Cheeses: Use mozzarella instead of cheddar for a different flavor. - Protein: Swap chicken for turkey or even cooked sausage for variety. These options let you make the dish your own and keep it exciting! This casserole is not just tasty, but also healthy. Each serving (1/6 of the recipe) has: - Calories: 350 - Protein: 28g - Carbohydrates: 7g - Fiber: 2g - Fat: 25g This makes it a great option for those watching carbs while still enjoying a filling meal. {{ingredient_image_1}} 1. First, preheat your oven to 350°F (175°C). This step warms the oven for baking. 2. Take a large mixing bowl. Combine 2 cups of shredded chicken, 1 cup of cauliflower florets, and 1 cup of broccoli florets. 3. In another bowl, mix 1 cup of softened cream cheese, half of the shredded cheddar cheese, ½ cup of grated parmesan, and 1 cup of low-sodium chicken broth. 4. Add 2 minced garlic cloves, 1 teaspoon of onion powder, 1 teaspoon of paprika, and salt and pepper. Stir until smooth. 5. Pour this creamy mixture over the chicken and veggies. Stir well until all pieces are covered. 6. Next, transfer the mixture to a greased 9x13 inch baking dish. Spread it out evenly. 7. Sprinkle the remaining cheddar cheese on top of the casserole. This adds a nice, cheesy crust. 8. Place the dish in your preheated oven. Bake for 25-30 minutes. Watch for the cheese to turn golden brown and the casserole to bubble. 9. When done, remove the dish from the oven. Let it cool for a few minutes before serving. 10. Serve the casserole in individual bowls. You can drizzle with extra chicken broth for moisture. 11. For a touch of color, sprinkle fresh parsley on top. It adds a nice, fresh taste too! To get a smooth cheese mix, use softened cream cheese. Softening helps it blend well. Mix the cream cheese with half of the cheddar cheese and parmesan cheese. Add chicken broth slowly while stirring. This helps avoid lumps. Use a hand mixer if needed for a creamier texture. You want a thick, spreadable mixture that coats the chicken and veggies. Choose fresh or frozen broccoli and cauliflower. Fresh gives a nice crunch, while frozen is quick and easy. If using frozen, thaw and drain them first. This keeps the casserole from being too watery. Cut the veggies into small pieces for even cooking. Mixing them well with chicken ensures every bite is tasty. You can prepare the casserole a day ahead. Just cover it tightly and store it in the fridge. When ready to bake, let it sit at room temperature for about 30 minutes. This helps it cook evenly. If you have leftovers, store them in an airtight container. To reheat, use the oven at 350°F (175°C) until warm. This keeps the cheese nice and melty. Pro Tips Use Leftover Chicken: This recipe is perfect for using up leftover cooked chicken, making it a quick and efficient meal option. Mix and Match Veggies: Feel free to substitute or add other low-carb vegetables like zucchini or spinach to suit your taste preferences. Cheese Variations: Experiment with different types of cheese such as mozzarella or pepper jack for varied flavors and textures. Make Ahead: Prepare the casserole a day in advance and refrigerate it to save time on busy nights; just add a few extra minutes to the baking time. {{image_2}} You can swap chicken for other proteins. Try turkey or cooked shrimp. Both work well in this dish. For a beef option, use shredded cooked beef. Each protein brings a unique flavor. Adjust cooking time as needed. Make sure all proteins are fully cooked before mixing. This keeps your casserole safe and tasty. If you want a vegetarian dish, replace chicken with hearty veggies. Use mushrooms, bell peppers, or zucchini. Add more cauliflower and broccoli for bulk. You can also use cooked lentils or beans for protein. Keep the cheese and cream cheese for a rich texture. This version is still creamy and filling. It’s a great choice for meatless meals. To make a dairy-free casserole, swap cheese and cream cheese for plant-based options. Use coconut cream and nutritional yeast for creaminess. There are many dairy-free cheeses available now. Look for brands that melt well. Check the ingredient labels to ensure they fit your diet. This version still offers great taste without dairy. To keep your low carb chicken casserole fresh, let it cool first. Then, place it in an airtight container. You can store it in the fridge for up to four days. If you want to keep it longer, freezing is a great option. For freezing, make sure the casserole is completely cool. Cut it into portions for easy use later. Wrap each piece tightly in plastic wrap. Place the wrapped portions in a freezer-safe bag or container. You can freeze it for up to three months. Label the bags with the date for easy tracking. When you're ready to enjoy your casserole again, there are a few ways to reheat it. For the oven, preheat to 350°F (175°C). Place the casserole in an oven-safe dish and cover with foil. Heat for 25-30 minutes, or until hot. If you're in a hurry, you can use the microwave. Place a portion on a microwave-safe plate, cover it, and heat for 2-3 minutes. Check that it is hot all the way through before serving. This casserole is low in carbs because it swaps pasta and rice for veggies. I use cauliflower and broccoli, which are both low in carbs. These vegetables add fiber and nutrients without the extra carbs. The cream cheese and cheese add flavor and richness without raising the carb count much. Overall, this dish is tasty and keeps carb numbers low. Yes, you can use different vegetables! I love to mix it up based on what I have. Zucchini, bell peppers, or spinach work great. Just chop them small so they cook well with the chicken. You can also use frozen veggies if fresh ones aren’t handy. Just remember to adjust cooking time if you use more water-rich veggies like zucchini. You can store this casserole in the fridge for about three to four days. Just cover it with plastic wrap or foil to keep it fresh. When you’re ready to eat, warm it up in the oven or microwave. It tastes great even as leftovers! In this post, we explored all about low-carb chicken casserole. We covered key ingredients, step-by-step cooking methods, and handy tips. You can customize your dish with variations like vegetarian or dairy-free options. Storing leftovers and reheating them is quick and easy. Try this recipe for a simple and tasty meal that fits your low-carb plan. Enjoy cooking, and savor each bite!

Low Carb Chicken Casserole Quick and Easy Meal

Looking for a tasty meal that won’t derail your low-carb diet? My Low Carb Chicken Casserole combines simple ingredients with

- 1 lb chicken thighs, boneless and skinless, cut into bite-sized pieces - 2 tablespoons gochujang, Korean chili paste - 1 tablespoon soy sauce - 1 tablespoon honey - 1 tablespoon sesame oil - 1 tablespoon minced garlic - 1 tablespoon grated ginger - Salt and pepper to taste - Vegetable oil for frying I love using chicken thighs for this dish. They stay juicy and tender when cooked. The marinade is key to the flavor. Gochujang adds heat and depth. Soy sauce gives the dish a savory touch. Honey balances the spice. Sesame oil adds a lovely nutty flavor. Garlic and ginger brighten everything up. - Gochujang - Soy sauce - Honey - Sesame oil - Minced garlic - Grated ginger Each seasoning plays a role in the final taste. Gochujang is the star, while soy sauce deepens the flavor. Honey adds sweetness to balance the heat. Garlic and ginger bring freshness. Together, they create a flavor explosion. - 1 teaspoon sesame seeds - 1 green onion, thinly sliced Garnishes make the dish pop! Sesame seeds add a nice crunch. Sliced green onions bring a fresh taste. You can add more if you like. They look great and enhance the flavor. Serve the chicken on a platter to show off the vibrant colors. {{ingredient_image_1}} To start, gather a large bowl. In it, mix these ingredients: - 2 tablespoons gochujang - 1 tablespoon soy sauce - 1 tablespoon honey - 1 tablespoon sesame oil - 1 tablespoon minced garlic - 1 tablespoon grated ginger Stir well until everything blends smoothly. This marinade brings heat and flavor to the chicken. Next, take 1 pound of boneless, skinless chicken thighs. Cut them into bite-sized pieces. Add the chicken to the marinade. Make sure each piece gets coated well. Cover the bowl with plastic wrap. Place it in the fridge for at least 30 minutes. If you have time, marinate for up to 2 hours. This helps the flavors sink in deeper. Now, heat a large skillet over medium-high heat. Add vegetable oil to the pan. Wait until the oil is hot before adding the chicken. Remove the marinated chicken from the fridge. Place it in the skillet in a single layer. Cook for about 6 to 8 minutes. Turn the chicken occasionally. You want it to cook through and caramelize nicely. Once finished, add salt and pepper to taste. Remove from heat. For a fun touch, sprinkle sesame seeds and sliced green onions on top. This adds crunch and color. Enjoy your spicy Korean chicken! To cook chicken just right, use bone-in thighs. They stay moist and juicy. Cut the chicken into bite-sized pieces for quick cooking. Always let your oil heat up before adding chicken. This helps it fry, not steam. Cook the chicken in a single layer to avoid overcrowding. Turn the pieces often for even cooking. Aim for a nice caramel color. This adds flavor and texture. If you want it spicy, add more gochujang. Start with a little and taste as you go. You can also add chili flakes for extra heat. If the spice is too much, balance it with honey. Honey adds sweetness and cools the heat. Consider serving with a side of rice to tone down the spice. This makes the meal more enjoyable for everyone. For a stunning look, use a large white platter. The bright red chicken pops against the white. Garnish with green onions for a fresh touch. You can also add sesame seeds for crunch. Serve with steamed rice and pickled veggies for color. This makes your dish more appealing and fun to eat. A beautiful plate makes everyone excited to dig in! Pro Tips Marinate Longer for Depth: Allowing the chicken to marinate for a longer period, up to 2 hours, will enhance the flavor and tenderness of the meat. High Heat for Perfect Caramelization: Ensure your skillet is hot enough before adding the chicken to achieve a nice caramelized exterior while keeping the inside juicy. Adjust Spice Level: If you prefer a milder dish, reduce the amount of gochujang or add a bit of sugar to balance the heat. Serve with Sides for Balance: Pair the spicy chicken with steamed rice or pickled vegetables to balance the heat and add texture to your meal. {{image_2}} You can turn Spicy Korean Chicken into a fun bowl meal. Start with a base of rice or quinoa. Layer on the cooked chicken, then add fresh veggies. Think cucumbers, carrots, or radishes for crunch. Drizzle more sauce over the top for extra flavor. This makes a tasty, balanced meal. You can also add a sunny-side-up egg for richness! If you prefer grilling, use the same marinade for chicken on skewers. Grill the chicken over medium heat for about 10-12 minutes. Keep turning until it’s cooked through. For baking, spread the marinated chicken on a baking sheet. Bake at 400°F for 20-25 minutes. Both methods add a smoky flavor that pairs well with the sauce. You can easily make this dish meat-free. Replace chicken with tofu or tempeh. Press and cube the tofu, then marinate it just like the chicken. Cook it in the same way until golden. You can also use seitan for a chewier texture. This way, everyone can enjoy the spicy and sweet flavor of Korean cuisine! To keep your spicy Korean chicken fresh, let it cool first. Then, place it in an airtight container. Store it in the fridge for up to three days. Make sure to label the container with the date. When you want to enjoy your leftovers, reheat them on the stove. Use medium heat to warm the chicken gently. Stir it often to avoid burning. You can also use a microwave. Heat on medium power for one to two minutes. Check to see if it is warm all the way through. If you have extra chicken, freezing it is a great option. Place the cooled chicken in a freezer bag. Squeeze out as much air as possible. It can stay in the freezer for up to three months. When ready to eat, thaw it in the fridge overnight before reheating. Gochujang is a thick Korean chili paste. It adds spice and depth to dishes. Made from red chili, glutinous rice, fermented soybeans, and salt, it has a sweet and spicy flavor. You can find it in most Asian grocery stores or online. Using gochujang in this recipe gives the chicken its signature heat. Yes, you can use chicken breasts instead of thighs. Chicken breasts are leaner and may cook faster. However, they can dry out if overcooked. If you choose breasts, watch the cooking time closely. The flavor will change slightly, but the dish will still taste great. Spicy Korean Chicken pairs well with steamed rice. The rice balances the heat and adds texture. You can also serve it with pickled vegetables or a simple salad. Adding a refreshing side helps to cool down the spice. Another great idea is to serve the chicken in lettuce wraps for a fun twist. To make Spicy Korean Chicken less spicy, reduce the amount of gochujang. You can start with one tablespoon instead of two. Mixing in a bit of honey can also help balance the heat. Adding yogurt or sour cream as a topping can cool it down too. These tips let you enjoy the flavors without too much spice. This blog post covered the essential steps to make Spicy Korean Chicken. We explored the key ingredients, from the main components to the seasonings that bring the dish to life. I shared tips for perfect cooking and clever variations to fit your tastes. Proper storage and reheating methods help you enjoy leftovers too. In closing, cooking this dish can be fun and rewarding. Don't hesitate to experiment with flavors and ingredients. Enjoy your cooking journey!

Spicy Korean Chicken Flavorful and Easy Recipe Guide

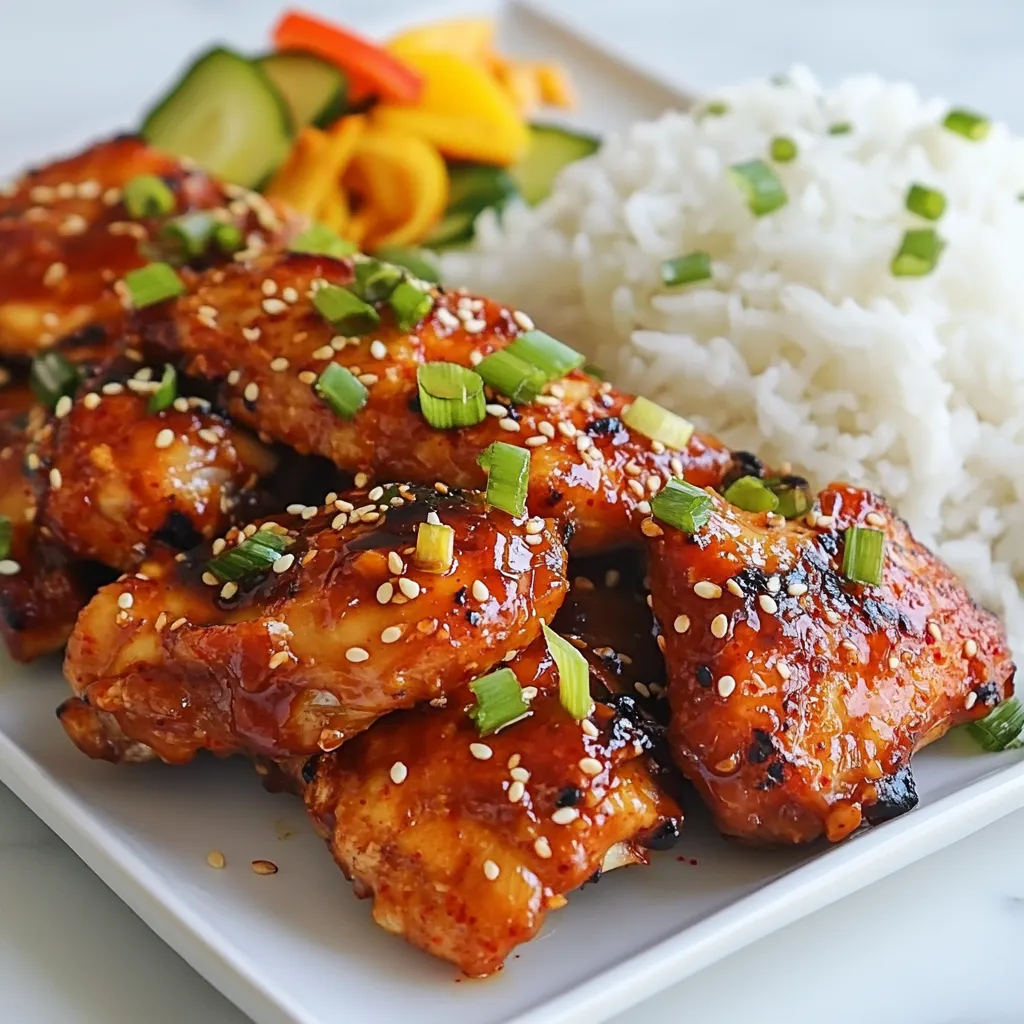
Are you ready to spice up your dinner routine? In this guide, I’ll show you how to make delightful Spicy

- 1 lb ground beef - 1 medium onion, finely chopped - 2 cloves garlic, minced - 1 medium carrot, diced - 1 stalk celery, diced - 1 can (28 oz) crushed tomatoes - 2 tablespoons tomato paste - 1 cup beef broth - 1 teaspoon dried oregano - 1 teaspoon dried basil - ½ teaspoon red pepper flakes (optional for heat) - Salt and black pepper to taste - 2 tablespoons olive oil - Fresh basil or parsley for garnish To make a tasty beef Bolognese, you need key ingredients. Ground beef is the main protein and gives your sauce a hearty base. Fresh vegetables add flavor and texture. Onion, garlic, carrot, and celery create a strong flavor base. Crushed tomatoes and tomato paste bring richness and depth. Beef broth keeps the sauce moist and adds more beef flavor. Dried oregano and basil are classic herbs that enhance the taste. - ½ teaspoon red pepper flakes for heat - Alternative protein options like ground turkey or lentils You can adjust the spice with red pepper flakes. If you want a bit of heat, add them to the sauce. If you prefer a different protein, ground turkey works well. For a vegetarian twist, try lentils. These options let you personalize your Bolognese. {{ingredient_image_1}} First, heat the olive oil in a large pot over medium heat. Add the finely chopped onion, diced carrot, and diced celery. Sauté these vegetables for about 5-7 minutes. You want them to become soft and fragrant. Next, stir in the minced garlic. Cook for one more minute. The aroma will be amazing, and your base is now ready. Now, increase the heat to medium-high. Add the ground beef to the pot. Cook it until it is browned, about 8-10 minutes. Use a wooden spoon to break up the meat as it cooks. Make sure there are no pink bits left. This step is key for flavor and texture. Once the beef is browned, it’s time to mix in the crushed tomatoes, tomato paste, and beef broth. Stir until everything is well combined. Next, add the dried oregano, dried basil, and red pepper flakes if you like some heat. Don’t forget to season with salt and black pepper. Taste as you go; this is crucial for a delicious sauce. Bring the mixture to a gentle simmer. Then, lower the heat to low and cover the pot. Let it simmer for at least 30 minutes. If you can, simmer it for up to 2 hours. The longer it cooks, the richer the flavor will be. Stir occasionally and taste again for seasoning. Adjust as needed. This step makes your Bolognese truly hearty and flavorful. To get the best texture for your sauce, focus on simmering time. A gentle simmer for at least 30 minutes is key. This allows the flavors to mix well. If you have more time, you can simmer for up to 2 hours. The longer it cooks, the richer the taste. If your sauce feels too thick, add a splash of beef broth. This helps loosen it up. If it is too thin, let it simmer uncovered for a bit. This will help it thicken naturally. For flavor adjustments, taste your sauce as it cooks. You can add more salt, pepper, or herbs based on your preference. If you want more depth, try adding a splash of soy sauce or Worcestershire sauce. These ingredients boost the umami flavor. Also, consider adding grated Parmesan cheese while cooking. It melts in and adds a creamy touch. Fresh herbs like basil or parsley can add brightness right before serving. These small tweaks make a big difference in flavor. Pro Tips Use Quality Meat: Opt for lean ground beef for a healthier option and better flavor, or consider mixing in some ground pork for added richness. Layer Your Flavors: For a deeper flavor, add a splash of red wine after browning the meat and let it reduce before adding the tomatoes. Let it Simmer: Allow the sauce to simmer longer than the minimum time for the best flavor development; a slow simmer for up to 2 hours makes a big difference. Finish with Fresh Herbs: Add fresh basil or parsley at the end of cooking for a burst of freshness that brightens the dish. {{image_2}} You can make a tasty vegetarian Bolognese. Use lentils or mushrooms instead of beef. Lentils give a hearty texture. They soak up flavors well. Use cooked green or brown lentils. They add protein and fiber. Mushrooms add umami and richness. Finely chop them and sauté with the vegetables. This swap keeps the dish filling and satisfying. Want to mix things up? You can use ground turkey or chicken. They are leaner than beef. This change makes the dish lighter. If you like red meat, try pork. Ground pork adds a nice flavor. It’s a bit sweeter than beef. Each meat brings a unique taste to your sauce. You can easily play with flavors in your Bolognese. Want it spicy? Add more red pepper flakes. This gives heat and depth. For an Italian twist, use more herbs. Rosemary or thyme work great. You can even add a splash of red wine. It enhances the sauce's richness. Customize it to fit your taste! To keep your beef Bolognese fresh, use airtight containers. Glass containers work well. They do not stain and seal tightly. Plastic containers are great too, just ensure they are BPA-free. Store the sauce in the fridge for up to four days. If you want to keep it longer, freezing is the way to go. Freezing is easy and keeps the sauce tasty. First, let the Bolognese cool completely. Then, divide it into portions. Use freezer bags or containers, leaving space for expansion. Label the bags with the date. You can freeze the sauce for up to three months. When ready to use, thaw it overnight in the fridge. Reheating is simple and can be done on the stove or in the microwave. For the stove, add the sauce to a pot over low heat. Stir often to prevent burning. If using the microwave, place the sauce in a microwave-safe bowl. Heat in short bursts, stirring in between. This way, you keep all the flavors intact. Enjoy it warm over your favorite pasta! Yes, you can! Making Hearty Beef Bolognese Sauce in advance is a great idea. The flavors get better as they sit. After cooking, let the sauce cool. Store it in an airtight container in the fridge. You can make it up to three days before you plan to serve it. This way, you save time on busy days. Just reheat it before serving. The taste will be rich and deep, perfect for your pasta. Bolognese sauce pairs well with many types of pasta. Some popular choices are: - Spaghetti - Fettuccine - Pappardelle - Tagliatelle These pasta types hold the sauce well. Their shapes capture the hearty beef and rich flavors. You can also use gluten-free pasta if needed. Choose a pasta that you enjoy for the best meal. You can store Bolognese sauce in the fridge for about three days. Make sure you keep it in an airtight container. This helps to keep the sauce fresh. If you want to keep it longer, consider freezing it. Bolognese sauce can last for up to three months in the freezer. When ready to eat, just thaw it overnight in the fridge and reheat. Enjoy the same tasty flavor as when it was first made! In this article, we explored the making of a hearty beef Bolognese sauce. We discussed essential ingredients like ground beef and fresh vegetables, plus optional items for your personal touch. You learned step-by-step instructions, like sautéing veggies and browning beef. We also covered tips for perfect texture and flavor. Remember to store leftovers safely and reheat carefully. With these insights, you can create a delicious sauce that suits your taste. Enjoy your cooking journey and the flavors you make!

Hearty Beef Bolognese Sauce Rich and Flavorful Recipe

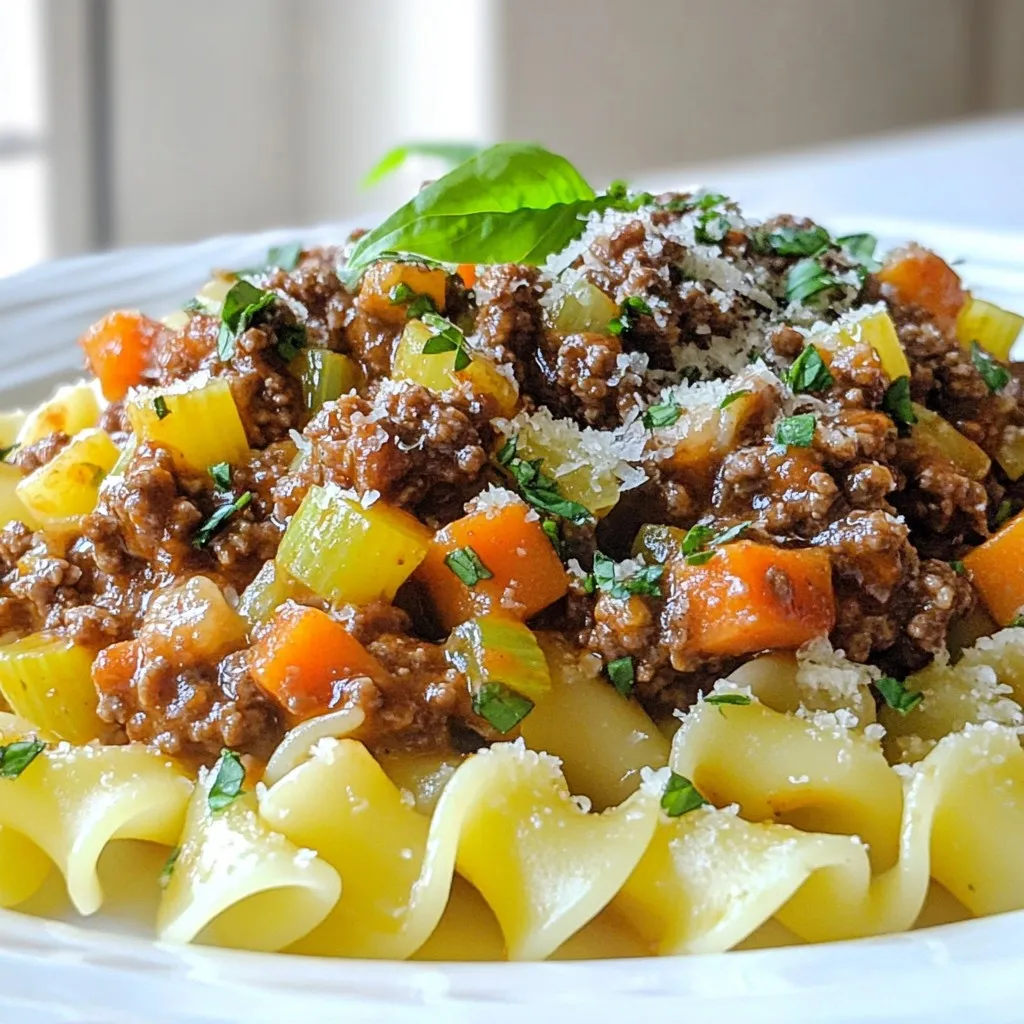
Welcome to my kitchen, where comfort food comes alive! Today, I’ll share my hearty beef Bolognese sauce recipe. This dish

To make this hearty soup, you need the following ingredients: - 2 tablespoons olive oil - 1 medium onion, diced - 3 cloves garlic, minced - 1 medium carrot, diced - 1 medium zucchini, diced - 1 bell pepper (any color), diced - 1 can (14 oz) fire-roasted diced tomatoes - 4 cups vegetable broth - 1 teaspoon ground cumin - 1 teaspoon chili powder - 1 teaspoon smoked paprika - 1 cup fideo pasta (or thin spaghetti broken into pieces) - 1 can (15 oz) black beans, drained and rinsed - Salt and pepper to taste - Fresh cilantro for garnish - Lime wedges for serving These ingredients create a warm and rich flavor, perfect for any cozy meal. You can enhance your soup with these optional ingredients: - Avocado for creaminess - Crushed tortilla chips for crunch - Sliced jalapeños for added heat - Corn for sweetness - Cheese, like queso fresco, for richness These optional ingredients add more depth and personal touch to your bowl of soup. Don’t have all the ingredients? No problem! Here are some easy swaps: - Use canola oil instead of olive oil. - Swap zucchini for other veggies like spinach or kale. - If you don’t have fideo, spaghetti works well. - For a protein boost, try chickpeas or lentils as a bean substitute. These substitutions keep the spirit of the dish while allowing you to use what you have on hand. {{ingredient_image_1}} To start, grab a large pot and heat 2 tablespoons of olive oil over medium heat. Once hot, add 1 medium onion, diced. Sauté it for about 5 minutes until the onion turns translucent. This step builds a solid flavor base for your soup. Next, stir in 3 cloves of minced garlic and cook for another minute until you smell that lovely aroma. Now it’s time to add some color and nutrition. Toss in 1 diced medium carrot, 1 diced medium zucchini, and 1 diced bell pepper of your choice. Sauté these veggies for 5 to 7 minutes until they soften. The mix of vegetables makes the soup hearty. Then, pour in 1 can of fire-roasted diced tomatoes along with their juices. Follow this with 4 cups of vegetable broth. Add 1 teaspoon of ground cumin, 1 teaspoon of chili powder, and 1 teaspoon of smoked paprika. Stir everything to blend those flavors well. Bring your soup to a boil, then reduce the heat. Let it simmer for about 10 minutes to allow the flavors to deepen. After that, add 1 cup of fideo pasta and 1 can of black beans, drained and rinsed. Cook for another 5 to 7 minutes, stirring occasionally, until the pasta is tender. Finally, taste your soup and add salt and pepper as needed. Let it sit for a few minutes before serving. This will let all those wonderful flavors meld together. To boost the taste of your soup, use fresh herbs like cilantro. Add them at the end for a bright flavor. You can also add a bay leaf while it simmers for more depth. For a smoky taste, try using smoked paprika. This spice adds warmth and flavor. If you want heat, toss in some chopped jalapeños or a dash of hot sauce. The key to a great texture is timing. Make sure to cook the fideo pasta just right. If you overcook it, the pasta can get mushy. Aim for tender pasta that still holds shape. Stir occasionally to prevent sticking. For a creamier texture, blend a portion of the soup and mix it back in. This adds a nice body to the dish. One common mistake is adding too much salt too soon. Taste your soup before seasoning. Another issue is not letting the soup simmer long enough. This can prevent the flavors from melding. Avoid skipping the sauté step. Cooking the onions and garlic first builds a solid flavor base. Lastly, don’t forget to garnish! Fresh cilantro and lime make a big difference. Pro Tips Use Fresh Ingredients: Opt for fresh vegetables and herbs to enhance the flavor and nutritional value of the soup. Adjust the Spice Level: Customize the heat by adding more chili powder or tossing in some diced jalapeños if you like it spicy! Let It Rest: Allow the soup to sit for a few minutes after cooking; flavors meld and deepen as it cools slightly. Store Leftovers Properly: If you have any leftovers, store them in an airtight container in the refrigerator for up to 3 days. {{image_2}} You can easily make this soup vegetarian or vegan. Start by using vegetable broth, as listed in the recipe. For protein, swap black beans for chickpeas or lentils. You can also add more veggies like spinach or kale. This increases nutrition while keeping it hearty and filling. The spices in the soup still bring out great flavor. To add some heat, use diced jalapeños or a pinch of cayenne pepper. You can also try adding hot sauce or more chili powder. Adjust the spices to your taste. This makes the soup exciting and wakes up your taste buds. If you like it extra spicy, serve it with sliced fresh chilies on top. For a meatier option, consider adding shredded chicken or cooked chorizo. These proteins pair well with the soup’s base. If you want something different, try diced tofu or tempeh for a savory bite. Each protein adds its unique flavor, making this soup versatile and satisfying. To keep your Cozy Mexican Fideo Soup fresh, store it in an airtight container. Let the soup cool first, then transfer it. Make sure to use a container that fits your portion size. This way, you can enjoy it in the days to come. Aim to store it in the fridge for up to four days. When you’re ready to enjoy the soup again, reheat it on the stove. Pour the soup into a pot over medium heat. Stir often to avoid sticking. If the soup seems thick, add a splash of vegetable broth or water. This will help bring back its original consistency. Heat until it’s nice and warm, about five to seven minutes. If you want to save your soup for later, freezing works great. First, let the soup cool completely. Then, pour it into freezer-safe bags or containers. Leave some space at the top, as the soup will expand. Label the bags with the date. You can freeze the soup for up to three months. When ready to eat, thaw it overnight in the fridge before reheating. Fideo pasta is a thin noodle used in many Mexican dishes. It looks a lot like spaghetti but is shorter. You can find it in most grocery stores. Fideo cooks quickly and adds a nice texture to soups. If you can't find fideo, break thin spaghetti into small pieces as a substitute. Yes, you can make this soup ahead of time. It tastes even better the next day as flavors blend. Just store it in the fridge in a sealed container. When you are ready to eat, heat it on the stove or in the microwave. This soup pairs well with many sides. Here are some great options: - Crusty bread for dipping - Fresh tortilla chips for crunch - A simple green salad for freshness - Mexican rice for heartiness - Sliced avocado for creaminess Feel free to mix and match these sides to create your perfect meal! Cozy Mexican Fideo Soup offers warmth through simple ingredients and easy steps. We explored key ingredients, cooking methods, and helpful tips. Remember, you can change flavors with various spices or try vegetarian versions. Avoid common mistakes to get the best texture. This soup stores well, making it perfect for leftovers. Overall, feel free to make it your own. Enjoy a bowl of comfort that tastes like home!

Cozy Mexican Fideo Soup Hearty and Flavorful Bowl

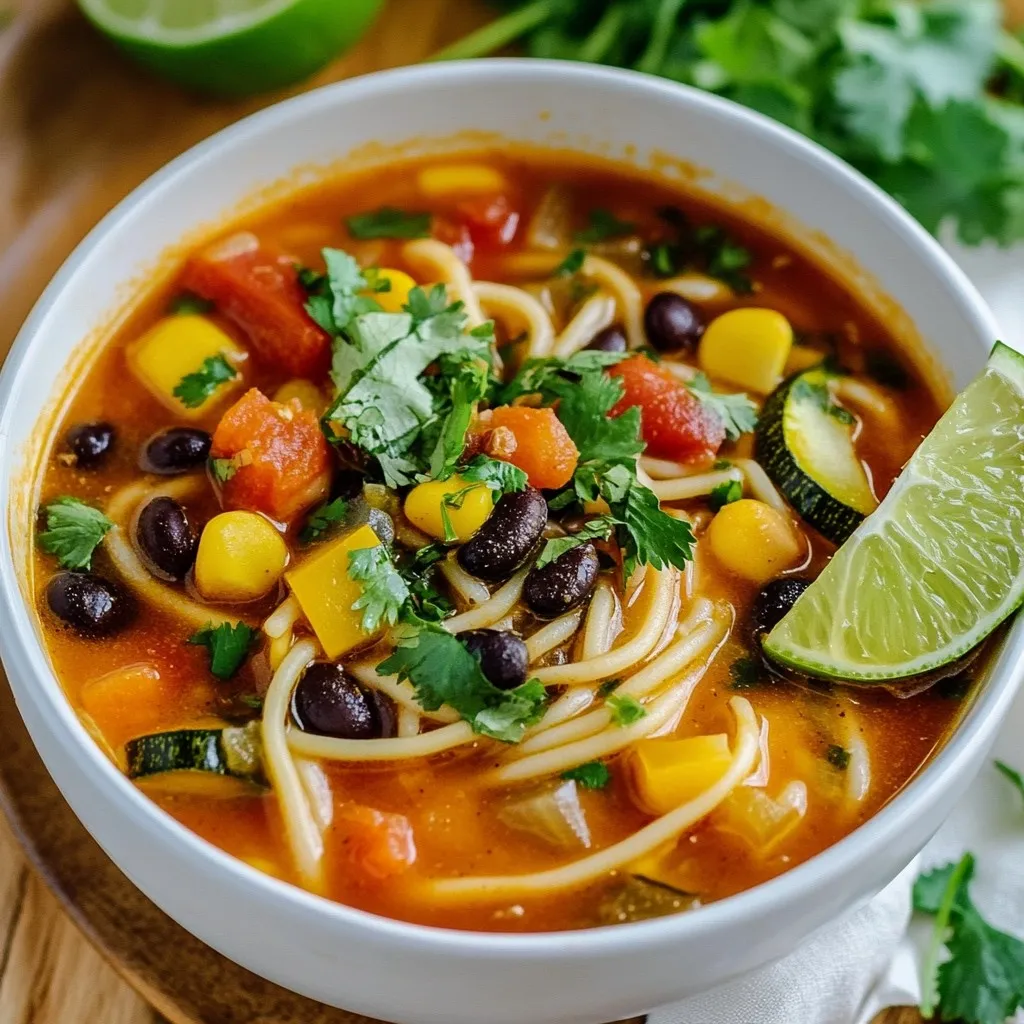
When the weather turns chilly, there’s nothing like a warm bowl of Cozy Mexican Fideo Soup to lift your spirits.

- 1 package of frozen dumplings (chicken, vegetable, or pork) - 6 cups chicken or vegetable broth - 1 tablespoon sesame oil - 1 tablespoon ginger, minced - 2 garlic cloves, minced - 1 cup bok choy, chopped - 1 cup shiitake mushrooms, sliced - 1 carrot, julienned - 1 tablespoon soy sauce - Salt and pepper to taste - 2 green onions, sliced - Fresh cilantro for garnish (optional) - Chili oil for serving (optional) You need these ingredients to make a tasty Asian dumpling potsticker soup. Start with frozen dumplings. You can choose chicken, vegetable, or pork. The broth is key. Use chicken or vegetable broth for rich flavor. Sesame oil adds a nice touch. Next, gather your aromatics. Minced ginger and garlic create a great base. For veggies, get bok choy, shiitake mushrooms, and carrots. These add color and nutrients to your soup. Finally, think about seasoning. Soy sauce gives depth. Salt and pepper boost flavor. For garnishes, slice green onions and cilantro. They add freshness. A drizzle of chili oil adds heat if you like spice. {{ingredient_image_1}} Start by heating 1 tablespoon of sesame oil in a large pot over medium heat. Once the oil is hot, add 2 minced garlic cloves and 1 tablespoon of minced ginger. Sauté these for about 1 to 2 minutes. This step fills the kitchen with a wonderful aroma. The garlic and ginger add great flavor to your soup. Next, pour in 6 cups of chicken or vegetable broth. Bring the broth to a gentle boil. Once it starts to bubble, it's time to add the frozen dumplings. You can use chicken, vegetable, or pork dumplings. Cook them according to the package instructions, which usually takes about 5 to 7 minutes. The dumplings will soak up the broth's flavor. After the dumplings are nearly done, it's time to add some veggies. Toss in 1 cup of chopped bok choy, 1 cup of sliced shiitake mushrooms, and 1 julienned carrot. Continue cooking for an extra 3 to 5 minutes. The veggies should be tender but still bright in color. Then, stir in 1 tablespoon of soy sauce. Season with salt and pepper to taste. This will enhance the soup's rich flavors. Ladle the soup into bowls and top with sliced green onions and fresh cilantro if you like. Enjoy! To cook the dumplings just right, follow the package instructions closely. Each type of dumpling may vary in cooking time. Usually, it takes about 5-7 minutes in boiling broth. Check them for doneness by cutting one open. Make sure the filling is hot and cooked through. This ensures you enjoy a tasty bite every time. You can switch up the veggies in your soup for variety. Bok choy is a great choice, but feel free to add spinach or kale. Shiitake mushrooms offer rich flavor, but button mushrooms work too. Carrots add crunch, but you can also use zucchini or bell peppers. Experiment with whatever you have on hand! Serve the soup in deep bowls for an inviting look. Garnish each bowl with fresh green onions for color and taste. If you like spice, add a small dish of chili oil on the side. You can also sprinkle fresh cilantro on top for a bright finish. This makes your meal not just tasty, but also beautiful! Pro Tips Fresh Ingredients: Use fresh vegetables whenever possible to enhance the flavor and texture of your soup. Broth Matters: Choose a high-quality broth for a richer and more flavorful soup base. Adjust Spice Level: Modify the amount of chili oil based on your preference for heat. Garnish for Appeal: Add extra garnishes like sesame seeds or sliced chilies for a pop of color and flavor. {{image_2}} For a tasty vegetarian soup, use vegetable dumplings. They are easy to find in stores. Choose a vegetable broth for the base. This keeps the dish light and fresh. Add in more veggies like bell peppers or snap peas. These ingredients add color and crunch. You can also use tofu for extra protein. This option is great for those who want a meat-free meal. Broth makes a big difference in flavor. You can try miso broth for a rich and savory taste. Miso adds umami and depth. Ramen broth is another option. It brings a hearty flavor that pairs well with dumplings. If you want something lighter, use a simple vegetable broth. This keeps the dish clean and bright. You can mix and match different broths to find your favorite. If you like heat, add chili oil to your soup. Start with a little and taste as you go. You can also use fresh chili peppers for a kick. Sliced jalapeños or bird's eye chilies work well. For a different twist, try sriracha or hot sauce. These can enhance the flavor without overwhelming the dish. Adjust the spice level to your liking for the perfect balance. After enjoying your soup, let it cool. Transfer it to an airtight container. I recommend using glass or BPA-free plastic. Seal the container tightly. This helps keep the soup fresh. Store it in the fridge. It will last for about three days. If you want to keep it longer, consider freezing it. Always label the container with the date. When you're ready to eat, take the soup out of the fridge. Pour it into a pot. Heat over medium heat. Stir the soup often. This helps it heat evenly. Once it's hot, serve it right away. If the soup is too thick, add a bit of broth or water. This will make it nice and soupy again. You can also use a microwave. Just heat in a microwave-safe bowl. Cover it loosely to avoid splatters. Heat in short bursts, stirring in between. If you want to freeze your soup, follow these steps: 1. Let the soup cool completely. 2. Use freezer-safe containers or bags. 3. Pour the soup into the containers, leaving some space for expansion. 4. Seal the containers tightly. 5. Label with the date and type of soup. To thaw, move the soup to the fridge the night before. When ready to eat, reheat it on the stove or in the microwave. Enjoy your tasty dumpling soup even after a few weeks! Yes, you can make this soup ahead of time. Prepare the broth and cook the dumplings. Then, store them in the fridge. When you are ready to eat, heat the soup in a pot. Add fresh veggies right before serving. This keeps them bright and crunchy. You can use many proteins in your dumplings. Some great options are shrimp, beef, or tofu. For a vegetarian choice, try mushrooms or lentils. Each protein adds a unique taste to the soup. Making dumplings from scratch is easy! Start with flour and water to make the dough. Roll it out and cut small circles. Fill each circle with your choice of meat or veggies. Pinch them closed to seal. You can find many detailed recipes online for help. This blog post showed how to make a delicious dumpling soup. We covered key ingredients like frozen dumplings, broth, and tasty veggies. You learned step-by-step instructions for cooking, plus pro tips for perfect results. We also explored tasty variations, storage tips, and common questions. In the end, this soup is simple and fun to make. With the right ingredients, you'll create a warm dish that everyone loves. Enjoy your cooking adventure!

Asian Dumpling Potsticker Soup Flavorful and Simple Meal

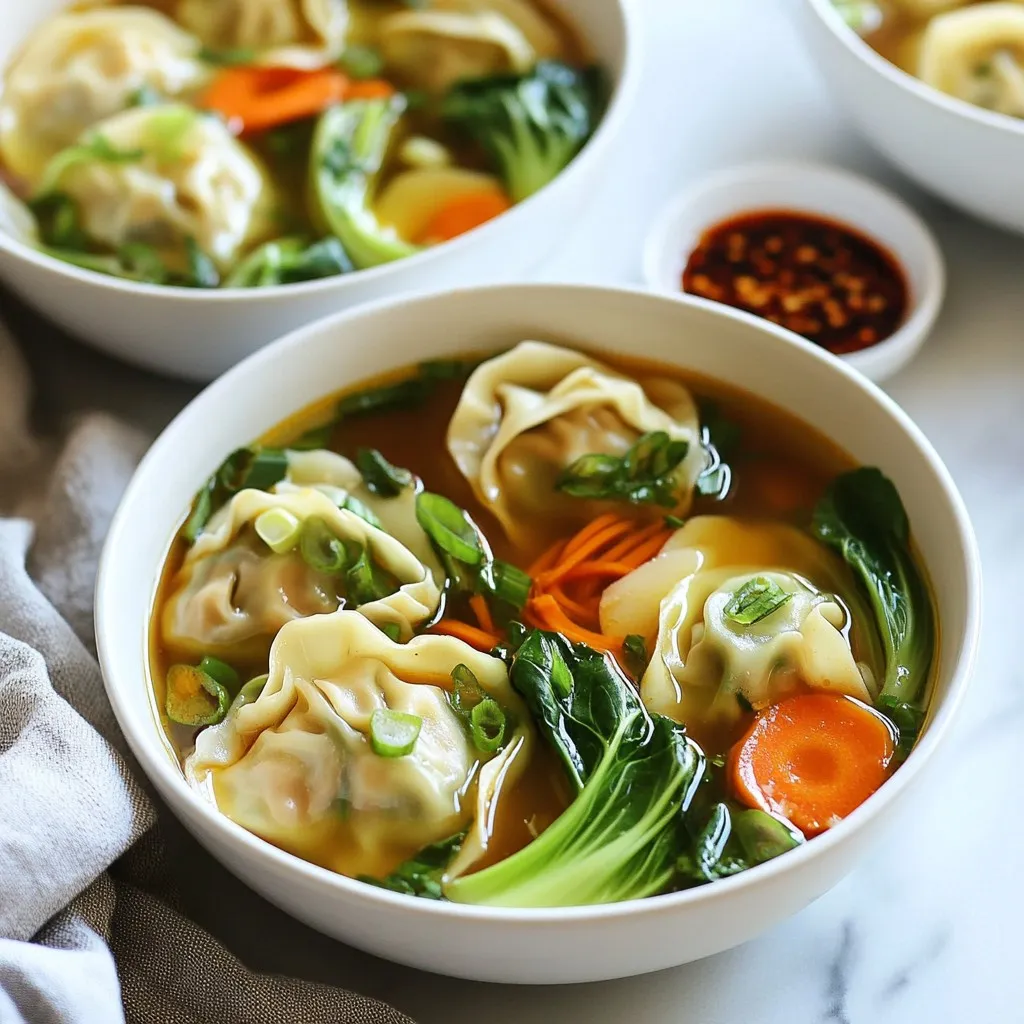
Welcome to the world of Asian Dumpling Potsticker Soup! This easy and tasty meal shines with rich flavors and vibrant

- 1 lb ground beef - 1 lb ground turkey - 1 cup breadcrumbs - 1/2 cup grated Parmesan cheese - 1/2 cup grated carrot - 1/2 cup finely chopped onion - 2 cloves garlic, minced - 2 large eggs - 1/4 cup ketchup (plus extra for topping) - 2 tablespoons Worcestershire sauce - 1 teaspoon Italian seasoning - Salt and pepper to taste - Fresh parsley, chopped (for garnish) To make a great meatloaf, I use a mix of ground beef and ground turkey. This combo gives the dish a nice taste and good texture. The beef adds richness, while turkey keeps it light. I also add breadcrumbs to bind everything together. For extra flavor, I mix in grated Parmesan cheese and grated carrot. The cheese brings a savory bite, and the carrot adds natural sweetness. Finely chopped onion and minced garlic give depth to the dish, making each bite tasty. I use two large eggs to help hold the loaf's shape. Ketchup and Worcestershire sauce add moisture and tang. Italian seasoning provides a warm blend of herbs, while salt and pepper bring everything together. Finally, I sprinkle fresh parsley on top for a pop of color and freshness. This ingredient list makes my sheet pan meatloaf easy and delicious. You can also add mixed vegetables to roast alongside the meatloaf. Bell peppers, zucchini, and green beans work well. They soak up the flavors and make this meal even better. {{ingredient_image_1}} - Preheat your oven to 375°F (190°C). - Line your sheet pan with parchment paper or grease it lightly. - In a big bowl, mix the ground beef and turkey together. - Add in breadcrumbs, Parmesan cheese, grated carrot, chopped onion, minced garlic, and eggs. - Shape the meat mixture into a loaf and place it in the center of the sheet pan. - Arrange mixed vegetables around the meatloaf. Drizzle them with olive oil, salt, and pepper. - Spread ketchup over the top of the meatloaf for added flavor and moisture. - Bake in the preheated oven for 45-50 minutes. The meatloaf should reach 160°F (70°C) inside. - Let the meatloaf rest for 10 minutes after baking. This helps keep it juicy. - Garnish with chopped parsley before serving. To get the best meatloaf, you need the right texture. First, avoid overworking the meat mixture. When you mix it too much, it can become tough. Just blend the ingredients until they come together. Make sure to have a uniform mixture of ingredients. This helps each bite taste great. Use your hands to combine the meat, veggies, and spices. Feel how everything mixes and aim for a well-blended result. You can boost the flavor of your meatloaf with extra spices. Try adding smoked paprika for a hint of heat. Or add a dash of cayenne for a kick. Fresh herbs like thyme or rosemary work well too. Don't forget to let your meatloaf rest after baking. This step is key! It allows the juices to settle. Rest for about 10 minutes before slicing. This way, every slice stays juicy and flavorful. How you serve your meatloaf can make a big difference. Place it on a nice platter for a special touch. You can also slice it into thick pieces for a hearty look. Garnish with fresh parsley for a pop of color. Serve alongside mashed potatoes or a green salad. These sides balance the meal and add freshness. Enjoy your beautiful sheet pan meatloaf! Pro Tips Use a Meat Thermometer: For perfect results, check the internal temperature of the meatloaf. It should reach 160°F (70°C) for safe consumption. Add Moisture: If your mixture feels too dry, add a splash of milk or broth to enhance moisture and flavor without compromising the texture. Customize Vegetables: Feel free to swap out the mixed vegetables based on what's in season or your personal preferences for a unique twist. Rest Before Slicing: Allow the meatloaf to rest for at least 10 minutes after baking. This helps retain moisture and makes slicing easier. {{image_2}} You can swap out the meats in this dish for different flavors. Use ground pork for a richer taste. Ground chicken or turkey is a leaner option. For those who prefer plant-based meals, try using lentils or chickpeas. You can mash them and mix in your usual spices for a tasty vegan loaf. Adding vegetables can really change the flavor of your meatloaf. Try diced bell peppers, zucchini, or even mushrooms for extra taste. You can also mix in cheese. A bit of cheddar or mozzarella adds a creamy touch. Sauces like BBQ or hot sauce can give your dish a fun twist, too. Want to serve individual portions? Shape small meatloaves instead of one big loaf. This way, everyone gets their own. You can also use a slow cooker. Just place the loaf inside and cook on low for several hours. An air fryer is another great option. It cooks quickly and gives a nice texture. Store leftover meatloaf in the fridge. Use an airtight container for best results. Place the meatloaf in the container and seal it tight. This keeps the meatloaf fresh for up to four days. You can also wrap it in plastic wrap before placing it in the container. This extra layer helps prevent any odors from the fridge. To freeze meatloaf, let it cool completely first. Wrap it in plastic wrap tightly. Then place it in a freezer bag. Label the bag with the date. You can freeze meatloaf for up to three months. When you want to eat it, transfer it to the fridge to thaw overnight. This helps keep the flavor and texture intact. Reheat meatloaf in the oven for best results. Preheat your oven to 350°F (175°C). Place the meatloaf in a baking dish. Cover it with foil to avoid drying out. Heat for about 20 minutes or until warm throughout. You can also use the microwave. Place slices on a plate and cover with a damp paper towel. Heat in short bursts of 30 seconds until warm. This helps keep the meatloaf moist and tasty. Sheet pan meatloaf lasts about 3 to 4 days in the fridge. Store it in an airtight container. This keeps it fresh and safe to eat. If you want to enjoy it longer, consider freezing it. Yes, you can use just one type of ground meat. Ground beef or turkey works well on its own. Keep in mind that mixing meats adds flavor and texture. But if you prefer one type, go for it! Cook the meatloaf until it reaches an internal temperature of 160°F (70°C). Use a meat thermometer to check this. This ensures your meal is safe to eat and perfectly cooked. In addition to checking the temperature, look for a nice brown color on the outside. The meatloaf should be firm but not hard. If it springs back when you touch it, it is likely done. Absolutely! You can add more vegetables to boost nutrition and flavor. Try bell peppers, zucchini, or spinach. Just chop them finely so they mix well with the meat. In this guide, we explored the key ingredients for a tasty sheet pan meatloaf, covering the main ingredients, flavor boosters, and seasonings. I shared step-by-step instructions for making and baking your meatloaf, along with tips for perfect texture and flavor. We also discussed variations, storage methods, and answered common questions. Meatloaf can be a fun and flexible dish. Use these ideas to craft your own version. Enjoy cooking and sharing this comforting meal.

Ingredient Sheet Pan Meatloaf Easy Family Dinner

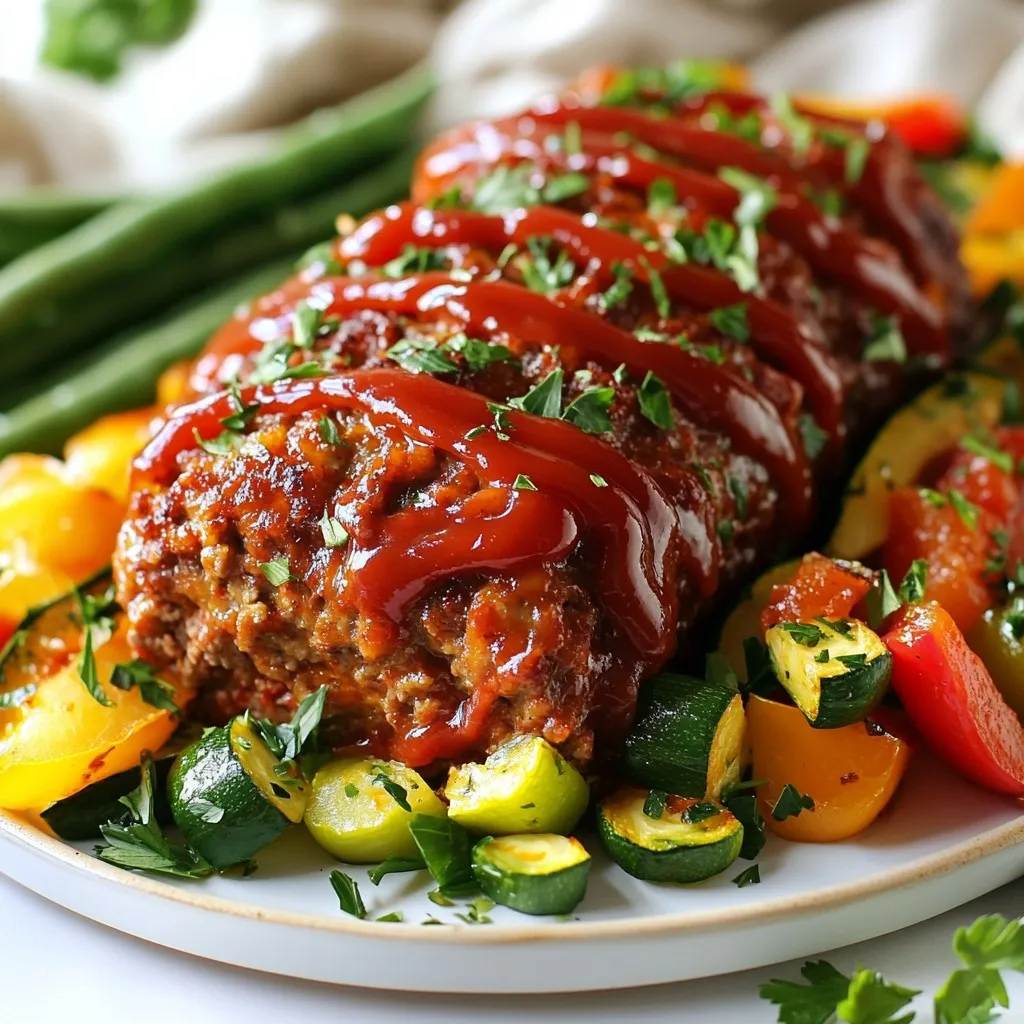
Looking for an easy and tasty dinner idea? Try my Ingredient Sheet Pan Meatloaf! It’s simple, quick, and packed with

To make Mexican Picadillo with Potatoes, you need: - 1 lb ground beef - 1 medium onion, finely chopped - 2 cloves garlic, minced - 1 medium red bell pepper, chopped - 1 medium green bell pepper, chopped - 2 medium potatoes, diced - 1 cup diced tomatoes (canned or fresh) - 1 cup beef or vegetable broth - 1 teaspoon ground cumin - 1 teaspoon dried oregano - 1 bay leaf - 1 cup frozen peas - Salt and pepper to taste - 2 tablespoons vegetable oil - Fresh cilantro for garnish (optional) You can add more flavor to your picadillo. Some options include: - Chopped carrots for sweetness - Corn for extra texture - Black olives for a briny taste - Jalapeños for heat If you have allergies, here are some swaps: - Use ground turkey or chicken instead of beef. - For a vegetarian option, try lentils or mushrooms. - Use low-sodium broth to cut back on salt. - Choose a gluten-free broth to avoid gluten. {{ingredient_image_1}} First, gather all your ingredients. You need ground beef, onions, garlic, bell peppers, potatoes, and more. Chop the onions and bell peppers finely. Dice the potatoes into small cubes. This helps them cook evenly. 1. Heat the oil: In a large skillet, heat the vegetable oil over medium heat. 2. Sauté onions and garlic: Add the chopped onions and minced garlic. Cook for about 3 minutes until they soften. 3. Cook ground beef: Add the ground beef. Break it up with a spatula. Cook this for 5-7 minutes until it’s brown. Drain any excess fat if needed. 4. Add veggies: Stir in the diced tomatoes, red and green bell peppers. Cook for 5 minutes until the peppers begin to soften. 5. Mix in potatoes and spices: Add the diced potatoes, broth, cumin, oregano, and bay leaf. Season with salt and pepper. 6. Simmer: Bring the mixture to a boil. Then, lower the heat. Cover the skillet and simmer for 20-25 minutes. Stir occasionally until the potatoes are tender. 7. Add peas: Finally, stir in the frozen peas. Cook for another 5 minutes until they are heated through. 8. Finish: Remove the bay leaf before serving. Adjust seasoning if needed. - Cut the potatoes into small, even cubes. This ensures they cook at the same rate. - Stir the mixture occasionally while it cooks. This helps prevent sticking and promotes even cooking. - Let the dish sit for a few minutes after cooking. This allows the flavors to meld together better. Enjoy your Mexican Picadillo with Potatoes! Serve it warm for a hearty meal. When making Mexican Picadillo, avoid overcooking the beef. Cook it just until it's brown. Don't skip the salt and pepper; they enhance the flavor. If you add too much liquid, the dish can become soupy. Be careful with the amount of broth you use. Lastly, remember to remove the bay leaf before serving. It adds flavor but isn’t meant to be eaten. To boost flavor, try adding a splash of lime juice. This brightens the dish. Fresh herbs can also lift the taste. Consider adding fresh cilantro or parsley at the end. If you like heat, add some diced jalapeños. For a smoky flavor, a dash of chipotle powder works well. You can also mix in olives or raisins for a sweet twist. You will need a large skillet for cooking. A spatula helps to break up the meat. Use a sharp knife and cutting board for chopping vegetables. A measuring cup is handy for broth and tomatoes. If you have one, a lid is great for simmering. Finally, a serving spoon helps you dish it out nicely. Pro Tips Use Fresh Ingredients: Whenever possible, opt for fresh vegetables and herbs to enhance the flavor and nutritional value of your picadillo. Adjust Spice Levels: Feel free to add a pinch of chili powder or cayenne pepper if you prefer a spicier dish. Adjust according to your taste. Let It Rest: Allow the picadillo to rest for a few minutes after cooking. This helps the flavors meld together for a more delicious result. Bulk It Up: For a heartier meal, consider adding additional veggies like carrots or zucchini. They complement the dish well and add more texture. {{image_2}} You can make a great vegetarian picadillo. Instead of ground beef, use lentils or mushrooms. Cook them until they are soft and flavorful. Replace the beef broth with vegetable broth. This keeps the taste rich and hearty. You can add more veggies like carrots or zucchini for extra nutrition. Picadillo changes by region in Mexico. In some areas, they add raisins or olives for sweetness and depth. Others might use different spices, like cinnamon or cloves, to change the flavor. You may find that some regions favor more tomatoes or potatoes. Each variation tells a story of the local culture and tastes. Picadillo pairs well with many sides. Serve it with warm tortillas for a classic touch. You can also enjoy it with fluffy rice to soak up the sauce. A fresh salad with lime vinaigrette can brighten the meal. For a heartier option, add refried beans or guacamole on the side. These sides will enhance your dining experience and make it more satisfying. To keep your Mexican Picadillo fresh, store it in an airtight container. Let it cool down before sealing. Place it in the fridge for up to three days. This dish tastes even better the next day, as the flavors meld together. You can freeze Mexican Picadillo for later. Use freezer-safe bags or containers. Make sure to label them with the date. It can last up to three months in the freezer. Thaw in the fridge overnight before reheating. Reheat your Picadillo on the stove for best results. Add a splash of broth or water to keep it moist. Heat it over low to medium heat, stirring often. You can also microwave it in short bursts, stirring in between. Enjoy it warm with tortillas or rice! Yes, you can use chicken or turkey in place of beef. Both options work well. Ground chicken or turkey will add a lighter taste. You may need to adjust cooking times. Make sure the meat is cooked through. The spices and flavors will still shine through. To add heat, use chopped jalapeños or serrano peppers. You can also add a pinch of cayenne pepper. If you like, include crushed red pepper flakes. Adjust the amount based on your taste. Spicy adds a fun kick to the dish. Just remember to balance the heat with other flavors. Picadillo has roots in Spanish and Latin cuisines. It combines ground meat with spices and vegetables. Many countries have their own take on Picadillo. In Mexico, it's often served with rice or tortillas. It is a comfort food for many families. Each region adds its own local twist. You learned about making delicious Picadillo. We covered ingredients, cooking steps, and common tips. Customizing flavors and avoiding mistakes will help you succeed. Remember to store leftovers properly for the best taste. Picadillo can adapt to many diets and preferences. Now, you can impress your family and friends with this classic dish. Enjoy your cooking journey and explore all the tasty variations!

Mexican Picadillo with Potatoes Savory and Simple Dish

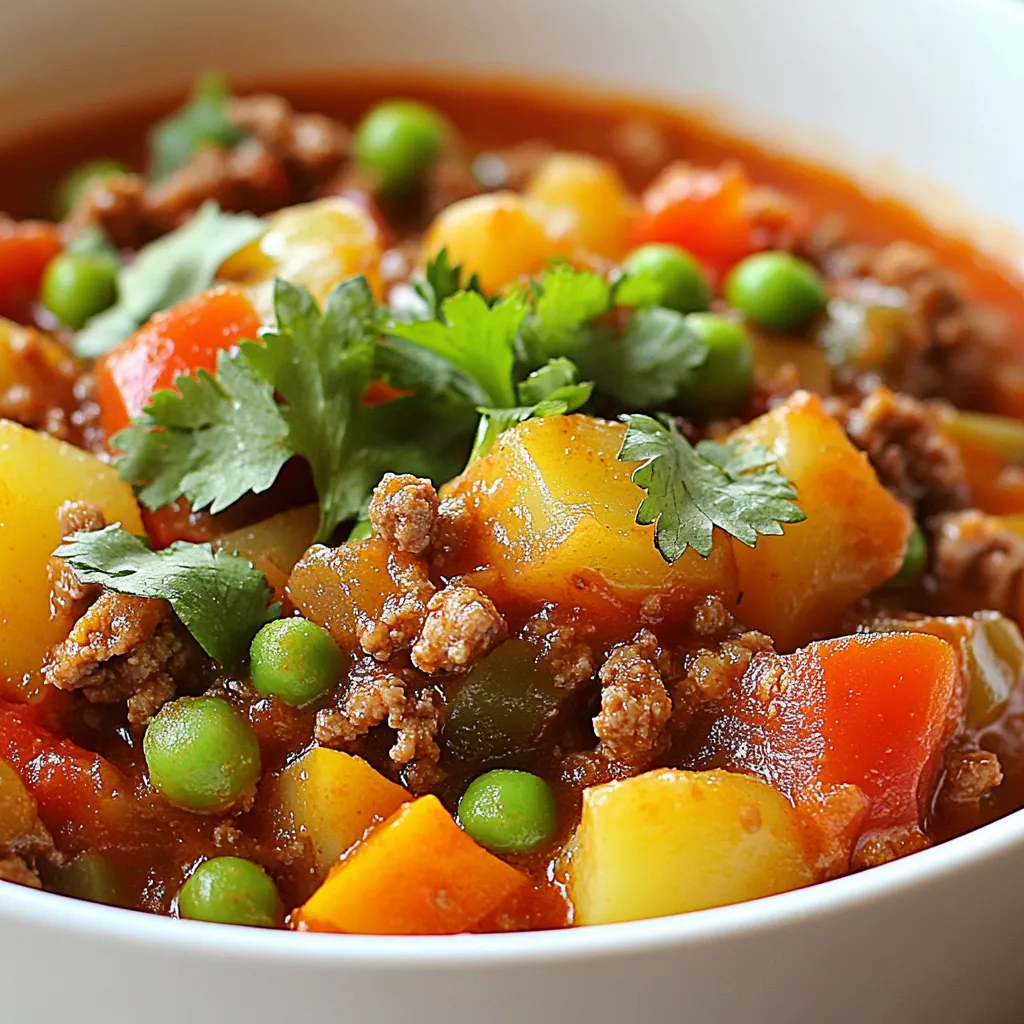
Looking for a tasty and simple meal? Mexican Picadillo with Potatoes is a perfect choice! This dish blends ground meat,

Older posts
Newer posts
← Previous Page1 … Page133 Page134 Page135 … Page143 Next →

dsad

© 2025 Southern Dishes • Built with GeneratePress

Our Policies

  • Copyright Policy
  • Cookie Policy
  • GDPR Policy
  • Privacy Policy
  • Disclaimer
  • Terms Of Use

More Information

  • Home
  • About
  • Contact
  • Appetizers
  • Dessert
  • Dinner
  • Drinks
©2025, Southern Dishes About Back To Top