Skip to content
DisclaimerTerms Of UseGDPR PolicyCookie Policy

Southern Dishes

  • Home
  • Drinks
  • Appetizers
  • Dinner
  • Dessert
  • About
  • Contact
  • Privacy Policy
DisclaimerTerms Of UseGDPR PolicyCookie Policy

Isabella

- 8 oz cheese tortellini - 1 lb flank steak, sliced thinly - 1 tablespoon olive oil Cheese tortellini brings a creamy twist to the dish. I love using fresh tortellini for best flavor. Flank steak adds rich taste and tender texture. Slice the steak thin to cook it fast. Olive oil makes everything nice and shiny. - 1 cup cherry tomatoes, halved - 1 cup baby spinach - 2 cloves garlic, minced Cherry tomatoes burst with sweetness when cooked. I often use ripe ones for better taste. Baby spinach adds a pop of color and nutrients. Garlic brings a warm, savory flavor that I can’t resist. - 1/2 teaspoon red pepper flakes (optional) - 1/2 cup beef broth - 1/4 cup grated Parmesan cheese Red pepper flakes give a spicy kick if you like heat. Beef broth adds depth and keeps everything moist. Grated Parmesan is a finishing touch that makes the dish rich and creamy. {{ingredient_image_1}} To start, I heat my skillet over medium-high heat. I pour in one tablespoon of olive oil. Next, I season the sliced flank steak with salt and pepper. Once the oil is hot, I add the steak to the skillet. I let it sear for about 3-4 minutes. This timing is key for perfect browning. When it’s brown, I remove the steak and set it aside. In the same skillet, I add minced garlic and red pepper flakes. I sauté them for about 30 seconds. The smell is amazing! Then, I pour in half a cup of beef broth. I bring it to a simmer and scrape the skillet to get those tasty browned bits. This step adds so much flavor. Next, I add the cheese tortellini and halved cherry tomatoes to the skillet. I let them cook for about 5-7 minutes. I stir gently until the tortellini is tender. Then, I toss in the baby spinach. I cook it until it wilts, which takes about 1-2 minutes. Once that’s done, I return the seared steak to the skillet. I toss everything together and let it heat for another minute. Finally, I sprinkle grated Parmesan cheese on top. Mixing it well helps it melt into the dish. I always taste it and adjust the salt and pepper as needed. To cook tortellini just right, follow the package instructions for timing. Generally, it takes about 5 to 7 minutes. You want the tortellini to be tender but still firm. This is called "al dente." If you overcook it, tortellini can become mushy. To avoid that, test a piece a minute or two before the time is up. To add more flavor, consider using fresh herbs like thyme or oregano. A dash of lemon zest can brighten the dish. You can also use chicken broth or vegetable broth as an alternative to beef broth. Each option will give a different but tasty note to your meal. When serving, use deep bowls to hold the dish nicely. Top it with fresh basil leaves and an extra sprinkle of Parmesan cheese. This not only looks great but also adds flavor. You can even drizzle a bit of olive oil for a shiny finish. Serve with crusty bread for a complete meal! Pro Tips Rest the Steak: After searing, let the steak rest for a few minutes before slicing. This allows the juices to redistribute, making the meat more tender and flavorful. Customizing the Heat: If you prefer a spicier dish, increase the amount of red pepper flakes or add a pinch of cayenne pepper for an extra kick. Use Fresh Ingredients: For the best flavor, use fresh cherry tomatoes and baby spinach. They will enhance the dish's overall taste and presentation. One-Pan Clean-up: To make clean-up easier, try to cook and serve everything from the skillet. This way, you minimize dish usage and keep flavors locked in. {{image_2}} You can change the protein in this dish. If you like chicken, use diced chicken breast. Cook it the same way as the steak. For a seafood twist, try shrimp. Cook them until they turn pink, about 3-4 minutes. If you want a vegetarian meal, mushrooms or chickpeas work great. Sauté sliced mushrooms until they are tender. For chickpeas, just drain and rinse a can. Add them to the skillet with the tortellini. Both options give a nice texture and flavor. Feel free to mix in other vegetables. Bell peppers add a sweet crunch. Cut them into strips and sauté them with the garlic. Zucchini is another tasty choice. Slice it thin and add it with the tortellini. You can also use seasonal vegetables. In summer, add fresh corn or peas. In fall, try using butternut squash. These changes make the dish fresh and fun. Enjoy experimenting with your favorite veggies! To keep your steak tortellini skillet fresh, store leftovers in the fridge. Use an airtight container. The dish can stay good for up to three days. Make sure to cool it down first before sealing it. If you want to save it for longer, freezing is a great option. Place the cooled dish in a freezer-safe container. You can freeze it for up to three months. Just remember to label it with the date. This way, you will know when to use it. Reheating your steak tortellini skillet is easy. The best method is to use the stovetop. Heat a skillet over medium heat. Add a splash of beef broth or water to keep it moist. Stir it often to ensure even heating. If you prefer using a microwave, put the dish in a microwave-safe bowl. Cover it loosely with a lid or wrap. Heat it in short bursts, stirring in between. This will help keep a good texture. Avoid overcooking to keep the tortellini firm and tasty. Yes, you can use frozen tortellini in your skillet. Cooking frozen tortellini is easy. First, add the frozen tortellini directly to the skillet. You don’t need to thaw them. Make sure to increase the cooking time by a few minutes. Stir gently to avoid breaking the tortellini. Cook until they float and are tender. This usually takes about 7 to 10 minutes. Frozen tortellini saves time and still tastes great! You can pair this dish with great side options. A fresh garden salad is a perfect match. Add mixed greens, cucumbers, and a light vinaigrette. Garlic bread also complements the rich flavors well. You can serve roasted vegetables alongside for added color and taste. Consider pairing it with a simple fruit salad for a refreshing finish. These sides enhance your meal and add variety. Making steak tortellini skillet gluten-free is simple. You just need to swap the tortellini. Look for gluten-free tortellini made from rice or corn. Check the label to ensure it is certified gluten-free. For the broth, use a gluten-free beef broth. Always read labels to avoid hidden gluten in processed foods. With these changes, you can enjoy this dish safely and deliciously! This article shared a simple, tasty dish that combines cheese tortellini and flank steak. I covered the key ingredients, cooking steps, and tips for success. You learned how to store leftovers and explore variations. My goal was to make cooking easy and fun for you. Experiment with flavors and proteins to make it your own. Enjoy every bite of your delicious creation!

Steak Tortellini Skillet Quick and Flavorful Meal

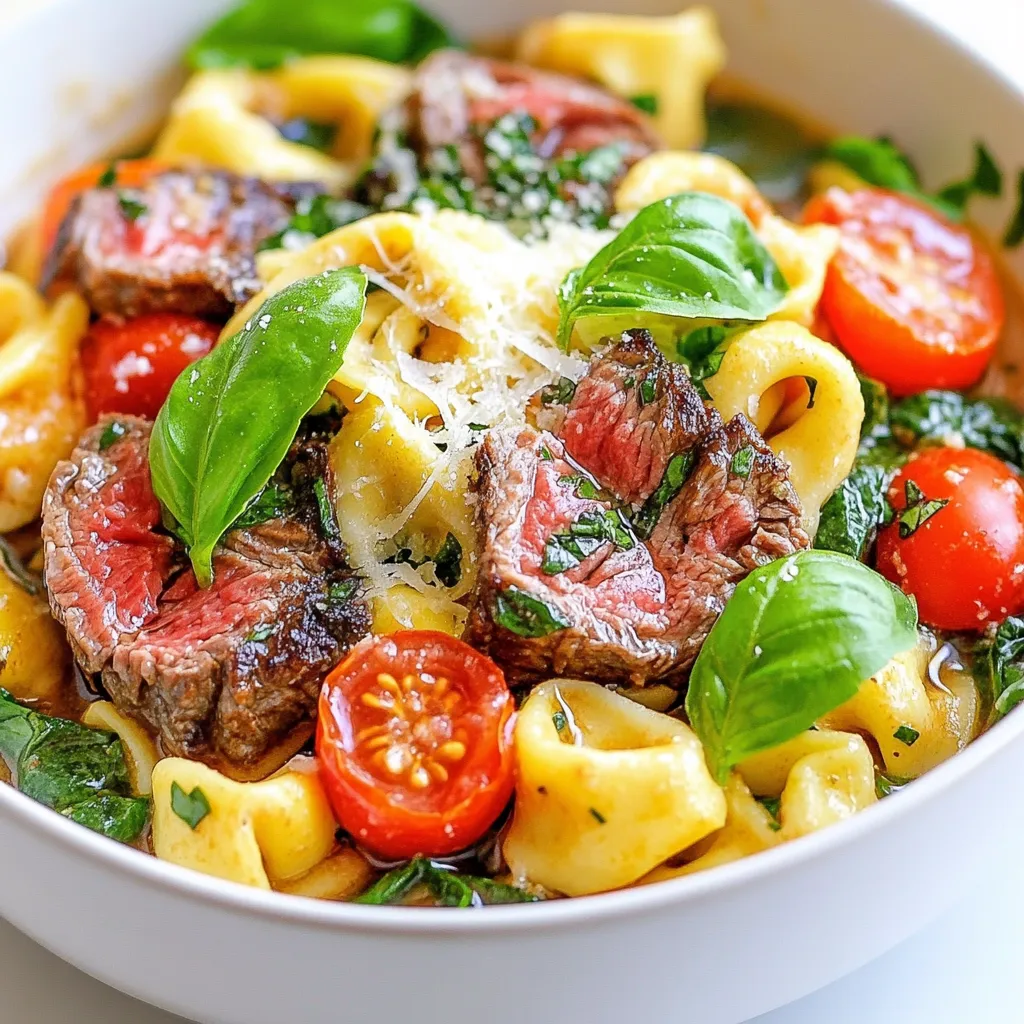
Looking for a quick and tasty meal? Try my Steak Tortellini Skillet! This dish combines tender flank steak, cheese tortellini,

To make a delicious Chicken Avocado Melt Sandwich, gather these items: - 2 cups cooked chicken breast, shredded - 1 ripe avocado, mashed - 1/2 cup Greek yogurt - 1 tablespoon Dijon mustard - 1 teaspoon garlic powder - Salt and pepper to taste - 4 slices whole grain bread - 1 cup shredded cheddar cheese - 1/2 cup fresh spinach leaves - Olive oil or butter for grilling You can swap some ingredients if needed: - Use plain yogurt instead of Greek yogurt for a lighter option. - Try regular mustard if you don't have Dijon. - Substitute chicken with canned tuna for a quick fix. - Use any cheese, like mozzarella or pepper jack, if cheddar is not available. Add some fun to your sandwich with these toppings: - Fresh tomato slices for a juicy bite. - Pickles for a tangy crunch. - Sliced jalapeños for a spicy kick. - Sprinkle some fresh herbs, like cilantro or parsley, for added flavor. - Serve with sweet potato fries or a light salad on the side for a complete meal. {{ingredient_image_1}} To start, gather your ingredients. You will need cooked chicken, a ripe avocado, Greek yogurt, Dijon mustard, garlic powder, salt, and pepper. In a large bowl, mix the shredded chicken and mashed avocado. Add the Greek yogurt for creaminess. Then, stir in the Dijon mustard and garlic powder. Season with salt and pepper to taste. Make sure everything blends well into a smooth mixture. This tasty filling will be the heart of your sandwich. Now it is time to build your sandwich. Take two slices of whole grain bread. Spread a generous amount of the chicken-avocado mixture on each slice. Next, add a handful of fresh spinach leaves on top. This will give your sandwich a nice crunch. Sprinkle a quarter of the shredded cheddar cheese over the spinach. Finally, place the other two slices of bread on top to form your sandwiches. Heat a skillet over medium heat. Drizzle some olive oil or add a small pat of butter to the pan. Place your sandwiches in the skillet carefully. Grill them for about 4-5 minutes on each side. You want them to be golden brown. Check that the cheese melts well inside. Once done, remove the sandwiches and cut them in half. Serve warm for the best taste! When picking an avocado, feel for ripeness. A good avocado yields slightly to gentle pressure. Look for a dark green or black skin. Avoid hard avocados; they are not ripe. Also, check for brown spots, which can mean bad spots inside. If you find a perfect avocado, use it soon. Ripe avocados can go bad quickly. For grilling, choose sturdy bread. Whole grain bread works well because it holds the filling. Sourdough or ciabatta also adds nice flavor. Avoid thin bread, as it may fall apart. Always make sure your bread is fresh. Fresh bread will give you the best crunch when grilled. Seasoning makes your sandwich pop. Use salt and pepper to taste for the best flavor. Garlic powder adds a nice kick. You can also try cayenne pepper for heat. If you want more zest, add lemon juice to the avocado. This keeps it fresh and brightens the flavors. Always taste as you go, and adjust to your liking. Pro Tips Use Fresh Ingredients: Always opt for fresh spinach and ripe avocados to enhance the flavor and texture of your sandwich. Customize the Cheese: Try using different types of cheese like pepper jack or mozzarella for a unique flavor twist. Grill to Perfection: Ensure your skillet is properly heated before grilling the sandwiches to achieve a crispy, golden-brown exterior. Spread the Love: Don't be shy with the chicken-avocado mixture; a generous amount makes for a more satisfying sandwich! {{image_2}} You can switch the chicken for turkey. Use shredded turkey breast for a tasty twist. If you want a meat-free option, try tofu. Press firm tofu to remove water. Then, cube it and sauté until golden. Both options keep the sandwich flavorful and fun. For a pure vegetarian treat, skip the chicken. Instead, add roasted veggies like zucchini or bell peppers. You can also use chickpeas for protein. Mash them with avocado and Greek yogurt. This mix is creamy and satisfying, perfect for anyone avoiding meat. Spice up your melt with different flavors. Add smoked paprika for a smoky kick. Or try cumin for warmth. To enhance the taste, drizzle sriracha or pesto inside the sandwich. You can even swap the Dijon mustard for spicy mustard for extra zing. Each change makes your sandwich unique! To keep your Chicken Avocado Melt Sandwich fresh, wrap it tightly. Use plastic wrap or a container with a lid. This helps prevent drying out. Store the sandwich in the fridge for up to three days. If you have extra filling, store it separately in an airtight container. When you're ready to enjoy your leftovers, reheat them gently. Use a skillet over low heat. This warms the sandwich without burning it. Flip it carefully to heat both sides evenly. You can also use a microwave, but be aware that the bread may become soft. Freezing is great for meal prep. Wrap each sandwich tightly in plastic wrap. Then place them in a freezer-safe bag. This keeps air out and prevents freezer burn. You can freeze the sandwiches for up to three months. To eat, let them thaw in the fridge overnight before reheating. Yes, you can make the chicken avocado mixture ahead of time. Store it in a sealed container. It will stay fresh in the fridge for up to 2 days. When you’re ready to eat, just grill the sandwiches. This saves time on busy days. This sandwich goes great with: - Sweet potato fries - A light salad - Fresh fruit - Crispy chips Each adds a nice touch to your meal. You can also serve it with a dipping sauce. Try ranch or a zesty aioli for extra flavor. Absolutely! Use lettuce wraps instead of bread. This keeps the tasty filling but cuts down on carbs. You can also use low-carb bread. There are many options available in stores today. Enjoy your melt without worry! We covered how to make the Chicken Avocado Melt Sandwich, from ingredients to tips. You learned about swaps, toppings, and how to store leftovers. This dish is flexible, allowing for different proteins and flavors. Whether you enjoy it fresh or as meal prep, it’s tasty and easy. Now, grab your ingredients and get cooking. Enjoy your delicious sandwiches!

Chicken Avocado Melt Sandwich Tasty and Simple Dish

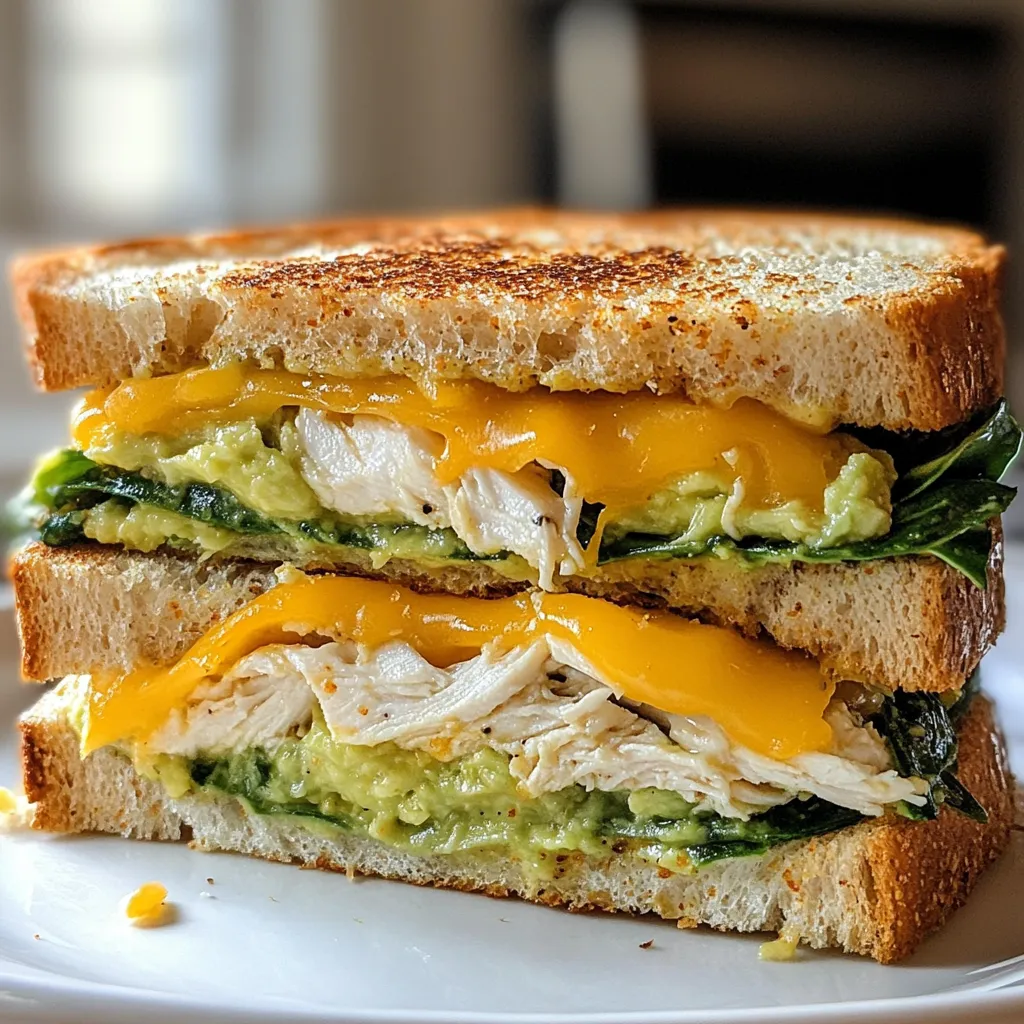
Are you ready to elevate your lunch game? The Chicken Avocado Melt Sandwich is both tasty and easy to make!

To make Amish Apple Fritter Bread, gather these items: - 2 cups all-purpose flour - 1 cup granulated sugar - 1 tablespoon baking powder - ½ teaspoon salt - 1 teaspoon ground cinnamon - ¼ teaspoon ground nutmeg - ½ cup unsalted butter, melted - 2 large eggs - 1 teaspoon vanilla extract - 1 cup peeled and diced apples (preferably Granny Smith) - ½ cup walnuts or pecans, chopped (optional) - ½ cup powdered sugar (for glaze) - 2 tablespoons milk (for glaze) You can make this bread fit your taste. Try adding: - ½ cup raisins or dried cranberries for sweetness. - 1 teaspoon lemon zest for a fresh twist. - A pinch of ginger for a warm spice. Change it up by using seasonal fruits. In fall, try: - Pears instead of apples for a soft texture. - Pumpkin puree mixed in for a cozy flavor. In spring, consider: - Fresh berries like blueberries or strawberries for a fruity kick. {{ingredient_image_1}} - Preheating the Oven Start by preheating your oven to 350°F (180°C). This step is key for even baking. Grease a 9x5 inch loaf pan with butter or cooking spray. This will help your bread release easily later. - Mixing Dry and Wet Ingredients In a large bowl, whisk together 2 cups of all-purpose flour, 1 cup of granulated sugar, 1 tablespoon of baking powder, ½ teaspoon of salt, 1 teaspoon of ground cinnamon, and ¼ teaspoon of ground nutmeg. This mix gives flavor and the right texture. In a separate bowl, mix ½ cup of melted unsalted butter, 2 large eggs, and 1 teaspoon of vanilla extract until smooth. - Incorporating Apples and Nuts Pour the wet mix into the dry ingredients. Stir gently until just combined. Do not overmix. Now, fold in 1 cup of peeled and diced Granny Smith apples and ½ cup of chopped walnuts or pecans, if you like. This adds a nice crunch and fresh taste. - Pouring and Layering the Batter Pour half of the batter into the greased loaf pan. Spread it evenly across the bottom. Then, add a layer of the rest of the batter on top. Smooth it out to cover the apples. - Swirling Technique for Marbled Effect With a knife or skewer, carefully swirl through the batter. This creates a beautiful marbled effect. Be gentle, as you don’t want to mix it too much. - Cooling Time Tips Bake the bread for 55 to 65 minutes. Check if it’s done by inserting a toothpick into the center. If it comes out clean, it’s ready. Let the bread cool in the pan for about 10 minutes. Then, transfer it to a wire rack to cool completely. - Making the Glaze While the bread cools, make your glaze. In a small bowl, mix ½ cup of powdered sugar with 2 tablespoons of milk. Stir until smooth. This glaze will add a sweet finish to your bread. Drizzle it over the cooled loaf before slicing. Enjoy your delicious Amish Apple Fritter Bread! When making Amish apple fritter bread, some simple mistakes can happen. Here are key points to keep in mind: - Overmixing the Batter: Stir just until combined. Overmixing will make the bread tough. - Incorrect Oven Temperature: Always preheat the oven. A cold oven can lead to uneven baking. - Skipping the Glaze: The glaze adds sweetness and a pretty finish. Don’t skip it! - Not Using Fresh Apples: Fresh apples bring the best flavor. Old apples can taste bland. - Ignoring Cooling Time: Let the bread cool before slicing. This helps it set properly. To keep your bread fresh, follow these tips: - Room Temperature: Store the bread wrapped in plastic. It stays fresh for up to three days. - Refrigeration: In warmer weather, keep it in the fridge. It can last up to a week. - Freezing: Wrap slices in foil and store in a freezer bag. It stays good for three months. - Thawing: Thaw at room temperature or warm in the microwave for a few seconds. Serving your Amish apple fritter bread can be fun! Here are some ideas: - Warm Slices: Serve warm for a cozy treat. Warmth makes the flavors pop. - With Ice Cream: Top slices with vanilla ice cream. The cold pairs well with warm bread. - Coffee Pairing: Enjoy it with a cup of coffee or tea. The flavors go together nicely. - Breakfast Treat: Serve slices for breakfast. It’s a great way to start the day! - On a Platter: Present slices on a wooden board. Dust with powdered sugar for a nice touch. Pro Tips Use Fresh Apples: For the best flavor and texture, use fresh, tart apples like Granny Smith. They hold their shape well during baking and balance the sweetness of the sugar. Don’t Overmix: When combining the wet and dry ingredients, mix just until combined. Overmixing can make the bread dense and tough. Cool Before Glazing: Allow the bread to cool completely before adding the glaze. This ensures the glaze doesn’t melt and runs off, keeping it beautifully drizzled on top. Experiment with Spices: Feel free to add additional spices like allspice or clove to enhance the flavor profile. Adjust to your taste preference for a unique twist on the classic recipe. {{image_2}} You can swap Granny Smith apples for other types. Honeycrisp or Fuji apples work great. They add sweetness and different textures. Tart apples give a nice balance to the sweet bread. Try using a mix of apples for a fun twist. Each bite will taste unique! If you need a gluten-free version, use a gluten-free flour blend. Make sure it includes xanthan gum to help with texture. You might need to adjust the liquid in the recipe. Start with less milk and add more as needed. This way, you’ll get a moist, tasty bread everyone can enjoy. The glaze can be fun to change up! Instead of milk, use apple cider for a fruity kick. You can also add a dash of cinnamon for extra flavor. Another option is to mix in maple syrup for a sweet touch. These swaps keep your apple fritter bread exciting and new! Amish Apple Fritter Bread has deep roots in Amish culture. The Amish people value homemade food and simple ingredients. This bread combines the joy of baking with the taste of fall. They often use apples from local orchards. Granny Smith apples are popular due to their tartness. This helps balance the sweetness of the bread. Amish baking traditions focus on family and community. They believe in sharing food to bring people together. Baking is often a way to bond. This bread is a great example of that. It is easy to make and shares well. The simple recipe allows anyone to connect with these traditions. It highlights the importance of home-cooked meals in Amish life. Different regions in America have their own spin on this bread. In Pennsylvania, you might find variations with more spices. In the Midwest, some add pumpkin or other fruits. Each variation tells a story of local tastes. Try different versions to find your favorite. Each bite connects you to a rich tapestry of American baking. Yes, you can freeze this bread. After it cools, wrap it tightly in plastic wrap. Then, place it in a freezer bag. It can stay fresh for up to three months. When you're ready to enjoy it, thaw it in the fridge overnight. You can also warm it in the oven for a fresh taste. If you need a substitute for butter, try using coconut oil or vegetable oil. You can also use applesauce for a lower-fat option. Just keep in mind that these will change the flavor and texture a bit. For a dairy-free version, stick with coconut oil. It works great and adds a nice flavor. To check if the bread is done, insert a toothpick into the center. If it comes out clean, the bread is ready. You can also look for a golden brown color on top. The edges should pull away slightly from the pan, showing it is baked well. Absolutely! Feel free to get creative with spices. You can add ginger or allspice for more warmth. A dash of cardamom also adds a unique touch. Just keep the total amount of spices balanced so the bread doesn’t become too strong. You've learned how to make Amish Apple Fritter Bread from start to finish. We covered the key ingredients, detailed steps, and helpful tips. Understanding the recipe's history adds even more to the experience. Now, you can customize it to suit your taste with seasonal fruits or different glazes. Enjoy baking and sharing this tasty treat with others. Remember, there are no wrong ways to make it your own. Happy baking!

Amish Apple Fritter Bread Heavenly and Easy Recipe

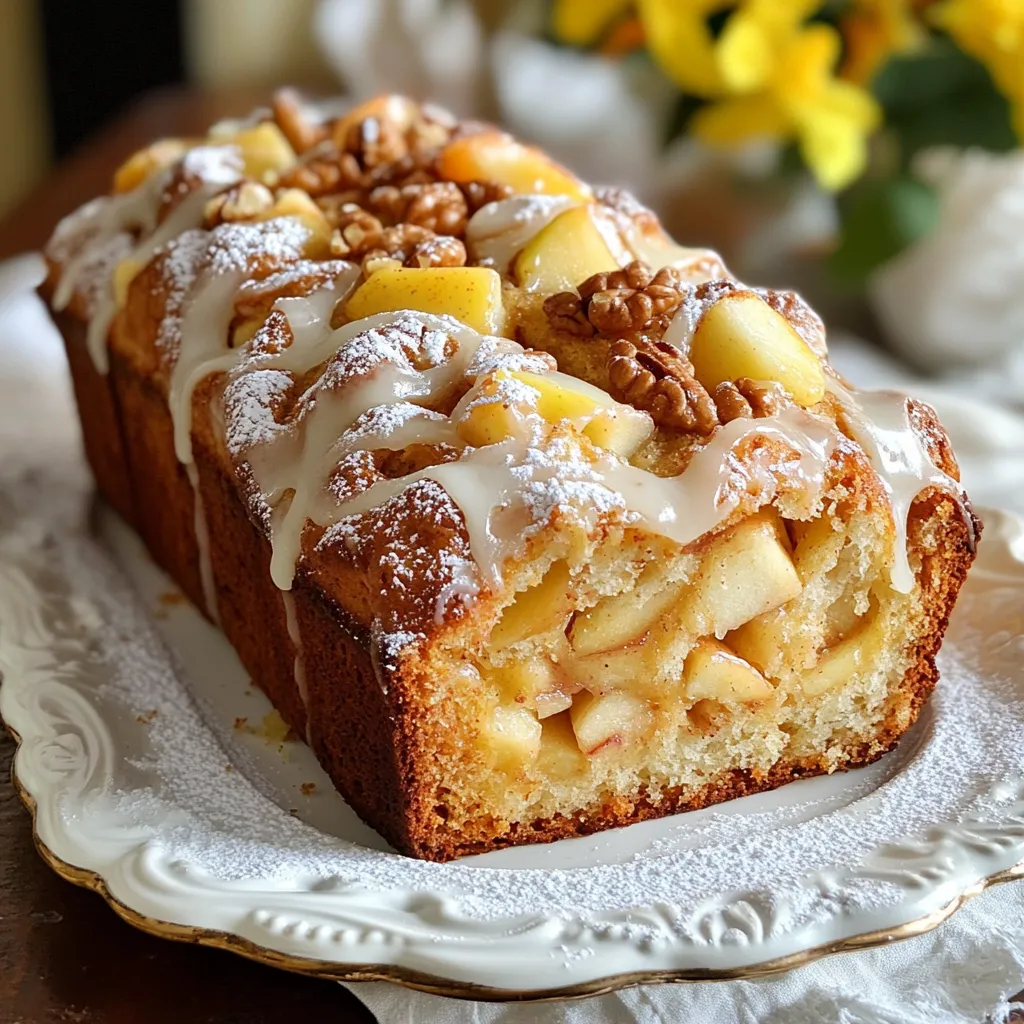
Craving a warm, sweet treat? You’re in the right place! This Amish Apple Fritter Bread is not only heavenly but

- 2 cups all-purpose flour - 1 tablespoon baking powder - 1/2 teaspoon salt - 1/2 cup unsalted butter, softened - 3/4 cup granulated sugar - 1 large egg - 1 teaspoon vanilla extract - 1 cup milk - 2 cups fresh strawberries, hulled and sliced - 1/4 cup granulated sugar (for strawberries) - 1 cup heavy cream - 2 tablespoons powdered sugar - 1 teaspoon vanilla extract (for whipped cream) I like to measure my ingredients carefully. This helps the cake rise and taste great. Use dry measuring cups for flour and sugar. Use liquid measuring cups for milk and cream. You can swap all-purpose flour for gluten-free flour if needed. For dairy-free options, try coconut cream instead of heavy cream. If you are allergic to eggs, use a flax egg or applesauce as a substitute. Check for allergens when using store-bought products. {{ingredient_image_1}} Start by slicing the fresh strawberries. Place them in a medium bowl. Add 1/4 cup of granulated sugar. Toss the strawberries gently. Let them sit for about 20-30 minutes. This will draw out their juices. You will get a nice syrup that adds flavor to your cake. Preheat your oven to 350°F (175°C). Grease and flour two 9-inch round cake pans. In a large mixing bowl, whisk together 2 cups of all-purpose flour, 1 tablespoon of baking powder, and 1/2 teaspoon of salt. In another bowl, cream together 1/2 cup of softened unsalted butter and 3/4 cup of granulated sugar. Beat until light and fluffy. This takes about 3-5 minutes. Next, add 1 large egg and 1 teaspoon of vanilla extract. Mix well. Gradually add the flour mix to the butter mix. Alternate with 1 cup of milk. Start and end with the flour mix. Mix until just combined. Divide the batter equally between the two prepared pans. Bake for 25-30 minutes. Check if a toothpick comes out clean from the center. Let the cakes cool in the pans for 10 minutes. Then, transfer them to wire racks to cool completely. In a medium bowl, pour 1 cup of heavy cream. Add 2 tablespoons of powdered sugar and 1 teaspoon of vanilla extract. Use a mixer to whip the cream until soft peaks form. This should take about 3-4 minutes. Once the cakes are cool, place one layer on a serving platter. Top it with half of the macerated strawberries and their syrup. Add a generous layer of whipped cream. Place the second cake layer on top. Repeat with the remaining strawberries and whipped cream. Feel free to garnish with whole strawberries or mint leaves for a nice touch. To make a light and fluffy cake, cream the butter and sugar well. This step adds air and makes your cake rise. Use softened butter for easier mixing. Mix the batter gently to avoid overworking it. Overmixing can lead to a dense cake. Alternate adding dry and wet ingredients to keep the texture light. Chill your bowl and beaters before whipping cream. Cold tools help the cream whip faster. Use heavy cream for the best results. When you add sugar and vanilla, do it gradually. Start on low speed so the sugar mixes in well. Keep whipping until soft peaks form. This means the cream holds its shape but is still smooth. One common mistake is using cold butter. It should be at room temperature. This helps it cream well with sugar. Don’t skip letting the strawberries sit with sugar. This step creates a lovely syrup. Also, be careful not to overbake the cakes. Check for doneness with a toothpick. A clean toothpick shows they are ready. Finally, let the cakes cool completely before stacking. This prevents melting the whipped cream. Pro Tips Use Fresh Strawberries: Always opt for the ripest and freshest strawberries for the best flavor and natural sweetness in your shortcake. Let the Strawberries Macerate: Allowing the strawberries to sit with sugar for a while helps to enhance their juices, creating a delicious syrup that will elevate your dessert. Don't Overmix the Batter: To ensure a light and fluffy cake, mix the batter just until combined. Overmixing can lead to a dense texture. Chill Your Whipped Cream: For better volume and stability, chill your mixing bowl and beaters before whipping the cream. This helps achieve perfect soft peaks. {{image_2}} You can make a vegan version of this cake. Replace the egg with one tablespoon of flaxseed meal mixed with three tablespoons of water. Let it sit for five minutes to thicken. Use coconut oil instead of butter. Choose almond milk or any plant milk instead of regular milk. You can also use a vegan whipped cream made from coconut cream or store-bought options. This way, you keep the taste and texture without the dairy. To make a gluten-free cake, use a gluten-free flour blend. These blends often include rice flour, almond flour, or tapioca flour. Make sure the baking powder is gluten-free too. The rest of the recipe stays the same. You may notice a slightly different texture, but the flavor will still shine. Serve it fresh to get the best taste! While strawberries are classic, you can use other fruits. Ripe peaches or plump blueberries work well. Sliced bananas add sweetness and creaminess. Mix fruits for a fun twist! You can even use seasonal fruits like raspberries or blackberries. This way, you can enjoy a new flavor with each cake! To store leftover cake, first, cool it completely. Wrap it tightly in plastic wrap. You can also place it in an airtight container. This keeps the cake moist and fresh. Store it in the fridge for up to five days. If you want to extend its life, freeze the cake. Just remember to wrap it well to prevent freezer burn. Keep fresh strawberries in the fridge. Store them in a container with holes for airflow. Do not wash them until you are ready to eat. Moisture can cause them to spoil faster. If you notice any bad berries, remove them right away. This helps the good ones last longer. Freezing strawberry shortcake is easy. First, slice the cake into pieces. Wrap each piece in plastic wrap. Then, place them in a freezer-safe bag. You can also freeze the strawberries. Slice them and mix with sugar before freezing. Store them in a sealed bag. When you want to enjoy the cake, thaw it in the fridge overnight. This keeps it tasty and fresh. To ripen strawberries, place them in a bowl at room temperature. Avoid washing them until you are ready to use. This helps keep them fresh longer. If you want them sweeter, keep them in a sunny spot for a few hours. Yes, you can make the cake ahead of time. Bake the cake layers and let them cool completely. Wrap them in plastic wrap and store in the fridge for up to three days. You can also freeze them for up to three months. Just thaw before assembling. To prevent sticking, grease and flour your cake pans well. You can also use parchment paper at the bottom of the pans. After baking, let the cakes cool for about 10 minutes before removing them from the pans. This helps keep the layers intact. You can add fresh strawberries on top for a burst of color. A drizzle of chocolate sauce or a sprinkle of nuts can add texture. Consider adding mint leaves for a fresh touch. For extra sweetness, dust with powdered sugar before serving. This blog post covered how to make Strawberry Shortcake Cake from start to finish. You learned about the key ingredients, step-by-step instructions, and helpful tips. I shared variations like vegan and gluten-free options to cater to different needs. Finally, I provided storage tips to keep your cake fresh. Enjoy creating your own shortcake masterpiece and experimenting with flavors. You now have all the tools to impress your friends and family with this classic dessert!

Strawberry Shortcake Cake Delightful and Easy Recipe

Craving a sweet and fruity treat? You’ll love this Strawberry Shortcake Cake! It’s simple to make and packed with fresh

For this dish, you’ll need 1 pound of ground beef. This will give your meal a rich flavor and protein boost. Choose lean ground beef for a healthier option. You will need 1 cup of orzo pasta. This small pasta cooks quickly and soaks up the sauce well. It adds a nice texture to the dish. The creamy tomato sauce needs 1 can (14 oz) of diced tomatoes that you will drain. You will also use 1 cup of heavy cream. This cream makes the sauce rich and smooth. You’ll want 1 medium onion, finely chopped, and 2 cloves of garlic, minced. Add 1 teaspoon of dried oregano and 1 teaspoon of paprika for flavor. Don't forget to season with salt and pepper to taste. Lastly, have 2 tablespoons of olive oil on hand for cooking. Fresh basil leaves and grated Parmesan cheese will add the perfect finishing touch to your dish. {{ingredient_image_1}} Start by grabbing a large skillet. Add two tablespoons of olive oil and heat it over medium heat. Toss in one medium onion that you have finely chopped. Sauté the onion for about 3-4 minutes. You want it to be soft and see-through. Next, add two cloves of minced garlic. Cook the garlic for one minute until it smells great. Now, increase the heat to medium-high. Add one pound of ground beef to the skillet. Use a wooden spoon to break it apart. Cook the beef for about 6-8 minutes until it turns brown. If there is too much fat, drain it off. This step keeps your dish from being greasy. Once the beef is browned, stir in one can of drained diced tomatoes. Add one teaspoon of dried oregano and one teaspoon of paprika for flavor. Don’t forget to sprinkle in salt and pepper to taste. Allow this mixture to simmer for 5 minutes. This lets all the flavors blend nicely. While the beef simmers, grab a pot. Cook one cup of orzo pasta according to the package instructions. Aim for al dente, which means it should still have a little bite. Once cooked, drain the orzo and set it aside for later. Lower the heat on your skillet. Pour in one cup of heavy cream and stir it into the beef mixture. Let it simmer for another 3-4 minutes. The sauce should thicken slightly. Now, add the cooked orzo to the skillet. Gently mix everything together until the orzo is fully coated. Taste your dish and adjust seasoning if needed. Now you’re ready to serve! To make this dish your own, start with salt and pepper. Add a little, then taste. If you want it spicier, add more paprika or chili flakes. Fresh herbs, like basil, can add a nice kick too. Always remember, you can add more but can’t take it out. Cook orzo in boiling water. Follow the package instructions closely. Check it a minute or two early. You want it al dente, not mushy. Drain it well, but do not rinse. Rinsing removes the starch that helps the sauce stick. Serve the orzo in wide, shallow bowls. This lets the sauce shine. Top each serving with fresh basil leaves. A sprinkle of grated Parmesan gives it a rich finish. For added flair, drizzle a little olive oil on top. This not only looks nice but boosts flavor too. Pro Tips Use Fresh Ingredients: Fresh garlic and herbs elevate the flavors of your dish significantly. Whenever possible, opt for fresh over dried. Rest the Dish: Allowing the dish to sit for a few minutes after cooking helps the flavors meld together, making each bite more delicious. Mix Well: Ensure the orzo is well coated with the beef and cream mixture for a harmonious taste in every bite. Customize Seasoning: Don't hesitate to adjust the seasoning to your taste. A pinch of red pepper flakes can add a delightful kick! {{image_2}} You can easily make this dish vegetarian. Use lentils or mushrooms instead of ground beef. Both options add great texture and flavor. Lentils provide protein, while mushrooms give a hearty feel. Cook them until soft to match the beef’s cooking time. This change keeps your dish rich and satisfying. Boost the nutrition by adding vegetables. Spinach, zucchini, or bell peppers work well. You can sauté these with the onions. This step adds color and vitamins to your dish. Cut the veggies into small pieces so they cook quickly. Add them to the skillet before the tomatoes for the best flavor. Enhance the flavor with fresh herbs and spices. Try adding fresh basil or parsley at the end. They add a burst of freshness. For a bit of heat, include crushed red pepper flakes. You can also experiment with thyme or rosemary. These spices bring depth to the tomato cream sauce. Adjust to your taste for a dish that’s uniquely yours. After enjoying your Ground Beef Orzo, store leftovers in an airtight container. Let the dish cool before sealing. This helps keep it fresh. Place the container in the fridge. It stays good for 3 to 4 days. If you want to eat it later, freezing is a great option. When ready to enjoy again, take the leftovers out of the fridge. Heat them in a pan over medium heat. Stir often to warm it evenly. You can add a splash of water or cream to keep it creamy. If using a microwave, cover the dish to avoid drying it out. Heat in short bursts, stirring in between. To freeze, divide the orzo into portions. Use freezer-safe containers or bags. Squeeze out as much air as possible before sealing. Label with the date. The dish can last up to 3 months in the freezer. When ready to eat, thaw it overnight in the fridge before reheating. This keeps it tasty and fresh! Yes, you can use whole wheat orzo. It adds fiber and a nutty flavor. Just remember, the cooking time may change slightly. Check the package for directions. To spice it up, add red pepper flakes or diced jalapeños. You can also use spicy paprika instead of regular. Start with a small amount and taste as you go. If you want a lighter option, use half-and-half or full-fat coconut milk. For a dairy-free choice, cashew cream works well too. Blend soaked cashews with water until smooth. Leftovers stay good for about three to four days. Store them in an airtight container. Reheat gently on the stove or in the microwave. This blog post covered how to make a delicious dish with ground beef, orzo, and creamy tomato sauce. We discussed how to prepare and cook each ingredient, along with useful tips for seasoning and presentation. You can even explore vegetarian options and add veggies for more nutrition. Proper storage tips will help keep your leftovers fresh. Remember, cooking is about trying new things. Don’t be afraid to make this recipe your own! Enjoy your cooking adventure.

Ground Beef Orzo with Tomato Cream Rich Dish Recipe

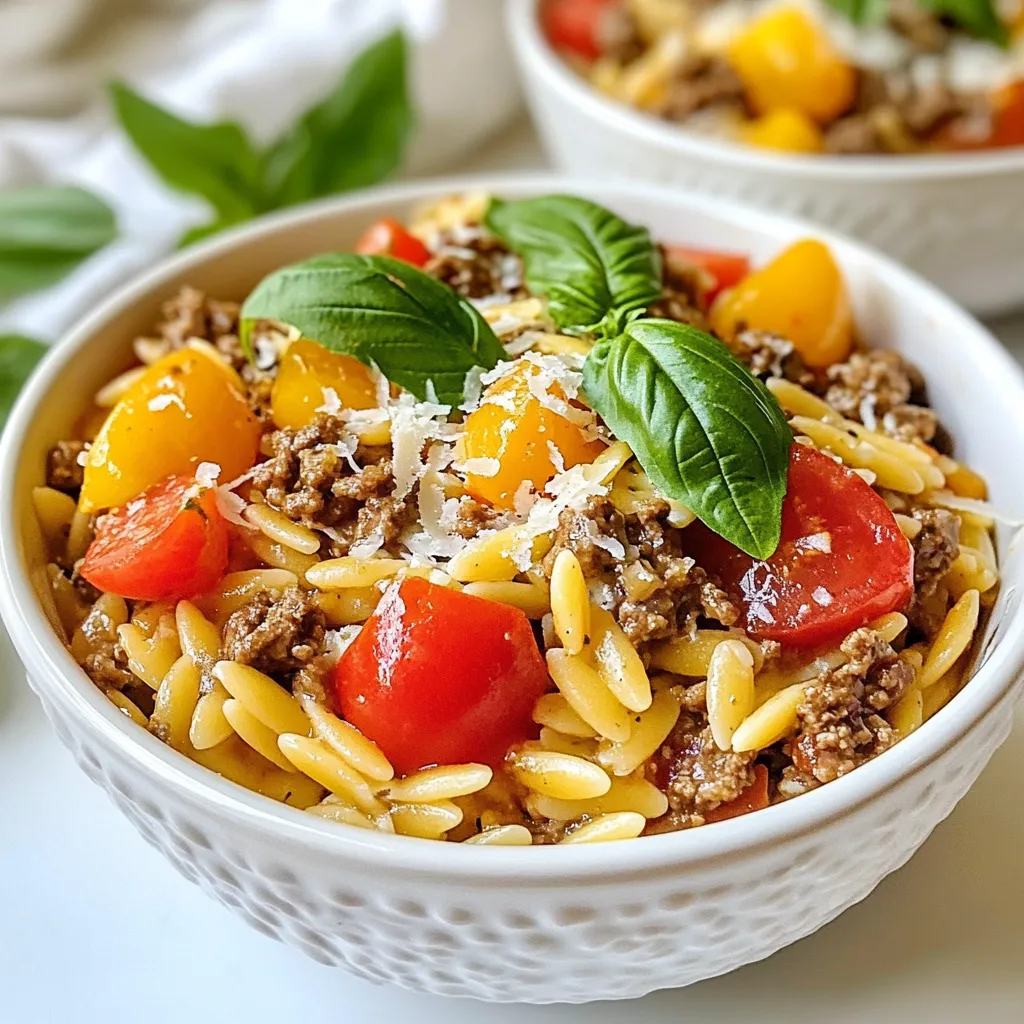
Are you ready for a cozy meal that warms the heart? Ground Beef Orzo with Tomato Cream is the perfect

- 8 oz whole wheat spaghetti - 1 lb ground turkey or chicken - 1 cup cottage cheese - 1 cup shredded mozzarella cheese - 2 cups spinach, fresh or frozen - 1 can (14 oz) diced tomatoes, drained - 1 cup black beans, rinsed and drained - 2 cloves garlic, minced - 1 teaspoon Italian seasoning - Salt and pepper to taste - 2 tablespoons olive oil - Fresh basil leaves for garnish Whole wheat spaghetti offers more fiber than regular pasta. This helps you feel full longer. Ground turkey or chicken provides lean protein. Protein is key for muscle growth and repair. Cottage cheese adds calcium and protein, which are good for bones. Spinach is rich in vitamins and minerals, making it a great choice for health. Black beans give you fiber and protein, which are good for digestion. Olive oil is a source of healthy fats and can help keep your heart healthy. All these ingredients work together to make a hearty, nutritious meal. If you need a gluten-free option, use gluten-free pasta. For a vegetarian meal, swap the turkey or chicken for lentils or tofu. You can use ricotta instead of cottage cheese if you prefer. If you can't have dairy, try using a plant-based cheese. For lower sodium, choose low-sodium black beans and diced tomatoes. These swaps let everyone enjoy this tasty casserole. {{ingredient_image_1}} 1. Preheat your oven to 350°F (175°C). Grease a 9x13 inch baking dish with cooking spray. 2. Cook 8 oz of whole wheat spaghetti in a large pot. Follow the package directions until al dente. Drain and set aside. 3. In a large skillet, heat 2 tablespoons of olive oil over medium heat. 4. Add 2 cloves of minced garlic. Sauté for about 1 minute until it smells great. 5. Add 1 lb of ground turkey or chicken to the skillet. Cook until browned, about 5-7 minutes. Season with salt, pepper, and 1 teaspoon of Italian seasoning. 6. Stir in 2 cups of spinach. Cook until it wilts. This takes about 2-3 minutes for fresh spinach or 1-2 minutes for frozen. 7. In a big mixing bowl, combine the cooked spaghetti, the meat mixture, 1 cup of cottage cheese, 1 can of drained diced tomatoes, and 1 cup of black beans. 8. Fold in half of the 1 cup of shredded mozzarella cheese. Mix everything well until combined. 9. Transfer the mixture to the prepared baking dish. Spread it evenly across the dish. 10. Top with the remaining mozzarella cheese. 11. Cover the casserole with aluminum foil. Bake for 25 minutes. 12. After 25 minutes, remove the foil and bake for another 10-15 minutes. The cheese should be bubbly and golden brown. 13. Once cooked, let it cool for a few minutes before slicing. Garnish with fresh basil leaves if you want. To get the best texture, cook the spaghetti just right. Follow the package instructions and aim for al dente. This means the pasta should be firm but not hard. When you mix it with the other ingredients, it will absorb some sauce and soften a bit. This way, it won’t get mushy during baking. One common mistake is overcooking the meat. Cook it just until it’s browned. If you cook it too long, it can turn dry. Another mistake is not draining the tomatoes well. If they are too watery, they can make your casserole soggy. Lastly, don’t skip the cheese topping. It adds flavor and a nice crust. Serve this casserole with a side salad for freshness. A simple green salad with lemon vinaigrette works great. You can also add garlic bread for crunch. If you want more flavor, sprinkle some crushed red pepper flakes on top. Fresh basil leaves make a lovely garnish too! Pro Tips Use Lean Meat: Opt for lean ground turkey or chicken to keep this casserole healthy while still packing in the protein. Add Extra Veggies: Feel free to include other vegetables like bell peppers or zucchini for added nutrition and flavor. Customize the Cheese: Experiment with different cheeses, such as cheddar or parmesan, for a unique twist on the flavor profile. Make Ahead: Prepare this casserole in advance and refrigerate it overnight. Just pop it in the oven when you're ready to eat! {{image_2}} To boost the protein in this dish, try adding more lean meat. Ground chicken or turkey works great. You can also use shredded rotisserie chicken for quick prep. If you want to skip meat, add plant-based proteins like lentils or chickpeas. Both options pack a protein punch and taste great in this casserole. For a vegetarian twist, replace the meat with extra beans or tofu. Use firm tofu and crumble it into the mix for texture. If you want this dish vegan, swap cottage cheese for a dairy-free version. Nutritional yeast can add a cheesy flavor while keeping it plant-based. This casserole is perfect for sneaking in veggies. You can add chopped bell peppers or zucchini for extra flavor. Consider mixing in broccoli or cauliflower for more crunch. Even carrots work well if you shred them finely. The more veggies, the better the nutrition and taste! To keep your high protein spaghetti casserole fresh, store it in an airtight container. Let the casserole cool down before sealing it. This helps to prevent excess moisture. It stays good in the fridge for about 3 to 5 days. For best taste, eat it within this time frame. Reheating the casserole is easy. Preheat your oven to 350°F (175°C). Place the casserole in an oven-safe dish, cover it with foil, and heat for about 20 minutes. This keeps it moist. You can also microwave single portions for 2 to 3 minutes. Just make sure to cover it to avoid drying it out. Freezing is a great way to save time. To freeze, let the casserole cool first. Then, cut it into portions and wrap each piece in plastic wrap. Place the wrapped pieces in a freezer bag. It will stay good for about 2 to 3 months. When you want to eat it, thaw it in the fridge overnight before reheating. This casserole packs a protein punch from several key ingredients. Ground turkey or chicken is lean and full of protein. Cottage cheese adds even more protein and creaminess. Black beans also contribute protein and fiber. Together, these ingredients help you feel full and satisfied. Yes, you can! If you prefer, use any pasta you like. Whole wheat pasta is great for extra fiber. Gluten-free pasta works well too. Just be sure to adjust the cooking time as needed. Each pasta type offers a unique taste and texture. To make this dish gluten-free, choose gluten-free pasta. Many brands offer great options that taste similar to regular pasta. Also, check that your canned tomatoes and beans are gluten-free. These small changes make the recipe safe for those with gluten allergies. This article covers everything you need to make a great spaghetti casserole. We explored key ingredients and their health benefits, plus smart substitutions. I laid out step-by-step cooking and baking tips to guide you. We discussed common mistakes and serving ideas for extra flavor. I shared variations for protein-packed or vegetarian choices. Lastly, I provided storage advice to keep leftovers fresh and tasty. With this knowledge, you can create a dish that satisfies everyone at your table. Try making it your own and enjoy!

High Protein Spaghetti Casserole Easy Family Meal

Looking for a family meal that packs a protein punch? My High Protein Spaghetti Casserole is easy to make and

To make a tasty honey mustard dressing, you only need a few simple items. Each ingredient adds a unique flavor. Here’s your shopping list: - Honey - Dijon Mustard - Apple Cider Vinegar - Olive Oil - Optional: Water - Salt and Pepper These ingredients blend well together. Honey gives sweetness, while Dijon mustard adds a nice kick. Apple cider vinegar brings tanginess, and olive oil makes the dressing smooth. You can add water if you want a thinner texture. Don’t forget the salt and pepper to perfect the taste. Now, let’s explore how these ingredients work together in your dressing. Each one plays a role in creating a balance of sweet and tangy flavors. You can adjust the amounts to fit your taste, making this recipe truly yours. Enjoy making it! {{ingredient_image_1}} To make honey mustard dressing, start by gathering your ingredients. You will need honey, Dijon mustard, apple cider vinegar, olive oil, and salt and pepper. 1. In a medium bowl, combine 1/3 cup honey and 1/4 cup Dijon mustard. 2. Whisk them together until smooth. This is the base of your dressing. 3. Next, add 2 tablespoons of apple cider vinegar. Whisk until it blends well. 4. Slowly drizzle in 1/4 cup of olive oil while whisking. This helps create a smooth, thick dressing. 5. If the dressing feels too thick, add 1 tablespoon of water. Stir to thin it out. 6. Finally, season with salt and pepper. Taste and adjust sweetness or tanginess if needed. To get your dressing just right, remember a few things. If it's too thick, always start with a little water. This way, you won't make it too thin. If you want it creamier, add more olive oil. Just whisk until you see the right texture. Store your dressing in an airtight container in the fridge. Shake well before each use for the best flavor. To boost the taste of your honey mustard dressing, consider these tips: - Add herbs: Fresh herbs like dill or parsley can add depth. - Introduce spice: A pinch of cayenne or red pepper flakes can add heat. - Experiment with vinegar: Try using balsamic or white wine vinegar for a different kick. - Use flavored oils: Infused oils like garlic or chili can enhance richness. These simple tweaks can make your dressing stand out. Emulsifying is key to a smooth dressing. Here are my tips to get it right: - Use room temperature ingredients: Cold ingredients may not mix well. - Add oil slowly: Drizzle the olive oil slowly while whisking. This helps create a stable emulsion. - Whisk constantly: Keep whisking to help the ingredients blend smoothly. - Try a blender: If you prefer, blend the ingredients for a quick, easy emulsification. These methods help ensure your dressing has the perfect texture. Proper storage keeps your honey mustard dressing fresh. Follow these guidelines: - Use an airtight container: This prevents air from spoiling the dressing. - Refrigerate promptly: Store it in the fridge right after making. - Check for freshness: Use it within one week for the best taste. - Shake well before use: The dressing may separate. A good shake brings it back together. By following these tips, your dressing remains delicious and ready to enjoy! Pro Tips Fresh Ingredients: Using fresh, high-quality ingredients will significantly enhance the flavor of your dressing. Opt for organic honey and extra virgin olive oil for the best results. Adjust to Taste: Feel free to tweak the balance of honey and mustard according to your personal preference. If you prefer a sweeter dressing, add more honey; for a tangier flavor, increase the mustard. Storage Tips: Store your dressing in an airtight container in the refrigerator. It will last up to a week, but always give it a good shake before using as ingredients may separate. Versatile Use: This dressing is not just for salads! Try it as a marinade for chicken or drizzle it over roasted vegetables for an added flavor boost. {{image_2}} To make your honey mustard dressing spicy, add some heat. Start with 1-2 teaspoons of hot sauce. You can also use chili powder for a different kick. Mix these into the dressing after you whisk in the vinegar. This way, you get a nice balance of sweet and spicy. It pairs well with grilled chicken or a zesty salad. For an herb-infused version, I love adding fresh herbs. Chopped parsley or dill can brighten the flavor. Simply mix in 1-2 tablespoons of your chosen herbs when you combine the honey and mustard. This adds freshness and aroma. It works great on roasted veggies or as a dip for bread. If you want a vegan version of honey mustard dressing, use maple syrup instead of honey. Maple gives a nice sweetness and works well with the mustard. Just swap it in the same amount as the honey. You can also use a plant-based yogurt to add creaminess. This dressing is perfect for salads or drizzling over grain bowls. Each serving of honey mustard dressing has about 90 calories. This is based on a serving size of 2 tablespoons. The calories mainly come from honey and olive oil. Honey brings sweetness and more calories, while olive oil adds healthy fats. Honey mustard dressing offers several key nutrients: - Carbohydrates: Mainly from honey, which provides quick energy. - Fats: Olive oil gives healthy monounsaturated fats. - Vitamins: Apple cider vinegar has small amounts of vitamins and minerals. - Minerals: Dijon mustard can contain minerals like calcium and magnesium. Honey mustard dressing fits many diets but consider these points: - Vegetarian: This dressing is suitable for vegetarians as all ingredients are plant-based. - Gluten-Free: Ensure the mustard is gluten-free if you need to avoid gluten. - Low-Carb: If on a low-carb diet, use less honey to reduce sugar intake. - Vegan: Substitute honey with agave syrup or maple syrup for a vegan option. This dressing makes a great addition to salads or as a dip. Always think about your specific dietary needs when enjoying it. Yes, you can make honey mustard dressing without honey. If you want a vegan option, use maple syrup or agave nectar. Both sweeteners provide a similar sweetness. You can also try using brown sugar or a sugar substitute if you prefer. Just remember to adjust the amount based on how sweet you want the dressing. You can use honey mustard dressing in many ways. Here are some of my favorites: - Drizzle it over fresh salads for a sweet kick. - Use it as a dip for veggies or chicken strips. - Spread it on sandwiches or wraps for added flavor. - Toss it with roasted vegetables for a tasty side dish. - Marinate meats like chicken or pork before grilling. Homemade honey mustard dressing lasts about one week in the refrigerator. Store it in an airtight container to keep it fresh. Before each use, give it a good shake. If you notice any changes in color or smell, it’s best to throw it away and make a fresh batch. In this article, we explored how to make a tasty honey mustard dressing. We went over the key ingredients like honey, Dijon mustard, and apple cider vinegar. You learned the mixing process and tips to improve flavor and shelf life. I shared variations to fit your taste, and gave nutritional facts to help you make healthy choices. Always remember, making your own dressing is easy and fun! Enjoy experimenting with different flavors!

Honey Mustard Dressing Flavorful and Easy Recipe

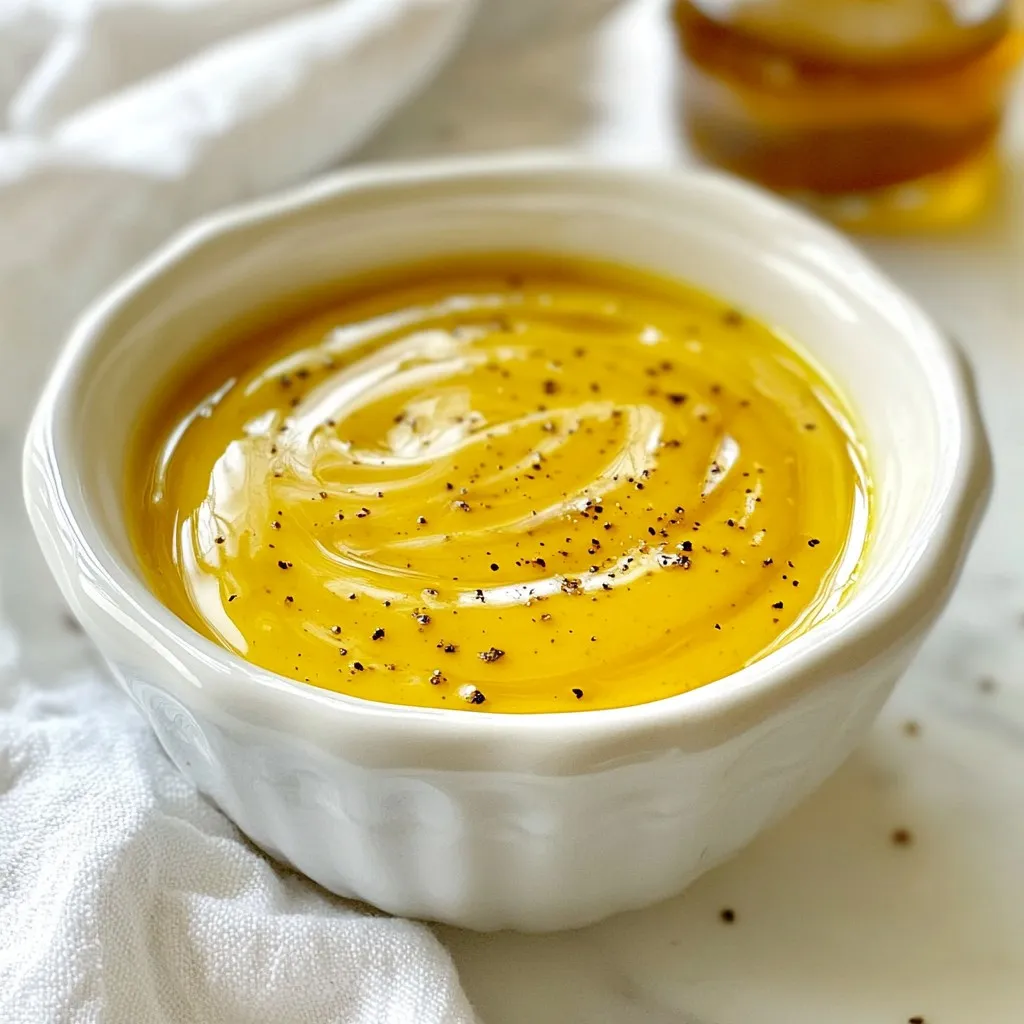
Are you ready to transform your salads with a simple yet delicious honey mustard dressing? I’m excited to share an

- 1 cup broccoli florets - 1 cup bell peppers (mixed colors), sliced - 1 cup sugar snap peas - 1 medium carrot, julienned - 1 cup mushrooms, sliced - 2 cloves garlic, minced - 1-inch piece ginger, grated - 2 tablespoons soy sauce (low sodium) - 1 tablespoon sesame oil - 1 tablespoon cornstarch mixed with 2 tablespoons water - 1 teaspoon sesame seeds (for garnish) - Cooked rice or quinoa (for serving) In this recipe, we use fresh, colorful vegetables. Broccoli adds crunch. Bell peppers bring sweetness. Sugar snap peas add a lovely snap. Carrots give a vibrant touch. Mushrooms offer depth in flavor. Each of these veggies makes your dish more fun and tasty! For flavor, garlic and ginger are key. They bring warmth and zest that you will love. Low-sodium soy sauce adds saltiness without being too strong. This mix of flavors makes each bite exciting. We finish it with sesame oil. This oil adds a nutty taste. A little cornstarch mixed with water helps thicken the sauce. It makes everything stick together nicely. Finally, we sprinkle sesame seeds on top for a nice crunch. Serve this stir-fry over rice or quinoa for a complete meal. {{ingredient_image_1}} Start by chopping your vegetables. You need to make them bite-sized. For the broccoli, cut it into small florets. Slice the bell peppers into thin strips. Julienning the carrot is easy; just cut it into long, thin pieces. Next, you will mince the garlic and grate the ginger. For this, peel the garlic cloves and chop them finely. Use a grater for the ginger, which adds a nice kick to your dish. Now, it’s time to cook! Heat 1 tablespoon of sesame oil in a large skillet or wok over medium-high heat. When the oil is hot, add the minced garlic and grated ginger. Sauté them for about 1 minute. You want to smell that amazing aroma! Toss in the broccoli and carrot next. Stir-fry these for about 3-4 minutes. They should become slightly tender. After that, add the sliced bell peppers, sugar snap peas, and mushrooms. Stir-fry everything for another 3-5 minutes. Look for bright colors and a crisp-tender texture in your veggies. Pour in 2 tablespoons of low-sodium soy sauce. Stir well to mix everything together. To thicken the sauce, slowly add your cornstarch mixture while stirring. It should take about 1-2 minutes to get that nice, thick sauce. Remove the skillet from heat and sprinkle 1 teaspoon of sesame seeds on top. Now your veggie-packed stir fry is ready! Serve it hot over cooked rice or quinoa for a complete meal. To make a great stir-fry, cook on high heat. High heat cooks the veggies fast. This keeps them crisp and bright. Timing is key. Start with veggies that need longer cooking, like carrots and broccoli. After a few minutes, add the quicker-cooking ones, like bell peppers and snap peas. This way, everything stays crunchy and colorful. Want to add some spice? Try red pepper flakes or chili paste. Both give a nice kick. If you want less salt, use low-sodium soy sauce. You can also mix soy sauce with a bit of vinegar for a tangy twist. This adds depth to your dish without too much salt. Serve your stir-fry on colorful plates. This makes the dish pop and look fun. For garnishing, sprinkle sesame seeds on top. A drizzle of sesame oil adds shine and flavor. These small touches make your meal look as good as it tastes. Pro Tips Prep Ahead: Chop and prepare all vegetables in advance to make the cooking process smoother and quicker. High Heat: Stir-frying works best at high heat to achieve that perfect crisp-tender texture, so don’t hesitate to raise the temperature. Color Variety: Use a mix of colorful vegetables not only for visual appeal but also to maximize nutritional benefits. Adjust to Taste: Tweak the soy sauce and sesame oil amounts to suit your flavor preference; add more for a bolder taste. {{image_2}} You can add protein to your veggie packed stir fry. Tofu is a great choice for a vegetarian option. It soaks up the flavors well. Press it to get rid of excess water. Then, cut it into cubes. Sauté the tofu until golden brown before adding veggies. If you prefer meat, chicken, beef, or shrimp works too. Cut them into small pieces for quick cooking. Add them to the pan after the garlic and ginger. This way, the meat cooks through while keeping your veggies crisp. Feel free to swap vegetables based on what you have. Seasonal veggies are always fresh and tasty. Think of zucchini, asparagus, or even spinach. You can mix and match to keep it fun! Frozen vegetables are an easy option too. They last longer and save time. Just toss them in straight from the bag. They cook quickly and still taste great. If you need a gluten-free stir fry, use tamari instead of soy sauce. Tamari has a similar flavor but is safe for gluten-free diets. For thickening, use arrowroot powder or potato starch instead of cornstarch. Mix it with water first. Then, add it to your stir fry to create a nice sauce. To keep your veggie packed stir fry fresh, store leftovers right away. Use airtight containers to seal in flavor and moisture. Glass or BPA-free plastic containers work best. Make sure to cool the stir fry before sealing it. This helps prevent condensation, which can make your veggies soggy. If you want to save some for later, freezing is a great option. First, let the stir fry cool completely. Then, portion it into freezer-safe bags or containers. Squeeze out as much air as possible to avoid freezer burn. When you're ready to eat it, thaw the stir fry in the fridge overnight. To reheat, use a skillet over medium heat, stirring until hot. In the fridge, your veggie packed stir fry lasts about 3 to 5 days. Always check for spoilage before eating. Look for changes in color or smell. If it looks mushy or smells off, it's best to toss it. Proper storage helps you enjoy this dish longer! To make your stir fry healthier, you can use low-calorie ingredients. Try using more veggies like zucchini or spinach. You can also swap soy sauce for a low-sodium version. This helps cut down on salt. Use less oil by trying a non-stick pan or wok. You can also steam some veggies instead of frying them. You can serve your veggie packed stir fry with rice, quinoa, or noodles. Each option adds a nice base to your dish. For a complete meal, add a protein like tofu, chicken, or shrimp. A fresh salad on the side can also balance your plate. Yes, you can prep ingredients in advance! Chop your vegetables the night before. Keep them in the fridge in an airtight container. You can also marinate proteins ahead of time for extra flavor. Just remember to keep everything fresh until you cook! This blog post covered a delicious veggie stir-fry packed with color and flavor. We explored key ingredients, essential cooking tips, and creative variations to keep it fresh. Remember to cook on high heat to keep veggies crisp and flavorful. Feel free to swap ingredients based on your taste or what you have on hand. Store leftovers properly or freeze them for later. Embrace this simple dish as a healthy, tasty option. Enjoy your cooking adventure, and keep experimenting to make it your own!

Veggie Packed Stir Fry Easy and Delicious Recipe

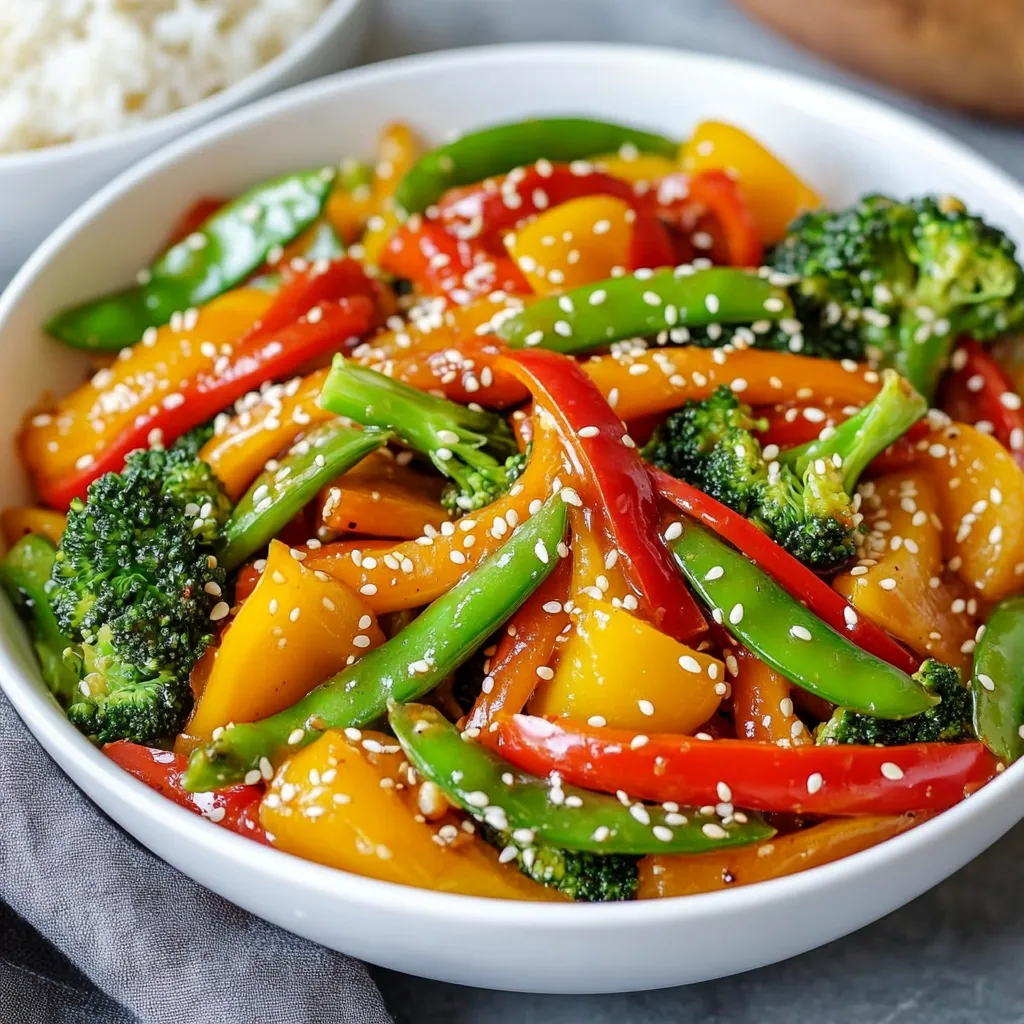
Looking for a quick and healthy meal that packs a punch? This Veggie Packed Stir Fry recipe is your answer!

- 1 large cauliflower head, cut into florets - 1 cup all-purpose flour - 1 teaspoon garlic powder - 1 teaspoon onion powder - 1 teaspoon smoked paprika - 1 teaspoon salt - 1/2 teaspoon black pepper - 1 cup water (or plant-based milk for a richer taste) - 1 cup buffalo sauce (mild or hot based on preference) - 2 tablespoons olive oil - Fresh parsley, chopped (for garnish) The key to crispy buffalo cauliflower lies in the batter. The flour creates a nice coating. The spices add flavor. You can use milk for a creamier texture. The cauliflower absorbs the sauce well after frying. - Bread crumbs for extra crunch - Nutritional yeast for a cheesy flavor - Other vegetables like broccoli or carrots Want to switch things up? Add bread crumbs for a crunchier bite. Nutritional yeast gives a cheesy taste without dairy. You can also mix in other veggies for variety. - Extra spices like cayenne or chili powder for heat - Ranch or blue cheese dressing for dipping - Lemon juice for a zesty kick Feel free to experiment with spices! If you like heat, cayenne is perfect. Pair your buffalo cauliflower with ranch or blue cheese dressing. A splash of lemon juice brightens the flavors. {{ingredient_image_1}} Start by cutting your large cauliflower head into bite-sized florets. Each floret should be similar in size for even cooking. Place them in a large bowl. This helps keep them from getting mushy. In another bowl, mix the dry ingredients: flour, garlic powder, onion powder, smoked paprika, salt, and black pepper. Then, whisk in a cup of water or plant-based milk. You want this mix to be smooth and like pancake batter. Dip each floret into the batter until well coated. Let any extra batter drip off before placing them on a plate. Preheat your air fryer to 375°F (190°C) for about 5 minutes. Lightly spray the basket with olive oil. Arrange the battered florets in a single layer. Make sure not to overcrowd the basket. Air fry them for 12 to 15 minutes. Shake the basket halfway through to make sure they cook evenly. Look for a golden brown color and crisp texture. Once the cauliflower is crispy and cooked, remove it from the air fryer. Place the hot florets in a large bowl. Drizzle your favorite buffalo sauce over the cauliflower. Toss gently to make sure every piece gets coated. If you want extra crispiness, you can return the coated florets to the air fryer. Cook for another 3 to 5 minutes at 375°F (190°C). This is a great way to enhance that crunchy texture. Enjoy your flavorful snack! To get that perfect crisp, follow these steps: - Batter Consistency: Make sure your batter is smooth. It should feel like pancake batter. - Coating: Coat each cauliflower floret well. This helps it crisp up nicely. - Single Layer Cooking: Avoid overcrowding the air fryer. Cook in batches if needed. - Shake the Basket: Halfway through cooking, shake the basket. This helps them cook evenly. For a tastier dish, consider these tips: - Season Your Batter: Add more spices like cayenne for heat. Garlic powder and onion powder enhance flavor. - Use Different Sauces: Mix buffalo sauce with ranch or blue cheese for unique flavors. - Garnish: Fresh parsley adds color and a fresh taste. It makes the dish pop! If you need swaps, here are some ideas: - Flour Options: Use almond flour or chickpea flour for a gluten-free version. - Milk Choices: Replace water with almond milk or oat milk for richer flavor. - Buffalo Sauce Alternatives: Try BBQ sauce for a sweeter taste or sriracha for more heat. These tips keep your dish fun and adaptable! Pro Tips Choose the Right Cauliflower: Select a large, fresh cauliflower head with tight florets and vibrant green leaves for the best flavor and texture. Adjust the Spice Level: Feel free to mix mild and hot buffalo sauces or add a touch of honey for sweetness if you prefer a milder flavor. Keep It Crispy: Make sure not to overcrowd the air fryer basket to ensure even cooking and crispiness. Work in batches if necessary. Garnish for Flavor: Adding chopped fresh herbs like parsley or cilantro not only enhances the presentation but also adds a fresh flavor contrast to the spicy buffalo sauce. {{image_2}} You can choose how hot you want your buffalo cauliflower. For a spicy kick, use a hot buffalo sauce. If you prefer mild flavors, choose a milder sauce. You can even mix sauces. Try half hot and half mild for a balanced taste. Adding a bit of honey or maple syrup can also tone down the heat. If you need a gluten-free option, use gluten-free flour. Almond flour or chickpea flour works great. Substitute the all-purpose flour with the gluten-free option in the batter. The rest of the recipe stays the same. This way, you can enjoy the crispy snack without worry. Besides the air fryer, you can bake or roast the cauliflower. For baking, preheat your oven to 425°F (220°C). Spread the battered florets on a baking sheet lined with parchment paper. Bake for about 20–25 minutes, flipping them halfway. If you want to grill, place the florets on skewers. Grill them over medium heat until they get crispy and charred. Each method gives a unique taste. To keep your Air Fryer Buffalo Cauliflower fresh, place leftovers in an airtight container. Make sure to store them in the fridge. They will stay good for about 3 days. Avoid stacking the pieces too close. This helps prevent sogginess. When reheating, use the air fryer for best results. Preheat your air fryer to 375°F (190°C). Place the cauliflower in a single layer. Heat for about 5 to 7 minutes. This will help restore that crispy texture. You can also use an oven. Set it to 375°F (190°C) and bake for 10 minutes. If you want to freeze your buffalo cauliflower, first let it cool completely. Spread the florets on a baking sheet in a single layer. Freeze for 1 to 2 hours until firm. Then, transfer them to a freezer bag. They can stay frozen for up to 3 months. When you are ready to eat, cook them straight from the freezer. No need to thaw! To make buffalo cauliflower vegan, swap regular flour for chickpea flour. Use plant-based milk instead of water for the batter. This keeps the dish fully plant-based. Finally, check your buffalo sauce to ensure it is vegan-friendly. Yes, you can use frozen cauliflower. Just thaw and drain it well before using it in the recipe. Make sure the florets are dry to help the batter stick. Buffalo cauliflower tastes great with ranch or blue cheese dressing. You can also try a creamy avocado dip or a tangy tahini sauce. These pair well with the spicy kick. Cook the buffalo cauliflower for about 12 to 15 minutes at 375°F (190°C). Shake the basket halfway through for even cooking. If you want extra crispiness, you can air fry it for an additional 3 to 5 minutes after tossing it in sauce. Yes, you can prepare the batter ahead. Store it in the fridge for up to 24 hours. Just give it a quick stir before using, as it may thicken slightly. In this article, we explored how to make Air Fryer Buffalo Cauliflower with ease. We covered key ingredients, step-by-step instructions, and tips for the perfect texture. You can try variations and learn how to store leftovers too. With simple ways to adjust spice levels and sauces, you can make it just right for you. Enjoy your crispy, flavor-packed dish anytime you crave it!

Air Fryer Buffalo Cauliflower Flavorful and Crispy Snack

Craving a delicious snack that won’t ruin your diet? You’re in the right place! I’m excited to share my recipe

To make this soup, you will need the following ingredients: - 2 cups broccoli florets - 2 medium potatoes, peeled and diced - 1 medium onion, chopped - 3 cloves garlic, minced - 4 cups vegetable broth - 1 cup milk (or dairy-free alternative) - 1 ½ cups sharp cheddar cheese, grated - 2 tablespoons olive oil - Salt and pepper to taste - ½ teaspoon smoked paprika - Fresh chives, chopped (for garnish) You can swap some ingredients if needed. Here are a few ideas: - Use cauliflower instead of broccoli for a different taste. - Swap potatoes with sweet potatoes for a sweeter flavor. - If you want a lighter soup, use almond milk instead of regular milk. - For a sharper flavor, try using gouda cheese instead of cheddar. - Fresh herbs can replace chives for a unique twist. Fresh ingredients make a big difference in this soup. Fresh broccoli gives a bright taste and nice color. Fresh garlic adds a strong aroma and flavor. Using fresh herbs, like chives, brings a pop of brightness. They help create a dish that tastes homemade and comforting. Always choose ingredients that are in season, as they often taste better. You will notice the quality in every spoonful! {{ingredient_image_1}} To start, gather all your ingredients. You will need: - 2 cups broccoli florets - 2 medium potatoes, peeled and diced - 1 medium onion, chopped - 3 cloves garlic, minced - 4 cups vegetable broth - 1 cup milk (or dairy-free alternative) - 1 ½ cups sharp cheddar cheese, grated - 2 tablespoons olive oil - Salt and pepper to taste - ½ teaspoon smoked paprika - Fresh chives, chopped (for garnish) Next, chop the onion and mince the garlic. This helps add a great base flavor. Dice the potatoes into small cubes for quick cooking. Set these aside while you prepare the pot. In a large pot, heat the olive oil over medium heat. Once hot, add the chopped onion and minced garlic. Sauté until the onion turns soft and clear, about five minutes. This step builds a tasty base for your soup. Now, add the diced potatoes to the pot. Stir them for about two to three minutes. This helps to release their flavor. Pour in the vegetable broth next and bring the mix to a boil. Lower the heat, cover the pot, and let it simmer for about fifteen minutes. You want the potatoes to be tender at this point. After that, toss in the broccoli florets. Simmer the soup for another five to seven minutes. The broccoli should turn a bright green color and become tender. To make the soup creamy, use an immersion blender. Blend the soup until smooth. If you don’t have one, you can use a regular blender. Just be careful, and blend in small batches. Once blended, return the soup to low heat. Slowly stir in the milk and grated cheddar cheese. Mix until the cheese melts completely, creating a rich, creamy texture. Lastly, add salt, pepper, and smoked paprika to taste. Stir well and heat through. The soup is now ready to serve! Enjoy it hot, garnished with fresh chives for a pop of color and flavor. To get a smooth and creamy soup, blend it well. I love using an immersion blender. It makes the job easy and keeps the soup hot. If you use a regular blender, blend in small batches. Always let the soup cool a bit before blending. This helps to avoid spills. Adding the milk and cheese slowly also helps. Stir until everything melts into a creamy mix. Seasoning is key for a tasty soup. Start with salt and pepper to bring out the flavors. I add smoked paprika for a touch of warmth. It adds depth to the soup without being too spicy. You can also try adding garlic powder or onion powder. Fresh herbs like chives on top give a nice finish. They add a fresh taste and make the soup look pretty. Store any leftover soup in an airtight container. It will last about 3-4 days in the fridge. For longer storage, freeze it in portions. When you are ready to eat, thaw in the fridge overnight. Reheat in a pot over low heat. Stir often to keep it from sticking. You can add a splash of milk if it gets too thick. Enjoy this comforting bowl anytime! Pro Tips Use Fresh Ingredients: For the best flavor and nutrients, use fresh broccoli and potatoes. Frozen vegetables can also work, but fresh will enhance the taste and texture of your soup. Blend for Creaminess: Using an immersion blender will give you a silky smooth texture without transferring hot soup to a blender. If using a blender, allow the soup to cool slightly before blending in batches. Customize Your Cheese: Experiment with different types of cheese for varied flavor profiles. Gruyère or gouda can add a delicious twist to the classic cheddar taste. Adjust Consistency: If you prefer a thicker soup, add less milk or blend more thoroughly. For a thinner soup, simply add more milk or broth until desired consistency is achieved. {{image_2}} You can make this soup vegan and dairy-free with simple swaps. Use plant-based milk, like almond or oat milk, instead of regular milk. For cheese, try a vegan cheese that melts well, or use nutritional yeast for a cheesy flavor. This way, you keep the creamy texture while making it suitable for everyone. You can add protein to your soup for a heartier meal. Diced chicken adds great flavor and pairs well with the cheese. Cook the chicken before adding it to the soup. If you prefer a plant-based option, use canned beans like cannellini or chickpeas. These add fiber and protein while keeping it filling. If you like heat, add some spice! A pinch of red pepper flakes can give your soup a nice kick. If you want a smoky flavor, try adding more smoked paprika. For a fresh twist, add a dash of hot sauce just before serving. Adjust the spice to match your taste! After you make this soup, let it cool first. Then, pour it into a clean container. Make sure the container is airtight. You can store the soup in the fridge. It will stay fresh for about three days. When you want to eat it again, just reheat it on the stove. If you want to keep the soup longer, freezing is a great option. First, let the soup cool completely. Then, use freezer-safe bags or containers. Leave some space at the top, as the soup will expand when it freezes. Make sure to label the bags with the date. You can freeze it for up to three months. In the fridge, the soup lasts for about three days. If you freeze it, try to eat it within three months. After that, the soup may lose its taste and texture. Always check for any signs of spoilage before eating. If it smells off or has changed color, it’s best to throw it out. Yes, you can use frozen broccoli instead of fresh. It saves time and still tastes good. Just add it to the pot during the last 5 minutes of cooking. This way, it will cook through and keep its bright color. Frozen broccoli can also help with meal prep. To thicken your soup, try a few easy methods. First, blend some of the soup and stir it back in. You can also add more potatoes or use a cornstarch slurry. Mix 1 tablespoon of cornstarch with 2 tablespoons of cold water, then add it to the soup while it simmers. This soup pairs well with crusty bread or a fresh salad. You can also serve it with a sprinkle of extra cheese on top. For a fun twist, add some croutons or crispy bacon bits for crunch. Lastly, a drizzle of olive oil can enhance the flavor. This blog post covered all you need for broccoli potato cheese soup. We explored ingredients, substitutions, and the need for fresh items. I shared step-by-step cooking methods and blending tips. You learned how to make it creamy, enhance flavor, and store leftovers. In the end, feel free to change up the recipe with proteins or spices. Enjoy your cooking journey and savor the warmth of your soup!

Broccoli Potato Cheese Soup Creamy and Comforting Dish

Are you ready to warm your belly with a tasty bowl of Broccoli Potato Cheese Soup? This creamy and comforting

Older posts
Newer posts
← Previous Page1 … Page132 Page133 Page134 … Page143 Next →

dsad

© 2025 Southern Dishes • Built with GeneratePress

Our Policies

  • Copyright Policy
  • Cookie Policy
  • GDPR Policy
  • Privacy Policy
  • Disclaimer
  • Terms Of Use

More Information

  • Home
  • About
  • Contact
  • Appetizers
  • Dessert
  • Dinner
  • Drinks
©2025, Southern Dishes About Back To Top