Skip to content
DisclaimerTerms Of UseGDPR PolicyCookie Policy

Southern Dishes

  • Home
  • Drinks
  • Appetizers
  • Dinner
  • Dessert
  • About
  • Contact
  • Privacy Policy
DisclaimerTerms Of UseGDPR PolicyCookie Policy

Isabella

- 4 boneless, skinless chicken thighs - 1/2 cup low sodium teriyaki sauce - 2 tablespoons sesame oil - 2 tablespoons honey - 2 cloves garlic, minced - 1 inch ginger, grated - 1 cup fresh broccoli florets - 1 red bell pepper, sliced - 1 cup sugar snap peas - 1 cup carrots, sliced - 1 tablespoon sesame seeds - Chopped green onions - Salt and pepper to taste When making Sheet Pan Teriyaki Chicken, the right ingredients make all the difference. First, you'll need chicken thighs. They stay juicy and cook well in the oven. The marinade is key to great flavor. You need low sodium teriyaki sauce, sesame oil, honey, minced garlic, and grated ginger. This mix gives the chicken a sweet and savory taste. For the veggies, you want colors and crunch. Fresh broccoli, red bell pepper, sugar snap peas, and sliced carrots work great. They add texture and nutrition to your dish. Lastly, garnishes like sesame seeds and chopped green onions give your meal a beautiful finish. Sprinkle these on top just before serving. A pinch of salt and pepper can also enhance the flavors. This combination makes the dish not just tasty but also visually appealing. {{ingredient_image_1}} - Preheat oven to 400°F (200°C). - Line a baking sheet with parchment paper. - In a bowl, mix teriyaki sauce, sesame oil, honey, garlic, and ginger. - Place the chicken in a zip-top bag. Pour half of the marinade over it. - Seal the bag and let it sit for at least 15 minutes. - In another bowl, combine broccoli, bell pepper, sugar snap peas, and carrots. - Drizzle with olive oil, then add salt and pepper. Toss well. - Take the marinated chicken out of the bag. Place it on one side of the baking sheet. - Spread the prepared vegetables on the other side of the sheet. - Drizzle the remaining marinade over both the chicken and vegetables. - Roast in the oven for 25-30 minutes. - Use a meat thermometer to ensure the chicken reaches 165°F (75°C). - Once cooked, take the dish out of the oven. Let it rest for a few minutes. - Sprinkle sesame seeds and chopped green onions on top before serving. To get the best flavor, marinate the chicken longer. I recommend at least 15 minutes. For even more taste, let it sit overnight. That way, the chicken absorbs all the yummy flavors. Use a zip-top bag to coat the chicken. This helps cover every bit of the meat with the marinade. You will be amazed at how juicy the chicken tastes. Cut your vegetables into uniform sizes. This helps them cook evenly and look great on the plate. For example, slice carrots and bell peppers about the same thickness. Use a meat thermometer to check the chicken. Make sure it reaches 165°F (75°C) to ensure it is safe to eat. This step is key to avoid undercooked meat. Line your baking sheet with parchment paper. This makes cleanup super easy. Once the meal is done, just toss the paper away. I also suggest cleaning as you go. If you rinse your tools and bowls right away, you will have less mess later. This way, you can enjoy your meal without the stress of a messy kitchen. Pro Tips Marinate Longer for More Flavor: For the best flavor infusion, marinate the chicken for at least an hour or overnight if time allows. This allows the spices and sauces to penetrate the meat more deeply. Cut Vegetables Evenly: Ensure all vegetables are cut to a similar size to ensure even cooking. This way, they will roast at the same rate and achieve the perfect tenderness. Use Fresh Ingredients: Fresh garlic and ginger can make a significant difference in flavor. Always opt for fresh over pre-minced or jarred versions for the best taste. Check Chicken Doneness: Use a meat thermometer to check that the chicken has reached an internal temperature of 165°F (75°C) to ensure it is safely cooked through and juicy. {{image_2}} You can easily swap out vegetables in this dish. For a fun twist, replace broccoli with green beans. Green beans add a nice crunch and fresh taste. Another option is to use asparagus instead of sugar snap peas. Asparagus adds a unique flavor and pairs well with teriyaki sauce. Want to kick up the flavor? Add chili flakes for some heat. This small change can make the dish exciting. You can also substitute maple syrup for honey. Maple syrup gives a rich sweetness that works well with the chicken. If you want a change in protein, use chicken breast instead of thighs. Chicken breast will be leaner but still tasty. You can also try shrimp or tofu for a vegetarian option. Both shrimp and tofu soak up the teriyaki sauce nicely, making each bite flavorful. Store any leftovers in an airtight container. This keeps them fresh. You can keep them in the fridge for up to 3 days. Make sure to seal the container well to avoid any odors. When you're ready to eat, just take them out and enjoy! You can freeze the cooked chicken and vegetables for up to 3 months. This is great for meal prep! Just place them in a freezer-safe bag. When you're ready to eat, thaw them in the fridge overnight. This helps them defrost slowly and keeps the flavor intact. To reheat, the oven gives the best result. Preheat the oven to 350°F (175°C). Place the chicken and veggies on a baking sheet. Heat for about 15-20 minutes. You can also use the microwave if you’re short on time. Just place them in a microwave-safe dish. Heat in short bursts, stirring in between, until warm. Enjoy your meal like it’s fresh out of the oven! Yes, chicken breasts or thighs both work well. Chicken thighs have more flavor and stay juicy. Chicken breasts are leaner and cook faster. Choose what you like best. Use a gluten-free teriyaki sauce. Many brands offer gluten-free options made with tamari. Check labels to be sure. This way, you can enjoy the dish without worry. Serve with rice, quinoa, or noodles for a complete meal. These sides soak up the sauce well. You can also add a salad for extra crunch and freshness. Yes, you can marinate the chicken and prepare the vegetables ahead of time. Just store them in the fridge. This makes cooking easy on busy days. This recipe brings together tasty chicken, fresh veggies, and savory sauce. You learned how to prepare marinated chicken and colorful vegetables on a sheet pan. Using simple tips and tricks can make cooking easier and tastier. Feel free to change ingredients and flavors to fit your taste. Enjoy this meal with rice or noodles for a complete dinner. You now have the tools to create a delicious, healthy dish at home. Happy cooking!

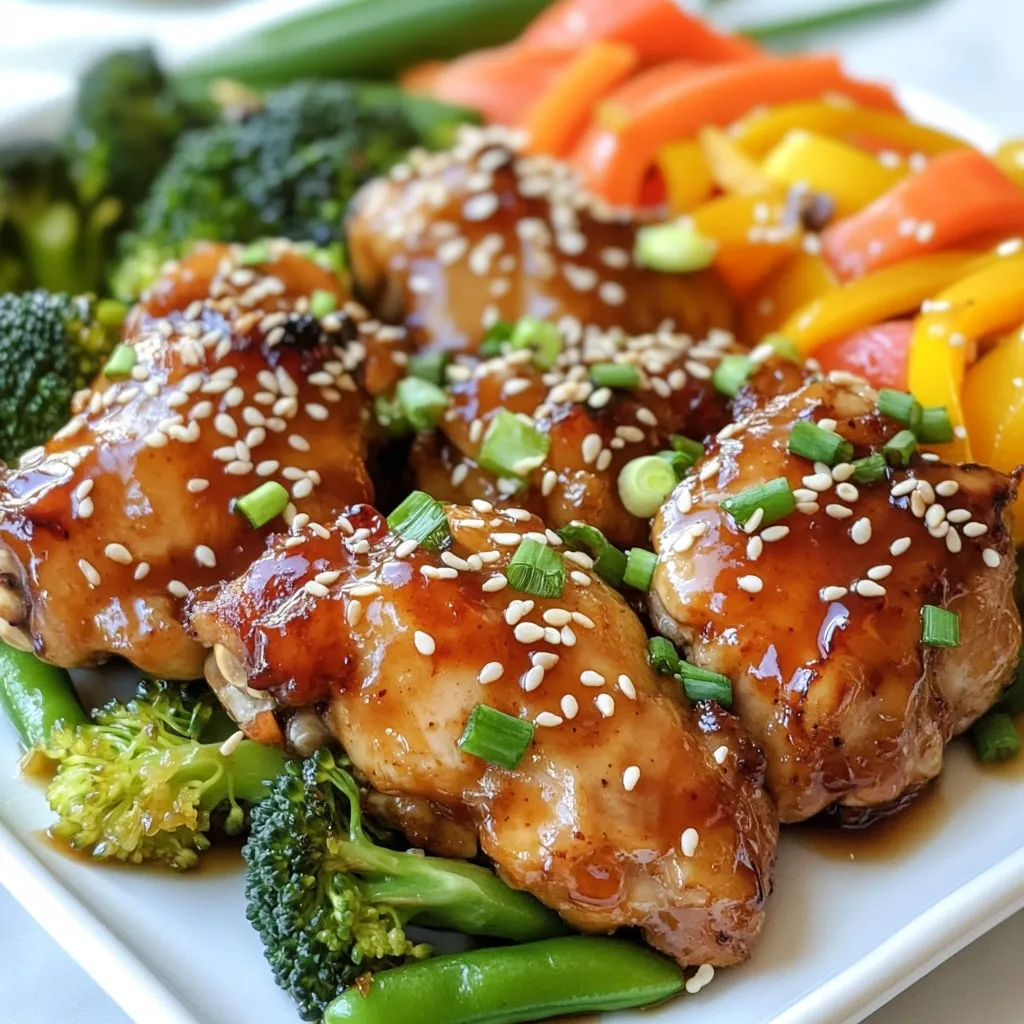
Sheet Pan Teriyaki Chicken Savory and Simple Dish

Looking for a quick and tasty meal? Sheet Pan Teriyaki Chicken is your answer! This dish brings together juicy chicken

To make your homemade cranberry sauce, you will need the following ingredients: - 12 ounces fresh cranberries - 1 cup granulated sugar - 1 cup water - Zest of 1 orange - 1/4 cup fresh orange juice - 1/2 teaspoon ground cinnamon - 1/4 teaspoon ground nutmeg - Pinch of salt - 1/2 cup chopped pecans (optional) These ingredients create a bright, tangy sauce that will wow your taste buds. The fresh cranberries give a tart flavor. The sugar balances this with sweetness. The orange zest and juice add a citrusy punch that lifts the dish. Cinnamon and nutmeg bring warmth and spice, creating depth. If you like nuts, pecans add a nice crunch. You can leave them out if you prefer a smooth sauce. Each ingredient plays a role in making this sauce rich and flavorful. When you combine these simple items, you get a delightful sauce that complements many meals. {{ingredient_image_1}} Start by rinsing the fresh cranberries under cold water. You want to remove dirt and any bad berries. Look closely and sort them. Discard any stems or damaged berries. This step ensures your sauce tastes fresh. Next, take a medium saucepan. Pour in 1 cup of water and add 1 cup of granulated sugar. Place the pan over medium heat. Stir the mixture until the sugar fully dissolves. This creates a sweet base for your sauce. Now, add the rinsed cranberries to your saucepan. Bring the mixture to a rolling boil. Once boiling, reduce the heat to a simmer. Stir in the zest of 1 orange, 1/4 cup of fresh orange juice, 1/2 teaspoon of ground cinnamon, 1/4 teaspoon of ground nutmeg, and a pinch of salt. Let it simmer for about 10 to 12 minutes. You will see the cranberries burst, and the sauce will thicken slightly. If you like nuts, stir in 1/2 cup of chopped pecans during the last few minutes of cooking. This will add a nice crunch. Once the sauce thickens, remove it from the heat. Allow it to cool to room temperature. It will thicken more as it cools. Transfer it to a bowl or jar for serving later. To know when the sauce is thickened, watch for the cranberries to burst. They should pop open, releasing their juices. Stir the sauce gently while it simmers. You want it to look glossy and slightly thick. If you want it a bit thicker, let it cook longer. Adding a few spices can boost your cranberry sauce. Ground cinnamon gives warmth. A touch of ground nutmeg adds depth. You can also try adding ginger for a kick. If you want sweetness, consider a splash of maple syrup. Fresh herbs like rosemary can make it unique too. Homemade cranberry sauce pairs well with many dishes. It is great with turkey at holiday meals. Try it on sandwiches for lunch. It also goes well with desserts like cheesecake or ice cream. You can serve it chilled or at room temperature. Pro Tips Freshness Matters: Always use fresh cranberries for the best flavor and texture in your sauce. Adjust Sweetness: Depending on your taste, you can adjust the sugar level to make the sauce sweeter or more tart. Thickening Tip: If your sauce isn’t thickening enough, let it simmer a little longer while stirring occasionally. Storage Solution: Store the sauce in an airtight container in the fridge for up to 2 weeks, or freeze for longer storage. {{image_2}} You can swap sugar with honey or maple syrup. Both add sweetness and a unique taste. If you want a low-calorie option, try using a sugar substitute like stevia. Just remember, use less, as these sweeteners are often sweeter than sugar. Want to spice things up? Add a tablespoon of grated ginger for warmth. You can also mix in some apple juice. This gives the sauce a sweet and fruity twist. Other options include a splash of vanilla extract or a dash of cayenne for extra heat. If you or your guests have nut allergies, skip the pecans. The sauce tastes great without them. For added texture, consider using sunflower seeds or pumpkin seeds instead. These seeds will give your sauce a nice crunch without the nuts. To keep your cranberry sauce fresh, store it in an airtight container. Place it in the fridge after it cools. This helps preserve its flavor and texture. It tastes best when chilled, so make sure to let it cool to room temperature first. You can freeze your cranberry sauce for later use. To do this, pour it into a freezer-safe container. Leave some space at the top for expansion. Seal it tightly and label it with the date. When you're ready to use it, thaw it in the fridge overnight. Stir it before serving to regain its texture. Homemade cranberry sauce lasts about one week in the fridge. If you freeze it, it can stay good for up to six months. Always check for any off smell or changes in color before using. Enjoy your sauce at its best! Yes, you can make homemade cranberry sauce ahead of time. I often prepare it a few days before serving. This saves time on busy days. To prepare in advance, follow these steps: - Make the sauce as directed. - Let it cool to room temperature. - Store it in an airtight container. - Place it in the fridge. This way, the flavors will blend well. It will taste even better after a day or two. Homemade cranberry sauce lasts about two weeks in the fridge. Store it in a sealed jar or container. Make sure the lid is tight to keep it fresh. If you freeze it, it can last up to six months. Just thaw it in the fridge before using. You can use dried cranberries, but the sauce will be different. Dried cranberries are sweeter and chewier. If you want to use them, soak them in warm water for about 30 minutes. This will soften them. Then, add them to the sauce while it cooks. Keep in mind, the texture will change. The sauce may not be as thick or tart as with fresh cranberries. Making homemade cranberry sauce is easy and fun. You can use fresh cranberries, sugar, and spices to create a tasty treat. Follow the steps for cooking and thickening your sauce just right. Use our tips for serving and storing to keep it fresh. Mix in variations to suit your taste. Whether for a holiday meal or just because, this sauce is a hit. Try these steps, and enjoy your delicious cranberry sauce!

Homemade Cranberry Sauce Simple and Flavorful Recipe

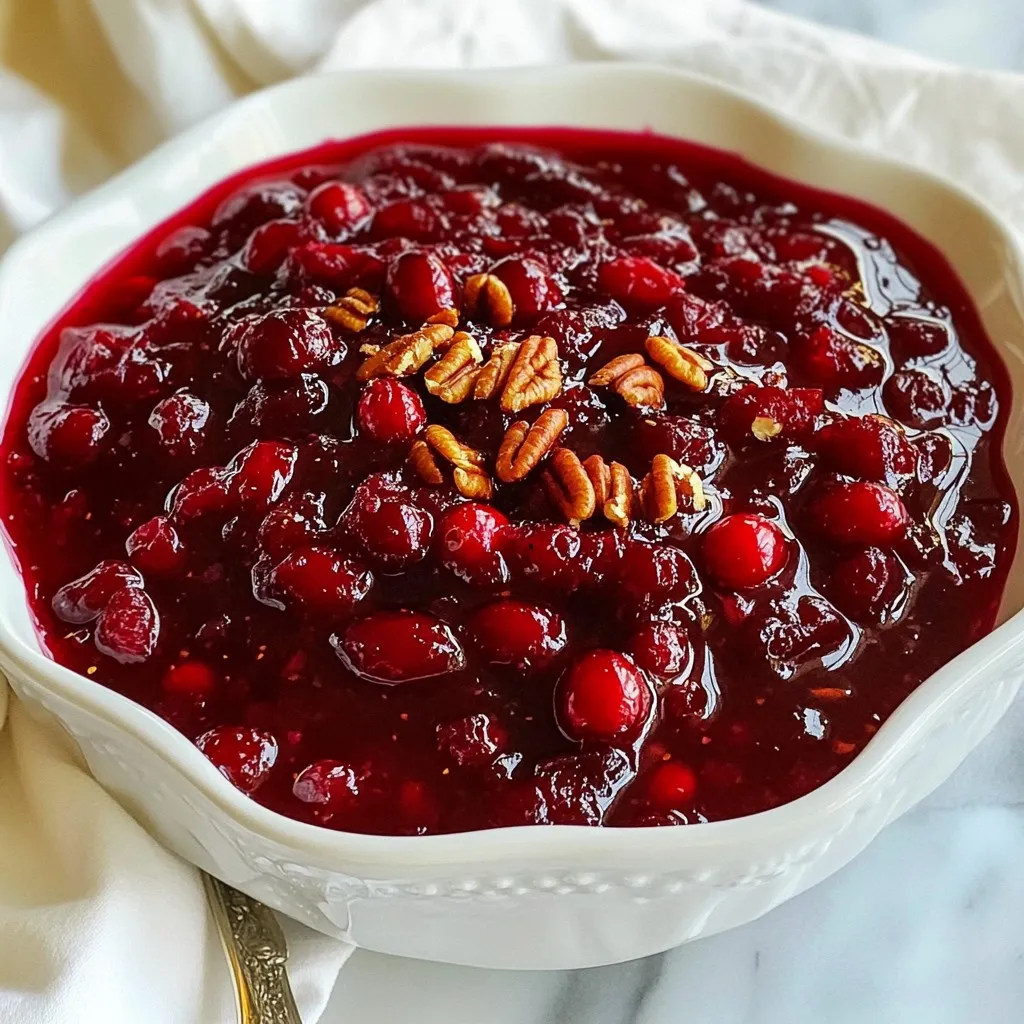
Want to make the perfect homemade cranberry sauce? This simple and flavorful recipe is your go-to for adding that zesty

- 3 ripe bananas, mashed - 2 large eggs - 1/4 cup unsweetened applesauce - 1 teaspoon vanilla extract - 1 teaspoon baking soda - 1/2 teaspoon baking powder - 1/2 teaspoon salt - 1 teaspoon ground cinnamon - 1 1/2 cups whole wheat flour - 1/2 cup chopped walnuts or pecans (optional) - 1/4 cup sugar-free chocolate chips (optional) To make sugar-free banana bread, gather these simple ingredients. Start with three ripe bananas. The riper, the better! They add great flavor. Next, you need two large eggs for binding. Then, grab 1/4 cup of unsweetened applesauce. This keeps the bread moist and adds natural sweetness. You’ll also need one teaspoon of vanilla extract. It adds a warm aroma to the bread. Baking soda and baking powder are key. Use one teaspoon of baking soda and 1/2 teaspoon of baking powder. They help the bread rise. Don’t forget the salt! Just 1/2 teaspoon enhances all the flavors. Ground cinnamon brings a nice spice. Use one teaspoon for a cozy taste. For the base, you’ll need 1 1/2 cups of whole wheat flour. It gives the bread a hearty texture. If you want to add some crunch, throw in 1/2 cup of chopped walnuts or pecans. These are optional but so tasty! Lastly, for a sweet touch, add 1/4 cup of sugar-free chocolate chips, if you like. They melt into the bread and add a delightful surprise. Now, you have everything you need to make this delicious banana bread! {{ingredient_image_1}} First, set your oven to 350°F (175°C). This will help the bread bake evenly. While it heats, grab a 9x5-inch loaf pan. You can grease it with cooking spray or line it with parchment paper. This makes it easy to take the bread out later. Now, in a big bowl, mash the three ripe bananas until they are smooth. Add 1/4 cup of unsweetened applesauce to the bananas. Mix them well. Next, crack in the two large eggs and pour in the teaspoon of vanilla extract. Stir this mixture until it looks nice and blended. In another bowl, whisk together the dry stuff. Take 1 1/2 cups of whole wheat flour, 1 teaspoon of baking soda, 1/2 teaspoon of baking powder, 1/2 teaspoon of salt, and 1 teaspoon of ground cinnamon. Make sure there are no lumps in this mix. Slowly add the dry mix to the wet mix. Stir just until you don’t see any flour. Be careful not to overmix, as this can make the bread tough. If you want, fold in 1/2 cup of chopped walnuts or pecans and 1/4 cup of sugar-free chocolate chips for some extra flavor. Pour the batter into the prepared loaf pan. Spread it out evenly. Bake it in the oven for 50-60 minutes. Check if it’s done by sticking a toothpick in the center; it should come out clean. Let it cool in the pan for about 10 minutes, then move it to a wire rack to cool completely. To get the best texture in your sugar-free banana bread, follow these steps: - Use very ripe bananas. They should be brown and soft. - Mash the bananas well. This helps mix them into the batter smoothly. - When mixing wet and dry ingredients, stir gently. Mix just until you see no dry flour. - Avoid overmixing. This keeps the bread light and fluffy. Adding flavors can make your banana bread even better. Here are some ideas: - Fold in 1/2 cup of chopped walnuts or pecans. They add crunch and taste. - Add a teaspoon of vanilla extract to boost the flavor. - A sprinkle of nutmeg can give a warm spice note. - If you like chocolate, mix in 1/4 cup of sugar-free chocolate chips. They melt and make each bite special. Serving your banana bread nicely makes it more appealing. Try these tips: - Cut the bread into even slices for a clean look. - Serve it warm or at room temperature. - Top each slice with a dollop of sugar-free yogurt. It adds creaminess. - A smear of nut butter can enhance the flavor and add protein. These simple tips can elevate your banana bread from good to great! Pro Tips Choose Ripe Bananas: The riper the bananas, the sweeter and more flavorful your banana bread will be. Look for bananas with lots of brown spots for the best taste. Don't Overmix: When combining the wet and dry ingredients, mix just until they are combined. Overmixing can lead to a dense bread. Cooling Time: Allowing the banana bread to cool in the pan for 10 minutes before transferring it to a wire rack helps it maintain its shape and prevents it from falling apart. Storage Tips: Store any leftover banana bread in an airtight container at room temperature for up to 3 days, or freeze for longer storage. Wrap slices individually for easy thawing. {{image_2}} You can easily make this banana bread gluten-free. Simply replace the whole wheat flour with a gluten-free all-purpose flour. Look for blends that include xanthan gum. This helps mimic the texture of regular flour. Follow the same measurements in the recipe. Your banana bread will still be soft and tasty! To make this banana bread vegan, you need to swap the eggs. Use 1/2 cup of unsweetened applesauce instead of 2 eggs. This keeps the bread moist. You can also use flax eggs. Mix 1 tablespoon of ground flaxseed with 2.5 tablespoons of water. Let it sit for a few minutes before adding it to the batter. This adds fiber too! Feel free to get creative with mix-ins! Here are some fun ideas: - Dried fruits like raisins, cranberries, or apricots - Seeds like chia, pumpkin, or sunflower seeds - Shredded coconut for a tropical twist - Spices like nutmeg or ginger for added warmth Add any of these to your batter before baking. They bring new flavors and textures to your banana bread! Store your banana bread in a cool, dry place. Wrap it tightly in plastic wrap or foil. This keeps it moist and fresh. A bread box works well for this. Avoid storing it in direct sunlight. If you want to keep it longer, refrigerate your banana bread. Wrap it tightly in plastic wrap and place it in an airtight container. This helps it stay fresh for about a week. You can also freeze it for up to three months. Slice the bread first for easy thawing. Wrap each slice in plastic wrap and place them in a freezer bag. At room temperature, banana bread lasts about 3-4 days. In the fridge, it can stay fresh for up to a week. If frozen, it can last for three months. Always check for signs of spoilage. If it smells off or has mold, it’s best to throw it away. Yes, you can use other sweeteners in this recipe. Some good options are mashed dates or pureed prunes. These swaps add natural sweetness and moisture. However, each sweetener changes the taste and texture. Test a small batch to see how you like it. Yes, this banana bread is suitable for diabetics. It uses ripe bananas and unsweetened applesauce for sweetness. Whole wheat flour adds fiber, which helps control blood sugar. Always check with a doctor if you have concerns about your diet. To keep your banana bread moist, use very ripe bananas. Ripe bananas have more natural sugars and moisture. Don't overmix the batter; this can make the bread dense. Adding nuts or chocolate chips also helps keep it soft while adding flavor. You now know how to make delicious banana bread. Start with ripe bananas and simple ingredients. Follow the steps to mix and bake your bread perfectly. Remember to try the tips for great texture and flavor. You can create fun variations too, like gluten-free or vegan options. Proper storage keeps your banana bread fresh longer. Enjoy experimenting with this recipe and share it with friends. Making banana bread is easy and rewarding. You’ll love both the taste and the joy of baking!

Sugar-Free Banana Bread Simple and Tasty Recipe

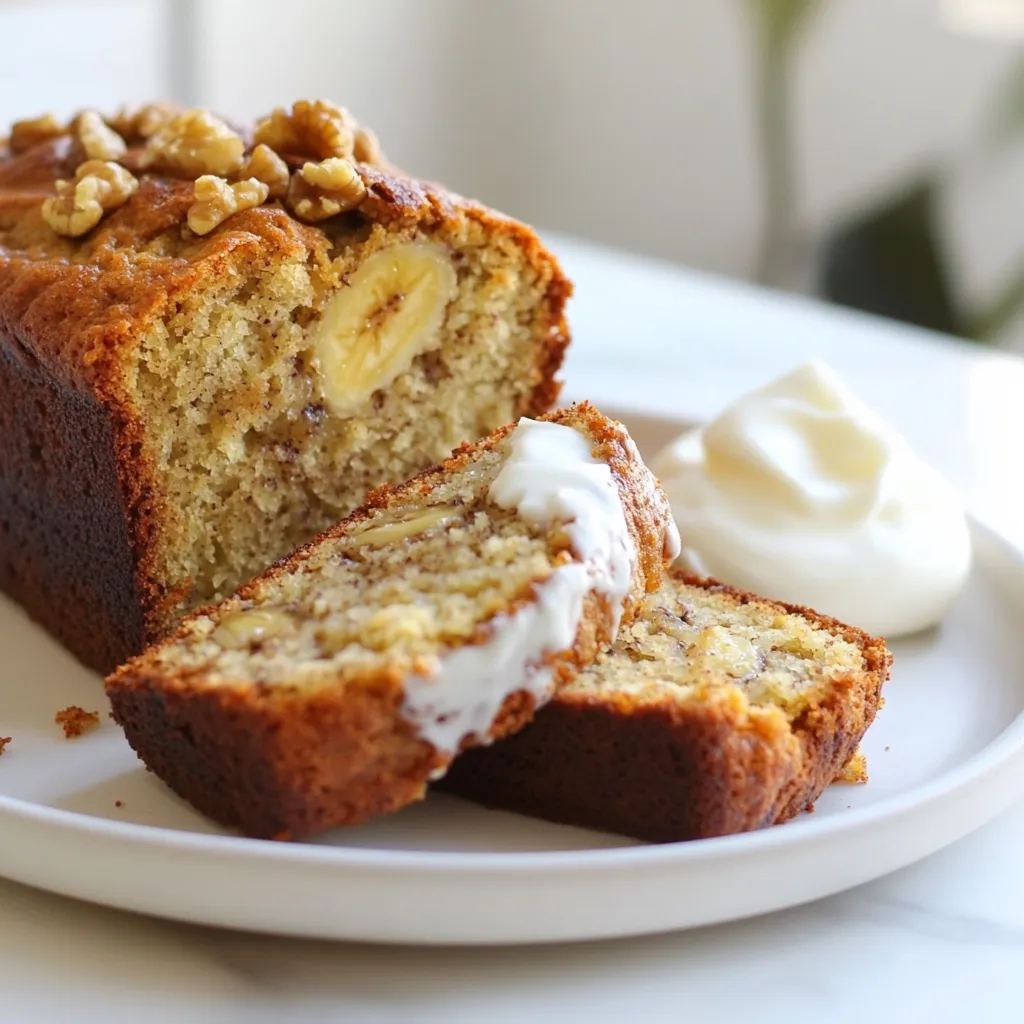
Are you craving a sweet treat without the sugar? You’re in the right place! My sugar-free banana bread is not

To make the Vegan Pumpkin Marble Cake, gather these ingredients: - 1 cup canned pumpkin puree - 1 cup almond milk (or any plant-based milk) - 1/2 cup coconut oil, melted - 1 cup brown sugar - 1 teaspoon vanilla extract - 2 cups all-purpose flour - 1 teaspoon baking soda - 1 teaspoon baking powder - 1/2 teaspoon salt - 1 teaspoon ground cinnamon - 1/2 teaspoon ground nutmeg - 1/4 teaspoon ground ginger - 1/2 cup cocoa powder - 1 tablespoon maple syrup (for drizzling) You can easily swap some ingredients to suit your needs. Here are some ideas: - Coconut oil: Use vegetable oil or melted vegan butter if you prefer. - Almond milk: Any plant-based milk works, such as soy, oat, or cashew milk. - Brown sugar: Granulated sugar or coconut sugar will also work well. - All-purpose flour: You can use whole wheat flour for a healthier option. - Cocoa powder: Carob powder or dark chocolate may be good alternatives if you want a different flavor. This cake has some great ingredients that bring health benefits: - Pumpkin puree: It's full of fiber and vitamins A and C. This helps boost your immune system and keeps your eyes healthy. - Almond milk: Lower in calories than cow's milk, it’s good for your heart and has no cholesterol. - Coconut oil: It may help with digestion and boost your energy levels. - Spices: Cinnamon and nutmeg can help reduce inflammation and aid digestion. - Cocoa powder: This is rich in antioxidants and may improve heart health. Using these healthy ingredients makes this cake not only tasty but also a bit good for you! {{ingredient_image_1}} First, set your oven to 350°F (175°C). This helps the cake bake evenly. Grease a 9x5 inch loaf pan or line it with parchment paper. This makes it easy to remove the cake later. In a large bowl, add 1 cup of canned pumpkin puree, 1 cup of almond milk, 1/2 cup of melted coconut oil, 1 cup of brown sugar, and 1 teaspoon of vanilla extract. Mix these well. You want everything to blend smoothly. This mix gives the cake its rich flavor. In another bowl, whisk together 2 cups of all-purpose flour, 1 teaspoon of baking soda, 1 teaspoon of baking powder, 1/2 teaspoon of salt, 1 teaspoon of ground cinnamon, 1/2 teaspoon of ground nutmeg, and 1/4 teaspoon of ground ginger. Make sure these dry ingredients are well mixed. This step adds volume and spice to the cake. Now, divide the batter into two bowls. In one bowl, add 1/2 cup of cocoa powder. Mix it well to create a chocolate batter. You should have one bowl of pumpkin batter and one bowl of chocolate batter. To marble, scoop spoonfuls of each batter into the prepared loaf pan. Alternate between the two. Use a knife or skewer to swirl the batters together gently. This creates a beautiful marbled look. Drizzle the top of the batter with 1 tablespoon of maple syrup for a sweet touch. Place the loaf pan in the oven and bake for 50-60 minutes. Check if it's done by inserting a toothpick in the center. If it comes out clean, it's ready. Let the cake cool in the pan for about 10 minutes before moving it to a wire rack. This cooling step is key to keeping the cake moist. To get the best texture in your vegan pumpkin marble cake, follow these tips. First, mix your wet ingredients well. This helps blend the flavors. Next, when adding dry ingredients, stir gently. Overmixing can lead to a tough cake. A few lumps are okay; they won't hurt the final result. Remember, the right texture is light and fluffy, not dense. Drizzling maple syrup can add a lovely touch. Use a small spoon or a squeeze bottle for control. Start from the center of the cake and move outwards. This helps spread the syrup evenly. If you want a more artistic look, try a zigzag pattern. The syrup will soak in during baking, adding flavor and moisture. There are a few common mistakes to watch out for. First, don’t skip preheating the oven. This step is key for even baking. Second, avoid using too much cocoa powder. It can overpower the pumpkin flavor. Lastly, be patient when cooling. If you cut the cake too soon, it may fall apart. Give it time to set, and enjoy every slice! Pro Tips Use Fresh Spices: For the best flavor, opt for fresh ground spices instead of pre-ground ones. This will enhance the taste of your cake significantly. Check Your Oven Temperature: Ovens can vary in temperature; for accurate baking, use an oven thermometer to ensure it's preheating correctly. Don’t Overmix the Batter: Overmixing can lead to a dense cake. Mix until just combined for a light and fluffy texture. Let It Cool Properly: Allow the cake to cool in the pan before transferring it to a wire rack. This helps maintain its structure and prevents it from breaking apart. {{image_2}} To make a gluten-free pumpkin marble cake, swap the all-purpose flour for a gluten-free blend. Look for a mix that has xanthan gum, as it helps with texture. Use the same amount of flour listed in the recipe. The cake will still be soft and moist, just like the original! You can add nuts or dried fruits for extra flavor. Chopped walnuts or pecans give a nice crunch. If you prefer dried fruits, try raisins or cranberries. Add about 1/2 cup to the batter before pouring it into the pan. This will add a tasty twist to your cake! If you want to top your cake, consider different frostings. A simple coconut whipped cream pairs well with the flavors. You can also use a vegan cream cheese frosting for a rich taste. For a fun twist, try a chocolate glaze. Just melt some dark chocolate with a bit of almond milk, and drizzle it over the cooled cake. Each option brings a new layer of flavor to your vegan pumpkin marble cake! To keep your vegan pumpkin marble cake fresh, store it in an airtight container. Place it on the counter for up to three days. If you want it to last longer, put it in the fridge. It will stay good for about a week in the fridge. Make sure it is fully cooled before you store it. This helps keep the moisture inside. You can freeze this cake for longer storage. First, let it cool completely. Wrap it tightly in plastic wrap. Then, place it in a freezer bag or airtight container. It will last for up to three months in the freezer. When you're ready to eat it, thaw it in the fridge overnight. This keeps the texture nice. To reheat your cake, slice it into pieces. Place the slices on a microwave-safe plate. Heat them in the microwave for about 15-20 seconds. If you want it warm, but not too hot, check it after 15 seconds. You can also reheat slices in the oven. Set the oven to 350°F (175°C) and warm the slices for about 10 minutes. Enjoy it warm with a touch of coconut whipped cream! Yes, you can use fresh pumpkin. Start by roasting a small pumpkin. Cut it in half, scoop out the seeds, and bake it for about 45 minutes at 350°F (175°C). Once soft, mash it until smooth. Use it in the same amount as the canned pumpkin for great flavor. To make this cake nut-free, swap almond milk for any non-nut milk. Soy milk or oat milk works well. Just ensure the milk you choose is unsweetened. This way, you keep the flavor and texture while making it safe for those with nut allergies. If you need a substitute for coconut oil, try using vegetable oil or canola oil. Both options will give you a similar texture. You can also use melted vegan butter for a rich taste. Just make sure whatever you choose is melted before mixing it into the batter. In this post, we explored the key ingredients for the recipe, along with their health benefits. We covered how to prepare, bake, and cool the cake, ensuring you achieve the perfect texture. I shared useful tips, variations, and storage information to help you succeed. Remember, small swaps can lead to big flavor changes. Embrace your creativity with this recipe, and don’t be afraid to experiment. Enjoy baking and delighting your taste buds!

Vegan Pumpkin Marble Cake Tasty and Simple Recipe

Are you ready to dive into the world of baking with a twist? This Vegan Pumpkin Marble Cake combines rich

- 1 cup red lentils, rinsed - 1 medium onion, finely chopped - 2 cloves garlic, minced - 1-inch piece fresh ginger, minced - 1 medium carrot, diced - 1 can (14 oz) coconut milk - 1 can (14 oz) diced tomatoes - 2 tablespoons curry powder - 1 teaspoon ground cumin - 1 teaspoon turmeric - 1 cup vegetable broth - 2 tablespoons olive oil - 1 cup spinach, chopped - Salt and pepper to taste - Fresh cilantro for garnish Red lentils are packed with protein and fiber. They help keep you full and satisfied. Coconut milk adds creaminess and healthy fats. It also brings a rich flavor to the dish. Spinach is a great source of vitamins and minerals. It boosts the nutritional value of your meal. Curry powder contains spices like turmeric and cumin. These spices add flavor and have health benefits. Turmeric has anti-inflammatory properties. Cumin aids digestion. Using fresh garlic and ginger adds antioxidants to the dish. They also enhance the taste with their zest. When buying red lentils, look for a vibrant color. They should be dry and free from moisture. Check onions for firmness and a dry outer layer. Choose garlic bulbs that are plump and firm. Fresh ginger should feel smooth and have a strong aroma. For carrots, pick ones that are bright and firm without spots. Always choose coconut milk with a good fat content. This helps create a rich and creamy texture. Check canned tomatoes for low sodium to keep the dish healthy. Lastly, buy fresh spinach that looks bright green without wilting. These tips will ensure your curry is tasty and nutritious. {{ingredient_image_1}} 1. Start by heating 2 tablespoons of olive oil in a large pot over medium heat. 2. Add 1 finely chopped onion. Sauté it until it turns translucent, which takes about 5 minutes. 3. Next, stir in 2 minced garlic cloves and 1-inch piece of minced ginger. Cook for 1-2 minutes until you smell their aroma. 4. Add 1 diced medium carrot to the pot. Sauté for another 3-4 minutes until it softens. 5. Now, sprinkle in 2 tablespoons of curry powder, 1 teaspoon of ground cumin, and 1 teaspoon of turmeric. Stir well for 1 minute to coat the veggies. 6. Pour in 1 cup of rinsed red lentils, 1 can of diced tomatoes, and 1 can of coconut milk. Mix everything until it’s combined. 7. Add 1 cup of vegetable broth and bring the mix to a boil. Once it bubbles, reduce the heat to low. 8. Let it simmer uncovered for 20-25 minutes. Stir occasionally until the lentils become tender. 9. After cooking, fold in 1 cup of chopped spinach and cook for 5 more minutes until it wilts. 10. Finally, season with salt and pepper to your liking. Remove the pot from heat. Serve warm and top with fresh cilantro. - Don’t skip rinsing the lentils. This helps remove any debris. - Avoid cooking on high heat. It can burn the bottom and ruin the flavor. - Stir regularly to prevent sticking. This keeps the lentils from burning. - Don’t forget to taste. Adjust the seasoning to your liking. - When the onion is soft and translucent, that’s a cue to add garlic and ginger. - After adding spices, you should smell their strong aroma. This means they are ready. - When the lentils are tender and creamy, that tells you they are properly cooked. - The spinach should turn bright green and wilted when it's fully cooked. To boost flavor, start with fresh spices. Fresh curry powder, cumin, and turmeric make a big difference. Always toast your spices in oil before adding other ingredients. This step wakes up their aromas. I love adding a splash of lime juice at the end. It adds brightness and balances the dish. Fresh cilantro as a garnish brings a lovely finish too. Using the right tools will make cooking easier. A sharp chef's knife helps with chopping the onion and carrot. A sturdy cutting board is a must. I recommend a heavy-bottomed pot for even cooking. This pot prevents burning and ensures even heat. A wooden spoon is great for stirring without scratching the pot. Lastly, a measuring cup and spoons help keep your recipe precise. To adjust the spice level, add more or less curry powder. If you want it spicier, include a pinch of cayenne pepper or red chili flakes. For milder curry, reduce the spices slightly. Always taste as you go. This way, you can find the perfect balance. Add salt at the end for the best flavor. It enhances the dish without overpowering it. Pro Tips Rinse Lentils Thoroughly: Rinsing the lentils helps remove any debris and prevents them from becoming mushy during cooking. Customize Spice Level: Adjust the amount of curry powder and spices according to your taste for a milder or spicier dish. Add Extra Veggies: Feel free to include additional vegetables like bell peppers or peas for added nutrition and flavor. Serve with a Side: This curry pairs wonderfully with rice, quinoa, or flatbreads for a complete meal experience. {{image_2}} You can switch up the flavors in your red lentil curry. Try using sweet potatoes instead of carrots. They add a nice sweetness and creaminess. You can also add a splash of lime juice for a zesty kick. If you want more heat, add diced jalapeños or red pepper flakes. For a smoky flavor, mix in some smoked paprika. You can play with spices too. Try garam masala or coriander for a different twist. To make your curry heartier, add protein-rich foods. Chickpeas are a great choice. They add a nice texture and soak up the curry flavors well. Tofu is another good option. Just cube it and toss it in during the cooking process. For veggies, consider bell peppers or zucchini. They add color and crunch. You can also use kale instead of spinach for a stronger taste. Serving your red lentil curry can be fun! Try it over fluffy rice or quinoa for a filling meal. You can also serve it with warm naan bread. It’s perfect for scooping up the curry. For a lighter meal, serve it with a fresh salad. A cucumber salad with mint pairs wonderfully. Don’t forget to top with fresh cilantro for a pop of color and flavor! To freeze vegan red lentil curry, let it cool completely. Use airtight containers or freezer bags. Portion the curry for easy meals later. When ready to eat, thaw it in the fridge overnight. Reheat it gently on the stove or in the microwave. Stir it well to avoid hot spots. You can store the curry in the fridge for up to five days. Keep it in a sealed container to maintain freshness. If you notice any off smells, it’s best to discard it. For longer storage, freeze it. It can last for up to three months in the freezer. Leftover curry is versatile! You can use it as a filling for wraps or tacos. Serve it over rice or quinoa for a hearty meal. Add it to soups for extra flavor. You can also blend it into a creamy dip for veggies. The options are endless! You can use almond milk or soy milk instead of coconut milk. These options will change the flavor slightly, but they still work well. You can also try cashew cream for a richer texture. If you want a creamier taste, blend soaked cashews with water. This gives a nice base for the curry. Vegan red lentil curry lasts about 4 to 5 days in the fridge. Store it in an airtight container to keep it fresh. If you want to keep it longer, consider freezing it. It can last up to 3 months in the freezer. Just thaw it in the fridge before reheating. Yes, you can use other types of lentils, but they may cook differently. Green and brown lentils are great options. They take longer to cook but add a nice texture. Black lentils also work, but they may change the look of the dish. Adjust the cooking time based on the lentils you choose. You now have everything you need to make the best vegan red lentil curry. We discussed key ingredients and their nutrition. You learned cooking steps and how to avoid common mistakes. Flavor tips and suggested tools will make your meal even better. Variations allow you to try new tastes, while storage tips help you keep leftovers fresh. With these insights, you can cook a delicious curry that suits your style and taste. Enjoy your cooking adventure!

Best Vegan Red Lentil Curry Flavorful and Easy Recipe

Are you ready to make an easy and tasty vegan red lentil curry? This dish is simple to prepare and

- 1 lb chicken breast strips - 1 cup buttermilk (or substitute with 1 cup milk + 1 tablespoon lemon juice) - 1 cup all-purpose flour - 1 teaspoon garlic powder - 1 teaspoon onion powder - 1 teaspoon paprika - 1 teaspoon salt - 1/2 teaspoon black pepper - 1/2 teaspoon cayenne pepper (optional for a kick) - 1 cup panko bread crumbs - Cooking spray The main ingredients create a tasty base for your chicken tenders. The chicken breast strips are juicy and tender. Buttermilk adds a tangy flavor and keeps the meat moist. You can use milk with lemon juice if you're out of buttermilk. The all-purpose flour helps the coating stick well. Next, we have the spices and seasonings. Each spice adds its unique flavor. Garlic powder gives depth, while onion powder adds sweetness. Paprika gives a nice color and mild heat. Salt and black pepper are key to enhancing all flavors. If you want some heat, add cayenne pepper. Finally, the coating ingredients make your tenders crispy. Panko bread crumbs create an extra crunchy layer. Cooking spray ensures the tenders brown evenly and don’t stick. Using these ingredients will help you make air fryer chicken tenders that are crispy and flavorful. {{ingredient_image_1}} To start, combine the chicken strips with buttermilk in a bowl. This mix helps tenderize the meat and adds flavor. I recommend marinating for at least 30 minutes. If you have time, letting the chicken sit overnight makes it even better. Next, set up your dredging station with three bowls. In the first bowl, mix flour with garlic powder, onion powder, paprika, salt, and black pepper. The second bowl holds the buttermilk, and the third contains panko bread crumbs. This setup will help you coat the chicken easily. Now it’s time to coat the chicken. Remove the strips from the buttermilk, letting the excess drip off. First, dip each strip in the flour mixture. Then, back into the buttermilk, and finally, coat it with panko bread crumbs. Press gently to make sure the panko sticks well. Preheat your air fryer to 400°F (200°C) for about 5 minutes. This step is crucial. Preheating helps the chicken cook evenly and get that perfect crispy texture. Spray the air fryer basket with cooking spray. Place the chicken tenders in a single layer. Avoid overcrowding; this lets the hot air circulate. Lightly spray the tops of the tenders with cooking spray for an extra crispy finish. Cook the chicken tenders for 10-12 minutes. Flip them halfway through to ensure even cooking. They are done when they turn golden brown and reach an internal temperature of 165°F (74°C). Use a meat thermometer to check for doneness. To get crispy and tender chicken, marination is key. Soak your chicken in buttermilk for at least 30 minutes. This helps to make the meat juicy. You can marinate overnight for even more flavor. Aim for that golden brown crust. The coating should be crisp, while the inside stays moist. Spices can change everything. Try adding chili powder for heat or Italian herbs for a twist. You can mix and match seasonings to suit your taste. For dipping sauces, consider ranch, honey mustard, or barbecue. These sauces complement the chicken well, adding extra flavor. If your air fryer is small, cook in batches. Place the chicken strips in a single layer. This ensures they cook evenly and stay crispy. To reheat, use the air fryer. Set it to 350°F for about 5 minutes. This will keep them crunchy and warm. Pro Tips Marination Matters: Allowing the chicken to marinate for longer enhances its flavor and tenderness, so consider marinating overnight if you have the time. Use Panko for Crunch: Panko breadcrumbs create a lighter, crispier coating compared to regular breadcrumbs, giving your tenders an irresistible crunch. Don’t Overcrowd the Basket: Cooking in batches ensures even cooking and crispiness; overcrowding can lead to soggy tenders. Check for Doneness: Always use a meat thermometer to ensure the chicken reaches an internal temperature of 165°F (74°C) for safe consumption. {{image_2}} You can easily make these chicken tenders gluten-free. For the flour, use a gluten-free blend. You can also swap panko crumbs for gluten-free breadcrumbs. Keep an eye on the cooking time. Gluten-free breading may need a minute or two less to cook. Always check the chicken's internal temperature. It should reach 165°F to be safe. Air frying is a healthier choice compared to traditional frying. With air frying, you use less oil, which cuts down on calories. The texture remains crispy on the outside and juicy inside. In traditional frying, the chicken tends to absorb more oil. This can lead to a heavier feel. Both methods create delicious chicken, but air frying keeps it lighter and easier to clean up. Adding veggies can boost your meal's nutrition. Try air frying bell peppers, zucchini, or carrots alongside your chicken. Cut them into similar sizes for even cooking. Most veggies will cook in 8 to 12 minutes at 400°F. You can toss them in a bit of oil and season them as you like. This way, you enjoy a full meal from the air fryer. To store your leftover chicken tenders, let them cool first. Place them in airtight containers. This keeps them fresh and safe. I recommend using glass or plastic containers with tight lids. You can keep them in the fridge for up to three days. If you want to freeze cooked tenders, let them cool completely. Arrange them in a single layer on a baking sheet. Freeze them for about an hour until firm. After that, transfer them to freezer bags. Make sure to remove as much air as possible. When you are ready to eat, reheat them in the air fryer at 375°F (190°C) for about 10 minutes. This will help keep them crispy. Cooked chicken tenders can last in the fridge for three days. In the freezer, they can stay good for up to three months. Always check for signs of spoilage before eating. Look for any off smells, discoloration, or slimy textures. If you notice any of these, it's best to throw them away. To make air fryer chicken tenders crispy, follow these tips: - Use panko bread crumbs for extra crunch. - Marinate the chicken in buttermilk for at least 30 minutes. - Make sure to coat the chicken evenly with the flour, buttermilk, and panko. - Lightly spray the chicken with cooking spray before air frying. - Cook in a single layer without overcrowding the basket. These steps help create a golden and crunchy exterior that everyone loves. Yes, you can use frozen chicken strips! Just adjust the cooking time. - Preheat the air fryer to 400°F (200°C). - Add an extra 5 minutes to the cooking time. - Check for a safe internal temperature of 165°F (74°C). This way, you can still enjoy tasty tenders without defrosting. Many sauces pair well with chicken tenders. Here are some popular choices: - Honey mustard for a sweet and tangy flavor. - BBQ sauce for a smoky kick. - Ranch dressing for a cool and creamy dip. - Ketchup for a classic option. Feel free to try any of your favorites! Yes, you can! If you don't have buttermilk, try this: - Use 1 cup of milk and add 1 tablespoon of lemon juice. - Let it sit for 5 minutes to thicken. This will give you a similar tangy flavor. Cooking chicken tenders usually takes 10-12 minutes in an air fryer. - Preheat to 400°F (200°C). - Flip the tenders halfway through for even cooking. Always check that they reach 165°F (74°C) for safety. You learned how to make delicious air fryer chicken tenders from scratch. We covered the key ingredients, from chicken strips to spices. Marinating and coating the chicken ensures the best flavor and texture. I shared tips for cooking and storing your tenders, plus options for variations and sauce pairings. Enjoy making this easy, tasty dish for yourself or your family. With practice, you'll create perfect tenders every time. Happy cooking!

Air Fryer Chicken Tenders Crispy and Flavorful Meal

Are you ready to make the crispiest, most flavorful air fryer chicken tenders? I’m here to help you master this

- 1.5 lbs boneless, skinless chicken thighs - 1 can (14 oz) coconut milk - 1 cup chicken broth - 2 tablespoons red curry paste - 1 tablespoon fresh ginger, grated - 2 cloves garlic, minced - 1 red bell pepper, sliced - 1 cup green beans, trimmed and cut - 1 medium onion, sliced - 2 tablespoons soy sauce (or tamari for gluten-free) - 1 teaspoon turmeric - Salt and pepper to taste - Fresh cilantro, for garnish - Lime wedges, for serving This dish uses simple and fresh ingredients. The chicken thighs give a tender bite. Coconut milk adds creaminess and a hint of sweetness. Red curry paste brings heat and depth. Fresh ginger and garlic are key to the flavor. They add warmth and fragrance. The red bell pepper and green beans provide crunch and color. Onion rounds out the dish with its sweetness. Soy sauce or tamari enhances the umami taste. Turmeric adds a golden color and earthiness. Salt and pepper balance all the flavors. Cilantro and lime juice brighten the dish when served. These ingredients come together in a way that makes each bite exciting. They create a comforting meal that you and your family will love. {{ingredient_image_1}} First, we need to prepare the chicken thighs. Pat them dry with a paper towel. Then, season them with salt and pepper. Place the seasoned chicken at the bottom of the crockpot. This step ensures the chicken absorbs all the flavors from the sauce and veggies. Next, we will make the coconut curry sauce. In a mixing bowl, combine the coconut milk, chicken broth, red curry paste, grated ginger, minced garlic, soy sauce, and turmeric. Whisk these ingredients until they blend well. This sauce is the heart of the dish. Pour the coconut curry mixture over the chicken in the crockpot. The chicken will soak up this rich and tasty sauce. Now, let’s incorporate the veggies. Add the sliced red bell pepper, green beans, and onion on top of the chicken. Stir gently to mix everything. Make sure the vegetables are coated in the curry sauce. Cover the crockpot and set it to cook. For low heat, cook for 6-8 hours. If you use high heat, cook for 3-4 hours. The chicken should be tender and well-cooked. Once the chicken is done, it’s time to shred it. Use two forks to shred the chicken in the pot. Mix everything well, so the flavors combine. Taste the dish and adjust seasoning if needed. Serve the coconut curry hot over rice or quinoa. Don’t forget to garnish with fresh cilantro and a squeeze of lime juice. This adds a fresh touch to your meal. Enjoy! To make your dish pop, taste it after cooking. You might need to add more salt or pepper. If you like heat, add chili flakes to spice things up. It gives a nice kick. You want your chicken to be tender and juicy. Cook it on low for 6-8 hours. If you're short on time, use the high setting for 3-4 hours. Check if it's done by shredding it with a fork. If it pulls apart easily, it's ready! For a beautiful finish, garnish with fresh cilantro. It adds a nice green touch and fresh flavor. Serve with lime wedges on the side. A squeeze of lime brightens the dish and makes it even better. Pro Tips Use Fresh Ingredients: Always opt for fresh vegetables and herbs for the best flavor. Fresh cilantro and ginger can elevate the dish significantly. Adjust Spice Level: If you prefer a milder curry, reduce the amount of red curry paste. You can always add more later if you want extra heat. Thicken the Sauce: For a thicker curry, you can add a tablespoon of cornstarch mixed with water during the last 30 minutes of cooking. Leftover Magic: This curry tastes even better the next day! Store leftovers in the fridge and reheat for a quick meal. {{image_2}} You can switch chicken thighs for chicken breast. Chicken breast is leaner, but it can dry out faster. Cook it on low for the best results. If you want a vegetarian option, you can use tofu. Firm tofu works best. Just press it first to remove extra water. Cut it into cubes and add it like you would chicken. Feel free to add other vegetables. Carrots add sweetness and color, while peas add a nice pop of green. You can also try different bell pepper colors. Yellow or orange bell peppers can brighten the dish visually and taste-wise. Mix and match based on what you have at home. You can make a peanut curry sauce for a new twist. Simply add peanut butter to the coconut milk mixture. It adds creaminess and a nutty flavor. If you want a richer taste, add coconut cream. This makes the curry even more decadent and smooth. To store leftovers in the fridge, let the curry cool first. Place the curry in an airtight container. You can keep it in the fridge for up to three days. Be sure to cover it well to keep it fresh. When ready to eat, just open the container and enjoy. Best practices for freezing curry include using a freezer-safe container. Divide the curry into portions for easy use. Make sure to leave some space at the top of the container. This allows for expansion as the curry freezes. You can freeze it for up to three months. Label the container with the date, so you remember when you made it. To reheat without losing flavor or texture, you can use a few methods. The best way is to thaw it overnight in the fridge. Then, warm it in a pot over low heat. Stir often to keep it from sticking. You can also microwave it in a bowl, covered with a paper towel. This helps keep the moisture in. Make sure it’s heated all the way through before serving. It takes about 6 to 8 hours on low heat. If you are short on time, you can cook it on high for 3 to 4 hours. Your chicken should be tender and cooked through when ready. Yes, you can make this dish gluten-free. Just use tamari instead of regular soy sauce. Tamari is a gluten-free soy sauce that works great in this recipe. You can serve this dish with rice or quinoa. Both options soak up the curry flavor well. You can also add a side salad or steamed vegetables for extra nutrients. This blog post shared a simple and tasty way to make coconut curry chicken in a crockpot. You learned about the main ingredients, which include chicken thighs and coconut milk. We covered how to prepare the chicken and the curry sauce, plus tips to enhance flavor and texture. You can even try different proteins and veggies. Store and reheat leftovers easily for more delicious meals. Remember, cooking should be fun and enjoyable, so get creative! Your kitchen is a place for great flavors and new ideas to shine.

Crockpot Coconut Curry Chicken Flavorful and Easy Meal

Looking for a simple yet delicious dinner idea? My Crockpot Coconut Curry Chicken is just the answer! This dish features

- 1 pound boneless, skinless chicken thighs, diced - 1 cup white rice - 1 cup salsa verde - 2 cups chicken broth - 1 medium onion, chopped - 2 cloves garlic, minced - 1 bell pepper (any color), diced - 1 teaspoon cumin - 1 teaspoon smoked paprika - Salt and pepper to taste - 1 cup corn (fresh or frozen) - ½ cup cilantro, chopped (for garnish) - Lime wedges (for serving) In this dish, I use boneless, skinless chicken thighs because they stay juicy. The white rice acts as a base and soaks up all the flavors. Salsa verde brings a tangy kick that brightens the meal. For the additional ingredients, I choose chicken broth to add depth and flavor. The onion, garlic, and bell pepper create a tasty aroma and add sweetness. I season the dish with cumin and smoked paprika for warmth. A bit of salt and pepper balances everything. I also throw in corn for sweetness and color. Finally, cilantro and lime give the dish a fresh finish. {{ingredient_image_1}} Start by heating the olive oil in a large skillet over medium heat. Add in the chopped onion and diced bell pepper. Sauté these veggies until they soften, about 5 minutes. Next, add the minced garlic and cook for another minute. You want to smell that garlic! Now, push the veggies to one side of the skillet. Add the diced chicken thighs to the other side. Season the chicken with salt, pepper, cumin, and smoked paprika. Cook until the chicken turns white and is no longer pink, about 5 to 7 minutes. After the chicken is cooked, stir everything together in the skillet. Now it's time to add the rice, chicken broth, and salsa verde. Mix it well, and bring this to a boil. Once it bubbles, lower the heat to low and cover the skillet. Let it simmer for about 20 minutes. This will allow the rice to cook and soak up all the tasty flavors. If you’re using frozen corn, stir it in during the last 5 minutes of cooking. Once the rice is tender, fluff it with a fork. This helps it stay light and airy. Let it sit for a few minutes before serving. For a beautiful presentation, garnish with chopped cilantro. Serve warm with lime wedges on the side. The lime adds a fresh zing that enhances the dish. Enjoy every bite! - Best practices for sautéing chicken: Start with a hot skillet. Use olive oil to prevent sticking. Cut chicken into small pieces for even cooking. Don’t overcrowd the pan; this lets the chicken brown well. Cook until no longer pink, about 5-7 minutes. - Tips for perfectly cooked rice: Rinse your rice before cooking. This removes excess starch and helps it cook better. Use a 2:1 ratio of broth to rice for fluffy results. Once it boils, cover and reduce heat right away. Let it simmer without lifting the lid. - Alternatives for chicken and rice: You can swap chicken thighs for boneless chicken breasts, or even turkey. If you want a grain-free option, try cauliflower rice. Quinoa also works well as a healthy substitute for rice. - How to adjust spice levels: To tone down spice, use mild salsa verde. You can add more sour cream as a topping. For a kick, add jalapeños or chili powder. Taste as you go to find your perfect balance. - Suggestions for additional spices or toppings: Add more depth with garlic powder or onion powder. Fresh lime juice brightens flavors. Top with avocado slices or crumbled cheese for creaminess. For crunch, sprinkle tortilla chips on top just before serving. Pro Tips Use Fresh Ingredients: Whenever possible, opt for fresh vegetables and herbs. They provide a vibrant flavor that enhances the overall dish. Cook Rice Perfectly: To ensure your rice is fluffy and not sticky, rinse it under cold water before cooking to remove excess starch. Customize Spice Level: Adjust the heat of your salsa verde by choosing a mild or spicy version, or add jalapeños for an extra kick. Let It Rest: After cooking, let the skillet sit covered for a few minutes before serving. This helps the flavors meld and the rice to firm up. {{image_2}} You can easily change the protein in this dish. If you want shrimp, use about a pound of peeled shrimp. Cook them in the skillet until pink. This swap adds a sweet flavor. For a veggie option, use a mix of your favorite vegetables. Zucchini, mushrooms, or bell peppers work well. Just sauté them like you do the chicken. This option makes the dish light and fresh. Salsa verde is a great base, but you can try different flavors. Use green salsa or red salsa to change the taste. Each adds its unique twist to the dish. Adding beans can boost protein and texture. Black beans or pinto beans blend well with the rice. They also make the dish heartier and more filling. Pair this dish with a simple side salad or some tortilla chips. This adds crunch and balance to the meal. You can also create burrito bowls. Just layer the rice, chicken, and salsa in a bowl. Top with cheese, avocado, or sour cream. Another idea is to make tacos. Use small tortillas and fill them with the skillet mix. This makes for a fun, interactive meal! To store leftovers, let the dish cool first. Place it in an airtight container. Glass or plastic containers work well. Make sure to seal the lid tightly. This keeps your Salsa Verde Chicken Rice Skillet fresh. You can freeze portions for future meals. Use freezer-safe bags or containers. Divide the dish into single servings. This makes it easy to grab a meal later. When ready to eat, thaw overnight in the fridge. Reheat in the microwave or on the stovetop until hot. In the fridge, your dish lasts about 3 to 4 days. If you freeze it, it can last up to 3 months. Always check for any off smells or changes in color before eating. Store smart and enjoy your meals longer! Yes, you can make this dish ahead of time. To prepare, follow the recipe and cook as directed. Once it cools, store it in an airtight container in the fridge. It will stay fresh for about three days. When you are ready to eat, reheat it on the stove over low heat. Stir often to heat evenly. You can also use a microwave, but stir halfway through for the best results. If you want a change, you can use chicken breasts instead. They cook faster but may be less juicy. For a lighter option, try turkey breast. If you prefer plant-based, use firm tofu or tempeh, cubed and sautéed. You can also use beans for protein, like black beans or chickpeas. These options fit different diets while keeping the dish tasty. Salsa verde can vary in heat. Some brands are mild, while others are spicy. It mainly uses tomatillos and green chilies. If you like heat, choose a spicier salsa. If you prefer milder flavors, look for a mild version or make your own. You can adjust the spice by adding less salsa verde to your dish. This way, you can enjoy the flavor without too much heat. This blog post covered an easy, tasty chicken dish. We explored the main ingredients like chicken thighs, rice, and salsa verde. I shared step-by-step instructions to help you cook it right. You learned helpful tips for sautéing and flavoring your meals. We also discussed storage and how to make variations. Cooking at home can be simple and fun. Try this dish, and enjoy the flavors!

Salsa Verde Chicken Rice Skillet Tasty and Easy Meal

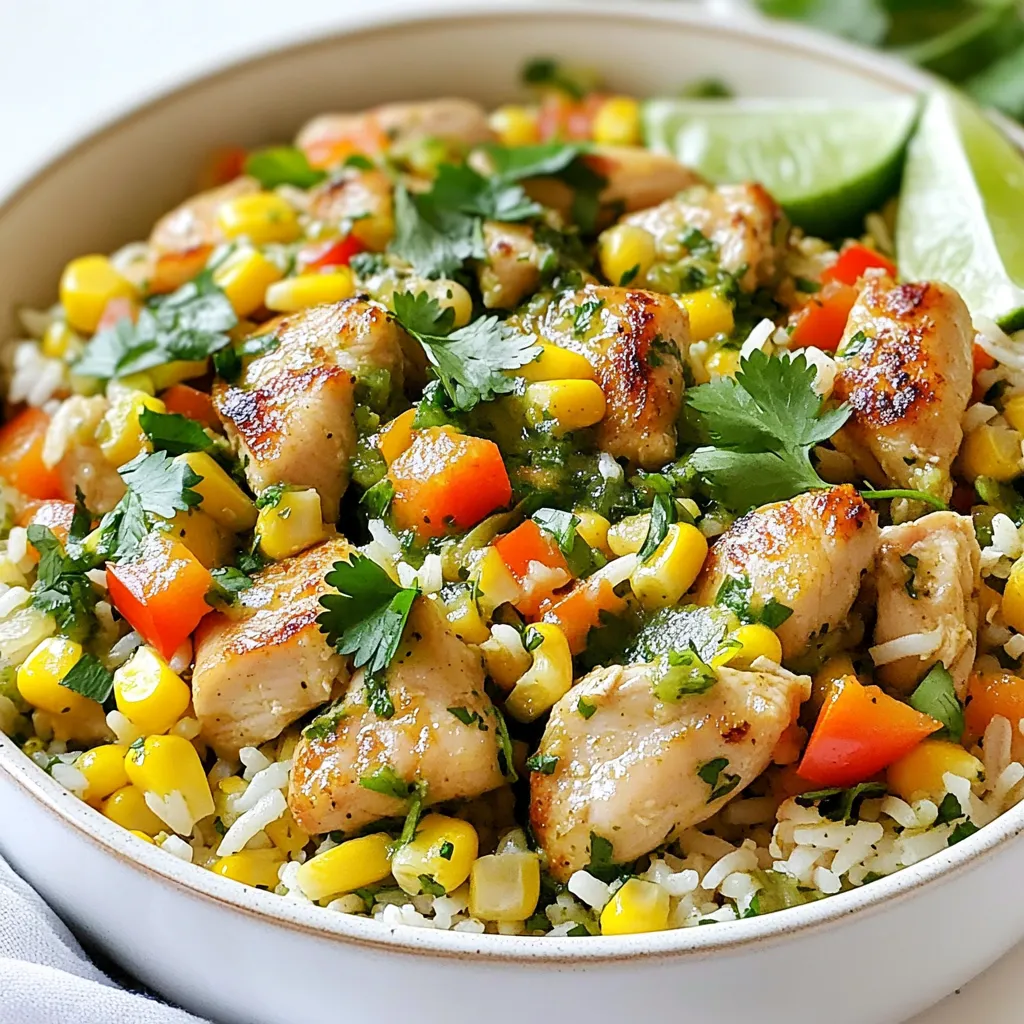
Looking to whip up a quick, tasty meal? Try my Salsa Verde Chicken Rice Skillet! This one-pan dish is packed

To make your Festive Spiced Christmas Jam, gather these simple ingredients: - 4 cups mixed berries (strawberries, raspberries, blackberries) - 2 cups sugar - 1/2 cup fresh orange juice - Zest of 1 orange - 1 teaspoon ground cinnamon - 1/2 teaspoon ground ginger - 1/4 teaspoon ground nutmeg - 1 teaspoon vanilla extract - 1/4 cup lemon juice - 1 pouch fruit pectin (like Sure-Jell) You can add a few items to boost the flavor of your jam: - A splash of brandy or rum for warmth - A few cloves for a bold spice kick - A pinch of black pepper for a surprising twist These optional ingredients can make your jam even more festive and fun. If you can’t find some ingredients, here are some swaps: - Use any combination of berries you prefer, like blueberries or cranberries. - Swap sugar with honey or maple syrup for a natural sweetness. - If you lack fresh orange juice, bottled juice will work too. These substitutions will keep your jam delicious and allow you to customize it to your taste. Enjoy making your jam! {{ingredient_image_1}} To start, gather all your ingredients. You will need mixed berries, sugar, orange juice, and spices. I prefer using strawberries, raspberries, and blackberries. They mix well and taste great together. You will also need lemon juice and fruit pectin to help the jam set. 1. In a large pot, combine the mixed berries. Use a fork or potato masher to mash them lightly. This helps release the juices. 2. Next, add the sugar, orange juice, orange zest, cinnamon, ginger, nutmeg, and vanilla extract. Let this sit for about 10 to 15 minutes. This time allows the sugar to pull out more juice from the berries. 3. Now, stir in the lemon juice and fruit pectin. Make sure everything is well mixed. 4. Place the pot on medium-high heat. Bring the mixture to a rapid boil while stirring often. Once it boils, cook for 10 to 15 minutes. The jam will thicken and become gel-like during this time. To check if your jam is ready, take a small amount and place it on a cold plate. Let it cool for a minute. If it holds its shape, the jam is done. If it spreads too much, boil it for a few more minutes. This simple test helps ensure your jam has the right consistency. When making festive spiced Christmas jam, start with fresh berries. I love using strawberries, raspberries, and blackberries. They mix well together and create a great flavor. Use a fork or potato masher to mash the berries slightly. This step helps release their juices. After mixing in the sugar and spices, let everything sit for about 10-15 minutes. This allows the sugar to pull out more juice from the berries. Stir often while cooking. This keeps the jam from sticking to the pot. To get the right jam consistency, watch the cooking time closely. Cook the mixture over medium-high heat until it boils rapidly. Stir frequently to prevent burning. After about 10-15 minutes, test if it thickens. Use a cold plate; drop a bit of jam on it. If it holds its shape after cooling for a minute, it’s ready. If it’s still runny, boil for a few more minutes. Remember, the jam will thicken more as it cools. Sterilization is key for safe storage. First, wash your jars in hot, soapy water. Then, place them in a boiling water bath for 10 minutes. This kills any germs. After making your jam, pour it into the warm jars while still hot. Seal them tightly. For long-term storage, process the jars in a boiling water bath for 5-10 minutes. This helps keep the jam fresh. Let the jars cool completely before storing them in a cool, dark place. Pro Tips Use Fresh Ingredients: The quality of your berries and citrus will greatly affect the flavor of the jam, so opt for the freshest options available. Adjust Sweetness to Taste: Depending on the natural sweetness of your berries, you may want to adjust the amount of sugar used in the recipe. Check for Gel Consistency: If your jam doesn't seem to thicken, you can add a little more pectin and boil for a few additional minutes. Label Your Jars: Don't forget to label your jars with the date and contents; homemade jam makes great gifts and it's nice to know when it was made! {{image_2}} You can switch up the fruit in your jam for fun. Instead of mixed berries, try using peaches or apples. These fruits add a sweet twist. Mix in some cranberries for a tart flavor. Pairing fruits gives your jam a unique taste. You can even use pears or cherries. Each fruit brings its own charm to the jam. Spices can change the flavor of your jam. If you love warm spices, add cardamom or allspice. A hint of cloves can also warm up the taste. You could even toss in some chopped fresh mint for a fresh kick. Another good idea is to add a splash of rum or brandy. This gives a cozy holiday feel to your jam. If you want a healthier jam, think about sugar swaps. You can use honey or maple syrup instead of sugar. These natural sweeteners can cut down on refined sugar. Stevia or agave syrup are good choices too. Just remember to adjust the amount based on the sweetness. These alternatives keep the jam tasty without all the sugar. To store your festive spiced Christmas jam, first, make sure it cools completely. Once cooled, transfer the jam into clean, sterilized jars. Seal the jars tightly with lids. Keep the jars in a cool, dark place, like a pantry. If you plan to use the jam soon, the fridge works too. Always use a clean spoon when scooping out jam. This helps keep it fresh longer. Homemade jam can last up to one year if stored properly. If you refrigerate it, it can last up to three weeks once opened. Check for signs of spoilage, like mold or off smells. If you notice any, it's best to throw it out. Always label your jars with the date you made them. This way, you know how long they’ve been stored. Gifting homemade jam is a sweet gesture. For a lovely presentation, use cute jars with colorful lids. You can tie a ribbon around the jar for a festive touch. Add a small tag with the jam's name and date made. This personal touch makes the gift special. You can also include a recipe card for a dish that pairs well with the jam. Yes, you can use frozen berries. They work well in jams. Just thaw them first. This helps them mix nicely with the other ingredients. Frozen berries may also give your jam a nice texture. To check if the jam is set, use a cold plate. Place a small amount of jam on it. Wait a minute. If it holds its shape, it is ready. If it spreads too much, boil it a little longer. Testing this way gives you the perfect jam texture. Processing jars in a boiling water bath is not always needed. It helps seal the jars for longer storage. If you plan to eat the jam quickly, you can skip this step. For long-term storage, I recommend processing them for about 5-10 minutes. This keeps your jam safe and fresh. Making homemade jam is fun and rewarding. You learned about key ingredients, step-by-step instructions, and helpful tips. Using optional flavors or alternative fruits can boost your jam's taste. Proper storage keeps it fresh longer. Remember, using frozen berries works well, and testing for doneness is crucial. With practice, you'll feel confident in your jam-making skills. Enjoy the process and share your tasty creations with friends and family!

Festive Spiced Christmas Jam Delightful Holiday Treat

Get ready to spread some holiday cheer with my delightful Festive Spiced Christmas Jam! This easy-to-make jam bursts with cozy

To make a great beef pho, you need key ingredients. Here’s what you will need: - 1 lb beef brisket, thinly sliced - 1 lb beef bones (preferably with marrow) - 8 cups water - 1 onion, halved - 1 ginger root (2 inches), sliced - 2 star anise - 1 teaspoon coriander seeds - 1 cinnamon stick - 2 cloves - 1 tablespoon fish sauce - 1 teaspoon salt - 1 tablespoon sugar - Rice noodles (pho noodles) for serving These ingredients form the base of your flavorful broth. The beef bones add richness, while the spices bring warmth and depth. You can enhance your pho with fresh garnishes. These add flavor and color. Consider these options: - Fresh basil leaves - Bean sprouts - Sliced jalapeños - Lime wedges Adding these fresh toppings lets you customize each bowl. You can mix and match based on your taste. Choosing the right ingredients matters. Here are some tips: - Beef Brisket: Look for bright red meat with good marbling. This gives the broth more flavor. - Beef Bones: Choose bones with marrow for a rich taste. Ask your butcher for help if needed. - Spices: Use whole spices for better flavor. They stay fresh longer and have a stronger taste. - Fresh Herbs: Select vibrant, fragrant herbs. Freshness impacts the overall dish. Quality ingredients elevate your pho. Put in the effort to find the best, and you will taste the difference. {{ingredient_image_1}} To make the broth, start with the beef bones. Place them in a large pot and add the water. Bring this to a boil over high heat. Once it boils, reduce the heat to medium-low. You will see foam rise to the top; skim this off. Let it simmer for about 30 minutes. This helps the broth become clear and rich. After 30 minutes, it’s time to add more flavor. While the broth simmers, you can char the onion and ginger. Take the halved onion and the sliced ginger root. Heat a dry skillet on medium heat. Once hot, add the onion and ginger. Cook them until they turn caramelized and smell great. This step adds depth to your broth. The charred flavors will enhance your pho. After simmering, it’s time to finish your pho. Strain the broth through a fine-mesh sieve. Discard the solid bits. Now, cook the rice noodles according to the package instructions. Drain the noodles and set them aside. To serve, place a handful of noodles in a bowl. Top with slices of raw brisket. The hot broth will cook the meat. Ladle the hot broth over the noodles and brisket. Finally, serve with fresh basil, bean sprouts, sliced jalapeños, and lime wedges. This allows everyone to customize their bowl. Enjoy the warmth of your homemade beef pho! To make the best broth, use beef bones with marrow. Marrow adds richness. Simmer the broth for at least three hours. This helps extract deep flavors. Char the onion and ginger before adding them. This step brings out their sweetness. Don’t rush the simmering process; patience is key. Keep the pot partially covered to trap flavors. Add fish sauce for umami. Adjust salt and sugar to taste. Taste often to find the right balance. One common mistake is not skimming the foam. Skimming helps keep your broth clear. Another mistake is using low-quality beef bones. Always choose bones with marrow for the best flavor. Avoid adding too many spices at once. Less is more when it comes to spices. Too much can overpower your broth. Lastly, don’t skip the resting time for the broth. Letting it sit enhances the flavors. Use a large pot for your broth. A stockpot is ideal for this recipe. A fine-mesh sieve is essential for straining. This helps keep your broth smooth. A skillet works well for charring the onion and ginger. A ladle is great for serving hot broth. Don’t forget a sharp knife for slicing the brisket. A cutting board is also important for safe prep. These tools will make your cooking experience easier and more enjoyable. Pro Tips Use Quality Ingredients: The flavor of your pho largely depends on the quality of the beef and bones you use. Opt for fresh, high-quality cuts to enhance the broth's richness. Char for Depth: Charring the onion and ginger before adding them to the broth adds a deeper flavor profile. Don’t skip this step for a more authentic taste. Adjust Seasoning: Once the broth is strained, taste it and adjust the seasoning as needed. You can add more fish sauce, salt, or sugar to suit your preferences. Customize Your Bowl: Encourage your guests to customize their bowls with fresh herbs, sprouts, and lime. This not only enhances flavor but also adds a vibrant aesthetic to the dish. {{image_2}} You can use many proteins in pho. If you want to try something new, consider chicken or pork. Thin slices of steak work well too. Even shrimp can be a tasty choice. Just remember to adjust the cooking time for each type. Chicken takes less time to cook than beef. Always ensure your protein is tender and flavorful. You can easily make pho without meat. For a vegetarian version, use vegetable broth as your base. Add mushrooms for a rich, umami flavor. Tofu is a great protein source. You can use firm tofu and sauté it for extra flavor. For a vegan option, skip fish sauce and use soy sauce or tamari instead. Load up on fresh veggies like bok choy, carrots, and bell peppers. This way, you get a colorful, satisfying bowl. Pho has many regional twists. In the North of Vietnam, the broth is clear and light. They often use simple herbs like cilantro. In the South, the broth is richer and sweeter, with more spices. You’ll find lots of fresh herbs and bean sprouts on the side. In the Central region, pho can pack a spicy punch. They add chili and extra herbs for a bold flavor. Explore these different styles to find what you love best! After enjoying your beef pho, store leftovers safely. First, cool the broth. Pour it into a container with a lid. Keep the noodles and broth separate. Place them in the fridge. Use the broth within three days. The noodles can last for up to a week. Always label your containers with dates. To reheat your pho, start with the broth. Pour it into a pot. Heat it on medium until it simmers. This helps keep the flavor strong. For noodles, put them in a bowl. Cover them with boiling water for a few minutes. This warms them up without cooking them more. Once both are hot, combine them for a delicious meal. You can freeze pho, but do it right. Freeze the broth in airtight bags. Remove as much air as possible. This keeps it fresh longer. Do not freeze the noodles. They become mushy when thawed. If you want to freeze garnishes, like basil, do it separately. When ready to eat, thaw the broth overnight and reheat. Enjoy your homemade comfort bowl! Pho stands out due to its deep, rich broth. The broth comes from simmering beef bones and spices for hours. Other soups often use quick methods, while Pho takes time. The unique spices, like star anise and cinnamon, create its distinct flavor. The rice noodles are also special; they are flat and chewy, adding a unique texture. Pho is not just a meal; it’s a warm hug in a bowl. Making Authentic Beef Pho takes about three hours in total. You start with 30 minutes of simmering the beef bones to form the broth. After that, you add spices and simmer for 2-3 hours more. While it sounds long, most of it is hands-off cooking. The wait is worth it for that flavorful broth. Plus, you can prep other ingredients during the simmering time. Yes, you can use a slow cooker for this recipe. It’s a great way to develop flavor without constant attention. Start by browning the bones and spices in a skillet, then add them to your slow cooker. Pour in the water and set it on low for 8-10 hours or high for 4-6 hours. This method will still give you a rich broth, though you may miss some depth from the stovetop method. Making authentic beef pho involves key ingredients, careful broth prep, and tasty garnishes. You learned how to pick the best ingredients, avoid common mistakes, and explore fun variations. My final thoughts? Your pho journey can be rewarding and delicious! You can create a dish that warms your soul and impresses your friends. Follow these tips, enjoy the process, and savor every bowl. Now, go on and make some pho magic!

Authentic Beef Pho Flavorful Homemade Comfort Bowl

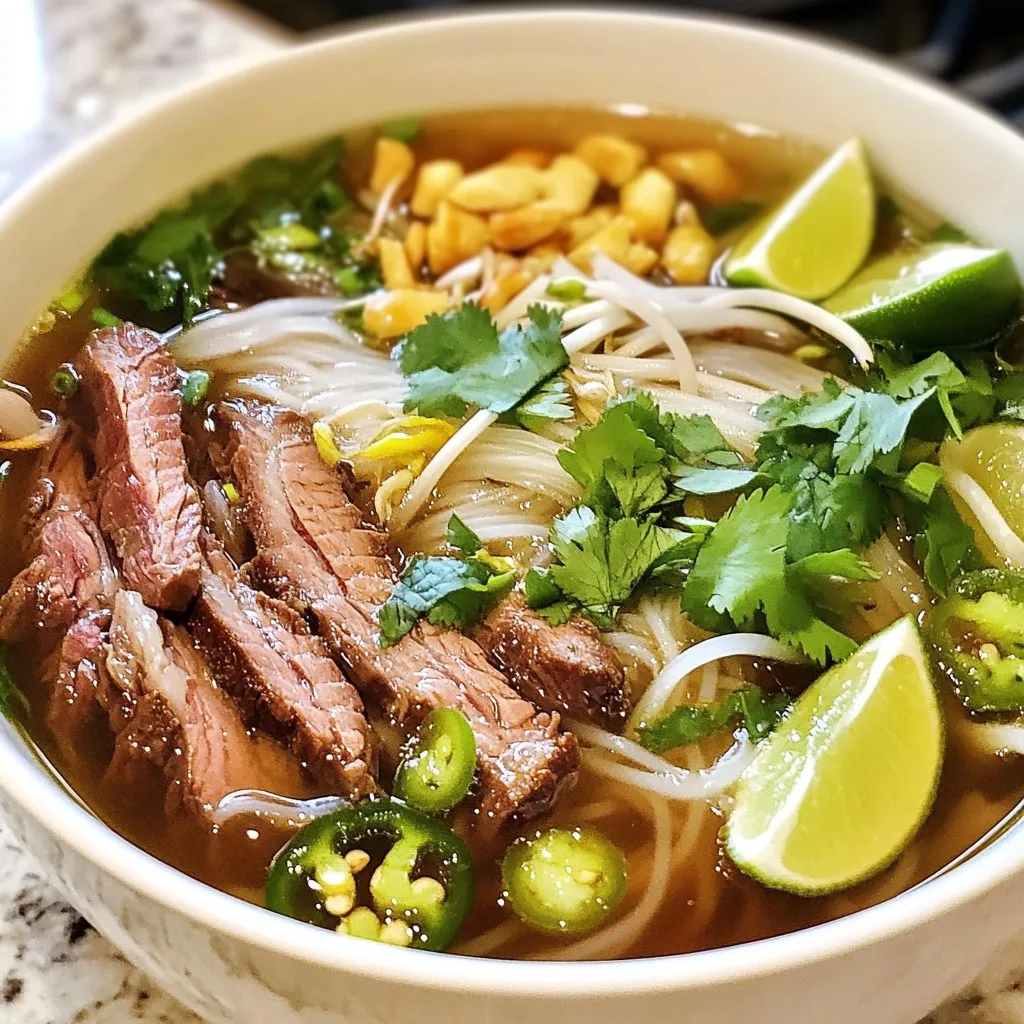
Welcome to your journey towards making Authentic Beef Pho—a flavorful comfort bowl that warms the soul. With rich broth, tender

Older posts
Newer posts
← Previous Page1 … Page131 Page132 Page133 … Page143 Next →

dsad

© 2025 Southern Dishes • Built with GeneratePress

Our Policies

  • Copyright Policy
  • Cookie Policy
  • GDPR Policy
  • Privacy Policy
  • Disclaimer
  • Terms Of Use

More Information

  • Home
  • About
  • Contact
  • Appetizers
  • Dessert
  • Dinner
  • Drinks
©2025, Southern Dishes About Back To Top