Skip to content
DisclaimerTerms Of UseGDPR PolicyCookie Policy

Southern Dishes

  • Home
  • Drinks
  • Appetizers
  • Dinner
  • Dessert
  • About
  • Contact
  • Privacy Policy
DisclaimerTerms Of UseGDPR PolicyCookie Policy

Isabella

- Chickpeas and Broth - 2 cans (15 oz each) chickpeas, drained and rinsed - 4 cups vegetable broth - Vegetables and Seasonings - 1 medium onion, finely chopped - 3 cloves garlic, minced - 2 medium carrots, diced - 1 celery stalk, diced - 1 teaspoon ground cumin - 1 teaspoon smoked paprika - 1/2 teaspoon turmeric powder - 2 cups kale, chopped - 2 tablespoons olive oil - Salt and pepper to taste - Optional Garnishes - Fresh parsley, for garnish - Lemon wedges, for serving In my kitchen, I love to keep it simple yet flavorful. The base of this soup starts with chickpeas and broth. Chickpeas are packed with protein and fiber. They give the soup a nice, hearty feel. I always use two cans for the best taste. Vegetable broth adds depth, making every spoonful rich and warm. Next come the vegetables. I finely chop one medium onion, which gives the soup a sweet base. Three cloves of minced garlic add a punch of flavor. I dice two medium carrots and one celery stalk for crunch and color. These fresh veggies make the soup bright and lively. Now, let’s talk about the spices. Ground cumin and smoked paprika bring warmth and a smoky note. Just half a teaspoon of turmeric powder adds a lovely golden hue and health benefits. Finally, I toss in two cups of chopped kale. It wilts beautifully and adds nutrients. For cooking, I use two tablespoons of olive oil. This enhances the flavor and gives the soup a silky texture. Don’t forget the seasonings! Salt and pepper are key to balance the flavors. For garnishes, fresh parsley adds a pop of color, and lemon wedges bring a zesty touch. These small details make the soup shine. {{ingredient_image_1}} Sautéing the Onions and Vegetables Start by heating 2 tablespoons of olive oil in a large pot over medium heat. Once the oil is hot, add 1 medium finely chopped onion. Cook the onion for about 3 to 4 minutes. You want it to turn translucent. Next, add 3 minced garlic cloves, 2 diced carrots, and 1 diced celery stalk. Stir these vegetables together and let them cook for about 5 minutes. Stir occasionally to keep them from burning. Adding Spices and Chickpeas Now, it's time to add flavor. Sprinkle in 1 teaspoon of ground cumin, 1 teaspoon of smoked paprika, and 1/2 teaspoon of turmeric powder. Stir the spices into the mix and let them toast for about 1 minute. This helps bring out their rich flavors. After that, add the 2 cans of drained and rinsed chickpeas and 4 cups of vegetable broth. Turn up the heat and bring the soup to a gentle boil. Cooking the Soup Once boiling, reduce the heat to low. Let the soup simmer for 10 minutes. This allows all the flavors to blend nicely. After 10 minutes, stir in 2 cups of chopped kale. Cook for an additional 3 to 5 minutes until the kale wilts. Finally, season the soup with salt and pepper to your liking. Serve hot, and don’t forget to garnish with fresh parsley and a lemon wedge for a bright finish. Enjoy your warm, comforting bowl of Minute Chickpea Soup! Sautéing is key to building flavor in this soup. Start with medium heat. Heat the olive oil until it shimmers. Add the chopped onion and cook until it looks clear. This takes about 3-4 minutes. Next, add garlic, carrots, and celery. Cook for 5 minutes. Stir often to keep things from sticking. This step adds depth to the soup. Spices are the heart of this dish. Ground cumin and smoked paprika give it warmth. Adjust these spices to your taste. If you like heat, add a pinch of cayenne pepper. For a brighter flavor, a bit of lemon zest works well too. Remember, taste as you go. You can always add more, but it’s hard to take away. Garnishes add a fun touch to your soup. Fresh parsley gives color and freshness. Lemon wedges are great for a zesty kick. Just squeeze a little on top before you eat. You can also add a dollop of yogurt or sour cream for creaminess. These simple changes make your bowl of soup feel special. Pro Tips Soak Your Chickpeas: If you prefer using dried chickpeas, soak them overnight to reduce cooking time and enhance digestibility. Flavor Boost: Add a splash of soy sauce or tamari for an umami kick, enhancing the soup's depth of flavor. Greens Galore: Feel free to substitute kale with spinach or Swiss chard, depending on your preference and availability. Leftover Magic: This soup keeps well in the fridge for up to 3 days; the flavors will deepen, making it an even more delicious leftover meal. {{image_2}} Different Beans or Lentils You can swap chickpeas for other beans. Try black beans, kidney beans, or lentils. Each option adds a unique taste and texture. For lentils, remember to adjust cooking times. They cook faster than chickpeas. Vegetable Options Feel free to mix in your favorite veggies. Spinach, zucchini, or bell peppers work well. You can even add corn for a sweet crunch. The soup is flexible, so use what you have! Dairy-Free Alternatives If you want a dairy-free version, skip the cheese. Instead, add a splash of coconut milk for creaminess. You can also use cashew cream for a rich flavor. These swaps keep the soup tasty and light. Side Dishes Pair this soup with crusty bread or a fresh salad. A simple green salad adds crunch and color. You can also serve it with warm pita for dipping. These sides make any meal more filling. Meal Pairings For a complete meal, serve the soup with grilled chicken or fish. The protein balances the soup's warmth. You can also enjoy it with a grain bowl. Quinoa or rice adds heartiness to your dinner. To keep your Minute Chickpea Soup fresh, store it in an airtight container. This helps lock in flavors and moisture. Place it in the fridge as soon as it cools down. The soup stays good for about 3 to 4 days. You can freeze Minute Chickpea Soup for later use. Let it cool completely before transferring it to freezer-safe containers. Leave some space at the top for expansion. It can last for up to 3 months in the freezer. When you are ready to enjoy your frozen soup, thaw it overnight in the fridge. Reheat it in a pot over medium heat. Stir occasionally to warm it evenly. If it seems thick, add a splash of vegetable broth or water to loosen it up. It takes about 25 minutes to make Minute Chickpea Soup. You spend 10 minutes prepping the ingredients. Then, cooking the soup takes around 15 minutes. This soup is quick and easy, perfect for a busy day. Yes, you can use dried chickpeas. Just remember to soak them first. Soaking helps them cook faster. You will need to boil them for about 1 to 2 hours. After boiling, you can add them to the soup like canned chickpeas. If you don’t have kale, you can use spinach or Swiss chard. Both greens cook quickly and add good flavor. You can also try collard greens. Just chop them up like you would with kale. Whatever you choose, add them near the end of cooking. This way, they stay bright and fresh. In this post, we covered how to make a tasty chickpea soup. We began with the main ingredients, including chickpeas, broth, and fresh veggies. I shared step-by-step instructions to prepare the soup perfectly. You found tips for adding flavor and some variations to try. Don’t forget how to store your soup in the fridge or freezer. With these insights, you can enjoy a delicious meal at home. Now, go make this soup and enjoy the warm flavors!

Minute Chickpea Soup Simple and Flavorful Comfort

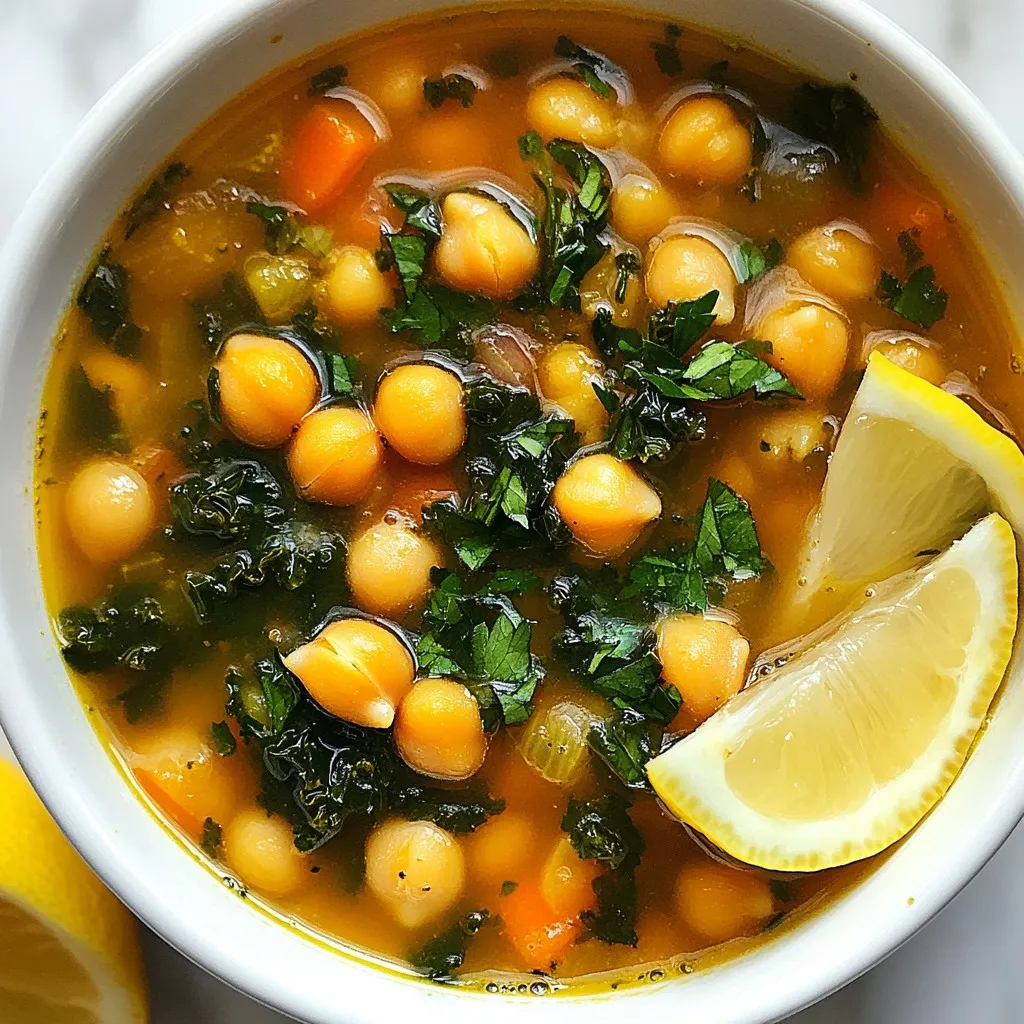
Looking for a quick, delicious meal? This Minute Chickpea Soup is your answer! Packed with flavor and comfort, it requires

To make Snickers stuffed dates, you need a few simple ingredients. Here’s what you’ll need: - 12 Medjool dates, pitted - 1 cup creamy peanut butter - 1/2 cup chopped Snickers bars (about 2 full-size bars) - 1/4 cup chopped roasted peanuts - 1/4 cup dark chocolate chips - Sea salt, for sprinkling These ingredients come together to create a sweet treat that is hard to resist. Medjool dates are soft and sweet. They make a perfect base for our filling. Creamy peanut butter adds richness and flavor, while chopped Snickers gives that delicious chocolate-caramel taste. Roasted peanuts add a nice crunch, making each bite satisfying. Dark chocolate chips provide a decadent touch. Finally, a sprinkle of sea salt enhances all the flavors. You can adjust any ingredient based on your taste. Want it sweeter? Add more Snickers. Prefer a nut-free option? Use sun butter instead of peanut butter. The possibilities are endless! {{ingredient_image_1}} 1. First, preheat your oven to 350°F (175°C). This step warms up the oven for baking. 2. Next, line a baking sheet with parchment paper. This helps the dates not stick. 3. Carefully slice each pitted date lengthwise. Make a pocket but don’t cut all the way through. 1. In a bowl, mix the creamy peanut butter with chopped Snickers bars. Stir until it’s well combined. 2. Now, take each date and stuff it with the peanut butter mixture. Press gently to keep it secure. 3. After stuffing, sprinkle chopped roasted peanuts on top. This adds a nice crunch and texture. 1. Melt dark chocolate chips in a microwave-safe bowl. Do this in 30-second bursts and stir until smooth. 2. Drizzle the melted chocolate over the stuffed dates. Be generous here; it makes them extra tasty. 3. Place the baking sheet in the oven and bake for 10 to 12 minutes. Look for the chocolate to be slightly set. 4. Right after baking, sprinkle a pinch of sea salt on each date. This gives a perfect sweet and salty finish. 5. Let the dates cool slightly before you serve them. Enjoy the delightful mix of flavors! Choosing the right dates: I love using Medjool dates for this recipe. They are sweet and soft. Look for dates that are plump and shiny. Avoid any that feel dry or hard. Adjusting sweetness levels: You can change the amount of Snickers in the mix. If you want it sweeter, add more Snickers. If you prefer less sweetness, use fewer pieces. You can also try different nut butters to find your preferred flavor. Arranging on a plate: To make your stuffed dates pop, use a nice plate. Place the dates in a line or a circle. Drizzle extra melted chocolate on top for a fancy touch. Garnishing ideas: Sprinkle some chopped roasted peanuts on your dates. You can also add a few chocolate shavings for more flair. A light dusting of sea salt adds a nice contrast to the sweetness. Tips for melting chocolate perfectly: Melt dark chocolate in short bursts. Use the microwave for 30 seconds, then stir. Repeat until smooth. Avoid overheating the chocolate to keep it silky. Ensuring filling stays secure: When filling the dates, press gently. Make sure the filling does not spill out. If you worry about it leaking, wrap each date in a small piece of foil before baking. Pro Tips Use Fresh Dates: Opt for fresh Medjool dates as they are naturally sweet and have a chewy texture that complements the filling perfectly. Customize Your Filling: Feel free to experiment with different types of chocolate or nut butters to create your own unique flavor combinations. Chill Before Serving: For a refreshing treat, consider chilling the stuffed dates in the refrigerator for about 30 minutes before serving. Presentation Matters: Enhance the visual appeal by drizzling extra melted chocolate and adding a sprinkle of colorful toppings like crushed candy or edible glitter. {{image_2}} You can customize your Snickers stuffed dates with different candy bars. Try using Milky Way or Twix for a new twist. Each candy brings its own flavor, making your treat unique. If you want a nutty touch, swap Snickers for Reese's Peanut Butter Cups. The creamy peanut butter pairs well with chocolate and caramel. Nut butter options are also great. You can use almond butter or cashew butter instead of peanut butter. Each nut butter adds its own taste, enhancing the flavor of the dates. For a fun twist, mix in some honey or maple syrup for added sweetness. If you need gluten-free options, this recipe is already safe. All ingredients are naturally gluten-free. Always check candy labels to confirm they meet your needs. For vegan options, replace the creamy peanut butter with a plant-based alternative. Use a vegan chocolate brand for the drizzle. Many dark chocolates are dairy-free, so read labels carefully to ensure they fit your diet. Adding spices or extracts can elevate the flavor of your stuffed dates. A dash of cinnamon or a hint of vanilla can bring warmth and depth. You can even try a touch of sea salt mixed with the filling for a sweet and salty combo. Using different types of chocolate can also enhance your treats. White chocolate gives a creamy flavor, while milk chocolate offers sweetness. Feel free to experiment with flavored chocolates, like mint or orange, for something special. To keep your Snickers stuffed dates fresh, store them in the fridge. Place them in an airtight container. This helps maintain their flavor and texture. They will last for up to one week in the fridge. If you want to save them for later, freezing works great. To freeze, place the stuffed dates in a single layer on a baking sheet. Freeze them for about one hour until they are firm. Then, transfer them to a freezer-safe bag. These dates can last up to three months in the freezer. When you're ready to enjoy, take them out and let them thaw in the fridge overnight. Snickers stuffed dates pair well with many drinks. Try serving them with milk or hot chocolate for a sweet treat. You can also enjoy them with coffee or tea. For a fun twist, serve them on a platter with fresh fruit. This adds color and freshness to your dessert spread. Snickers stuffed dates are a fun and tasty dessert. They combine sweet Medjool dates with creamy peanut butter and chopped Snickers bars. The dates have a soft, chewy texture. The Snickers add chocolate, caramel, and peanuts for extra flavor. You bake the stuffed dates for a warm treat. A sprinkle of sea salt on top makes them even better. Yes, you can make nut-free Snickers stuffed dates. Instead of peanut butter, use sunflower seed butter or soy nut butter. These options keep the creamy texture. You can still use Snickers bars as they contain peanuts. If you want to avoid peanuts completely, check for nut-free candy bars. They can replace Snickers and still taste great. Making Snickers stuffed dates is quick and easy. It takes about 10 minutes to prepare. You will slice the dates and mix the filling. Baking the dates takes another 10 to 12 minutes. So, the total time is about 25 minutes from start to finish. You will have a delicious treat ready in no time! In this post, we explored the tasty world of Snickers stuffed dates. We covered the key ingredients, including Medjool dates and dark chocolate. I shared steps to make this treat, tips for perfecting it, and ways to personalize your version. These stuffed dates are easy to make and fun to share. You can impress friends with your creativity. Try different flavors or enjoy them on their own. Enjoy your sweet adventure!

Snickers Stuffed Dates Irresistible Sweet Treat

Craving something sweet and simple? Let’s talk about Snickers Stuffed Dates! This treat combines rich chocolate, gooey caramel, and natural

- Beef Chuck: You need 2 lbs of beef chuck. This cut is tough but flavorful. It breaks down well during cooking. This gives the dish a rich taste. - Vegetables and Aromatics: Use 2 large onions, finely chopped. Add 4 cloves of minced garlic. These add depth to the flavor. You will also need 2 diced bell peppers, one red and one green. Finally, 3 medium potatoes, peeled and diced, add heartiness. - Spices and Seasonings: For spice, include 2 tablespoons of sweet paprika. This gives the goulash its signature color. Add 1 teaspoon of caraway seeds for a unique taste. Include 1 teaspoon of dried thyme for a herby touch. Season with salt and pepper to taste. Each ingredient plays a key role in making the goulash hearty and flavorful. Together, they create a warm and inviting dish that is perfect for sharing. {{ingredient_image_1}} Start by cutting the beef chuck into 1-inch cubes. This size cooks evenly and gets tender. Next, finely chop the onions and dice the bell peppers. You can use one red and one green bell pepper for color. Don’t forget to peel and dice the potatoes. They add a nice texture. In a large pot or Dutch oven, heat 2 tablespoons of vegetable oil over medium-high heat. Add the beef cubes in batches. Make sure to brown them on all sides. This step adds great flavor. Once browned, remove the beef and set it aside. In the same pot, add the chopped onions. Sauté until they turn translucent, about 5-7 minutes. This brings out their sweet flavor. Add the minced garlic, sweet paprika, caraway seeds, and dried thyme. Stir for about a minute until the spices release their aroma. Return the browned beef to the pot. Add the diced bell peppers, potatoes, beef broth, and undrained diced tomatoes. Give everything a good stir to combine. This mix will create a rich and hearty stew. Bring the mixture to a boil. Once boiling, reduce the heat to low and cover the pot. Let it simmer for about 2 hours. This slow cooking makes the beef tender and infuses the flavors. Stir occasionally to prevent sticking. After simmering, taste the goulash. Season with salt and pepper to your liking. If you want more warmth, add a pinch of paprika. This step enhances the dish's flavor even more. When ready to serve, garnish with fresh chopped parsley. Enjoy this hearty delight with some crusty bread! Browning Techniques Browning the beef is key. It adds flavor and color to your goulash. Use a hot pot and don’t crowd the meat. This helps it brown well. Brown the beef in batches for the best results. Spice Adjustments Feel free to adjust the spices to your taste. If you like it spicy, add a dash of cayenne pepper. If you prefer milder, reduce the paprika. Taste as you cook. This way, you can find the right balance. Checking Beef Tenderness Cook the goulash low and slow for tender beef. After about two hours, check if the beef is fork-tender. If it’s not, let it simmer longer. Patience is key for a great goulash. Ideal Pairings Serve goulash with crusty bread. It’s great for soaking up the rich sauce. A simple green salad also pairs well. The freshness balances the hearty dish. Garnishing Ideas Garnish with fresh parsley for a pop of color. You can also add a dollop of sour cream on top. This adds creaminess and a nice tang. A sprinkle of paprika can enhance the dish's look too. Pro Tips Brown the Meat Well: Ensure the beef is browned thoroughly to develop a rich flavor base for the goulash. Let it Simmer: The longer you simmer the goulash, the more tender the beef will become and the flavors will deepen. Adjust the Seasoning: Always taste and adjust the seasoning towards the end of cooking to enhance the dish's overall flavor. Serve with Bread: Pair the goulash with a hearty bread to soak up the delicious sauce and enhance the meal experience. {{image_2}} You can swap beef chuck for other meats. Pork or chicken works well. For a plant-based option, try using mushrooms or lentils. These options still give you a hearty meal. Each protein brings its own flavor and texture. Feel free to change up the veggies. Carrots, peas, or zucchini add great taste. You can use any fresh or frozen vegetables you have. Just remember to adjust cooking times as needed. Each vegetable adds its unique twist to the dish. Hungarian goulash is often more soupy. It uses more paprika and often includes caraway seeds. German goulash is thicker and heartier. It focuses more on beef and potatoes. Both are delicious but have different styles and flavors. Goulash can be found in many countries. Each region has its own spin. For example, Czech goulash often uses beer for depth. In Austria, it may include dumplings as a side. Each version shines with local ingredients and traditions. To keep your German goulash fresh, start with proper cooling. Let the goulash sit at room temperature for about 30 minutes. This helps prevent bacteria from growing. After it cools, transfer it to the fridge. Use airtight containers for storage. I recommend glass or BPA-free plastic containers. They keep the goulash from drying out and help retain flavor. Make sure to label them with the date. This way, you know when it was made. You can reheat your goulash in two ways: the microwave or stovetop. For the microwave, put the goulash in a microwave-safe bowl. Cover it loosely to prevent splatters. Heat it for about 2-3 minutes, stirring halfway through. If you prefer the stovetop, pour the goulash into a pot. Heat it over low to medium heat. Stir it often to avoid sticking. This method helps maintain flavor and texture. You might want to add a splash of beef broth or water. This keeps it nice and moist. Enjoy your hearty meal again! Goulash is a rich stew. It has roots in Hungary but is loved in Germany. This dish dates back to the 9th century. It was first made by herdsmen. They used simple ingredients like meat and vegetables. Over time, it grew in popularity across Europe. In Germany, goulash is more than just a meal. It brings families together. People enjoy it during cold months. Goulash shows the warmth of German cooking. It uses local meats, spices, and fresh veggies. Each region has its own twist on this classic dish. You can easily make goulash vegetarian. Start with hearty vegetables like mushrooms and carrots. Use vegetable broth instead of beef broth. This keeps the stew rich and tasty. You can add beans for protein too. To keep the flavor, use smoked paprika. This gives that deep, warm taste. Cook the veggies until soft, just like the meat. This way, you keep the texture nice. Goulash can last in the fridge for about three days. Make sure it cools before you store it. Use an airtight container for best results. Look for signs of spoilage. If it smells off or has a strange color, it’s best to toss it. Reheat it well before serving again to enjoy its rich flavors. German goulash is a hearty and satisfying dish made with beef, veggies, and spices. You learned the steps to prep and cook it perfectly, along with tips for serving and storing. Remember, small changes in ingredients can make a big impact, so feel free to explore variations. This dish not only fills your stomach but also ties you to the culture and history of Germany. Now you can create your own delicious meal and share it with friends and family. Enjoy the process and savor each bite!

Classic German Goulash Hearty and Flavorful Delight

Are you ready to make a classic German goulash that warms your heart and fills your stomach? This hearty dish

For Chicken Fajita Pasta, I love using either fettuccine or penne. Both types hold sauce well. Fettuccine offers a flat surface, while penne's tubes trap bits of chicken and veggies. Choose what you enjoy most! The star of this dish is boneless, skinless chicken breasts. I slice them into strips for quick cooking. They soak up all the spices and flavors, making every bite tasty. You can also use grilled chicken or rotisserie chicken if you're short on time. This dish needs vibrant bell peppers and onion. I usually pick one red or yellow bell pepper for sweetness and one green bell pepper for a bit of crunch. Garlic adds depth to the flavor. For spices, I use chili powder, cumin, and smoked paprika. These give the dish a warm, smoky kick. Don’t forget salt and pepper to enhance all the flavors! {{ingredient_image_1}} Start by boiling water in a large pot. Add a pinch of salt to the water. Once it’s boiling, add 12 oz of fettuccine or penne pasta. Cook the pasta until it’s al dente, following the package instructions. This usually takes around 8-10 minutes. When done, drain the pasta and set it aside. It will soak up all the delicious flavors later. In a large skillet, heat 2 tablespoons of olive oil over medium-high heat. Add 1 pound of sliced boneless, skinless chicken breasts. Cook the chicken for about 5-7 minutes until it turns white and is no longer pink. Season it with salt, pepper, 1 tablespoon of chili powder, 1 teaspoon of cumin, and 1 teaspoon of smoked paprika. Stir it well to coat each piece in those spices. This gives the chicken a nice flavor. Next, it’s time to add some veggies. Toss in 1 sliced bell pepper (red or yellow), 1 sliced green bell pepper, 1 sliced medium onion, and 2 minced garlic cloves. Sauté these for 3-4 minutes until they are tender and fragrant. Then, pour in 1 cup of chicken broth and bring it to a simmer. Let it cook for about 2-3 minutes to reduce slightly. Lower the heat and stir in 1 cup of heavy cream. Gradually add 1 cup of shredded cheddar cheese, stirring until it melts and the sauce is creamy. Finally, add the cooked pasta to the skillet and toss it all together. Cook for another minute to warm everything through. Enjoy garnished with fresh cilantro and lime wedges on the side! To cook pasta just right, follow the package instructions. Use a big pot of boiling, salted water. Add the pasta and stir right away. This helps prevent sticking. Cook until al dente, which means it should be firm but not hard. Drain the pasta well, but do not rinse. This keeps the starch, which helps sauce cling to it. Want more heat? Add extra chili powder or fresh jalapeños. For milder flavor, cut back on spices. You can also use sweet bell peppers or skip the chili powder. Just taste as you go. This way, you can find the right balance for your family. To make your dish extra creamy, add the heavy cream slowly. Stir it in while the heat is low. This helps it mix in better. Use freshly shredded cheddar cheese for the best melt. If you want, add a splash of pasta water. This can help create a smoother sauce. Pro Tips Use Fresh Ingredients: Fresh bell peppers and onions enhance the flavor of the dish significantly. Try to use vibrant vegetables for the best taste and presentation. Customize the Spice Level: Adjust the amount of chili powder based on your heat preference. You can add more spices or even some diced jalapeños for an extra kick. Cheese Choice: While cheddar is a classic choice, you can experiment with other cheeses like Monterey Jack or Pepper Jack for a different flavor profile. One-Pan Wonder: For easier cleanup, cook the pasta in the same skillet after the chicken and vegetables, adding water as needed to create a delicious sauce. {{image_2}} You can easily make this dish vegetarian. Swap the chicken for grilled mushrooms or zucchini. These veggies soak up flavors well. You can also use firm tofu. Just marinate it in the same spices. This adds a nice kick without meat. For added protein, try using chickpeas or black beans. They blend well with the sauce and add texture. If you want protein but not chicken, consider shrimp or beef. Shrimp cooks fast and adds a lovely taste. Simply sauté it for a few minutes until pink. For beef, thinly slice flank steak and cook it in the same way as chicken. It will absorb the spices just right. You can also try turkey for a leaner option. While fettuccine or penne works great, you can try other pasta. Bowtie or rotini pasta will hold the sauce well. You could also use whole wheat pasta for a healthier twist. Gluten-free pasta is another choice for those with dietary needs. Just follow the cooking time on the package to get it just right. Store Chicken Fajita Pasta in an airtight container. This keeps it fresh for about three to four days. Before storing, let it cool to room temperature. This step helps prevent condensation and sogginess. To freeze Chicken Fajita Pasta, place it in freezer-safe bags or containers. Make sure to remove as much air as possible. It can last in the freezer for up to three months. When you are ready to eat, thaw it in the fridge overnight before reheating. Reheat Chicken Fajita Pasta on the stove or in the microwave. For the stove, heat it in a skillet over medium heat. Add a splash of chicken broth or cream to keep it moist. Stir it often until warmed through. In the microwave, use a microwave-safe bowl. Cover it with a damp paper towel and heat in short intervals, stirring in between. This helps it heat evenly without drying out. Yes, you can swap cheddar for other cheeses. Monterey Jack melts well and adds a nice flavor. If you want a sharper taste, try using pepper jack. You can even mix cheeses for a unique twist. Just remember, the cheese should melt smoothly for the best texture. To make Chicken Fajita Pasta gluten-free, choose gluten-free pasta. Many brands offer great options. Check the label for certification. You can also use rice noodles or zucchini noodles for a fresh twist. Just cook them as directed and follow the rest of the recipe. For side dishes, consider a light salad. A simple green salad with lime dressing pairs well. You could also serve corn on the cob for a sweet crunch. If you want something warm, try refried beans. They add a nice touch of flavor and protein. This blog post covered all you need to make Chicken Fajita Pasta. You learned about pasta options, proteins, and tasty veggies. I shared steps for cooking pasta, chicken, and mixing flavors. You gained tips for perfect pasta, spice levels, and adding creaminess. We discussed variations like vegetarian swaps and storage tips for leftovers. Cooking can be fun and easy with these ideas. Enjoy your time in the kitchen and make a dish everyone loves!

Chicken Fajita Pasta Tasty and Quick Dinner Idea

Looking for a quick and tasty dinner? Chicken Fajita Pasta is your answer! This dish combines tender chicken, vibrant veggies,

To make a great lamb curry, you need some key ingredients. Here’s what you’ll need: - 1.5 lbs lamb shoulder, cut into cubes - 2 tablespoons vegetable oil - 2 large onions, finely chopped - 4 cloves garlic, minced - 1 inch ginger, grated - 2 green chilies, slit - 2 tomatoes, chopped - 1 teaspoon turmeric powder - 2 teaspoons garam masala - 2 teaspoons coriander powder - 1 teaspoon cumin powder - 1 can (400 ml) coconut milk - Salt to taste - Fresh cilantro, chopped for garnish These ingredients bring rich flavors to your meal. The lamb shoulder is ideal for tender, juicy bites. The spices give warmth and depth. Coconut milk adds creaminess that balances the heat. For even more flavor, consider these optional ingredients: - A pinch of cinnamon for warmth - A tablespoon of lemon juice for brightness - A handful of peas for color and sweetness Adding these can change the dish's profile. For instance, lemon juice brightens up the curry. Peas offer a nice pop of color and texture. If you have dietary restrictions, there are easy swaps. Here are some ideas: - Use chicken or beef instead of lamb if you prefer. - For a vegan option, substitute lamb with jackfruit or chickpeas. - Swap coconut milk for almond milk for a lighter version. These substitutions keep the essence of the dish while fitting your needs. Always adjust cooking times based on what you choose. {{ingredient_image_1}} To start, gather all your ingredients. You will need: - 1.5 lbs lamb shoulder, cut into cubes - 2 tablespoons vegetable oil - 2 large onions, finely chopped - 4 cloves garlic, minced - 1 inch ginger, grated - 2 green chilies, slit - 2 tomatoes, chopped - 1 teaspoon turmeric powder - 2 teaspoons garam masala - 2 teaspoons coriander powder - 1 teaspoon cumin powder - 1 can (400 ml) coconut milk - Salt to taste - Fresh cilantro, chopped for garnish Once you have everything, chop the onions, garlic, tomatoes, and ginger. This prep makes cooking a breeze. First, heat the vegetable oil in a large pot over medium heat. Add the onions and sauté them until they turn golden brown, about 10 minutes. This step builds a rich base for your curry. Next, stir in the minced garlic, grated ginger, and slit green chilies. Sauté for about 2 minutes until fragrant. Now, add the lamb cubes. Brown them on all sides for about 5-7 minutes. After that, mix in the chopped tomatoes and cook them until soft, about 3-4 minutes. Then, sprinkle in the spices: turmeric, garam masala, coriander, and cumin. Stir well to coat the meat with all the flavors. Now, pour in the coconut milk and stir to combine. Add salt to taste. Bring the mixture to a gentle simmer. Cover the pot and let it cook on low heat for about 1.5 hours. Stir occasionally to prevent sticking. The lamb will become tender and juicy. To achieve the perfect consistency, make sure to simmer gently. If the curry is too thick, add a splash of water. If it’s too thin, let it cook uncovered for a few minutes. Taste the curry as it cooks. Adjust the salt and spices to your liking. Always garnish with freshly chopped cilantro before serving. This adds a fresh touch to your dish. Serve the lamb curry in a decorative bowl with basmati rice or naan. Enjoy the blend of flavors and the tender lamb! To bring out the true taste of lamb curry, use fresh spices. Whole spices are best. Toast them in the pot before adding other ingredients. This step releases their oils and boosts the flavor. You can also add a pinch of sugar. This balances the spices and enhances the sauce. One common mistake is rushing the cooking time. Lamb needs time to become tender. Cook on low heat for at least 1.5 hours. Another mistake is not browning the meat well. Browning adds depth to the flavor. Avoid skipping the sautéing steps, as they build the base of taste. You can easily adjust the spice in your lamb curry. For milder curry, use fewer green chilies. If you enjoy heat, add more chilies or some red chili powder. Taste as you cook. This lets you find the perfect balance for your family or guests. Pro Tips Marinate the Lamb: For an even deeper flavor, marinate the lamb in yogurt and spices for a few hours or overnight before cooking. Use Fresh Spices: Using freshly ground spices can elevate the flavor of your curry significantly. Consider grinding whole spices just before use. Adjust the Heat: If you prefer a milder curry, reduce the number of green chilies or remove the seeds. For extra heat, add a pinch of chili powder. Let it Rest: Allow the curry to sit for at least 30 minutes after cooking. This resting period allows the flavors to meld beautifully. {{image_2}} Lamb curry changes across regions. In North India, cooks use yogurt for creaminess. They often add spices like cardamom and cloves. This gives a rich flavor. In South India, people prefer coconut milk and curry leaves. This makes the dish lighter and fresher. You might find variations with tamarind, too. Each region brings its own twist to lamb curry. You can make lamb curry in different ways. A slow cooker is great for busy days. Just set it in the morning and enjoy the meal later. Use low heat to let the flavors blend. An Instant Pot works fast. You can cut cooking time down to about 40 minutes. Both methods keep the lamb tender and juicy. If you want a vegetarian option, try chickpeas or jackfruit. They both soak up flavors well. You can also use paneer for a cheese variation. For a healthier choice, use cauliflower or mushrooms. They add texture and are satisfying. Adjust the spices to match your taste. This way, you still enjoy the essence of lamb curry without meat. Storing your lamb curry properly is key. After you finish your meal, let the curry cool. Place it in an airtight container. Make sure to keep it in the fridge. This helps the flavors stay fresh. Eat your leftovers within three days for the best taste. If you plan to keep it longer, freezing is a great option. When you want to enjoy your leftovers, reheating needs care. Use a pot on low heat to warm it. Stir often to avoid sticking. You can add a splash of water or coconut milk. This adds moisture and keeps it creamy. Avoid using a microwave, as it can dry it out. Heat it until it’s warm all the way through. Freezing lamb curry is simple and effective. Transfer it to a freezer-safe container. Leave some space at the top for expansion. Label the container with the date and type. To thaw, move it to the fridge overnight. This helps keep the texture nice. Reheat it gently on the stove before serving. Enjoy your delicious lamb curry later! You can serve lamb curry with rice or bread. Basmati rice is a great choice. Naan or roti also pairs well. Add a side of yogurt or raita for creaminess. Fresh salad and lime wedges add a nice touch too. Lamb curry can last for about 3 to 4 days in the fridge. Store it in an airtight container. Make sure it cools completely before sealing. Always check for any off smell or changes in color before eating. Yes, you can use chicken, beef, or goat in this recipe. Adjust cooking time accordingly. Chicken cooks faster, while beef may need more time. The spices work well with all these meats. Lamb curry can be spicy due to green chilies. If you prefer less heat, remove the seeds from the chilies. You can also reduce the number of chilies used. Adding more coconut milk can help cool the spice too. We explored how to make an authentic lamb curry, covering key ingredients, cooking steps, and tips. You learned different dietary options and how to store leftovers correctly. Remember, it’s all about balance. Adjust spices to fit your taste. Embrace the variations, from regional styles to cooking methods. With practice, you’ll create a dish that suits your palate. Enjoy the flavors and make this recipe your own!

Authentic Lamb Curry Flavorful and Easy Recipe

Are you ready to spice up your dining table with an authentic lamb curry? This flavorful and easy recipe will

For a tasty Italian pasta salad, gather these main ingredients: - 12 oz rotini or fusilli pasta - 1 cup cherry tomatoes, halved - 1 cup cucumber, diced - 1/2 cup bell peppers (red and yellow), diced - 1/2 cup red onion, finely chopped - 1 cup black olives, pitted and sliced - 1 cup mozzarella balls (bocconcini) - 1/4 cup fresh basil, chopped - 1/4 cup Parmesan cheese, grated These ingredients work together to create a colorful and flavorful dish. The pasta acts as a base, while the veggies add crunch and freshness. Mozzarella and olives give it a nice, savory touch. To make the salad sing, you need these dressing ingredients: - 1/3 cup extra virgin olive oil - 2 tablespoons red wine vinegar (or apple cider vinegar) - 1 teaspoon dried oregano - 1/2 teaspoon garlic powder - Salt and pepper to taste This dressing blends well with the salad. The olive oil adds richness, while the vinegar brings a tangy kick. Oregano and garlic powder give it great flavor. You can customize your pasta salad with these optional add-ins: - Cooked chicken or turkey - Pepperoni slices - Artichoke hearts - Spinach or arugula These add-ins can boost the flavor and nutrition of your salad. They offer a chance to get creative and make the dish your own. {{ingredient_image_1}} To make the perfect Italian pasta salad, start by cooking 12 oz of rotini or fusilli pasta. Boil water in a large pot and add a bit of salt. Cook the pasta according to the package instructions until it is al dente. This usually takes about 8 to 10 minutes. Once done, drain the pasta in a colander. Rinse it under cold water to stop the cooking. This keeps the pasta firm and fresh. Set the cooled pasta aside. In a large mixing bowl, combine your cooled pasta with fresh ingredients. Add 1 cup of halved cherry tomatoes, 1 cup of diced cucumber, and 1/2 cup each of diced red and yellow bell peppers. Next, include 1/2 cup of finely chopped red onion and 1 cup of sliced black olives. Finally, toss in 1 cup of mozzarella balls. This mix of colors and textures makes the salad lively and tasty. For the dressing, take a small bowl and whisk together the flavors. Combine 1/3 cup of extra virgin olive oil with 2 tablespoons of red wine vinegar. If you prefer, you can use apple cider vinegar instead. Then, add 1 teaspoon of dried oregano and 1/2 teaspoon of garlic powder. Season with salt and pepper to taste. Whisk everything until it is well mixed. This dressing adds a zesty kick to the salad. Now, pour the dressing over your pasta salad. Gently toss the ingredients to coat them evenly. Be careful not to crush the vegetables or cheese. After that, add 1/4 cup of chopped fresh basil and 1/4 cup of grated Parmesan cheese. Toss once more to blend everything together. This step spreads all the flavors throughout the salad. Taste your pasta salad and adjust the seasoning if needed. For the best flavor, refrigerate the salad for at least 30 minutes. This allows the flavors to meld beautifully. When ready to serve, scoop it into bowls and enjoy. This salad is a colorful and fresh delight for any meal or gathering. To make a great pasta salad, pick the right pasta. I love using rotini or fusilli. These shapes hold the dressing well. They also mix easily with other ingredients. Cook the pasta until it is al dente. This gives it a nice bite. Rinse it under cold water to cool it down. This step helps keep the pasta from getting mushy. Fresh vegetables make your salad pop. I recommend cherry tomatoes and cucumbers for a nice crunch. Bell peppers add color and sweetness. Red onions bring a bit of zing. Black olives add a salty touch. You can also add other veggies if you like. Just keep them fresh and crisp for the best taste. Herbs bring life to your pasta salad. Fresh basil is my go-to herb for this dish. It adds a lovely aroma and flavor. Dried oregano is also great. Mix it with olive oil, vinegar, garlic powder, salt, and pepper. This dressing ties all the flavors together. Taste it and adjust if needed. You want a flavor that makes you smile. Serve your pasta salad cold for the best flavor. Chill it for at least 30 minutes before serving. This waiting time helps the flavors blend. You can serve it as a side dish or a light meal. Pair it with grilled meats or fish for a tasty combo. Enjoy it at picnics, barbecues, or family gatherings. It’s always a crowd-pleaser! Pro Tips Use Fresh Ingredients: For the best flavor, opt for fresh vegetables and herbs. They add brightness and enhance the overall taste of the salad. Chill Before Serving: Allow the pasta salad to chill in the refrigerator for at least 30 minutes. This helps the flavors meld together beautifully. Customize Your Veggies: Feel free to add or substitute other vegetables like artichokes, spinach, or zucchini to suit your taste preferences. Make Ahead: This pasta salad can be made a day in advance, making it perfect for potlucks or meal prep. Just keep it covered in the fridge. {{image_2}} To give your Italian pasta salad a Mediterranean twist, swap in some fresh flavors. Use sun-dried tomatoes instead of fresh ones. Add artichoke hearts and some capers for extra zing. Feta cheese can replace mozzarella for a salty bite that complements the salad well. Fresh herbs like dill or mint can bring a bright taste. This version is perfect for summer picnics. If you want to make your pasta salad more filling, add protein. Grilled chicken or shrimp works great. You can also use chickpeas or cannellini beans for a hearty touch. These additions not only boost nutrition but also make it a full meal. Mix the proteins in with the veggies and pasta for a colorful dish. To make a vegan version of this salad, simply leave out the cheese. You can use nutritional yeast for a cheesy flavor without dairy. Swap regular pasta for a gluten-free option if needed. Use a vinegar-based dressing to keep it light and fresh. This version is still packed with flavor and perfect for plant-based diets. Store leftover pasta salad in an airtight container. Keep it in the fridge. It stays fresh for about three days. If you notice any bad smells or change in color, toss it out. Always label your container with the date. This helps you track freshness. Freezing pasta salad is not the best option. The veggies can get mushy when thawed. If you must freeze it, leave out fresh ingredients like tomatoes and cucumbers. Instead, freeze just the pasta and dressing. When you're ready to eat, mix in fresh veggies after thawing. Meal prep is easy with pasta salad. Cook a big batch and store it in portions. Use jars for easy serving and storage. Layer the dressing at the bottom, then add pasta and veggies. This keeps everything fresh until you’re ready to eat. Always check flavors before serving; add more seasoning if needed. You can store Italian pasta salad in the fridge for up to five days. Use a tight lid to keep it fresh. The flavors will blend and taste even better after a day. Yes, you can use many types of pasta. Fusilli or rotini works great, but penne or farfalle also taste good. Different shapes add fun textures. If you don’t have mozzarella balls, try cubed cheese like cheddar or feta. You can also use dairy-free cheese if you want a vegan option. To make a gluten-free version, use gluten-free pasta. Many stores sell it now. Just check the label to ensure it fits your needs. Absolutely! Making pasta salad a day ahead helps the flavors meld. Just cover it well and chill it in the fridge. Add extra herbs like parsley or basil for a fresh taste. You can also mix in some lemon juice or zest for a bright kick. A sprinkle of chili flakes can add heat if you like! In this article, we covered how to make a tasty Italian pasta salad. We explored key ingredients, step-by-step instructions, and helpful tips. You learned about great variations and how to store leftovers. Enjoy mixing sauces, adding your favorite veggies, and trying new twists. This dish is fun to make, and perfect for any meal. Keep experimenting with flavors and ingredients. The more you create, the better your salads will be! Enjoy your pasta salad journey!

Italian Pasta Salad Fresh and Flavorful Delight

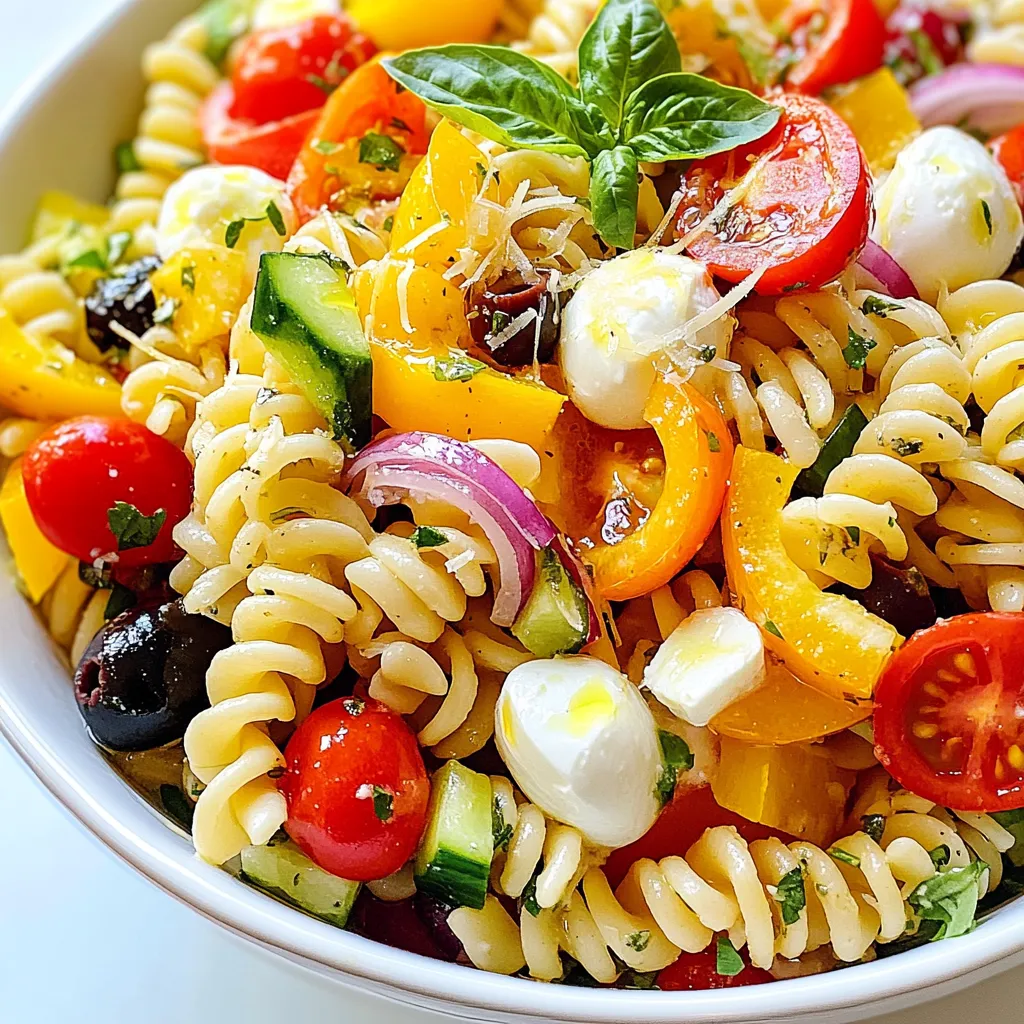
If you’re craving a dish that’s fresh, colorful, and packed with flavor, look no further than Italian Pasta Salad. This

To create tasty cranberry stuffing balls, gather these simple items: - 4 cups day-old bread, crusts removed and torn into pieces - 1 cup vegetable broth - 1 cup celery, diced - 1 cup onion, diced - 1 cup fresh cranberries, roughly chopped - 1 teaspoon dried thyme - 1 teaspoon dried sage - ½ teaspoon salt - ½ teaspoon black pepper - ¼ cup parsley, chopped - 2 large eggs, beaten - ½ cup walnuts or pecans, chopped (optional) - 2 tablespoons olive oil You can swap some ingredients if needed. Here are a few ideas: - Use chicken broth instead of vegetable broth for a richer taste. - If you don't have fresh cranberries, dried cranberries work too. - For a gluten-free option, choose gluten-free bread. - You can replace the eggs with flaxseed meal mixed with water for a vegan version. Want to make your stuffing balls even better? Try these add-ins: - Add chopped apples for a sweet twist. - Mix in cooked sausage for a heartier flavor. - Sprinkle in some cheese for creaminess. - Use different herbs like rosemary or oregano for a unique taste. {{ingredient_image_1}} 1. Start by preheating your oven to 375°F (190°C). This sets the stage for a nice, crispy finish. 2. Line a baking sheet with parchment paper. This helps prevent sticking and makes cleanup easy. 3. Get a large skillet and heat two tablespoons of olive oil over medium heat. This oil will add flavor to your veggies. 4. Chop one cup each of onion and celery. Add them to the skillet. Sauté for about 5-7 minutes. You want them soft and clear. 5. While the veggies cook, tear four cups of day-old bread into pieces. Remove the crusts for a softer texture. 6. In a large mixing bowl, mix the torn bread, sautéed onions, celery, one cup of chopped fresh cranberries, one teaspoon of dried thyme, one teaspoon of dried sage, half a teaspoon of salt, and half a teaspoon of black pepper. Stir until everything is combined. 7. Pour in one cup of vegetable broth. Mix until the bread is moist but not soggy. If it feels dry, add a tablespoon of broth at a time. 8. Beat two large eggs in a small bowl. Add the eggs to your mixture along with a quarter cup of chopped parsley and nuts if you want. Mix gently until just combined. 9. Let the mixture sit for about 10 minutes. This allows the flavors to blend well for tasty stuffing balls. 10. With clean hands, form the mixture into balls about the size of golf balls. Place them on your prepared baking sheet. 11. Bake in the preheated oven for 25-30 minutes. Look for a golden brown color and a crispy outside. - Use day-old bread to get the right texture. Fresh bread can make the stuffing too wet. - Make sure to chop the veggies small. This helps them cook evenly and mix well. - Don't skip the resting time. It allows the herbs and flavors to deepen. - For extra crunch, consider using walnuts or pecans. They add a nice texture and flavor. - Always check the stuffing balls toward the end of baking. Oven times can vary, and you want them perfectly golden. Now you're ready to make delicious cranberry stuffing balls that are sure to impress! To make the best cranberry stuffing balls, use day-old bread. This bread holds moisture well. Don't skip the fresh cranberries; they add a great tartness. When mixing, ensure your bread isn't too soggy. If it feels dry, add broth slowly. Let the mix sit for ten minutes. This helps the flavors blend nicely. Form your balls gently; don’t pack them too tightly. Finally, bake until golden brown for a nice crunch. One common mistake is using fresh bread. Fresh bread makes the stuffing too soggy. Another mistake is adding too much broth. You want moist stuffing balls, not soup! Be careful not to skip the resting time. This step is key for flavor. Lastly, don’t rush the baking time. If they aren't golden brown, they may be undercooked. Check them halfway through for even baking. Serve cranberry stuffing balls on a colorful platter. Garnish with fresh parsley or whole cranberries. They look festive and appealing. Pair them with roasted turkey or a rich gravy. You can also serve them as appetizers with a dipping sauce. Try a tangy yogurt or herb dip for added flavor. These tips will impress your guests and elevate your meal. Pro Tips Use Fresh Herbs: Fresh thyme and sage will elevate the flavor of your stuffing balls compared to dried herbs. Customize Your Nuts: Feel free to substitute walnuts or pecans with your favorite nuts like almonds or hazelnuts for a unique twist. Let Them Rest: Allowing the formed balls to rest for 10 minutes before baking helps them hold their shape better. Check for Crispiness: For extra crispiness, turn on the broiler for the last 2-3 minutes of baking, watching closely to prevent burning. {{image_2}} You can easily change the nuts in cranberry stuffing balls. Walnuts and pecans add a great crunch and flavor. If you want to switch things up, try almonds or hazelnuts. These nuts have a mild taste that pairs well with cranberries. You can also skip the nuts if you prefer a nut-free version. Just add more bread to keep the right texture. Making this recipe vegetarian is simple. Just use vegetable broth instead of chicken broth. For a vegan version, replace the eggs with ground flaxseed. Mix one tablespoon of flaxseed with three tablespoons of water. Let it sit for five minutes until it thickens. This swap keeps the balls together while fitting a vegan diet. You can also add more veggies, like carrots or bell peppers, for extra flavor. To make your cranberry stuffing balls even tastier, add more herbs and spices. Consider using rosemary or oregano for a warm flavor. A pinch of nutmeg can also bring a cozy touch. If you love heat, try adding a bit of red pepper flakes. Fresh herbs, like thyme or parsley, can brighten the dish. Mix and match these flavors to find your perfect combo! Store your leftover stuffing balls in an airtight container. Keep them in the fridge for up to three days. If you want to keep them longer, consider freezing. Always allow them to cool completely before packing. To freeze your stuffing balls, place them on a baking sheet. Make sure they are not touching. Freeze them for about two hours. Once they're firm, transfer the balls into a freezer bag. Remove as much air as you can from the bag. They can stay frozen for up to three months. When you’re ready to enjoy them again, preheat your oven to 350°F (175°C). Place the stuffing balls on a baking sheet. Bake them for about 15-20 minutes. Check if they are heated through. You can also microwave them but watch to avoid drying them out. Enjoy the warmth and flavor again! Yes, you can make cranberry stuffing balls ahead of time. Prepare the mixture and form the balls. Then, place them on a baking sheet and cover with plastic wrap. Store them in the fridge for up to 24 hours. Before baking, let them sit at room temperature for about 15 minutes. This helps them cook evenly. If you want to skip bread, try using cooked rice or quinoa. These options add a nice texture. You can also use gluten-free bread if you need a gluten-free version. Just make sure to adjust the liquid slightly. You want the mixture to stay moist but not soggy. To check if the stuffing balls are done, look for a golden brown color. They should be crispy on the outside. You can also use a food thermometer. The center should reach a safe temperature of 165°F (74°C). If they seem soft or mushy, give them a few more minutes in the oven. You learned about making tasty cranberry stuffing balls, from ingredients to storage. Each section provided valuable tips for great results. Remember to try substitutions and enhance flavor with add-ins. Avoid common mistakes to create the best dish. After mastering this recipe, impress friends and family at your next gathering. Enjoy the process, and don't be afraid to get creative with variations. Keep this guide handy for delicious stuffing balls every time you cook.

Cranberry Stuffing Balls Flavorful and Simple Recipe

Looking for a tasty twist on your holiday spread? Today, I’ll share my simple and flavorful recipe for cranberry stuffing

- 1 cup crushed graham crackers - 1/2 cup unsweetened shredded coconut - 1/4 cup unsalted butter, melted - 1 cup cream cheese, softened - 1/2 cup powdered sugar - 1 teaspoon vanilla extract - 1 cup heavy whipping cream - 1 cup fresh strawberries, chopped - 10 mini taco-shaped shells - Extra strawberries and mint leaves for garnish When measuring, use precise tools for best results. A standard measuring cup works for dry ingredients. For liquids, use a liquid measuring cup. This ensures each taco has the right balance. Pick fresh strawberries. Look for bright color and firmness. For cream cheese, choose full-fat for a rich taste. Use unsweetened coconut to control sweetness. Always check your graham crackers for freshness. This will enhance the flavor of your tacos. {{ingredient_image_1}} Start by mixing the crushed graham crackers, shredded coconut, and melted butter in a bowl. Make sure to combine them well. This mixture will become the tasty base for your tacos. Press this mix into the bottom of each mini taco shell. This step helps form a crunchy base that holds the filling. Set them aside to firm up a bit while you prepare the next steps. In another bowl, blend the softened cream cheese with powdered sugar and vanilla extract. Mix until it turns smooth and creamy. This filling is the heart of your cheesecake tacos. Next, whip the heavy cream in a separate bowl until stiff peaks form. Gently fold this whipped cream into the cream cheese mix. This process makes your filling light and fluffy. Now it’s time to fill your taco shells! Spoon the cheesecake filling into each shell over the crunchy base. Don’t be shy; fill them generously! On top of the filling, add the chopped strawberries for a burst of freshness. For an extra crunch, sprinkle some of the remaining mix on top. Once all the tacos are assembled, refrigerate them for at least 30 minutes. This chilling time helps the flavors blend beautifully. Before serving, garnish your tacos with extra strawberries and fresh mint leaves. This adds a lovely touch and makes them look fancy. Enjoy your fun and easy treat! To make the best crunch base, start with fresh crushed graham crackers. You want them finely ground for a smooth texture. Mix in unsweetened shredded coconut for extra flavor. Use melted butter to help bind it all together. Press the mixture firmly into each mini taco shell. This helps the base hold its shape when you fill it. When whipping cream, make sure your bowl is cold. Chilling it makes the cream whip faster. Use heavy whipping cream for the best volume and texture. Beat it until stiff peaks form. This means the cream will hold its shape. Gently fold the whipped cream into the cream cheese mixture. This keeps it light and fluffy. These tacos look great on any table. For a fun touch, add extra chopped strawberries on top. A sprig of mint adds color and freshness. Serve them chilled for a cool treat on warm days. You can also arrange them on a platter for parties. Your guests will love these fun and tasty desserts! Pro Tips Use Fresh Strawberries: Always opt for fresh strawberries to enhance the flavor and texture of your cheesecake tacos. They provide a juicy and sweet contrast to the creamy filling. Chill Before Serving: Allowing the tacos to chill for at least 30 minutes not only helps the flavors meld but also firms up the filling, making them easier to handle and eat. Customize the Crunch: Feel free to mix in some nuts or different types of cookies with the graham cracker crust for added flavor and texture variation. Presentation Matters: For a beautiful presentation, arrange the tacos on a platter and garnish with mint leaves and extra strawberries. This makes them visually appealing for any occasion. {{image_2}} You can swap the filling to create fun flavors. Try chocolate cream cheese for a rich twist. Lemon cream cheese gives a bright taste. You can also mix in peanut butter for a nutty delight. Just remember to balance sweetness with your choice. To make these tacos gluten-free, use gluten-free graham crackers. Many brands offer these in stores now. You can also use almond flour instead of regular flour for the crunch base. Check labels on all ingredients to ensure they are gluten-free. This way, everyone can enjoy this tasty treat! Add seasonal fruits for a fresh twist. In summer, peaches or blueberries work well. In fall, try diced apples or pears with a sprinkle of cinnamon. You can even mix berries for a colorful look. Changing fruits keeps this recipe exciting and delicious! To keep your Strawberry Crunch Cheesecake Tacos fresh, store them in an airtight container. This helps to prevent them from getting soggy. Place a piece of wax paper between layers if you stack them. Keep them in the fridge for up to three days. Always check for freshness before eating. If you want to freeze your tacos, prepare them, but do not add fresh fruit on top. Wrap each taco in plastic wrap. Then, place them in a freezer-safe bag or container. You can freeze them for up to one month. To serve, thaw them overnight in the fridge before enjoying. These tacos are best served cold, but if you want to reheat them, be careful. Place them on a baking sheet and warm them in a low oven, around 300°F, for about 5-7 minutes. This keeps the crunch intact. Avoid the microwave, as it can make the shells soggy. Yes, you can use other fruits! Try blueberries, raspberries, or peaches. Each fruit offers a new flavor. Mix and match for fun. Just keep the balance of sweetness in mind. You can store these tacos for up to three days in the fridge. Keep them in an airtight container. This helps maintain their crunch and freshness. After three days, the shells might get soggy. You can find mini taco-shaped shells at many grocery stores. Check the baking aisle or the dessert section. If you prefer, you can also make them at home. Use a muffin tin to shape dough into taco forms. Yes, you can prepare the cheesecake filling a day ahead. Store it in the fridge in a covered container. This saves time on the day you want to serve the tacos. Just assemble them fresh before serving for the best taste. Strawberry Crunch Cheesecake Tacos are a tasty treat easy to make at home. We covered the key ingredients, the step-by-step instructions, and even helpful tips for success. You can explore fun variations and learn the best ways to store or freeze them. With these insights, you can create delightful tacos anytime. Enjoy your cooking journey and impress your friends with this unique dessert!

Strawberry Crunch Cheesecake Tacos Easy and Fun Treat

Ready to impress your friends and family with a fun treat? Strawberry Crunch Cheesecake Tacos are the perfect mix of

To make a flavorful Stuffed Pepper Casserole, gather these simple ingredients: - 4 large bell peppers (any color), diced - 1 cup cooked quinoa or rice - 1 lb ground turkey or beef - 1 can (15 oz) black beans, rinsed and drained - 1 can (15 oz) diced tomatoes with green chilies - 1 cup corn (fresh, frozen, or canned) - 1 medium onion, chopped - 2 cloves garlic, minced - 1 tablespoon chili powder - 1 teaspoon cumin - Salt and pepper to taste - 1 ½ cups shredded cheese (cheddar or a blend) - 2 tablespoons olive oil - 1 tablespoon fresh cilantro or parsley, chopped (for garnish) You can easily swap ingredients based on what you have. - Use brown rice instead of quinoa for a different texture. - Ground chicken is a lighter option. - Canned diced tomatoes can be replaced with fresh tomatoes. - If you want a vegetarian dish, use lentils or chickpeas instead of meat. - Try different types of cheese, like Monterey Jack or pepper jack, for a kick. This casserole is not only tasty but also nutritious. Each serving is rich in protein and fiber. - Calories: About 350 per serving. - Protein: Approximately 25 grams. - Fiber: Roughly 10 grams. - Fat: Around 15 grams, depending on the meat and cheese used. - Carbohydrates: About 40 grams, mostly from the peppers, beans, and grains. This dish gives you a balanced meal in one pot! Enjoy the flavors and the health benefits. {{ingredient_image_1}} 1. Preheat your oven. Set it to 375°F (190°C). This helps the casserole bake evenly. 2. Chop the veggies. Dice the bell peppers and chop the onion. Mince the garlic. This makes them ready to mix in. 3. Cook the quinoa or rice. If you haven't done this yet, make sure it’s ready to go. You can use leftovers too. 4. Gather your ingredients. Make sure you have everything on hand. This keeps you organized. 1. Heat the skillet. Pour olive oil into a large skillet over medium heat. This gets the oil hot and ready. 2. Cook the onion. Add the chopped onion and stir it for about 5 minutes until it turns translucent. This adds a good base flavor. 3. Add the garlic. Stir in the minced garlic for one minute. You want it to smell great. 4. Brown the meat. Add the ground turkey or beef. Break it up with a spoon. Cook it for about 6-8 minutes until it’s no longer pink. 5. Mix in the veggies and beans. Add the diced bell peppers, cooked quinoa or rice, black beans, diced tomatoes, and corn. Stir in the chili powder, cumin, salt, and pepper. This makes a colorful and tasty mix. 1. Transfer to a dish. Pour the mixture into a greased 9x13-inch casserole dish. Spread it out evenly. 2. Add cheese. Sprinkle the shredded cheese on top. This will melt and create a gooey layer. 3. Cover and bake. Use aluminum foil to cover the dish. Bake it for 25 minutes. This keeps it moist. 4. Uncover and finish baking. Remove the foil and bake for another 15-20 minutes. This browns the cheese and makes it bubbly. 5. Let it rest. Once out of the oven, let the casserole sit for 5 minutes. This helps it hold together when you serve. Garnish with chopped cilantro or parsley for a fresh touch. To make your stuffed pepper casserole shine, focus on your ingredients. Use fresh bell peppers for a vibrant taste. Choose a good quality ground turkey or beef for the best flavor. Cook the onion until soft; this adds sweetness to the dish. Don't skip the spices! Chili powder and cumin give your casserole a warm kick. Be generous with the cheese; it adds richness and a golden crust. Layer your ingredients well and don’t rush the baking time. Let it bubble in the oven for that perfect finish. You can prep your casserole in advance. Cook the meat and veggies the day before. Mix everything together and store it in the fridge. When you’re ready to eat, just bake it. This saves time on busy nights. You can also freeze the uncooked casserole. Just wrap it tightly and label it. When you want to enjoy it, thaw it overnight in the fridge. Then bake it as usual. This way, you always have a great meal ready to go! Serve your stuffed pepper casserole with a fresh side salad. A simple lettuce and tomato mix works well. You can also add some avocado slices for creaminess. For extra crunch, try tortilla chips on the side. If you like heat, serve it with hot sauce. Don't forget to sprinkle fresh cilantro or parsley on top for color. This adds a nice touch to the dish. Enjoy every bite with family and friends! Pro Tips Choose Colorful Peppers: Using a mix of bell pepper colors not only adds visual appeal but also enhances the flavor profile of the dish. Cook Grains Ahead: Preparing the quinoa or rice in advance can save time and ensure that they are perfectly cooked and fluffy for your casserole. Experiment with Proteins: Feel free to swap the ground turkey or beef for shredded chicken, tofu, or a plant-based meat alternative for a unique twist. Customize Your Cheese: Mix different types of cheese like pepper jack for a spicy kick or mozzarella for a gooey texture to elevate your casserole. {{image_2}} If you want a vegetarian or vegan dish, skip the meat. Use a mix of beans and lentils instead. This gives you protein and a hearty texture. Replace the cheese with a vegan alternative or leave it out. You can also add more veggies like zucchini or mushrooms for extra flavor. This makes the dish colorful and fun to eat. For meat lovers, you can use ground beef, turkey, or chicken. Each adds its own taste. Ground lamb brings a unique flavor twist. You can mix meats too, like half turkey and half beef. This keeps the dish juicy and packed with flavor. Just make sure to cook the meat through before mixing in the other ingredients. Want to kick up the flavor? Try adding spices like paprika or oregano. You could also stir in some hot sauce for a spicy kick. Fresh herbs like basil or thyme can brighten up the dish too. Don't forget about toppings! Add a dollop of sour cream or avocado for creaminess. Each of these changes makes the casserole even more tasty and exciting. To keep your stuffed pepper casserole fresh, let it cool first. Once cooled, place it in an airtight container. Make sure to cover it tightly. This will keep the flavors intact. You can store it in the fridge for up to 4 days. If you want to keep it longer, freezing is the best option. When you are ready to enjoy the leftovers, preheat your oven to 350°F (175°C). Transfer the casserole to an oven-safe dish. If the casserole seems dry, add a splash of water or broth. Cover it with foil. Heat for about 20 minutes, or until warm. You can also use a microwave. Just heat in short bursts, stirring in between, until hot. For freezing, put the casserole in a freezer-safe container. It’s best to freeze it without garnishes. You can freeze it for up to 3 months. When you are ready to eat, thaw it in the fridge overnight. Then, reheat as mentioned above. This way, you can enjoy a tasty meal even weeks later! Yes, you can use other grains. Some great options are farro, barley, or even couscous. Each grain brings its own taste and texture. For example, farro has a nice chewiness. Barley adds a nutty flavor. Couscous cooks quickly and is light. Just make sure to cook them before adding to the mix. This will keep your casserole from getting soggy. Stuffed Pepper Casserole is filling, but you can pair it with sides. A simple green salad works well. You could also serve some crusty bread. Cornbread is a great match, too! If you want a fresh taste, top with avocado slices or a dollop of sour cream. These add creaminess and flavor. This casserole can last up to four days in the fridge. Make sure to store it in an airtight container. When you want to reheat, simply pop it in the oven or microwave. Just check that it’s heated all the way through. Enjoy it as a quick lunch or dinner! This blog post covered all you need to know about stuffed pepper casserole. We discussed essential ingredients, easy steps for preparation, and helpful storage tips. Plus, we explored variations to make the dish suit your taste. Remember, you can customize the recipe to your liking. With some simple adjustments, this meal can be a hit for any dinner. Enjoy making your unique version of stuffed pepper casserole and delight your family with this tasty dish!

Stuffed Pepper Casserole Flavorful Family Delight

Are you ready to impress your family with a delicious meal that’s easy to make? My Stuffed Pepper Casserole is

- 2 cups pasta (fusilli or penne works best) - 1 cup cherry tomatoes, halved - 1 cucumber, diced - 1 red bell pepper, diced - 1/2 red onion, finely chopped - 1 can chickpeas, rinsed and drained - 1/2 cup feta cheese, crumbled - 1/4 cup fresh basil leaves, chopped - 1/4 cup black olives, sliced - Secret Ingredient: 2 tablespoons tahini - 3 tablespoons lemon juice - 3 tablespoons olive oil - Salt and pepper to taste Each ingredient in this pasta salad plays a key role. The pasta serves as the base, giving the salad its hearty texture. Cherry tomatoes add a burst of sweetness. Cucumber brings a refreshing crunch. The red bell pepper adds color and crispness. Red onion gives a mild bite, while chickpeas boost protein and fiber. Feta cheese provides a creamy and tangy flavor. Fresh basil adds a hint of herbal brightness. Black olives contribute salty depth. The olive oil creates a smooth dressing, while lemon juice adds brightness. Finally, tahini is the secret ingredient that ties everything together. It gives a nutty flavor and creamy texture, making the salad unique and tasty. The secret ingredient, tahini, transforms this dish. It adds a rich, nutty taste that you won't find in typical pasta salads. Tahini also makes the dressing creamy without extra dairy. This makes the salad more interesting and satisfying. By using tahini, you add a healthy fat that helps with flavor and texture. It blends well with lemon juice and olive oil, creating a perfect dressing. Trust me, this secret ingredient takes your pasta salad to a whole new level. {{ingredient_image_1}} Start by boiling water in a large pot. Add a pinch of salt to the water. When the water boils, add 2 cups of pasta. Fusilli or penne works best. Cook the pasta until it is al dente, which means it should be firm but not hard. This usually takes about 8 to 10 minutes. Drain the pasta and rinse it under cold water. This stops the cooking and cools it down. Set the pasta aside to let it dry a bit. While the pasta cooks, chop your veggies. Dice 1 cucumber and 1 red bell pepper. Halve 1 cup of cherry tomatoes. Finely chop 1/2 of a red onion. Rinse and drain 1 can of chickpeas. In a large bowl, combine the chopped vegetables and chickpeas. Add 1/2 cup of crumbled feta cheese, 1/4 cup of chopped fresh basil leaves, and 1/4 cup of sliced black olives. Mix these ingredients together gently. In a small bowl, whisk together 2 tablespoons of tahini, 3 tablespoons of lemon juice, and 3 tablespoons of olive oil. Add salt and pepper to taste. The tahini is the secret ingredient that gives this salad a creamy and nutty flavor. It sets this dish apart from others. Make sure to mix well so the dressing is smooth. Now, add the cooled pasta to the bowl with the veggies and chickpeas. Pour the dressing over everything. Gently toss the mixture until all ingredients are well coated with the dressing. Taste the salad and adjust seasoning with more salt and pepper if needed. For the best flavor, let the pasta salad chill in the fridge for at least 30 minutes. This helps all the flavors blend beautifully. For an elegant touch, serve in a large bowl. Sprinkle extra feta and whole basil leaves on top. Drizzle a bit of olive oil before serving for added flavor. Enjoy your delicious Secret Ingredient Pasta Salad! To make the best pasta salad, follow these tips: - Cook pasta al dente: This keeps it firm and prevents mushiness. - Rinse with cold water: After cooking, rinse the pasta to stop the cooking. - Mix fresh and canned ingredients: Fresh veggies add crunch, while canned chickpeas add protein. - Use quality olive oil: It enhances the flavor of your dressing. Chilling your pasta salad is key for great taste. Here’s why: - Flavors meld together: Chilling lets the dressing soak into the pasta and veggies. - Texture improves: Cold pasta salad feels refreshing and crisp. - Make ahead: You can prepare it a day early. Just keep it in the fridge! Serve your pasta salad in style with these ideas: - Large bowl with garnishes: Use extra feta and basil leaves on top for a nice look. - Drizzle extra olive oil: A little drizzle before serving adds flavor and shine. - Pair with proteins: Add grilled chicken or shrimp for a complete meal. - Serve with crusty bread: This is perfect for soaking up any extra dressing. Pro Tips Chill for Flavor: Allow the pasta salad to chill in the refrigerator for at least 30 minutes before serving. This helps the flavors to meld beautifully. Customizable Veggies: Feel free to add any of your favorite vegetables or seasonal produce to this salad for added freshness and flavor. Make Ahead: This pasta salad can be made a day ahead. Just keep it covered in the refrigerator and give it a good stir before serving. Adjust the Dressing: Taste the dressing before combining. You can add more lemon juice or tahini to suit your preference for tanginess or creaminess. {{image_2}} You can easily change the flavors in your pasta salad. Try different pasta shapes like bow tie or rotini for fun. Swap cherry tomatoes for sun-dried tomatoes for a rich taste. If you want more crunch, use bell peppers or add radishes. For a fresh twist, include arugula or spinach instead of basil. Each swap can give your salad a new vibe. Want to make your salad heartier? Add proteins like grilled chicken, shrimp, or tofu. You can mix in cooked bacon for a smoky flavor. If you like more veggies, consider adding shredded carrots, peas, or zucchini. These additions create a balanced meal that fills you up and keeps it colorful. While tahini gives a unique taste, feel free to explore other dressings. A light balsamic vinaigrette can add sweetness. You might also try a creamy ranch or a zesty Italian dressing. Each dressing changes the whole flavor profile. Just remember to adjust the amount of salt and pepper after you add a new dressing. To keep your pasta salad fresh, place it in an airtight container. Make sure the lid seals tightly. Store it in the fridge. It will stay good for about 3 to 5 days. If you notice any signs of spoilage, throw it away. I recommend adding a little extra dressing before serving if it seems dry. You can freeze pasta salad, but it may change in texture. To freeze, use a freezer-safe container. Leave some space at the top for expansion. It can last up to 2 months in the freezer. When you're ready to eat it, thaw it overnight in the fridge. Be aware that some ingredients may not hold up well. If you want to reheat the pasta salad, use the microwave. Heat it in short bursts, stirring in between. This helps avoid uneven heating. You may also enjoy it cold, straight from the fridge. Add a splash of olive oil or fresh lemon juice for extra flavor when serving. If you don't have tahini, you can use peanut butter or sunflower seed butter. Both options give a creamy texture. You can also blend roasted sesame seeds with a bit of oil to mimic tahini. The pasta salad can last up to three days in the fridge. Make sure to keep it in an airtight container. The flavors will blend more as it sits, making it even tastier. Yes, you can easily make this pasta salad vegan. Just skip the feta cheese or use a plant-based feta. The tahini dressing is already vegan, so you’re good to go! To add some heat, include chopped jalapeños or red pepper flakes. You can also mix in a dash of hot sauce to the dressing. Adjust the spice level to your taste! Pasta salad pairs well with grilled chicken or fish for a hearty meal. You can also serve it with a slice of crusty bread or as part of a picnic spread. This blog post covered how to make a delicious pasta salad. We explored the key ingredients, including the secret ingredient that adds flavor. I shared step-by-step instructions to ensure your dish turns out perfect. You learned useful tips for making the best pasta salad and ideas for variations. Remember, storing leftovers correctly will keep your salad fresh. With these insights, you can create a tasty meal everyone will love. Enjoy your cooking and have fun mixing things up!

Secret Ingredient Pasta Salad Flavorful Recipe Idea

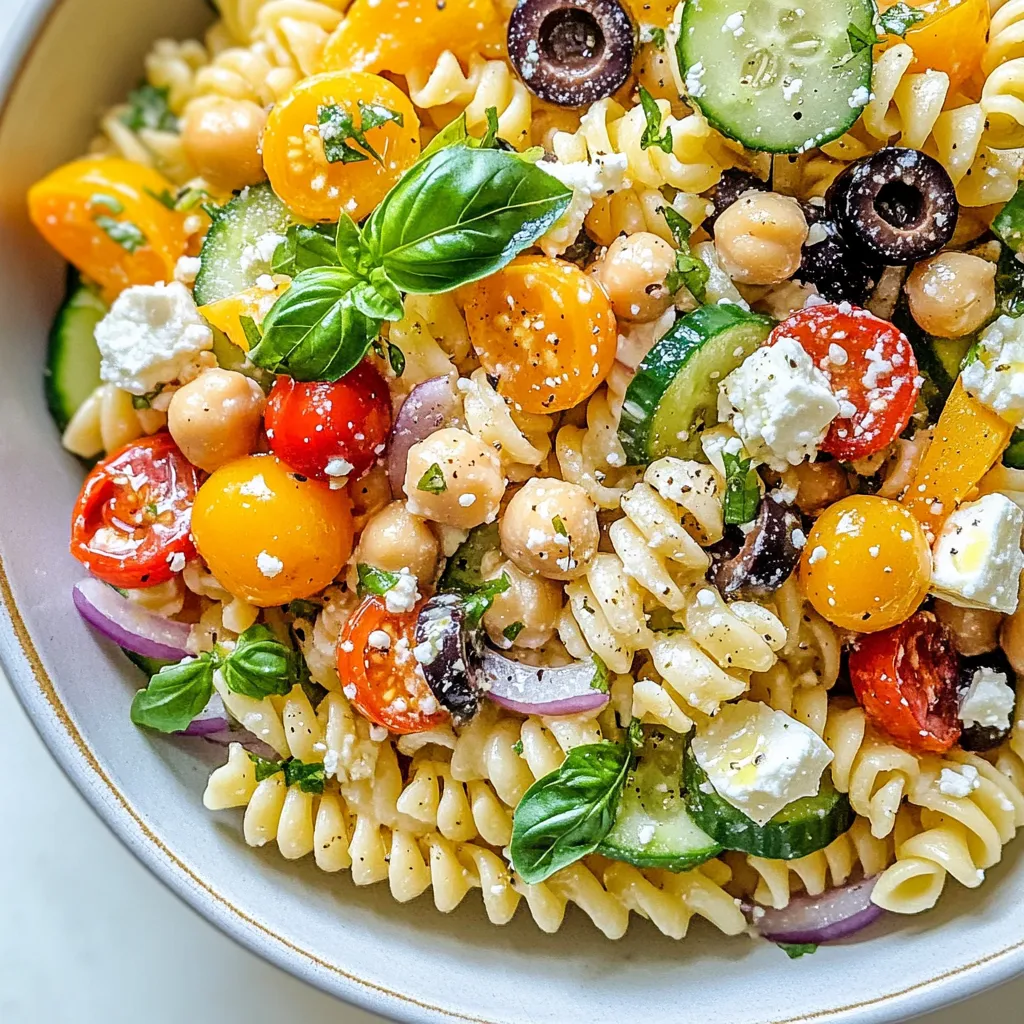
Looking to spice up your pasta salad game? I’ve got just the thing. This Secret Ingredient Pasta Salad is not

Older posts
Newer posts
← Previous Page1 … Page130 Page131 Page132 … Page143 Next →

dsad

© 2025 Southern Dishes • Built with GeneratePress

Our Policies

  • Copyright Policy
  • Cookie Policy
  • GDPR Policy
  • Privacy Policy
  • Disclaimer
  • Terms Of Use

More Information

  • Home
  • About
  • Contact
  • Appetizers
  • Dessert
  • Dinner
  • Drinks
©2025, Southern Dishes About Back To Top