Skip to content
DisclaimerTerms Of UseGDPR PolicyCookie Policy

Southern Dishes

  • Home
  • Drinks
  • Appetizers
  • Dinner
  • Dessert
  • About
  • Contact
  • Privacy Policy
DisclaimerTerms Of UseGDPR PolicyCookie Policy

Isabella

For this delightful Ravioli Lasagna, you will need: - 2 packages (9 oz each) refrigerated cheese ravioli - 2 cups marinara sauce - 1 cup ricotta cheese - 2 cups shredded mozzarella cheese - 1 cup grated Parmesan cheese - 1 teaspoon Italian seasoning - 1/2 teaspoon garlic powder - 1/2 teaspoon onion powder - Salt and pepper to taste These ingredients come together to create layers of cheesy goodness. The ravioli acts as the base, and the cheeses add a rich taste. You can add fresh basil leaves for garnish. They will give a fresh touch to your dish. If you want more flavor, consider adding red pepper flakes for heat or sautéed vegetables for extra texture. You can also use a different cheese like provolone. You will need a crockpot for this recipe. A non-stick spray will help prevent sticking. A mixing bowl is essential for the cheese mixture. Use a spoon for layering and serving. Finally, have measuring cups ready to get the right amounts. These tools make the process easy and fun. Enjoy the cooking! {{ingredient_image_1}} To start, grab a mixing bowl. Add 1 cup of ricotta cheese. Then, mix in 1 teaspoon of Italian seasoning, 1/2 teaspoon of garlic powder, and 1/2 teaspoon of onion powder. Add a pinch of salt and pepper. Stir until the mixture is smooth. This blend will add creaminess to your dish. Set this aside for layering later. Now, let’s build the layers. First, spray the inside of your crockpot with cooking spray. This helps prevent sticking. Next, spread a thin layer of marinara sauce at the bottom. Then, take 1 package of refrigerated ravioli and layer half of them on top of the sauce. Spoon half of the cheese mixture over the ravioli. After that, sprinkle 1 cup of shredded mozzarella and 1/2 cup of grated Parmesan cheese on top. Repeat this process. Add another layer of marinara sauce, the rest of the ravioli, and the remaining cheese mixture. Finish with the last of the marinara sauce, mozzarella, and Parmesan on top. Cover the crockpot. Cook on low for 4-5 hours or high for 2-3 hours. You want the cheese to melt and bubble up. Once it’s done, turn off the crockpot. Let it sit for about 10 minutes before serving. This helps the layers set. If you like, add fresh basil leaves as a garnish for color and flavor. Enjoy your meal! When you layer your ravioli lasagna, start with sauce on the bottom. This helps prevent sticking. Next, add half the ravioli evenly. Then, spread half the ricotta mix on top. Follow with mozzarella and Parmesan layers. Repeat this order until you finish with cheese. This method ensures even cooking and great flavor. Use fresh herbs like basil to boost taste. A sprinkle of red pepper flakes adds heat. If you like a bolder flavor, try adding more garlic powder or Italian seasoning. You can also add cooked ground meat for richness. Each layer can be a chance to mix things up! Before you start, spray the crockpot with cooking spray. This simple step helps the layers come out clean. If you find it hard to serve, use a silicone spatula. It can slide under the layers easily. Avoid packing the layers too tightly, as air needs to flow for even cooking. Pro Tips Layer Smartly: To ensure even cooking, make sure to press down on the layers gently as you build them, which helps the ingredients meld together beautifully. Cheese Choices: Feel free to mix up the cheeses! Adding a blend of cheddar or fontina can elevate the flavor profile of your lasagna. Make Ahead: This dish can be assembled the night before and stored in the refrigerator. Just pop it in the crockpot the next day for a hassle-free meal. Garnishing Tip: For a burst of freshness, add a drizzle of olive oil and a sprinkle of crushed red pepper flakes before serving. {{image_2}} For a meat lover’s twist, add cooked ground beef or sausage. Brown the meat first, then mix it into the ricotta cheese. Layer it along with the ravioli and sauce. This gives you a hearty, filling meal. You can also use Italian sausage for a spicy kick. If you want a vegetarian option, use spinach or mushrooms instead of meat. Sauté sliced mushrooms until soft. Mix fresh spinach into the ricotta for extra flavor and nutrition. Layer these veggies with the ravioli and sauce. This adds color and freshness to your dish. Switch up the sauce for a unique taste. Try pesto instead of marinara for a herby flavor. You can also use Alfredo sauce for a creamy, rich dish. Mix sauces for more depth, like a half-and-half blend of marinara and Alfredo. Each variation can change the whole vibe of your ravioli lasagna. To store your ravioli lasagna, let it cool down first. Place any leftover portions in an airtight container. Make sure to cover it well to keep it fresh. You can keep it in the fridge for up to three days. If you want to freeze your ravioli lasagna, cut it into smaller pieces. Wrap each piece in plastic wrap tightly. Then, place the wrapped pieces in a freezer bag. Label the bag with the date. It will stay good for up to three months. When you're ready to eat it, thaw it in the fridge overnight. To reheat, you can use the microwave or oven. If using the microwave, place a piece on a microwave-safe plate. Heat it for about 2-3 minutes, checking every minute. For the oven, preheat it to 350°F (175°C). Place the lasagna in an oven-safe dish, cover with foil, and heat for about 20 minutes. This keeps the cheese nice and melty. If it looks a bit dry, add a splash of marinara sauce before reheating. Enjoy! Yes, you can use frozen ravioli in this dish. Just add a few extra minutes to cooking time. Frozen ravioli will cook well and still taste great. They hold up nicely in the layers. Thawing is not necessary, but you can if you prefer. If you need a substitute for ricotta cheese, try cottage cheese. It has a similar texture and can work well. You can also use cream cheese mixed with a little milk. This will make it smooth and creamy. To make this recipe gluten-free, choose gluten-free ravioli. Many stores now sell these options. Check the labels to be sure. Use gluten-free marinara sauce as well. This keeps the dish tasty and safe for those with gluten sensitivities. Yes, you can cook this dish on high heat. The cooking time will be 2-3 hours. Just keep an eye on it to prevent burning. The cheese should still melt and bubble nicely. This blog post covered all you need for making ravioli lasagna. We looked at the key ingredients, cooking steps, and handy tips. Plus, I shared fun variations to fit your taste. Storing leftovers and reheating also plays a big role in your meal prep. You can enjoy this dish in many ways. Get creative and try what you love! Cooking should be fun and tasty, so dive in and make your favorite version today.

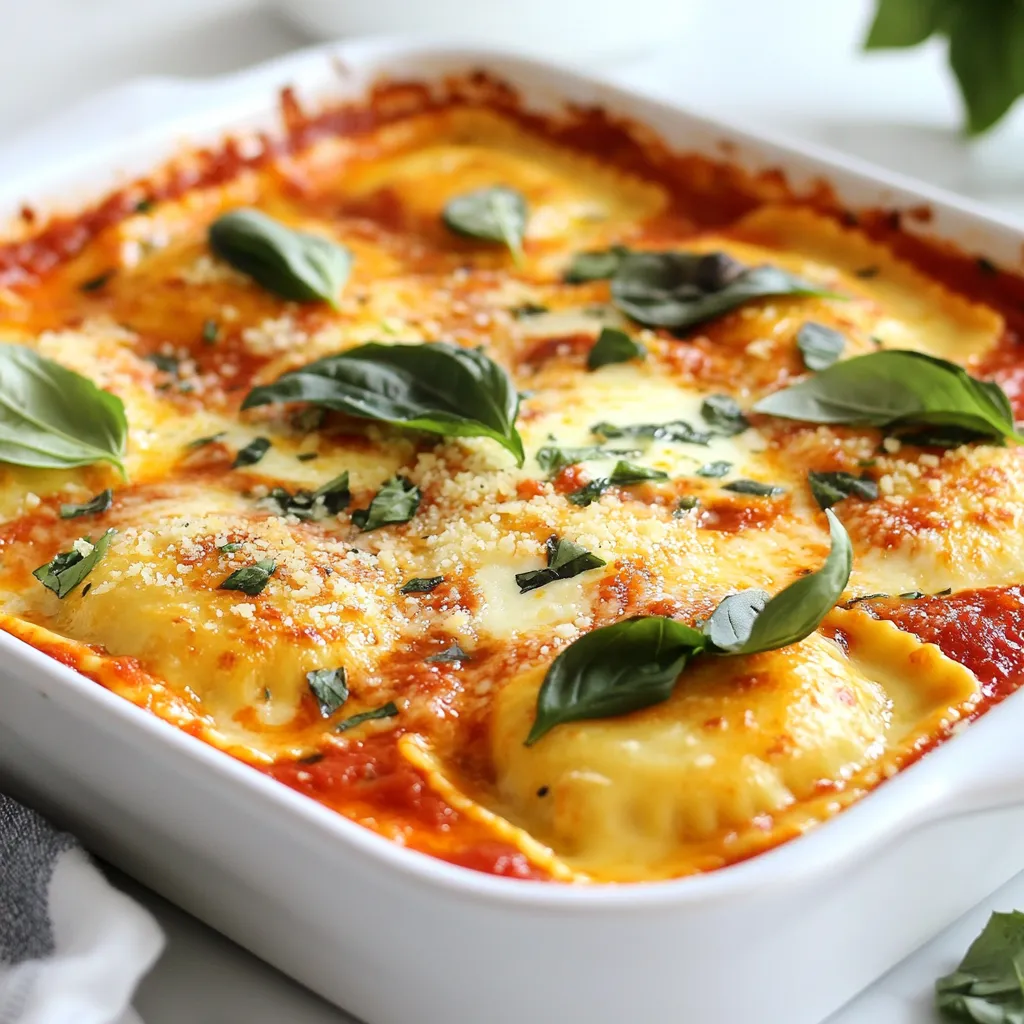
Ravioli Lasagna Crockpot Easy and Savory Dish

If you crave a warm, cheesy dish that’s quick to make, try my Ravioli Lasagna Crockpot! This recipe blends the

To make Baked Ziti Supreme, you need a few key ingredients. Here’s what you will need: - 12 oz ziti pasta - 2 cups marinara sauce - 1 cup ricotta cheese - 1 cup shredded mozzarella cheese - 1/2 cup grated Parmesan cheese - 1 cup cooked Italian sausage, crumbled (or ground turkey) - 1/2 red bell pepper, diced - 1/2 green bell pepper, diced - 1/2 onion, finely chopped - 2 cloves garlic, minced - 1 tablespoon olive oil - 1 teaspoon dried oregano - 1 teaspoon dried basil - Salt and pepper to taste - Fresh basil leaves, for garnish These ingredients blend well to create a rich flavor. The ziti pasta holds the sauce well. The mix of cheeses gives it a creamy texture. You can add ingredients to make the dish your own. Some ideas include: - Mushrooms for an earthy flavor - Spinach for a boost of nutrients - Olives for a salty kick - Red pepper flakes for heat Feel free to mix and match these extras. They can change the taste and make it special. If you want to make a vegetarian version, skip the meat. Use more veggies or extra cheese instead. For a gluten-free option, use gluten-free ziti pasta. This way, everyone can enjoy Baked Ziti Supreme, no matter their diet. {{ingredient_image_1}} First, boil a large pot of salted water. Once the water is bubbling, add 12 oz of ziti pasta. Cook it until it's al dente, which means it should be firm to the bite. This usually takes about 8 to 10 minutes. When done, drain the pasta in a colander and set it aside. Remember, this step is key for the best texture in your dish. Next, heat 1 tablespoon of olive oil in a large skillet over medium heat. Add 1/2 onion, finely chopped, and 2 cloves of minced garlic. Sauté them for about 1 to 2 minutes. Then, add 1/2 red bell pepper and 1/2 green bell pepper, both diced. Cook until the veggies are soft, about 3 to 5 minutes. Now, stir in 1 cup of cooked Italian sausage, crumbled, or ground turkey. Cook until the meat is browned. Season with salt, pepper, 1 teaspoon of dried oregano, and 1 teaspoon of dried basil. This mix gives your dish a rich flavor. In a large bowl, combine the cooked ziti pasta with the sautéed mixture, 2 cups of marinara sauce, and 1 cup of ricotta cheese. Mix it well until everything blends together. It's important to ensure every piece of pasta is coated in that delicious sauce. Then, add half of the 1 cup of shredded mozzarella cheese to the bowl. Stir again to combine. This mixture is now ready for the oven. Transfer the ziti mixture into a greased 9x13-inch baking dish. Spread it evenly so every bite gets the same great taste. Top the mixture with the remaining mozzarella cheese and 1/2 cup of grated Parmesan cheese. Cover the dish with aluminum foil. Bake it in your preheated oven at 375°F (190°C) for 25 minutes. After that, remove the foil and bake for another 10 to 15 minutes. This step will make the cheese bubble and turn golden. Once it’s done, let it cool for a few minutes. For a fresh touch, garnish with some basil leaves before serving. To get that perfect cheese melt, use fresh mozzarella. Grate it yourself for a better texture. When you sprinkle it on top, be sure to cover all the pasta. This helps it melt evenly. Baking with foil traps steam, making the cheese gooey. Remove the foil near the end to brown the cheese. Start by sautéing the onion and garlic in olive oil. This adds depth to your dish. Don't rush this step; let them become soft and fragrant. Adding the sausage gives a nice, rich flavor. Spice it up with oregano and basil while cooking. These herbs boost the taste and aroma. Mixing the marinara sauce with the ricotta creates a creamy base. This adds moisture and richness to each bite. One common mistake is overcooking the pasta. Make sure to cook it al dente. It will continue to cook in the oven. Another mistake is not seasoning enough. Salt and pepper are key to bringing out the flavors. Lastly, don’t skip the foil. It helps the cheese melt right. If you want a crispy top, remove it for the last 10-15 minutes of baking. Pro Tips Use Fresh Herbs: Adding fresh basil or parsley just before serving enhances the flavor and adds a pop of color to your baked ziti. Layer Cheese for Extra Flavor: For an even cheesier dish, try mixing in some provolone or gouda cheese along with the mozzarella. Customize Your Proteins: Feel free to substitute the Italian sausage with grilled chicken, or make it vegetarian by adding more veggies like spinach or mushrooms. Make Ahead and Freeze: This dish can be prepared ahead of time and frozen. Just bake it straight from the freezer, adding an extra 10-15 minutes to the cooking time. {{image_2}} For a vegetarian twist, skip the meat. Use extra veggies instead. Try mushrooms, zucchini, or spinach. These add great flavor and nutrition. You can also use plant-based sausage for a meaty texture. Just make sure to check the labels for allergens. Combine these veggies with the marinara, ricotta, and cheeses. Bake it just like the original recipe. To make a gluten-free version, swap the ziti pasta for gluten-free pasta. Many brands offer great options that taste just as good. Check the cooking time, as gluten-free pasta can cook faster. Use gluten-free marinara sauce, too. Always read the labels to ensure no hidden gluten. This way, everyone can enjoy this great dish! Want to elevate the taste? Consider adding some extra ingredients. Chopped olives or artichokes can add a nice briny flavor. You might also try sun-dried tomatoes for a touch of sweetness. Fresh herbs like parsley or thyme can bring a fresh note. For a spicy kick, add red pepper flakes. Mix these in with your other ingredients. Your baked ziti will be even more delicious! After you make Baked Ziti Supreme, let it cool first. Then, cover it tightly with plastic wrap or foil. You can also use an airtight container. This keeps your dish fresh for up to 3 days in the fridge. Make sure to label it with the date. This helps you know when to eat it. If you want to freeze Baked Ziti Supreme, follow these steps. First, let it cool completely. Then, cut it into portions. Wrap each piece in plastic wrap, and then place them in freezer bags. Remove as much air as possible from the bags. You can freeze it for up to 3 months. When you're ready to eat, just thaw it in the fridge overnight. To reheat Baked Ziti Supreme, use the oven for the best taste. Preheat your oven to 350°F (175°C). Place the ziti in an oven-safe dish and cover it with foil. Heat for about 20-30 minutes, or until hot. If you want a crisp top, remove the foil for the last 5-10 minutes. You can also use a microwave if you're in a hurry. Just heat it in short bursts, stirring in between. Enjoy your delicious leftovers! You can prepare Baked Ziti Supreme ahead of time. First, cook the ziti pasta and sauté the veggies and meat. Combine these with the sauce and cheese as usual. Next, place the mixture in a greased baking dish. Cover it tightly with plastic wrap or foil. You can store it in the fridge for up to two days before baking. When you’re ready, just pop it in the oven. Bake it longer if it’s cold from the fridge. Yes, you can use different types of cheese in your Baked Ziti Supreme. For more flavor, try using provolone or gouda. If you want it extra creamy, use mascarpone. You can even mix cheeses for a unique taste. Just make sure to keep some mozzarella for that gooey top layer. Experimenting with cheese can make this dish even more special! Serve Baked Ziti Supreme hot from the oven. Cut it into squares for easy serving. A sprinkle of fresh basil on top adds color and flavor. Pair it with a side salad or garlic bread. This combo makes a great meal. You can also offer extra marinara sauce on the side for dipping or drizzling. Enjoy every cheesy bite! Baked Ziti Supreme is a dish full of flavor and options. You learned about key ingredients and how to prepare your dish step-by-step. We explored tips for the best cheese melt and techniques to enhance taste. I shared ideas for vegetarian and gluten-free versions, along with storage tips to keep your leftovers fresh. As you try this recipe, remember to customize it to suit your taste. Enjoy the process, and share the joy of this delicious meal with loved ones.

Baked Ziti Supreme Flavorful and Simple Recipe

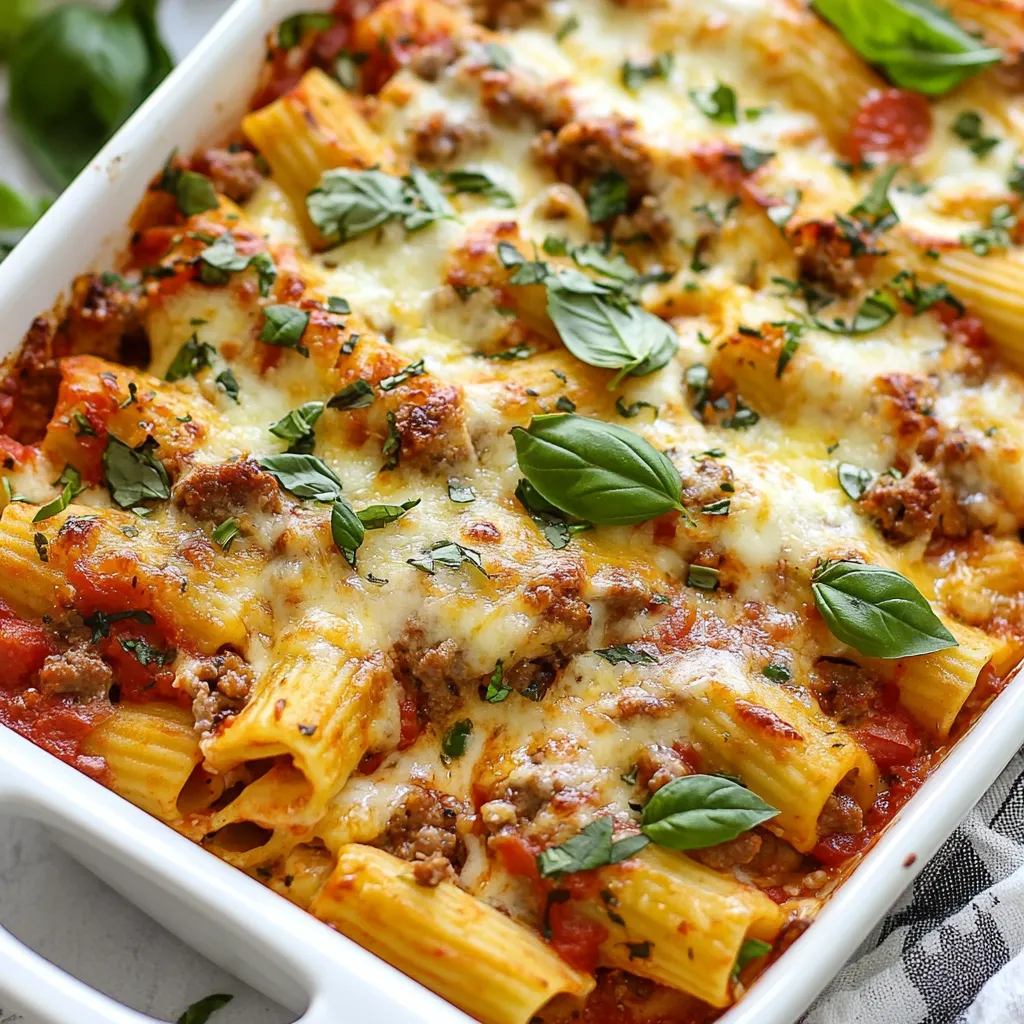
Looking for a simple and tasty meal? Baked Ziti Supreme is your answer! This recipe combines pasta, cheese, and hearty

To make herb roasted potatoes, carrots, and zucchini, gather these simple items: - 4 medium potatoes, cubed - 3 large carrots, sliced - 2 medium zucchinis, cut into half-moons - 3 tablespoons olive oil - 2 teaspoons dried rosemary - 1 teaspoon dried thyme - 1 teaspoon garlic powder - Salt and pepper to taste - Fresh parsley, chopped (for garnish) Choose fresh vegetables for the best taste. Look for potatoes that are firm and smooth. Avoid any with green spots or sprouts. Select carrots that are bright and crisp. They should feel heavy for their size. Zucchini should be shiny and firm. If it feels soft, skip it. Fresh herbs add a lovely touch. Look for parsley that is bright green and fragrant. To add more depth to your dish, consider these optional ingredients: - 1 onion, chopped for sweetness - 1 bell pepper, cut into strips for color - 1 teaspoon paprika for a smoky flavor - A splash of balsamic vinegar for tang These extras can take your herb roasted vegetables to a new level. Mix and match based on what you enjoy! {{ingredient_image_1}} First, gather all your ingredients. You need potatoes, carrots, and zucchini. Cut the potatoes into cubes. Slice the carrots into rounds. Cut the zucchini into half-moons. This shape helps them cook evenly. Place all the chopped veggies in a large mixing bowl. Next, drizzle 3 tablespoons of olive oil over the vegetables. Toss them gently to coat each piece. This oil helps the veggies roast well and adds flavor. In a small bowl, mix 2 teaspoons of dried rosemary, 1 teaspoon of dried thyme, 1 teaspoon of garlic powder, and salt and pepper. Sprinkle this herb blend over the vegetables. Toss again to ensure even seasoning. Now, preheat your oven to 425°F (220°C). Spread the seasoned vegetables on a large baking sheet. Make sure they lay in a single layer. This helps them roast evenly. Place the sheet in the oven and set a timer for 25 to 30 minutes. Halfway through, stir the veggies to promote even cooking. Check the veggies after 25 minutes. They should be golden brown and tender. You can test them with a fork. If it goes in easily, they are done. If not, roast for another few minutes. Once ready, remove them from the oven and let cool slightly. Garnish with fresh parsley for a pop of color. Enjoy your flavorful dish! To get the best roast, keep these tips in mind: - Cut veggies into equal sizes. This helps them cook evenly. - Use enough oil to coat each piece. It adds flavor and helps them brown. - Spread veggies out in one layer. This prevents steaming and makes them crispy. - Stir halfway through cooking. This ensures even browning and crispness on all sides. Here are some mistakes that can ruin your dish: - Overcrowding the baking sheet. This steams the veggies instead of roasting them. - Not preheating the oven. This can lead to uneven cooking. - Skipping the seasoning. Herbs and spices enhance the flavor of the veggies. - Not checking for doneness. Use a fork to test if they are tender. Having the right tools makes cooking easier: - A sharp knife for cutting veggies. This saves time and effort. - A large mixing bowl for tossing ingredients. It helps mix everything well. - A baking sheet with edges. This keeps the oil and juices contained. - A spatula for stirring the veggies. This ensures even cooking and easy serving. Pro Tips Use Fresh Herbs: Whenever possible, opt for fresh herbs instead of dried for a more vibrant flavor. Cut Uniformly: Ensure all vegetables are cut to similar sizes for even cooking and roasting. Don't Overcrowd the Pan: Give the vegetables room on the baking sheet; overcrowding can lead to steaming instead of roasting. Experiment with Spices: Feel free to mix in your favorite spices or add a pinch of cayenne for some heat! {{image_2}} You can change the veggies in this dish. Try bell peppers, sweet potatoes, or broccoli. Each veggie adds its own flavor. For instance, sweet potatoes bring a hint of sweetness. Bell peppers add a nice crunch. Just cut them into similar sizes for even cooking. Herbs and spices can change the taste a lot. Instead of rosemary, try oregano or basil. A little cumin adds warmth, while smoked paprika gives a nice kick. Mix and match to find your favorite combination. Just remember to keep the balance right so one flavor doesn't overpower the others. This dish is naturally vegan and gluten-free. Use more vegetables for a heartier meal. You can also add chickpeas for protein. They roast well and add a nice texture. If you need a richer flavor, drizzle with balsamic glaze after roasting. This gives it a sweet and tangy finish that everyone will love. To keep your herb roasted potatoes, carrots, and zucchini fresh, let them cool first. Place the veggies in an airtight container. Store them in the fridge. They will stay good for about 3 to 5 days. If you want to keep them longer, freezing is a great option. When it's time to eat the leftovers, you can reheat them in a few ways. The oven works best. Preheat it to 350°F (175°C). Spread the veggies on a baking sheet and heat for 10-15 minutes until warm. You can also use a microwave. Just place them in a bowl and cover. Heat for 1-2 minutes, stirring halfway. If you want to freeze your herb roasted veggies, follow these steps. First, let them cool completely. Then, spread them out on a baking sheet in a single layer. Freeze for about 1-2 hours. Once frozen, transfer them to a freezer-safe bag or container. Label it with the date. They can last up to 3 months. When you’re ready to eat, just reheat straight from the freezer. To make herb roasted potatoes, carrots, and zucchini, start by preheating your oven to 425°F (220°C). Cube four medium potatoes, slice three large carrots, and cut two medium zucchinis into half-moons. In a large bowl, mix these vegetables. Drizzle three tablespoons of olive oil over them, ensuring they are well-coated. In a small bowl, mix two teaspoons of dried rosemary, one teaspoon of dried thyme, one teaspoon of garlic powder, salt, and pepper. Sprinkle this herb mixture over the veggies and toss well. Spread everything on a baking sheet in a single layer. Roast for 25-30 minutes until they are golden and tender. Stir halfway through cooking. After done, let them cool a bit and garnish with fresh parsley before serving. Yes, you can use fresh herbs instead of dried. Fresh herbs add a bright flavor to your dish. If you choose fresh rosemary or thyme, use about three times more than dried. Chop them finely and add them when mixing the vegetables. This swap brings a lively taste to herb roasted potatoes, carrots, and zucchini. Herb roasted vegetables pair well with many dishes. They complement grilled chicken, fish, or steak beautifully. You can serve them alongside pasta, rice, or quinoa for a hearty meal. They also work well in salads. Toss them in a green salad or serve them as a warm side dish. Their rich flavors enhance any meal. Yes, you can make this recipe in an air fryer. Preheat the air fryer to 400°F (200°C). Prepare the vegetables as you would for the oven. Toss them with oil and herbs. Place them in the air fryer basket in a single layer. Cook for about 15-20 minutes, shaking the basket halfway through. This method gives you crispy edges while keeping the inside tender. In this article, we covered the key steps for making herb-roasted vegetables. You learned about the right ingredients, tips for fresh produce, and optional flavors. We went through simple roasting steps and how to tell when your veggies are done. I shared tools, common mistakes, and ways to tweak the recipe. Finally, you now know how to store leftovers and answer common questions. Embrace these tips to make delicious meals with ease. Enjoy your cooking journey!

Herb Roasted Potatoes Carrots Zucchini Flavorful Dish

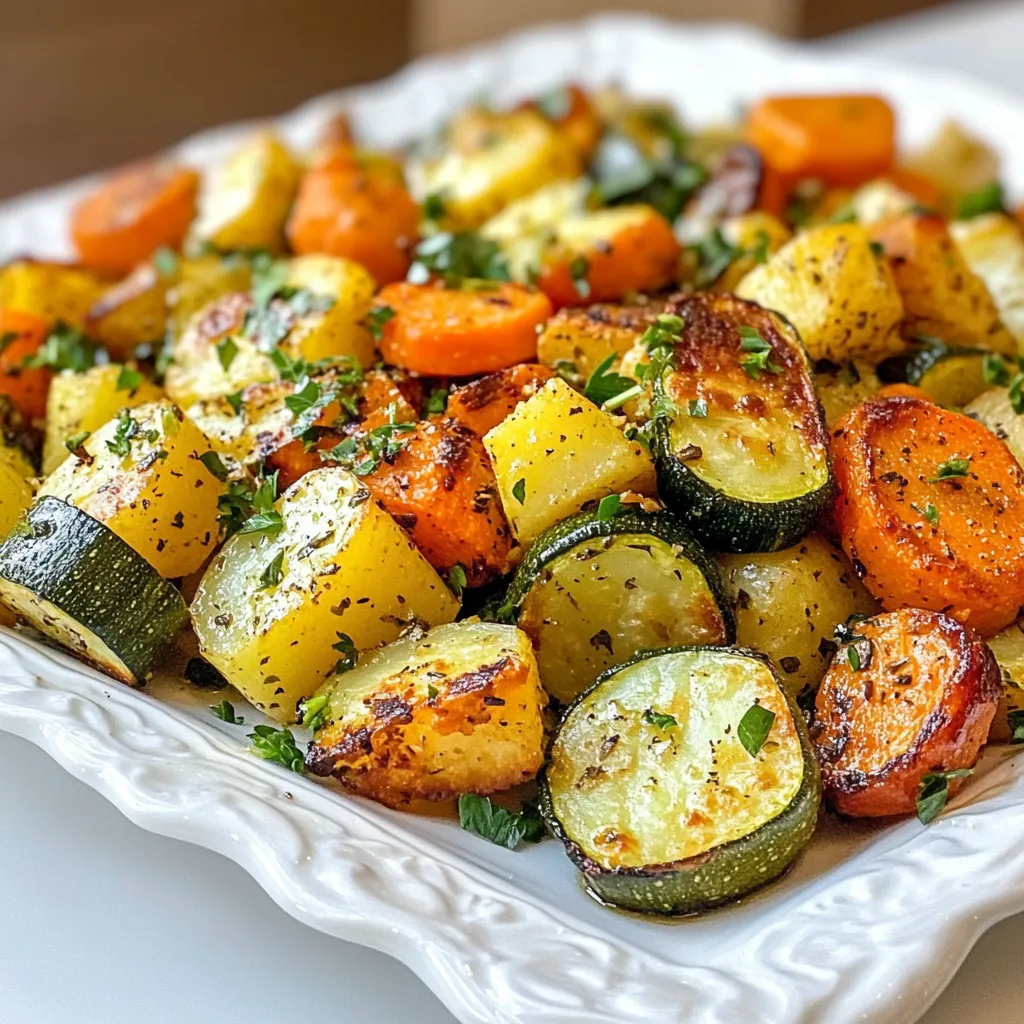
If you’re searching for a simple yet delicious side dish, look no further! Herb roasted potatoes, carrots, and zucchini are

- 12 oz rigatoni pasta - 2 tablespoons olive oil - 1 medium onion, finely chopped - 3 garlic cloves, minced - 1 can (28 oz) crushed tomatoes - 1 teaspoon dried basil - 1 teaspoon dried oregano - ½ teaspoon red pepper flakes (optional) - Salt and pepper to taste - Fresh basil leaves, for garnish - Grated Parmesan cheese, for serving The main ingredients for this dish are simple yet flavorful. Rigatoni pasta is the star. It holds sauce well and gives a nice bite. Olive oil adds richness, while onion and garlic bring great aroma. Crushed tomatoes form the base of the marinara sauce. Dried basil and oregano add classic Italian flavor. You can adjust the salt and pepper to your taste. - ½ teaspoon red pepper flakes - Fresh basil leaves - Grated Parmesan cheese Optional ingredients can elevate your dish. Red pepper flakes add heat if you like spice. Fresh basil leaves give a burst of fresh flavor. Grated Parmesan cheese adds a salty finish and creaminess. You can mix and match these toppings based on what you enjoy. {{ingredient_image_1}} To start, fill a large pot with water and add a generous amount of salt. This makes the pasta taste better. Bring the water to a rolling boil. Once it boils, add 12 ounces of rigatoni pasta. Cook it according to the package instructions. Aim for al dente, which means the pasta should still have a slight bite. This usually takes about 10-12 minutes. When ready, drain the pasta and save about 1 cup of the water. Set the pasta aside for later. Next, grab a large skillet and heat it over medium heat. Pour in 2 tablespoons of olive oil. Wait until the oil is hot, then add the finely chopped onion. Sauté the onion for about 4-5 minutes. You want it to become soft and a bit transparent. After that, stir in 3 minced garlic cloves. Cook for just 1 more minute. You should smell the garlic's rich aroma. Now, it’s time for the marinara sauce. Pour in one 28-ounce can of crushed tomatoes. Stir well to combine. Next, add 1 teaspoon of dried basil, 1 teaspoon of dried oregano, and ½ teaspoon of red pepper flakes if you like a bit of heat. Bring the sauce to a gentle simmer. Let it cook for 10-15 minutes, stirring every few minutes. At the end of this time, season with salt and pepper to your taste. Once the sauce is ready, add the cooked rigatoni to the skillet. Toss the pasta gently with the sauce, ensuring every piece gets coated. If the sauce seems thick, add some of the reserved pasta water. This helps thin it out to your desired consistency. Cook everything together for 2-3 minutes. This allows the pasta to soak up the sauce's flavors. - Salt Tips for Boiling Water: Always add salt to your boiling water. This step enhances the pasta's flavor. Use about 1 tablespoon of salt for every 4 quarts of water. It is key for great-tasting pasta. - How to Achieve Al Dente: Cook your rigatoni until it is firm but not hard. This is called al dente. Check the package for the cooking time. Start tasting it a minute or two before the time is up. - Tips for Fresh Herbs Usage: Fresh basil adds a nice touch. Chop it and add it at the end for a bright flavor. This keeps the herb fresh and aromatic. You can also use dried herbs if fresh ones are not available. - Secrets for a Richer Marinara Flavor: For a deeper taste, let your sauce simmer longer. This helps all the flavors mix well. A bit of sugar can balance the acidity from the tomatoes too. - Best Pairings with Rigatoni Marinara: Serve your rigatoni with a side salad or garlic bread. These sides complement the meal perfectly. A light red wine can also enhance your dining experience. - Plating Ideas for Presentation: Use a large bowl for family style or individual plates for a special touch. Top with fresh basil and a sprinkle of Parmesan cheese. It makes the dish look as good as it tastes! Pro Tips Use High-Quality Tomatoes: Opt for San Marzano or other high-quality canned tomatoes for a richer flavor in your marinara sauce. Don't Skip the Pasta Water: The starchy pasta water helps to bind the sauce and pasta, giving it a silky texture. Adjust Spice Levels: Feel free to modify the red pepper flakes according to your heat preference; start with a small amount and add more if desired. Fresh Herbs Make a Difference: Add fresh basil just before serving for a burst of flavor that elevates the entire dish. {{image_2}} Adding vegetables can make your rigatoni marinara more colorful and healthy. You can use classic vegetables like bell peppers, zucchini, or mushrooms. If you want fresh flavors, try seasonal veggies like asparagus in spring or spinach in winter. Just chop them up and toss them in with the onion and garlic. This will add taste and texture to your meal. If you want to make your dish heartier, consider adding protein. Cooked chicken or Italian sausage works well with marinara sauce. Just slice or crumble the meat and sauté it with the onions. This not only adds flavor but also makes the meal more filling. You can also use shrimp for a twist on this classic dish. While marinara is a classic, you can explore other sauces too. Try a creamy Alfredo for a rich taste or a pesto for a fresh vibe. Both pair well with rigatoni. You can even mix sauces, like combining marinara with pesto for a unique flavor. Experimenting with sauces can lead to exciting new meals! To keep your rigatoni marinara fresh, store it in an airtight container. Make sure to cool it down first. Leftovers last up to four days in the fridge. Label the container with the date. This helps you remember when you made it. You can freeze rigatoni marinara for up to three months. Divide it into portions for easy thawing. Use freezer-safe bags or containers. To freeze, let it cool completely before sealing. To thaw, place it in the fridge overnight. For best flavor and texture, reheat on the stove. Add a splash of water or extra olive oil while warming. Stir often to heat evenly. You can also microwave it, but check every minute to avoid overcooking. Enjoy your meal just like when you first made it! To make this dish gluten-free, choose gluten-free rigatoni. Many brands offer pasta made from rice or corn. These options cook well and taste great. Just follow the package instructions for cooking times. This way, you can enjoy rigatoni marinara without gluten. Yes, you can use other pasta types. Penne, farfalle, or even spaghetti work well. Each shape offers a unique texture. Just make sure to adjust the cooking time based on the pasta you choose. This keeps your meal tasty and fun. If you lack crushed tomatoes, try using diced tomatoes or tomato puree. Both options provide a similar flavor. You can also blend whole tomatoes for a smooth texture. This keeps your marinara sauce rich and delicious. Leftovers will last about three to five days in the fridge. Store them in an airtight container. To enjoy the meal later, reheat on the stove or in the microwave. This keeps the flavors fresh and enjoyable. This blog post covered all aspects of making rigatoni with marinara sauce. You learned about the key ingredients, step-by-step preparation, and helpful tips to enhance the dish. Variations allow you to customize your meal, while storage info ensures your leftovers stay fresh. Experiment with different herbs, proteins, or sauces to find your favorite twist. Cooking should be fun and flavorful, so enjoy every step in the process! With practice and creativity, you can create a delicious meal every time.

Weeknight Rigatoni Marinara Simple and Tasty Meal

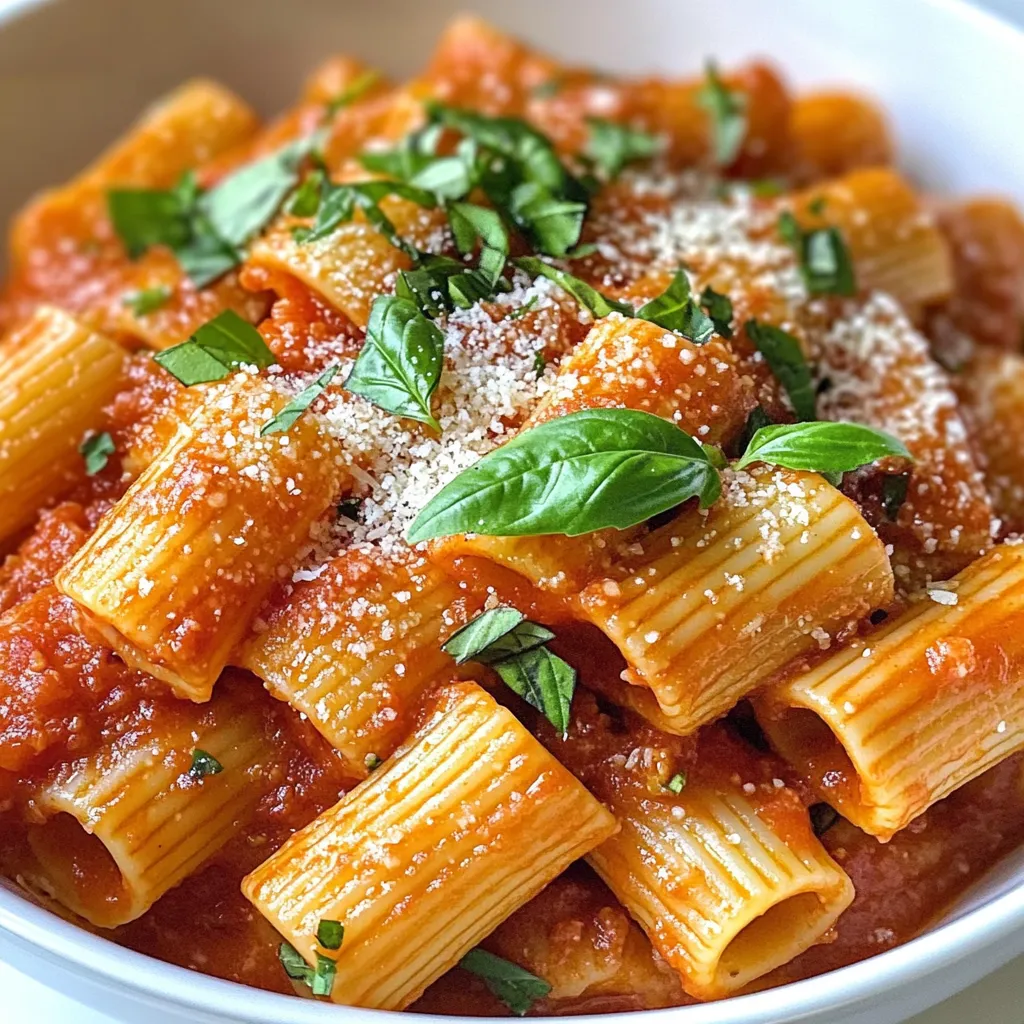
Busy weeknights don’t have to mean bland dinners! With my simple Weeknight Rigatoni Marinara recipe, you can whip up a

Newer posts
← Previous Page1 … Page123 Page124

dsad

© 2025 Southern Dishes • Built with GeneratePress

Our Policies

  • Copyright Policy
  • Cookie Policy
  • GDPR Policy
  • Privacy Policy
  • Disclaimer
  • Terms Of Use

More Information

  • Home
  • About
  • Contact
  • Appetizers
  • Dessert
  • Dinner
  • Drinks
©2025, Southern Dishes About Back To Top