Skip to content
DisclaimerTerms Of UseGDPR PolicyCookie Policy

Southern Dishes

  • Home
  • Drinks
  • Appetizers
  • Dinner
  • Dessert
  • About
  • Contact
  • Privacy Policy
DisclaimerTerms Of UseGDPR PolicyCookie Policy

Isabella

To make this tasty treat, gather these simple ingredients: - 1 package (14 oz) graham crackers - 2 cups heavy cream - 1 cup powdered sugar - 1 teaspoon vanilla extract - 1 package (3.4 oz) instant vanilla pudding mix - 2 cups milk - 2 medium apples, peeled and diced - 1 cup caramel sauce (store-bought or homemade) - 1 teaspoon cinnamon - 1/2 cup chopped nuts (walnuts or pecans, optional) You can switch things up with these fun extras: - Add chocolate chips for a sweet twist. - Use different nuts like almonds or hazelnuts. - Swap apples for pears for a new flavor. If you have dietary needs, here are some easy swaps: - Use dairy-free cream for a vegan option. - Replace milk with almond or oat milk. - Choose gluten-free graham crackers for a gluten-free version. This recipe remains flexible and delicious, allowing you to enjoy it your way! {{ingredient_image_1}} Start by grabbing a large mixing bowl. Pour in two cups of heavy cream. Use a hand mixer to whip the cream until you see soft peaks. Now, add one cup of powdered sugar and one teaspoon of vanilla extract. Keep mixing until stiff peaks form. In another bowl, combine one package of instant vanilla pudding mix with two cups of milk. Whisk this mixture until it is smooth and slightly thick. Next, gently fold the whipped cream into the pudding mixture. Make sure it blends well without losing volume. This cream will be the star of your cake! Now, take a 9x13 inch baking dish. Start with a layer of graham crackers at the bottom. Cover them well, so they form a solid base. On top of the graham crackers, spread half of your cream mixture evenly. Then, sprinkle half of the diced apples across the cream. Drizzle some caramel sauce over the apples. Don't forget a dash of cinnamon for extra flavor! Next, add another layer of graham crackers. Repeat the process with the remaining cream mixture, the rest of the apples, and more caramel sauce. Finish with a final layer of graham crackers on top. Cover your dish tightly with plastic wrap. Place it in the fridge for at least four hours. For the best taste, let it chill overnight. This time helps the flavors blend and the graham crackers soften. When you're ready to serve, drizzle more caramel sauce on top. You can also sprinkle with chopped nuts if you like. This dessert tastes even better when it's cold and the flavors are fully developed! Whipping cream is simple but needs some care. Start with cold heavy cream. Cold cream whips better and faster. Use a large bowl to avoid splatters. Beat the cream with a mixer on medium speed. Gradually add powdered sugar and vanilla. Stop when you see stiff peaks. This means your cream is ready. Don’t overwhip it; it can turn into butter. Choosing apples is key for this dessert. Look for firm apples that are crisp. Granny Smith apples add a nice tartness. Honeycrisp offers sweetness, which balances well. Always peel and dice your apples before adding them. This helps them mix well with the other flavors. Fresh apples give the best taste, so pick ones that are in season. Some things can go wrong when making this cake. If your whipped cream is too runny, it may need more whipping. Check if you added enough sugar. If the layers slide apart, let the cake chill longer. This helps it set up better. If you don’t have enough caramel, add more when serving. A drizzle on top always makes it look great. Pro Tips Use Cold Ingredients: Make sure your heavy cream and milk are cold for better whipping and a creamier texture. Chill Overnight: For the best flavor and texture, allow the cake to chill overnight. This lets the graham crackers soften perfectly. Customize Your Apples: Experiment with different apple varieties like Granny Smith for tartness or Fuji for sweetness to suit your taste. Add a Crunch: For added texture, consider mixing in some crushed nuts into the cream layers or sprinkling them on top before serving. {{image_2}} To make a chocolate version, swap some ingredients. Use chocolate graham crackers instead of regular ones. You can also add chocolate pudding mix in place of vanilla. This gives the dessert a rich, chocolatey twist. Drizzle chocolate sauce along with the caramel. It will be a chocolate lover's dream! For a gluten-free dessert, choose gluten-free graham crackers. Check the label to ensure they fit your needs. You can also use almond flour or coconut flour for a different flavor. This way, everyone can enjoy the cake without worry. The taste remains just as delightful! If you want a vegan option, use plant-based milk, like almond or oat milk. Instead of heavy cream, whip coconut cream for the filling. Replace eggs with a vegan pudding mix. You can also find vegan caramel sauce at stores. These changes keep the dessert creamy and tasty! To keep your Caramel Apple Éclair Cake fresh, cover it tightly with plastic wrap. This helps prevent air from drying it out. Store it in the fridge for up to five days. If you notice any change in texture or smell, it’s best to toss it. You can freeze this cake if you want to prepare it early. Make the cake but skip the final layer of graham crackers and toppings. Wrap the cake well in plastic wrap and foil. Freeze it for up to three months. When ready to eat, thaw it in the fridge overnight. Add the last layer and toppings just before serving. The cake stays fresh in the fridge for about five days. If you freeze it, it keeps for three months. For the best taste, I recommend eating it fresh. Always check for any signs of spoilage before serving. Enjoy your dessert while it’s at its best! Yes, you can make Caramel Apple Éclair Cake a day ahead. In fact, it tastes even better after resting. This allows the flavors to mix well. Just cover it tightly with plastic wrap. Store it in the fridge until you are ready to serve. If you don’t have graham crackers, you can use vanilla wafers or digestive biscuits. Both options work well and provide a nice texture. You can even try shortbread cookies for a richer flavor. Just remember to adjust the sweetness based on your choice. Making homemade caramel sauce is simple and fun! Here’s how: 1. In a saucepan, combine 1 cup of sugar and 1/4 cup of water. 2. Heat over medium heat until the sugar dissolves. 3. Let it boil without stirring until it turns a golden color. 4. Remove it from heat and carefully add 1/2 cup of heavy cream. 5. Stir until smooth. Let it cool before using. This sauce adds a delicious touch to your dessert! You’ve learned how to make a delicious caramel apple éclair cake. We covered ingredients, steps, and various tips to ensure your cake turns out perfectly. You can mix it up with different flavors or dietary options. Remember to store leftovers well to keep them fresh. I hope you feel ready to try this fun recipe. Enjoy baking and sharing this tasty treat!

Caramel Apple Eclair Cake Irresistible Dessert Delight

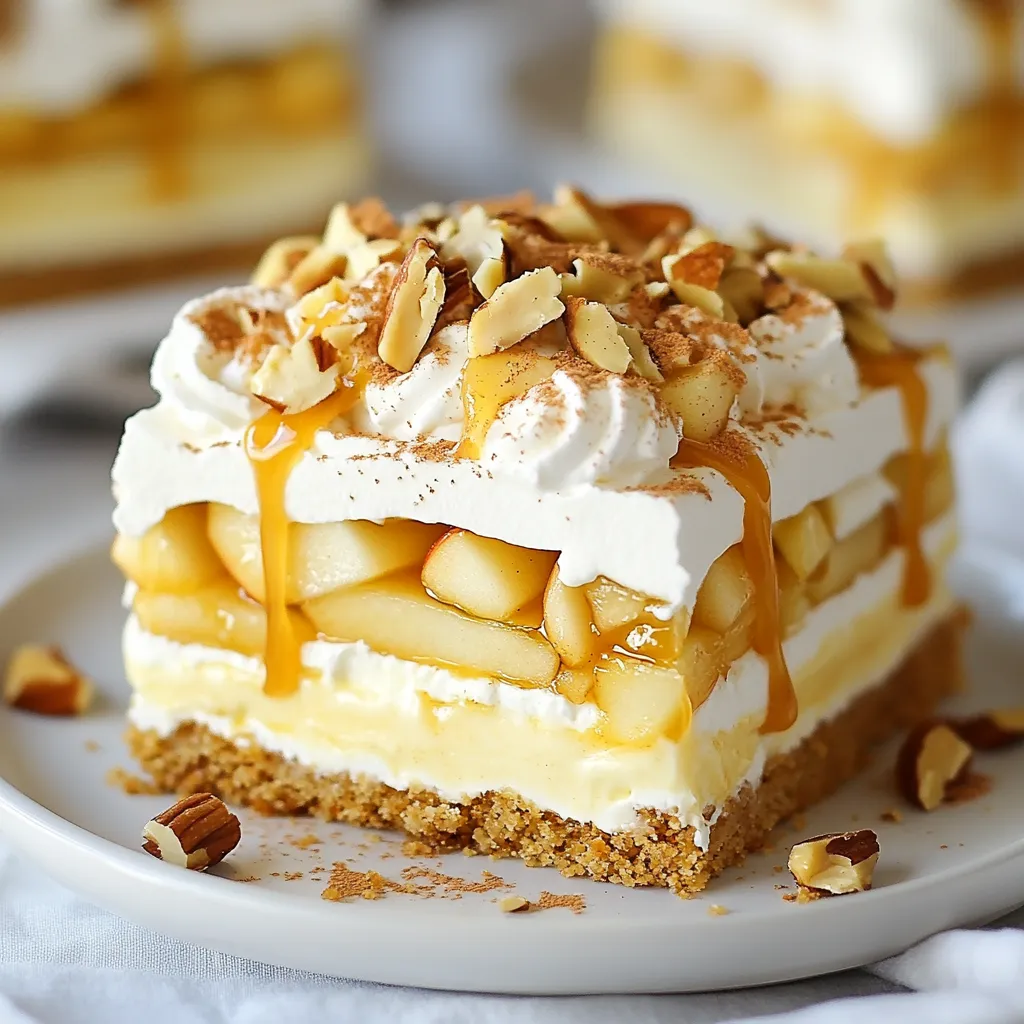
If you crave a dessert that packs a flavor punch, look no further than the Caramel Apple Eclair Cake. This

For this creamy pesto chicken skillet, you will need: - 2 boneless, skinless chicken breasts - 1 tablespoon olive oil - Salt and pepper to taste - 1 cup heavy cream - ½ cup prepared pesto sauce - 1 cup cherry tomatoes, halved - 1 cup fresh spinach - ½ cup grated Parmesan cheese - ½ teaspoon garlic powder - ½ teaspoon Italian seasoning - Fresh basil leaves for garnish This list gives you all you need for a flavorful meal. Each ingredient plays a key role in making the dish rich and tasty. You can use fresh or store-bought pesto. Fresh pesto has bright flavors from basil and garlic. It adds a nice depth to the dish. If time is short, store-bought pesto works well too. Just pick one that has good quality ingredients. Check labels for added preservatives. You can switch out some ingredients if needed. Here are a few ideas: - Use chicken thighs instead of breasts for extra juiciness. - Swap heavy cream for Greek yogurt for a lighter version. - If you don’t have cherry tomatoes, any ripe tomato will do, just chop it up. - For a dairy-free option, use coconut milk and nutritional yeast instead of cheese. Feel free to customize the recipe to your taste! Each change can make this dish your own. {{ingredient_image_1}} Start by seasoning the chicken breasts. Use salt, pepper, garlic powder, and Italian seasoning. Make sure to coat both sides well. This step adds great flavor. Heat a large skillet over medium heat. Add one tablespoon of olive oil. Once the oil is hot, place the seasoned chicken in the skillet. Cook for 5-7 minutes on each side. You want a nice golden brown color. When done, remove the chicken and set it aside. In the same skillet, pour in one cup of heavy cream. Add half a cup of prepared pesto sauce. Stir the mixture well. Let it simmer gently. After a minute, add one cup of halved cherry tomatoes. Cook them for about 2 minutes. They should soften up nicely. Now, stir in one cup of fresh spinach. Cook until the spinach wilts, which takes about 1-2 minutes. Finally, reduce the heat to low. Add half a cup of grated Parmesan cheese. Stir until it melts and blends into the sauce. Return the chicken breasts to the skillet. Spoon the creamy pesto sauce over them. Let everything cook together for another 2-3 minutes. This will heat the chicken through. Once done, remove from heat. Garnish with fresh basil leaves. Serve the creamy pesto chicken on a plate. Drizzle extra sauce on top for added flavor. Enjoy your savory dinner delight! To keep chicken tender, start with fresh meat. Use boneless, skinless chicken breasts for best results. Season the chicken with salt, pepper, garlic powder, and Italian seasoning. Let it rest for a few minutes after seasoning. This helps the flavors soak in. Cook the chicken in a hot skillet with olive oil. This creates a nice sear. Cook for 5-7 minutes on each side. Use a meat thermometer to check for doneness. The internal temperature should reach 165°F. Let the chicken rest for a couple of minutes before slicing. This keeps the juices inside. For a smooth, creamy sauce, use heavy cream. It blends nicely with the pesto. After adding the cream, stir until it simmers. This helps the flavors mix well. Add the grated Parmesan cheese slowly. Stir it in until it melts completely. If the sauce is too thick, you can add a splash of chicken broth. This keeps it creamy without making it too runny. Always taste the sauce before serving. Adjust the seasoning if needed. A beautiful plate makes a meal more inviting. Use fresh basil leaves for a pop of color. Sprinkle extra grated Parmesan on top for richness. For added brightness, toss in some halved cherry tomatoes. This not only looks great but adds flavor too. Serve the creamy pesto chicken on a white plate. This contrast makes the dish stand out. Pair it with garlic bread or pasta for a complete meal. Enjoy your creation and impress your family! Pro Tips Tip Title: Use Fresh Ingredients: For the best flavor, opt for fresh basil and spinach instead of dried. Fresh ingredients elevate the dish and provide a vibrant taste. Tip Title: Adjust the Creaminess: If you prefer a lighter sauce, substitute half of the heavy cream with chicken broth. This will still give you a delicious flavor without being overly rich. Tip Title: Perfectly Cooked Chicken: Use a meat thermometer to ensure your chicken reaches an internal temperature of 165°F (75°C) for safe and juicy results. Tip Title: Leftovers Storage: Store any leftovers in an airtight container in the fridge for up to 3 days. Reheat gently on the stove to maintain the creamy texture. {{image_2}} You can easily add more veggies to your creamy pesto chicken skillet. Veggies boost nutrition and flavor. Consider adding: - Zucchini, sliced thin - Bell peppers, chopped - Broccoli florets These vegetables cook fast and blend well with the creamy sauce. Just toss them into the skillet with the cherry tomatoes. This way, you get a colorful and healthy meal. If you want to switch up the protein, try these options. Each gives a new taste: - Shrimp: Cook for about 3-4 minutes until they turn pink. - Tofu: Use firm tofu, cubed and pan-fried until golden. - Turkey: Substitute turkey cutlets for a leaner option. Adjust the cooking time for each protein type. This keeps your meal exciting and tasty. You can make this dish gluten-free and dairy-free with a few swaps. For a gluten-free meal, use: - Gluten-free pasta or rice as a base. - Check the pesto ingredients for gluten. To make it dairy-free, use: - Coconut cream instead of heavy cream. - Nutritional yeast in place of Parmesan for a cheesy flavor. These options let everyone enjoy this dish, no matter their diet. After enjoying your creamy pesto chicken, let the leftovers cool. Place them in an airtight container. This helps keep the chicken fresh. Make sure to store it in the fridge. Your leftovers will last for about three days. If you want to enjoy it later, freezing is a great option. To reheat, use a skillet over low heat. Add a splash of water or cream to keep it moist. Stir gently to warm it through. You can also microwave it. Place the chicken on a safe dish and cover it. Heat in short bursts, checking often to avoid overcooking. This keeps the chicken juicy and tasty. If you plan to freeze the dish, do it soon after cooking. Let it cool completely first. Use freezer-safe containers or bags, removing as much air as possible. Label the bags with the date. Your creamy pesto chicken can stay frozen for up to three months. When ready to eat, thaw it in the fridge overnight before reheating. You can serve this dish with garlic bread or cooked pasta. Both pair well with the creamy sauce. A fresh salad with mixed greens also makes a nice side. The crunch of the salad balances the creaminess. If you want more veggies, try steamed broccoli or roasted zucchini. Yes, you can use dried pesto. However, the flavor will differ. Fresh pesto has bright, bold notes that dried pesto may lack. If you use dried, add a bit more to get good flavor. You can also mix it with oil or water to create a paste. The chicken is done when it reaches an internal temperature of 165°F. You can use a meat thermometer for an accurate reading. The chicken should be golden brown outside and no longer pink inside. If you cut it, the juices should run clear, not pink. This post covered how to make a creamy pesto chicken skillet. We discussed ingredients, cooking steps, and helpful tips. You can use fresh or store-bought pesto, and I shared great substitutions. You learned how to ensure tender chicken and creamy sauce. Plus, I offered ideas for adding nutrition and storing leftovers. Now, you have all you need to try this dish. I hope you enjoy cooking it as much as I do. Happy cooking!

Creamy Pesto Chicken Skillet Savory Dinner Delight

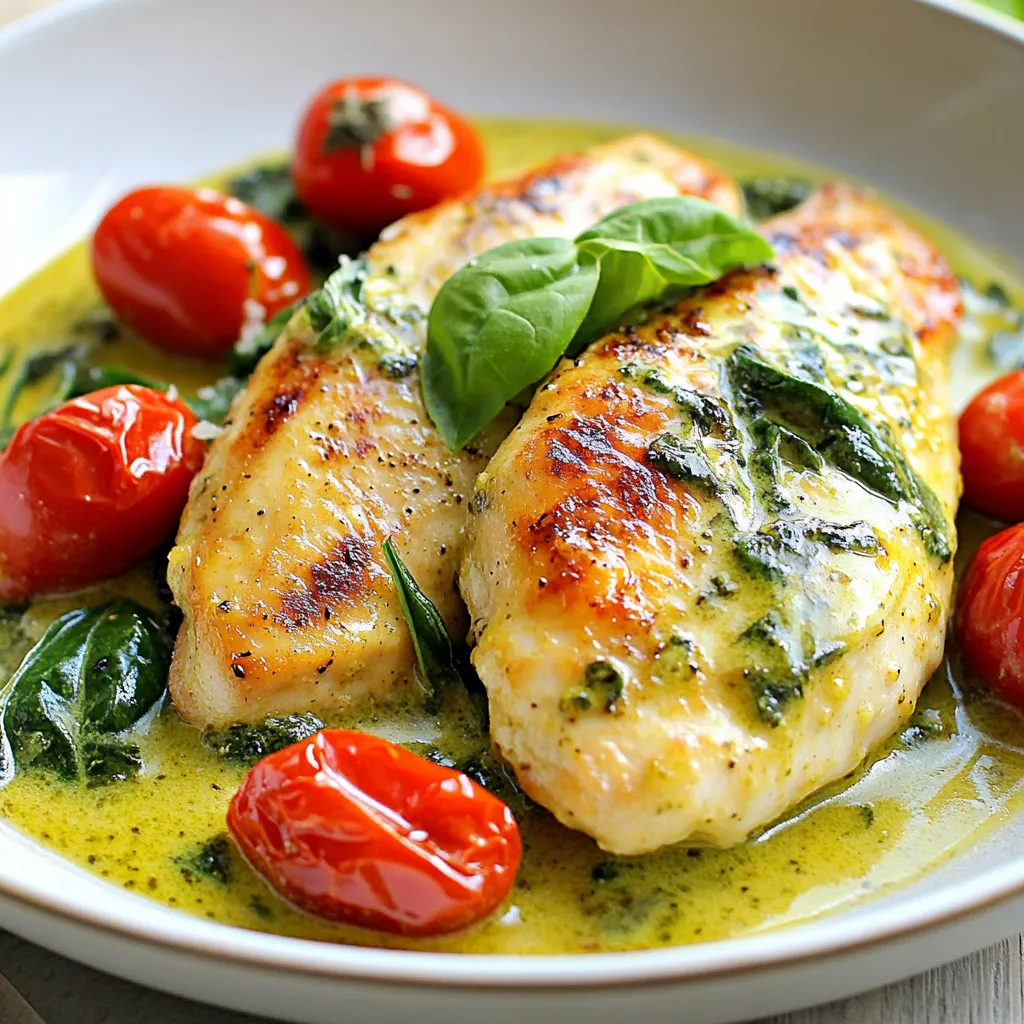
Get ready to wow your taste buds with my Creamy Pesto Chicken Skillet! This dish combines juicy chicken and rich,

To make tasty zucchini wraps, gather these simple ingredients: - 2 large zucchinis - 1 cup hummus (store-bought or homemade) - 1 red bell pepper, thinly sliced - 1 carrot, grated - 1 cucumber, thinly sliced - 1/2 cup spinach leaves - 1 tablespoon olive oil - Salt and pepper to taste - Fresh herbs (like dill or parsley) for garnish If you want to mix things up, consider these swaps: - Use eggplant instead of zucchini for a different flavor. - Swap bell peppers for thinly sliced avocado for creaminess. - Try using any leafy green, like arugula, instead of spinach. - Add a layer of cream cheese for extra richness. Choosing the right hummus makes a big difference. Here are some great brands: - Sabra offers a smooth and creamy option. - Tribe has a nice variety, including roasted red pepper. - Cedar's provides a nice organic choice. - Make your own hummus with chickpeas, tahini, and olive oil for a fresh touch. Each of these options will elevate your zucchini wraps. {{ingredient_image_1}} Start with two large zucchinis. Wash them well under cold water and dry them with a towel. Cut off both ends. Use a mandoline or a sharp knife to slice each zucchini lengthwise into thin strips. Aim for strips about 1/8 inch thick. This size will help them roll nicely. Set the strips aside on a plate or cutting board. Next, heat a non-stick skillet over medium heat. Add about one tablespoon of olive oil to the pan. Once the oil is warm, carefully add the zucchini strips. Sauté them for about 2 to 3 minutes on each side. You want them tender yet still crunchy. Season with salt and pepper to taste. After cooking, remove the strips from heat and let them cool on a plate. Once the zucchini strips are cool, lay them flat on a clean surface. Spread a layer of hummus on each strip, leaving a small border at the edges. Add layers of thinly sliced red bell pepper, grated carrot, cucumber slices, and a few spinach leaves on top of the hummus. Now, carefully roll each zucchini strip tightly from one end to the other. Make sure the fillings stay inside. Place the wraps seam side down on a platter. For a nice touch, garnish with fresh herbs like dill or parsley. Enjoy your fresh and flavorful zucchini wraps! When cutting zucchini, use a sharp knife or a mandoline. Aim for thin strips, about 1/8 inch. This helps them cook evenly and stay flexible. Always cut off both ends of the zucchini first. Then, slice lengthwise for uniformity. If you find it tricky, chill the zucchini first. Cold zucchini is firmer and easier to slice. To elevate flavor, add spices to your zucchini. Try garlic powder, smoked paprika, or cumin. Mix these into the salt and pepper you use when sautéing. Fresh herbs like dill or parsley add a burst of flavor too. Don't forget to season your hummus. A dash of lemon juice or a pinch of cayenne can make it pop. For a stunning display, use a wooden board or colorful platter. Lay the wraps seam side down to keep them tight. Drizzle a little olive oil or lemon juice on top for shine. You can also slice the wraps into bite-sized pieces for easy sharing. Garnish with fresh herbs for a touch of green and extra taste. Pro Tips Choose Firm Zucchini: Select zucchinis that are firm and slightly glossy for the best texture and flavor. Customize Your Fillings: Feel free to add other vegetables or proteins like grilled chicken or feta cheese to enhance the wraps. Use Fresh Herbs: Adding fresh herbs like basil or cilantro can elevate the flavor profile of your wraps significantly. Make Ahead: Prepare the zucchini strips and fillings ahead of time, and assemble just before serving for optimal freshness. {{image_2}} You can change the filling to suit your taste. Try adding proteins like grilled chicken, turkey, or tofu. These add a nice texture and flavor. For veggies, consider roasted red peppers, shredded cabbage, or avocado. Each option brings a new taste to your wraps. These wraps are naturally vegan and gluten-free. Use hummus made from chickpeas for a creamy base. You can swap the olive oil with avocado oil for a richer flavor. Always check labels on store-bought items to ensure they meet your diet needs. You can create different flavor profiles with just a few changes. For a Mediterranean twist, add olives and feta cheese. A dash of lemon juice brightens the taste. For an Asian-inspired wrap, use sesame oil and add sliced radishes or scallions. A bit of soy sauce or tamari can enhance the flavor too. Each variation makes these wraps fresh and exciting! To keep your zucchini wraps fresh, store them in an airtight container. Place parchment paper between the wraps to avoid sticking. This method keeps the texture intact and prevents sogginess. You can store them in the fridge for up to 3 days. If you notice any moisture, change the paper to keep them crunchy. You can freeze zucchini wraps for later use. First, wrap each one in plastic wrap. Then, place them in a freezer-safe bag. Remove as much air as possible to prevent freezer burn. When ready to eat, thaw them in the fridge overnight. Reheat in a pan for a few minutes to restore some warmth and crunch. Zucchini wraps taste best when eaten fresh. However, if you have leftovers, store them well. Always keep them in the fridge and consume them within 3 days. If you notice any change in smell or texture, it’s best to discard them. When reheating, avoid microwaves, as they can make wraps soggy. A quick sauté on the stove works better. Yes, you can make zucchini wraps ahead of time. Prepare the wraps and store them in the fridge. They stay fresh for up to two days. Just keep them in an airtight container. This saves time when you want a quick meal. If you need a hummus substitute, try avocado or cream cheese. Both options spread easily on zucchini. You can also use yogurt for a tangy taste. Each option adds a unique flavor to your wraps. Yes, zucchini wraps are very healthy. They are low in calories and high in nutrients. Zucchini provides vitamins and minerals. Plus, they are packed with fresh veggies. This makes them a great choice for a light meal or snack. To keep zucchini wraps from getting soggy, avoid using too much liquid. Sauté the strips just enough to soften them. Let them cool before adding fillings. You can also sprinkle salt on zucchini to draw out moisture before cooking. You learned about making delicious zucchini wraps. We covered key ingredients, step-by-step prep, and storage tips. You can explore many flavors and healthy options. Use these wraps at any meal for a fresh twist. Remember, with the right ingredients and techniques, you can make tasty dishes that keep well, too. Try different fillings and spices to find your favorite combination. Enjoy experimenting with this fun, healthy recipe!

Homemade Zucchini Wraps Fresh and Flavorful Delight

Looking for a fresh and tasty way to enjoy your veggies? Homemade zucchini wraps are your answer! These wraps are

- Tonic water - Lemon-lime soda - Fresh lime juice - Agave syrup or honey - Spirulina powder - Fresh blueberries - Fresh mint leaves - Ice cubes Glow Worm Soda shines bright with its fun and vibrant colors. Each ingredient plays a key role in making this drink special. Let’s break down what you need to create this refreshing treat. - Tonic water: This gives the soda its unique glow. The quinine in tonic water makes it sparkle and adds a slight bitterness. - Lemon-lime soda: This adds sweetness and a fizzy kick. It balances the bitterness of tonic water well. - Fresh lime juice: Use fresh lime juice for a zesty flavor. It brings brightness to the drink. - Agave syrup or honey: This sweetens the drink naturally. Choose agave for a vegan option, or honey if you prefer. - Spirulina powder: This superfood gives the drink its green color. A little goes a long way! - Fresh blueberries: These are not just for garnish; they add a burst of flavor and color. - Fresh mint leaves: Mint adds a refreshing touch. Plus, it looks pretty! - Ice cubes: These keep your drink chilled and refreshing. Gather these ingredients, and you are ready to enjoy a colorful and delightful drink! {{ingredient_image_1}} To start, grab a large mixing bowl or pitcher. This is where we will make our soda. Make sure it is clean and dry. Next, measure out your ingredients. You will need: - 1 cup tonic water - 1 cup lemon-lime soda - 2 tablespoons fresh lime juice - 1 tablespoon agave syrup - 1 teaspoon spirulina powder - 1/4 cup fresh blueberries - Fresh mint leaves - Ice cubes Having everything ready will make mixing easier and faster. Now, combine the tonic water and lemon-lime soda in your mixing bowl. Gently stir them together. Be careful not to stir too hard. We want to keep the fizz! Next, add the fresh lime juice and agave syrup. Stir again until everything blends nicely. This mix will be the base of your Glow Worm Soda. Time to make it glow! Gradually sprinkle in the spirulina powder while stirring. This gives your drink a vibrant green color. Keep mixing until the color is even. You can add more spirulina if you want a deeper green. Just remember to stir gently to keep the bubbles. Now we are ready to serve! Fill your glasses with ice cubes first. This keeps your drink cold and refreshing. Pour the Glow Worm mixture over the ice. Fill the glasses until they are full. For the final touch, garnish each glass with fresh blueberries and a few mint leaves. This adds a nice pop of color and flavor. Enjoy your beautiful and colorful Glow Worm Soda! To make Glow Worm Soda just right for you, taste is key. If you want it sweeter, add more agave syrup or honey. For a tangy twist, add more fresh lime juice. Both changes can brighten the drink. If you prefer a different sweetener, try maple syrup or stevia. These can give you a unique flavor while keeping it fun. Presentation matters when serving Glow Worm Soda. Use tall, clear glasses to show off the drink's vibrant color. Add ice cubes before you pour the soda to keep it cool. For garnishing, fresh blueberries and mint leaves work great. They not only look pretty but also add a burst of flavor. Skewering a few blueberries on a toothpick can add some flair too. The tonic water is a must for that magical glow. Its quinine reacts with the light, making it shine. If you want a more intense glow, adjust the spirulina powder. Start with a teaspoon and add more until you get the color you like. Just remember that too much can change the taste, so go slow. Pro Tips Chill Your Ingredients: For the best flavor and refreshing experience, ensure your tonic water and lemon-lime soda are well-chilled before mixing. This helps maintain carbonation and enhances the overall taste. Balance the Sweetness: Adjust the amount of agave syrup or honey based on your preference for sweetness. You can start with less and add more after tasting to ensure it’s just right! Spirulina Tips: When adding spirulina powder, mix it in gradually to avoid clumping. This ensures an even color distribution throughout your drink. Garnish Creatively: Feel free to experiment with different garnishes! Slices of lime or lemon, edible flowers, or even other berries can add visual appeal and flavor to your Glow Worm Soda. {{image_2}} You can change the flavor of Glow Worm Soda by using flavored tonic water. Try elderflower or cucumber tonic for a unique twist. These options add a fresh taste that pairs well with the lime. Adding fresh fruits or herbs can also enhance the drink. Slices of kiwi or strawberries bring sweetness and color. You can even toss in some basil or rosemary for an herbal note. These little changes make your drink special. Creating mocktail versions of Glow Worm Soda is simple and fun. Use the same recipe, but switch out the lemon-lime soda for flavored sparkling water. This keeps it light and refreshing. For a creative presentation, use fancy glasses or colorful straws. You might add ice cubes made from fruit juice. This keeps your drink cool and makes it look great. You can adapt Glow Worm Soda for different seasons. In summer, add lots of fresh berries and citrus slices. In winter, use pomegranate seeds and mint for a festive touch. Incorporating seasonal fruits makes the drink even tastier. Think peaches in summer or oranges in winter. These options show off the beauty of each season. To keep Glow Worm Soda fresh, store any leftovers in the fridge. Use a tightly sealed container to keep the fizz. This method helps maintain the taste and carbonation. If you leave it open, it loses its sparkle fast. Enjoy the soda within two days for the best flavor. You can prepare Glow Worm Soda in advance. Mix the tonic water and lemon-lime soda ahead of time. Add the lime juice and agave syrup just before serving. This keeps the drink fizzy. If you add spirulina too early, it may settle. For best results, serve immediately after mixing. Glow Worm Soda is a fun and fizzy drink. It combines tonic water and lemon-lime soda. The drink gets its unique color from spirulina powder, a green algae. When you mix these ingredients, you create a vibrant, refreshing beverage. It’s perfect for parties or a hot day. The bubbles and bright color make it stand out. Glow Worm Soda has some health benefits. Tonic water contains quinine, which may aid digestion. Lemon-lime soda adds a sweet and tangy flavor. Fresh lime juice gives vitamin C, boosting your immune system. Agave syrup or honey offers natural sweetness. Spirulina adds nutrients like protein and antioxidants. Blueberries are rich in vitamins and fiber. Overall, it’s a tasty drink with a few healthy perks. You can find Glow Worm Soda ingredients in many stores. Look for tonic water and lemon-lime soda in the beverage aisle. Fresh limes and blueberries are usually in the produce section. Agave syrup or honey can be found near sweeteners. Spirulina powder may be in health food stores or online. You can also order ingredients from grocery delivery services. Yes, you can make Glow Worm Soda without spirulina. If you skip it, the drink will lose its bright color. You can use food coloring for a similar effect. Another option is to add fresh herbs like mint for a twist on flavor and color. You can also try other natural color sources, like beet juice or carrot juice. Adjust the recipe to fit your taste! In this article, I covered how to make Glow Worm Soda from start to finish. We explored the ingredients, step-by-step instructions, and even tips to enhance your drink. Remember, you can adjust sweetness and presentation to fit your taste. This refreshing soda can be a fun treat any time of year. With its vibrant color and flavors, it’s perfect for gatherings or as a daily refreshment. Now, go ahead and mix up your own Glow Worm Soda and enjoy the experience!

Glow Worm Soda Refreshing and Colorful Beverage Delight

Are you looking for a drink that’s as fun to make as it is to sip? Glow Worm Soda is

- 12 oz linguine or spaghetti - 1 pound shrimp, peeled and deveined - 1 pound mussels, cleaned - 1 cup scallops - 4 garlic cloves, minced - 1 medium onion, chopped - 1 bell pepper (red or green), diced - 1 cup cherry tomatoes, halved The base of this dish starts with pasta. You can use linguine or spaghetti. I prefer linguine for its shape. Next, choose your seafood. I like a mix of shrimp, mussels, and scallops. This mix gives great taste and texture. Don’t forget the fresh produce! Garlic adds depth. Onion and bell pepper bring sweetness. Cherry tomatoes add a burst of freshness. - 1 tablespoon Cajun seasoning - 1 teaspoon smoked paprika - Salt and pepper to taste Cajun seasoning packs a punch. It brings warmth and flavor. I always add smoked paprika for a hint of smoke. Salt and pepper balance the dish. - Fresh parsley - Lemon wedges Garnishing your plate makes it pop. Fresh parsley adds color and freshness. Lemon wedges give a zesty touch. Squeeze them on right before you eat! {{ingredient_image_1}} - Boil 12 oz of linguine or spaghetti in salted water. - Cook until al dente, about 8-10 minutes. - Drain the pasta and set it aside. - Heat 3 tablespoons of olive oil in a large skillet over medium heat. - Add 1 medium chopped onion and 1 diced bell pepper. - Sauté for 3-4 minutes until softened. - Stir in 4 minced garlic cloves and cook for 1 more minute. - Add 1 pound of shrimp, 1 pound of cleaned mussels, and 1 cup of scallops to the skillet. - Sprinkle with 1 tablespoon of Cajun seasoning and 1 teaspoon of smoked paprika. - Season with salt and pepper to taste. - Pour in 2 cups of vegetable broth and add 1 cup of halved cherry tomatoes. - Bring to a simmer. Cook until mussels open and shrimp turn pink, about 5-7 minutes. - Toss the cooked pasta into the skillet with the seafood mixture. - Gently combine everything for 2-3 minutes to heat through. - Remove from heat and garnish with fresh chopped parsley. - Serve with lemon wedges for a zesty touch. Timing for Shellfish Cooking seafood, like shrimp and mussels, is quick. Shrimp cooks in about 2-3 minutes. Mussels take around 5-7 minutes. Watch closely. They are done when shrimp turns pink and mussels open. How to Avoid Overcooking Overcooked seafood gets rubbery. To prevent this, take it off heat as soon as it’s done. A quick stir and a taste test help. Pull it from the pan while it’s still tender. Additional Seasonings to Try Cajun seasoning adds a kick. For more depth, try adding a pinch of cayenne or oregano. Fresh herbs like basil or thyme can brighten the dish too. A splash of lemon juice adds freshness. Alternative Ingredients for Customization You can swap seafood. Try crab or lobster for a richer dish. For a vegetarian twist, use mushrooms or zucchini. Adding spinach or kale makes it even healthier. Best Side Dishes for Mardi Gras Seafood Pasta Garlic bread pairs well. A light salad with citrus dressing contrasts the rich pasta. Roasted vegetables can add color and flavor too. Pairing with Wine or Drinks White wine, like Sauvignon Blanc, works well. Its crispness balances the dish's richness. For non-alcoholic options, a sparkling water with lime is refreshing. Pro Tips Fresh Seafood: Always opt for fresh seafood to enhance the flavor and texture of your dish. Check for a mild ocean scent and firm texture when selecting shrimp, mussels, and scallops. Don't Overcook: Keep a close eye on your seafood while cooking. Shrimp should be pink and opaque, while mussels should open up. Overcooking can lead to a rubbery texture. Adjust Spice Levels: Feel free to adjust the amount of Cajun seasoning and smoked paprika according to your spice tolerance. Start with less and add more to taste. Garnish for Freshness: A sprinkle of fresh parsley not only adds color but also enhances the dish's flavor. Pair it with lemon wedges for a zesty kick. {{image_2}} To make your Mardi Gras seafood pasta spicy, you can add red pepper flakes or hot sauce. Start with a small amount, like half a teaspoon of red pepper flakes. Stir it in with the seafood for a nice kick. If you love heat, feel free to add more. Hot sauce can also work well. Just drizzle some on your finished dish. This gives you control over the spice level. If you want a vegetarian twist, skip the seafood. Instead, use a mix of colorful veggies. Bell peppers, zucchini, and mushrooms are great options. You can sauté them just like the seafood. Add the Cajun seasoning to keep the flavor bold. This way, you still enjoy the festive taste of Mardi Gras. For a gluten-free version, choose gluten-free pasta. Many brands offer good options that taste great. Cook the gluten-free pasta just like regular pasta. Follow the package instructions for the best results. The rest of the recipe stays the same. You can enjoy this flavorful dish without any gluten. To store your Mardi Gras seafood pasta, let it cool first. Then, place it in an airtight container. This helps keep the dish fresh. Store it in the fridge for up to three days. When you reheat, check it to ensure it’s safe to eat. You can reheat seafood pasta in a few ways. A microwave works well; just cover it to keep moisture in. Stir it halfway through to heat evenly. You can also reheat it on the stove. Add a splash of broth or water for moisture. Heat it over medium until warm. To freeze, pack the pasta in a freezer-safe container. Leave some space at the top for expansion. It will last up to three months in the freezer. To thaw, place it in the fridge overnight. For quick thawing, use the microwave on the defrost setting. After thawing, reheat as described above. To add spice, use red pepper flakes. Start with a teaspoon. Taste and add more if needed. You can also use hot sauce or Cajun seasoning for extra heat. These options give a nice kick without losing flavor. Yes, you can use frozen seafood. It saves time and is often just as good. Make sure to thaw it first. Pat it dry to avoid extra water in your dish. This keeps the pasta from becoming watery. Cooking time may change slightly, so keep an eye on it. Good sides include garlic bread and a fresh salad. Both complement the pasta well. You can also serve it with coleslaw for a crunchy texture. These options balance the rich seafood flavors and make your meal special. Yes, this dish is great for meal prep. It holds up well in the fridge. Just store it in airtight containers. Reheat it on the stove or in the microwave. You can also freeze it for later. Just remember to add fresh parsley after reheating for the best taste. Mardi Gras Seafood Pasta combines fresh seafood and vibrant flavors. This dish is not just tasty; it's fun to make. Use linguine, shrimp, and spices to create a feast. Follow the steps for a perfect outcome, and don't forget the optional garnishes. For spice lovers, try adding red pepper flakes. You can even customize it with veggies for a vegetarian option. Enjoying this meal can bring the spirit of Mardi Gras right to your kitchen. With the tips and tricks provided, you can impress anyone at your table.

Mardi Gras Seafood Pasta Flavorful and Simple Dish

Are you ready to bring the vibrant flavors of Mardi Gras to your dinner table? This flavorful and simple Mardi

- 1 cup pure pumpkin puree - 1/2 cup granulated sugar - 1/2 cup brown sugar, packed - 1/2 cup vegetable oil - 3 large eggs - 1 1/2 cups all-purpose flour - 1 teaspoon baking soda - 1/2 teaspoon baking powder - 1 teaspoon ground cinnamon - 1/2 teaspoon ground nutmeg - 1/4 teaspoon ground ginger - 1/4 teaspoon ground cloves - 1/2 teaspoon salt - 1/2 cup chopped walnuts or pecans (optional) - 1/2 cup chocolate chips (optional) To make classic pumpkin bread, you need a few key ingredients. First, pure pumpkin puree gives the bread its rich flavor and moist texture. You can use canned puree or make it fresh. Sweetness comes from granulated sugar and brown sugar, which adds depth. Next, vegetable oil helps keep the bread moist. You’ll also use three large eggs, which add structure and richness. All-purpose flour acts as the base, while baking soda and baking powder help the bread rise. Spices make this bread special. Ground cinnamon, nutmeg, ginger, and cloves create that warm, cozy taste. Don’t forget the salt; it balances the sweetness. For extra crunch, consider adding walnuts or pecans. You can also mix in chocolate chips for a sweet twist. These optional additions can make your pumpkin bread even more delightful. {{ingredient_image_1}} First, preheat your oven to 350°F (175°C). This helps your pumpkin bread bake evenly. While the oven heats, grease a 9x5 inch loaf pan. You can also line it with parchment paper. This makes it easy to remove the bread later. In a large bowl, combine 1 cup of pure pumpkin puree, 1/2 cup of granulated sugar, 1/2 cup of brown sugar, and 1/2 cup of vegetable oil. Mix until smooth. Then, add 3 large eggs one at a time. Beat well after each egg. This helps the batter become light and fluffy. In another bowl, whisk together 1 1/2 cups of all-purpose flour, 1 teaspoon of baking soda, and 1/2 teaspoon of baking powder. Add 1 teaspoon of ground cinnamon, 1/2 teaspoon of ground nutmeg, 1/4 teaspoon of ground ginger, 1/4 teaspoon of ground cloves, and 1/2 teaspoon of salt. Mixing these dry ingredients well ensures they blend evenly into the batter. Gradually add the dry mixture to the pumpkin mixture. Stir gently until just combined. Be careful not to overmix, as this can make the bread tough. If you want to add some texture, fold in 1/2 cup of chopped walnuts or pecans, and 1/2 cup of chocolate chips, if you like. Pour the batter into your prepared loaf pan. Smooth the top with a spatula for a nice finish. Bake in the preheated oven for 55-65 minutes. To check if it’s done, insert a toothpick into the center. If it comes out clean, your bread is ready. Once baked, remove the pumpkin bread from the oven. Let it cool in the pan for 10 minutes. Then, transfer it to a wire rack to cool completely. For a lovely presentation, slice the bread and serve it on a wooden board. You can dust it with powdered sugar or drizzle a cream cheese glaze for extra sweetness. Avoiding overmixing When making pumpkin bread, mix gently. Overmixing can make the bread tough. You want a soft, moist bread. Stir until just blended. A few lumps are okay. Ensuring even baking To bake evenly, place your loaf pan in the center of the oven. This allows hot air to circulate around the pan. Also, check the bread near the end of baking. Each oven is different. Use a toothpick to test for doneness. Spice variations and additions Pumpkin bread shines with spices. You can change the flavor by using more or less. Try adding allspice or cardamom for a twist. You can also mix in some vanilla extract. This adds warmth to the flavor profile. Ideal pairings and garnishing ideas Pumpkin bread tastes great on its own, but you can make it even better. Serve warm with butter or cream cheese. You can also sprinkle powdered sugar on top. For a special touch, drizzle a cream cheese glaze. It adds sweetness and looks lovely on a plate. Pro Tips Perfect Pumpkin Puree: Use pure pumpkin puree, not pumpkin pie filling, for the best flavor and consistency in your bread. Don't Overmix: Gently fold the dry ingredients into the wet ingredients to avoid a dense loaf. Overmixing can lead to tough bread. Cool Completely: Allow the bread to cool completely on a wire rack before slicing to ensure clean cuts and prevent it from becoming gummy. Add Spice to Taste: Feel free to adjust the spices according to your preference; adding more cinnamon or nutmeg can enhance the flavor profile. {{image_2}} You can make pumpkin bread healthier with a few smart swaps. Consider using alternative sweeteners. Instead of granulated sugar, try using honey, maple syrup, or stevia. These options can cut down on calories and add unique flavors. For gluten-free options, use almond flour or a gluten-free blend. This keeps the bread soft while making it safe for those with gluten sensitivities. Always check if your chosen flour works as a one-to-one substitute. Want to add a twist? Try making pumpkin spice latte bread. Just mix in a splash of brewed coffee and a little espresso powder. This gives your bread a rich, coffee flavor. You can also add dried fruits or zests. Chopped cranberries or raisins bring sweetness and texture. For a citrusy kick, mix in lemon or orange zest. These fruits make every bite bright and exciting. Pumpkin bread is perfect for the holidays. For Thanksgiving, add a touch of nutmeg and cloves to enhance the warm flavors. You can even top it with a cream cheese frosting for extra sweetness. At Christmas, try mixing in peppermint extract or crushed candy canes. This gives a festive flair that delights everyone. Each season offers a chance to create new, delicious flavors in your pumpkin bread. Store your pumpkin bread at room temperature for the best taste. Wrap it tightly in plastic wrap or foil. This keeps it fresh for a few days. If you live in a warm place, store it in the fridge. The cold can help prevent mold. Just remember, the bread may lose some of its soft texture in the fridge. To freeze pumpkin bread, first cool it completely. Wrap it in plastic wrap, then in aluminum foil. This stops freezer burn. Place it in a freezer bag for extra protection. You can freeze it for up to three months. When you're ready, take it out and thaw it in the fridge overnight. For a quick thaw, leave it at room temperature for a few hours. Pumpkin bread lasts about 3 to 5 days at room temperature. In the fridge, it lasts about a week. Look for signs of spoilage. If you see mold or if it smells sour, it’s time to toss it. A fresh loaf feels soft and moist. If it gets hard or dry, it’s no longer good. Enjoy your pumpkin bread while it's fresh! To keep pumpkin bread moist, use these tips: - Add an extra egg for richness. - Use oil instead of butter for moisture. - Mix in yogurt or sour cream for added softness. - Avoid overmixing the batter to keep the air in. - Bake at the right temperature for the right time. Yes, you can use fresh pumpkin. Here’s how: - Pick a sugar pumpkin for the best flavor. - Cut it in half and scoop out the seeds. - Roast it in the oven until soft, about 45 minutes. - Blend the cooked pumpkin until smooth. - Use this fresh pumpkin in place of the puree. If you want a vegan option, try these substitutes: - 1/4 cup applesauce for each egg. - 1/4 cup mashed banana works well too. - Use 1 tablespoon ground flaxseed mixed with 3 tablespoons water. - Silken tofu blended until smooth can also replace eggs. To check if your bread is ready, use the toothpick test: - Insert a toothpick into the center of the bread. - If it comes out clean or with a few crumbs, it’s done. - If it has wet batter on it, bake for a few more minutes. In this article, we explored the key ingredients and steps for making pumpkin bread. We covered everything from prepping your oven to mixing wet and dry ingredients. I shared tips to enhance texture and flavor, plus variations for every season. With the right storage practices, your bread will stay fresh longer. Overall, making pumpkin bread is fun and rewarding. Use this guide to create your own tasty loaf, and enjoy it with friends and family. You now have the tools for delicious success!

Classic Pumpkin Bread Tasty and Easy Recipe Guide

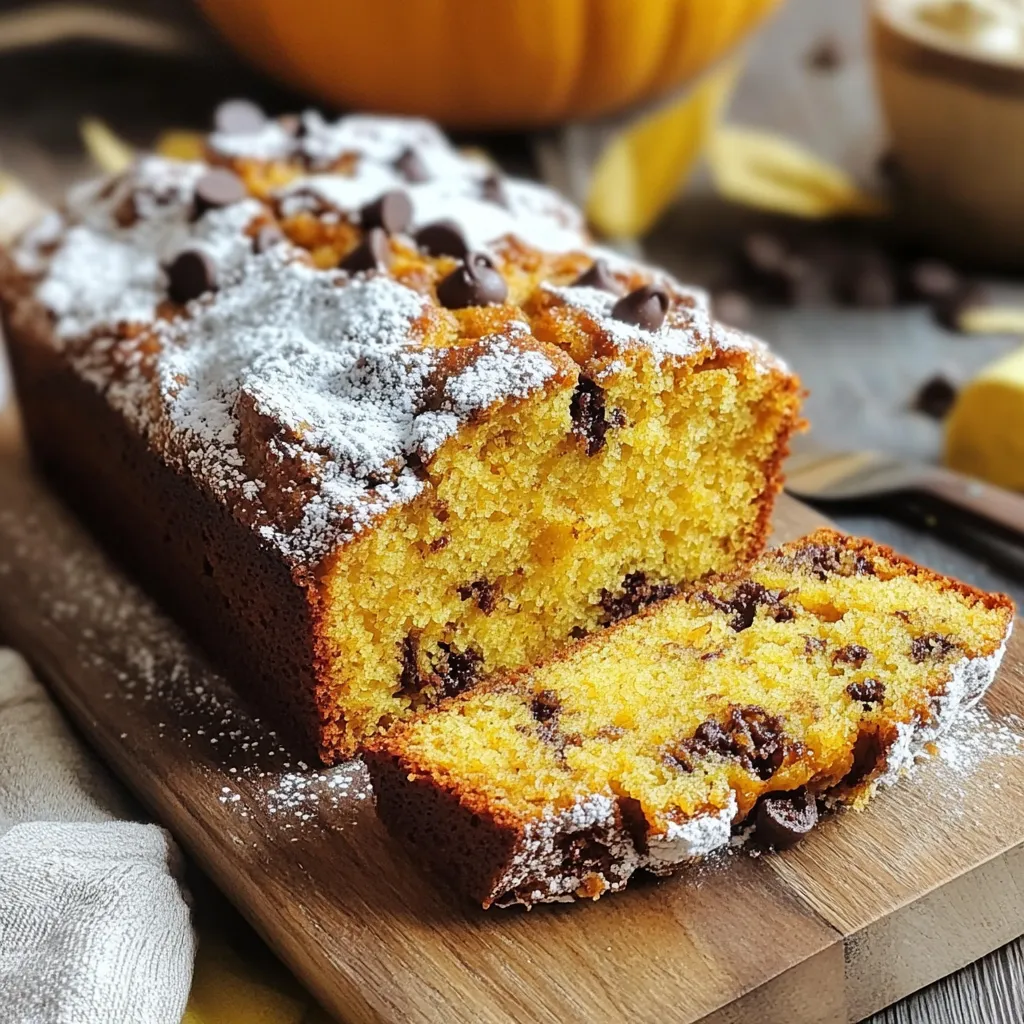
Fall is here, and what better way to celebrate than with a warm loaf of classic pumpkin bread? In this

To make Zucchini Lemon Orzo, you will need these fresh and simple ingredients: - Orzo pasta - Zucchini - Olive oil - Garlic - Vegetable broth - Lemon - Parmesan cheese (optional) - Seasonings - Garnish Each ingredient plays a key role in creating a flavorful dish. The orzo pasta gives you a nice bite, while zucchini adds texture and freshness. Olive oil brings richness, and garlic adds depth to the flavor. The vegetable broth keeps it light yet savory. The lemon brings a bright zing, balancing the dish perfectly. If you choose to add Parmesan cheese, it melts in beautifully, providing a creamy finish. You can season with salt and pepper to taste, and fresh herbs or a pinch of red pepper flakes can add a touch of flair. With these ingredients ready, you can create a dish that is not only delicious but also visually appealing. Remember, fresh ingredients make all the difference in this recipe! {{ingredient_image_1}} 1. Start by bringing a large pot of salted water to a boil. 2. Once the water boils, add 1 cup of orzo pasta. Cook it according to the package instructions until it is al dente. This usually takes about 8 to 10 minutes. 3. After cooking, drain the orzo in a colander. Set it aside while you prepare the other ingredients. 1. In a large skillet, heat 1 tablespoon of olive oil over medium heat. 2. When the oil is hot, add 2 cloves of minced garlic. Sauté it for about 1 minute until it smells great. 3. Next, add 2 medium zucchinis, diced into small pieces. Cook these for 3 to 4 minutes. Stir them occasionally until they are tender but still crisp. 4. Pour in 1 cup of vegetable broth. Bring it to a gentle simmer and let it reduce for about 2 to 3 minutes. 1. Add the drained orzo back into the skillet with the zucchini and broth mixture. 2. Squeeze in the juice of 1 lemon and add the lemon zest. If you like some heat, add a pinch of red pepper flakes. 3. Stir everything well to mix the flavors. 4. Remove the skillet from heat. If you want, toss in ¼ cup of grated Parmesan cheese. Stir until it melts and makes the dish creamy. 5. Season with salt and pepper to taste. Your Zucchini Lemon Orzo is now ready to enjoy! To make your zucchini tender, cook it just right. You want it soft but still crisp. This keeps the flavor bright. Cook the zucchini for about 3-4 minutes. Stir it often while it cooks. This way, it won’t get mushy. For the orzo, you want it al dente. This means it should have a little bite to it. Follow the cooking time on the package. After cooking, drain the orzo and set it aside. This helps keep it from getting too soft. To boost flavor, use fresh herbs like basil or parsley. You can also add a pinch of red pepper flakes for heat. Fresh lemon juice is the best choice. It gives a bright taste. Bottled lemon juice lacks the same zing. Zest the lemon for even more flavor. The zest adds a nice aroma. Pair this dish with grilled chicken or shrimp for protein. It makes a great meal. You can also serve it as a side dish. For a fun twist, try it in a lettuce wrap. Just scoop the orzo into the leaves. Top it with fresh herbs for a colorful look. This adds a nice crunch! Pro Tips Tip on Zucchini Prep: For the best texture, choose medium-sized zucchinis and avoid overcooking them; they should be tender yet crisp. Tip for Orzo Cooking: Make sure to salt your water generously when cooking orzo; it adds flavor to the pasta during cooking. Lemon Zest Usage: Use a microplane to zest the lemon, which gives you a finer texture and more intense flavor without the bitter pith. Garnishing Tips: Add fresh basil leaves just before serving to maintain their vibrant color and fresh aroma, enhancing the dish visually and in flavor. {{image_2}} You can customize this dish with various vegetables. Try adding bell peppers, cherry tomatoes, or spinach. These veggies will add color and flavor. You can also use seasonal veggies like asparagus in spring or squash in fall. The key is to keep the cooking time in mind. Softer veggies need less cooking time than the zucchini. Want to make this dish heartier? Add protein! Grilled chicken or shrimp pairs well with the fresh flavors. Simply cook the protein separately and mix it in at the end. For a vegetarian option, consider chickpeas or white beans. They add protein and a nice texture. If you're looking for a vegan version, it's simple! Omit the Parmesan cheese or use a vegan substitute. Nutritional yeast is a great option for a cheesy flavor without dairy. Also, replace the vegetable broth with water or a homemade vegetable stock. This keeps the dish light and fresh while staying vegan-friendly. Store your Zucchini Lemon Orzo in a tight container. Glass or plastic containers work well. Make sure the dish is cool before sealing. It will stay fresh in the fridge for about 3 to 4 days. Check for any signs of spoilage before eating. You can freeze Zucchini Lemon Orzo for longer storage. Let the dish cool completely before freezing. Scoop it into freezer-safe bags or containers. Flatten the bags to save space. It can last up to 2 months in the freezer. To reheat, thaw it in the fridge overnight. Warm it on the stovetop with a splash of broth. Zucchini Lemon Orzo is great for meal prep. Cook a big batch and store it for the week. You can mix it with grilled chicken or shrimp for added protein. Divide it into portions for easy lunches or dinners. Add fresh herbs or a squeeze of lemon before serving for extra flavor. Yes, you can use other pasta types. Try using penne, fusilli, or even spaghetti. Cook these according to their package instructions. Adjust the cooking time as needed. This way, you can enjoy the same great flavors with your favorite pasta shape. To make this dish gluten-free, swap out orzo for gluten-free pasta. Many brands offer great alternatives made from rice or corn. Just follow the cooking time on the package. This keeps the dish tasty and safe for those with gluten sensitivities. Leftovers are a great way to get creative! Try mixing Zucchini Lemon Orzo into a salad. You can also use it as a filling for wraps or stuffed peppers. Reheat it with a bit of broth for a quick soup. The options are endless, and it’s just as delicious the next day! This blog post covered a simple and tasty Zucchini Lemon Orzo recipe. We explored each ingredient, ensuring you have everything you need. You learned how to cook orzo and sauté zucchini, then combine them for a delicious dish. Tips and tricks helped you perfect texture and flavor, while variations opened up creative possibilities. Lastly, we discussed storage and meal prep to make your cooking life easier. Embrace these ideas and enjoy your cooking adventures!

Zucchini Lemon Orzo Flavorful and Fresh Recipe

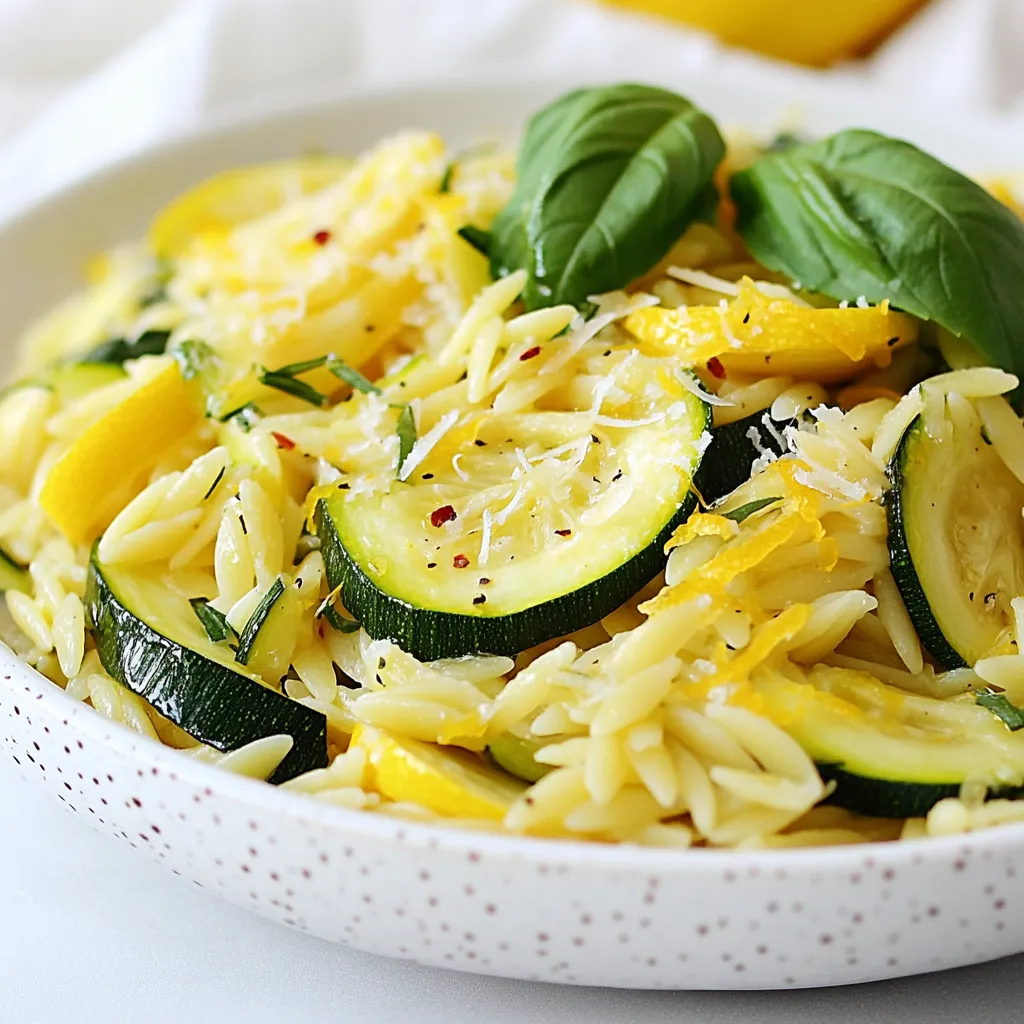
Get ready to enjoy a dish that bursts with flavor! This Zucchini Lemon Orzo recipe is fresh, easy, and perfect

- 1 ½ cups cottage cheese - 1 cup Greek yogurt - 2 tablespoons honey or maple syrup - 1 teaspoon vanilla extract - 2 teaspoons lemon juice - ¼ cup protein powder (vanilla or unflavored) - 2 tablespoons cornstarch - 2 large eggs - 1 cup almond flour (for the crust) - 2 tablespoons coconut oil, melted - 1 tablespoon sweetener (optional, adjust to taste) - Pinch of salt High-protein ingredients make this cheesecake healthy and filling. Cottage cheese packs in protein, calcium, and vitamins. Greek yogurt adds more protein and probiotics. These good bacteria help your gut. Eggs are a complete protein and provide healthy fats. Almond flour has healthy fats and fiber. It also keeps the crust gluten-free. Using protein powder boosts protein even more. You can swap ingredients easily for your needs. Use ricotta cheese if you don't like cottage cheese. Any yogurt works if Greek is not available. For sweeteners, use agave nectar or stevia. You can also try oat flour instead of almond flour for the crust. If you want a dairy-free option, use silken tofu instead of cottage cheese and yogurt. These swaps keep the recipe tasty and healthy. {{ingredient_image_1}} To make the g Protein Cheesecake, you need to gather your ingredients first. This recipe takes about 20 minutes to prep. You will also need time for baking and chilling. Plan for a total of 3 hours to enjoy this tasty dish. 1. Preheat the Oven: Start by setting your oven to 325°F (160°C). 2. Prepare the Crust: In a bowl, mix the almond flour, melted coconut oil, and a pinch of salt. Stir until it looks like wet sand. Press this mix into the bottom of a greased 9-inch springform pan. Bake it for 10-12 minutes until it turns slightly golden. Once done, let it cool. 3. Make the Filling: In a blender or food processor, add the cottage cheese, Greek yogurt, honey (or maple syrup), vanilla extract, lemon juice, protein powder, cornstarch, and eggs. Blend until smooth. Scrape down the sides if needed. 4. Combine: Pour the filling over the cooled crust. Smooth the top with a spatula. 5. Bake: Place the cheesecake in the oven. Bake for about 30-35 minutes. The edges should be set, but the center can jiggle a bit. 6. Cool Down: Turn off the oven and slightly open the door. Let the cheesecake cool inside for about 1 hour. This helps to avoid cracks. Afterward, move it to the fridge to chill for at least 2 hours or overnight for the best texture. 7. Serve: Once chilled, carefully take the cheesecake out of the springform pan. Slice it up and serve it plain or with fresh berries and a drizzle of honey for extra sweetness. - Blend Well: Make sure to blend the filling until it is very smooth. This helps create a creamy texture. - Don't Overbake: Keep an eye on the time. Overbaking can lead to cracks. - Cool Slowly: Allowing the cheesecake to cool slowly in the oven helps maintain its texture. To avoid cracks in your cheesecake, keep a few things in mind. First, don’t overmix the filling. Blend until smooth, but stop once it’s creamy. Second, bake at a low temperature. I recommend 325°F (160°C). This helps the cheesecake cook evenly. Lastly, let the cheesecake cool slowly. After baking, crack the oven door. This prevents sudden temperature changes that cause cracks. Chilling is key for a nice texture. After you bake the cheesecake, let it cool in the oven for one hour. This helps it set. Then, transfer it to the fridge. Chill for at least two hours, but overnight is best. This allows the flavors to meld. If you’re in a hurry, a quick chill in the freezer for 30 minutes can help, but it’s not as effective. For serving, keep it simple yet tasty. You can enjoy the cheesecake plain, or add toppings. Fresh berries like strawberries or blueberries add a bright flavor. Drizzle some honey or maple syrup for extra sweetness. If you want a creamy touch, add a dollop of Greek yogurt on top. These small additions can elevate your dessert and make it even more delicious! Pro Tips Choose the Right Sweetener: For a more natural taste, use honey or maple syrup. If you want to keep it low-calorie, opt for a low-calorie sweetener. Prevent Cracking: Cooling the cheesecake in the oven with the door ajar helps to prevent cracks on the surface. This gradual temperature change is essential. Texture Tip: Ensure all your ingredients, especially the cottage cheese and eggs, are at room temperature before blending for a smoother filling. Chill Time Matters: For the best flavor and texture, allow the cheesecake to chill overnight. This helps the flavors meld beautifully. {{image_2}} You can change the flavor of your cheesecake easily. Try adding cocoa powder for chocolate cheesecake. Mix in some fresh berries for a fruity twist. Just blend the berries into the filling before baking. You can also add a bit of almond extract for a nutty flavor. Each variation lets you create a new taste. If you need a gluten-free crust, use ground oats or almond flour. Almond flour works great for a nutty taste. You can also use crushed gluten-free cookies for a sweet base. Just mix them with melted coconut oil. Press the mixture into your pan as you would with regular crust. Toppings can make your cheesecake even better. For a fresh taste, add a dollop of Greek yogurt on top. You can also drizzle honey or maple syrup for sweetness. Fresh fruit like strawberries or blueberries adds color and flavor. Try a fruit sauce for a fun finish. These toppings let you customize each slice to your liking. To store leftover cheesecake, place it in an airtight container. Keep it in the fridge. This helps keep it fresh and tasty. Make sure to cover the cheesecake well. You can also use plastic wrap if you prefer. Store it for up to 5 days. You can freeze cheesecake for later. First, let it cool completely. Then, slice it into pieces. Wrap each slice in plastic wrap tightly. Place the wrapped slices in a freezer-safe bag or container. This helps prevent freezer burn. You can freeze it for up to 3 months. To eat, thaw it in the fridge overnight. The cheesecake lasts about 5 days in the fridge. After that, it may lose flavor and texture. For the best taste, eat it fresh. When freezing, ensure the cheesecake is well-wrapped. This keeps it tasting great when you thaw it. Always check for any signs of spoilage before enjoying your leftovers. The G Protein Cheesecake has about 150 calories per slice. This is based on cutting it into eight slices. Each slice gives you a healthy treat without too many calories. The lower calorie count comes from using cottage cheese and Greek yogurt instead of cream cheese. These ingredients add protein while keeping calories low. Yes, you can use different protein powders. Whether you prefer whey, plant-based, or pea protein, all work well. Just make sure the flavor matches your taste. Vanilla or unflavored protein powders are best for this recipe. They help keep the cheesecake tasting fresh and light. You can keep the cheesecake in the fridge for up to five days. Store it in an airtight container to keep it fresh. If you have any leftovers, this is a great way to enjoy more treats later. Just remember, the longer it sits, the softer the texture may become. This blog post covered the essential ingredients for a high-protein cheesecake. You learned about their benefits, common substitutions, and how they contribute to better health. We also explored detailed baking steps and key tips to ensure perfect texture. Enjoy a variety of flavors, crust options, and toppings to enhance your cheesecake. Plus, I shared the best ways to store leftovers and answered common questions. With these insights, you can create a delicious and nutritious treat that fits your needs. Enjoy baking and sharing your high-protein cheesecake!

g Protein Cheesecake Simple and Delicious Recipe

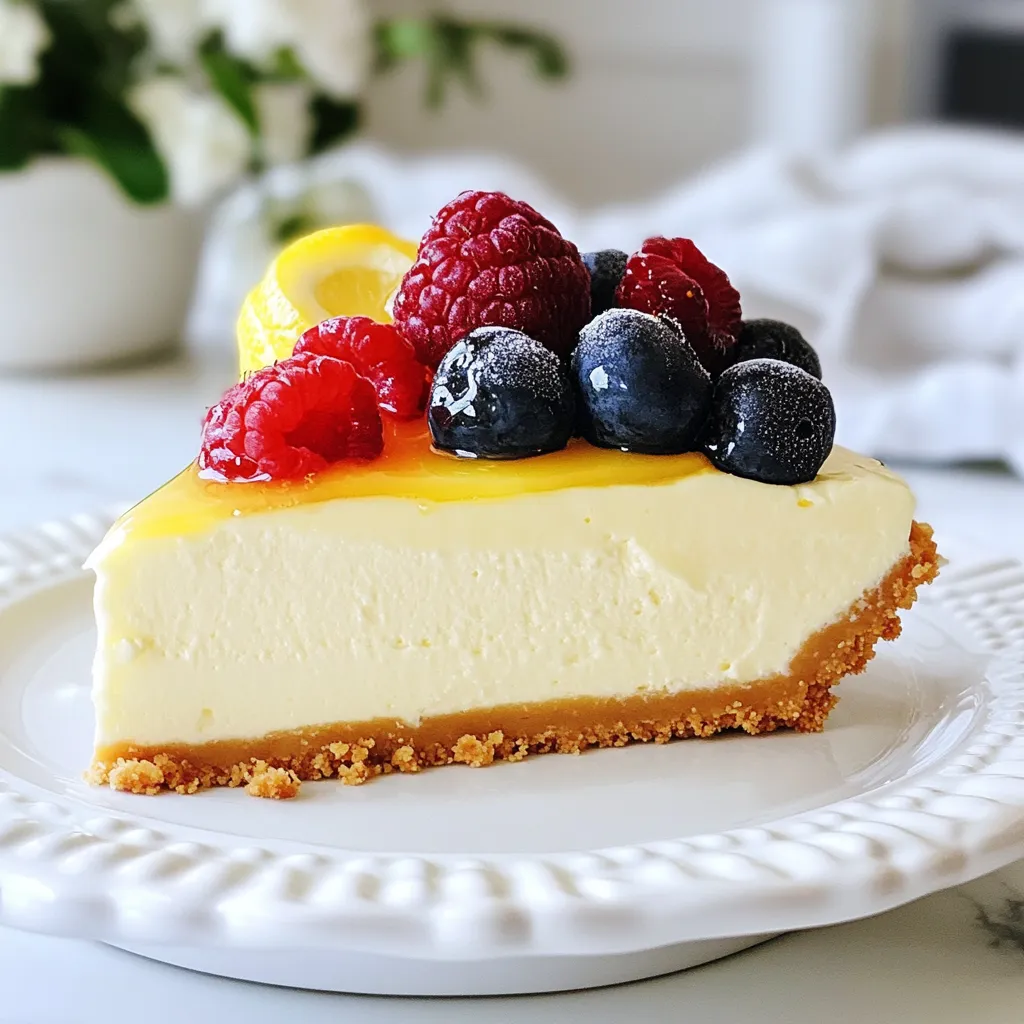
Are you ready to indulge in a dessert that’s both simple and packed with protein? This g Protein Cheesecake recipe

To make herb roasted potatoes, carrots, and zucchini, gather these simple items: - 4 medium potatoes, cubed - 3 large carrots, sliced - 2 medium zucchinis, cut into half-moons - 3 tablespoons olive oil - 2 teaspoons dried rosemary - 1 teaspoon dried thyme - 1 teaspoon garlic powder - Salt and pepper to taste - Fresh parsley, chopped (for garnish) Choose fresh vegetables for the best taste. Look for potatoes that are firm and smooth. Avoid any with green spots or sprouts. Select carrots that are bright and crisp. They should feel heavy for their size. Zucchini should be shiny and firm. If it feels soft, skip it. Fresh herbs add a lovely touch. Look for parsley that is bright green and fragrant. To add more depth to your dish, consider these optional ingredients: - 1 onion, chopped for sweetness - 1 bell pepper, cut into strips for color - 1 teaspoon paprika for a smoky flavor - A splash of balsamic vinegar for tang These extras can take your herb roasted vegetables to a new level. Mix and match based on what you enjoy! {{ingredient_image_1}} First, gather all your ingredients. You need potatoes, carrots, and zucchini. Cut the potatoes into cubes. Slice the carrots into rounds. Cut the zucchini into half-moons. This shape helps them cook evenly. Place all the chopped veggies in a large mixing bowl. Next, drizzle 3 tablespoons of olive oil over the vegetables. Toss them gently to coat each piece. This oil helps the veggies roast well and adds flavor. In a small bowl, mix 2 teaspoons of dried rosemary, 1 teaspoon of dried thyme, 1 teaspoon of garlic powder, and salt and pepper. Sprinkle this herb blend over the vegetables. Toss again to ensure even seasoning. Now, preheat your oven to 425°F (220°C). Spread the seasoned vegetables on a large baking sheet. Make sure they lay in a single layer. This helps them roast evenly. Place the sheet in the oven and set a timer for 25 to 30 minutes. Halfway through, stir the veggies to promote even cooking. Check the veggies after 25 minutes. They should be golden brown and tender. You can test them with a fork. If it goes in easily, they are done. If not, roast for another few minutes. Once ready, remove them from the oven and let cool slightly. Garnish with fresh parsley for a pop of color. Enjoy your flavorful dish! To get the best roast, keep these tips in mind: - Cut veggies into equal sizes. This helps them cook evenly. - Use enough oil to coat each piece. It adds flavor and helps them brown. - Spread veggies out in one layer. This prevents steaming and makes them crispy. - Stir halfway through cooking. This ensures even browning and crispness on all sides. Here are some mistakes that can ruin your dish: - Overcrowding the baking sheet. This steams the veggies instead of roasting them. - Not preheating the oven. This can lead to uneven cooking. - Skipping the seasoning. Herbs and spices enhance the flavor of the veggies. - Not checking for doneness. Use a fork to test if they are tender. Having the right tools makes cooking easier: - A sharp knife for cutting veggies. This saves time and effort. - A large mixing bowl for tossing ingredients. It helps mix everything well. - A baking sheet with edges. This keeps the oil and juices contained. - A spatula for stirring the veggies. This ensures even cooking and easy serving. Pro Tips Use Fresh Herbs: Whenever possible, opt for fresh herbs instead of dried for a more vibrant flavor. Cut Uniformly: Ensure all vegetables are cut to similar sizes for even cooking and roasting. Don't Overcrowd the Pan: Give the vegetables room on the baking sheet; overcrowding can lead to steaming instead of roasting. Experiment with Spices: Feel free to mix in your favorite spices or add a pinch of cayenne for some heat! {{image_2}} You can change the veggies in this dish. Try bell peppers, sweet potatoes, or broccoli. Each veggie adds its own flavor. For instance, sweet potatoes bring a hint of sweetness. Bell peppers add a nice crunch. Just cut them into similar sizes for even cooking. Herbs and spices can change the taste a lot. Instead of rosemary, try oregano or basil. A little cumin adds warmth, while smoked paprika gives a nice kick. Mix and match to find your favorite combination. Just remember to keep the balance right so one flavor doesn't overpower the others. This dish is naturally vegan and gluten-free. Use more vegetables for a heartier meal. You can also add chickpeas for protein. They roast well and add a nice texture. If you need a richer flavor, drizzle with balsamic glaze after roasting. This gives it a sweet and tangy finish that everyone will love. To keep your herb roasted potatoes, carrots, and zucchini fresh, let them cool first. Place the veggies in an airtight container. Store them in the fridge. They will stay good for about 3 to 5 days. If you want to keep them longer, freezing is a great option. When it's time to eat the leftovers, you can reheat them in a few ways. The oven works best. Preheat it to 350°F (175°C). Spread the veggies on a baking sheet and heat for 10-15 minutes until warm. You can also use a microwave. Just place them in a bowl and cover. Heat for 1-2 minutes, stirring halfway. If you want to freeze your herb roasted veggies, follow these steps. First, let them cool completely. Then, spread them out on a baking sheet in a single layer. Freeze for about 1-2 hours. Once frozen, transfer them to a freezer-safe bag or container. Label it with the date. They can last up to 3 months. When you’re ready to eat, just reheat straight from the freezer. To make herb roasted potatoes, carrots, and zucchini, start by preheating your oven to 425°F (220°C). Cube four medium potatoes, slice three large carrots, and cut two medium zucchinis into half-moons. In a large bowl, mix these vegetables. Drizzle three tablespoons of olive oil over them, ensuring they are well-coated. In a small bowl, mix two teaspoons of dried rosemary, one teaspoon of dried thyme, one teaspoon of garlic powder, salt, and pepper. Sprinkle this herb mixture over the veggies and toss well. Spread everything on a baking sheet in a single layer. Roast for 25-30 minutes until they are golden and tender. Stir halfway through cooking. After done, let them cool a bit and garnish with fresh parsley before serving. Yes, you can use fresh herbs instead of dried. Fresh herbs add a bright flavor to your dish. If you choose fresh rosemary or thyme, use about three times more than dried. Chop them finely and add them when mixing the vegetables. This swap brings a lively taste to herb roasted potatoes, carrots, and zucchini. Herb roasted vegetables pair well with many dishes. They complement grilled chicken, fish, or steak beautifully. You can serve them alongside pasta, rice, or quinoa for a hearty meal. They also work well in salads. Toss them in a green salad or serve them as a warm side dish. Their rich flavors enhance any meal. Yes, you can make this recipe in an air fryer. Preheat the air fryer to 400°F (200°C). Prepare the vegetables as you would for the oven. Toss them with oil and herbs. Place them in the air fryer basket in a single layer. Cook for about 15-20 minutes, shaking the basket halfway through. This method gives you crispy edges while keeping the inside tender. In this article, we covered the key steps for making herb-roasted vegetables. You learned about the right ingredients, tips for fresh produce, and optional flavors. We went through simple roasting steps and how to tell when your veggies are done. I shared tools, common mistakes, and ways to tweak the recipe. Finally, you now know how to store leftovers and answer common questions. Embrace these tips to make delicious meals with ease. Enjoy your cooking journey!

Herb Roasted Potatoes Carrots Zucchini Flavorful Dish

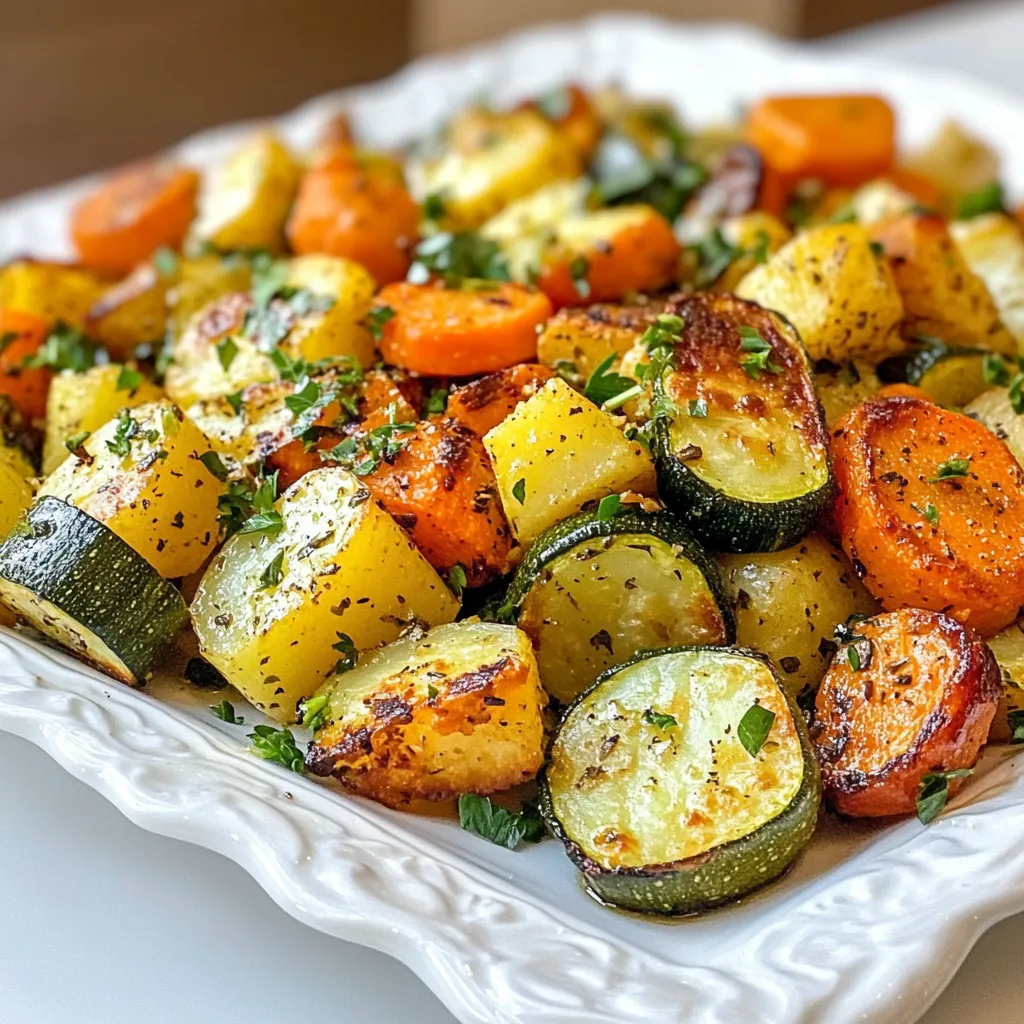
If you’re searching for a simple yet delicious side dish, look no further! Herb roasted potatoes, carrots, and zucchini are

- 12 oz rigatoni pasta - 2 tablespoons olive oil - 1 medium onion, finely chopped - 3 garlic cloves, minced - 1 can (28 oz) crushed tomatoes - 1 teaspoon dried basil - 1 teaspoon dried oregano - ½ teaspoon red pepper flakes (optional) - Salt and pepper to taste - Fresh basil leaves, for garnish - Grated Parmesan cheese, for serving The main ingredients for this dish are simple yet flavorful. Rigatoni pasta is the star. It holds sauce well and gives a nice bite. Olive oil adds richness, while onion and garlic bring great aroma. Crushed tomatoes form the base of the marinara sauce. Dried basil and oregano add classic Italian flavor. You can adjust the salt and pepper to your taste. - ½ teaspoon red pepper flakes - Fresh basil leaves - Grated Parmesan cheese Optional ingredients can elevate your dish. Red pepper flakes add heat if you like spice. Fresh basil leaves give a burst of fresh flavor. Grated Parmesan cheese adds a salty finish and creaminess. You can mix and match these toppings based on what you enjoy. {{ingredient_image_1}} To start, fill a large pot with water and add a generous amount of salt. This makes the pasta taste better. Bring the water to a rolling boil. Once it boils, add 12 ounces of rigatoni pasta. Cook it according to the package instructions. Aim for al dente, which means the pasta should still have a slight bite. This usually takes about 10-12 minutes. When ready, drain the pasta and save about 1 cup of the water. Set the pasta aside for later. Next, grab a large skillet and heat it over medium heat. Pour in 2 tablespoons of olive oil. Wait until the oil is hot, then add the finely chopped onion. Sauté the onion for about 4-5 minutes. You want it to become soft and a bit transparent. After that, stir in 3 minced garlic cloves. Cook for just 1 more minute. You should smell the garlic's rich aroma. Now, it’s time for the marinara sauce. Pour in one 28-ounce can of crushed tomatoes. Stir well to combine. Next, add 1 teaspoon of dried basil, 1 teaspoon of dried oregano, and ½ teaspoon of red pepper flakes if you like a bit of heat. Bring the sauce to a gentle simmer. Let it cook for 10-15 minutes, stirring every few minutes. At the end of this time, season with salt and pepper to your taste. Once the sauce is ready, add the cooked rigatoni to the skillet. Toss the pasta gently with the sauce, ensuring every piece gets coated. If the sauce seems thick, add some of the reserved pasta water. This helps thin it out to your desired consistency. Cook everything together for 2-3 minutes. This allows the pasta to soak up the sauce's flavors. - Salt Tips for Boiling Water: Always add salt to your boiling water. This step enhances the pasta's flavor. Use about 1 tablespoon of salt for every 4 quarts of water. It is key for great-tasting pasta. - How to Achieve Al Dente: Cook your rigatoni until it is firm but not hard. This is called al dente. Check the package for the cooking time. Start tasting it a minute or two before the time is up. - Tips for Fresh Herbs Usage: Fresh basil adds a nice touch. Chop it and add it at the end for a bright flavor. This keeps the herb fresh and aromatic. You can also use dried herbs if fresh ones are not available. - Secrets for a Richer Marinara Flavor: For a deeper taste, let your sauce simmer longer. This helps all the flavors mix well. A bit of sugar can balance the acidity from the tomatoes too. - Best Pairings with Rigatoni Marinara: Serve your rigatoni with a side salad or garlic bread. These sides complement the meal perfectly. A light red wine can also enhance your dining experience. - Plating Ideas for Presentation: Use a large bowl for family style or individual plates for a special touch. Top with fresh basil and a sprinkle of Parmesan cheese. It makes the dish look as good as it tastes! Pro Tips Use High-Quality Tomatoes: Opt for San Marzano or other high-quality canned tomatoes for a richer flavor in your marinara sauce. Don't Skip the Pasta Water: The starchy pasta water helps to bind the sauce and pasta, giving it a silky texture. Adjust Spice Levels: Feel free to modify the red pepper flakes according to your heat preference; start with a small amount and add more if desired. Fresh Herbs Make a Difference: Add fresh basil just before serving for a burst of flavor that elevates the entire dish. {{image_2}} Adding vegetables can make your rigatoni marinara more colorful and healthy. You can use classic vegetables like bell peppers, zucchini, or mushrooms. If you want fresh flavors, try seasonal veggies like asparagus in spring or spinach in winter. Just chop them up and toss them in with the onion and garlic. This will add taste and texture to your meal. If you want to make your dish heartier, consider adding protein. Cooked chicken or Italian sausage works well with marinara sauce. Just slice or crumble the meat and sauté it with the onions. This not only adds flavor but also makes the meal more filling. You can also use shrimp for a twist on this classic dish. While marinara is a classic, you can explore other sauces too. Try a creamy Alfredo for a rich taste or a pesto for a fresh vibe. Both pair well with rigatoni. You can even mix sauces, like combining marinara with pesto for a unique flavor. Experimenting with sauces can lead to exciting new meals! To keep your rigatoni marinara fresh, store it in an airtight container. Make sure to cool it down first. Leftovers last up to four days in the fridge. Label the container with the date. This helps you remember when you made it. You can freeze rigatoni marinara for up to three months. Divide it into portions for easy thawing. Use freezer-safe bags or containers. To freeze, let it cool completely before sealing. To thaw, place it in the fridge overnight. For best flavor and texture, reheat on the stove. Add a splash of water or extra olive oil while warming. Stir often to heat evenly. You can also microwave it, but check every minute to avoid overcooking. Enjoy your meal just like when you first made it! To make this dish gluten-free, choose gluten-free rigatoni. Many brands offer pasta made from rice or corn. These options cook well and taste great. Just follow the package instructions for cooking times. This way, you can enjoy rigatoni marinara without gluten. Yes, you can use other pasta types. Penne, farfalle, or even spaghetti work well. Each shape offers a unique texture. Just make sure to adjust the cooking time based on the pasta you choose. This keeps your meal tasty and fun. If you lack crushed tomatoes, try using diced tomatoes or tomato puree. Both options provide a similar flavor. You can also blend whole tomatoes for a smooth texture. This keeps your marinara sauce rich and delicious. Leftovers will last about three to five days in the fridge. Store them in an airtight container. To enjoy the meal later, reheat on the stove or in the microwave. This keeps the flavors fresh and enjoyable. This blog post covered all aspects of making rigatoni with marinara sauce. You learned about the key ingredients, step-by-step preparation, and helpful tips to enhance the dish. Variations allow you to customize your meal, while storage info ensures your leftovers stay fresh. Experiment with different herbs, proteins, or sauces to find your favorite twist. Cooking should be fun and flavorful, so enjoy every step in the process! With practice and creativity, you can create a delicious meal every time.

Weeknight Rigatoni Marinara Simple and Tasty Meal

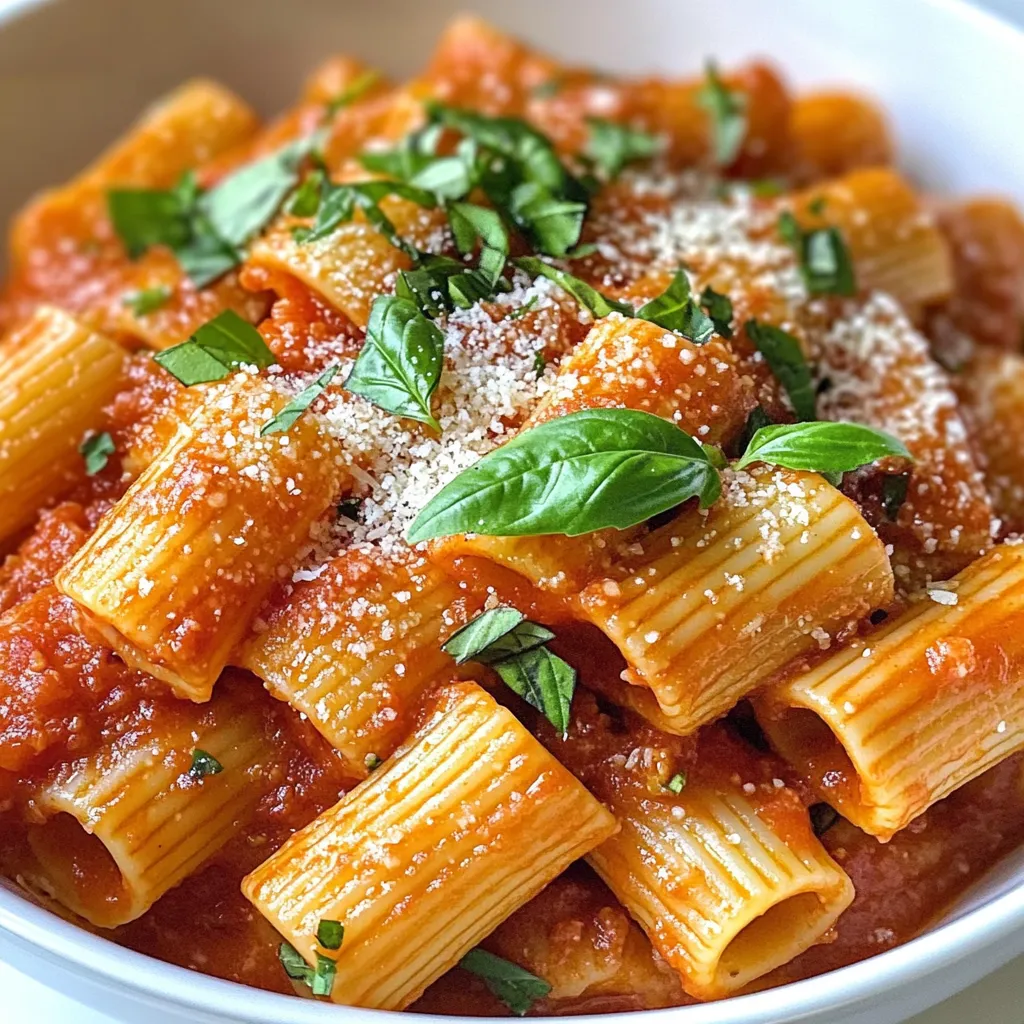
Busy weeknights don’t have to mean bland dinners! With my simple Weeknight Rigatoni Marinara recipe, you can whip up a

Newer posts
← Previous Page1 … Page119 Page120

dsad

© 2025 Southern Dishes • Built with GeneratePress

Our Policies

  • Copyright Policy
  • Cookie Policy
  • GDPR Policy
  • Privacy Policy
  • Disclaimer
  • Terms Of Use

More Information

  • Home
  • About
  • Contact
  • Appetizers
  • Dessert
  • Dinner
  • Drinks
©2025, Southern Dishes About Back To Top