Skip to content
DisclaimerTerms Of UseGDPR PolicyCookie Policy

Southern Dishes

  • Home
  • Drinks
  • Appetizers
  • Dinner
  • Dessert
  • About
  • Contact
  • Privacy Policy
DisclaimerTerms Of UseGDPR PolicyCookie Policy

Isabella

To make honey butter roasted carrots, you need these ingredients: - 1 pound baby carrots (or regular carrots, peeled and cut into sticks) - 3 tablespoons unsalted butter, melted - 2 tablespoons honey - 1 teaspoon cinnamon - 1/2 teaspoon salt - 1/4 teaspoon black pepper - Fresh thyme leaves for garnish (optional) These simple items work well together. The carrots get sweet from the honey and rich from the butter. The cinnamon adds a warm touch, making this dish special. To prepare this dish, gather these tools: - A large mixing bowl - A whisk for mixing - A baking sheet - Parchment paper - An oven with a reliable temperature Having these tools handy makes the process smoother. You can easily mix and roast your carrots without any fuss. If you want to switch up your ingredients, here are some ideas: - Use maple syrup instead of honey for a different sweetness. - Swap unsalted butter with olive oil for a lighter option. - Try different spices like nutmeg or paprika to change the flavor. These options keep the dish fresh and fun. You can adjust based on what you have at home. First, you need to preheat your oven. Set it to 400°F (200°C). This is the perfect heat for roasting. While the oven warms up, gather your ingredients. You will need: - 1 pound baby carrots (or regular carrots, peeled and cut into sticks) - 3 tablespoons unsalted butter, melted - 2 tablespoons honey - 1 teaspoon cinnamon - 1/2 teaspoon salt - 1/4 teaspoon black pepper - Fresh thyme leaves for garnish (optional) Make sure your carrots are clean. If you use regular carrots, cut them into sticks. This helps them cook evenly. In a large bowl, mix the melted butter and honey. Add the cinnamon, salt, and black pepper. Whisk these together until smooth. This honey butter sauce makes the carrots sweet and tasty. It coats them well, adding flavor to every bite. Next, toss your carrots into the bowl. Stir them well so they get coated in the sauce. Then, spread the carrots on a baking sheet. Make sure they are in a single layer. This helps them roast evenly. Now, place the baking sheet in your oven. Roast the carrots for about 25-30 minutes. Halfway through, turn the carrots. This helps them brown nicely on all sides. When they are done, they should be tender and lightly caramelized. Once cooked, take the baking sheet out. Let the carrots sit for a few minutes. Then, transfer them to a serving dish. If you like, sprinkle fresh thyme leaves on top for a pop of color and flavor. Enjoy your honey butter roasted carrots! To get perfectly cooked carrots, choose similar sizes. If using regular carrots, cut them into equal sticks. This helps them cook evenly. Spread them out on your baking sheet. Avoid stacking them. Stacked carrots can steam instead of roast. This can lead to uneven cooking. The honey butter mixture is tasty, but you can add more flavor. A pinch of garlic powder or a dash of smoked paprika can boost taste. If you like heat, add a little cayenne pepper. Fresh herbs like rosemary or parsley can also give a new twist. Remember to mix these in with the honey butter before tossing the carrots. These roasted carrots are great on their own. However, you can pair them with many dishes. They go well with grilled chicken or steak. Serve them alongside rice or quinoa for a full meal. For a fancy touch, sprinkle some feta cheese on top. A squeeze of lemon juice right before serving adds brightness. {{image_2}} You can make honey butter roasted carrots even better by adding other veggies. Try using baby potatoes, parsnips, or sweet potatoes. These will roast well and absorb the sweet flavors. Just cut them to the same size as the carrots. This way, they cook evenly. Toss them in the honey butter mix just like the carrots. If you want a different sweet flavor, use maple syrup instead of honey. The maple will add a rich taste that pairs well with the carrots. Use the same amount as honey in the recipe. This gives your dish a nice twist. Try it out; you might love it! You can change the spices to create new tastes. For a warm flavor, add nutmeg or ginger. If you like heat, sprinkle in some cayenne pepper. Just a pinch will give it a nice kick. Mix and match spices to find your favorite blend. This way, you can enjoy honey butter roasted carrots in many ways. After enjoying your honey butter roasted carrots, store them in an airtight container. Let them cool completely first. This keeps them fresh for up to four days in the fridge. You can also place a piece of parchment paper between layers to absorb moisture. This helps prevent sogginess. To reheat, use the oven for the best results. Preheat your oven to 350°F (175°C). Place the carrots on a baking sheet. Heat for about 10-15 minutes until warmed through. This method keeps them crispy. You can also use the microwave. Heat in short bursts of 30 seconds. Check often to avoid overcooking. Freezing honey butter roasted carrots is a good option if you have leftovers. First, let them cool completely. Then, spread them on a baking sheet in a single layer. Freeze until solid, about 1-2 hours. After that, transfer to a freezer-safe bag. They can last for up to three months. To enjoy, thaw in the fridge overnight and reheat in the oven. You can swap the butter for a plant-based option. Use vegan butter or coconut oil. These will give you a similar taste and texture. For the honey, use agave syrup or maple syrup. Both options add sweetness without animal products. This way, you keep the dish tasty and vegan-friendly. Yes, you can use dried thyme. It works well in this recipe. Use about one-third of the amount you would use for fresh thyme. Dried herbs are stronger, so a little goes a long way. Just sprinkle them into the honey butter mixture to infuse flavor. This dish pairs well with many meals. Serve it with roasted chicken or grilled fish for a complete meal. Honey butter roasted carrots also go great with a simple salad or rice. You can even enjoy them as a tasty snack on their own. Honey butter roasted carrots are simple and delicious. We discussed the must-have ingredients and tools for success. I shared step-by-step instructions to enhance your cooking skills. You learned helpful tips for even cooking and flavor boosting. We explored variations to keep your meals exciting and covered storage methods to prolong freshness. These carrots not only taste great but also fit many diets. With easy swaps, you can make them your own. Enjoy making this dish and impressing your friends and family!

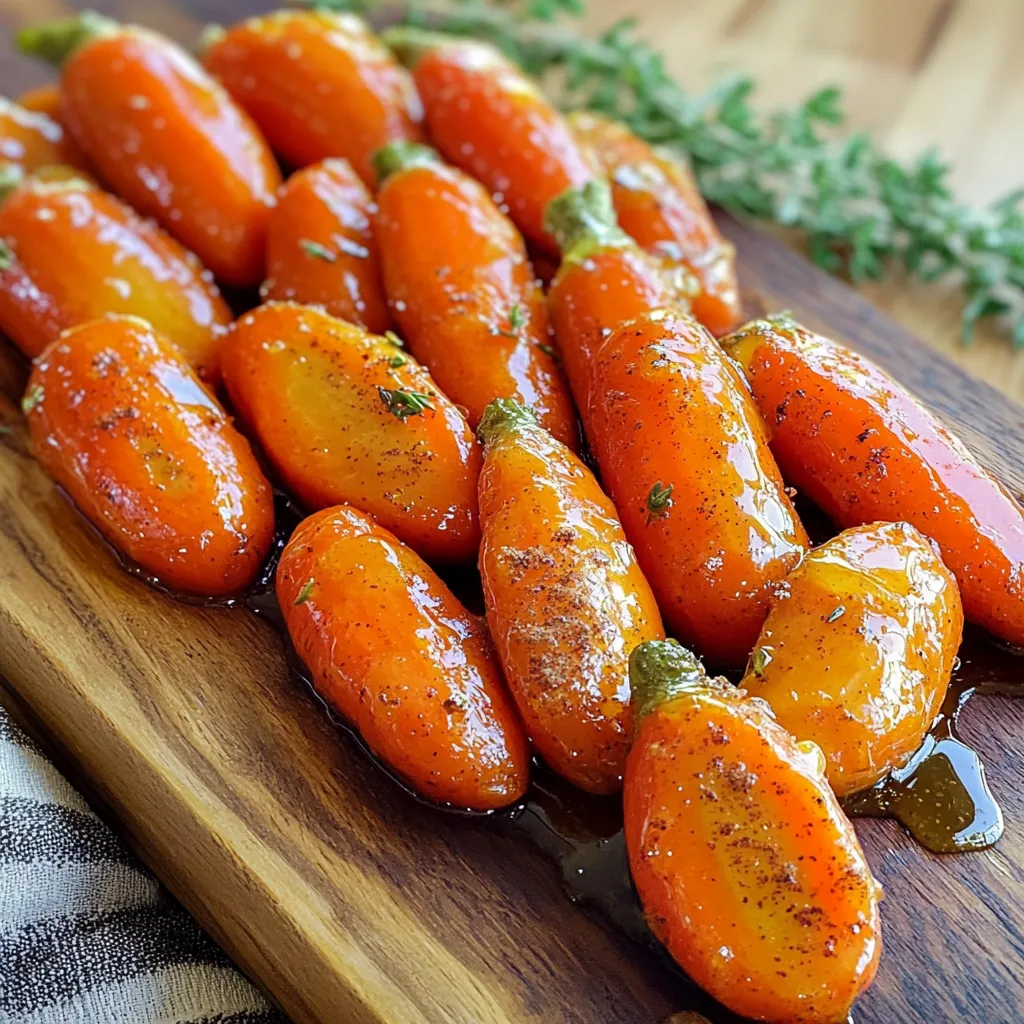
Honey Butter Roasted Carrots Flavorful and Simple Dish

Looking for a tasty and easy dish? Honey Butter Roasted Carrots are here to impress! With just a few simple

- 2 cups graham cracker crumbs - 1 cup unsweetened shredded coconut - 1 cup dried cranberries - 1/2 cup almond butter (or peanut butter) - 1/4 cup honey or maple syrup - 8 oz white chocolate, chopped - 1 teaspoon vanilla extract - Pinch of salt Finding the right ingredients is key. For the graham cracker crumbs, choose a brand that uses simple ingredients. This keeps the bars tasty. Unsweetened shredded coconut adds texture and a nice flavor. I like using sweetened dried cranberries. They bring a tangy burst to each bite. I recommend brands like Justin's for almond butter. Their almond butter has a rich taste and smooth texture. For white chocolate, Ghirardelli offers a great melting chocolate. It melts well and tastes sweet. Using fresh cranberries can be tempting, but they are tart. Dried cranberries work better for this recipe. They add sweetness without the extra moisture. Always check for the freshest dried cranberries. Freshness matters for flavor! Before you start, gather your tools. Get a large bowl, a microwave-safe bowl, and a spatula. Make sure your baking dish is ready. Line it with parchment paper for easy removal later. Measure your ingredients carefully. Accurate measurements make a big difference in taste and texture. Step 1: Prepare the Base In a large bowl, mix the graham cracker crumbs, shredded coconut, and dried cranberries. Stir until they are evenly combined. This mix gives your bars a great base. Step 2: Make the Mixture In a separate bowl, add the almond butter and honey. Microwave them together in 30-second bursts. Stir after each burst until the mix is smooth. Then, add the vanilla extract and a pinch of salt for flavor. Step 3: Combine Pour the almond butter mixture into the bowl with the graham cracker mix. Stir well until everything is coated. This should form a sticky mixture that holds together. Step 4: Melt the Chocolate Take your chopped white chocolate and place it in a microwave-safe bowl. Microwave it in 30-second intervals, stirring in between. Keep doing this until the chocolate is smooth and melted. Step 5: Combine Chocolate Pour half of the melted white chocolate into the sticky mixture. Stir well to combine. Then, press this mixture firmly into your lined baking dish. Make sure it’s even and packed down. Step 6: Top with Chocolate Now, take the rest of the melted white chocolate and pour it over the top. Spread it evenly with a spatula. This creates a nice, smooth top layer. Step 7: Chill Put the baking dish in the fridge. Let it chill for at least 2 hours. This helps the bars set and hold their shape. Step 8: Cut and Serve Once the bars are set, lift them out using the parchment paper. Cut them into squares or rectangles, based on your preference. For best results, take pictures at each step. This will help you see how your bars should look. When melting chocolate, be patient. Stir often to avoid burning. If you notice lumps, continue to microwave in short bursts until smooth. To avoid sticky mixtures, you can use a few tricks. First, make sure your graham cracker crumbs are finely crushed. Larger pieces can lead to a clumpy texture. Next, when mixing in the almond butter and honey, stir quickly. This helps distribute the sticky ingredients evenly. If your mixture is too wet, add a bit more graham cracker crumbs. If you face issues with texture, don’t worry. Sometimes the bars can be too crumbly. If that happens, try adding a touch more almond butter. This will help bind the mixture better. On the other hand, if they feel too soft, chill them longer. The fridge works wonders for firming up the bars. For garnishing your bars, consider using extra dried cranberries. They add color and a pop of flavor. A sprinkle of shredded coconut on top makes the bars look fancy. You can also drizzle a bit of melted white chocolate for extra flair. When serving these bars at a party, cut them into fun shapes. You can make small squares or rectangles. Arrange them on a decorative platter. This makes a great centerpiece for your dessert table. To save time, you can make these bars ahead of time. Prepare them the night before and let them chill overnight. This way, they will be ready when you need them. For storing leftovers, keep them in an airtight container. They last well in the fridge for about a week. You can also freeze them for longer storage. Just wrap them tightly in plastic wrap before placing them in a freezer bag. {{image_2}} You can make these bars your own! Adding nuts or seeds gives a nice crunch. Try chopped almonds, walnuts, or sunflower seeds. Each option brings a new taste. You can also switch up the dried fruits. Instead of cranberries, use cherries, apricots, or raisins. Each fruit adds unique flavors. For sweeteners, honey works great, but maple syrup adds a nice twist. If you need a gluten-free option, use gluten-free graham crackers. They work just as well. For those who want a vegan treat, substitute almond butter with sunflower seed butter. You can also use agave syrup instead of honey. This keeps the bars vegan and delicious. Make these bars festive! For holidays, add spices like cinnamon or nutmeg. These flavors make them feel cozy and warm. You can even top with seasonal fruits. In fall, use pumpkin spice, and in summer, add fresh berries. These twists keep the recipe fresh and fun for any occasion. To keep your no-bake white chocolate cranberry bars fresh, store them in the fridge. Use an airtight container to prevent them from drying out. You can also wrap them in plastic wrap for extra protection. If you want to save some for later, freeze the bars. Just cut them into pieces first, then wrap each piece tightly. This method keeps them safe from freezer burn. These bars stay fresh for about one week in the fridge. If you freeze them, they can last up to three months. Look for signs of spoilage, like a change in color or a weird smell. If the bars feel dry or hard, it’s time to toss them. Enjoying these bars while they’re fresh ensures the best taste and texture! Can I use milk chocolate instead of white chocolate? Yes, you can use milk chocolate. It will change the flavor a bit. Milk chocolate is sweeter than white chocolate. This swap will create a different taste, but it will still be delicious. How long do these bars need to set in the fridge? These bars need to chill for at least two hours. This time allows the chocolate to harden. If you want firmer bars, leave them in longer. Can I substitute peanut butter for almond butter? Absolutely! Peanut butter works great in this recipe. It adds a slightly different taste. Both nut butters will give you a rich, creamy texture. Is it possible to make these bars nut-free? Yes, you can make them nut-free by using sun butter or a seed butter. This option keeps the bars creamy and delicious without nuts. Just ensure your other ingredients are also nut-free. What can I serve with these no-bake bars? These bars pair well with fresh fruit or a scoop of vanilla ice cream. You can also serve them with a cup of tea or coffee. They make a perfect sweet treat for any gathering. This blog post detailed how to make delicious no-bake bars. We covered each ingredient, from graham crackers to the white chocolate topping. I shared tips for preparation, serving, and storage. You can customize flavors to fit your taste or dietary needs. Whether for a party or a quick snack, these bars are easy to make and fun to share. Enjoy creating your own tasty treats, and don’t be afraid to experiment!

No-Bake White Chocolate Cranberry Bars Delight

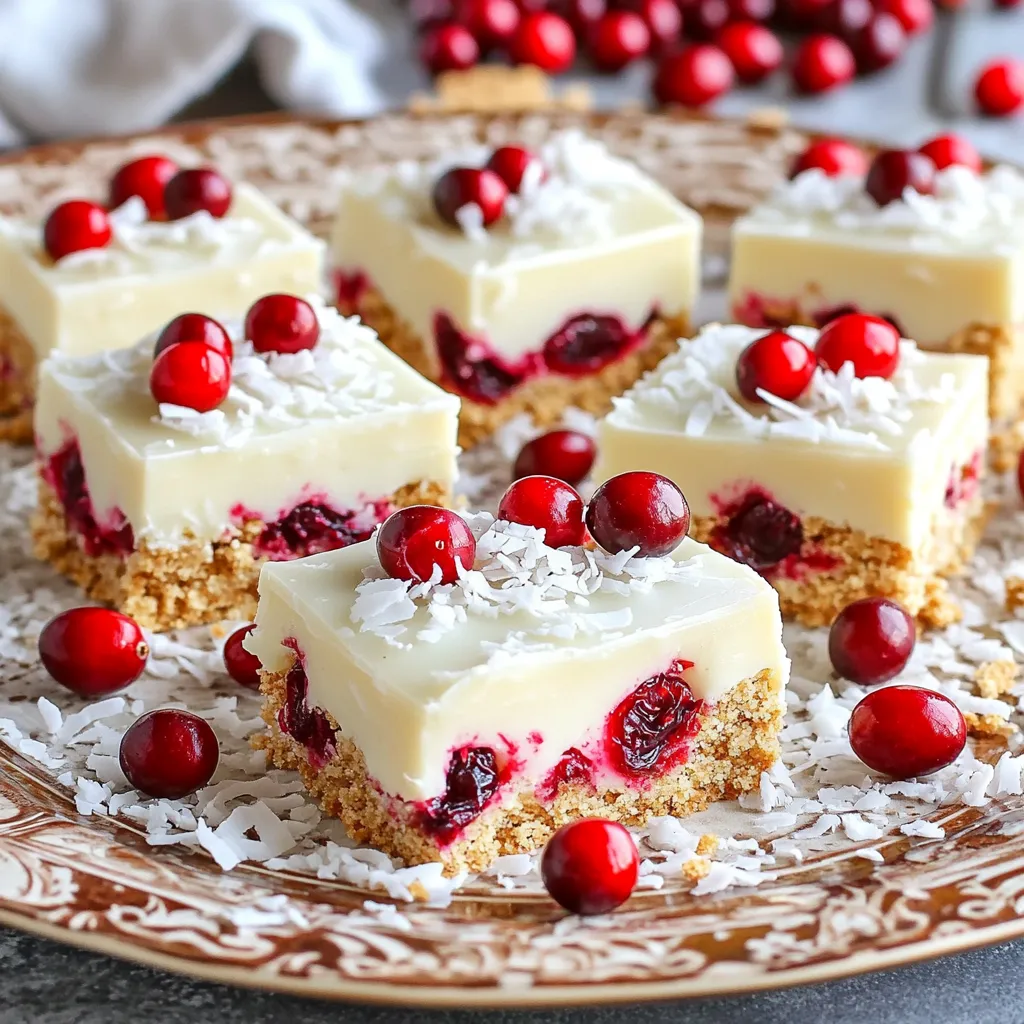
Craving a sweet treat but don’t want to bake? You’re in luck! My No-Bake White Chocolate Cranberry Bars are the

To make this warm soup, gather these simple ingredients: - 2 tablespoons olive oil - 1 medium onion, chopped - 3 cloves garlic, minced - 1 pound ground beef or turkey - 1 teaspoon Italian seasoning - 1/2 teaspoon red pepper flakes (optional) - 1 (28-ounce) can crushed tomatoes - 4 cups chicken or vegetable broth - 8 lasagna noodles, broken into pieces - 1 cup ricotta cheese - 1 cup heavy cream - 1 cup shredded mozzarella cheese - 1/2 cup grated Parmesan cheese - Fresh basil, for garnish - Salt and pepper to taste If you need to swap some ingredients, here are a few ideas: - Use ground chicken or plant-based meat instead of beef or turkey. - Swap the ricotta cheese for cottage cheese for a lighter option. - Use vegetable broth for a vegetarian version. - Try adding spinach or kale for extra nutrition. - Replace heavy cream with a non-dairy milk for a lighter soup. To create this cozy dish, you will need: - A large pot or Dutch oven - A wooden spoon for stirring - A knife for chopping - A cutting board - Measuring cups and spoons - A ladle for serving With these ingredients and tools, you are ready to cook up a delightful pot of lasagna soup. Enjoy the warmth and comfort it brings! {{ingredient_image_1}} Start by heating 2 tablespoons of olive oil in a large pot over medium heat. Next, add 1 medium chopped onion. Sauté it for about 3-4 minutes. You want it to be soft and clear. Then, add 3 cloves of minced garlic and 1 pound of ground beef or turkey. Cook the meat until it turns brown. Make sure to drain any extra fat from the pot. This keeps your soup light and healthy. After that, stir in 1 teaspoon of Italian seasoning. If you like some heat, add 1/2 teaspoon of red pepper flakes. Cook this mixture for another minute to bring out the flavors. Now, it’s time to make it soupy! Pour in 1 (28-ounce) can of crushed tomatoes and 4 cups of chicken or vegetable broth. Bring this mixture to a boil. Then, add 8 lasagna noodles that you have broken into smaller pieces. Cook this for about 10-12 minutes. You want the noodles to be soft but not mushy. Once they are tender, lower the heat to make it gentle. This is the fun part! Stir in 1 cup of ricotta cheese and 1 cup of heavy cream. Mix until it looks creamy and smooth. Then, fold in 1 cup of shredded mozzarella cheese and 1/2 cup of grated Parmesan cheese. You’ll see it melt and blend into the soup. Don’t forget to season with salt and pepper to taste. Let it simmer for another 5 minutes. This step helps all the good flavors come together. Serve hot and top with fresh basil leaves for a lovely finish. To make the best lasagna soup, use fresh ingredients. Start by sautéing your onions until soft. This adds a sweet flavor base. Choose high-quality meat, whether beef or turkey, and season it well. Fresh garlic boosts the taste significantly. For a richer flavor, let the soup simmer longer. This helps the flavors blend well. Always taste and adjust the seasoning before serving. Creaminess is key in this recipe. Use full-fat ricotta and heavy cream. They give the soup a rich feel. Stir these in after cooking the noodles to keep them smooth. If you want it even creamier, add more cheese. Mozzarella melts beautifully. Parmesan adds a salty touch that enhances the flavor. For a twist, try adding a splash of broth if it seems too thick. Serve your lasagna soup hot. Top it with fresh basil for a pop of color and flavor. You can also add some extra cheese on top. A sprinkle of crushed red pepper gives a nice kick. Pair it with crusty bread for dipping. A simple green salad on the side adds freshness. This makes a well-rounded meal everyone will enjoy. Pro Tips Use Fresh Herbs: Fresh basil adds a burst of flavor and aroma that dried herbs can't replicate. Add it just before serving to maintain its freshness. Customize Your Protein: Feel free to substitute ground beef with ground turkey, chicken, or even plant-based meat for a healthier or vegetarian option. Perfect Creaminess: For a thicker soup, reduce the amount of broth or add more ricotta cheese. Adjust to your preferred consistency! Make Ahead: This soup can be made in advance and stored in the refrigerator for up to 3 days. Reheat gently on the stove before serving. {{image_2}} You can easily make this soup vegetarian. Swap out the meat for mushrooms or lentils. Both options add great texture. Use vegetable broth instead of chicken broth. Add more veggies like zucchini and spinach. They will enhance the soup's flavor and nutrition. You can still use ricotta, mozzarella, and Parmesan for creaminess. This version is just as cozy and hearty! To make the soup gluten-free, choose gluten-free lasagna noodles. Many brands offer tasty alternatives made from rice or corn. You can also use spiralized zucchini instead. Just be careful with the cooking time, as zucchini cooks quickly. Ensure your broth and cheese are gluten-free as well. This way, everyone can enjoy this comforting soup. Want to boost the taste? Add more vegetables like bell peppers or carrots to the pot. They add sweetness and crunch. Fresh herbs like thyme or oregano can brighten the flavor too. A splash of balsamic vinegar brings a nice tang. Consider adding a dash of hot sauce for a spicy kick! These enhancements will make your soup even more flavorful. To keep your lasagna soup fresh, store it in an airtight container. Let it cool first. Once cool, place the soup in the fridge. It will stay good for up to three days. If you want to keep it longer, consider freezing it. Reheat your lasagna soup on the stove for the best results. Pour it into a pot and heat over medium heat. Stir often until it warms through. You can also microwave it. Place the soup in a microwave-safe bowl and cover it. Heat for one minute, then stir and heat for another minute if needed. For long-term storage, freeze the soup in portions. Use freezer-safe bags or containers. Leave space at the top as the soup will expand. It can last for up to three months in the freezer. When you're ready to eat, thaw it in the fridge overnight. Then, reheat as mentioned above. Enjoy that cozy taste whenever you wish! You can boost the taste in many ways. Add fresh herbs like thyme or oregano. A splash of balsamic vinegar can add depth. Sautéed mushrooms or spinach gives more texture and nutrients. You can also try different cheeses, like goat cheese or feta, for unique flavor twists. Yes, you can prepare this soup ahead of time. Cook the soup and let it cool before storing it. Place it in an airtight container and refrigerate for up to three days. For best results, reheat it gently on the stove. You may need to add a bit of broth when reheating. To make the soup dairy-free, substitute the heavy cream with coconut milk or a dairy-free cream. Use a dairy-free cheese option or skip the cheese altogether. You can still enjoy the creamy texture by using blended cashews or silken tofu. Serve the soup in warm bowls. Top each bowl with fresh basil for a pop of color and flavor. A side of crusty bread pairs well for dipping. You can also offer extra cheese on the side for those who want more richness. Cozy creamy lasagna soup is a delightful dish you can make with simple ingredients. You learned about the best tools, cooking steps, and tips for creaminess. I shared ways to adapt the recipe for different diets and how to store leftovers. Enjoy making this soup your own! The warm, rich flavors will impress everyone. Remember, cooking is fun, and each bowl can be unique. So, get creative and make this recipe a family favorite.

Cozy Creamy Lasagna Soup Simple and Hearty Recipe

Warm up with a bowl of Cozy Creamy Lasagna Soup! This easy recipe combines rich flavors with comforting textures to

To make this creamy soup, gather these simple ingredients: - 4 large russet potatoes, peeled and diced - 1 medium onion, finely chopped - 3 cloves garlic, minced - 4 cups vegetable broth - 1 cup heavy cream or coconut cream (for dairy-free option) - 1 cup sharp cheddar cheese, shredded - 1/2 cup sour cream or Greek yogurt - 1/4 cup green onions, sliced - 1/2 cup crispy crumbled tortilla chips or bacon bits (optional) - 2 tablespoons olive oil - Salt and black pepper to taste - 1 teaspoon smoked paprika (optional for a smoky flavor) You can make the soup even better with these toppings: - Extra shredded cheddar cheese - A dollop of sour cream or Greek yogurt - Sliced green onions for a fresh touch - Crispy bacon bits for crunch - Crumbled tortilla chips for added texture If you want to make this soup dairy-free or vegetarian, here are some ideas: - Use coconut cream instead of heavy cream. - Swap sour cream for a dairy-free yogurt. - Ensure the broth is vegetable-based for a vegetarian option. - Add nutritional yeast for a cheesy flavor without dairy. {{ingredient_image_1}} First, gather all your ingredients. You will need: - 4 large russet potatoes, peeled and diced - 1 medium onion, finely chopped - 3 cloves garlic, minced - 4 cups vegetable broth - 1 cup heavy cream or coconut cream - 1 cup sharp cheddar cheese, shredded - 1/2 cup sour cream or Greek yogurt - 1/4 cup green onions, sliced - 1/2 cup crispy crumbled tortilla chips or bacon bits (optional) - 2 tablespoons olive oil - Salt and black pepper to taste - 1 teaspoon smoked paprika (optional) Now, peel and dice the potatoes into small cubes. Chop the onion finely and mince the garlic. This helps the flavors blend well. In a large pot, heat the olive oil over medium heat. Add the chopped onion and minced garlic. Sauté them for about 5 minutes. You want the onion to look clear. This step builds a great flavor base. Next, add the diced potatoes to the pot. Pour in the vegetable broth and stir. Bring the mixture to a simmer. Cook until the potatoes are soft, around 15 to 20 minutes. Check them with a fork to ensure they are tender. After the potatoes are cooked, you can blend the soup to your liking. Use a potato masher for a chunkier texture or an immersion blender for a smooth finish. Next, stir in the heavy cream and shredded cheese. Allow them to melt into the soup. If it feels too thick, add more broth or water to get the right consistency. Season with salt, pepper, and smoked paprika if you want a smoky taste. Remove the pot from heat and mix in the sour cream. This adds creaminess and tang. Serve the soup hot. Top it with sliced green onions and your choice of crispy tortilla chips or bacon bits for crunch. Enjoy your loaded baked potato soup! To get the best texture in your soup, mash the potatoes well. I like to use a potato masher for some chunks. This gives the soup a nice body. If you prefer it smooth, an immersion blender works great. Blend it until it’s silky but don't overdo it. You want some potato pieces for a hearty feel. Adjust the thickness by adding more broth or water if needed. Store leftover soup in an airtight container. It keeps well in the fridge for about three days. If you want to keep it longer, freeze the soup. Just let it cool first, then pour it into freezer-safe bags. When reheating, do it slowly on the stove. Stir often to prevent sticking. You can add a splash of broth to thin it out. Want to make your soup even better? Try adding more toppings. Crispy bacon bits give a great crunch. You can also add tortilla chips for extra texture. For a smoky twist, sprinkle in smoked paprika. If you like it spicy, add some diced jalapeños. Fresh herbs like chives or parsley also boost flavor. Experiment with your favorites to find the best mix! Pro Tips Use Fresh Ingredients: Fresh potatoes and vegetables enhance the flavor and texture of your soup, making it more delicious and satisfying. Adjust Consistency: If you prefer a creamier soup, blend it longer or add more cream. For a heartier texture, leave some potato chunks intact. Flavor Boost: Experiment with different cheeses such as gouda or pepper jack for a unique twist on the classic flavor profile. Storage Tips: Store leftovers in an airtight container in the fridge for up to 3 days. Reheat gently on the stove, adding a splash of broth if it thickens too much. {{image_2}} To make a vegetarian version, I swap the regular broth for vegetable broth. This gives the soup a rich flavor without using meat. I also add more veggies like carrots or celery. They add color and nutrition. If you want a heartier soup, you can toss in some beans. Black beans or kidney beans work well. You still get all the creamy goodness with cheese and sour cream. For a dairy-free soup, I replace heavy cream with coconut cream. It adds a nice, subtle flavor. You can use a dairy-free cheese for extra creaminess too. Nutritional yeast is another great option. It adds a cheesy taste without dairy. Finally, swap sour cream with cashew cream or more coconut cream. This keeps the soup deliciously creamy while being kind to your tummy. If you like spice, I have a few tips. First, add diced jalapeños or a pinch of cayenne pepper when cooking. This gives the soup a nice kick. You can mix in some hot sauce, too, for an extra boost. Try topping the soup with spicy salsa or even a sprinkle of chili powder. These additions make the soup exciting and full of flavor! To keep your loaded baked potato soup fresh, store it in airtight containers. Let the soup cool down before sealing it. This helps avoid condensation and keeps the soup creamy. Label each container with the date you made it. Use glass or BPA-free plastic containers for best results. You can freeze loaded baked potato soup for up to three months. To freeze, let the soup cool completely. Then, pour it into freezer-safe bags or containers. Leave some space at the top, as the soup will expand when frozen. When you're ready to eat, thaw it in the fridge overnight before reheating. When stored in the fridge, the soup lasts about three to four days. To reheat, warm it on the stove over low heat. Stir often to prevent sticking. If the soup seems thick, add a splash of broth or water for creaminess. You can also microwave it in a safe bowl, but stir halfway through for even heating. Yes, you can use other potatoes. For a creamier soup, try Yukon Gold potatoes. They have a buttery flavor and cook well. Red potatoes work too, but they keep their shape and add a nice texture. You can even mix different potatoes for added flavor. Just remember to adjust cooking times if needed. To make this soup gluten-free, ensure your vegetable broth is certified gluten-free. Most broths are safe, but always check the label. The other ingredients, like potatoes and cheese, are naturally gluten-free. If you want a thicker soup, use cornstarch or arrowroot powder instead of flour. This soup pairs well with many sides. Here are some ideas: - Warm crusty bread - Garlic breadsticks - A simple green salad - Crispy tortilla chips - Grilled cheese sandwiches These options will enhance your meal and add more flavor. Enjoy! You’ve learned how to make a delicious loaded baked potato soup from start to finish. We covered ingredients, from main components to optional toppings. The step-by-step guide ensures you can cook with ease. Tips helped you get the perfect texture and store leftovers. Variations show you can adapt the recipe for different diets. Remember, this soup is versatile and satisfying. Enjoy your cooking journey, and share this recipe with friends!

Loaded Baked Potato Soup Creamy and Delicious Treat

Get ready to warm your soul with a bowl of Loaded Baked Potato Soup! This creamy and delicious treat combines

- 6 bone-in, skin-on chicken thighs - 1/4 cup pure maple syrup - 2 tablespoons Dijon mustard - 2 tablespoons olive oil - 4 cloves garlic, minced - 1 teaspoon smoked paprika - 1 teaspoon dried thyme - Salt and pepper to taste - 1 pound baby potatoes, halved - 2 cups green beans, trimmed Gathering the right ingredients is key to making this dish shine. First, you need chicken thighs. I love using bone-in, skin-on thighs for their flavor and juiciness. The skin crisps up so nicely, adding texture. The next star ingredients are pure maple syrup and Dijon mustard. They create a sweet and tangy marinade that really lifts the chicken. You’ll also want some olive oil to add richness. Garlic brings in a bold flavor that pairs well with the other ingredients. Smoked paprika gives a nice warmth, while dried thyme adds that herbaceous touch. Don’t forget to season with salt and pepper for balance. For the veggies, I recommend baby potatoes and green beans. The potatoes become tender and absorb all the lovely flavors from the chicken. The green beans add a pop of color and crunch. This mix brings both taste and nutrition to your meal. - Preheat the oven to 425°F (220°C). - In a large bowl, mix together: - 1/4 cup pure maple syrup - 2 tablespoons Dijon mustard - 2 tablespoons olive oil - 4 cloves garlic, minced - 1 teaspoon smoked paprika - 1 teaspoon dried thyme - Salt and pepper to taste The marinade is key to the flavor. Maple syrup adds sweetness, while Dijon mustard brings tang. Olive oil keeps the chicken juicy. - Coat the chicken thighs well with the marinade. - Let them marinate for at least 15 minutes. This step is important. It allows the chicken to soak up all those tasty flavors. If you have more time, marinate for up to an hour. - Toss halved baby potatoes with olive oil, salt, and pepper. - Spread them out on a large baking sheet. - Nestle the marinated chicken thighs among the potatoes. - Bake for 25 minutes. The potatoes turn golden and crispy as they cook. They soak up the juices from the chicken, making them extra tasty. - After 25 minutes, add green beans to the baking sheet. - Toss them lightly with the chicken juices. - Bake for another 15-20 minutes. This step adds a nice crunch. The green beans pair well with the chicken and potatoes. - If you want extra crispiness, broil for 2-3 minutes. - Keep an eye on them to avoid burning. - Let the dish rest for a few minutes before serving. Resting allows the juices to settle. Enjoy your delicious Sheet Pan Maple Dijon Chicken Thighs! Marinate your chicken thighs for at least 15 minutes. For a deeper flavor, go for one hour. This time allows the flavors to soak in well. If you have leftover marinade, store it in the fridge. Use an airtight container to keep it fresh. Always remember, never reuse marinade that has touched raw chicken without cooking it first. To get crispy chicken skin, bake your thighs skin-side up. The high heat of 425°F helps render the fat, making the skin crispy. For an extra crunch, broil them for 2-3 minutes at the end. Watch them closely to avoid burning. Let your chicken rest for a few minutes after cooking. This step keeps the juices inside and helps with the texture. You need a few essential tools for this recipe. A large mixing bowl is great for marinating the chicken. A rimmed baking sheet is best for even cooking. Use a whisk to mix the marinade well. I also recommend using a meat thermometer. It helps ensure your chicken reaches 165°F, which is safe to eat. Having these tools makes cooking easier and more fun! {{image_2}} You can switch the chicken thighs for chicken breasts or tofu. Chicken breasts will cook faster, so check them sooner. Tofu is a great option for a vegetarian meal. For veggies, feel free to swap in carrots, bell peppers, or broccoli. Each option will add its own flavor and texture. To make your dish pop, try adding spices like cumin or rosemary. Fresh herbs like parsley or basil can also add a nice touch. If you want a different glaze, honey mustard or teriyaki sauce work well. These flavors will bring new life to the chicken. This dish pairs well with rice or quinoa for a filling meal. You could also serve it with a crisp salad for a light touch. Other side options include roasted veggies or garlic bread. Each of these will complement the chicken and make your meal special. To keep your Sheet Pan Maple Dijon Chicken Thighs fresh, use airtight containers. Glass or plastic containers work well. Make sure the chicken and veggies cool down first. Store them in the fridge for up to four days. For the best results, reheat leftovers in the oven. Set your oven to 350°F (175°C). Place the chicken and veggies on a baking sheet. Heat for about 15 to 20 minutes. To keep the skin crispy, try broiling for a few minutes at the end. You can freeze leftover chicken and vegetables too. Use freezer-safe bags or containers. Remove as much air as possible. They can stay in the freezer for up to three months. To thaw, place them in the fridge overnight. Reheat them in the oven to keep the flavor and texture. You should marinate the chicken for at least 15 minutes. This helps the flavors sink in. For more flavor, try marinating for up to 1 hour. Yes, you can use boneless chicken thighs. Cook them for about 20-25 minutes instead of 25. Keep an eye on them, as they cook faster. The chicken should reach an internal temperature of 165°F (75°C). This ensures it is safe to eat. Use a meat thermometer to check. Yes, you can prepare this dish in advance. Marinate the chicken and store it in the fridge. You can also cook it and store the leftovers. This recipe combines chicken, potatoes, and green beans for a balanced meal. You learned how to create a tasty marinade and the importance of marinating. Achieving crispy chicken skin is also important. Remember, you can customize flavors and adjust ingredients to suit your taste. Store leftovers properly and follow reheating tips for the best results. Enjoy making this dish and savor every bite!

Sheet Pan Maple Dijon Chicken Thighs Simple Delight

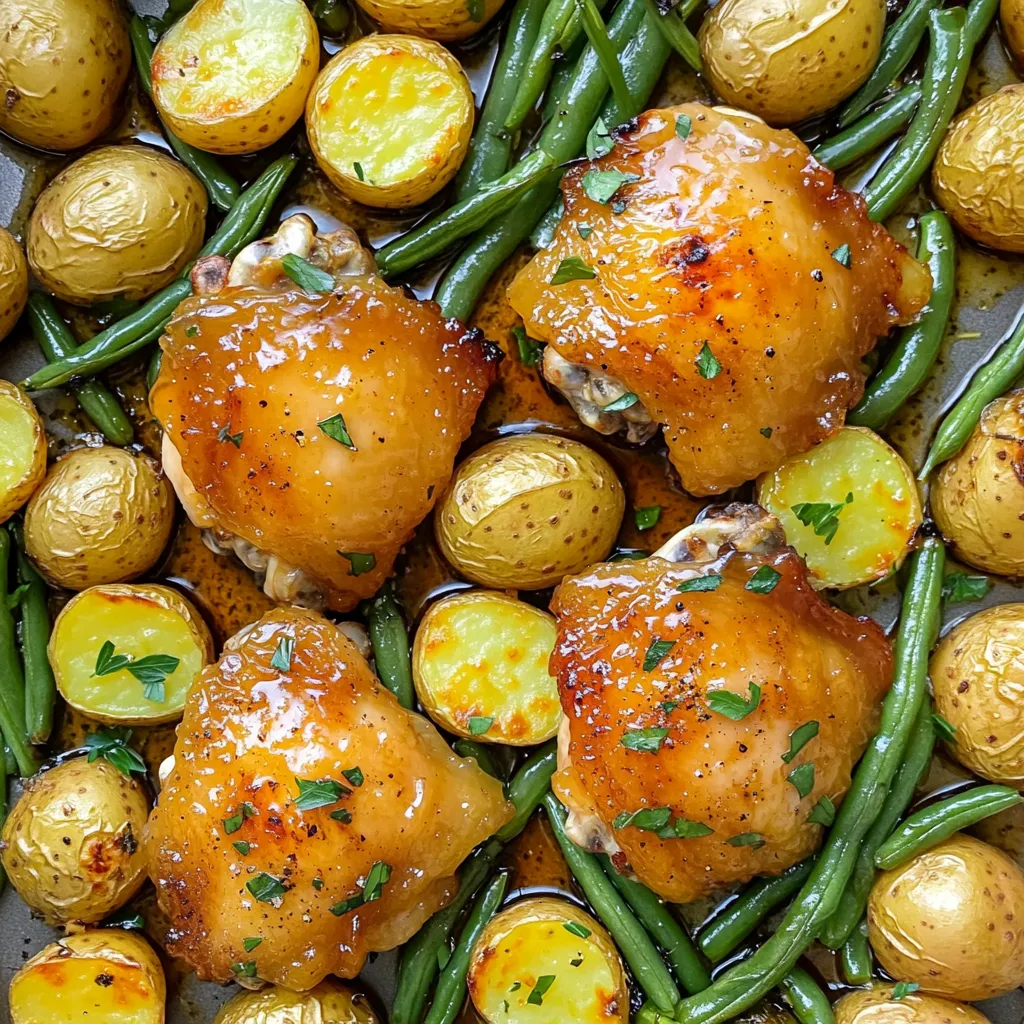
Looking for a quick and tasty dinner? Try my Sheet Pan Maple Dijon Chicken Thighs! This simple delight features juicy

- 1 block (14 oz) firm tofu, pressed and cubed - 2 tablespoons cornstarch - 2 tablespoons soy sauce - 2 tablespoons sriracha - 2 cloves garlic, minced - 1 teaspoon ginger, grated - 1 tablespoon olive oil - Salt and pepper to taste - 1 tablespoon sesame seeds - Fresh cilantro, chopped Gathering fresh ingredients is key for flavor. Firm tofu works best for this recipe. It holds its shape and gives a satisfying bite. Press the tofu first to remove extra moisture. This step makes a big difference in crispiness. Cornstarch creates that crispy outer layer. It coats the tofu evenly and helps it fry up golden. Soy sauce adds a savory umami kick, while sriracha brings the heat. You can adjust the sriracha to your spice level. If you like more heat, add a bit more. Garlic and ginger add depth and aroma. They enhance the overall taste, making your nuggets more exciting. Olive oil helps with frying and adds richness. Salt and pepper round out the flavors. For garnishing, sesame seeds and fresh cilantro bring a nice pop. They also add a lovely look to your dish. Be sure to have these ingredients ready before you start cooking. This ensures a smooth cooking process and delicious results. First, press the tofu to remove excess moisture. Wrap the tofu block in a clean towel or paper towels. Place a weight on top for about 15 minutes. This step helps the tofu absorb the marinade better. Next, cut the pressed tofu into bite-sized cubes. Aim for uniform pieces so they cook evenly. Place the cubes in a large mixing bowl for easy marinating. Now, prepare the marinade. In a small bowl, mix together 2 tablespoons of soy sauce, 2 tablespoons of sriracha, 2 cloves of minced garlic, 1 teaspoon of grated ginger, 1 tablespoon of olive oil, and salt and pepper to taste. Pour this marinade over the tofu cubes. Gently mix to ensure each cube is evenly coated. Let the tofu marinate for at least 15 minutes. This will infuse the tofu with deep flavor. Sprinkle 2 tablespoons of cornstarch over the marinated tofu. Toss lightly to coat each cube. This step is key for achieving that crispy texture. Preheat your air fryer to 375°F (190°C) for about 5 minutes. This ensures the nuggets cook evenly and get that nice crunch. Place the coated tofu nuggets in the air fryer basket. Arrange them in a single layer, making sure not to overcrowd. Cook for 15-20 minutes, shaking the basket halfway through. This helps them cook evenly. They should turn golden brown and crispy when done. Once cooked, remove the nuggets from the air fryer. Sprinkle with sesame seeds and fresh chopped cilantro for that extra flavor and pop of color. Enjoy your crispy and spicy tofu nuggets! To get that perfect crisp, you need to press the tofu. Pressing removes extra moisture. This step helps the tofu absorb flavors and fry better. I recommend wrapping the tofu in a clean towel. Then, place a weight on top for about 15 minutes. This simple trick makes a big difference! Next, cornstarch plays a key role in texture. After marinating, sprinkle cornstarch over the tofu. Toss it gently to coat each piece. The cornstarch creates a crunchy outside when you air fry the nuggets. Trust me, this step is crucial for that delightful crunch. To adjust the spice level, use sriracha wisely. If you like more heat, add extra sriracha. For a milder flavor, reduce the amount. This flexibility makes the dish perfect for everyone. You can also add extra herbs for depth of flavor. Fresh cilantro adds a bright touch. You might try adding green onions or parsley too. These additions can elevate your nuggets to a whole new level! Enjoy playing with the flavors to find what you love best. {{image_2}} You can tweak the flavors in your spicy garlic tofu nuggets. For a sweet and spicy twist, add honey or maple syrup to your marinade. This blend balances the heat of the sriracha. If you like more heat, sprinkle in some extra spices. Paprika adds a smoky flavor, while cayenne gives it a kick. Experimenting with these spices opens up new taste experiences. If you're not a fan of tofu, there are great alternatives. Tempeh or seitan work well in this recipe. Both offer a similar texture and absorb flavors nicely. For those who need gluten-free options, ensure your soy sauce is gluten-free. You can also use tamari as a perfect substitute. These swaps let everyone enjoy this dish without worry. To store your tofu nuggets, let them cool down first. Place them in an airtight container. They will stay fresh in the fridge for up to three days. If you want to keep them longer, consider freezing. Place the nuggets in a freezer-safe bag. They can last up to three months in the freezer. Just remember to label the bag with the date. To reheat your tofu nuggets, use your air fryer for the best results. Set it to 375°F (190°C) and cook for about 5 to 7 minutes. This method will help them regain their crispiness. You can also use an oven. Preheat it to 375°F (190°C) and bake the nuggets for about 10 minutes. Both methods will make your leftovers taste fresh again! You should use firm tofu for this recipe. Firm tofu holds its shape better when cooked. Soft tofu can fall apart and lacks the texture you want in nuggets. If you use soft tofu, the nuggets may turn mushy instead of crispy. These nuggets stay fresh in the fridge for about 3 to 5 days. Store them in an airtight container. Make sure they cool down before you put them in the fridge. This helps keep them crispy for longer. You have many great options for dipping sauces! Here are a few ideas: - Sweet chili sauce: This adds a nice sweet and spicy touch. - Soy sauce: Simple and classic for a salty kick. - Peanut sauce: Creamy and rich, perfect for a unique flavor. - Sriracha mayo: Blend mayo with sriracha for a creamy, spicy dip. Try different sauces to find your favorite! You now have a clear guide to making tasty tofu nuggets. We covered all key steps, from ingredients to cooking. Remember, pressing the tofu is vital for the best texture. The marinade and cornstarch add flavor and crispness. Feel free to tweak spices or try new ingredients. Leftovers stay fresh for days with proper storage. Make these nuggets your own and enjoy them in different ways. Cooking can be fun and rewarding, especially with this recipe. Get started and impress yourself and others!

Air Fryer Spicy Garlic Tofu Nuggets Crispy Delight

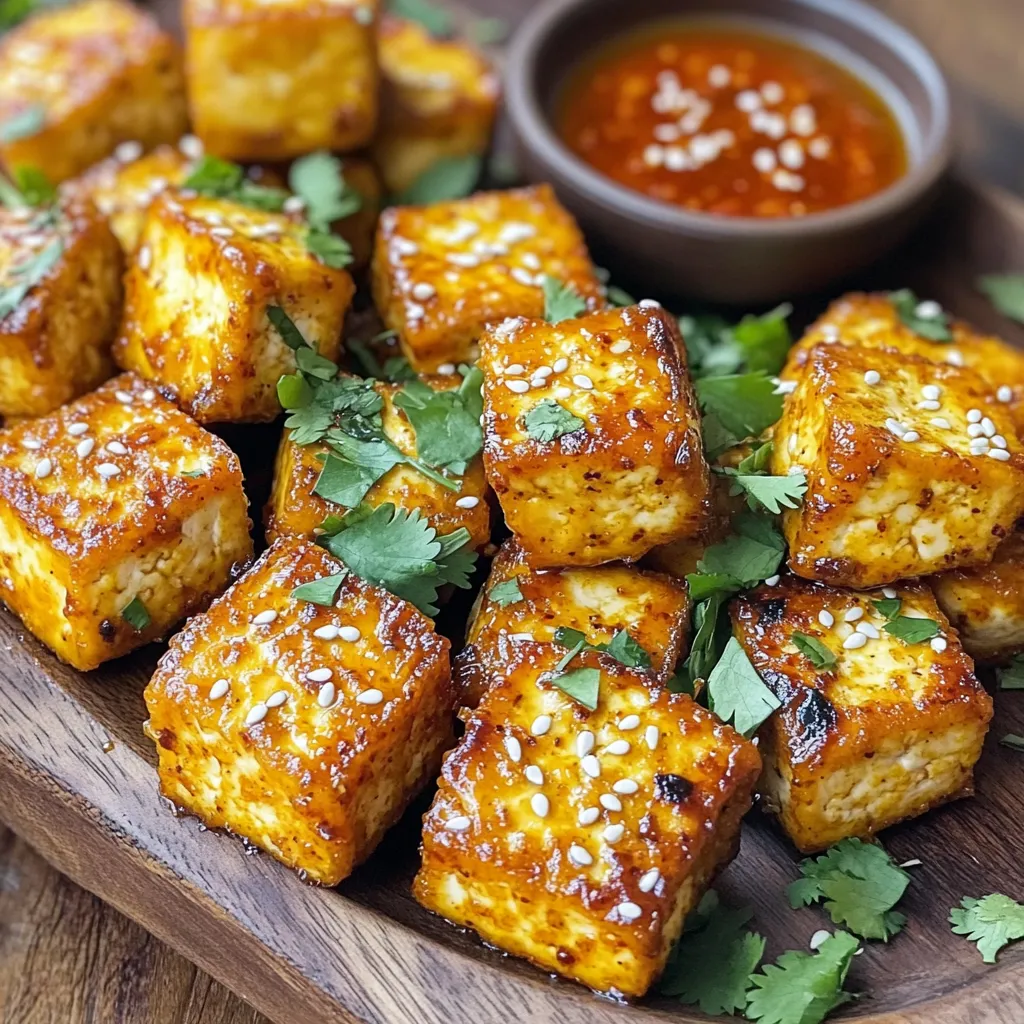
Are you ready to transform your meals with a tasty twist? My Air Fryer Spicy Garlic Tofu Nuggets deliver a

- 1 cup graham cracker crumbs - 1/2 cup unsweetened cocoa powder - 1/2 cup almond butter (or peanut butter) - 1/2 cup maple syrup - 1 teaspoon vanilla extract - 1 cup mini marshmallows - 1/2 cup milk chocolate chips - 1/4 cup crushed graham crackers (for topping) You can swap almond butter for peanut butter or cashew butter. If you want a different sweetener, use honey or agave syrup. These changes can fit your tastes or needs. To make these fudge bars, gather a few tools: - Mixing bowls - Whisk - Baking dish (8x8 inches) - Parchment paper Having the right tools helps make the process smooth and easy. Each item plays a key role in mixing ingredients and setting the fudge. First, gather your ingredients. You will mix dry and wet items separately. This method helps create a smoother fudge. Next, you will fold in the chocolate chips and marshmallows. This adds sweetness and texture. - Step 1: Mix graham cracker crumbs and cocoa powder In a medium bowl, add 1 cup of graham cracker crumbs. Then, add 1/2 cup of cocoa powder. Use a fork or whisk to mix them well. This gives your fudge a rich chocolate flavor. - Step 2: Prepare the wet mixture with nut butter and syrup In another bowl, combine 1/2 cup of almond butter and 1/2 cup of maple syrup. Also, add 1 teaspoon of vanilla extract. Whisk these ingredients together until the mixture is smooth. This blend creates a creamy base for your fudge. - Step 3: Combine mixtures and form the fudge dough Slowly add the dry mixture into the wet mixture. Stir continuously until everything is fully combined. The mixture will become thick and doughy. This texture is perfect for fudge bars. - Step 4: Forming and refrigerating the fudge Line an 8x8 inch baking dish with parchment paper. This will help you remove the fudge easily later. Press the fudge mixture into the dish evenly. Smooth the top with a spatula. - Topping with crushed graham crackers Sprinkle 1/4 cup of crushed graham crackers over the fudge. Gently press them down into the mixture. This adds a nice crunch. - Cutting into squares for serving Refrigerate the fudge for at least 2 hours. Once firm, lift it out using the parchment paper. Cut the fudge into squares and serve. Enjoy your tasty treat! - Overmixing the fudge: When you mix too much, the texture changes. You want a thick dough that holds together. Stop mixing as soon as everything is combined. - Not refrigerating long enough: If you don’t chill the fudge enough, it will be too soft. Aim for at least 2 hours in the fridge. This helps the fudge set properly. - Serving suggestions and plating ideas: For a rustic look, serve the fudge on a wooden platter. Cut it into squares for easy grabbing. - Optional garnishes: A drizzle of melted chocolate makes it shine. Extra mini marshmallows on top add a fun touch. - Freezing instructions for longer storage: To freeze the fudge, wrap it tightly in plastic wrap. Then, place it in an airtight container. It will last for up to three months. - Best practices for thawing: To thaw, take it out of the freezer and place it in the fridge overnight. This keeps the texture nice and firm. {{image_2}} You can make your fudge bars even more fun! Add a few drops of mint extract for a mint chocolate twist. This gives a fresh taste that pairs well with chocolate. You can also mix in some nuts or dried fruits. Chopped walnuts or cranberries add great texture and flavor. If you want a vegan treat, swap out dairy products. Use coconut oil instead of butter and maple syrup for sweetening. You can also choose plant-based nut butter. To make it gluten-free, use gluten-free graham crackers. This way, everyone can enjoy your fudge bars. Get creative with toppings! Try using white chocolate chips instead of milk chocolate. Butterscotch chips also add a sweet flavor. For a fun finish, sprinkle on coconut flakes or colorful sprinkles. These small changes can make your fudge bars stand out and taste amazing. To keep your No Bake S'mores Fudge Bars fresh, you should store them in the fridge. Use an airtight container to prevent them from drying out. A glass or plastic container with a tight lid works best. This helps keep the fudge moist and tasty for longer. These fudge bars will last about one week in the fridge. After that, you might notice changes in texture and flavor. Watch for signs of spoilage like a change in smell or a dry texture. If they seem hard or smell off, it's best to toss them. You can freeze these fudge bars for up to three months. To do this, cut them into squares first. Wrap each piece in plastic wrap, then place them in a freezer-safe bag. Be sure to remove as much air as possible. When you're ready to enjoy, thaw them in the fridge overnight for the best texture. Yes, you can make these bars ahead of time. They are great for meal prep. Store them in the fridge for up to a week. Use an airtight container to keep them fresh. If you want to keep them longer, freeze them. Cut them into squares before freezing for easy servings. Thaw them in the fridge overnight before enjoying. Absolutely! You can swap the milk chocolate chips for dark or dairy-free chocolate. This change will give the fudge a richer flavor. If you prefer a sweeter taste, stick with milk chocolate. For a vegan option, use dairy-free chocolate chips. This way, you can still enjoy the same great taste without dairy. Yes, you can make these bars nut-free. Instead of almond butter, try sunflower seed butter. This option gives a similar texture and taste. You can also use soy nut butter. Both alternatives work well in this recipe. Just make sure to check for allergies when serving. You can create delicious No Bake S’mores Fudge Bars with simple ingredients. We covered required items, alternatives, and tools needed. The steps guide you through mixing, shaping, and refrigerating your fudge. Don’t forget the tips for avoiding mistakes and making variations to suit your taste. Remember, proper storage keeps your fudge fresh longer. Enjoy getting creative and making this treat your own! With each bite, you taste the sweet reward of your effort.

No Bake S’mores Fudge Bars Easy and Tasty Dessert

Are you craving a sweet, simple treat? You’ll love these No Bake S’mores Fudge Bars. They combine the classic flavors

- 1 sheet of puff pastry, thawed - 2 large onions, thinly sliced - 4 oz goat cheese, crumbled - 1 tablespoon fresh thyme leaves (or 1 teaspoon dried thyme) - 1 teaspoon balsamic vinegar - 3 tablespoons olive oil - 1 teaspoon sugar - Salt and pepper to taste - 1 egg, beaten (for egg wash) To make a great Caramelized Onion Goat Cheese Tart, you need a few key items. The puff pastry is the base and adds a nice crunch. The onions are the star of the dish. They bring a sweet and rich flavor when you cook them down. Goat cheese adds creaminess and tang, which makes the tart delicious. For extra flavor, you can add fresh thyme and a splash of balsamic vinegar. This will lift the taste and make it more vibrant. Don’t forget the olive oil. It helps cook the onions and gives a nice finish. The sugar helps the onions caramelize, while salt and pepper bring everything together. Finally, an egg wash on the pastry gives it that golden look when baked. Gather these ingredients, and you’ll be on your way to making a wonderful tart! First, slice two large onions thinly. Heat three tablespoons of olive oil in a large skillet over medium heat. Once the oil is hot, add the sliced onions and a pinch of salt. Stir them often for about 15 to 20 minutes. You want them to soften and begin to caramelize. After the onions look golden, sprinkle one teaspoon of sugar on top. This helps deepen the flavor. Keep cooking for another five minutes. Then, add one teaspoon of balsamic vinegar and stir well. Remove from heat and let them cool a bit. Next, take your puff pastry out. Roll it out on a lightly floured surface. You want it to fit your tart pan, about 10 to 12 inches. Place the rolled pastry in the pan and trim any excess. Use a fork to prick the bottom. This keeps it from puffing too much. Spread the cooled caramelized onions evenly over the pastry base. Crumble four ounces of goat cheese on top. Don't forget to sprinkle fresh thyme leaves, about one tablespoon, over the cheese. Now it’s time for the egg wash. Beat one egg and brush the edges of the pastry for a nice golden finish. Preheat your oven to 400°F (200°C). Once hot, place the tart in the oven. Bake it for 25 to 30 minutes. Look for a puffed and golden brown pastry. When done, remove it from the oven and let it cool for a few minutes before slicing. Serve warm and enjoy! To get sweet, rich onions, you need to cook them right. Use medium heat for even cooking. Stir them often to avoid burning. If you go too high, the onions can scorch. Low heat can take longer but gives great flavor. It’s all about patience. Thaw your puff pastry ahead of time. Leave it in the fridge overnight. If you rush, it can become too warm and sticky. To keep the bottom from getting soggy, prick it with a fork. This helps steam escape while baking. Garnish your tart with fresh thyme and a drizzle of olive oil. This adds a nice touch of flavor. Pair the tart with a fresh salad or a glass of white wine. The tart’s warmth and creaminess match well with crisp greens. {{image_2}} You can switch goat cheese for feta. Feta adds a salty bite. It melts well and pairs nicely with caramelized onions. Another option is ricotta. Ricotta brings a creamy texture. It balances the sweetness of the onions. Feel free to add vegetables. Spinach works well and adds color. Mushrooms also add a nice earthiness. You can also try different herbs. Basil or oregano can enhance the flavor. Fresh herbs bring brightness to the tart. If you need a gluten-free option, use gluten-free pastry. Many stores sell this now. It works just like regular puff pastry. You can also try alternative crusts. Cauliflower or almond flour crusts are great. They add unique flavors and textures. To keep your tart fresh, store any leftovers in the fridge. Place it in an airtight container. If you do not have one, cover it tightly with plastic wrap. This will help prevent it from drying out. The tart will stay good for about 3-4 days. When reheating, I recommend using the oven. Preheat it to 350°F (175°C). Place the tart on a baking sheet. Heat for about 10-15 minutes. This keeps the crust crispy. The microwave works too, but it may get soggy. If you use the microwave, heat it for 1-2 minutes. Check often to avoid overcooking. You can freeze the tart before or after baking. If you freeze it before baking, wrap it well in plastic wrap. Then, place it in a freezer bag. This way, you can bake it fresh later. If you freeze it after baking, let it cool first. Wrap it tightly and store it in the freezer for up to 2 months. When ready to eat, thaw it overnight in the fridge before reheating. To caramelize onions fast, use a large skillet. Heat the skillet on medium heat. Add 3 tablespoons of olive oil and 2 large onions, thinly sliced. Sprinkle a pinch of salt and stir often. Cook for 15-20 minutes until the onions soften. Add 1 teaspoon of sugar to speed up browning. Cook for 5 more minutes until they are deep brown. Stir in 1 teaspoon of balsamic vinegar for extra flavor. This method saves time and enhances taste. Yes, you can prepare this tart ahead. Make the caramelized onions and let them cool. Roll out the puff pastry and fit it into the tart pan. Spread the onions on the pastry, add goat cheese, and thyme. Cover and store the tart in the fridge for up to 24 hours. When you are ready to bake, brush with egg wash and bake as directed. This way, you save time and enjoy fresh flavors. If you want to swap goat cheese, try feta cheese for a salty kick. Ricotta gives a creamy texture and a mild flavor. Cream cheese is another option, adding richness. For a sharp taste, use blue cheese. Each cheese brings a different flavor, so choose one that fits your taste. This blog post shared how to make a delicious tart using puff pastry, onions, and goat cheese. We explored optional ingredients like thyme and balsamic vinegar to enhance flavors. I also provided tips for caramelizing onions and preparing puff pastry for the perfect tart. You can customize this dish with different cheeses and vegetables. Enjoying this tart with a salad or wine makes it a great meal. Keep these steps and tips in mind for your next cooking adventure!

Caramelized Onion Goat Cheese Tart Simple and Savory

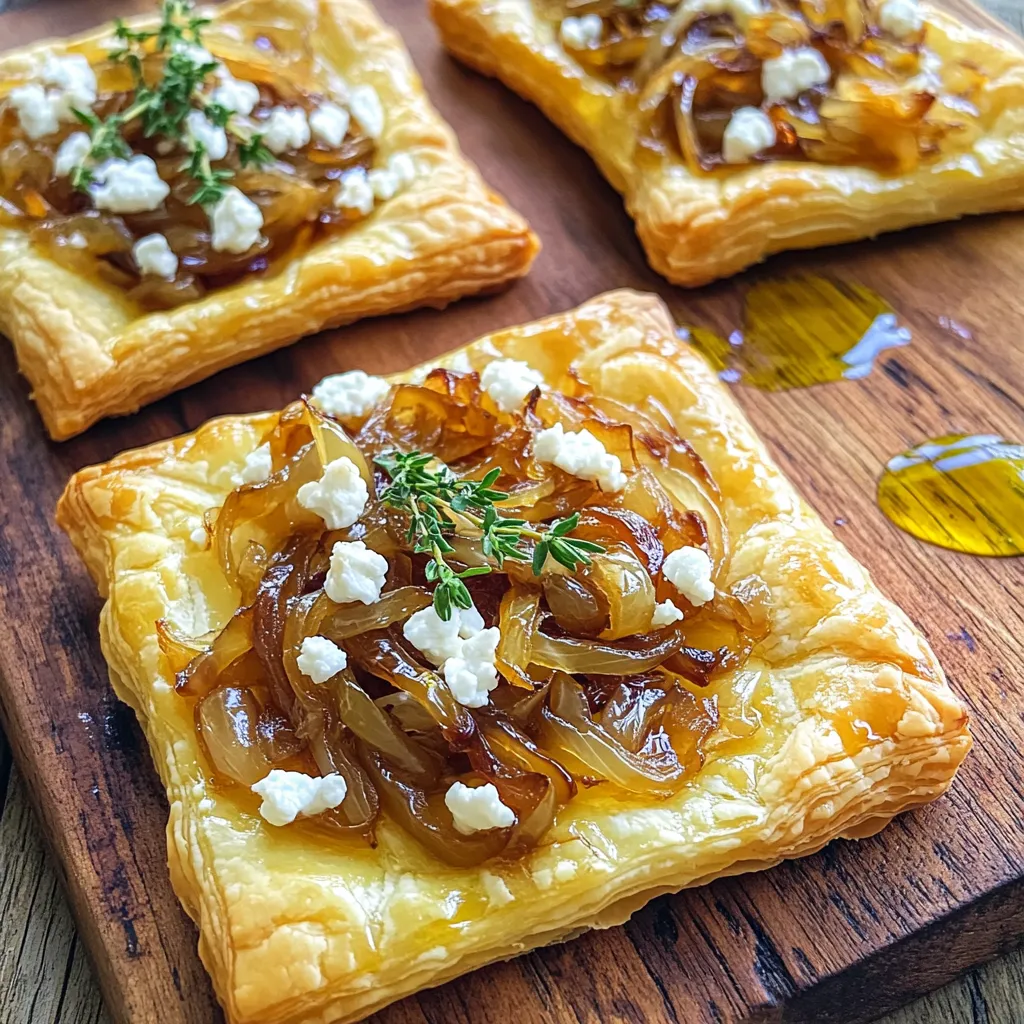
If you’re looking for a delicious dish that impresses with minimal fuss, you’ve found it! My Caramelized Onion Goat Cheese

To make Slow Cooker Sweet Potato Black Bean Chili, you need these items: - 2 large sweet potatoes, peeled and diced - 1 can (15 oz) black beans, drained and rinsed - 1 can (15 oz) diced tomatoes, with juice - 1 medium onion, diced - 2 cloves garlic, minced - 1 red bell pepper, diced - 2 cups vegetable broth - 1 tablespoon chili powder - 1 teaspoon cumin - 1 teaspoon smoked paprika - 1/2 teaspoon cayenne pepper (adjust for spice preference) - Salt and pepper to taste - 1 tablespoon olive oil - Fresh cilantro and avocado for garnish Using good-quality ingredients makes a big difference. Choose organic sweet potatoes for better flavor. Fresh herbs add brightness, so look for vibrant cilantro. Canned beans should have no added sugar or preservatives. Always check the label for quality. Fresh garlic and onion enhance the taste, so avoid pre-chopped versions. The better the ingredients, the more delicious your chili will be. You can easily swap out some ingredients. If you’re out of sweet potatoes, try butternut squash. Any beans work, so use pinto or kidney beans instead of black. If you want to skip the canned tomatoes, fresh diced tomatoes are a great choice. For a smoky flavor, use liquid smoke in place of smoked paprika. Adjust the spices based on your taste. First, gather all your ingredients. You will need: - 2 large sweet potatoes, peeled and diced - 1 can (15 oz) black beans, drained and rinsed - 1 can (15 oz) diced tomatoes, with juice - 1 medium onion, diced - 2 cloves garlic, minced - 1 red bell pepper, diced - 2 cups vegetable broth - 1 tablespoon chili powder - 1 teaspoon cumin - 1 teaspoon smoked paprika - 1/2 teaspoon cayenne pepper (adjust for spice preference) - Salt and pepper to taste - 1 tablespoon olive oil - Fresh cilantro and avocado for garnish Start by heating the olive oil in a skillet over medium heat. Add the diced onion. Sauté for about five minutes until it turns translucent. This will build a nice base flavor. Next, add the minced garlic and diced red bell pepper. Cook them together for another two to three minutes. You want the aroma to fill your kitchen. Now, transfer all your sautéed mix to the slow cooker. In the slow cooker, combine the diced sweet potatoes, black beans, and diced tomatoes with their juice. Pour in the vegetable broth. This will create a rich and hearty base. Next, season your mix with chili powder, cumin, smoked paprika, cayenne pepper, salt, and pepper. Stir everything well so the flavors can blend. It's important to cover the slow cooker with the lid. Cook it on low for six to eight hours or on high for three to four hours. The sweet potatoes should be tender when done. Once the cooking time is up, taste your chili. Adjust seasonings if needed. This is where you can make it your own. Serve it hot. Garnish with fresh cilantro and slices of avocado. The avocado adds creaminess. Enjoy your bowl of sweet potato black bean chili! You can adjust the cooking time based on your schedule. If you cook on low, plan for 6-8 hours. If you need it faster, use the high setting for 3-4 hours. Check the sweet potatoes to ensure they are soft. They should easily break apart when pressed with a fork. This helps make sure your chili has the perfect texture. To boost the flavor, consider adding more spices. A dash of extra chili powder can increase the heat. You can also add a bit of lime juice before serving. This will brighten the taste. For a smoky flavor, try adding a bit more smoked paprika. These small tweaks can make a big difference in your chili. Serve the chili hot in bowls. Top it with fresh cilantro for a pop of color. Slices of avocado add creaminess and balance the heat. You can also serve it with cornbread or tortilla chips for crunch. This chili pairs well with a side salad for a fresh touch. Enjoying it with friends makes the meal even better! {{image_2}} You can boost the nutrition of this chili by adding more vegetables. Consider diced carrots, zucchini, or corn. These veggies add color and flavor. You can also toss in some kale or spinach near the end. This keeps them bright and fresh. Feel free to get creative with what you have at home. Want to make this chili heartier? Add some protein! Cooked ground turkey or beef works great. If you prefer plant-based options, try adding lentils or quinoa. Both options add texture and protein. Just make sure to adjust the cooking time. You want everything to cook evenly. This recipe is already vegetarian and vegan-friendly. To keep it that way, avoid any meat additions. You can also check your broth to ensure it is plant-based. Use vegetable broth for a rich flavor. For extra creaminess, add a dollop of dairy-free yogurt or cashew cream when serving. These small tweaks can elevate your dish. After making your chili, let it cool. Once cool, transfer it to an airtight container. Store it in the fridge for up to five days. This keeps the flavors fresh and safe. You can freeze leftover chili for later. Use freezer-safe containers or bags. Make sure to leave some space for expansion. It will stay good for about three months. To enjoy, just thaw it overnight in the fridge. To reheat, you can use the stove or microwave. For the stove, heat it in a pot over medium heat. Stir often until warmed through. If using a microwave, place it in a bowl and cover it. Heat in short bursts, stirring in between. This helps it heat evenly. Enjoy your chili warm! Yes, you can make this chili on the stovetop. Start by heating olive oil in a pot. Sauté the onion, garlic, and bell pepper just like in the slow cooker method. Then, add the sweet potatoes, beans, tomatoes, and broth. Season well and bring to a boil. Lower the heat and let it simmer for about 30 minutes. Stir often until the sweet potatoes soften. To store leftover chili, first let it cool. Then, transfer it to an airtight container. You can keep it in the fridge for up to five days. If you want to store it longer, freeze it. Use freezer-safe containers or bags. It can last for three months in the freezer. Absolutely! If you want more heat, add extra cayenne pepper or chili powder. You can also mix in some diced jalapeños or hot sauce. Taste as you go to ensure you reach your desired spice level. This chili pairs well with many sides. You can serve it with cornbread or crusty bread. Rice or quinoa also makes great options. For a fresh touch, add a simple salad. Don't forget to top it with avocado and cilantro for added flavor. When using a slow cooker, cooking on low takes about 6-8 hours. If you are short on time, cooking on high takes about 3-4 hours. Both methods will yield tender sweet potatoes and a flavorful chili. This blog post covers everything you need for a great chili. We looked at key ingredients, their quality, and possible swaps. I outlined the steps for prep, slow cooking, and serving. You learned tips for adjusting cook times and enhancing flavors. We explored variations with extra veggies, proteins, and vegan options. Finally, I shared the best ways to store and reheat leftovers. Make your chili unique and delicious. With these tips, you can enjoy tasty meals anytime.

Slow Cooker Sweet Potato Black Bean Chili Delight

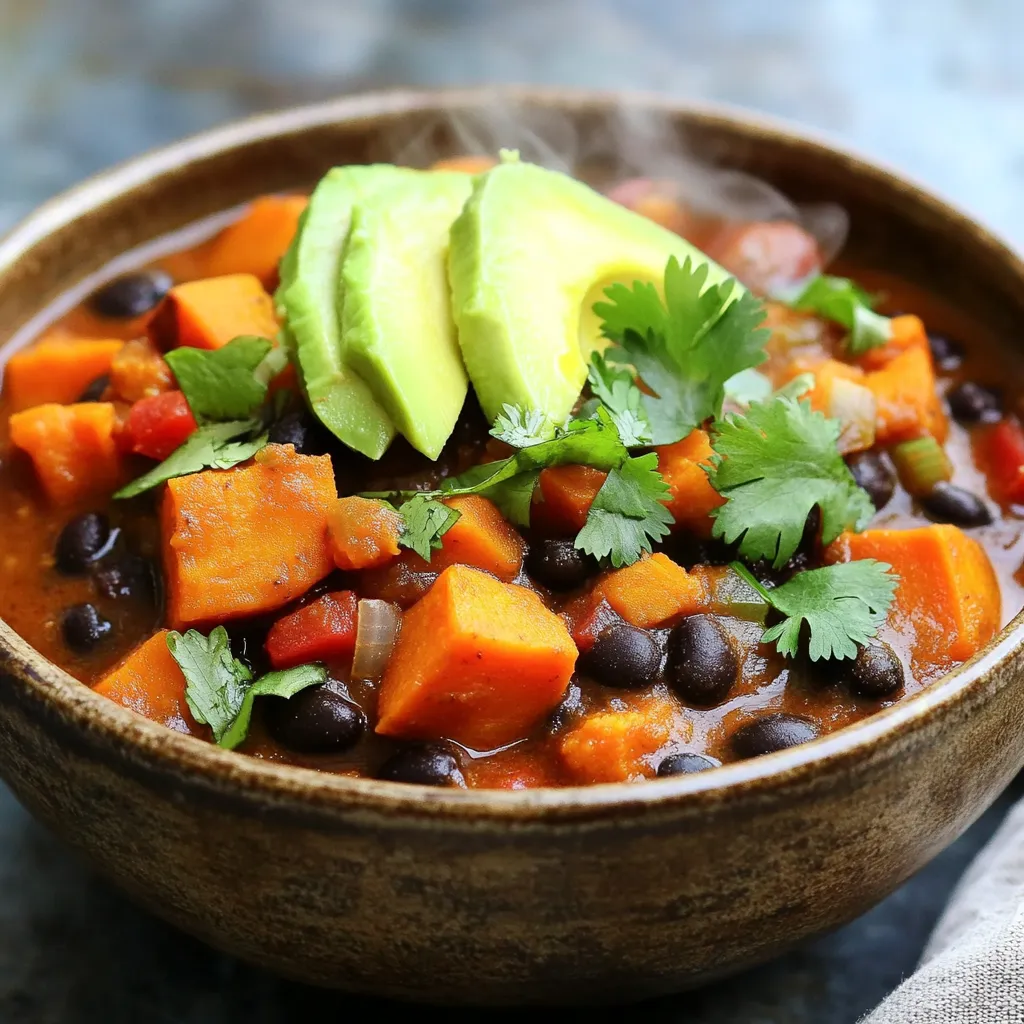
Are you ready to delight your taste buds with a warm, tasty dish? My Slow Cooker Sweet Potato Black Bean

To make One Pot Spinach Artichoke Pasta, gather these ingredients: - Pasta choices: 12 oz of penne, rotini, or fusilli - Vegetables: 1 cup of frozen spinach (thawed and drained), 1 cup of canned artichoke hearts (drained and roughly chopped), 3 cloves of garlic (minced), 1 onion (finely chopped) - Liquid: 4 cups of vegetable broth, 1 cup of cream cheese (softened) - Seasoning: 1 teaspoon of Italian seasoning, salt and pepper to taste, 1 tablespoon of olive oil - Garnish: Fresh parsley (chopped) Each ingredient plays a key role. The pasta serves as the base, while spinach and artichokes add nutrition and flavor. Garlic and onion bring a savory depth. The vegetable broth creates a rich sauce, and cream cheese adds creaminess. The Italian seasoning brings warmth, while salt and pepper enhance all the flavors. Fresh parsley adds a nice touch when serving. First, heat the olive oil in a large pot over medium heat. Add the finely chopped onion. Sauté it for about 3-4 minutes until it becomes soft and clear. This step builds a flavorful base. Next, add the minced garlic and cook for another 1-2 minutes. The garlic should smell great but not burn. Once the garlic is fragrant, stir in the thawed and drained spinach, along with the chopped artichoke hearts. Cook these together for another 2 minutes. This mix adds color and nutrition to your dish. Now, pour in the vegetable broth. Bring it to a boil. Once boiling, add your choice of pasta. I love using penne or rotini, but fusilli works too. Sprinkle in the Italian seasoning and stir well. The pasta should be fully submerged in the broth. Lower the heat to medium-low and cover the pot. Let it cook for 10-12 minutes. Stir occasionally to prevent sticking. The pasta should be al dente when done, which means it has a little bite to it. When the pasta is cooked, remove the pot from heat. Stir in the softened cream cheese and grated Parmesan cheese. Mix until everything is creamy and well combined. This is where the magic happens, creating a rich, tasty sauce. Finally, season with salt and pepper to your liking. Serve hot, and if you like, garnish with fresh chopped parsley. This simple step adds a nice touch of color and flavor. Enjoy your creamy spinach artichoke pasta! To make sure your pasta is al dente, follow these steps: - Check the package instructions for cooking time. - Start timing once the pasta hits the boiling broth. - Taste a piece before draining, it should be firm yet tender. For a creamy texture, use these stirring techniques: - Stir gently and consistently to mix in the cheese. - Scrape the bottom of the pot to avoid sticking. - Add a splash of broth if the sauce seems thick. If you need an alternative for cream cheese, consider these options: - Greek yogurt for a tangy twist. - Silken tofu for a dairy-free choice. - Ricotta cheese for added creaminess. For pasta types, feel free to mix it up: - Use whole wheat for more fiber. - Try gluten-free options like chickpea or lentil pasta. - Spiralized vegetables can make a fun, fresh base. Pair your One Pot Spinach Artichoke Pasta with these side dishes: - A light green salad with lemon vinaigrette. - Garlic bread for a comforting touch. - Roasted vegetables to add color and flavor. For presentation ideas, try these tips: - Serve in bowls topped with parsley. - Add a sprinkle of extra Parmesan for flair. - Use colorful plates to make the dish pop. {{image_2}} You can add protein to your One Pot Spinach Artichoke Pasta for a heartier meal. - Chicken or Shrimp Options: Cook diced chicken or shrimp in the pot before adding other ingredients. This adds nice flavor and boosts protein. Just make sure to cook the chicken until it's no longer pink or the shrimp until they turn pink and opaque. - Vegetarian Protein Sources: If you prefer plant-based options, try adding chickpeas or lentils. They add great texture and protein without meat. Just rinse canned chickpeas or cook lentils separately, then mix them in at the end. Enhancing flavors can take this pasta dish to the next level. - Extra Spices and Herbs: Consider adding crushed red pepper for heat or smoked paprika for depth. Fresh herbs like basil or thyme can also brighten the dish. Add these during cooking for the best flavor. - Using Different Cheeses for Creaminess: While cream cheese is great, you can mix in ricotta or goat cheese for a different taste. You might also try a strong cheese like blue cheese for a unique flavor twist. Many people have dietary needs. Here are some easy swaps. - Gluten-Free Pasta Alternatives: If you need gluten-free options, use gluten-free pasta. Brown rice or chickpea pasta works well. Just cook according to the package instructions. - Dairy-Free Substitutes for Cream Cheese: For a dairy-free version, use cashew cream or a dairy-free cream cheese. These will give you that creamy texture without the dairy. Just blend soaked cashews with a bit of water until smooth for a great substitute. To keep your One Pot Spinach Artichoke Pasta fresh, choose the right containers. Glass or BPA-free plastic containers work best. They seal tightly and prevent spills. If you have more leftovers, use smaller containers for easy portions. When it comes to refrigeration, store your pasta in the fridge within two hours of cooking. It lasts about 3 to 5 days. For longer storage, freezing is a good option. Divide your pasta into portions and freeze in airtight containers. It can last up to 3 months in the freezer. Reheating the pasta can be simple. The best methods include using the microwave or stovetop. If using the microwave, place your pasta in a bowl and add a splash of broth or water. Heat in 30-second intervals, stirring in between. To reheat on the stovetop, place the pasta in a pan over low heat. Add a bit of broth or cream to help with creaminess. Stir frequently to avoid sticking. This will keep your dish nice and smooth when reheated. Yes, you can make this pasta ahead of time. To prep, cook the pasta and sauce as normal. Let it cool completely before storing. Place it in an airtight container and refrigerate for up to 3 days. When ready to eat, simply reheat on the stove over low heat. You may want to add a splash of broth to keep it creamy. This dish pairs well with many sides. Consider serving: - Garlic bread for a crunchy contrast. - A fresh green salad for extra veggies. - Roasted vegetables to add more flavor and texture. - A light soup for a warm starter. This meal is quick and easy. Here's the breakdown: - Prep time: 10 minutes - Cook time: 15 minutes - Total time: 25 minutes - Servings: 4 people You can whip this up fast on a busy night! This post covered all the essentials for making One Pot Spinach Artichoke Pasta. We discussed the ingredients, step-by-step cooking instructions, and tips to enhance flavor and texture. You learned about variations to fit your taste and dietary needs. Lastly, we shared storage guidance to keep your dish fresh. Cooking can be simple and fun. With these steps, you'll impress anyone at your table. Enjoy the process, and let your creativity shine in every bowl!

One Pot Spinach Artichoke Pasta Quick and Tasty Meal

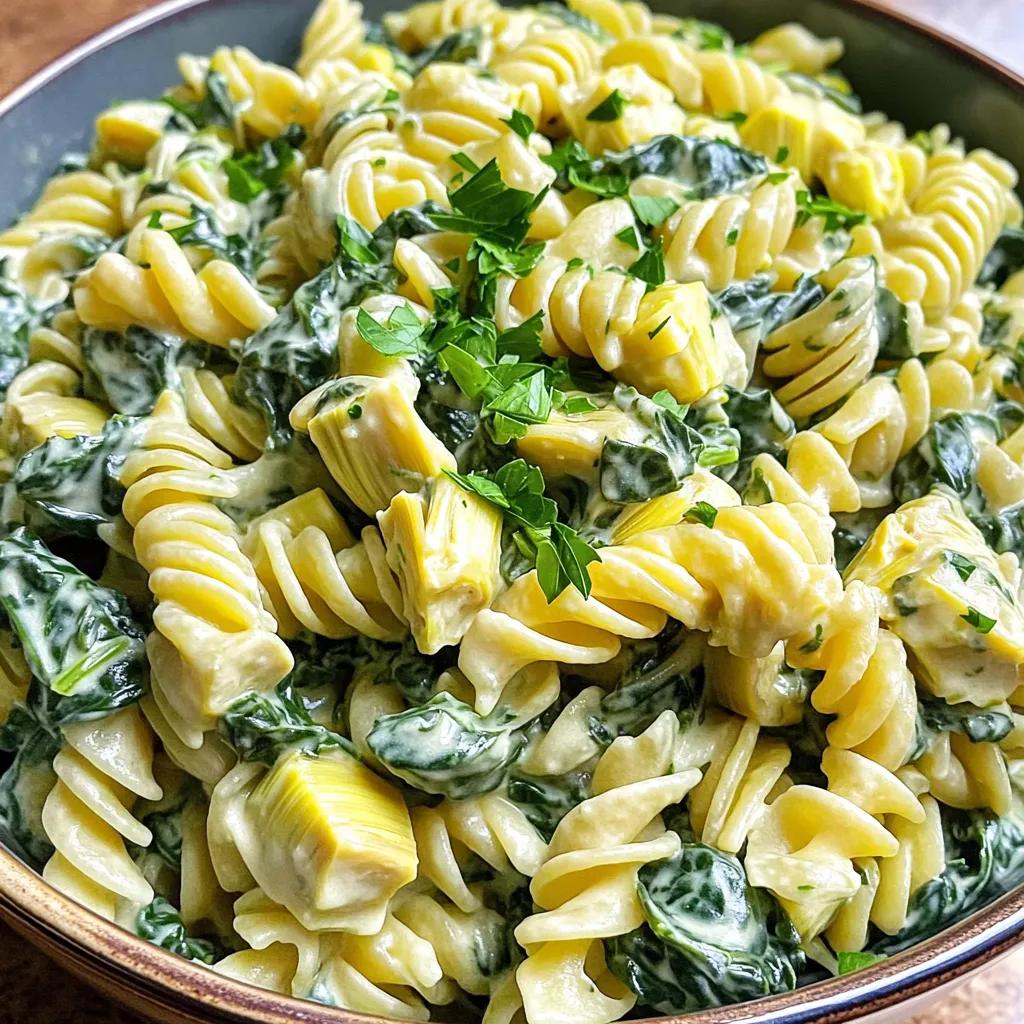
Looking for a quick and tasty meal? This One Pot Spinach Artichoke Pasta is your answer! It’s simple, packed with

Older posts
Newer posts
← Previous Page1 … Page11 Page12 Page13 … Page143 Next →

dsad

© 2025 Southern Dishes • Built with GeneratePress

Our Policies

  • Copyright Policy
  • Cookie Policy
  • GDPR Policy
  • Privacy Policy
  • Disclaimer
  • Terms Of Use

More Information

  • Home
  • About
  • Contact
  • Appetizers
  • Dessert
  • Dinner
  • Drinks
©2025, Southern Dishes About Back To Top