Skip to content
DisclaimerTerms Of UseGDPR PolicyCookie Policy

Southern Dishes

  • Home
  • Drinks
  • Appetizers
  • Dinner
  • Dessert
  • About
  • Contact
  • Privacy Policy
DisclaimerTerms Of UseGDPR PolicyCookie Policy

Isabella

- 2 ½ cups all-purpose flour - 1 ½ cups granulated sugar - 1 teaspoon baking soda - 1 teaspoon baking powder - 1 teaspoon salt - 1 tablespoon cocoa powder - 1 ½ cups vegetable oil - 1 cup buttermilk - 2 large eggs - 2 tablespoons red food coloring - 1 teaspoon vanilla extract - 1 teaspoon white vinegar

Red Velvet Cake Delight Simple and Tasty Recipe

Red Velvet Cake is a timeless favorite that never fails to impress. This deep red treat is not just beautiful;

To make a great apple pie, you need the right mix of ingredients. Let’s break them down.

Apple Pie Delight Simple Steps for Perfect Recipe

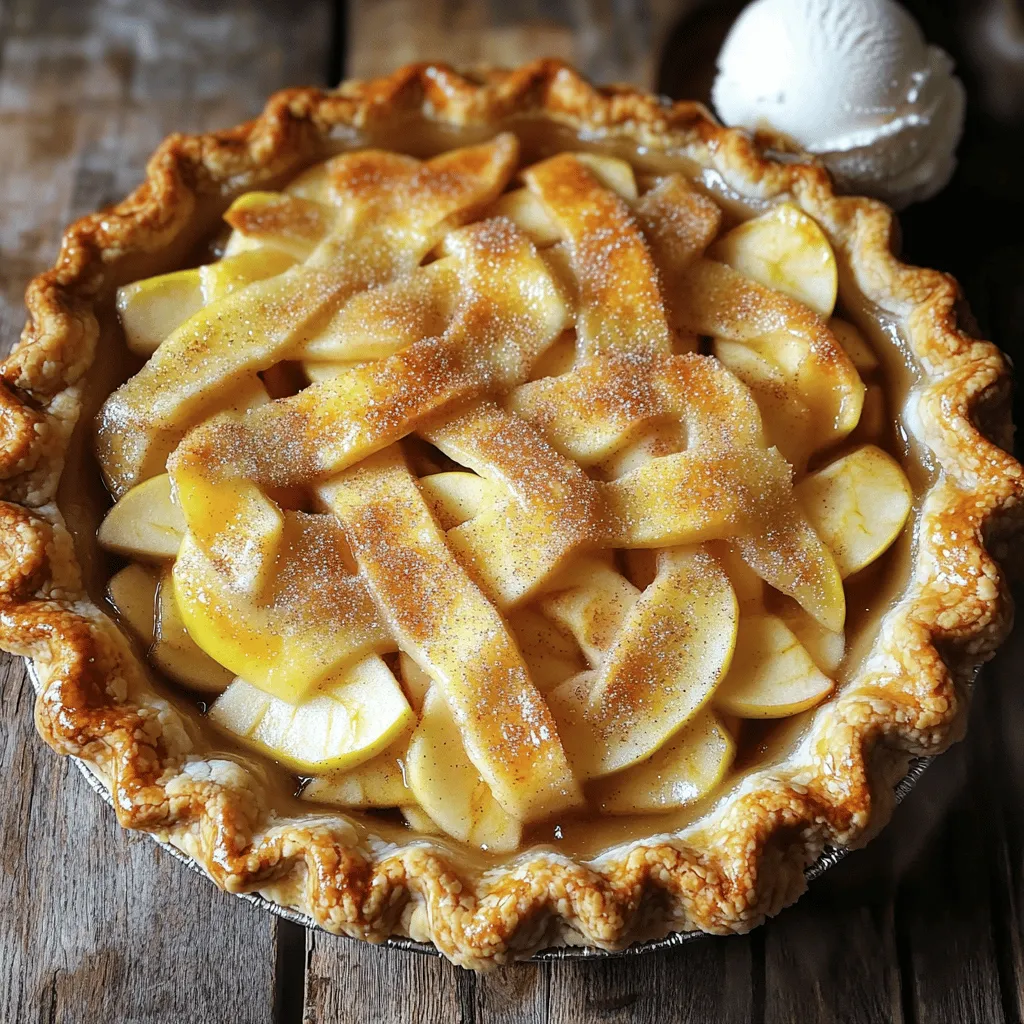
Are you ready to bake the perfect apple pie? In “Apple Pie Delight: Simple Steps for Perfect Recipe,” I will

- 4 boneless, skinless chicken breasts - 1 can (15 oz) black beans, rinsed and drained - 1 can (15 oz) sweet corn, drained - 1 can (14.5 oz) diced tomatoes with green chilies

Crockpot Mexican Chicken Flavorful and Simple Recipe

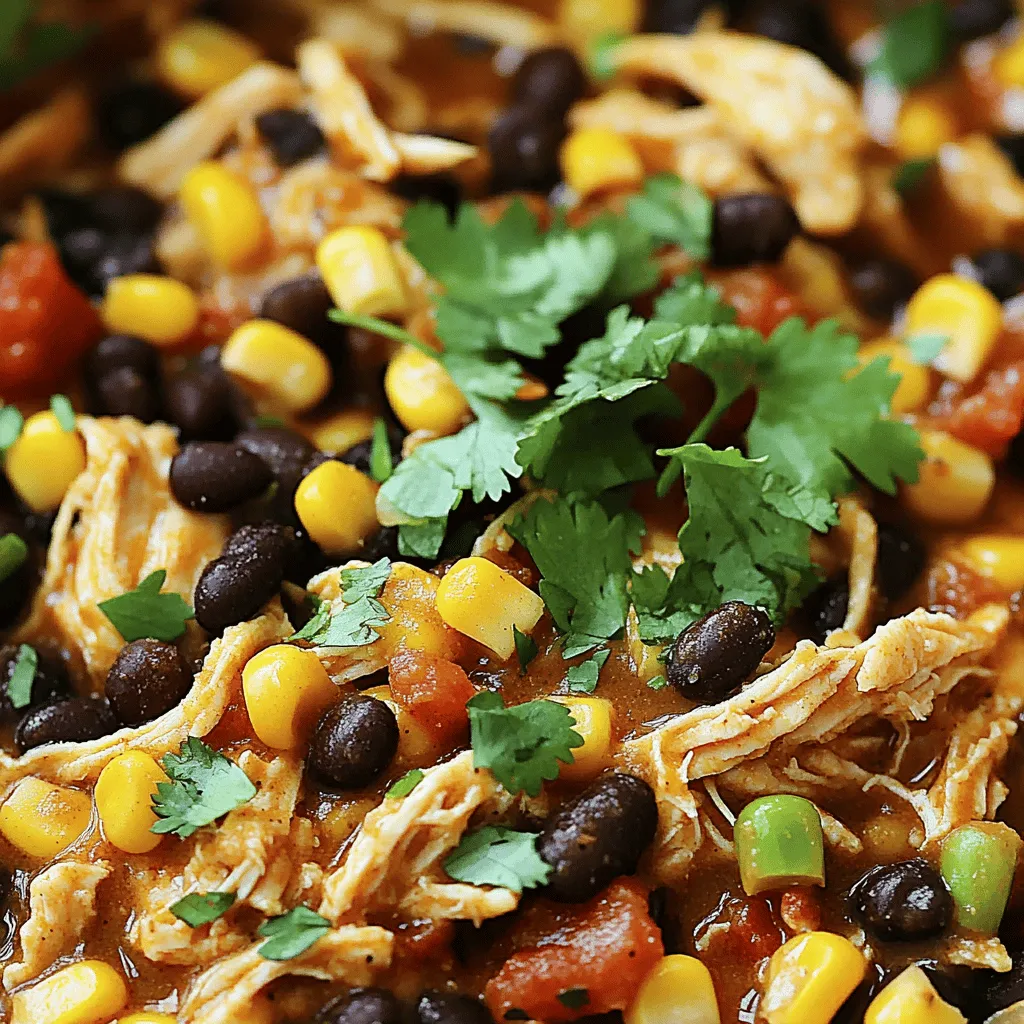
Looking for a simple, tasty meal? You’re in the right place! This Crockpot Mexican Chicken is packed with bold flavors

- 3 cups frozen hash browns - 6 large eggs - 1 cup heavy cream

Spring Hash Brown Crust Quiche Delightful and Easy Recipe

Looking for a quick, tasty dish for spring? Try my Spring Hash Brown Crust Quiche! This recipe combines crispy hash

To make Creamy Crack Chicken Gnocchi, gather these key ingredients: - 1 lb gnocchi (store-bought or homemade) - 2 cups cooked chicken, shredded - 4 oz cream cheese, softened - 1 cup chicken broth - 1 cup heavy cream - 1 cup shredded cheddar cheese - 1 teaspoon garlic powder - 1 teaspoon onion powder - 1 teaspoon Italian seasoning - Salt and pepper to taste - 2 green onions, sliced (for garnish) - Fresh parsley, chopped (for garnish) You can customize this dish with some optional ingredients: - Cooked bacon bits for extra flavor - Spinach or kale for added greens - Sun-dried tomatoes for a tangy twist - Different cheese like mozzarella or Parmesan Garnishing adds a nice touch to your dish. Here are some ideas: - Sliced green onions for a fresh crunch - Chopped fresh parsley for color - A sprinkle of red pepper flakes for heat - Grated Parmesan cheese for extra richness {{ingredient_image_1}} To start, boil salted water in a large pot. Once it bubbles, add 1 lb of gnocchi. Cook them until they float to the top, following package instructions. This usually takes just a few minutes. Drain the gnocchi and put them aside for now. In the same pot, keep the heat on medium. Add 2 cups of shredded chicken, 4 oz of softened cream cheese, and 1 cup of chicken broth. Pour in 1 cup of heavy cream too. Stir everything until the cream cheese melts. This creates a rich, creamy base. Next, mix in 1 teaspoon of garlic powder, 1 teaspoon of onion powder, and 1 teaspoon of Italian seasoning. Add salt and pepper to taste. Let it simmer for about 5 minutes, stirring occasionally. Now, it’s time to make it all come together. Gradually stir in 1 cup of shredded cheddar cheese. Keep stirring until it melts and the sauce becomes silky. Gently fold the cooked gnocchi into the creamy chicken sauce. Ensure every piece of gnocchi is coated well. Let it simmer for another 2-3 minutes. Taste it, and adjust the seasonings if needed. Serve the dish hot, garnished with sliced green onions and fresh parsley for a burst of color. - Use fresh or good-quality gnocchi. Homemade is best if you have time. - Cook gnocchi in boiling, salted water. It helps keep the flavor bright. - Watch for the gnocchi to float. This means they are done cooking. - Drain them gently. Avoid crushing the gnocchi to keep them intact. - Start with softened cream cheese. This helps it melt smoothly. - Use full-fat heavy cream. It gives the sauce a rich texture. - Stir the mixture constantly as it cooks. This helps mix the flavors well. - Gradually add cheese, allowing it to melt before adding more. This ensures creaminess. - Don’t rush the melting process. If you heat it too fast, it may curdle. - Avoid overcooking the gnocchi. They can become mushy if left in water too long. - Don’t skip seasoning. Salt and pepper enhance every flavor in the dish. - Always taste as you go. Adjust seasoning to suit your taste. Pro Tips Choose the Right Gnocchi: For the best texture, opt for fresh gnocchi if available, as it will hold up better in the creamy sauce compared to dried varieties. Customize Your Proteins: Feel free to substitute the shredded chicken with rotisserie chicken or even turkey for a different flavor profile. Make it Extra Creamy: Adding a splash of white wine to the sauce can enhance the flavor and creaminess, just let it simmer a bit longer to cook off the alcohol. Adjust Seasonings: Always taste your sauce before serving; you might want to add more salt, pepper, or even a dash of hot sauce for a kick! {{image_2}} You can easily switch up the protein in this dish. Instead of chicken, use turkey or shredded pork. Both options work well and add unique flavors. You can also try using rotisserie chicken for a quick fix. It saves time and still delivers great taste. For a twist, consider diced bacon or sausage for a smoky touch. If you prefer a vegetarian meal, I have great options for you. Replace the chicken with sautéed mushrooms or spinach. Both add depth and nutrition. You can also use chickpeas for a hearty protein source. Just make sure to tweak the seasoning to match your new ingredients. This keeps the flavors rich and exciting. Enhancing flavors is simple with a few fun additions. Try adding sun-dried tomatoes for a tangy kick. Fresh herbs like basil or thyme can brighten the dish. A splash of lemon juice adds freshness too. If you enjoy spice, consider red pepper flakes or jalapeños. Each addition creates a unique twist to the creamy goodness. To store leftovers, let the dish cool down first. Then, place it in an airtight container. This keeps it fresh for up to three days. Make sure to store it in the fridge. Label the container with the date, so you know when you made it. When you're ready to enjoy your leftovers, heat them gently. You can use the stove or microwave. If using the stove, add a splash of chicken broth. This helps keep the sauce creamy. Stir often until it's hot. In the microwave, cover the dish with a lid. Heat in short bursts, stirring in between. You can freeze this dish, but it may change the texture. If you decide to freeze it, use a freezer-safe container. Make sure to leave space for expansion. This meal can last up to three months in the freezer. When ready to eat, thaw it overnight in the fridge before reheating. Yes, you can use frozen gnocchi. Just cook them straight from the freezer. Follow the package instructions for best results. Frozen gnocchi is quick and easy to use. It saves time, and they taste great in this dish. You can make this dish healthier by swapping some ingredients. Use low-fat cream cheese and heavy cream. Replace chicken broth with low-sodium broth. You can add more veggies too. Spinach or broccoli works well and adds nutrients. Creamy Crack Chicken Gnocchi pairs well with a fresh salad. A simple green salad balances the creamy flavors. Garlic bread is another great option. It soaks up the extra sauce perfectly. You can also serve it with steamed vegetables for a complete meal. This blog post covered how to make Creamy Chicken Gnocchi. We discussed the complete ingredient list, cooking steps, and tips for perfect results. You learned about variations, storage, and common questions to help you succeed. Cooking can be fun and easy. Enjoy making this dish your own with different flavors. Keeping these tips in mind will help you create something tasty. Now, gather your ingredients and start cooking!

Creamy Crack Chicken Gnocchi Flavorful Weeknight Meal

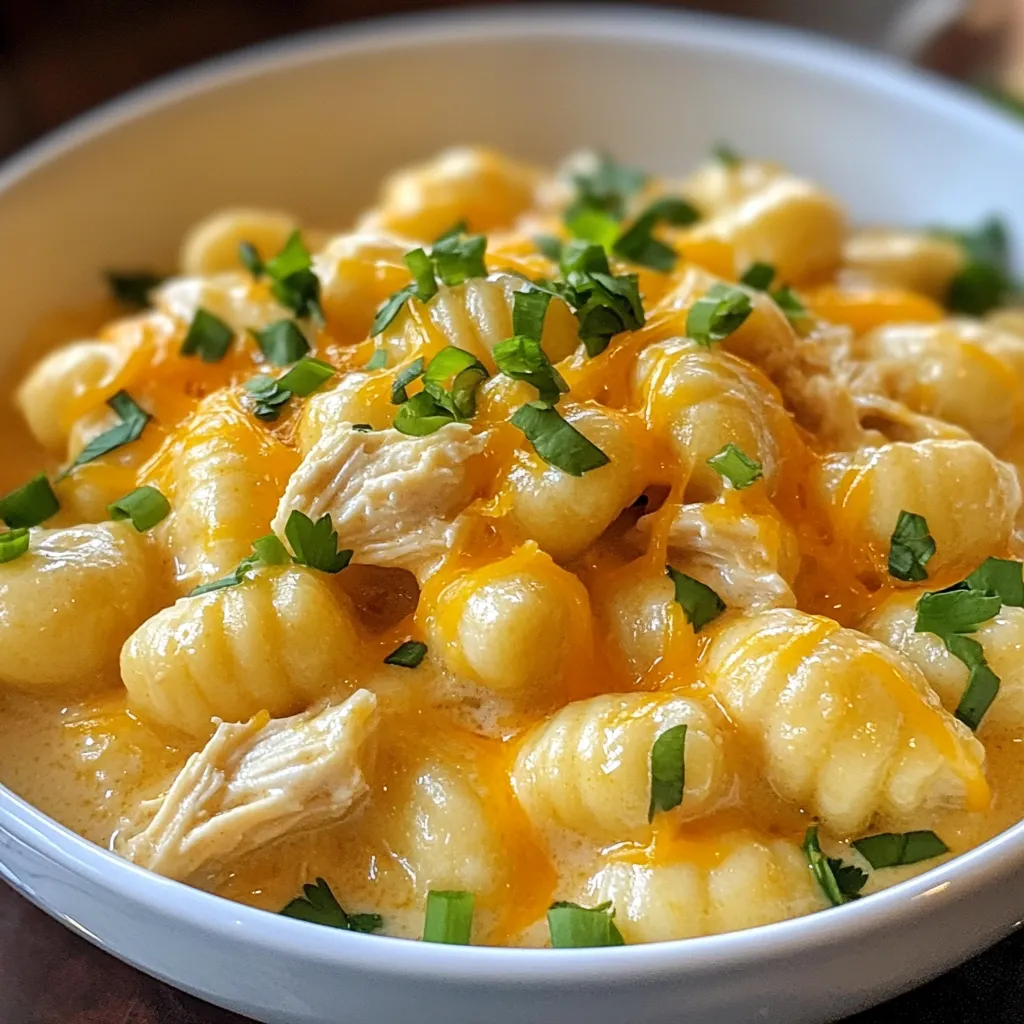
Craving a simple but delicious meal? You’ll love my Creamy Crack Chicken Gnocchi. This dish is packed with flavor and

- 2 medium-sized butternut squash - 3 tablespoons olive oil - 1 teaspoon garlic powder - 1 teaspoon smoked paprika - 1 teaspoon sea salt - 1/2 teaspoon freshly cracked black pepper - Optional: 1/4 teaspoon cayenne pepper for heat - Fresh herbs (like thyme or rosemary) for garnish - Squash: medium-sized - Olive oil: tablespoons - Garlic powder: teaspoons - Smoked paprika: teaspoons - Sea salt: teaspoons - Black pepper: teaspoons - Cayenne pepper: optional, teaspoons - Fresh herbs: sprigs You can add cayenne pepper to make your chips spicy. Fresh herbs like thyme or rosemary add great flavor. They also make your dish look pretty. You can mix and match spices to fit your taste. For example, try adding onion powder or chili powder for a new twist. {{ingredient_image_1}} First, gather your butternut squash. You will need two medium-sized squash for this recipe. Start by preheating your oven to 425°F (220°C). Line two baking sheets with parchment paper. This keeps the chips from sticking. Next, cut the squash in half lengthwise. Use a spoon to scoop out the seeds. Now, slice the squash into thin discs. Aim for about 1/8 inch thick. You can use a mandoline slicer for even cuts. If you don’t have one, a sharp knife works too. Even slices help the chips cook evenly. In a large mixing bowl, combine the following: - 3 tablespoons olive oil - 1 teaspoon garlic powder - 1 teaspoon smoked paprika - 1 teaspoon sea salt - 1/2 teaspoon freshly cracked black pepper - Optional: 1/4 teaspoon cayenne pepper for heat Mix these ingredients well until they blend. This mix adds great flavor to the squash. Add the sliced squash to the bowl. Gently toss the slices in the oil and seasoning mix. Make sure every slice gets coated. This step is key for tasty chips! Arrange the seasoned squash slices on your baking sheets. Lay them in a single layer. Avoid overlapping the slices; this ensures they get crispy. Now, roast the squash in your preheated oven. Cook for about 20 to 25 minutes. Flip the chips halfway through cooking. This helps them brown evenly. Keep an eye on them; ovens can vary. You want them golden brown and crispy. Once done, take them out of the oven. Let the chips cool for a few minutes. They will crisp up even more as they cool. For a finishing touch, sprinkle fresh herbs over the chips. This adds color and flavor. Enjoy your crispy roasted squash chips as a healthy snack! To make your squash chips crispy, slice them thinly. Aim for about 1/8 inch thick. A mandoline slicer helps you get even slices. Even thickness ensures even cooking. Toss the slices in a mix of olive oil and spices. This step helps the chips crisp up nicely. Lay them flat on the baking sheet without overlapping. This allows hot air to flow around each slice. Flip the chips halfway through baking for even crispiness. One common mistake is cutting the squash too thick. Thick slices do not crisp well; they may stay soft. Another mistake is overcrowding the baking sheet. If the chips overlap, they will steam instead of roast. Also, do not skip the seasoning. The oil and spices add flavor and aid in crisping. Lastly, keep an eye on the oven. Cooking times can vary, so check your chips often to avoid burning. Using a mandoline makes slicing squash easy and quick. It ensures each slice is the same size for even cooking. Invest in good baking sheets; they should be sturdy and non-stick. Lining them with parchment paper helps with easy cleanup. A large mixing bowl is also handy for tossing the slices with oil and spices. These tools make your cooking process smooth and enjoyable. Pro Tips Slice Evenly: Ensure your squash slices are uniform in thickness for even cooking and crispiness. Watch the Oven: Keep an eye on the chips as they roast; ovens can vary in temperature, and you want to avoid burning. Use Fresh Herbs: Garnish with fresh herbs right before serving for a burst of flavor and appealing presentation. Store Properly: Store any leftover chips in an airtight container to maintain their crispiness for a few days. {{image_2}} You can change the flavors of your squash chips easily. Try using fresh herbs like basil or oregano instead of thyme or rosemary. You can also swap seasonings. For a spicy kick, add more cayenne pepper. If you want a cheesy flavor, sprinkle some nutritional yeast before baking. Experiment with different spice blends like taco seasoning or curry powder. The options are endless! Crispy roasted squash chips taste great on their own, but dips can make them even better. Serve them with a creamy avocado dip or a tangy yogurt sauce. Hummus also works well. You can even pair them with salsa for a zesty touch. For a fun twist, try serving them alongside guacamole. These dips add flavor and make your snack more exciting. While butternut squash is a star, you can use other squash types too. Try zucchini or acorn squash for a different taste. Both can be sliced thin and roasted. Each squash brings its own flavor and texture. Experimenting with different squash types keeps your chips fresh and fun. Make sure to adjust cooking times based on the thickness of your slices. Enjoy discovering your favorite squash! To store leftover chips, place them in an airtight container. Make sure they cool down first. If you put warm chips in the container, they will get soggy. You can keep them in the fridge for up to three days. If you want to enjoy them later, use a paper towel inside the container to absorb moisture. When you are ready to eat the chips again, reheating is key. Preheat your oven to 350°F (175°C). Spread the chips in a single layer on a baking sheet. Bake them for about 5 to 10 minutes. This will bring back their crispiness. Avoid using the microwave, as it will make them soft. If you want to freeze the squash chips, place them in a single layer on a baking sheet first. Freeze them for about an hour until they are firm. Then, transfer the chips to a freezer-safe bag. Remove as much air as possible before sealing. You can store them in the freezer for up to three months. When you want to eat them, bake straight from frozen. Just add a few extra minutes to the cooking time. Butternut squash is the best for chips. It has a sweet taste and a firm texture. Other squashes, like acorn or kabocha, can work too. They provide a different flavor and texture. I love butternut squash for its balance of sweetness and crunch. To add spice, mix in cayenne pepper. A little goes a long way. Start with 1/4 teaspoon, then adjust to your taste. You can also add chili powder or paprika for a different kick. Experiment with spices like cumin or chipotle for unique flavors. Yes, you can use an air fryer! It cooks the chips faster and makes them extra crispy. Set the air fryer to 375°F (190°C) and cook for about 15 minutes. Shake the basket halfway for even cooking. Enjoy the same tasty result with less oil! In this blog post, we explored how to make delicious squash chips. We covered ingredients, step-by-step instructions, and tips to get them crispy. You learned about flavor variations, serving ideas, and storage tips for leftovers. These chips are fun, healthy, and easy to customize. So, grab your squash and start cooking! Your next snack will delight your taste buds and impress friends!

Crispy Roasted Squash Chips Easy Snack Delight

Looking for a crunchy snack that’s both tasty and healthy? You’re in the right place! Crispy Roasted Squash Chips are

- 3 ripe bananas, mashed - 2 large eggs - 1/4 cup unsweetened applesauce - 1 teaspoon vanilla extract - 1 teaspoon baking soda - 1/2 teaspoon baking powder - 1/2 teaspoon salt - 1 teaspoon ground cinnamon - 1 1/2 cups whole wheat flour - 1/2 cup chopped walnuts or pecans (optional) - 1/4 cup sugar-free chocolate chips (optional) To make sugar-free banana bread, gather these simple ingredients. Start with three ripe bananas. The riper, the better! They add great flavor. Next, you need two large eggs for binding. Then, grab 1/4 cup of unsweetened applesauce. This keeps the bread moist and adds natural sweetness. You’ll also need one teaspoon of vanilla extract. It adds a warm aroma to the bread. Baking soda and baking powder are key. Use one teaspoon of baking soda and 1/2 teaspoon of baking powder. They help the bread rise. Don’t forget the salt! Just 1/2 teaspoon enhances all the flavors. Ground cinnamon brings a nice spice. Use one teaspoon for a cozy taste. For the base, you’ll need 1 1/2 cups of whole wheat flour. It gives the bread a hearty texture. If you want to add some crunch, throw in 1/2 cup of chopped walnuts or pecans. These are optional but so tasty! Lastly, for a sweet touch, add 1/4 cup of sugar-free chocolate chips, if you like. They melt into the bread and add a delightful surprise. Now, you have everything you need to make this delicious banana bread! {{ingredient_image_1}} First, set your oven to 350°F (175°C). This will help the bread bake evenly. While it heats, grab a 9x5-inch loaf pan. You can grease it with cooking spray or line it with parchment paper. This makes it easy to take the bread out later. Now, in a big bowl, mash the three ripe bananas until they are smooth. Add 1/4 cup of unsweetened applesauce to the bananas. Mix them well. Next, crack in the two large eggs and pour in the teaspoon of vanilla extract. Stir this mixture until it looks nice and blended. In another bowl, whisk together the dry stuff. Take 1 1/2 cups of whole wheat flour, 1 teaspoon of baking soda, 1/2 teaspoon of baking powder, 1/2 teaspoon of salt, and 1 teaspoon of ground cinnamon. Make sure there are no lumps in this mix. Slowly add the dry mix to the wet mix. Stir just until you don’t see any flour. Be careful not to overmix, as this can make the bread tough. If you want, fold in 1/2 cup of chopped walnuts or pecans and 1/4 cup of sugar-free chocolate chips for some extra flavor. Pour the batter into the prepared loaf pan. Spread it out evenly. Bake it in the oven for 50-60 minutes. Check if it’s done by sticking a toothpick in the center; it should come out clean. Let it cool in the pan for about 10 minutes, then move it to a wire rack to cool completely. To get the best texture in your sugar-free banana bread, follow these steps: - Use very ripe bananas. They should be brown and soft. - Mash the bananas well. This helps mix them into the batter smoothly. - When mixing wet and dry ingredients, stir gently. Mix just until you see no dry flour. - Avoid overmixing. This keeps the bread light and fluffy. Adding flavors can make your banana bread even better. Here are some ideas: - Fold in 1/2 cup of chopped walnuts or pecans. They add crunch and taste. - Add a teaspoon of vanilla extract to boost the flavor. - A sprinkle of nutmeg can give a warm spice note. - If you like chocolate, mix in 1/4 cup of sugar-free chocolate chips. They melt and make each bite special. Serving your banana bread nicely makes it more appealing. Try these tips: - Cut the bread into even slices for a clean look. - Serve it warm or at room temperature. - Top each slice with a dollop of sugar-free yogurt. It adds creaminess. - A smear of nut butter can enhance the flavor and add protein. These simple tips can elevate your banana bread from good to great! Pro Tips Choose Ripe Bananas: The riper the bananas, the sweeter and more flavorful your banana bread will be. Look for bananas with lots of brown spots for the best taste. Don't Overmix: When combining the wet and dry ingredients, mix just until they are combined. Overmixing can lead to a dense bread. Cooling Time: Allowing the banana bread to cool in the pan for 10 minutes before transferring it to a wire rack helps it maintain its shape and prevents it from falling apart. Storage Tips: Store any leftover banana bread in an airtight container at room temperature for up to 3 days, or freeze for longer storage. Wrap slices individually for easy thawing. {{image_2}} You can easily make this banana bread gluten-free. Simply replace the whole wheat flour with a gluten-free all-purpose flour. Look for blends that include xanthan gum. This helps mimic the texture of regular flour. Follow the same measurements in the recipe. Your banana bread will still be soft and tasty! To make this banana bread vegan, you need to swap the eggs. Use 1/2 cup of unsweetened applesauce instead of 2 eggs. This keeps the bread moist. You can also use flax eggs. Mix 1 tablespoon of ground flaxseed with 2.5 tablespoons of water. Let it sit for a few minutes before adding it to the batter. This adds fiber too! Feel free to get creative with mix-ins! Here are some fun ideas: - Dried fruits like raisins, cranberries, or apricots - Seeds like chia, pumpkin, or sunflower seeds - Shredded coconut for a tropical twist - Spices like nutmeg or ginger for added warmth Add any of these to your batter before baking. They bring new flavors and textures to your banana bread! Store your banana bread in a cool, dry place. Wrap it tightly in plastic wrap or foil. This keeps it moist and fresh. A bread box works well for this. Avoid storing it in direct sunlight. If you want to keep it longer, refrigerate your banana bread. Wrap it tightly in plastic wrap and place it in an airtight container. This helps it stay fresh for about a week. You can also freeze it for up to three months. Slice the bread first for easy thawing. Wrap each slice in plastic wrap and place them in a freezer bag. At room temperature, banana bread lasts about 3-4 days. In the fridge, it can stay fresh for up to a week. If frozen, it can last for three months. Always check for signs of spoilage. If it smells off or has mold, it’s best to throw it away. Yes, you can use other sweeteners in this recipe. Some good options are mashed dates or pureed prunes. These swaps add natural sweetness and moisture. However, each sweetener changes the taste and texture. Test a small batch to see how you like it. Yes, this banana bread is suitable for diabetics. It uses ripe bananas and unsweetened applesauce for sweetness. Whole wheat flour adds fiber, which helps control blood sugar. Always check with a doctor if you have concerns about your diet. To keep your banana bread moist, use very ripe bananas. Ripe bananas have more natural sugars and moisture. Don't overmix the batter; this can make the bread dense. Adding nuts or chocolate chips also helps keep it soft while adding flavor. You now know how to make delicious banana bread. Start with ripe bananas and simple ingredients. Follow the steps to mix and bake your bread perfectly. Remember to try the tips for great texture and flavor. You can create fun variations too, like gluten-free or vegan options. Proper storage keeps your banana bread fresh longer. Enjoy experimenting with this recipe and share it with friends. Making banana bread is easy and rewarding. You’ll love both the taste and the joy of baking!

Sugar-Free Banana Bread Simple and Tasty Recipe

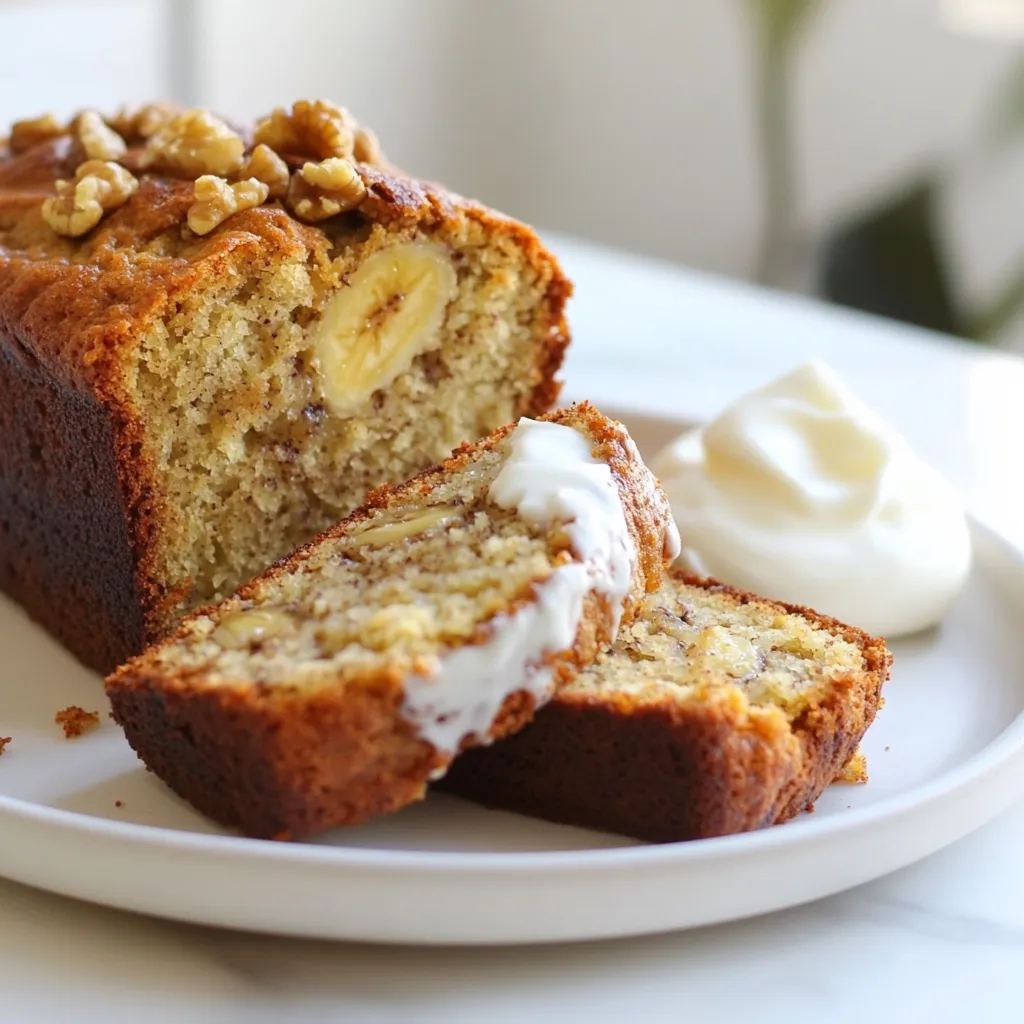
Are you craving a sweet treat without the sugar? You’re in the right place! My sugar-free banana bread is not

- 8 oz cheese tortellini - 1 lb flank steak, sliced thinly - 1 tablespoon olive oil Cheese tortellini brings a creamy twist to the dish. I love using fresh tortellini for best flavor. Flank steak adds rich taste and tender texture. Slice the steak thin to cook it fast. Olive oil makes everything nice and shiny. - 1 cup cherry tomatoes, halved - 1 cup baby spinach - 2 cloves garlic, minced Cherry tomatoes burst with sweetness when cooked. I often use ripe ones for better taste. Baby spinach adds a pop of color and nutrients. Garlic brings a warm, savory flavor that I can’t resist. - 1/2 teaspoon red pepper flakes (optional) - 1/2 cup beef broth - 1/4 cup grated Parmesan cheese Red pepper flakes give a spicy kick if you like heat. Beef broth adds depth and keeps everything moist. Grated Parmesan is a finishing touch that makes the dish rich and creamy. {{ingredient_image_1}} To start, I heat my skillet over medium-high heat. I pour in one tablespoon of olive oil. Next, I season the sliced flank steak with salt and pepper. Once the oil is hot, I add the steak to the skillet. I let it sear for about 3-4 minutes. This timing is key for perfect browning. When it’s brown, I remove the steak and set it aside. In the same skillet, I add minced garlic and red pepper flakes. I sauté them for about 30 seconds. The smell is amazing! Then, I pour in half a cup of beef broth. I bring it to a simmer and scrape the skillet to get those tasty browned bits. This step adds so much flavor. Next, I add the cheese tortellini and halved cherry tomatoes to the skillet. I let them cook for about 5-7 minutes. I stir gently until the tortellini is tender. Then, I toss in the baby spinach. I cook it until it wilts, which takes about 1-2 minutes. Once that’s done, I return the seared steak to the skillet. I toss everything together and let it heat for another minute. Finally, I sprinkle grated Parmesan cheese on top. Mixing it well helps it melt into the dish. I always taste it and adjust the salt and pepper as needed. To cook tortellini just right, follow the package instructions for timing. Generally, it takes about 5 to 7 minutes. You want the tortellini to be tender but still firm. This is called "al dente." If you overcook it, tortellini can become mushy. To avoid that, test a piece a minute or two before the time is up. To add more flavor, consider using fresh herbs like thyme or oregano. A dash of lemon zest can brighten the dish. You can also use chicken broth or vegetable broth as an alternative to beef broth. Each option will give a different but tasty note to your meal. When serving, use deep bowls to hold the dish nicely. Top it with fresh basil leaves and an extra sprinkle of Parmesan cheese. This not only looks great but also adds flavor. You can even drizzle a bit of olive oil for a shiny finish. Serve with crusty bread for a complete meal! Pro Tips Rest the Steak: After searing, let the steak rest for a few minutes before slicing. This allows the juices to redistribute, making the meat more tender and flavorful. Customizing the Heat: If you prefer a spicier dish, increase the amount of red pepper flakes or add a pinch of cayenne pepper for an extra kick. Use Fresh Ingredients: For the best flavor, use fresh cherry tomatoes and baby spinach. They will enhance the dish's overall taste and presentation. One-Pan Clean-up: To make clean-up easier, try to cook and serve everything from the skillet. This way, you minimize dish usage and keep flavors locked in. {{image_2}} You can change the protein in this dish. If you like chicken, use diced chicken breast. Cook it the same way as the steak. For a seafood twist, try shrimp. Cook them until they turn pink, about 3-4 minutes. If you want a vegetarian meal, mushrooms or chickpeas work great. Sauté sliced mushrooms until they are tender. For chickpeas, just drain and rinse a can. Add them to the skillet with the tortellini. Both options give a nice texture and flavor. Feel free to mix in other vegetables. Bell peppers add a sweet crunch. Cut them into strips and sauté them with the garlic. Zucchini is another tasty choice. Slice it thin and add it with the tortellini. You can also use seasonal vegetables. In summer, add fresh corn or peas. In fall, try using butternut squash. These changes make the dish fresh and fun. Enjoy experimenting with your favorite veggies! To keep your steak tortellini skillet fresh, store leftovers in the fridge. Use an airtight container. The dish can stay good for up to three days. Make sure to cool it down first before sealing it. If you want to save it for longer, freezing is a great option. Place the cooled dish in a freezer-safe container. You can freeze it for up to three months. Just remember to label it with the date. This way, you will know when to use it. Reheating your steak tortellini skillet is easy. The best method is to use the stovetop. Heat a skillet over medium heat. Add a splash of beef broth or water to keep it moist. Stir it often to ensure even heating. If you prefer using a microwave, put the dish in a microwave-safe bowl. Cover it loosely with a lid or wrap. Heat it in short bursts, stirring in between. This will help keep a good texture. Avoid overcooking to keep the tortellini firm and tasty. Yes, you can use frozen tortellini in your skillet. Cooking frozen tortellini is easy. First, add the frozen tortellini directly to the skillet. You don’t need to thaw them. Make sure to increase the cooking time by a few minutes. Stir gently to avoid breaking the tortellini. Cook until they float and are tender. This usually takes about 7 to 10 minutes. Frozen tortellini saves time and still tastes great! You can pair this dish with great side options. A fresh garden salad is a perfect match. Add mixed greens, cucumbers, and a light vinaigrette. Garlic bread also complements the rich flavors well. You can serve roasted vegetables alongside for added color and taste. Consider pairing it with a simple fruit salad for a refreshing finish. These sides enhance your meal and add variety. Making steak tortellini skillet gluten-free is simple. You just need to swap the tortellini. Look for gluten-free tortellini made from rice or corn. Check the label to ensure it is certified gluten-free. For the broth, use a gluten-free beef broth. Always read labels to avoid hidden gluten in processed foods. With these changes, you can enjoy this dish safely and deliciously! This article shared a simple, tasty dish that combines cheese tortellini and flank steak. I covered the key ingredients, cooking steps, and tips for success. You learned how to store leftovers and explore variations. My goal was to make cooking easy and fun for you. Experiment with flavors and proteins to make it your own. Enjoy every bite of your delicious creation!

Steak Tortellini Skillet Quick and Flavorful Meal

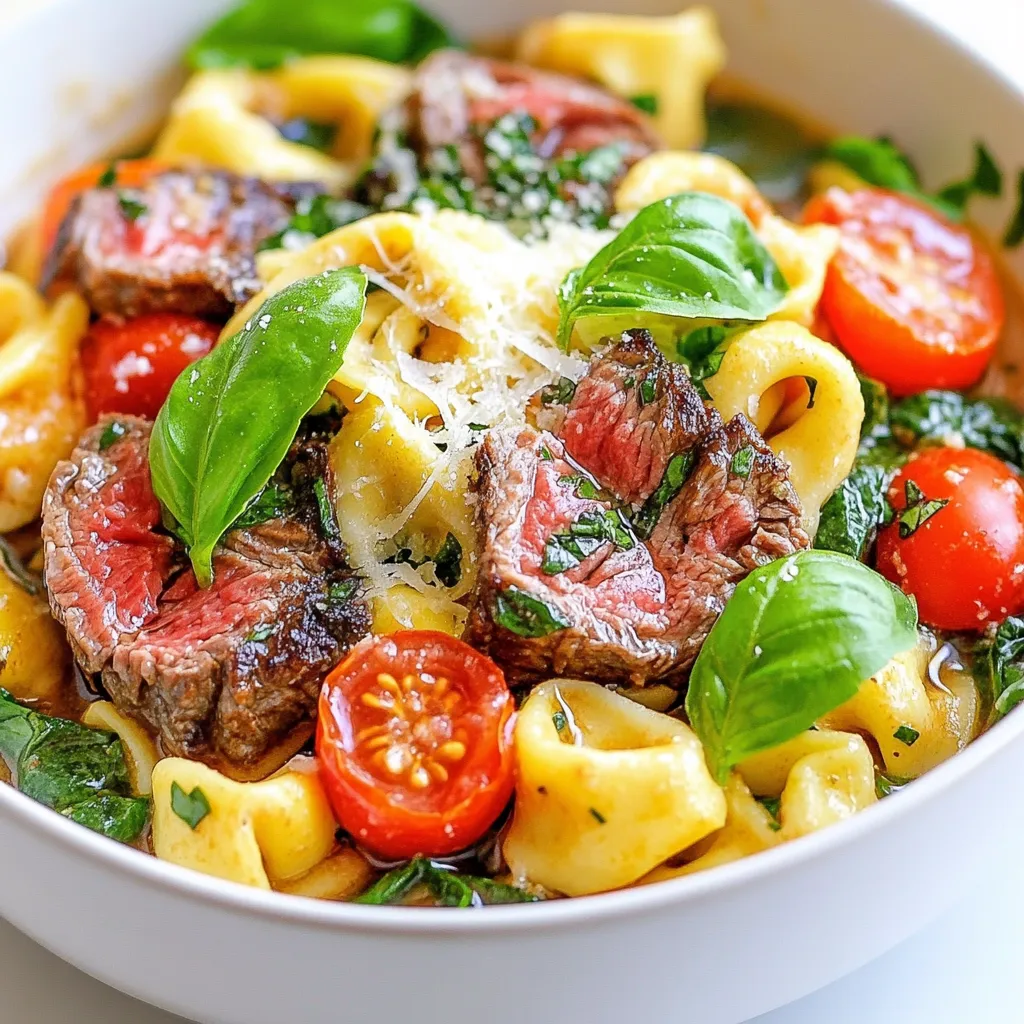
Looking for a quick and tasty meal? Try my Steak Tortellini Skillet! This dish combines tender flank steak, cheese tortellini,

To make a delicious Chicken Avocado Melt Sandwich, gather these items: - 2 cups cooked chicken breast, shredded - 1 ripe avocado, mashed - 1/2 cup Greek yogurt - 1 tablespoon Dijon mustard - 1 teaspoon garlic powder - Salt and pepper to taste - 4 slices whole grain bread - 1 cup shredded cheddar cheese - 1/2 cup fresh spinach leaves - Olive oil or butter for grilling You can swap some ingredients if needed: - Use plain yogurt instead of Greek yogurt for a lighter option. - Try regular mustard if you don't have Dijon. - Substitute chicken with canned tuna for a quick fix. - Use any cheese, like mozzarella or pepper jack, if cheddar is not available. Add some fun to your sandwich with these toppings: - Fresh tomato slices for a juicy bite. - Pickles for a tangy crunch. - Sliced jalapeños for a spicy kick. - Sprinkle some fresh herbs, like cilantro or parsley, for added flavor. - Serve with sweet potato fries or a light salad on the side for a complete meal. {{ingredient_image_1}} To start, gather your ingredients. You will need cooked chicken, a ripe avocado, Greek yogurt, Dijon mustard, garlic powder, salt, and pepper. In a large bowl, mix the shredded chicken and mashed avocado. Add the Greek yogurt for creaminess. Then, stir in the Dijon mustard and garlic powder. Season with salt and pepper to taste. Make sure everything blends well into a smooth mixture. This tasty filling will be the heart of your sandwich. Now it is time to build your sandwich. Take two slices of whole grain bread. Spread a generous amount of the chicken-avocado mixture on each slice. Next, add a handful of fresh spinach leaves on top. This will give your sandwich a nice crunch. Sprinkle a quarter of the shredded cheddar cheese over the spinach. Finally, place the other two slices of bread on top to form your sandwiches. Heat a skillet over medium heat. Drizzle some olive oil or add a small pat of butter to the pan. Place your sandwiches in the skillet carefully. Grill them for about 4-5 minutes on each side. You want them to be golden brown. Check that the cheese melts well inside. Once done, remove the sandwiches and cut them in half. Serve warm for the best taste! When picking an avocado, feel for ripeness. A good avocado yields slightly to gentle pressure. Look for a dark green or black skin. Avoid hard avocados; they are not ripe. Also, check for brown spots, which can mean bad spots inside. If you find a perfect avocado, use it soon. Ripe avocados can go bad quickly. For grilling, choose sturdy bread. Whole grain bread works well because it holds the filling. Sourdough or ciabatta also adds nice flavor. Avoid thin bread, as it may fall apart. Always make sure your bread is fresh. Fresh bread will give you the best crunch when grilled. Seasoning makes your sandwich pop. Use salt and pepper to taste for the best flavor. Garlic powder adds a nice kick. You can also try cayenne pepper for heat. If you want more zest, add lemon juice to the avocado. This keeps it fresh and brightens the flavors. Always taste as you go, and adjust to your liking. Pro Tips Use Fresh Ingredients: Always opt for fresh spinach and ripe avocados to enhance the flavor and texture of your sandwich. Customize the Cheese: Try using different types of cheese like pepper jack or mozzarella for a unique flavor twist. Grill to Perfection: Ensure your skillet is properly heated before grilling the sandwiches to achieve a crispy, golden-brown exterior. Spread the Love: Don't be shy with the chicken-avocado mixture; a generous amount makes for a more satisfying sandwich! {{image_2}} You can switch the chicken for turkey. Use shredded turkey breast for a tasty twist. If you want a meat-free option, try tofu. Press firm tofu to remove water. Then, cube it and sauté until golden. Both options keep the sandwich flavorful and fun. For a pure vegetarian treat, skip the chicken. Instead, add roasted veggies like zucchini or bell peppers. You can also use chickpeas for protein. Mash them with avocado and Greek yogurt. This mix is creamy and satisfying, perfect for anyone avoiding meat. Spice up your melt with different flavors. Add smoked paprika for a smoky kick. Or try cumin for warmth. To enhance the taste, drizzle sriracha or pesto inside the sandwich. You can even swap the Dijon mustard for spicy mustard for extra zing. Each change makes your sandwich unique! To keep your Chicken Avocado Melt Sandwich fresh, wrap it tightly. Use plastic wrap or a container with a lid. This helps prevent drying out. Store the sandwich in the fridge for up to three days. If you have extra filling, store it separately in an airtight container. When you're ready to enjoy your leftovers, reheat them gently. Use a skillet over low heat. This warms the sandwich without burning it. Flip it carefully to heat both sides evenly. You can also use a microwave, but be aware that the bread may become soft. Freezing is great for meal prep. Wrap each sandwich tightly in plastic wrap. Then place them in a freezer-safe bag. This keeps air out and prevents freezer burn. You can freeze the sandwiches for up to three months. To eat, let them thaw in the fridge overnight before reheating. Yes, you can make the chicken avocado mixture ahead of time. Store it in a sealed container. It will stay fresh in the fridge for up to 2 days. When you’re ready to eat, just grill the sandwiches. This saves time on busy days. This sandwich goes great with: - Sweet potato fries - A light salad - Fresh fruit - Crispy chips Each adds a nice touch to your meal. You can also serve it with a dipping sauce. Try ranch or a zesty aioli for extra flavor. Absolutely! Use lettuce wraps instead of bread. This keeps the tasty filling but cuts down on carbs. You can also use low-carb bread. There are many options available in stores today. Enjoy your melt without worry! We covered how to make the Chicken Avocado Melt Sandwich, from ingredients to tips. You learned about swaps, toppings, and how to store leftovers. This dish is flexible, allowing for different proteins and flavors. Whether you enjoy it fresh or as meal prep, it’s tasty and easy. Now, grab your ingredients and get cooking. Enjoy your delicious sandwiches!

Chicken Avocado Melt Sandwich Tasty and Simple Dish

Are you ready to elevate your lunch game? The Chicken Avocado Melt Sandwich is both tasty and easy to make!

- 4 large russet potatoes - 1 lb ground beef (or turkey) - 1 packet taco seasoning - 1 cup black beans (drained and rinsed) - 1 cup corn kernels (fresh or canned) - 1 cup shredded cheddar cheese - 1 cup sour cream - 1 medium tomato (diced) - 1/4 cup green onions (finely chopped) - 1/4 cup fresh cilantro (chopped) - Salt and pepper to taste - Olive oil for brushing Gathering the right ingredients is key for Cheesy Taco Potatoes. Start with russet potatoes. They have the perfect texture for baking. You need four large ones to make sure everyone gets a hearty serving. Next, choose between ground beef or turkey. Both work well with taco seasoning. The taco seasoning adds a burst of flavor. One packet is all you need. Don't forget the black beans. They add protein and fiber. Rinse and drain one cup before using. Corn kernels bring sweetness and crunch. You can use fresh corn or canned. Cheddar cheese is essential for that gooey, cheesy topping. You want one cup of shredded cheese. Sour cream brings creaminess and balances the spice. For a fresh touch, add diced tomatoes, green onions, and cilantro. They add color and flavor to your dish. Lastly, season with salt and pepper. A light brush of olive oil on the potatoes helps them bake perfectly. With these ingredients ready, you can create a flavorful and filling meal. {{ingredient_image_1}} - Preheat oven to 400°F (200°C). - Wash and scrub the russet potatoes. - Pierce each potato several times with a fork. - Brush potatoes lightly with olive oil. - Sprinkle salt over the potatoes for flavor. - Place the potatoes directly on the oven rack or on a baking tray. - Bake for about 45–60 minutes. - Check if they are tender by piercing with a fork. - Heat a skillet over medium-high heat. - Add ground beef and taco seasoning to the skillet. - Cook until the beef is browned, about 5–7 minutes. - Stir in black beans and corn, heat until warm. - Season the mixture with salt and pepper to taste. - Once baked, remove potatoes from the oven. - Let them cool slightly before handling. - Cut each potato lengthwise to create a pocket. - Use a fork to fluff the insides of the potatoes. - Fill each potato generously with the taco meat mixture. - Top with shredded cheddar cheese. - Return to the oven for 5–10 minutes until the cheese melts. - Remove and drizzle with sour cream, then add toppings like diced tomatoes, green onions, and cilantro. How to know when potatoes are done To check if your potatoes are ready, poke them with a fork. If the fork goes in easily, they are done. It usually takes 45–60 minutes at 400°F. You can also squeeze the potato gently; it should feel soft. Best practices for filling the potatoes After baking, cut the potatoes lengthwise. Use a fork to fluff the insides, making space for the filling. Be generous with the taco meat mix. It helps if you slightly mash the insides for a creamy texture. Presentation ideas for serving Serve your Cheesy Taco Potatoes on a large platter. Line the platter with fresh lettuce leaves. This adds color and a crisp touch. You can also place lime wedges around for zest. Garnishing options for added flavor Finish with a drizzle of sour cream on top. Add fresh diced tomatoes, green onions, and cilantro. These toppings bring freshness and a pop of color. A sprinkle of cheese on top makes it even better! Recommended side dishes Pair your Cheesy Taco Potatoes with a simple salad. A side of Mexican rice also works well. You can serve some chips and salsa for extra crunch. Beverage pairings to complement the meal Enjoy your potatoes with iced tea or lemonade. A light beer or a margarita can also enhance the meal. Choose what you love for a fun dining experience! Pro Tips Choose the Right Potatoes: For the best texture, opt for russet potatoes as they are fluffy and ideal for baking. Customize Your Filling: Feel free to add other ingredients like jalapeños or avocado for extra flavor and texture. Let Them Cool: After baking, let the potatoes cool for a few minutes before cutting to prevent burns and make handling easier. Make Ahead: You can prepare the filling in advance and store it in the fridge, making assembly quick and easy at mealtime. {{image_2}} You can swap the ground beef for other meats. Ground turkey or chicken works well. If you prefer plants, try lentils or crumbled tofu. For cheese, cheddar is great, but Monterey Jack adds a nice touch. Pepper Jack boosts the heat, so choose what you love. Spices can elevate your taco potatoes. Add cumin for warmth or chili powder for kick. Chopped bell peppers add sweetness while jalapeños bring the heat. These little tweaks can make a big difference. Think about what flavors you enjoy. To make this dish vegetarian, skip the meat. Use beans, lentils, or veggies to fill the potatoes. For a vegan option, replace sour cream with dairy-free yogurt. If you're watching carbs, try using cauliflower or zucchini instead of potatoes. You can still enjoy all that cheesy goodness! To store leftover Cheesy Taco Potatoes, let them cool first. Place them in an airtight container. This keeps the potatoes fresh. You can also wrap them in plastic wrap. Make sure they are sealed tight to prevent air from getting in. For best results, store them in the fridge. For reheating, the oven works best. Heat your oven to 350°F (175°C). Place the potatoes on a baking sheet. Cover them with foil to keep them moist. Bake for about 15-20 minutes, or until heated through. You can also use a microwave. Just put them on a microwave-safe plate. Heat for 1-2 minutes, checking to avoid overheating. Yes, you can freeze Cheesy Taco Potatoes. Start by letting them cool completely. This helps prevent ice crystals. Wrap each potato in plastic wrap, then in aluminum foil. This double layer protects them from freezer burn. Place the wrapped potatoes in a freezer bag. Squeeze out extra air before sealing. To thaw, place the potatoes in the fridge overnight. This keeps them safe. You can also use the microwave. Set it to defrost mode and check often. Once thawed, reheat as mentioned above for the best taste. Cheesy Taco Potatoes last about 3-5 days in the refrigerator. Store them in an airtight container. If you notice any mold, throw them away. Signs that the dish has gone bad include a sour smell or a change in color. If the potatoes feel mushy or slimy, do not eat them. Always trust your senses to keep meals safe and tasty. What can I use instead of sour cream? You can use Greek yogurt for a similar taste. It adds creaminess and tang. Another option is cottage cheese. Just blend it until smooth for a nice texture. Can I prepare this recipe in advance? Yes, you can. Bake the potatoes and prepare the taco mix ahead of time. Store them separately in the fridge. When ready, stuff the potatoes and bake to heat through. What do I do if the potatoes are hard after baking? If potatoes are hard, they may need more time. Bake them longer until they are soft when pierced. You can wrap them in foil to help cook them evenly. How to avoid soggy potatoes? To avoid soggy potatoes, make sure to pierce them before baking. This allows steam to escape. Also, avoid adding too much liquid to the filling. Can I make this recipe spicy? Yes! You can add diced jalapeños or a pinch of cayenne pepper to the meat mix. This will give it a nice kick that spicy food lovers will enjoy. What are some kid-friendly adaptations? For kids, you can leave out the spices or use mild taco seasoning. You can also add more cheese and omit the green onions or cilantro if they prefer simpler flavors. Cheesy Taco Potatoes are a fun and tasty dish that combines flavor and comfort. You gather simple ingredients like potatoes, meat, and cheese. I shared steps to prepare, bake, and serve them perfectly. Remember, you can swap ingredients for personal taste or dietary needs. These potatoes can be stored and even frozen for later meals. Enjoy making and sharing this dish with friends and family! You will impress everyone with your tasty creation.

Cheesy Taco Potatoes Loaded Flavorful Delight

Get ready to treat your taste buds! Cheesy Taco Potatoes are a fun and yummy way to enjoy a classic

Older posts
Newer posts
← Previous Page1 … Page118 Page119 Page120 Next →

dsad

© 2025 Southern Dishes • Built with GeneratePress

Our Policies

  • Copyright Policy
  • Cookie Policy
  • GDPR Policy
  • Privacy Policy
  • Disclaimer
  • Terms Of Use

More Information

  • Home
  • About
  • Contact
  • Appetizers
  • Dessert
  • Dinner
  • Drinks
©2025, Southern Dishes About Back To Top