Skip to content
DisclaimerTerms Of UseGDPR PolicyCookie Policy

Southern Dishes

  • Home
  • Drinks
  • Appetizers
  • Dinner
  • Dessert
  • About
  • Contact
  • Privacy Policy
DisclaimerTerms Of UseGDPR PolicyCookie Policy

Isabella

- Ripe mangoes - Ripe avocado - Small red onion - Red bell pepper - Jalapeño - Fresh cilantro - Fresh lime juice - Seasoning (salt and pepper) Selecting the right ingredients is key. Ripe mangoes should yield slightly when you press them. Look for a sweet smell near the stem. For avocados, choose ones that feel soft but not mushy. The skin should be dark green and smooth. Fresh cilantro should have bright green leaves without wilting. - Medium mixing bowl - Spatula or mixing tool - Knife and cutting board These tools will make your prep easy. A sharp knife helps you dice quickly and safely. A medium mixing bowl gives you enough space to combine all your ingredients. - How to select ripe mangoes: Look for a mango that is slightly soft and fragrant. The skin color varies by type, so feel for ripeness. - Choosing the best avocados: Press gently; it should give a bit. Avoid ones with dark spots. - Freshness indicators for herbs: Fresh cilantro should smell strong and look vibrant. Look for bright green leaves. These tips will help you find the best ingredients for your mango salsa. Enjoy the process—it makes the final dish even better! For the complete recipe, check the Full Recipe section. To make a tasty mango salsa, start with the mango and avocado. - Dicing mango and avocado: Take two ripe mangoes. Cut them into small, even cubes. Next, slice a ripe avocado in half. Remove the pit, and then dice the flesh into similar-sized pieces. - Chopping onion and bell pepper: Grab one small red onion. Chop it finely. Then, take one red bell pepper. Dice it into small bits, matching the size of the mango and avocado. - Mince jalapeño: Take one jalapeño. Cut it in half and remove the seeds. Mince it finely, so it adds just the right kick without being too hot. Now it's time to mix everything in a bowl. - Mixing ingredients in a bowl: In a medium mixing bowl, combine your diced mango and avocado. Add in the chopped red onion, diced red bell pepper, and minced jalapeño. - Flavor distribution tips: To ensure even flavor, use a spatula to gently mix all the ingredients together. Be careful not to mash the avocado; you want nice chunks. The last steps add the finishing flavor. - Season to taste: Drizzle two tablespoons of fresh lime juice over the mixture. Season with salt and pepper as needed. Taste and adjust if necessary. - Letting flavors meld: Let the salsa sit for about 10 minutes. This waiting time allows all the flavors to blend beautifully. Enjoy your vibrant and fresh mango salsa with avocado, as described in the Full Recipe. To make mango salsa with avocado, balance sweetness and acidity. Mangoes are sweet, while lime juice adds tang. Use fresh lime juice to brighten the salsa. If the salsa feels too sweet, add more lime juice. This helps it taste fresh and alive. For spice lovers, adjust heat by adding jalapeño. Start with a small amount, then taste. You can always add more if you like more heat. If you want less spice, remove the seeds from the jalapeño. This keeps the heat down while still adding flavor. When serving at parties, use a colorful bowl. A bright dish makes the salsa pop. Garnish with a sprig of cilantro. This adds a nice touch and makes it look fresh. Serve it with tortilla chips for dipping. You can also use it as a topping for grilled fish or chicken. For an elegant touch, serve individual portions. Small cups can hold salsa for each guest. This makes it easy for everyone to enjoy their own. Avoid mushy avocado by dicing it just before serving. If you prep early, the avocado may brown. To keep ingredients fresh, store salsa in an airtight container. If you have leftovers, eat them within a day. Stir gently when mixing to maintain the avocado's shape. You want creamy chunks, not a mushy mix. This keeps the salsa vibrant and adds a nice texture contrast. {{image_2}} You can change the peppers in your salsa to suit your taste. Try using green bell peppers for a milder flavor. You can also swap in a poblano pepper for a smoky taste. If you want a little heat, use serrano peppers instead of jalapeños. They add a nice kick! Cilantro is a favorite herb for many, but not everyone loves it. You can replace cilantro with fresh parsley for a different taste. Basil also works well, giving your salsa a fresh twist. Want to mix things up? Try adding fruits like pineapple or peach. These fruits add sweetness and a burst of flavor. You can chop them and mix them right in. Spices can also elevate your salsa. A pinch of cumin adds warmth and depth. You might also try a little chili powder for a spicy kick. Experiment with what you like best! This mango salsa is naturally vegan, making it perfect for plant-based diets. It’s fresh and full of flavor, so everyone can enjoy it. If you need a gluten-free option, you’re in luck! This salsa has no gluten ingredients. It pairs perfectly with gluten-free chips or grilled meats, making it a great choice for all diets. For the full recipe, check out the Mango Avocado Fiesta Salsa section above. Store your mango salsa in the fridge if you have leftovers. Use an airtight container to keep it fresh. Glass containers work well and help you see the salsa. You can also use plastic containers, but make sure they seal tightly. You can freeze mango salsa for later use. Just spoon it into a freezer-safe bag and remove excess air. Label the bag with the date. When you want to use it, thaw the salsa in the fridge overnight. To refresh the taste, stir in a little fresh lime juice or more cilantro. In the fridge, mango salsa lasts about three days. After that, it may lose its fresh taste. Watch for signs of spoilage. If it smells sour, looks brown, or has a watery texture, it’s best to throw it out. Enjoy your salsa while it’s fresh for the best flavor! To make mango salsa with avocado, follow this quick guide: 1. Gather Ingredients: You need ripe mangoes, avocado, onion, bell pepper, jalapeño, cilantro, lime juice, salt, and pepper. 2. Mix Base: In a bowl, combine diced mango and avocado. 3. Add Veggies: Stir in chopped onion, bell pepper, and minced jalapeño for heat. 4. Add Herbs: Toss in cilantro for freshness. 5. Add Lime: Squeeze lime juice over the mix for zing. 6. Combine Gently: Use a spatula to mix without mashing the avocado. 7. Season: Sprinkle with salt and pepper, adjusting to taste. 8. Rest: Let it sit for 10 minutes for flavors to blend. You can find the full recipe above! Yes, you can use frozen mango. But keep in mind, it may change the texture. Frozen mango can become mushy when thawed. The fresh flavor might also be less bright. If using frozen, thaw it well and drain excess liquid before mixing. This helps keep the salsa from getting watery. Mango salsa pairs well with many dishes: - Tortilla Chips: Perfect for dipping. - Grilled Fish: Adds a tropical twist. - Chicken: Use as a topping for grilled chicken. - Tacos: Great in fish or chicken tacos. - Salads: Mix into green salads for extra flavor. This salsa is versatile and brightens up any meal! You now know how to make a fresh mango salsa with avocado. I covered the key ingredients, tools, and tips for selecting ripe produce. You learned easy steps to prepare and mix your salsa. Remember to balance flavors and adjust spice levels to suit your taste. With some simple variations and storage tips, your salsa will shine at any gathering. Enjoy making and sharing your tasty creation!

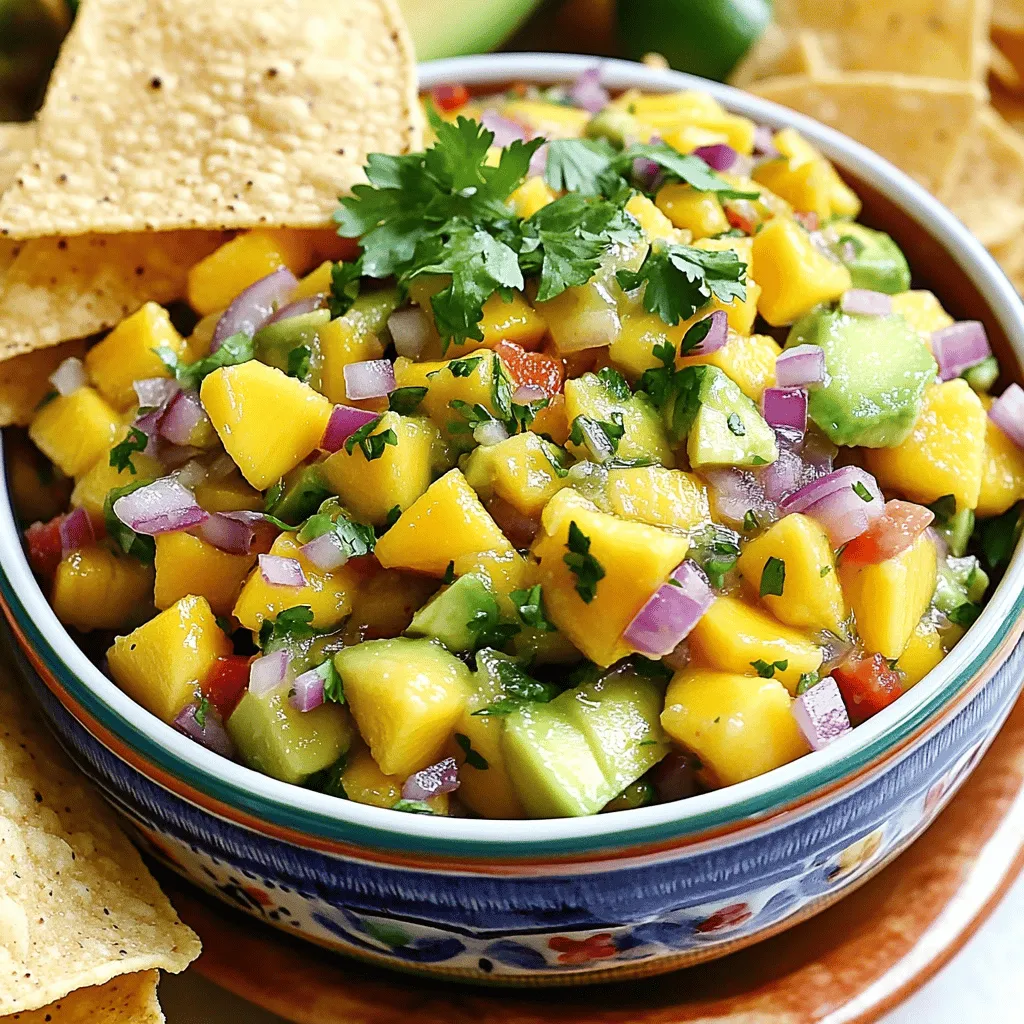
Mango Salsa with Avocado Tasty Fresh Delight

Ready to brighten your next meal? Mango Salsa with Avocado is a fresh and tasty delight that will wow your

- 1 large head of cauliflower, cut into florets - 1 cup shredded sharp cheddar cheese - 1 cup cream cheese, softened - 1/2 cup milk - 1/2 cup grated Parmesan cheese For this dish, the cauliflower serves as the star. It provides a nice, soft base. The sharp cheddar and Parmesan add a rich, cheesy flavor. Cream cheese makes the sauce creamy and smooth. The milk helps blend everything together. - 2 cloves garlic, minced - 1 teaspoon onion powder - 1 teaspoon Italian seasoning - 1/2 teaspoon paprika - Salt and pepper to taste Seasonings are vital for a tasty bake. Minced garlic brings a nice depth to the dish. Onion powder adds a hint of sweetness. Italian seasoning gives it a warm, herbal note. Paprika adds a touch of color and flavor. Don't forget to season with salt and pepper! - Fresh parsley, chopped (for garnish) Garnishing with fresh parsley makes the dish pop. It adds a bright color and a fresh taste. This simple touch makes your Cheesy Cauliflower Bake look inviting. I found that using high-quality cheese makes a big difference. It enhances the flavor and texture. You can find the Full Recipe at the beginning of this article. Enjoy cooking! - Preheat the oven to 375°F (190°C). - In a large pot, bring salted water to a boil. Add the cauliflower florets. Cook for 5-7 minutes until tender, then drain well. - In a mixing bowl, combine 1 cup of softened cream cheese, 1/2 cup of milk, and seasonings like minced garlic, onion powder, Italian seasoning, paprika, salt, and pepper. Mix until smooth. - Stir in 1 cup of shredded sharp cheddar cheese and half of the 1/2 cup of grated Parmesan. - Add the cooked cauliflower florets to the cheese mixture. Gently stir until the cauliflower is fully coated. - Transfer the mixture to a greased baking dish. Spread it evenly and sprinkle the remaining Parmesan on top. - Bake in the preheated oven for 25-30 minutes, until the top is golden and bubbly. This cheesy cauliflower bake is rich and flavorful, making it a perfect side dish. For the full recipe, check the details above. To get the best texture, cook the cauliflower until it is just tender. Boil it for 5-7 minutes. You want it soft but not mushy. Drain the florets well to avoid excess water. For the cheese sauce, mix the ingredients until smooth. This makes it easy to coat the cauliflower. You can make this dish even tastier. Try adding fresh herbs like thyme or basil. A pinch of garlic powder can also boost flavor. For cheese, mix in Gruyère or mozzarella for a twist. Each cheese brings its own unique taste. Serve your cheesy cauliflower bake with a fresh salad. It pairs well with roasted chicken or grilled fish. If you want a vegetarian meal, add a grain like quinoa or rice. For gluten-free options, ensure your cheese and seasonings are gluten-free. This dish is sure to please everyone at the table. Enjoy it warm and share the love! For the complete details on making this dish, check the Full Recipe. {{image_2}} You can make Cheesy Cauliflower Bake even more fun by changing up the veggies. Broccoli works great if you want a different taste. Spinach can add a nice green touch too. You can even mix these vegetables for a colorful dish. If you prefer a dairy-free option, consider using plant-based cheeses. Many brands offer creamy, tasty alternatives that melt well. This swap keeps the dish rich without dairy. Want to add some extra flavor? Try adding cooked bacon or ham. These meats bring a savory punch that pairs well with the cheese. You can also spice things up! Adding jalapeños gives a nice kick, or try a bit of cayenne pepper for more heat. How you serve this dish can change the whole experience. Individual servings in ramekins look fancy and are easy to serve. Plus, they make great portions for guests. For a more casual vibe, go for a casserole-style dish. Just scoop out portions straight from the baking dish. Both ways make the Cheesy Cauliflower Bake look appealing and delicious. For the full recipe, check out the [Full Recipe]. To keep your cheesy cauliflower bake fresh, store leftovers in an airtight container. This seals in flavor and moisture. You can keep it in the fridge for about 3 to 5 days. If you notice any off smells or changes in texture, it’s best to toss it out. You can freeze cheesy cauliflower bake for longer storage. First, let it cool completely before packing it away. Use a freezer-safe container or heavy-duty freezer bag. It will stay fresh for up to 3 months. When you want to eat it, move it to the fridge overnight to thaw. When reheating, the oven is the best choice. Preheat it to 350°F (175°C). Place the bake in a dish and cover it with foil. This helps keep it moist. Bake for about 20 minutes or until heated through. If using a microwave, heat in short bursts. Stir in between to keep it even. This way, your cheesy cauliflower bake stays tasty and creamy. Yes, you can prepare Cheesy Cauliflower Bake ahead of time. To make this easier, cook the cauliflower and mix it with the cheese sauce. Then, place it in a greased baking dish. Cover the dish with plastic wrap. Store it in the fridge for up to two days. When you are ready to bake, remove the wrap and bake it straight from the fridge. You might need to add a few extra minutes to the bake time for even cooking. Yes, Cheesy Cauliflower Bake is gluten-free. The main ingredients, such as cauliflower, cheese, and cream, do not contain gluten. Always check labels on your cheese and cream for any hidden gluten. Fresh herbs and spices used in the recipe are also gluten-free. This makes it a great choice for those with gluten intolerance. If you want to add some heat, there are a few great options. You can mix in some diced jalapeños or a pinch of cayenne pepper into the cheese sauce. Another option is to add a few dashes of hot sauce. You can also sprinkle red pepper flakes on top before baking for extra flavor. Adjust the spice level to what you enjoy most. Cheesy Cauliflower Bake pairs well with many sides. A fresh green salad adds a nice crunch. Roasted vegetables like carrots or Brussels sprouts complement the dish's creaminess. Grilled chicken or fish also works well for a balanced meal. For a comforting option, serve it with garlic bread or rolls to soak up the cheese sauce. Cheesy Cauliflower Bake combines creamy cheese and tender cauliflower for a delicious dish. We explored main ingredients, including sharp cheddar, cream cheese, and seasonings. I shared tips for texture and flavor, plus storage advice for leftovers. This dish is easy to customize with other veggies or spices. Enjoy experimenting with your own twists. Make it for a cozy family dinner or a fun gathering. You’ll love how simple and tasty it is!

Cheesy Cauliflower Bake Rich and Flavorful Delight

Are you ready to elevate your dinner game? My Cheesy Cauliflower Bake is a rich, flavorful delight that makes any

To make a great mushroom risotto, gather these key items: - 1 ½ cups Arborio rice - 5 cups vegetable broth - 1 cup mushrooms (cremini or shiitake), sliced - 1 small onion, finely chopped - 2 cloves garlic, minced - ½ cup grated Parmesan cheese - 3 tablespoons unsalted butter - 2 tablespoons olive oil - 1 teaspoon fresh thyme leaves (or ½ teaspoon dried thyme) - Salt and black pepper to taste These ingredients create a creamy and rich base, giving flavor and texture. You can enhance your risotto with these extra ingredients: - ½ cup frozen peas - Fresh parsley, chopped (for garnish) The peas add a pop of color and flavor, while parsley gives a fresh touch. Choosing the right mushrooms can elevate your dish. Here are some great options: - Cremini mushrooms offer a deeper flavor. - Shiitake mushrooms bring an earthy taste. - Button mushrooms are mild and widely available. - Portobello mushrooms add a meaty texture. Feel free to mix and match these varieties for a unique taste. To see the full recipe, check out the section titled Full Recipe. Start by heating the vegetable broth in a saucepan. Set it on medium heat. Let it simmer gently. Keep it warm while you make the risotto. This step is crucial. A warm broth helps the rice cook evenly. In a large skillet, heat the olive oil and one tablespoon of butter. Use medium heat for this. Add the finely chopped onion and cook for about three to four minutes. You want the onion to become clear, not brown. Next, add minced garlic and sliced mushrooms. Cook for another five minutes. Stir often until the mushrooms soften and brown. Add fresh thyme and season with salt and black pepper. This will create a tasty base. Now, it’s time for the rice. Add the Arborio rice to your skillet. Stir it well to coat in the oil. Toast the rice lightly for about two minutes. Then, begin adding the warm broth. Use one ladle at a time. Stir often and wait until the rice absorbs most of the liquid. Repeat this for around 18 to 20 minutes. Stirring is key in this step. It helps release starch from the rice, making it creamy. Keep the heat steady. If it gets too hot, the rice might stick or cook unevenly. When the rice is creamy and al dente, it’s time to finish up. Stir in the remaining two tablespoons of butter and the grated Parmesan cheese. Mix well until everything is melted and blended. If you like, add frozen peas and stir for another two minutes. Adjust seasoning with more salt and pepper if needed. Serve your risotto right away, garnished with fresh parsley. It’s a beautiful dish that smells amazing. For the full recipe, check out the details I shared earlier. Enjoy your cooking adventure! When choosing mushrooms, look for fresh ones. They should feel firm and look dry. Avoid any with dark spots or slime. I prefer cremini or shiitake mushrooms. They add deep flavor and texture. You can also mix different types for more fun. Just make sure they are all fresh for the best taste. To make risotto creamy, use Arborio rice. This rice releases starch as it cooks, giving a smooth texture. Add broth slowly, one ladle at a time. Stir often. This adds air and helps release starch. When the rice is al dente, mix in butter and cheese. This step enhances creaminess. Make sure to taste and adjust the seasoning as well. One common mistake is adding too much broth at once. This can make the rice cook unevenly. Another mistake is not stirring enough. Stirring helps develop that creamy texture. Lastly, don’t skip the cheese. It adds richness and depth. Follow these tips for a perfect risotto every time. For the full recipe, check out Creamy Dreamy Mushroom Risotto. {{image_2}} Truffle oil adds a rich flavor. Just a drizzle makes a big difference. When you finish cooking, stir in a little truffle oil. This gives your risotto a fancy touch. Use it sparingly; a little goes a long way. You can impress guests with this simple upgrade. Adding fresh herbs can change the taste without much effort. Basil brings a sweet note, while oregano adds a warm touch. Chop the herbs finely and stir them in at the end. This keeps their flavors bright. You can also use dried herbs if fresh isn't available. Adjust the amount to your liking for a personal twist. You can make a vegan version easily. Replace Parmesan cheese with nutritional yeast. This gives a cheesy flavor without dairy. Use plant-based butter or olive oil instead of regular butter. Ensure your broth is vegetable-based. You can still achieve that creamy texture with these swaps. It’s a great way to enjoy risotto while sticking to a vegan diet. For the full recipe, check out the Creamy Dreamy Mushroom Risotto ! To keep your mushroom risotto fresh, let it cool first. Place it in an airtight container. Store it in the fridge for up to three days. Be sure to label it with the date. This way, you can enjoy it later without worry. When reheating, add a splash of broth or water. This helps restore the creamy texture. Heat it slowly on the stove over low heat, stirring often. If you prefer the microwave, use a microwave-safe dish. Cover it loosely and heat in short bursts, stirring in between. Yes, you can freeze mushroom risotto! Just make sure it’s completely cool. Transfer it to a freezer-safe container. It will stay good for about one month. When you’re ready to eat, thaw it in the fridge overnight. Reheat as mentioned earlier for the best results. For the full recipe, check out the Creamy Dreamy Mushroom Risotto section. The best rice for mushroom risotto is Arborio rice. Arborio rice has a high starch content. This gives risotto its creamy texture. Other good options include Carnaroli and Vialone Nano. These types also cook well and create a rich dish. You can make mushroom risotto in advance, but it is best fresh. If you make it early, let it cool first. Store it in an airtight container in the fridge. Reheat it slowly, adding a bit of broth. This helps regain its creamy texture. Mushroom risotto lasts about 3 to 4 days in the refrigerator. Make sure to store it in a sealed container. If you notice any off smells or changes, it's best to throw it away. A good wine to pair with mushroom risotto is a light white wine. You can choose a Pinot Grigio or Sauvignon Blanc. If you prefer red, a light Pinot Noir works well too. These wines complement the earthy flavors of the mushrooms. For a deeper flavor, try a glass of dry vermouth. For the complete recipe, check out the Full Recipe section above. Mushroom risotto combines simple ingredients and careful techniques for a rich flavor. We covered the best mushrooms and how to prepare broth for a creamy finish. You learned tips for selecting quality mushrooms and avoiding common mistakes. I shared exciting variations to elevate your dish. Make this risotto your own by experimenting with flavors and ingredients. With practice, you can master this classic dish. Enjoy every bite and impress your loved ones with your cooking skills!

Mushroom Risotto Creamy and Flavorful Comfort Dish

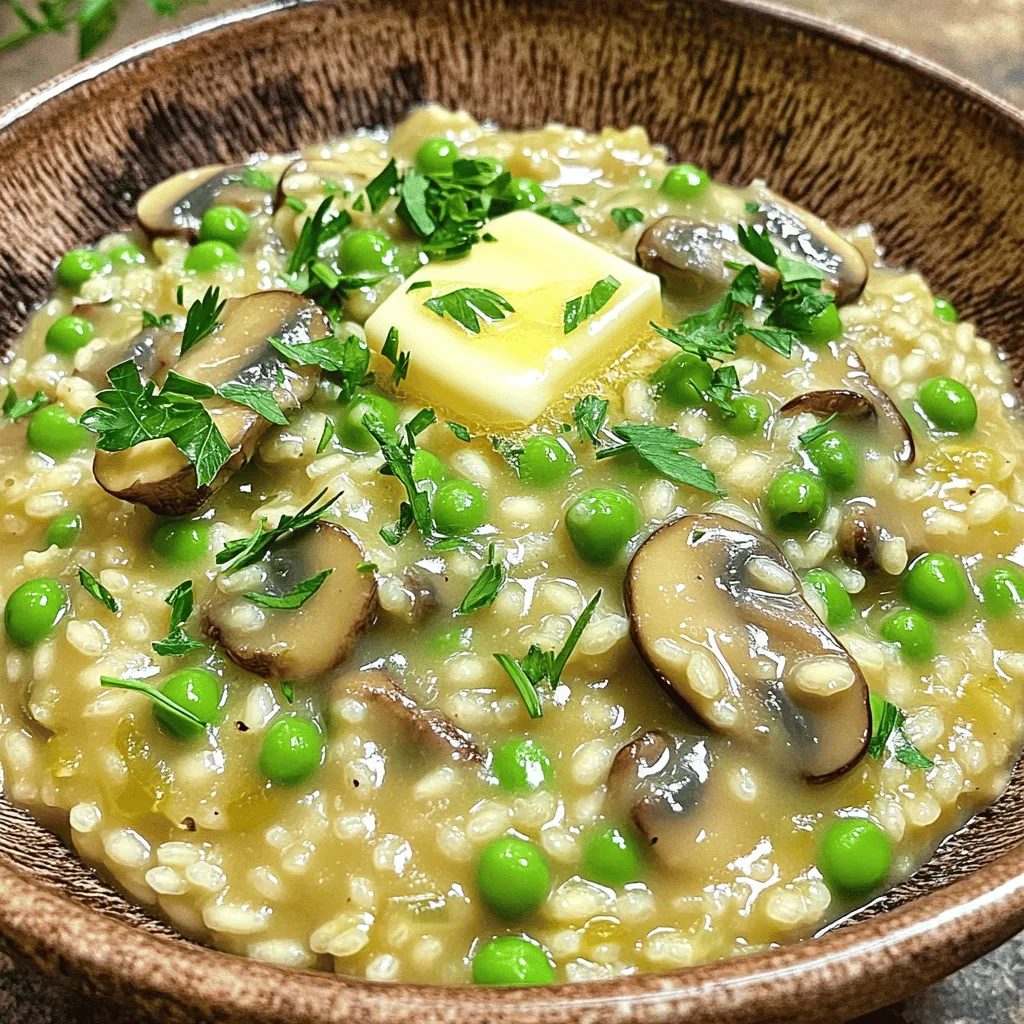
If you’re craving a warm, creamy dish that wraps you in comfort, mushroom risotto is the answer. This classic recipe

To make Sweet and Spicy Roasted Chickpeas, you will need: - 1 can (15 oz) chickpeas, drained and rinsed - 2 tablespoons olive oil - 1 tablespoon honey or maple syrup - 1 teaspoon chili powder - 1/2 teaspoon smoked paprika - 1/2 teaspoon garlic powder - 1/4 teaspoon cayenne pepper (adjust to taste) - Salt to taste - Fresh cilantro or parsley for garnish (optional) You can customize your chickpeas further with these options: - Lemon zest for a fresh kick - Cumin for a warm, earthy flavor - Cinnamon for a sweet twist - Nutritional yeast for a cheesy taste These optional ingredients let you play with flavors. Use what you enjoy most. Chickpeas are a great source of protein and fiber. They help keep you full. Olive oil adds healthy fats, which are good for your heart. Honey or maple syrup provide natural sweetness. Spices like chili powder and cayenne boost metabolism and add flavor. Incorporating these ingredients into your diet can support overall health and wellness. You get a tasty snack and a nutritional boost! Remember to check out the Full Recipe for more details. Start with a can of chickpeas. Drain and rinse them well under cold water. This step helps remove extra salt. Once rinsed, spread them on a clean kitchen towel. Pat them dry to get rid of moisture. Drying is key for crispiness later. In a large bowl, mix two tablespoons of olive oil with one tablespoon of honey or maple syrup. Stir until they blend together. Add the dried chickpeas to the bowl. Toss them well so they get coated evenly. Next, preheat your oven to 400°F (200°C). Spread the seasoned chickpeas on a baking sheet in a single layer. This ensures even roasting. Bake them for 25-30 minutes. Halfway through, shake the pan gently. This helps them cook evenly. Watch for a golden brown color. Once done, pull them from the oven. Let them cool for a few minutes. They will get crunchier as they cool down. To make sure your chickpeas are super crispy, remember these tips. Dry them well before seasoning. The less moisture, the better! Use a single layer on your baking sheet. If they are too crowded, they won’t crisp up. Also, keep an eye on them towards the end of cooking. Every oven is different. If they look golden brown, they are likely done. For an extra crunch, let them cool completely before serving. Enjoy your sweet and spicy roasted chickpeas! You can find the full recipe for Sweet and Spicy Roasted Chickpeas above. You can easily switch up the flavors. Try adding some cumin for a warm taste. If you like it sweet, add more honey or maple syrup. You can also use different spices, like curry powder or Italian herbs. They all bring a fun twist to your chickpeas. One big mistake is not drying the chickpeas well. If they are wet, they won’t get crispy. Another mistake is overcrowding the baking sheet. This keeps them from roasting evenly. Make sure to spread them out so they cook nicely. Lastly, don’t skip shaking the pan halfway. It helps them brown all over. Always preheat your oven before roasting. This ensures even cooking. Use a rimmed baking sheet for easy cleanup. Line it with parchment paper to prevent sticking. Shake the pan every 10 minutes for the best results. This keeps them from burning and helps them crisp up. Check for doneness by looking for a golden color. Enjoy your Sweet and Spicy Roasted Chickpeas as a tasty snack! For the full recipe, check out the details above. {{image_2}} You can change the spices to create new flavors. Try curry powder for a warm taste. Use lemon zest for a bright twist. Add cinnamon for a sweet, cozy vibe. If you love heat, double the cayenne pepper. These small changes can make a big difference. This recipe is already vegan and gluten-free. You can use maple syrup instead of honey for a vegan choice. If you want more crunch, add a bit of cornmeal to the mix. This gives a fun texture while keeping it plant-based. Sweet and spicy roasted chickpeas make a great snack on their own. They also work well in salads for extra crunch. Try them on grain bowls for added flavor. Serve them with veggie dips or hummus for a delightful combo. You can even mix them into popcorn for a fun movie snack. To store your leftover sweet and spicy roasted chickpeas, let them cool completely. Place them in an airtight container. This keeps them fresh and prevents moisture from getting in. Avoid using a container that is too big. A smaller container helps keep them from getting soft. To keep your chickpeas crispy, store them at room temperature. Do not refrigerate them. The cold makes them lose their crunch. If you notice them getting soft, you can re-roast them in the oven. Just pop them back in at 400°F (200°C) for about 5-10 minutes. This will help restore their crispiness. You can keep roasted chickpeas for about 3-5 days at room temperature. Make sure they are in a sealed container. If you want to keep them longer, you can freeze them. To freeze, spread them out on a baking sheet first. Freeze them for an hour, then transfer to a freezer bag. They can last up to 3 months in the freezer. For the full recipe, check the details provided earlier. Chickpeas are packed with protein and fiber. They help you feel full, which can aid weight loss. They also support heart health by lowering cholesterol. Chickpeas contain vitamins and minerals like iron, magnesium, and folate. These nutrients boost energy and support your immune system. Eating chickpeas can improve digestion due to their high fiber content. They are a great choice for a healthy snack. Yes, you can use dried chickpeas. However, they need soaking and cooking first. Start by soaking them in water overnight. This softens them and helps them cook faster. After soaking, boil them until they are tender. This usually takes about 1 to 2 hours. Once cooked, you can follow the same steps in the recipe. Just remember to drain and rinse them before seasoning. To spice things up, add more cayenne pepper. You can also try using hot paprika instead of smoked paprika. Another option is to toss in some crushed red pepper flakes. Adjust the spice level to your taste. Just remember, it is easier to add spice than to take it away. Start with small amounts and taste as you go. You can find the full recipe for Sweet and Spicy Roasted Chickpeas above. The steps are easy to follow, and the ingredients are simple. Enjoy making this tasty and healthy snack! Sweet and Spicy Roasted Chickpeas are easy to make and delicious. We covered the key ingredients and their health benefits. I shared tips for preparation, roasting, and storage. You can customize your seasoning for different flavors and avoid common mistakes. In conclusion, these chickpeas are a tasty snack or meal addition. With a few simple steps, you will create a crispy, flavorful dish. Enjoy exploring new ways to make this recipe your own!

Sweet and Spicy Roasted Chickpeas Flavorful Snack Idea

Looking for a snack that packs a punch? Try my Sweet and Spicy Roasted Chickpeas! They’re crunchy, flavorful, and easy

- 1 cup shredded cabbage - 1 cup grated carrots - 1 cup bean sprouts - 1 bell pepper, thinly sliced - 3 green onions, chopped Fresh vegetables are key to great spring rolls. Shredded cabbage gives a nice crunch. Grated carrots add sweetness and color. Bean sprouts provide a juicy bite. Thinly sliced bell pepper offers crispness. Chopped green onions bring a fresh flavor. - 2 cloves garlic, minced - 1 tablespoon fresh ginger, minced - 2 tablespoons soy sauce - 1 teaspoon sesame oil Flavor enhancers make your rolls pop. Minced garlic adds a robust taste. Fresh ginger gives warmth and zest. Soy sauce adds umami depth. Sesame oil brings a nutty finish that ties everything together. - 1 package spring roll wrappers - Vegetable oil for frying - Salt and pepper to taste Spring roll wrappers are vital for wrapping your filling. They crisp up nicely when fried. Vegetable oil is best for frying. It's important to use enough oil for even cooking. Lastly, a pinch of salt and pepper boosts the flavors. For the complete instructions and steps, check out the Full Recipe. To start, gather all your veggies. You need shredded cabbage, grated carrots, bean sprouts, sliced bell peppers, and chopped green onions. Add minced garlic and ginger for extra flavor. In a large bowl, combine these vegetables. Drizzle soy sauce and sesame oil over the mix. Sprinkle some salt and pepper to taste. Gently toss everything together until well mixed. This filling is the heart of your spring rolls. Next, it's time to roll. Place a spring roll wrapper on a clean surface. Point one corner toward you. Add about 2 tablespoons of the filling near the bottom corner. Now, fold the bottom corner over the filling. Then, fold both sides inward. Roll it up tightly. Use a little water to seal the edge. Repeat this process until all the filling is used. For frying, heat vegetable oil in a large skillet or deep frying pan. Aim for medium-high heat, around 350°F (175°C). Carefully add the spring rolls in batches. Fry them until they turn golden brown and crispy. This usually takes about 3-4 minutes per batch. Once done, remove them and let them drain on paper towels. Serve your crispy veggie spring rolls hot, and enjoy every delicious bite! To get your spring rolls nice and crispy, pay attention to the oil temperature. Heat the vegetable oil to about 350°F (175°C). This high heat cooks the rolls quickly, giving you that perfect crunch. If the oil is too cool, the rolls can absorb more oil and become greasy. Let the spring rolls rest on paper towels after frying. This step helps remove excess oil and keeps them crispy longer. I recommend waiting a few minutes before serving. One common mistake is overfilling the rolls. Use about 2 tablespoons of filling per roll. If you add too much, the rolls may burst while frying. A tightly packed roll is key, but not too tight! Another mistake is not sealing the edges properly. Use a little water to seal the edges. This keeps the filling inside while frying. Check to make sure they are secure before cooking. Sweet chili sauce pairs wonderfully with crispy veggie spring rolls. You can buy it or make your own. For a quick mix, combine soy sauce with a bit of honey and sesame oil for a tasty dip. Feel free to explore different flavors! Mixing sauces can add excitement to your meal. Try a spicy soy sauce for a kick or a creamy peanut sauce for a unique twist. {{image_2}} You can boost the flavor of your crispy veggie spring rolls in many ways. Adding protein is a great start. Tofu works well for a vegetarian option. It absorbs flavors nicely and adds texture. You might also try shrimp for a seafood twist. You can also mix in different vegetables. Think about using mushrooms for a savory touch. Bell peppers add sweetness and color. Spinach gives a nice green pop, while zucchini adds moisture. Be creative with your choices! If you want a healthier spring roll, try baking them. Preheat your oven to 400°F (200°C). After you roll the spring rolls, place them on a baking sheet. Brush them lightly with oil for crispiness. Bake for about 20-25 minutes, turning halfway through. Keep an eye on them to avoid burning. For those who need gluten-free, there are great wrapper choices. Look for rice paper or gluten-free spring roll wrappers. You can find these at many grocery stores. When it comes to filling, you can use different ingredients. Swap soy sauce for tamari or coconut aminos. These options keep the flavor while being gluten-free. Enjoy your tasty, crispy veggie spring rolls! For the full recipe, check out the detailed instructions above. To keep your spring rolls fresh, store them in an airtight container. This helps prevent them from getting soggy. Place a damp paper towel inside to maintain some moisture. They last about 2 to 3 days in the fridge. After that, the veggies may lose their crunch. If you want to save time, freeze your uncooked spring rolls. Lay them flat on a baking sheet and freeze for about an hour. Once firm, transfer them to a freezer bag. They will keep well for up to 2 months. When you’re ready to eat, fry them directly from the freezer. No need to thaw! Fry for a few extra minutes to get them crispy. Spring rolls make a great base for quick meals. Pair them with a salad or some rice for a full dish. They also work well as snacks. Simply grab a spring roll and dip it in your favorite sauce. They are perfect for lunchboxes too! You can tell spring rolls are done when they are golden brown. The skin should be crisp and not soggy. If you see bubbles around them, that means they are frying well. The sound of frying should be consistent. If you lift one, it should feel light and crunchy. Yes, you can prepare spring rolls ahead of time. Just fill and roll them, then cover with a damp cloth. This keeps them from drying out. You can also freeze them before frying. Just make sure to thaw them before cooking. The best dipping sauces include sweet chili sauce and soy sauce. You can also try peanut sauce for a creamy twist. Some love using hoisin sauce for a sweet touch. Mix and match to find what you like best! For the full recipe, check out the details on how to make crispy veggie spring rolls. You'll need fresh veggies and spring roll wrappers. Follow the simple steps for a tasty dish that everyone can enjoy! In this blog post, we explored how to make delicious crispy veggie spring rolls. We covered everything from choosing fresh vegetables to perfecting your rolling technique. Remember, the right oil temperature is key for that perfect crunch. Avoid common mistakes like overfilling to ensure your rolls seal well. Finally, don’t forget to try different dipping sauces for added flavor. With these tips, you'll create tasty spring rolls that impress everyone. Enjoy making them and sharing with friends!

Crispy Veggie Spring Rolls Flavorful and Simple Recipe

Are you ready to impress your family and friends? Crispy Veggie Spring Rolls are quick, tasty, and perfect for any

For my homemade granola bars, I use simple and healthy ingredients. Here’s what you need: - 2 cups rolled oats - 1 cup mixed nuts (almonds, walnuts, pecans), roughly chopped - 1/2 cup honey or maple syrup - 1/4 cup peanut butter or almond butter - 1/2 cup dried fruit (cranberries, raisins, apricots), chopped - 1/4 cup mini chocolate chips (optional) - 1 teaspoon vanilla extract - 1/2 teaspoon cinnamon - 1/4 teaspoon salt These ingredients work together to create a tasty and chewy treat. The oats form the base. They give a hearty texture. The nuts add crunch and healthy fats. Honey or maple syrup provides sweetness and helps bind everything. Peanut butter or almond butter adds creaminess and flavor. Dried fruits offer natural sweetness and chewy bits. Chocolate chips are a fun touch, but you can skip them if you prefer. You can swap ingredients based on your taste or what you have at home. Here are some ideas: - Nuts: Use sunflower seeds or pumpkin seeds for a nut-free option. - Sweeteners: Agave syrup or brown rice syrup can replace honey or maple syrup. - Nut Butters: Sunflower butter can work if you need a nut-free bar. - Dried Fruits: Try coconut flakes, or fresh fruits for a different flavor. - Chocolate Chips: Use dark chocolate or yogurt-covered raisins instead. These swaps keep your granola bars interesting. You can customize them to match your cravings or dietary needs. Each ingredient in my granola bars adds nutrition. Here’s a quick look: - Rolled Oats: Great source of fiber. They help with digestion and keep you full. - Mixed Nuts: Packed with protein, healthy fats, and vitamins. They support heart health. - Honey or Maple Syrup: Natural sugars for quick energy. They also have antioxidants. - Nut Butter: Provides protein and essential fats. It helps with muscle health. - Dried Fruit: Adds vitamins and minerals. It also gives a sweet taste. - Chocolate Chips (optional): Offers a fun flavor. Dark chocolate can have health benefits too. - Vanilla Extract: Provides flavor without added sugar. - Cinnamon: May help lower blood sugar and adds warmth to the taste. - Salt: Enhances flavor and balances sweetness. Each bite of your granola bar supports your health and satisfies your cravings. Enjoy making your own delicious and healthy snack! Start by preheating your oven to 350°F (175°C). Next, take an 8x8 inch baking dish. Line it with parchment paper. Leave some paper hanging over the sides. This makes it easy to lift out the bars later. Grab a large mixing bowl. In it, combine 2 cups of rolled oats and 1 cup of chopped nuts. You can use almonds, walnuts, or pecans. Add 1/2 cup of chopped dried fruit, like cranberries or apricots. If you like chocolate, toss in 1/4 cup of mini chocolate chips. Sprinkle in 1/2 teaspoon of cinnamon and 1/4 teaspoon of salt. Mix all these dry ingredients well. Make sure they are evenly spread. Now, take a small saucepan and set it on low heat. Add 1/2 cup of honey or maple syrup and 1/4 cup of peanut butter. Stir until this mixture melts and becomes smooth. Remove it from the heat and mix in 1 teaspoon of vanilla extract. Pour this warm mixture over your dry ingredients. Stir until everything is well coated. Next, transfer this mixture into your prepared baking dish. Press it down firmly with a spatula or your hands. Make sure it is even. Bake for 20-25 minutes until the edges turn golden brown. Once baked, let it cool completely in the pan. After cooling, lift the bars out using the parchment paper. Cut them into squares or rectangles. Store these bars in an airtight container. They stay fresh for a week at room temperature or longer in the fridge. For the full recipe, refer back to the beginning. To get that great texture in your granola bars, you need the right balance. Use rolled oats for chewiness. They hold together better than quick oats. Mix in enough nut butter to bind everything. Honey or maple syrup acts as glue too. Press the mixture firmly into the pan. This helps the bars stay together. Don’t skip the baking time; it adds a nice crunch on the edges. Add-ins can make your granola bars unique. Think about mixing in seeds, like pumpkin or sunflower. Dried fruits, such as cranberries or apricots, add sweetness. You can also include chocolate chips for a treat. Try spices like cinnamon or nutmeg for extra warmth. Each add-in brings its own taste and texture. Mix and match to find your favorite blend! Watch out for over-mixing your ingredients. It can make the bars too dense. Also, don’t skip lining your baking dish. This makes it easy to lift the bars out. Use enough sweetener; too little can lead to crumbly bars. Lastly, be careful not to bake them too long. Overbaking can result in hard bars. Follow these tips, and you’ll have perfect homemade granola bars every time! {{image_2}} If you want to make nut-free granola bars, use seeds instead of nuts. Sunflower seeds or pumpkin seeds work great. These seeds add crunch and nutrition. You can also use more dried fruit for flavor. Try adding coconut flakes for extra texture. Mix and match flavors to make your bars unique. For a fruity twist, use dried mango or banana chips. If you love chocolate, swap in dark chocolate chunks. You can also add spices like ginger or nutmeg for warmth. Think about mixing in some peanut butter or almond butter for creaminess. You can easily adjust this recipe to fit your diet. For gluten-free bars, use certified gluten-free oats. If you need a vegan option, replace honey with maple syrup. You can also use agave syrup. For lower sugar, reduce the sweetener or use unsweetened apple sauce. This way, you can enjoy a treat that fits your needs. For the full recipe, check out the Chewy Nutty Granola Bars. To keep your granola bars fresh, store them in an airtight container. This will help prevent them from getting stale. Place a piece of parchment paper between layers of bars. This will stop them from sticking together. You can keep them at room temperature for up to a week. If you want them to last longer, put them in the fridge. Just remember, cold bars can be a bit hard, so let them sit at room temp for a few minutes before enjoying. If you want to save granola bars for a long time, freezing is a great option. Wrap each bar in plastic wrap or foil. Then, place them in a freezer-safe bag. Label the bag with the date. You can freeze them for up to three months. When you want to eat one, just take it out and let it thaw on the counter. This keeps your snacks at hand whenever you need a quick bite. If your granola bars lose their crunch, don’t toss them! You can quickly revive stale bars in the oven. Preheat the oven to 300°F (150°C). Place the bars on a baking sheet. Heat them for about 5-10 minutes. This will help them crisp up again. If you like, you can add a little honey or syrup to freshen the flavor. Enjoy your bars fresh and tasty again! To make granola bars chewy, use more sticky ingredients. Honey or maple syrup helps. Adding nut butters also adds moisture. Press the mixture firmly into the pan for a dense texture. Baking at a lower temperature for a shorter time keeps them soft. I recommend baking for 20-25 minutes until just golden. This way, your bars will stay chewy and delicious. Yes, you can use rolled oats instead of quick oats. Rolled oats create a heartier texture. They also provide a nice chew. Quick oats absorb moisture faster and can make bars softer. If you like a bit of crunch, stick with rolled oats. Both types will work well in this recipe. You can add many healthy ingredients to your granola bars! Here are some great options: - Chia seeds - Flaxseeds - Coconut flakes - Pumpkin seeds - Sunflower seeds These add-ins boost nutrition and flavor. Feel free to mix and match based on your taste. For the full recipe, check out the Chewy Nutty Granola Bars. Enjoy the balance of flavors and textures! Homemade granola bars are simple and fun to make. You learned about key ingredients, their health benefits, and how to mix them. I showed you step-by-step instructions for baking. We discussed tips to get the right texture and flavor, plus how to avoid mistakes. You can explore fun variations and storage options to keep your bars fresh. Remember, customizing your granola bars can make them perfect for you. Enjoy your tasty, homemade snacks and feel proud of your creation!

Homemade Granola Bars Simple and Healthy Recipe

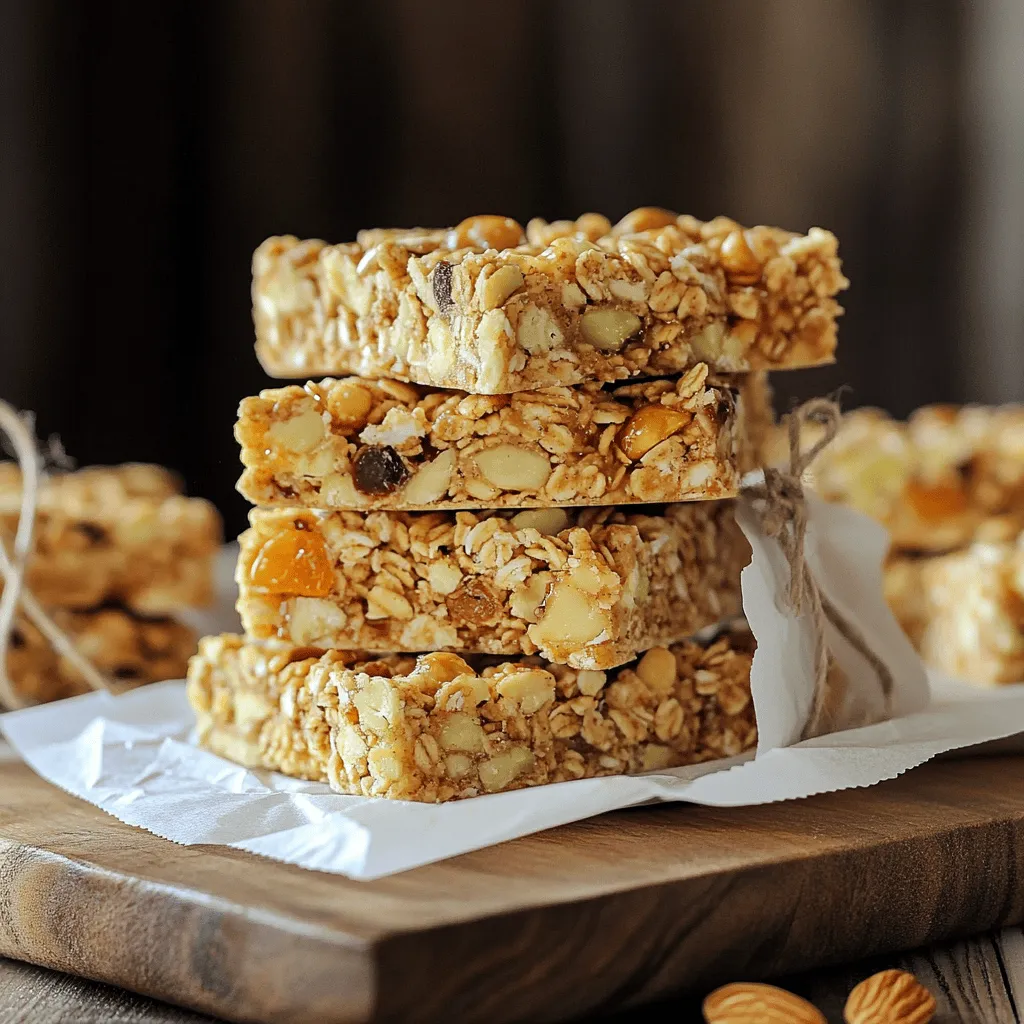
Are you ready to whip up a tasty and healthy snack? Homemade granola bars are the perfect treat! They’re quick

To make your Caramel Apple Dip with Cream Cheese, gather these simple ingredients: - 8 oz cream cheese, softened - 1/2 cup brown sugar - 1/4 cup granulated sugar - 1 tsp vanilla extract - 1/2 cup caramel sauce (plus extra for drizzling) - 1/2 tsp ground cinnamon - 1/4 cup chopped pecans (optional) - 4-5 medium apples (e.g., Granny Smith, Honeycrisp) These ingredients combine to create a rich and creamy dip. The cream cheese gives it a smooth base, while the sugars add sweetness. Vanilla extract enhances the flavor, and caramel sauce brings that delightful sweetness we crave. Ground cinnamon adds warmth, and if you use pecans, they add a nice crunch. Apples serve as the perfect dippers, offering a fresh and crisp contrast to the dip. Make sure to use good quality cream cheese for the best taste. Softening it first helps it mix well. Choose apples that are firm and tart, like Granny Smith or Honeycrisp, for a great balance with the sweet dip. For a full recipe, check out Caramel Apple Dream Dip . - Combine cream cheese, brown sugar, granulated sugar, and vanilla extract. - Blend until the mixture is smooth and creamy. Start with a medium bowl. Take your softened cream cheese and add the brown sugar, granulated sugar, and vanilla extract. Using a hand mixer, blend all the ingredients. Mix until you see a smooth and creamy texture. This step is key. You want the base to be rich and well-blended. - Fold in caramel sauce and ground cinnamon. - Incorporate chopped pecans if using. Once the base is ready, it’s time to add flavor. Gently fold in the caramel sauce. This gives the dip its sweet, sticky charm. Along with this, sprinkle in the ground cinnamon for warmth. If you like a little crunch, add in the chopped pecans now. This will enhance both the flavor and texture. - Transfer the mixture to a serving bowl. - Drizzle with additional caramel sauce and arrange apple slices around it. Now for the fun part! Transfer your creamy dip into a serving bowl. Use a spatula to smooth the top. Next, drizzle a little extra caramel sauce over the dip. This makes it look beautiful and inviting. Finally, arrange your apple slices around the bowl. This setup makes it easy for everyone to dip in and enjoy! To make your dip smooth, start with softened cream cheese. Cold cream cheese is hard to mix. I recommend letting it sit at room temperature for about 30 minutes. This way, it blends easily. A hand mixer helps you achieve a creamy consistency. I love using it because it makes the process quick and fun. Just mix until you see no lumps. Make your dip look fancy with a sprinkle of cinnamon. You can also add extra chopped pecans on top for crunch. I often serve it with a small bowl of caramel sauce in the center. This makes dipping easy and fun for everyone. It also adds an extra touch of sweetness to each bite. You can prepare this dip a day in advance. Making it ahead of time helps the flavors blend better. Just store it in the fridge until you’re ready to serve. This way, you save time and impress your guests. Trust me, the waiting makes it even tastier! {{image_2}} You can make this dip even better with simple tweaks. Try substituting pecans with walnuts or granola for a different crunch. Each option brings a unique texture. A pinch of nutmeg adds warmth to the flavor. It makes the dip feel cozy and inviting. Mixing in these flavors can surprise your taste buds in a fun way. Don't just stick to apples! This dip is great with graham crackers or pretzels. Marshmallows are also a fun choice for dipping. They add a sweet twist. You can also explore other fruits. Strawberries and bananas work well and offer a fresh taste. These options let you enjoy the dip in many fun ways. Keep your caramel apple dip in an airtight container. It will stay fresh in the fridge for up to 3 days. This way, you can enjoy it again later. Just remember to seal it well to avoid air exposure. You can freeze the dip for up to a month. Place it in a freezer-safe container, and then thaw it in the refrigerator overnight before serving. This method keeps the flavors intact. Just be sure to give it a good stir after thawing. Serve this dip cold for the best taste. Do not heat it, as warming can change the texture. Cold caramel apple dip tastes fresh and creamy, just how it should be! Enjoy it with apple slices or any dippers you like. Yes, you can, but it may alter the texture slightly. Low-fat cream cheese has less fat, which means it may not be as creamy. I suggest testing it out to see if you like the taste. The dip can last up to 3 days in the refrigerator. Make sure to store it in an airtight container. This helps keep it fresh for longer. Granny Smith and Honeycrisp are recommended for their tartness and crunch. These apples add a nice balance to the sweet dip. Their crisp texture makes every bite fun. For a complete recipe, please refer to Caramel Apple Dream Dip . This blog post shared a sweet and simple recipe for Caramel Apple Dream Dip. I covered ingredients, mixing methods, and serving tips. You learned how to create a rich dip for fresh apples while keeping it fun and easy. Remember, you can switch up the nuts or use different fruits for variety. Enjoy the creamy, caramel flavor and make it your own. With these steps, you’ll impress everyone at your next get-together!

Caramel Apple Dip with Cream Cheese Delight

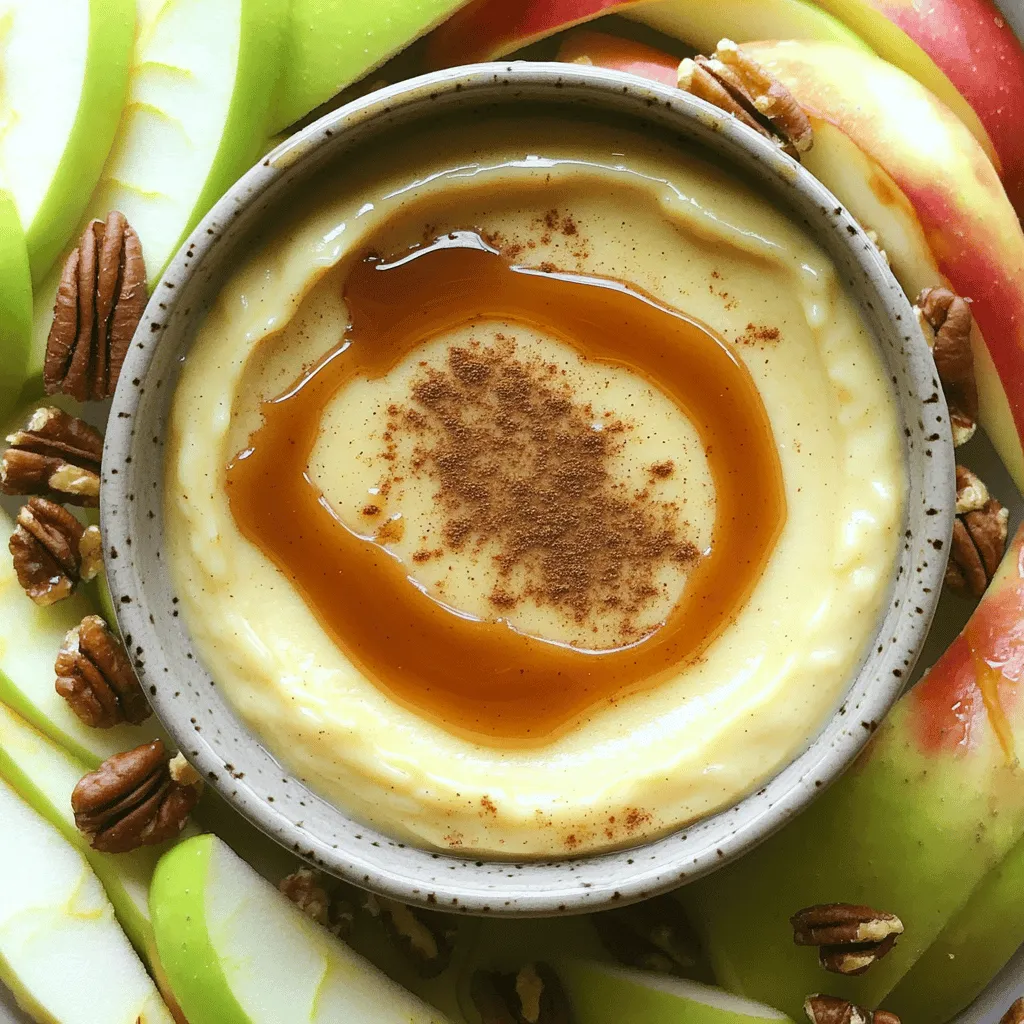
If you’re looking for a festive treat that pairs perfectly with crisp apple slices, you’ve found it! This Caramel Apple

- 1 cup rolled oats - 2 cups almond milk (or any milk of choice) - 2 ripe bananas, mashed - 4 tablespoons peanut butter (creamy or crunchy) - 2 tablespoons honey or maple syrup - 1 teaspoon vanilla extract - 1/2 teaspoon cinnamon - Pinch of salt - Sliced banana - Chopped nuts - Coconut flakes - Chocolate chips Gather these ingredients to make your Peanut Butter Banana Overnight Oats. The main ingredients are simple and wholesome. Rolled oats are the base, giving you a hearty start. Almond milk adds creaminess, while ripe bananas provide natural sweetness. Peanut butter brings rich flavor and protein. Honey or maple syrup can sweeten it to your taste. Vanilla extract adds warmth, and cinnamon brings a cozy touch. A pinch of salt balances the flavors perfectly. For toppings, sliced banana can add texture and more sweetness. Chopped nuts give a nice crunch. Coconut flakes can add a tropical twist, and chocolate chips bring a fun element. This recipe is flexible, so feel free to mix and match your toppings. You can find the full recipe in the article. Enjoy crafting your own delicious variety! - Combine rolled oats, almond milk, mashed bananas, peanut butter, honey or maple syrup, vanilla extract, cinnamon, and salt. - Mix ingredients thoroughly until well blended. This step is key for flavor. - Divide mixture into jars or airtight containers. - Seal and refrigerate overnight to allow oats to soften. - Stir the oats before serving to mix flavors. - Add desired toppings like sliced bananas, chopped nuts, or chocolate chips. These will enhance taste and texture. Enjoy this Peanut Butter Banana Overnight Oats recipe to start your day right! For the full recipe, click here. - Use ripe bananas for natural sweetness. Ripe bananas provide a rich flavor. - Adjust peanut butter quantity based on preference. More peanut butter gives a creamier taste. - Add extra almond milk if oats are too thick. This helps keep the oats smooth. - Taste and adjust sweetness before refrigerating. You can add more honey or syrup if needed. - Enjoy oats for breakfast up to 3 days after preparation. They stay fresh and tasty in the fridge. {{image_2}} You can easily change the taste of your oats. Add cacao powder for a yummy chocolate twist. It gives a rich flavor and pairs well with peanut butter. If you want extra protein, toss in some protein powder. It makes your meal filling and helps with muscle recovery. You don't have to stick to almond milk. Try soy, oat, or coconut milk instead. Each milk brings a different taste. Coconut milk adds a nice creaminess, while oat milk keeps it light and smooth. Experiment and find your favorite! If you want a vegan option, switch honey for maple syrup. It keeps the sweetness without using animal products. Maple syrup adds a unique taste that pairs perfectly with bananas and peanut butter. You can enjoy your oats while sticking to your diet! For the full recipe, check out Peanut Butter Banana Bliss Overnight Oats. Store your leftover Peanut Butter Banana Overnight Oats in an airtight container in the fridge. This keeps them fresh and tasty. You can enjoy them for up to 3 days. Just make sure to check for any changes in smell or texture before eating. If you want to make a big batch, you can freeze the mixture before soaking. However, be aware that freezing can change the texture. To enjoy your oats later, thaw them overnight in the refrigerator. This way, you can still have a delicious breakfast ready to go! Oats can be stored in the refrigerator for up to 3 days. This makes them great for meal prep. You can enjoy a quick breakfast for several days. Just remember to keep them in airtight containers. Yes, but the texture may differ; adjust soaking time accordingly. Quick oats absorb liquid faster. This can make them softer and creamier. If you like a chunkier texture, stick with rolled oats. Yes, ensure oats are certified gluten-free if sensitive. Many oats can be cross-contaminated with gluten. Always check for labels that say "gluten-free" to be safe. Substitute with almond butter or sunflower seed butter for nut-free options. These alternatives will still give you a creamy texture. They also add their own unique flavors, making your oats special. Nutritional details can be provided based on specific ingredients used. You can calculate calories, fats, and protein based on what you add. For the best results, check each ingredient's nutrition facts. Peanut butter banana overnight oats are easy to make and fun to customize. We mixed oats, almond milk, ripe bananas, and nut butter for flavor and nutrition. You can store them for three days, making breakfast quick and simple. Feel free to experiment with different toppings, flavors, and milk options. This recipe fits many diets, so enjoy it your way. You'll have a tasty meal ready in no time. Get started today and make your mornings better!

Peanut Butter Banana Overnight Oats Simple Recipe

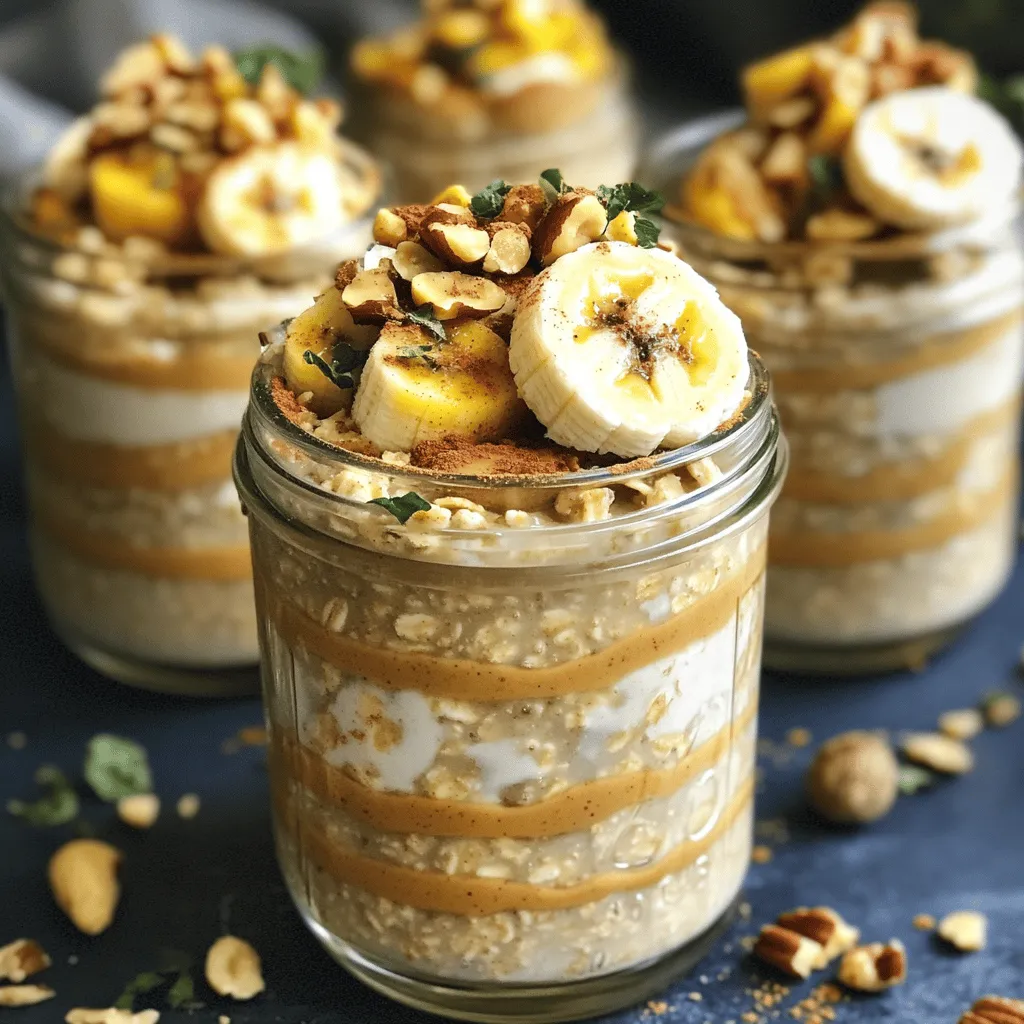
Looking for a quick, tasty breakfast? Peanut Butter Banana Overnight Oats are perfect for you! This simple recipe takes just

To make chocolate-dipped almonds, gather these simple ingredients: - 1 cup raw almonds - 1 cup dark chocolate chips (preferably 70% cocoa) - 1 tablespoon coconut oil - Sea salt (for sprinkling) - Optional: 1 teaspoon vanilla extract - Optional: 1/4 teaspoon cinnamon or cayenne pepper Each ingredient plays a key role in the final taste and texture. Raw almonds give that nice crunch, while dark chocolate brings rich flavor. Coconut oil helps the chocolate melt smoothly, making it easy to dip. You can add vanilla extract for a hint of sweetness. If you like a kick, try cinnamon or cayenne pepper. This spice adds warmth and depth to the treat. Having these ingredients ready makes the process quick and fun. Once you have everything, you can start making this sweet treat right away. Check the [Full Recipe] for detailed steps! Making chocolate-dipped almonds is simple and fun. Follow these steps for a tasty treat. 1. Prepare the Baking Sheet: Line a baking sheet with parchment paper. This keeps the almonds from sticking. It also makes cleanup easy. Set it aside for later. 2. Toast the Almonds: Preheat your oven to 350°F (175°C). Spread the raw almonds in a single layer on the sheet. Toast them for about 10 to 12 minutes. Stir halfway through. Look for a golden brown color. Let them cool when done. Toasting adds flavor and crunch. 3. Melt the Chocolate: In a microwave-safe bowl, mix the dark chocolate chips and coconut oil. Heat in the microwave. Do it in 30-second intervals. Stir well after each time. Stop when the chocolate is smooth and melted. If you want, add vanilla extract or cinnamon for extra flavor. 4. Dip the Almonds: Once the almonds are cool, dip each one halfway into the melted chocolate. Let the excess chocolate drip off. This makes sure they aren’t too messy. 5. Place on Baking Sheet: Put the chocolate-dipped almonds back on the lined baking sheet. If you like, sprinkle a tiny pinch of sea salt on top while the chocolate is still wet. This adds a nice touch of flavor. 6. Chill Until Set: Place the baking sheet in the fridge for about 30 minutes. This helps the chocolate harden. Wait until the chocolate is firm. 7. Serve and Store: Once set, take the almonds off the parchment paper. Store them in an airtight container. They can go at room temperature or in the fridge. Enjoy them as a snack or share them with friends! For the full recipe, check out the section above. Using a fork helps with dipping. It allows you to hold the almond and dip it easily into the chocolate. You can gently shake off any extra chocolate. This keeps your treat from being too messy. Avoid chocolate clumps by stirring well. If you see lumps, keep stirring until smooth. If you dip too quickly, you might get clumps. Play it safe and dip slowly for the best results. Microwaving chocolate needs care. Start with 30-second bursts on low heat. Stir between each burst to avoid burning. This method melts the chocolate more evenly. Adding coconut oil makes the chocolate glossy. Just one tablespoon helps the chocolate shine. It also makes it easier to dip the almonds without clumping. Consider adding flavor to your chocolate. You can mix in vanilla or a pinch of cinnamon. These flavors bring warmth to your treat. If you like heat, cayenne pepper can add a spicy kick. Using high-quality chocolate makes a difference. Dark chocolate with at least 70% cocoa is best. It adds rich flavor and health benefits. Choose a brand you love for the best taste. For the complete process, see the Full Recipe. {{image_2}} You can play with flavors in your chocolate-dipped almonds. A tiny bit of cayenne or chili powder adds a fun kick. Just mix it in when melting the chocolate. It gives a sweet and spicy mix that surprises your taste buds. If you want a different twist, use extracts. Almond extract boosts the almond flavor. Orange extract adds a bright note, making the treat feel fresh. Not a fan of dark chocolate? You can switch it up! Try white chocolate or milk chocolate instead. Each will change the taste and feel. You can also roll your almonds in nuts or coconut. Chopped nuts add crunch, and coconut offers a chewy texture that pairs well with the chocolate. For a healthier choice, use raw or sprouted almonds. They keep more nutrients and have a great crunch. You can also find sugar-free chocolate options. These help you enjoy the treat without added sugar. They taste great, too! Check out the Full Recipe for all these ideas and more. To keep your chocolate-dipped almonds fresh, use airtight containers. Glass jars or plastic containers work best. Make sure they are sealed tightly. This way, they stay crunchy and tasty. Avoid using paper bags, as they let air in. To maintain freshness, store the almonds in a cool, dark place. Heat and light can make the chocolate melt or lose flavor. A pantry or a cupboard away from the stove is perfect. Chocolate-dipped almonds can last at room temperature for about a week. If you store them in the fridge, they can last up to two weeks. The cooler temperature helps the chocolate stay firm longer. Look for signs of spoilage. If the chocolate looks dull or the almonds smell off, it’s time to toss them. Fresh almonds should still have a nice crunch. You can prepare chocolate-dipped almonds in advance for parties or gifts. Just make them a day or two ahead of time. They will be ready when you need them. Batch preparation is also an option. You can double or triple the recipe. Store the extra in separate containers. This way, you’ll always have a tasty treat on hand. For the [Full Recipe], check the earlier section. To make chocolate-dipped almonds, follow these easy steps: 1. Prepare the Baking Sheet: Line a baking sheet with parchment paper. 2. Toast the Almonds: Preheat your oven to 350°F. Spread the almonds on the sheet and toast for 10-12 minutes. Stir halfway through and let them cool. 3. Melt the Chocolate: In a bowl, mix dark chocolate chips and coconut oil. Microwave in 30-second bursts, stirring each time until smooth. 4. Dip the Almonds: Once cooled, dip each almond halfway into the melted chocolate. Let the excess chocolate drip off. 5. Place on Baking Sheet: Put the dipped almonds back on the baking sheet. Sprinkle sea salt on top while the chocolate is still wet. 6. Chill Until Set: Refrigerate for 30 minutes until the chocolate hardens. 7. Serve and Store: Enjoy them right away or store in an airtight container. You can find the full recipe for more details. You can find chocolate-dipped almonds in many places: - Local Stores: Check your local grocery stores, health food shops, or specialty candy stores. - Online Options: Websites like Amazon or specialty chocolate shops offer a wide range of options. Chocolate-dipped almonds are not just tasty; they also offer health perks: - Almonds: They are rich in healthy fats, fiber, and protein. They can help with heart health and weight management. - Dark Chocolate: It contains antioxidants and may improve brain function and heart health. Choose chocolate with 70% cocoa or higher for the best benefits. Yes, you can swap almonds for other nuts: - Cashews: They have a creamy texture and pair well with chocolate. - Pecans: Their rich flavor makes a lovely treat when dipped in chocolate. - Walnuts: They add a nice crunch and extra nutrients. Feel free to experiment with different nuts for your chocolate-dipped snacks! You now know how to make chocolate-dipped almonds. We covered the must-have ingredients, straightforward steps, and helpful tips. Remember to choose high-quality chocolate for the best taste. You can add flavors to match your preferences or store them for later. Enjoy your treats with friends or save them for yourself. Making these snacks is simple and fun. You’ll impress everyone with your tasty creation!

Chocolate-Dipped Almonds Irresistible Sweet Treat

If you’re craving a sweet treat that’s easy to make, chocolate-dipped almonds are perfect! They’re crunchy, creamy, and offer great

To make S'mores Brownie Bars, you need the right ingredients. Here’s a complete list: - 1 cup unsalted butter, melted - 2 cups granulated sugar - 4 large eggs - 1 teaspoon vanilla extract - 1 cup all-purpose flour - 1 cup unsweetened cocoa powder - ½ teaspoon baking powder - ½ teaspoon salt - 1 cup semi-sweet chocolate chips - 1 cup mini marshmallows - 1 cup graham cracker crumbs - ½ cup additional mini marshmallows for topping When it comes to optional swaps, you can use coconut oil instead of butter for a dairy-free version. You can also swap granulated sugar with brown sugar for a richer flavor. If you want a gluten-free treat, try almond flour in place of all-purpose flour. These swaps help you customize your bars to fit your needs. For the full recipe, check out the details above. 1. Preheat the Oven: Start by preheating your oven to 350°F (175°C). Grease a 9x13-inch baking dish with a little butter or line it with parchment paper. This step helps the bars come out easily. 2. Mix Wet Ingredients: In a large bowl, combine 1 cup of melted butter with 2 cups of granulated sugar. Whisk until the mixture is smooth. Next, add 4 large eggs, one at a time, and mix well. Finally, stir in 1 teaspoon of vanilla extract. 3. Combine Dry Ingredients: In a separate bowl, whisk together 1 cup of all-purpose flour, 1 cup of unsweetened cocoa powder, ½ teaspoon of baking powder, and ½ teaspoon of salt. Gradually add these dry ingredients to the wet mixture. Mix until just combined. Then, fold in 1 cup of semi-sweet chocolate chips. 1. Pour and Spread the Batter: Pour the brownie batter into the prepared baking dish. Use a spatula to spread it evenly across the pan. 2. Bake and Monitor Baking Time: Place the dish in the oven and bake for 25 to 30 minutes. To check if they are done, insert a toothpick into the center. It should come out with a few moist crumbs, not wet batter. 1. Timing for Adding Marshmallows: Remove the baking dish from the oven. Immediately sprinkle 1 cup of mini marshmallows over the top of the brownies. This adds that special S'mores touch. 2. Cooling Process Before Slicing: Return the dish to the oven and bake for an additional 5 to 7 minutes. You want the marshmallows to be gooey and slightly toasted. After baking, let the bars cool in the pan for at least 15 to 20 minutes. This cooling time makes slicing much easier. To get the best texture for your brownie bars, follow these tips: - Use room temperature eggs. This helps them mix well. - Do not overmix the batter. Stir until just combined. - Bake at the right temperature. A hot oven helps them rise. To avoid overbaking, watch the time closely. Start checking at 25 minutes. Insert a toothpick in the center. If it comes out with a few moist crumbs, they are ready. For a beautiful presentation, serve the bars warm. Drizzle chocolate sauce on top for extra fun. Add crushed graham crackers for a nice touch. You can also pair these bars with ice cream or whipped cream. The cold cream contrasts well with the warm bars. You can change the flavor by adding different mix-ins. Try peanut butter chips or toffee bits for a twist. You can also use flavored marshmallows for a fun surprise. Feel free to top your bars with nuts, coconut, or fresh berries. Get creative with your toppings to make each batch unique. For the full recipe, check the detailed steps above. {{image_2}} You can change the recipe for S'mores Brownie Bars to suit your needs. If you want gluten-free bars, swap the all-purpose flour for a gluten-free blend. This will keep the same great taste. For a vegan version, replace the butter with coconut oil. Use flax eggs instead of regular eggs. Mix one tablespoon of ground flaxseed with three tablespoons of water for each egg. This will give you a nice texture without the eggs. Want to mix things up? Try adding mint extract to the batter for a fresh flavor. Peanut butter can also add a creamy twist. Just swirl it in before baking. For a rich caramel taste, drizzle caramel sauce over the batter. Seasonal ideas are fun too! In fall, add pumpkin spice for a cozy touch. In summer, mix in fresh berries for a fruity kick. These changes keep your S'mores Brownie Bars exciting all year round. Make your S'mores Brownie Bars extra special for holidays. For Halloween, use orange and black sprinkles on top. For Christmas, add red and green candies. These small touches make a big impact. You can also use fun shapes. Cut the bars into hearts for Valentine's Day. Layer them in a clear cup to show off the layers. People love seeing the gooey marshmallows and chocolate. These ideas make your S'mores Brownie Bars a treat for the eyes too! To keep your S'mores Brownie Bars fresh, store them in an airtight container. This helps prevent them from drying out. You can line the container with parchment paper for easy removal. Keep them at room temperature for up to four days. If you want them to last longer, put them in the fridge. You can freeze these brownie bars for future treats! First, cut them into squares. Wrap each square tightly in plastic wrap. Then, place them in a freezer-safe bag. They can stay in the freezer for up to three months. When you want to enjoy one, take it out and let it thaw in the fridge. For the best texture, warm it in the microwave for a few seconds before serving. Can I use different types of chocolate? Yes, you can use dark, milk, or even white chocolate. Each type gives a unique taste. Dark chocolate adds richness while milk chocolate makes it sweeter. Feel free to mix them too for fun flavors! How long will these bars last? These bars will stay fresh for about a week when stored in an airtight container. You can also refrigerate them to keep them fresh longer. Just remember to let them warm up before serving! What to do if they turn out dry? If your bars come out dry, check your baking time. Baking too long can dry them out. You can also add a bit of melted chocolate or a scoop of ice cream to help with moisture. Adjusting sweetness levels If the bars are too sweet, reduce the sugar next time. You can also use dark chocolate, which is less sweet. Balancing the sweetness will give you that perfect bite! Can I substitute butter with oil? Yes, you can use oil instead of butter. About ¾ cup of oil works well. The texture might change a bit, but they will still taste great! What can I use instead of eggs? If you need an egg substitute, try using applesauce or mashed bananas. Use ¼ cup for each egg. This will keep your bars moist and delicious without eggs! For the complete recipe, check the Full Recipe section. You’ve learned how to make S'mores Brownie Bars from scratch. We covered every step, from ingredients to baking and storage. Remember, choose flavors and toppings that excite you. Don’t hesitate to experiment with swaps or variations. The possibilities are endless, and you can enjoy delicious results. With proper storage, these bars stay fresh for later. So, gather your ingredients and start baking! Enjoy the sweet rewards of your effort.

S’mores Brownie Bars Decadent and Easy to Make

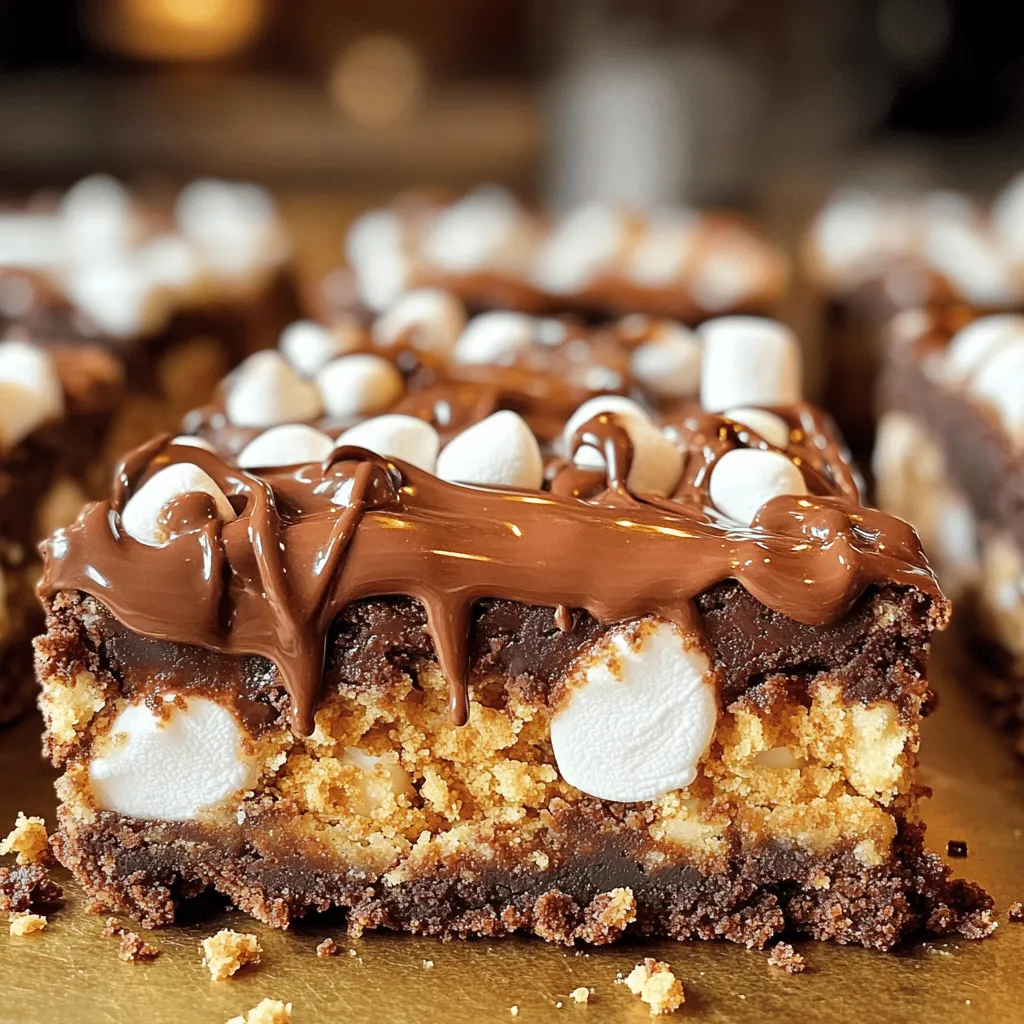
Get ready to indulge in a sweet treat that combines two favorites: s’mores and brownies! In my latest recipe, I’ll

Older posts
Newer posts
← Previous Page1 … Page105 Page106 Page107 … Page121 Next →

dsad

© 2025 Southern Dishes • Built with GeneratePress

Our Policies

  • Copyright Policy
  • Cookie Policy
  • GDPR Policy
  • Privacy Policy
  • Disclaimer
  • Terms Of Use

More Information

  • Home
  • About
  • Contact
  • Appetizers
  • Dessert
  • Dinner
  • Drinks
©2025, Southern Dishes About Back To Top