Skip to content
DisclaimerTerms Of UseGDPR PolicyCookie Policy

Southern Dishes

  • Home
  • Drinks
  • Appetizers
  • Dinner
  • Dessert
  • About
  • Contact
  • Privacy Policy
DisclaimerTerms Of UseGDPR PolicyCookie Policy

Isabella

- 3 cans of refrigerated biscuit dough - 2 cups shredded mozzarella cheese - 1 cup pizza sauce - 1 cup pepperoni slices - 1 teaspoon Italian seasoning - 1/2 teaspoon garlic powder - 1/4 cup melted butter - 1/4 cup grated Parmesan cheese - Fresh basil leaves for garnish (optional) To make Cheese Pizza Monkey Bread, you need simple ingredients. I love how easy this recipe is. You can find these items in your local grocery store. - Bundt pan - Mixing bowls - Kitchen scissors or knife - Measuring cups and spoons Having the right tools makes cooking fun and easy. A Bundt pan helps shape the monkey bread perfectly. Mixing bowls help you combine all those tasty ingredients. Kitchen scissors or a knife make cutting the biscuit dough a breeze. Measuring cups and spoons ensure you get the right amounts. Trust me, using these tools makes your cooking experience smoother! - Preheat your oven to 350°F (175°C). This helps the bread cook evenly. - Grease the bundt pan with non-stick cooking spray. This prevents sticking and makes serving easy. - Cut biscuit dough into quarters. This makes them small enough to layer well. - In a bowl, combine melted butter, garlic powder, and Italian seasoning. This mix adds great flavor. - Start layering! Place half the biscuit pieces in the pan. - Add half of the mozzarella cheese and half of the pepperoni slices on top. - Pour half of the pizza sauce over these layers. This keeps everything moist and tasty. - Repeat the layering with the rest of the biscuit pieces, mozzarella cheese, pepperoni, and finish with the remaining pizza sauce. - Once you finish the layers, sprinkle the grated Parmesan cheese over the top. This adds a nice touch. - Bake in the preheated oven for 30-35 minutes. Look for golden brown biscuits. - After baking, let it cool for about 5 minutes. This helps it set. - Invert the bundt pan onto a serving plate. This reveals the fun monkey bread shape. - Serve warm with extra pizza sauce on the side if you like. You can garnish with fresh basil leaves for a pop of color. Check out the Full Recipe for all the details! How to ensure even cooking: To make Cheese Pizza Monkey Bread cook evenly, cut the biscuit dough into small, uniform pieces. This helps them cook at the same rate. Layer them well in the bundt pan. Make sure to push the pieces down gently. This allows space for heat to circulate. Managing the moisture of the pizza sauce: Too much moisture can make your monkey bread soggy. Use a thicker pizza sauce for better results. If your sauce is watery, simmer it on low heat for a few minutes before using. This reduces excess liquid and keeps your dish perfect. Additional seasonings or toppings: You can amp up the flavor with more spices. Try adding crushed red pepper for heat or dried oregano for a classic taste. You can also mix in veggies like bell peppers or mushrooms to enhance the dish. Alternative cheeses for different flavors: While mozzarella is a classic choice, you can switch things up. Try using cheddar for a sharp taste or provolone for a smoky flavor. Mixing different cheeses adds depth and fun to your Cheese Pizza Monkey Bread. {{image_2}} You can play with the ingredients to make Cheese Pizza Monkey Bread your own. For a vegetarian twist, swap out pepperoni for veggies. Try mushrooms, bell peppers, or spinach. These add color and taste without meat. You can also add olives for a briny kick. If you need a gluten-free option, use gluten-free biscuit dough. Many brands offer gluten-free varieties that work well. Just make sure to check the package for the best results. Want to try a different cooking method? Use an air fryer! Preheat your air fryer to 320°F (160°C). Cut your biscuit dough and layer it in a small air fryer-safe pan. Cook for about 20-25 minutes, checking for golden brown color. You can also make this dish in a slow cooker. Layer your ingredients as usual, but set the slow cooker on low for about 2-3 hours. This gives the bread a soft and gooey texture. These fun variations let you enjoy Cheese Pizza Monkey Bread in new ways! For the full recipe, check out the details above. To keep your Cheese Pizza Monkey Bread fresh, store it properly. First, let it cool completely. Then, wrap it tightly in plastic wrap or aluminum foil. You can also place it in an airtight container. This helps keep out air and moisture. Store it in the fridge for up to three days. If you want to enjoy it later, consider freezing it. When you're ready to enjoy leftovers, reheating is key. You want to keep the bread crispy. Preheat your oven to 350°F (175°C). Place the bread on a baking sheet. Cover it lightly with foil to prevent burning. Heat for about 10-15 minutes. Check it to make sure it’s warm all the way through. You can also use an air fryer. Set it to 300°F (150°C) for about 5-7 minutes. This method gives you a nice crisp texture. Enjoy your warm, cheesy goodness! For the full recipe, visit the previous section. Can I freeze Cheese Pizza Monkey Bread? Yes, you can freeze Cheese Pizza Monkey Bread. After baking, let it cool completely. Wrap it tightly in plastic wrap and then in aluminum foil. It will keep well for up to three months. When you're ready to eat it, thaw it in the fridge overnight. Then, reheat it in the oven until warm. How long does it last in the refrigerator? Cheese Pizza Monkey Bread lasts about three to four days in the fridge. Store it in an airtight container to keep it fresh. Reheat individual pieces in the microwave or oven. This keeps the bread tasty and warm. What other cheeses can I use for this recipe? You can use any cheese you like! Cheddar, provolone, or even gouda work great. Mixing cheeses adds fun flavors. Just make sure to keep the same amount as mozzarella for best results. Can I use homemade pizza sauce instead of store-bought? Absolutely! Homemade pizza sauce tastes amazing. Just make sure it’s thick enough to avoid soggy bread. You can blend tomatoes, garlic, and herbs for a fresh sauce. It makes your Cheese Pizza Monkey Bread even more special. For the full recipe, be sure to check the details above. This recipe guide covers everything you need for Cheese Pizza Monkey Bread. You learned about the ingredients, tools, and easy steps to make it. I shared tips for perfecting the dish and explored tasty variations. Remember, you can customize this recipe to fit your taste. Enjoy storing your leftovers and reheating them for a quick meal later. With this knowledge, I hope you feel confident to create a fun and delicious dish for you and your friends. Dive in and enjoy every bite!

Cheese Pizza Monkey Bread Tasty and Fun Recipe

Are you ready to take your pizza night to a whole new level? Dive into this fun recipe for Cheese

- 1 sheet of puff pastry, thawed - 1 cup fresh wild blueberries - 1/2 cup cream cheese, softened - 1/4 cup powdered sugar - 1 teaspoon vanilla extract - 1/4 teaspoon almond extract - 1 tablespoon lemon juice - 1 egg, beaten (for egg wash) - 1/3 cup granola (for topping) - Zest of 1 lemon (for garnish) When making Wild Blueberry Coffee Cake Danishes, the right ingredients make a big difference. I love using fresh wild blueberries because they burst with flavor. They bring a sweet, tangy taste that pairs well with the creamy filling. You’ll want to start with a sheet of puff pastry. This gives the danishes their flaky, crispy texture. Make sure to thaw it properly before rolling it out. The cream cheese is the star of the filling. It adds a rich and smooth texture. Mixing it with powdered sugar and extracts boosts its flavor. Vanilla and almond extracts create a sweet aroma that fills the kitchen. A splash of lemon juice adds brightness. It cuts through the creaminess and balances the sweetness. The egg wash gives a nice golden color when baked. Don’t forget the granola! It adds a delightful crunch on top. Finally, a sprinkle of lemon zest as a garnish makes the dish pop. It’s all about balancing flavors and textures for the perfect treat. For the full recipe, check out the details above. - Preheat the oven to 400°F (200°C). Line a baking sheet with parchment paper. - Roll out the puff pastry on a floured surface. Smooth any creases and expand it slightly. Cut the pastry into squares, about 4 inches each. - In a bowl, mix softened cream cheese, powdered sugar, vanilla extract, almond extract, and lemon juice. Stir until smooth and creamy. - Place about a tablespoon of this cream cheese mixture in the center of each pastry square. - Add a few wild blueberries on top of the cream cheese, leaving space around the edges. - Fold the corners of the pastry squares toward the center. Pinch the edges to seal the pockets. - Brush the tops of the danishes with beaten egg. Sprinkle granola on top of the blueberries for crunch. - Place the danishes on the prepared baking sheet. Bake for 15-20 minutes until they are golden brown and puffed. - After baking, remove them from the oven. Let them cool slightly. Garnish with lemon zest before serving. You can find the full recipe with detailed instructions and ingredients for these Wild Blueberry Coffee Cake Danishes. Enjoy making this delightful treat! To make great danishes, start with puff pastry. Thaw it overnight in the fridge. When ready, roll it out on a floured surface. You want to smooth out any creases. Aim for a thickness of about 1/8 inch. This helps the pastry puff nicely. Cut the pastry into squares, about 4 inches each. Sealing the edges is key. After adding your filling, fold the corners towards the center. Pinch them tightly. This keeps the filling inside and helps the pastry rise. To add more flavor, try spices. A pinch of cinnamon or nutmeg can elevate your danishes. You can also add a bit of lemon zest to the cream cheese mix. This gives a fresh taste. If you want more texture, consider adding chopped nuts. Pecans or walnuts work well. For garnishing, use lemon zest after baking. It adds a pop of color and flavor. You can also dust the tops with powdered sugar for a sweet touch. Many people struggle with soggy pastries. This often happens from too much filling. Be careful not to overfill your danishes. Leave space around the edges. Another pitfall is baking time. Keep an eye on them in the oven. If they start to brown quickly, check the inside. They should puff and be golden brown. If they are dark outside but raw inside, adjust your time. Aim for 15-20 minutes for the best results. For more details, refer to the Full Recipe to make your Wild Blueberry Coffee Cake Danishes shine! {{image_2}} You can mix it up with these fun flavors. Try making mixed berry and cream cheese danishes. Use blueberries, raspberries, and blackberries for a bright treat. You can also use other fruits like strawberries. They add a sweet twist to the danish. Each fruit brings its own taste and color. This change makes your danish unique every time. If you need gluten-free options, try gluten-free puff pastry. Many brands offer this now, making it easy. For a dairy-free version, you can use dairy-free cream cheese. These swaps help everyone enjoy the danishes. You don't lose flavor, just the dairy or gluten. These danishes pair well with coffee or tea. The rich flavors go great with a warm drink. You can serve them as a dessert or a breakfast item. They are perfect for a cozy morning or a sweet ending to a meal. Enjoy them fresh from the oven, or let them cool for later. For the full recipe, follow the steps provided above. To keep your danishes fresh at room temperature, place them in an airtight container. This will help prevent them from drying out. Make sure to consume them within two days for the best taste. If you want to keep them longer, refrigerate the danishes. Wrap them in plastic wrap or place them in a sealed container. They can last up to five days in the fridge. For longer storage, you can freeze the danishes. First, let them cool completely. Then, wrap each danish in plastic wrap and place them in a freezer bag. This method helps keep them fresh for about three months. When you’re ready to enjoy them, reheat the danishes in the oven. Preheat the oven to 350°F (175°C) and bake for 10-15 minutes. This will help restore their crispy texture. Danishes stay fresh for about two days at room temperature. In the fridge, they can last up to five days. If you notice any mold or an off smell, it’s best to discard them. Fresh danishes should have a light, fluffy texture and a sweet aroma. Always check for these signs before enjoying your treat. To make Wild Blueberry Coffee Cake Danishes, follow these steps: 1. Prepare the oven: Preheat your oven to 400°F (200°C) and line a baking sheet with parchment paper. 2. Roll out the puff pastry: On a floured surface, roll out the thawed puff pastry. Cut it into 4-inch squares. 3. Mix the filling: In a bowl, blend softened cream cheese, powdered sugar, vanilla, almond extract, and lemon juice until creamy. 4. Assemble the danishes: Place a spoonful of cream cheese mix on each square. Add a few wild blueberries on top. Fold the corners to form pockets and pinch the edges to seal. 5. Add egg wash and granola: Brush the tops with beaten egg and sprinkle granola on the blueberries. 6. Bake: Place them on the baking sheet and bake for 15-20 minutes until golden brown. 7. Cool and garnish: Let them cool slightly and garnish with lemon zest before serving. This recipe makes a delightful treat that is sure to impress. Yes, you can use frozen blueberries. Here are some pros and cons: - Pros: Frozen blueberries are convenient. They are often picked at peak ripeness, so they taste great. They can add moisture to the filling. - Cons: Frozen berries may release more juice, which can make the pastry soggy. You may need to adjust baking time slightly to ensure they cook well. Using frozen blueberries can still yield tasty danishes but be aware of the extra moisture. If you need a substitute for cream cheese, consider these options: - Ricotta cheese: This has a creamy texture and mild flavor. - Greek yogurt: It can add a tangy taste and is lower in fat. - Mascarpone: This is rich and creamy, making it a great alternative. Each substitute will change the flavor slightly, so choose one that fits your taste. This blog post covered making delicious wild blueberry danishes. We discussed key ingredients, from puff pastry to cream cheese. I shared step-by-step instructions for preparation and baking. Tips helped enhance flavor and avoid mistakes. Variations showed how to customize your danishes with different fruits. For great taste, serve them fresh. Store extras properly to maintain quality. With these insights, you can create delightful danishes that impress everyone! Enjoy your baking journey!

Wild Blueberry Coffee Cake Danishes Delightful Treat

If you love the sweet taste of wild blueberries and the flaky goodness of puff pastry, you’re in for a

- 2 cups all-purpose flour - 1/2 cup unsalted butter, cold and cubed - 1/4 cup granulated sugar - 1/2 teaspoon salt - 1/2 cup milk, warmed - 1 packet (2 1/4 teaspoons) active dry yeast - 1 large egg, for egg wash When making croissants, the dough needs the right balance of ingredients. The flour gives structure, while cold butter adds flakiness. Sugar adds a touch of sweetness. Salt enhances all the flavors. Warm milk helps activate the yeast, which is vital for rising. Finally, the egg wash gives a lovely golden color when baked. - 1 cup shelled roasted pistachios - 1/4 cup powdered sugar - 1 tablespoon honey - 1/2 teaspoon vanilla extract - 1/4 cup cream cheese, softened The filling is where the magic happens. Pistachios provide a rich, nutty flavor. Powdered sugar adds sweetness, while honey gives it a sticky texture. Vanilla extract enhances the taste, and cream cheese makes it creamy. This filling is smooth and delightful. - Chocolate chips - Almond extract - Orange zest Feel free to get creative! Chocolate chips add richness, while almond extract boosts flavor. A hint of orange zest gives a fresh twist. These options let you customize your croissants to your taste. Remember to check the [Full Recipe] for all the details! - Combine warm milk and yeast in a bowl. - Wait for 5-10 minutes until bubbly. To start, you need to activate the yeast. Warm milk helps wake up the yeast. When it gets bubbly, it means it's ready. This step is vital for fluffy croissants. - Combine flour, sugar, and salt in a mixing bowl. - Cut in butter until coarse crumbs form. - Mix in the activated yeast mixture. Next, mix flour, sugar, and salt in a big bowl. Then, add cold butter. Use your fingers or a pastry cutter to make crumbs. After that, add the bubbly yeast mixture. This forms your dough. Knead it gently on a floured surface for 2-3 minutes. - Blend pistachios, powdered sugar, honey, vanilla extract, and cream cheese. - Pulse until smooth and set aside. Now it’s time for the filling. In a food processor, blend shelled pistachios, powdered sugar, honey, vanilla extract, and cream cheese. Pulse until you get a smooth mix. This will be the tasty surprise inside your croissants. - Roll out dough and cut it into triangles. - Add filling and roll into a crescent shape. After making the dough and filling, roll out the dough into a large rectangle. Cut it into triangles, about 4 inches wide. Place a spoonful of filling at the wide end of each triangle. Roll it tightly to form a crescent shape. - Let croissants rise for 1 hour. - Brush with egg wash and bake. Place the croissants on a baking sheet lined with parchment paper. Cover them with a towel and let them rise in a warm spot for 1 hour. Preheat your oven to 375°F (190°C). Brush the croissants with beaten egg for a golden finish. Bake for 15-20 minutes until puffed and golden brown. Enjoy these delicious pistachio-filled croissants! For more details, refer to the Full Recipe. To make great croissants, start with cold ingredients. Cold butter helps create flaky layers. If the butter warms up, your dough will not rise well. Remember to chill the dough for at least one hour. This step is key to a light and airy croissant. When adding the pistachio filling, control the amount. Too much filling can make your croissants overflow. Just a spoonful at the wide end works best. Always use fresh pistachios for the best taste. The flavor of fresh nuts is bright and rich. An egg wash gives your croissants a nice shine. Beat the egg well and brush it on before baking. This helps create a golden crust. To ensure perfect baking, use an oven thermometer. It helps you know if your oven is at the right temperature. {{image_2}} You can make your pistachio filled croissants even sweeter. Try adding chocolate or fruit fillings. A few chocolate chips can melt inside for a rich taste. Or mix in some fruit preserves for a fruity twist. You can also experiment with spices like cinnamon. A touch of cinnamon adds warmth and depth to the pistachio filling. These simple changes can turn your croissants into a delightful treat. Savory options can surprise your taste buds. Incorporate cheese or herbs into the pistachio mixture. Cream cheese and herbs can give a lovely flavor. You could also try different nut fillings. Almonds or hazelnuts can complement pistachios well. Each nut brings its own unique flavor. This way, you can create a mix of sweet and savory bites. You can adjust this recipe to fit dietary needs. Use gluten-free flour instead of all-purpose flour. This makes it friendly for those with gluten issues. For a vegan option, swap out butter and cream cheese with plant-based alternatives. Look for vegan butters and cream cheeses at your store. These swaps help everyone enjoy pistachio filled croissants. You can store your croissants at room temperature for about 2 days. This keeps them fresh and tasty. If you want them to last longer, place them in the fridge. This will help maintain their quality for a few more days. To freeze croissants, wrap them tightly. Use plastic wrap or foil to ensure they stay fresh. Then, place them in freezer-safe bags. You can keep them in the freezer for up to a month. This way, you can enjoy your pistachio filled croissants later! When you want to eat your croissants, you can reheat them in the oven. This will make them crispy again. Place them in a preheated oven at 350°F (175°C) for about 10 minutes. If you prefer a softer texture, use the microwave instead. Heat them for about 15-20 seconds, but be careful not to overdo it! Enjoy your warm, delicious croissants! Use a warm environment or oven for proofing. A warm spot helps yeast grow. You can turn on your oven to 200°F for a few minutes, then turn it off. Place the dough inside to rise. It works well! Yes, if in a pinch; however, homemade is recommended. Store-bought saves time but lacks fresh flavor. Making your own dough lets you control the taste and texture. Plus, it feels special! Options include almond paste, chocolate, or fruit preserves. Almond paste gives a nutty taste. Chocolate adds sweetness, while fruit preserves bring a fruity flavor. Feel free to mix and match! Check local bakeries or specialty shops. Some grocery stores may also sell them. If you want the freshest taste, try making them at home with the Full Recipe. Yes, with clear instructions and tips provided! I made sure to break down each step. You can follow along easily. Cooking can be fun and rewarding. Serve warm with coffee or tea for the best experience. The warm croissants pair nicely with a hot drink. Enjoy them fresh out of the oven! Making croissants at home is a fun adventure. You learned about the main ingredients and steps to create light, flaky pastry. The pistachio filling adds a delightful twist, while various tips help achieve perfect results. Remember to experiment with different fillings and storage methods. Enjoy this tasty treat fresh, and share your creations with friends. Baking can be simple and rewarding, so go ahead and try it for yourself!

Pistachio Filled Croissants Delightful and Simple Recipe

Indulge in the delightful world of pistachio filled croissants! This simple recipe transforms flaky dough into a sweet, nutty treat.

To make the crispy chickpea salad, you will need: - 1 can (15 oz) chickpeas, drained and rinsed - 2 tablespoons olive oil - 1 teaspoon smoked paprika - 1/2 teaspoon garlic powder - Salt and pepper to taste - 4 cups mixed greens (spinach, arugula, or lettuce) - 1 cucumber, diced - 1 cup cherry tomatoes, halved - 1/4 red onion, thinly sliced - 1/4 cup feta cheese, crumbled (optional) - 2 tablespoons lemon juice - 1 tablespoon apple cider vinegar This salad is not only tasty but also packed with nutrients. Chickpeas are high in protein and fiber, which help keep you full. Olive oil provides healthy fats that support heart health. Smoked paprika and garlic powder add flavor without extra calories. Mixed greens are low in calories but rich in vitamins A, C, and K. Cucumbers are hydrating and low in calories. Cherry tomatoes are full of antioxidants. Red onions can help lower blood sugar. Feta cheese adds calcium but can be skipped for a lighter dish. Lemon juice and apple cider vinegar support digestion and add zest. You can easily customize this salad for different diets. For a vegan option, skip the feta cheese or use a plant-based alternative. If you want gluten-free, this recipe is already safe. For low-carb diets, replace chickpeas with roasted cauliflower. You can swap olive oil with avocado oil for a different flavor. If you dislike any ingredient, feel free to leave it out or replace it with something you enjoy. Remember, cooking should be fun and fit your taste! For the full recipe and detailed cooking steps, check out the Full Recipe. Making a crispy chickpea salad is easy and fun. You start by gathering your ingredients. You will need chickpeas, oil, and spices. The mixed greens, cucumber, and tomatoes add freshness. The feta cheese adds creaminess, but you can skip it if you want. You can find the full recipe at the end. 1. Preheat Oven: Set your oven to 400°F (200°C). This step is key for crispy chickpeas. 2. Season Chickpeas: In a bowl, mix the chickpeas, olive oil, smoked paprika, garlic powder, salt, and pepper. Make sure every chickpea gets coated well. 3. Spread on Baking Sheet: Take a baking sheet and line it with parchment paper. Spread the chickpeas evenly on the sheet. 4. Roast Chickpeas: Place the sheet in the oven. Roast for 25-30 minutes. Shake the pan halfway through. This helps them cook evenly and become golden brown. 5. Prepare Salad Base: While the chickpeas cook, take a large salad bowl. Add the mixed greens. 6. Add Veggies: Chop the cucumber and halve the cherry tomatoes. Add them to the greens along with the sliced red onion and feta cheese, if using. 7. Make Dressing: In a small bowl, whisk together the lemon juice and apple cider vinegar. Drizzle this over the salad and toss gently. 8. Combine: Once the chickpeas are crispy, let them cool for a moment. Add them to the salad and toss one last time. - Dry Well: Make sure your chickpeas are dry before seasoning. This helps them crisp up. - Don’t Crowd the Pan: Give them some space on the baking sheet. This allows hot air to circulate. - Check for Doneness: Keep an eye on them in the last few minutes. You want a nice golden color. - Cool Before Adding: Let the chickpeas cool a bit before adding to the salad. This keeps the greens fresh. Enjoy this healthy and filling meal option! When selecting chickpeas, look for canned ones labeled as “no salt added.” This gives you control over flavor. Check the can for dents or damage. Choose brands that have a clear label for freshness. You can also use dried chickpeas. Just soak them overnight for best results. They should be firm and intact. To get those chickpeas perfectly crispy, drain and rinse them well. Pat them dry with a towel. Removing moisture is key. Coat them in olive oil and spices before roasting. Bake them at 400°F (200°C) for 25-30 minutes. Shake the pan halfway through for even cooking. If they look golden brown, they are done. Serve your crispy chickpea salad in a large, shallow bowl. This makes it look great. For extra flavor, add a dollop of yogurt or a drizzle of tahini. You can pair it with grilled chicken or fish for extra protein. It also goes well with a slice of whole-grain bread. For a fun twist, add some avocado or nuts for crunch. For full details on making this dish, check out the Full Recipe. {{image_2}} You can add protein to your crispy chickpea salad for a heartier meal. Some great options include grilled chicken, shrimp, or tofu. Each of these adds a unique flavor and texture. If you want a plant-based option, try adding black beans or lentils. Both are tasty and filling. To elevate the taste, use fresh herbs and spices. Basil, cilantro, or parsley can brighten the salad. Add a pinch of cumin or chili powder for warmth. You might also try adding zest from a lemon or lime. This gives a fresh zing that pairs well with the chickpeas. Make your salad shine with seasonal produce. In spring, add fresh peas or asparagus. Summer brings juicy peaches or sweet corn. In fall, try roasted squash or apples. Winter calls for hearty greens like kale. These ingredients not only taste great but also make your salad colorful and fun. For the complete recipe, check out the Full Recipe. To keep your crispy chickpea salad fresh, store it in an airtight container. Place the salad and chickpeas separately. This way, the chickpeas stay crunchy. Refrigerate both for up to three days. If you mix them together, the chickpeas may lose their crispiness. When prepping this salad, think about your week. You can roast the chickpeas in advance and store them in a separate container. Wash and chop the veggies ahead of time. Keep them in the fridge in sealed bags or containers. This makes it easy to assemble your salad quickly. If you want to reheat the chickpeas, spread them on a baking sheet. Heat them in a preheated oven at 400°F (200°C) for about 10 minutes. This will help them regain their crunch. Be careful not to overcook them. Enjoy your salad fresh whenever you can! For the full recipe, check out the Crispy Chickpea Salad. To make this salad vegan, skip the feta cheese. You can add avocado for a creamy texture instead. You can also use tahini as a dressing instead of the apple cider vinegar. Yes, you can prepare this salad ahead of time. Just keep the crispy chickpeas separate until you're ready to serve. This keeps them crunchy. You can mix the veggies and dressing in advance. Store them in a sealed container in the fridge. You can try many dressings for this salad. Here are a few ideas: - Balsamic vinaigrette - Tahini dressing - Ranch dressing - Sesame ginger dressing Each option adds a different taste to the salad. To make crispy chickpeas in an air fryer, follow these steps: 1. Preheat your air fryer to 400°F (200°C). 2. Toss the chickpeas with olive oil and spices. 3. Place the chickpeas in the air fryer basket in a single layer. 4. Cook for about 15-20 minutes, shaking the basket halfway through. This method makes them crunchy and quick. Yes, you can use canned chickpeas. They save time and are easy to use. Just drain and rinse them well. This helps remove extra sodium and keeps your salad fresh. Using canned chickpeas makes this recipe quick and simple. For the full recipe, check the details above. In this blog post, we explored the full journey of creating a tasty chickpea salad. We covered key ingredients and their benefits, plus how to roast chickpeas for the best crunch. I shared tips for choosing and pairing flavors to elevate your dish. We also discussed storage and preparation options for your busy life. Remember, cooking is fun. Try new flavors and enjoy your meals!

Crispy Chickpea Salad Tasty and Healthy Meal Option

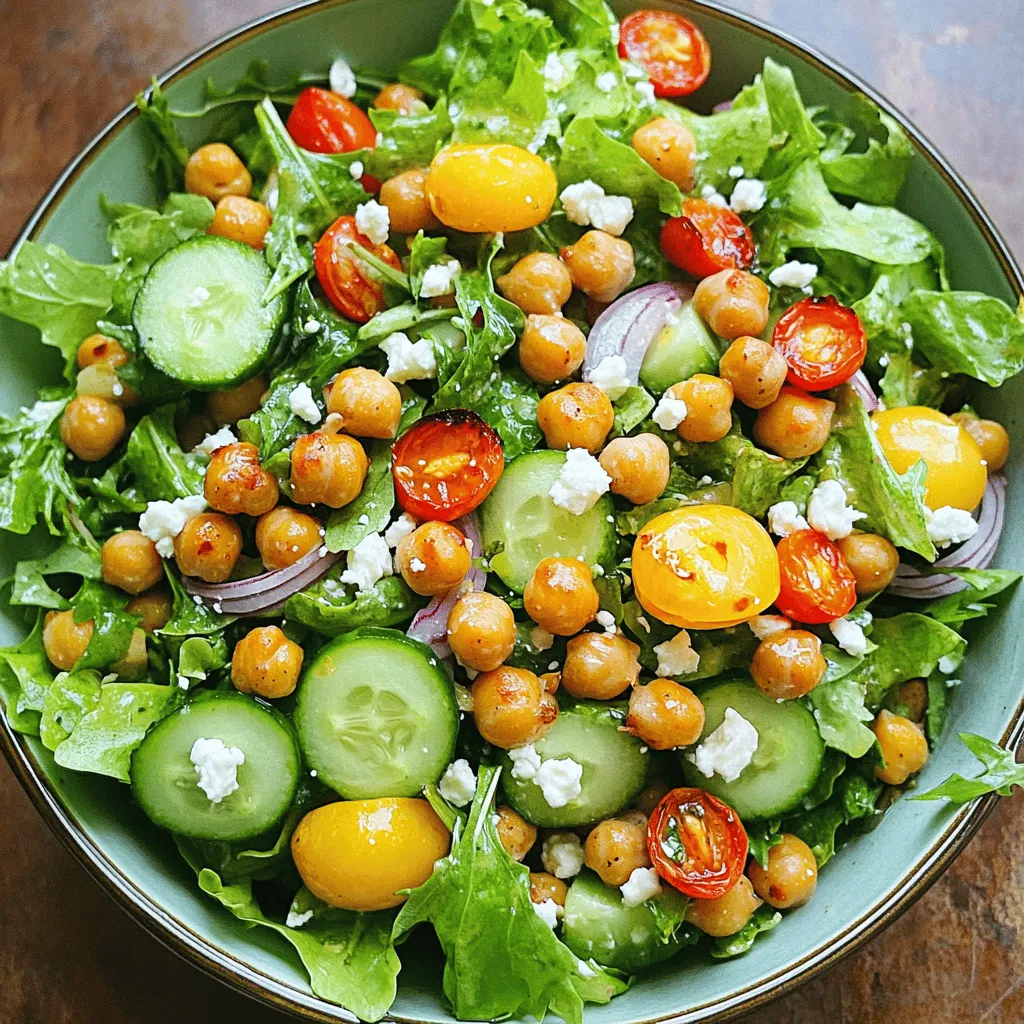
Looking for a tasty and healthy meal option? You’ll love this Crispy Chickpea Salad! Packed with nutrients and flavor, it

To make delicious homemade granola bars, you'll need these simple ingredients: - 2 cups rolled oats - 1 cup mixed nuts (chopped) - 1/2 cup unsweetened nut butter - 1/2 cup honey or maple syrup - 1/2 cup mini chocolate chips - 1/4 cup flaxseeds or chia seeds - 1/2 teaspoon vanilla extract - A pinch of salt These ingredients form the base of your granola bars. Rolled oats provide a chewy texture. The mixed nuts add crunch and protein. Nut butter acts as a binder and gives flavor. Honey or maple syrup sweetens your bars and helps hold everything together. Mini chocolate chips add a sweet treat to each bite. Flaxseeds or chia seeds boost nutrition and fiber. Vanilla extract gives your bars a lovely aroma, while salt balances the sweetness. You can personalize your granola bars by adding some optional ingredients: - Dried fruits (raisins, cranberries) - Seeds (pumpkin seeds, sunflower seeds) - Protein powder Dried fruits add chewiness and flavor. Seeds give extra crunch and nutrients. Protein powder can make your bars more filling and boost their nutritional value. Feel free to mix and match these add-ins for your perfect granola bar! For the full recipe, check out the Nutty-Choco Delight Granola Bars. To start, preheat your oven to 350°F (175°C). This step warms the oven for even baking. Next, line a 9x9 inch baking dish with parchment paper. Make sure to leave some paper hanging over the edges. This allows for easy removal later. In a large bowl, combine the rolled oats, chopped mixed nuts, flaxseeds, and a pinch of salt. Stir well to mix all the dry ingredients evenly. This blend forms the base of your granola bars. In a small saucepan, melt the nut butter and honey over low heat. Stir continuously until you see a smooth mixture. Remove it from the heat, then add the vanilla extract and mix again. This mixture adds sweetness and flavor to your bars. Pour the wet mixture into the bowl with the dry ingredients. Mix everything together until all the dry ingredients are coated. Gently fold in the mini chocolate chips. This adds a delightful touch of chocolate in every bite. Transfer your mixture to the prepared baking dish. Press it down firmly into an even layer. Bake in the preheated oven for 20-25 minutes, or until the edges turn golden brown. This step ensures a crispy texture. After baking, let the granola bars cool in the dish for about 10 minutes. Then, lift them out using the parchment paper. Transfer them to a wire rack and allow them to cool completely. Once cool, cut them into bars. Enjoy your tasty snack! For the complete recipe, check out the Full Recipe section. To get the best texture, press the mixture down firmly. Use a spatula or your hands. This helps the bars stick together well. If you don't press enough, they might crumble. The baking time is also key. Bake them until the edges turn golden brown. This usually takes about 20-25 minutes. If they are underbaked, they will be too soft. If overbaked, they will be hard and dry. You can add spices like cinnamon or nutmeg for a warm taste. Just a pinch can make a big difference. Feel free to experiment with different nut butters too. Almond butter gives a nice flavor, while peanut butter is classic. Each type of nut butter adds its own unique twist to the bars. Stack the bars in a small basket for a fun display. You can also wrap them in parchment paper. Tie them with twine for a rustic look. This makes them great for gifts or snacks. Serve them with yogurt or fresh fruit for a tasty combination. This adds freshness and makes your snack even more enjoyable. For a fun twist, try different serving ideas to keep things exciting! {{image_2}} If you need nut-free options, sunflower seed butter works great. It adds a nice flavor and keeps the bars creamy. You can also mix in seeds like pumpkin seeds, hemp seeds, or even dried fruit. These options keep your granola bars tasty and safe for those with nut allergies. For chocolate lovers, try adding cocoa powder to your mix. This gives the bars a rich chocolate flavor. You can also use dark chocolate chips instead of mini chips. This not only adds a bold taste but also gives a little extra health boost. Want more protein? Add a scoop of protein powder to your mix. It blends well and boosts nutrition. You can also throw in extra seeds like chia seeds or hemp seeds. These additions keep your energy up and make for a filling snack. You can find the Full Recipe to start making your own variations! To keep your homemade granola bars fresh, store them in airtight containers. This helps prevent moisture from making them soggy. If you want to keep them longer, freezing is a great option. Wrap each bar tightly in plastic wrap and place them in a freezer-safe bag. This way, you can enjoy them for weeks! Granola bars last about one week in the pantry. If stored in the fridge, they can last up to two weeks. Check for signs of staleness, like a dry or hard texture. If they smell off or taste stale, it's best to toss them. Keeping an eye on these signs helps ensure you enjoy your tasty snacks! Yes, you can easily customize your granola bars. Try adding your favorite nuts or seeds. Dried fruits like raisins or cranberries bring natural sweetness. You can also add spices like cinnamon for extra flavor. Feel free to mix and match until you find your perfect combo. If you want a different sweetener, try agave syrup or brown rice syrup. These options work well and keep the bars sticky. Maple syrup is another great choice. Each sweetener adds its own unique taste to the bars. To make sure your granola bars are gluten-free, use certified gluten-free oats. Always check the labels on other ingredients, like nut butter and chocolate chips. This way, you can enjoy your bars without worry. To get chewy granola bars, use more nut butter and sweetener. You can also reduce the baking time slightly. This keeps them soft and chewy. Mixing in a bit of chia seeds can help with that chewy texture too! Yes, making these bars vegan is simple. Just replace honey with maple syrup or agave. Use a plant-based nut butter, like almond or peanut butter. This way, you keep the flavor while making them vegan-friendly. When stored in an airtight container, these granola bars last about a week. If you keep them in the fridge, they can last up to two weeks. For longer storage, you can freeze them. Just make sure to wrap them well! Homemade granola bars are simple and fun to make. You need basic ingredients like oats, nuts, and nut butter. Add any extras you like, such as fruit or protein powder. Follow the steps carefully, and you'll have a tasty snack in no time. Store them well to keep them fresh. Customize recipes to fit your taste and needs. Granola bars can be both healthy and delicious when made right. Enjoy making and sharing your creations!

Homemade Granola Bars Easy Recipe for Healthy Snacking

Are you ready to snack smarter? In this blog post, I’ll guide you through a simple recipe for homemade granola

To make a delicious sweet potato and black bean chili, you need the best ingredients. Here’s what you’ll need: - Sweet Potatoes - Black Beans - Tomatoes - Aromatics (Onion, Garlic, Bell Pepper) - Spices and Seasonings - Vegetable Broth - Olive Oil - Garnishes Sweet potatoes are the star of this dish. They add a sweet flavor and a creamy texture when cooked. Use two medium sweet potatoes, peeled and diced. Black beans bring protein and fiber to your chili. One can (15 oz) of black beans, drained and rinsed, works perfectly. Tomatoes add acidity and depth. One can (14 oz) of diced tomatoes adds great flavor. Aromatics enhance the taste. You’ll need 1/2 onion, finely chopped, 2 cloves of garlic, minced, and 1 bell pepper, diced. Choose any color bell pepper you like. Spices bring warmth and zest. Use 1 teaspoon of ground cumin and smoked paprika. For heat, add 1/2 teaspoon of cayenne pepper, adjusting to your taste. Vegetable broth adds moisture and richness. You need 4 cups for a hearty chili. Olive oil helps sauté the aromatics and adds flavor. Use 2 tablespoons in your pot. Garnishes make your chili look and taste even better. Fresh cilantro for garnish and avocado slices for serving add freshness. You can find the full recipe to make this delightful chili, which combines all these ingredients beautifully, and transforms them into a warm bowl of comfort. Sautéing the Aromatics Start by heating 2 tablespoons of olive oil in a large pot over medium heat. Add the finely chopped onion and diced bell pepper. Cook for about 5 minutes until they soften. This step builds a strong flavor base. Next, add 2 cloves of minced garlic along with 1 teaspoon of ground cumin, 1 teaspoon of smoked paprika, and 1/2 teaspoon of cayenne pepper. Stir and cook for 1-2 minutes. You will smell the wonderful aroma fill your kitchen. Adding Vegetables and Beans Now, it’s time to add the star ingredients. Toss in the diced sweet potatoes, 1 can of drained and rinsed black beans, and 1 can of diced tomatoes (with juices). Mix everything well. This blend of sweet potatoes and beans creates a hearty texture. Bringing to a Boil and Simmering Pour in 4 cups of vegetable broth next. Raise the heat to bring the mixture to a boil. Once boiling, lower the heat to a gentle simmer. Let the chili cook for 25-30 minutes. Stir occasionally and check for tenderness. The sweet potatoes should be soft but not mushy. Cooking Duration The total cooking time is about 45 minutes. This includes 15 minutes for prep. The simmering time is key for allowing flavors to meld. Tips for Achieving Desired Consistency If you like your chili thicker, mash a few sweet potato pieces with the back of a spoon. This makes a creamy texture without adding extra ingredients. Adjust the broth if needed, adding more for a soupier chili or less for a thicker stew. Garnishing Ideas Serve your chili hot, garnished with fresh cilantro and slices of avocado. These toppings add color and flavor. You can also use lime wedges for a zesty finish. Pairing Recommendations Pair it with crusty bread or tortilla chips for a complete meal. This chili also goes well with a side salad for added freshness. Enjoy every bite of this hearty vegan delight! For the full recipe, check [Full Recipe]. To make your sweet potato and black bean chili shine, adjust the spices. Start with the basic recipe, then tweak the cayenne for more heat. If you want a smokier taste, add more smoked paprika. You can also try adding a splash of lime juice for brightness. Consider extra ingredients for depth. Adding corn can give a sweet crunch. You can also toss in some diced zucchini or carrots for added nutrition. Consider using fresh herbs like thyme or oregano for a fragrant twist. Each addition builds layers of flavor. Use a sturdy pot for even cooking. A Dutch oven is perfect for this chili. It holds heat well and keeps your chili warm. You can also use a large saucepan if you don’t have a Dutch oven. Gather essential tools for preparation. You will need a sharp knife for chopping and a wooden spoon for stirring. A measuring cup is handy for broth and spices. These tools will help you work efficiently, making cooking fun. Watch out for overcooking sweet potatoes. You want them tender, not mushy. Keep an eye on the clock, and check them as they cook. If they fall apart, your chili will lose its texture. Misbalancing flavors is another common mistake. Taste your chili as it cooks. If it’s too spicy, add a pinch of sugar or more sweet potatoes. If it’s too bland, add more spices or salt. Balancing flavors makes all the difference in a great chili. For the full recipe, check out the Sweet Potato & Black Bean Chili guide. {{image_2}} You can make sweet potato and black bean chili even more fun by swapping ingredients. Here are some ideas: - Using Different Legumes: Try kidney beans or chickpeas instead of black beans. Each legume adds a unique taste and texture. White beans also work well for a lighter flavor. - Adding Extra Vegetables: Toss in corn, zucchini, or carrots for added nutrition. These veggies bring freshness and color to the dish. You can even add leafy greens like spinach or kale near the end of cooking for extra vitamins. This chili is already vegan, but you can adapt it further: - Vegan and Gluten-Free Options: All the ingredients in this chili are vegan and gluten-free. Check your vegetable broth to ensure it meets these needs. Most store-bought broths are safe, but it’s good to double-check. - Adjusting for Allergies: If you have a nightshade allergy, skip the tomatoes and use pumpkin puree instead. This keeps your chili creamy and flavorful without the tomatoes. You can change the flavor of your chili to suit your taste: - Sweet vs. Smoky: For a sweeter chili, add a touch of maple syrup or brown sugar. If you prefer a smoky flavor, increase the smoked paprika or add a dash of liquid smoke. This will give your chili a lovely depth. - Incorporating Different Spices: Try adding spices like oregano, chili powder, or even cinnamon for warmth. Experiment with what you have on hand. Each spice can transform the chili into something new and exciting. For the full recipe, check out the Sweet Potato & Black Bean Chili section above. For storing your sweet potato and black bean chili, use airtight containers. Glass or plastic containers work well. This helps keep the chili fresh. You can store it in the fridge for up to five days. Just make sure it cools down before sealing it up. If you want to keep it longer, freezing is a great option. Use freezer-safe containers or bags. Make sure to leave some space for expansion. You can freeze it for up to three months. When you’re ready to eat, thaw it overnight in the fridge. To warm up your chili, you have a few options. You can use the stove or microwave. If using the stove, heat it in a pot over medium heat. Stir it often so it warms evenly. If using the microwave, heat it in short bursts, stirring in between. This keeps the flavor strong and fresh. Enjoy it hot, just like when you first made it! You can serve sweet potato and black bean chili with rice or quinoa. Cornbread pairs well too. You might also enjoy it with tortilla chips for crunch. A fresh salad on the side adds a nice touch. Consider avocado slices for creaminess and cilantro for brightness. This chili lasts about 4 to 5 days in the fridge. Store it in an airtight container for best results. The flavors deepen as it sits, making it even tastier. Yes, you can use frozen sweet potatoes. Just make sure they are diced and thawed first. They may cook a bit faster, so check for tenderness during simmering. Common toppings include diced avocado, fresh cilantro, and lime wedges. You can also add shredded vegan cheese or sour cream. Some people enjoy spicy jalapeños for extra heat. Absolutely! This recipe is great for meal prep. You can make a big batch and portion it out. Just store it in the fridge or freezer for easy meals later. For the full recipe, refer to the complete cooking instructions above. In this post, I covered how to make a tasty sweet potato and black bean chili. We explored ingredients, preparation steps, and cooking tips to boost flavor. I shared ways to adapt the recipe for different diets and variations for more ideas. I also provided storage tips to keep your chili fresh. With these simple steps, I hope you feel ready to create a comforting meal. Enjoy the process and make the recipe your own!

Sweet Potato and Black Bean Chili Hearty Vegan Delight

If you’re craving a bowl of warmth and comfort, look no further! This Sweet Potato and Black Bean Chili is

To make tasty turkey meatballs, you need a few simple items: - 1 lb ground turkey - 1/2 cup breadcrumbs - 1/4 cup grated Parmesan cheese - 1/4 cup fresh parsley, chopped - 1 large egg - 2 cloves garlic, minced - 1 teaspoon Italian seasoning - Salt and pepper to taste These ingredients come together to create a flavorful base for your meatballs. The ground turkey gives them a light texture. Breadcrumbs help keep them moist, while Parmesan adds a nice cheesy taste. Fresh parsley brightens the dish. The egg binds everything, and garlic gives it a kick. You can use any marinara sauce you like. Here are some options: - Store-bought marinara sauce - Homemade marinara sauce If you have time, making homemade marinara can add a fresh touch. Just simmer tomatoes, garlic, and herbs. If you’re short on time, a good quality store-bought sauce works great too. Warm it before adding the meatballs, ensuring they soak up all the flavor. Garnishing elevates your dish. Consider these options: - Fresh basil leaves - Additional Parmesan cheese Fresh basil adds a pop of color and flavor. A sprinkle of Parmesan on top gives it that gourmet look. These garnishes are simple but make a big difference in presentation. Enjoy your meal with these tasty touches! For the complete recipe, check out the Full Recipe section above. Start by gathering all your ingredients. You need ground turkey, breadcrumbs, and Parmesan cheese. Then, add chopped parsley, a large egg, minced garlic, Italian seasoning, salt, and pepper. Place all the ingredients in a large mixing bowl. Use your hands or a spoon to mix everything well. You want a smooth and even mixture. It should hold together easily when you roll it into balls. Now, preheat your oven to 400°F (200°C). Take small amounts of the mixture and roll them into 1-inch meatballs. Place the meatballs on a baking sheet lined with parchment paper. Make sure they are spaced out. This helps them cook evenly. Bake the meatballs in the oven for 20 to 25 minutes. Look for a nice golden brown color. They should be fully cooked by this time. While the meatballs bake, you can heat the marinara sauce. Pour the sauce into a saucepan and set it over medium heat. Stir it occasionally until it warms through. This will take about 5 to 10 minutes. When the meatballs are ready, add them to the warm sauce. Gently stir to coat each meatball. Let them simmer for 5 minutes. This step allows the meatballs to soak up the flavor of the sauce. For the full details on how to make these delicious turkey meatballs, check out the Full Recipe. To make moist turkey meatballs, you should use the right mix of ingredients. Ground turkey can be lean, so add breadcrumbs and Parmesan cheese. These ingredients help keep moisture in. The egg also binds the meatballs and keeps them soft. When mixing, don't overwork the meat. Just combine until mixed. This keeps the meatballs tender and juicy. Baking turkey meatballs at 400°F (200°C) works best. This temperature cooks them evenly while giving a nice brown color. Bake for 20-25 minutes. Check them around the 20-minute mark. The meatballs should be golden brown and firm to the touch. Use a meat thermometer if you want. The center should reach 165°F (74°C) to be safe to eat. Turkey meatballs are great on spaghetti or on their own with marinara sauce. You can also serve them in a sub sandwich with melted cheese. For a lighter option, try them on a salad with fresh greens. Garnish with fresh basil or more Parmesan cheese for a nice touch. You can find the full recipe to make these tasty meatballs and explore more ideas for serving them. {{image_2}} You can make your turkey meatballs even healthier by adding vegetables. Try finely chopping spinach, zucchini, or bell peppers. These veggies not only add nutrients but also enhance flavor. Mix about 1/2 cup of chopped veggies into the meatball mixture. This small change can make a big difference. If you need a gluten-free option, you can use gluten-free breadcrumbs. They work just as well in binding the meatballs. You could also try oats instead of breadcrumbs. Just blend them into a fine powder. Both options keep your meatballs tasty and enjoyable for everyone. While marinara is a classic choice, don’t be afraid to try other sauces. A creamy Alfredo sauce pairs well with turkey meatballs too. If you like spice, a zesty arrabbiata sauce adds a nice kick. You could even use barbecue sauce for a fun twist. Each sauce gives your dish a new flavor to explore. For the full recipe, check out the details above. After enjoying your turkey meatballs, let them cool down. Place them in an airtight container. They stay fresh in the fridge for 3 to 4 days. Ensure the sauce is stored separately. This keeps the meatballs from getting soggy. If you want to keep them longer, freezing is a great option. First, let the meatballs cool completely. Next, place them on a baking sheet in a single layer. Freeze for about an hour. This prevents them from sticking together. Once frozen, transfer the meatballs to a freezer bag. They can last for up to three months in the freezer. To reheat, take out the desired amount of meatballs. You can place them in the oven at 350°F (175°C) for about 15 minutes. This method keeps them moist. If you prefer, you can also reheat them in the microwave. Just add a splash of sauce to keep them juicy. Heat for 1-2 minutes, checking to avoid overcooking. Enjoy your turkey meatballs with marinara again, just like the first time! For the full recipe, refer to the recipe section above. To keep turkey meatballs moist, use fresh ground turkey. Add breadcrumbs and egg for binding. These ingredients help trap moisture. Avoid overcooking them in the oven. Baking at 400°F for 20-25 minutes works well. You can also simmer them in marinara sauce after baking. This adds flavor and moisture. Yes, you can swap ground turkey for ground beef. Beef gives a richer flavor and a different texture. Keep in mind, ground beef is higher in fat. Adjust cooking time if needed, as it may take longer to cook. The result will still be delicious. Turkey meatballs are done when they reach an internal temperature of 165°F. Use a meat thermometer for accuracy. The meatballs should be golden brown outside and firm to touch. Cut one open to check; it should be cooked through with no pink inside. Enjoy your turkey meatballs with marinara! For the full recipe, check out the complete guide. You learned about making tasty turkey meatballs. We covered ingredients, preparation, and cooking tips. I shared ideas for sauces and how to add veggies. Storing and reheating were also explained. Remember to keep the meatballs moist and use your favorite sauce. Enjoy this healthy dish in various ways. With these tips, you can make great meals. Now it's your turn to try this recipe!

Easy Turkey Meatballs with Marinara for Dinner

Looking for a quick and tasty dinner? You’ve come to the right place! These Easy Turkey Meatballs with Marinara are

Making Savory Cheesy Zucchini Fritters is easy once you have the right ingredients. Here’s what you need: - 2 medium zucchinis, grated - 1 teaspoon salt - 1 cup all-purpose flour - 1/2 cup grated Parmesan cheese - 1/2 cup shredded mozzarella cheese - 2 large eggs - 1/4 cup green onions, finely chopped - 2 cloves garlic, minced - 1/2 teaspoon black pepper - 1/2 teaspoon Italian seasoning - Olive oil for frying These ingredients come together to create a tasty and crisp snack. The zucchini gives a fresh flavor, while the cheeses add a rich taste. The eggs help bind everything together, making the fritters hold their shape when cooked. Next, let’s talk about nutritional information. Each serving of these fritters is packed with goodness, making them a great choice for a snack or light meal. This recipe is a delightful way to enjoy veggies and satisfy your cheese cravings all at once. For the full recipe, check out the instructions provided above. 1. Grate and salt the zucchini. Start with two medium zucchinis. Grate them into a bowl. Next, sprinkle one teaspoon of salt over the grated zucchini. This step is key. Let the zucchini sit for 10 minutes. This helps draw out extra moisture. 2. Squeeze out excess moisture from zucchini. After 10 minutes, grab a clean kitchen towel. Place the zucchini inside it and twist to wring out the liquid. Removing this moisture makes for crispier fritters. 1. Combine ingredients in a bowl. In a large mixing bowl, add the squeezed zucchini. Then, include one cup of all-purpose flour, half a cup of grated Parmesan cheese, and half a cup of shredded mozzarella cheese. Next, crack in two large eggs. Add a quarter cup of finely chopped green onions, two minced garlic cloves, half a teaspoon of black pepper, and half a teaspoon of Italian seasoning. Mix everything well until combined. 2. Heat skillet and fry fritters until golden brown. Heat a generous amount of olive oil in a non-stick skillet over medium heat. Once the oil is hot, drop spoonfuls of the zucchini mixture into the skillet. Flatten each spoonful slightly to form fritters. Cook for about 3-4 minutes on each side. They should turn golden brown and crispy. Adjust the heat as needed to prevent burning. Serve the fritters warm. They pair well with dips like Greek yogurt. For a kick, try spicy aioli. You can also arrange the fritters on a nice platter. Garnish with fresh herbs like parsley or chives. Drizzle with olive oil for that glossy touch. For the complete recipe, check the Full Recipe. - Always check the oil temperature before frying. Hot oil ensures crispy fritters. - Start with medium heat. Adjust it if the fritters brown too fast. - Place fritters neatly on a platter. Make it look inviting for guests. - Add fresh herbs like parsley on top. This adds color and flavor. - You can swap the cheese types. Use cheddar or feta for different flavors. - Try adding spices like garlic powder for extra zest. Adjust salt based on cheese used. For the full recipe, check the detailed instructions provided above. {{image_2}} You can easily change the base of your fritters. Swap zucchini for other vegetables. Carrots or summer squash work great too. Each veggie brings its own flavor. You can also use different types of cheese. Try feta for a tangy kick or cheddar for a sharper taste. This keeps your fritters fun and fresh. To boost flavor, add spices. A pinch of cayenne pepper gives a nice heat. Paprika adds a smoky taste that works well too. Fresh herbs can brighten your dish. Mix in basil for a sweet touch or dill for a fresh taste. These small changes create new flavor profiles. You can make your meal more filling. Serve your fritters with quinoa for a complete dish. The nutty flavor of quinoa pairs well with the fritters. You can also add fritters to a salad. They give a hearty bite to fresh greens. This adds nutrition and variety to your meal. Check out the Full Recipe for more ideas on how to enjoy these fritters! To keep your fritters fresh, store them in an airtight container. If you want to refrigerate them, let them cool first. Place a paper towel at the bottom of the container. This helps absorb moisture and keeps the fritters crisp. You can store them in the fridge for up to three days. For longer storage, freeze the fritters. Lay them flat on a baking sheet first. Once frozen, transfer them to a freezer bag. This method prevents them from sticking together. When it's time to enjoy your fritters again, reheating is key. The best way to keep them crispy is to use an oven or air fryer. Preheat your oven to 375°F (190°C). Place the fritters on a baking sheet in a single layer. Heat them for about 10-15 minutes, or until hot and crisp. If using an air fryer, set it to 350°F (175°C) and cook for 5-7 minutes. Avoid the microwave; it makes them soggy. In the fridge, your fritters last for about three days. When frozen, they can stay good for up to three months. Just remember to label your freezer bag with the date. This way, you’ll know when to enjoy them next. Keeping track of your leftovers can help you avoid waste and enjoy these tasty bites longer. For the full recipe, check out the details above. If your fritters are too wet, drying the zucchini is key. Start by grating the zucchini and sprinkling it with salt. Let it sit for about 10 minutes. This draws out excess moisture. After that, take a clean kitchen towel and wring out the zucchini well. Remove as much liquid as you can. This step is crucial for crispy fritters. Yes, you can make the batter ahead of time. Mix all the ingredients as directed. Then, cover the bowl with plastic wrap and store it in the fridge. This keeps the batter fresh for about 2 hours. Just give it a good stir before frying to mix everything well again. To make these fritters gluten-free, you can use alternative flours. Almond flour or chickpea flour works great. Substitute the all-purpose flour with one of these options in equal amounts. This keeps the fritters tasty without gluten. Enjoy them with your favorite dips! To make savory cheesy zucchini fritters, you need simple ingredients. Here is the list: - 2 medium zucchinis, grated - 1 teaspoon salt - 1 cup all-purpose flour - 1/2 cup grated Parmesan cheese - 1/2 cup shredded mozzarella cheese - 2 large eggs - 1/4 cup green onions, finely chopped - 2 cloves garlic, minced - 1/2 teaspoon black pepper - 1/2 teaspoon Italian seasoning - Olive oil for frying These ingredients come together to create a tasty snack. The combination of zucchini and cheese gives these fritters a rich flavor. The salt helps draw out moisture from the zucchini, making your fritters crispy. The flour binds everything, while the eggs add richness. The cheeses provide a savory depth that makes every bite delightful. Using fresh herbs like green onions adds a burst of flavor. Garlic brings in an aromatic touch. Black pepper and Italian seasoning round out the taste perfectly. You can find the full recipe for cooking these fritters at the end. Savory Cheesy Zucchini Fritters are simple and fun to make. We went through ingredients, preparation, cooking steps, and variations. Each step adds flavor and texture. You can change veggies or spices for your taste. Store leftovers easily and reheat for crunchy bites. These fritters are great as snacks or meals. Try them today, and enjoy new flavors in every bite!

Savory Cheesy Zucchini Fritters Tasty and Crisp Snack

Are you ready to spice up your snack game? Let me introduce you to Savory Cheesy Zucchini Fritters! These tasty,

- 2 cups fresh spinach, chopped - 1 can (14 oz) artichoke hearts, drained and chopped - 1 cup cream cheese, softened - 1 cup sour cream - 1 cup shredded mozzarella cheese - 1/2 cup grated Parmesan cheese - 2 cloves garlic, minced - 1 teaspoon onion powder - 1/2 teaspoon red pepper flakes (optional) - Salt and pepper to taste - Tortilla chips or sliced baguette for serving To make a great Creamy Spinach and Artichoke Dip, you need these key ingredients. Fresh spinach adds color and nutrients. Artichoke hearts bring a unique, tangy taste. Cream cheese and sour cream create a smooth base. Mozzarella cheese gives it that gooey texture we all love. Parmesan cheese adds a savory kick. Garlic and onion powder enhance the flavors. Red pepper flakes add a touch of heat, but you can skip them if you prefer mild. Finally, don’t forget salt and pepper to taste. Now, let's talk about the equipment needed to whip up this dip. You’ll need a mixing bowl to combine everything. A baking dish is essential for cooking the dip. Lastly, an oven will bake your creation to perfection. This dip serves 6 to 8 people. Each serving has about 250 calories. The macronutrient breakdown includes roughly 15 grams of fat, 8 grams of carbs, and 10 grams of protein. This dip is rich and filling, making it a great choice for gatherings. For the full recipe, check out the details above. - Preheat your oven to 350°F (175°C). - In a mixing bowl, combine cream cheese and sour cream until smooth. To create the base of your dip, first, take your cream cheese. Make sure it is softened. This helps it mix easily with the sour cream. Use a sturdy spoon or a mixer to blend them well. You want a creamy texture that is free of lumps. - Stir in chopped spinach and artichoke hearts. - Add mozzarella, Parmesan, garlic, onion powder, and seasonings. Next, add your chopped spinach and artichoke hearts. Fresh spinach adds great flavor, but you can use frozen if needed. The artichokes bring a unique taste. Then, sprinkle in the mozzarella and Parmesan cheese. These cheeses melt nicely and give the dip a cheesy pull. Don't forget the minced garlic! It adds a lovely aroma. Mix in the onion powder and season with salt and pepper to taste. This step is key to making it flavorful. - Transfer the mixture to a baking dish and bake for 25-30 minutes. - Remove from the oven and cool slightly before serving. Now, pour the mixture into a baking dish. Spread it evenly to ensure it cooks well. Bake it in the preheated oven for 25-30 minutes. You want to see it bubbly and golden brown on top. Once done, take it out and let it cool slightly. This will help the flavors settle. Serve it warm for the best experience. You can enjoy this creamy spinach and artichoke dip with tortilla chips or a sliced baguette. For the full recipe, check the complete guide! To make your dip smooth and creamy, let the cream cheese sit out. When it reaches room temperature, it mixes better. Fresh spinach gives a great flavor, but frozen works too if fresh isn’t available. Just make sure to thaw and drain it well. Be careful not to overmix your ingredients. This can make the dip too mushy. Also, let your dip cool a bit before serving. If you serve it too hot, you might burn your mouth. Serve this dip warm for the best taste. It works great with tortilla chips or sliced baguette. For a nice touch, garnish with fresh herbs like parsley or a sprinkle of red pepper flakes. This adds color and a hint of extra flavor. Check the Full Recipe for more details! {{image_2}} You can change the cheeses in this dip to fit your taste. Try using cheddar or gouda for a new twist. If you want a vegan option, you can use cream cheese made from nuts and a plant-based sour cream. These swaps keep the dip creamy and tasty. Adding herbs can really boost the flavors of your dip. Fresh basil or dill adds a bright taste. You can also add spices like cumin or smoked paprika for a warm kick. If you want some extra richness, try adding cooked bacon bits. Sun-dried tomatoes can bring a sweet and tangy flavor. These additions make your dip unique and fun. When it comes to serving, think outside the box. You can use crispy breadsticks or crunchy crackers. For a fancy touch, serve the dip in small cups with fresh veggies. This makes a great hors d'oeuvre for parties. Get creative, and your guests will love it! For the full recipe, check the detailed steps above. After enjoying your creamy spinach and artichoke dip, let it cool down. Transfer any leftovers to a clean, airtight container. Store the dip in the fridge. When kept properly, it will last for about 3 to 5 days. This way, you can savor the flavors again soon. To enjoy your dip again, you can reheat it. The best method is using the oven. Preheat your oven to 350°F (175°C) and place the dip in a baking dish. Heat for about 15-20 minutes until it’s warm and bubbly. If you choose the microwave, do so in short bursts. Heat for about 1 minute, stir, and check if it’s warm enough. The oven keeps the texture nice, while the microwave is quicker. Yes, you can freeze this dip! To freeze, place it in a freezer-safe container. Make sure to leave some space at the top, as it will expand. It can last in the freezer for up to 2 months. When you’re ready to eat it, move it to the fridge to thaw overnight. Reheat in the oven for the best results. Avoid freezing it more than once to keep the taste and texture great. For the full recipe, check back to make your next batch! To add spice to your dip, use more red pepper flakes. You can also mix in diced jalapeños or a splash of hot sauce. For a smoky flavor, try smoked paprika. These changes will give your dip a nice kick without losing its creamy texture. Yes, you can prepare this dip a day before. Simply follow the recipe, but don’t bake it yet. Store the mixed dip in the fridge, covered. When you’re ready to serve, just bake it as directed. This makes it easy for parties or gatherings. This dip pairs well with tortilla chips, sliced baguette, or pita chips. You can also use fresh veggies like carrots or celery sticks. These sides add crunch and balance the creaminess of the dip. Creamy Spinach and Artichoke Dip has some healthy ingredients. Spinach and artichokes are good for you. They provide vitamins and minerals. However, the dip is high in fat and calories due to cream cheese and sour cream. Enjoy it in moderation for a balanced diet. For a lighter version, you can use Greek yogurt instead of sour cream. Check the Full Recipe for easy steps to make this tasty dip! This blog post shared how to make a delicious creamy spinach and artichoke dip. We covered ingredients, steps, tips, and storage methods. You now have all you need to prepare a tasty dish. Whether you tweak the recipe or follow it closely, enjoy the flavors. Try it at your next gathering; I bet it will be a hit. With practice, you’ll impress everyone with your cooking skills. Get ready to share this warm, cheesy dip that brings smiles every time!

Creamy Spinach and Artichoke Dip Irresistible Delight

Are you ready to whip up a crowd favorite? This Creamy Spinach and Artichoke Dip is the perfect blend of

- 3 ripe bananas, mashed - 1/3 cup melted butter - 1/2 cup granulated sugar - 1 large egg, beaten - 1 teaspoon vanilla extract - 1 teaspoon baking soda - Pinch of salt - 1 1/2 cups all-purpose flour - 1/2 cup Nutella - 1/4 cup chopped walnuts (optional) - Extra bananas for topping (optional) You need ripe bananas for the best flavor. They give the bread sweetness and moisture. I usually pick bananas with brown spots; they are perfect for mashing. Melted butter adds richness and helps bind the bread. Granulated sugar is essential for sweetness. The beaten egg acts as a binder and adds fluffiness. Vanilla extract enhances the flavor of the bread. Baking soda helps it rise, while a pinch of salt balances the sweetness. All-purpose flour gives structure to the bread. Nutella is the star here; it adds a creamy, chocolatey surprise. If you like crunch, use chopped walnuts. Extra bananas on top make it look lovely and inviting. This Nutella-Stuffed Banana Bread is not just a treat; it brings joy to any meal. For the full recipe, check out the complete guide. - Preheat your oven to 350°F (175°C). - Grease a 9x5-inch loaf pan or use parchment paper. - In a mixing bowl, combine melted butter and mashed bananas. Stir well. - Add granulated sugar, beaten egg, and vanilla extract. Mix until smooth. - Sprinkle in baking soda and a pinch of salt. Stir to combine. - Gradually add flour, mixing until just incorporated. The batter should be lumpy. - If you like, fold in chopped walnuts. - Pour half of the banana bread batter into the loaf pan. - Create a well in the center. Spoon Nutella into the well. - Spread the Nutella evenly. - Top with the remaining batter. Smooth the top with a spatula. - For a nice look, slice a banana lengthwise and place it on top. - Bake in the preheated oven for 50-60 minutes. - Check doneness with a toothpick. It should come out clean, with some chocolate. - Let the bread cool in the pan for 10-15 minutes. - After that, move it to a wire rack to cool completely. For the full recipe, refer to the earlier section. Enjoy making your Nutella-stuffed banana bread! To make great banana bread, start with ripe bananas. Look for bananas with brown spots. They are sweet and soft, perfect for baking. Aim for three medium-sized bananas. Mixing is key too. Use a gentle hand when combining ingredients. Over-mixing can make the bread tough. Stir until you don’t see dry flour. The batter should look a bit lumpy. Once you master the base recipe, think about adding flavors. You can mix in chocolate chips, or dried fruit for extra texture. Walnuts add a nice crunch, but they are optional. Adjust the sweetness to your taste. If you like it less sweet, cut back on sugar. Adding a pinch of cinnamon can also boost the flavor without adding more sugar. For the full recipe, check out the instructions earlier in the article. {{image_2}} If you want to make a nut-free version of this recipe, you can swap out Nutella. Try using chocolate hazelnut spread made with sunflower seeds. You can also try creamy peanut butter or almond butter, if no nut allergies exist. These spreads bring a rich taste similar to Nutella but without nuts. For those who need gluten-free options, you can use almond flour or a gluten-free flour blend. These flours work well in banana bread, giving it a moist texture. Just remember to check baking soda is gluten-free. If you're looking for vegan substitutions, replace the egg with a flax egg. To make a flax egg, mix one tablespoon of ground flaxseed with two and a half tablespoons of water. Let it sit for five minutes until it thickens. You can also use dairy-free butter instead of regular butter. This keeps the bread rich and tasty while being plant-based. For the full recipe, make sure to check out the instructions above! To keep your Nutella-stuffed banana bread fresh, store it in an airtight container. This helps retain moisture and flavor. You can refrigerate it for up to five days. Just remember to let it cool completely before sealing. If you want to keep it for longer, freezing is a great option. For freezing, wrap the banana bread tightly in plastic wrap and then in aluminum foil. This double wrapping helps prevent freezer burn. You can freeze it for up to three months. When you're ready to enjoy it, just thaw it in the fridge overnight. Warming up slices of banana bread is easy. You can use the microwave, oven, or toaster. For the microwave, place a slice on a plate and heat for about 15 seconds. Check it to see if it’s warm enough. If you prefer the oven, preheat it to 350°F (175°C). Place the slice on a baking sheet and warm it for about 10 minutes. This method helps keep the crust nice and soft. Using a toaster is another quick method. Just pop in a slice and toast for a couple of minutes. This gives it a nice, crispy outside while keeping the inside soft. Enjoy your warm banana bread with a fresh spread of Nutella on top! How ripe should the bananas be for optimal flavor? Use very ripe bananas. They should be brown and soft. This gives the bread a sweet taste. Ripe bananas mix well and keep the bread moist. Can I bake this in a different-sized pan? Yes, you can use a different pan. If you use a smaller pan, the bread will be thicker. This may need more baking time. A bigger pan will make thinner slices, baking faster. Just watch it closely as it bakes. How long will leftovers last? Leftovers last about 3 days at room temperature. Store them in an airtight container. You can also refrigerate them for up to a week. For longer storage, freeze the slices. Can I add chocolate chips or other flavors? Absolutely! Chocolate chips add more sweetness. You can also try nuts or spices like cinnamon. Be creative! Just keep the total mix-ins under one cup for the best texture. For the full recipe, check out the link above. This blog post walked you through making Nutella-stuffed banana bread. We covered ingredients and step-by-step baking. You learned great tips for perfecting your bread, as well as variations for dietary needs. In conclusion, this recipe is fun and easy to follow. Feel free to customize it with your favorite add-ins. Enjoy the rich flavor of Nutella combined with sweet bananas. Happy baking!

Nutella-Stuffed Banana Bread Delightful and Easy Recipe

If you love a sweet treat that’s simple to make, you’re in for a real treat! Nutella-Stuffed Banana Bread combines

Older posts
Newer posts
← Previous Page1 … Page102 Page103 Page104 … Page122 Next →

dsad

© 2025 Southern Dishes • Built with GeneratePress

Our Policies

  • Copyright Policy
  • Cookie Policy
  • GDPR Policy
  • Privacy Policy
  • Disclaimer
  • Terms Of Use

More Information

  • Home
  • About
  • Contact
  • Appetizers
  • Dessert
  • Dinner
  • Drinks
©2025, Southern Dishes About Back To Top