Baked Apple Hand Pies Delightful and Easy Dessert

WANT TO SAVE THIS RECIPE?

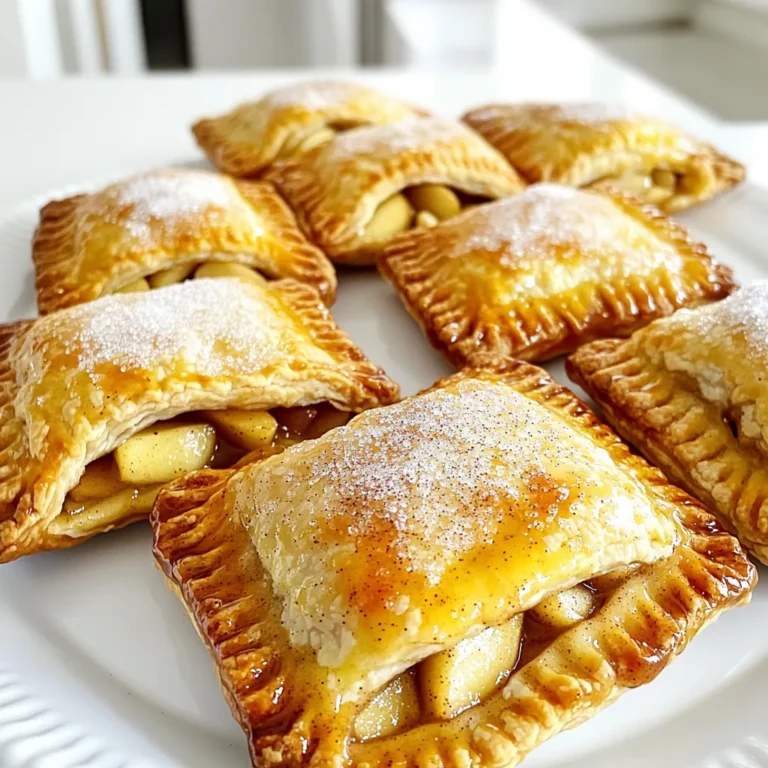
Craving a sweet treat that’s simple and satisfying? These Baked Apple Hand Pies are your answer! With juicy apples, warm spices, and flaky crust, they’re sure to delight everyone. In this guide, I’ll walk you through the easy steps to create these delicious desserts at home. Whether you want a warm dessert or a tasty snack, these hand pies will not disappoint. Let’s dive into the sweet world of baking!

Ingredients

List of Ingredients

– 2 large apples (Granny Smith or Honeycrisp)

– 1/4 cup brown sugar

– 1 teaspoon ground cinnamon

– 1/4 teaspoon nutmeg

– 1 tablespoon lemon juice

– 1 tablespoon cornstarch

– 1 package (store-bought) pie crusts (2 crusts)

– 1 egg, beaten (for egg wash)

– 1 tablespoon granulated sugar (for sprinkling)

Optional Garnishes and Add-ins

– Vanilla ice cream

– Whipped cream

– Caramel sauce

Suggested Substitutions

– Alternative sweeteners

– Different types of apples

The key to making great baked apple hand pies is to start with fresh, crisp apples. I suggest using Granny Smith or Honeycrisp for their balance of sweetness and tartness. The apples should be peeled and diced before mixing with brown sugar, cinnamon, nutmeg, lemon juice, and cornstarch. This mix creates a sweet and spiced filling.

Brown sugar adds a rich flavor and deeper sweetness. Ground cinnamon and nutmeg bring warmth and depth to each bite. Lemon juice adds a nice zing, balancing the sweetness. Cornstarch helps thicken the filling for a perfect texture.

For the crust, I recommend using store-bought pie crusts. They save time and still taste great. You can also make your own if you prefer. An egg wash gives the pies a beautiful golden color. Sprinkling sugar on top adds a sweet crunch.

Feel free to get creative! You can add vanilla ice cream, whipped cream, or caramel sauce when serving. If you want to change things up, try using different types of apples or alternative sweeteners. The possibilities are endless!

Step-by-Step Instructions

Preparation Steps

1. First, preheat your oven to 400°F (200°C). This heat helps the pies bake evenly. Line a baking sheet with parchment paper. This makes cleanup easy and prevents sticking.

2. Now, prepare the apple filling. In a medium bowl, mix the diced apples, brown sugar, cinnamon, nutmeg, lemon juice, and cornstarch. Stir until the apples are well-coated in the sweet mixture. This will add a rich flavor to your pies.

Rolling and Cutting Dough

1. Next, roll out the pie crusts on a lightly floured surface. This will keep the dough from sticking. Aim for about 1/8 inch thick for a nice flaky crust.

2. Use a biscuit cutter or the rim of a glass to cut circles in the dough. Each circle should be about 4-5 inches in diameter. You should get enough circles for eight hand pies.

Assembling the Hand Pies

1. Place a heaping tablespoon of the apple filling in the center of each dough circle. Be careful not to overfill, or the pies may burst while baking.

2. Fold the crust over the filling to form a half-moon shape. Press the edges together firmly. Use a fork to crimp the edges for a nice finish. This also helps seal the filling inside.

Baking Instructions

1. Place the hand pies on the prepared baking sheet. Brush the tops with the beaten egg. This gives the pies a shiny, golden look when baked. Sprinkle with granulated sugar for added sweetness.

2. Cut one or two small slits in the top of each pie. This allows steam to escape while baking, helping the pies stay crisp.

3. Bake in the preheated oven for 20-25 minutes, or until they are golden brown and crisp. The aroma will fill your kitchen!

4. Allow the hand pies to cool slightly before enjoying them. They are great warm or at room temperature.

Tips & Tricks

Best Practices for Pie Crust

How to avoid shrinkage

To stop your pie crust from shrinking, chill the dough before rolling it out. Wrap it in plastic wrap and let it rest in the fridge for about 30 minutes. This helps the gluten relax, keeping its shape better while baking.

Ensuring a flaky texture

For a flaky crust, use cold ingredients. Cold butter or shortening creates steam during baking, forming those lovely layers. Cut the fat into the flour until it looks like small peas. This step is key for that perfect texture.

Enhancing Flavor

Additional spices to consider

You can add more spice for flavor. Try a pinch of allspice or cloves. These spices add depth to the apple filling and make your hand pies more exciting. Don’t be shy to experiment with flavors!

Using flavored extracts

Consider adding a splash of vanilla or almond extract to the filling. Just a little can give your hand pies a unique twist. This small change can elevate the taste and make your dessert truly special.

Baking Tips

How to determine doneness

To check if your hand pies are done, look for a golden brown color. The crust should be crisp and firm to the touch. You can also poke a small slit and peek inside; the filling should bubble slightly.

Tips for achieving a golden brown finish

For that perfect golden look, brush the tops with a beaten egg before baking. This egg wash helps create a beautiful shine. Sprinkle a bit of sugar on top for extra crunch and sweetness.

Variations

Flavor Variations

You can make baked apple hand pies even more exciting by adding nuts or dried fruits. Chopped walnuts or pecans give a nice crunch. They also add a rich flavor that pairs well with apples. Just mix them into the apple filling.

Dried fruits can also boost flavor. Try adding raisins or chopped dates. These fruits add sweetness and chewiness. They make each bite interesting.

Dough Variations

While store-bought crusts work great, making your own can be fun. A homemade pie crust allows you to control the taste and texture. Plus, it can be fresher. Use flour, butter, and cold water for a simple crust.

If you need a gluten-free option, there are many ready-made gluten-free crusts. You can also make your own using almond flour or gluten-free flour blends. These will still hold the filling well and taste delicious.

Different Fillings

Baked apple hand pies are not just for apples. You can fill them with cherries or mixed berries for a fruity twist. The tartness of these fruits makes a nice balance with the sweetness.

Pumpkin or sweet potato fillings are great for fall. They add warmth and depth to the pies. Combine them with spices like cinnamon and nutmeg for a cozy flavor. Each filling option opens up a world of taste and fun.

Storage Info

How to Store Baked Hand Pies

After baking, let your hand pies cool. Place them in an airtight container. This keeps them fresh in the fridge. You can store them for up to three days. If you want to keep them longer, freezing is a great option. Wrap each pie in plastic wrap, then place them in a freezer bag. This helps prevent freezer burn.

Reheating Guidelines

To enjoy your hand pies later, you can reheat them. The best method is using an oven. Preheat the oven to 350°F (175°C). Place the pies on a baking sheet. Heat for about 10-15 minutes. This keeps the crust crispy. You can also use a microwave, but it may make them soft. If you choose the microwave, heat each pie for 30 seconds.

Shelf Life

Baked hand pies last for three days in the fridge. For frozen hand pies, they can last up to three months. Just make sure to wrap them well. When you are ready to eat, follow the reheating guidelines for the best taste.

FAQs

Can I use other types of apples?

Yes, you can use different apples. Some great options include Fuji, Braeburn, or Golden Delicious. Each apple brings a unique taste. Granny Smith apples add a tart flavor, while Honeycrisp apples offer sweetness. Mixing varieties can also enhance flavor. Experiment and find what you love best.

How do I prevent the filling from leaking?

To keep the filling inside, proper sealing is key. After adding the filling, fold the crust carefully. Press the edges firmly together. Use a fork to crimp the edges for a tight seal. Also, avoid overfilling each pie. This helps prevent leaks while baking.

Can I make these hand pies ahead of time?

Yes, you can prepare these pies in advance. Assemble them, then freeze before baking. Place the unbaked hand pies in a single layer on a baking sheet. Once frozen, transfer them to a zip-top bag. They can be stored for up to three months. When ready, bake straight from the freezer. Just add a few extra minutes to the baking time.

What can I serve with hand pies?

These hand pies pair well with various accompaniments. Vanilla ice cream adds a creamy touch. Whipped cream offers a light and fluffy option. Drizzling caramel sauce on top adds sweetness. You can also serve them with a warm drink, like cider or tea, for a cozy treat.

Now you know how to make delicious hand pies from scratch. We covered ingredients, preparation, baking tips, and variations. Don’t forget, you can adjust flavors and fillings to suit your taste. Remember to try serving them warm with ice cream or whipped cream for a treat. Enjoy sharing these scrumptious hand pies with friends and family! Get baking, and let your creativity shine in the kitchen. Your homemade hand pies will impress everyone.

- 2 large apples (Granny Smith or Honeycrisp) - 1/4 cup brown sugar - 1 teaspoon ground cinnamon - 1/4 teaspoon nutmeg - 1 tablespoon lemon juice - 1 tablespoon cornstarch - 1 package (store-bought) pie crusts (2 crusts) - 1 egg, beaten (for egg wash) - 1 tablespoon granulated sugar (for sprinkling) - Vanilla ice cream - Whipped cream - Caramel sauce - Alternative sweeteners - Different types of apples The key to making great baked apple hand pies is to start with fresh, crisp apples. I suggest using Granny Smith or Honeycrisp for their balance of sweetness and tartness. The apples should be peeled and diced before mixing with brown sugar, cinnamon, nutmeg, lemon juice, and cornstarch. This mix creates a sweet and spiced filling. Brown sugar adds a rich flavor and deeper sweetness. Ground cinnamon and nutmeg bring warmth and depth to each bite. Lemon juice adds a nice zing, balancing the sweetness. Cornstarch helps thicken the filling for a perfect texture. For the crust, I recommend using store-bought pie crusts. They save time and still taste great. You can also make your own if you prefer. An egg wash gives the pies a beautiful golden color. Sprinkling sugar on top adds a sweet crunch. Feel free to get creative! You can add vanilla ice cream, whipped cream, or caramel sauce when serving. If you want to change things up, try using different types of apples or alternative sweeteners. The possibilities are endless! 1. First, preheat your oven to 400°F (200°C). This heat helps the pies bake evenly. Line a baking sheet with parchment paper. This makes cleanup easy and prevents sticking. 2. Now, prepare the apple filling. In a medium bowl, mix the diced apples, brown sugar, cinnamon, nutmeg, lemon juice, and cornstarch. Stir until the apples are well-coated in the sweet mixture. This will add a rich flavor to your pies. 1. Next, roll out the pie crusts on a lightly floured surface. This will keep the dough from sticking. Aim for about 1/8 inch thick for a nice flaky crust. 2. Use a biscuit cutter or the rim of a glass to cut circles in the dough. Each circle should be about 4-5 inches in diameter. You should get enough circles for eight hand pies. 1. Place a heaping tablespoon of the apple filling in the center of each dough circle. Be careful not to overfill, or the pies may burst while baking. 2. Fold the crust over the filling to form a half-moon shape. Press the edges together firmly. Use a fork to crimp the edges for a nice finish. This also helps seal the filling inside. 1. Place the hand pies on the prepared baking sheet. Brush the tops with the beaten egg. This gives the pies a shiny, golden look when baked. Sprinkle with granulated sugar for added sweetness. 2. Cut one or two small slits in the top of each pie. This allows steam to escape while baking, helping the pies stay crisp. 3. Bake in the preheated oven for 20-25 minutes, or until they are golden brown and crisp. The aroma will fill your kitchen! 4. Allow the hand pies to cool slightly before enjoying them. They are great warm or at room temperature. How to avoid shrinkage To stop your pie crust from shrinking, chill the dough before rolling it out. Wrap it in plastic wrap and let it rest in the fridge for about 30 minutes. This helps the gluten relax, keeping its shape better while baking. Ensuring a flaky texture For a flaky crust, use cold ingredients. Cold butter or shortening creates steam during baking, forming those lovely layers. Cut the fat into the flour until it looks like small peas. This step is key for that perfect texture. Additional spices to consider You can add more spice for flavor. Try a pinch of allspice or cloves. These spices add depth to the apple filling and make your hand pies more exciting. Don’t be shy to experiment with flavors! Using flavored extracts Consider adding a splash of vanilla or almond extract to the filling. Just a little can give your hand pies a unique twist. This small change can elevate the taste and make your dessert truly special. How to determine doneness To check if your hand pies are done, look for a golden brown color. The crust should be crisp and firm to the touch. You can also poke a small slit and peek inside; the filling should bubble slightly. Tips for achieving a golden brown finish For that perfect golden look, brush the tops with a beaten egg before baking. This egg wash helps create a beautiful shine. Sprinkle a bit of sugar on top for extra crunch and sweetness. {{image_2}} You can make baked apple hand pies even more exciting by adding nuts or dried fruits. Chopped walnuts or pecans give a nice crunch. They also add a rich flavor that pairs well with apples. Just mix them into the apple filling. Dried fruits can also boost flavor. Try adding raisins or chopped dates. These fruits add sweetness and chewiness. They make each bite interesting. While store-bought crusts work great, making your own can be fun. A homemade pie crust allows you to control the taste and texture. Plus, it can be fresher. Use flour, butter, and cold water for a simple crust. If you need a gluten-free option, there are many ready-made gluten-free crusts. You can also make your own using almond flour or gluten-free flour blends. These will still hold the filling well and taste delicious. Baked apple hand pies are not just for apples. You can fill them with cherries or mixed berries for a fruity twist. The tartness of these fruits makes a nice balance with the sweetness. Pumpkin or sweet potato fillings are great for fall. They add warmth and depth to the pies. Combine them with spices like cinnamon and nutmeg for a cozy flavor. Each filling option opens up a world of taste and fun. After baking, let your hand pies cool. Place them in an airtight container. This keeps them fresh in the fridge. You can store them for up to three days. If you want to keep them longer, freezing is a great option. Wrap each pie in plastic wrap, then place them in a freezer bag. This helps prevent freezer burn. To enjoy your hand pies later, you can reheat them. The best method is using an oven. Preheat the oven to 350°F (175°C). Place the pies on a baking sheet. Heat for about 10-15 minutes. This keeps the crust crispy. You can also use a microwave, but it may make them soft. If you choose the microwave, heat each pie for 30 seconds. Baked hand pies last for three days in the fridge. For frozen hand pies, they can last up to three months. Just make sure to wrap them well. When you are ready to eat, follow the reheating guidelines for the best taste. Yes, you can use different apples. Some great options include Fuji, Braeburn, or Golden Delicious. Each apple brings a unique taste. Granny Smith apples add a tart flavor, while Honeycrisp apples offer sweetness. Mixing varieties can also enhance flavor. Experiment and find what you love best. To keep the filling inside, proper sealing is key. After adding the filling, fold the crust carefully. Press the edges firmly together. Use a fork to crimp the edges for a tight seal. Also, avoid overfilling each pie. This helps prevent leaks while baking. Yes, you can prepare these pies in advance. Assemble them, then freeze before baking. Place the unbaked hand pies in a single layer on a baking sheet. Once frozen, transfer them to a zip-top bag. They can be stored for up to three months. When ready, bake straight from the freezer. Just add a few extra minutes to the baking time. These hand pies pair well with various accompaniments. Vanilla ice cream adds a creamy touch. Whipped cream offers a light and fluffy option. Drizzling caramel sauce on top adds sweetness. You can also serve them with a warm drink, like cider or tea, for a cozy treat. Now you know how to make delicious hand pies from scratch. We covered ingredients, preparation, baking tips, and variations. Don't forget, you can adjust flavors and fillings to suit your taste. Remember to try serving them warm with ice cream or whipped cream for a treat. Enjoy sharing these scrumptious hand pies with friends and family! Get baking, and let your creativity shine in the kitchen. Your homemade hand pies will impress everyone.

Baked Apple Hand Pies

Indulge in the delightful taste of Sweet & Spiced Baked Apple Hand Pies! These easy-to-make treats combine juicy apples, warm spices, and a flaky crust, making them perfect for any occasion. Discover the simple steps to create these delicious hand pies that everyone will love. Don’t miss out—click to explore the full recipe and bring a touch of sweetness to your kitchen! #BakedApplePies #DessertRecipes #FallBaking #HandPies

Ingredients
  

2 large apples (preferably Granny Smith or Honeycrisp), peeled and diced

1/4 cup brown sugar

1 teaspoon ground cinnamon

1/4 teaspoon nutmeg

1 tablespoon lemon juice

1 tablespoon cornstarch

1 package (store-bought) pie crusts (2 crusts)

1 egg, beaten (for egg wash)

1 tablespoon granulated sugar (for sprinkling)

Instructions
 

Preheat your oven to 400°F (200°C) and line a baking sheet with parchment paper.

    In a medium bowl, combine the diced apples, brown sugar, cinnamon, nutmeg, lemon juice, and cornstarch. Mix until the apples are well-coated.

      Roll out the pie crusts on a lightly floured surface to prevent sticking. Cut each crust into circles that are about 4-5 inches in diameter. You can use a biscuit cutter or the rim of a glass.

        Place a heaping tablespoon of the apple filling in the center of each circle. Be careful not to overfill, as it might spill out during baking.

          Fold the crust over the filling to create a half-moon shape. Press the edges together firmly and use a fork to crimp the edges for a decorative finish.

            Transfer the hand pies to the prepared baking sheet. Brush the tops with the beaten egg and sprinkle with granulated sugar.

              Cut a small slit or two in the top of each hand pie to allow steam to escape while baking.

                Bake in the preheated oven for 20-25 minutes, or until golden brown and crisp.

                  Allow the hand pies to cool slightly before serving. Enjoy warm or at room temperature!

                    Prep Time: 20 min | Total Time: 45 min | Servings: 8

                      WANT TO SAVE THIS RECIPE?

                      Leave a Comment

                      Recipe Rating