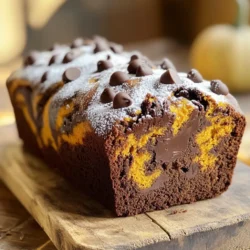
Are you ready for a treat that blends rich chocolate and cozy pumpkin? This Chocolate Pumpkin Marble Loaf is not just a delicious dessert; it’s a moist and delightful way to celebrate fall. Whether you want a sweet snack or a fancy dish to impress, this loaf delivers on taste and texture. Get ready to whip up a loaf that will wow your friends and family! Let’s dive into the recipe!
Ingredients
List of Ingredients
To make Chocolate Pumpkin Marble Loaf, gather these ingredients:
– 1 cup canned pumpkin puree
– 1/2 cup unsweetened applesauce
– 1/2 cup granulated sugar
– 1/4 cup brown sugar, packed
– 1/3 cup vegetable oil
– 2 large eggs
– 1 teaspoon vanilla extract
– 1 1/2 cups all-purpose flour
– 1 teaspoon baking soda
– 1/2 teaspoon baking powder
– 1/2 teaspoon salt
– 1 teaspoon ground cinnamon
– 1/2 teaspoon ground nutmeg
– 1/4 cup unsweetened cocoa powder
– 1/2 cup semi-sweet chocolate chips
Ingredient Substitutions
You can swap some ingredients if needed:
– Use mashed bananas instead of applesauce for moisture.
– Substitute coconut oil for vegetable oil for a tropical twist.
– Replace granulated sugar with honey or maple syrup for a natural sweetener.
– Try whole wheat flour instead of all-purpose flour for added fiber.
– Use dairy-free chocolate chips for a vegan option.
Tips for Freshness
Keep your loaf moist and fresh with these tips:
– Store it in an airtight container at room temperature for up to three days.
– For longer storage, wrap it tightly in plastic wrap and freeze.
– Always let the loaf cool completely before wrapping it.
– Add a slice of bread to the container to keep it soft longer.
– Enjoy it warm by reheating slices briefly in the microwave.
These tips will help your Chocolate Pumpkin Marble Loaf stay delicious and fresh!
Step-by-Step Instructions
Prepping the Oven and Pan
First, preheat your oven to 350°F (175°C). This step is key for even baking. Next, grab a 9×5-inch loaf pan. You can grease it with butter or oil. Alternatively, use parchment paper for easy removal later.
Mixing the Wet Ingredients
In a large mixing bowl, add the following wet ingredients:
– 1 cup canned pumpkin puree
– 1/2 cup unsweetened applesauce
– 1/2 cup granulated sugar
– 1/4 cup brown sugar, packed
– 1/3 cup vegetable oil
– 2 large eggs
– 1 teaspoon vanilla extract
Whisk these ingredients together. Mix until they are smooth and well-combined. This creates a rich base for your loaf.
Combining Dry Ingredients and Creating Layers
Now, take another bowl and sift together the dry ingredients:
– 1 1/2 cups all-purpose flour
– 1 teaspoon baking soda
– 1/2 teaspoon baking powder
– 1/2 teaspoon salt
– 1 teaspoon ground cinnamon
– 1/2 teaspoon ground nutmeg
Gradually add the dry mix to the wet mixture. Stir gently until just combined. Next, divide the batter into two equal parts. Add 1/4 cup unsweetened cocoa powder and 1/2 cup semi-sweet chocolate chips to one half. Mix well.
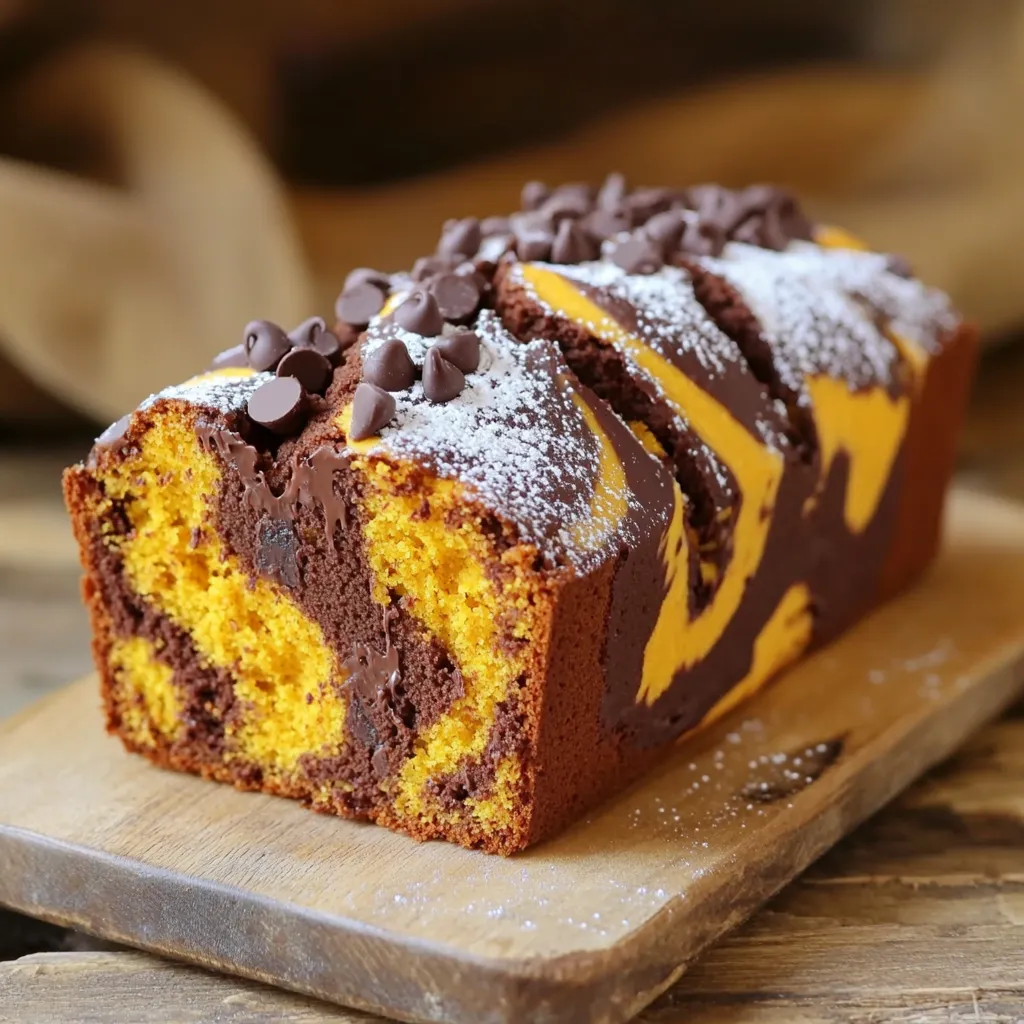
Now it’s time to create layers in your loaf pan. Start with half of the pumpkin batter. Then add half of the chocolate batter. Alternate the layers, finishing with a swirl using a knife. This gives your loaf a beautiful marbled look.
Tips & Tricks
Baking Time and Doneness
Baking time is key for a moist loaf. Bake your Chocolate Pumpkin Marble Loaf for 60 to 70 minutes. Check doneness with a toothpick. Insert it into the center of the loaf. If it comes out clean, your loaf is ready. If it has wet batter, bake for a few more minutes. Oven temperatures can vary, so keep an eye on it.
Achieving the Perfect Marble Effect
To create a great marble effect, layer your batters carefully. Start with half of the pumpkin batter. Then, add half of the chocolate batter. Repeat this step. Use a knife or skewer to swirl the batters. Don’t over-mix; you want clear marble lines. This makes each slice look beautiful and inviting.
Serving Suggestions
Let your loaf cool before slicing. Serve it on a rustic wooden board. A light dusting of powdered sugar adds charm. For a special touch, pair it with whipped cream. A scoop of vanilla ice cream also works well. You can enjoy it as a dessert or a snack. The flavors of pumpkin and chocolate will delight everyone!
Variations
Gluten-Free Options
You can enjoy this loaf without gluten. Use gluten-free all-purpose flour instead of regular flour. Most brands work well in this recipe. Ensure the flour blend contains xanthan gum to help with texture. This swap keeps the loaf moist and delicious.
Alternative Flavor Enhancements
Want to change flavors? Add spices like ginger or cloves for warmth. A teaspoon of espresso powder can boost the chocolate taste. You can also fold in nuts like walnuts or pecans for crunch. If you love fruit, mix in dried cranberries or raisins. Each addition makes the loaf unique.
Mini Loaf or Muffin Adaptations
You can make mini loaves or muffins for easy serving. Use a mini loaf pan or muffin tin to bake. Adjust the baking time to about 20-25 minutes for muffins. Check for doneness with a toothpick. This way, you can share or enjoy smaller treats.
Storage Info
Best Storage Practices
To keep your Chocolate Pumpkin Marble Loaf fresh, wrap it well. Use plastic wrap or foil. Store it at room temperature for up to three days. If you want it to last longer, consider refrigerating it. The cool air keeps it moist and tasty.
How to Freeze and Thaw
Freezing this loaf is simple. First, let it cool completely. Then, wrap it tightly in plastic wrap. Place it in a freezer bag to avoid freezer burn. It can stay frozen for up to three months. When you’re ready to enjoy it, take it out of the freezer. Let it thaw in the fridge overnight. For a quick thaw, leave it at room temperature for a few hours.
Shelf Life of the Loaf
This delicious loaf has a good shelf life. At room temperature, it lasts about three days. If stored in the fridge, it can last a week. When frozen, the loaf stays fresh for up to three months. Enjoy it at your own pace!
FAQs
Can I use fresh pumpkin instead of canned?
Yes, you can use fresh pumpkin. Start by roasting or steaming your pumpkin. After it cools, scoop out the flesh and blend it until smooth. You need about one cup of pumpkin puree for this recipe. Fresh pumpkin can add a great taste. Just remember, it may have more water than canned. Drain any excess liquid if needed. This will keep your loaf from getting too soggy.
How can I make this loaf healthier?
You can make small changes to boost nutrition. Here are some ideas:
– Replace half the sugar with honey or maple syrup.
– Use whole wheat flour instead of all-purpose flour.
– Swap vegetable oil for unsweetened applesauce for moisture.
– Add nuts like walnuts for healthy fats and protein.
These tweaks can help lower calories and add fiber. Your loaf will still taste great!
What are some good pairings for Chocolate Pumpkin Marble Loaf?
This loaf pairs well with many treats. Here are some favorites:
– Serve it with whipped cream for a sweet touch.
– A scoop of vanilla ice cream makes it extra special.
– Pair it with a cup of warm tea or coffee for a cozy feel.
– Drizzle with chocolate sauce for a rich flavor boost.
These pairings will enhance the loaf’s taste and create a lovely dessert experience.
This blog post covered each step to make a tasty Chocolate Pumpkin Marble Loaf. We discussed the key ingredients, offered substitutions, and shared tips for freshness. You learned how to prep your oven and mix ingredients for the best results. We included baking tips and serving ideas to elevate your loaf. Lastly, we explored variations like gluten-free options and storage tips.
Now, you can enjoy this delicious treat and share it with others. Happy baking!