S’mores Bars Delightful Chocolate and Marshmallow Treat

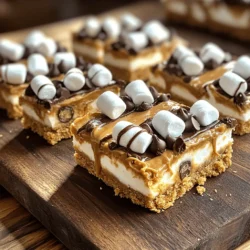
S’mores bars blend rich chocolate and gooey marshmallows in a tasty treat. You can enjoy this easy dessert anytime—even without a campfire! In today’s post, I’ll guide you through the simple steps to create these tasty bars. Plus, I’ll share tips to customize your s’mores and make them fit any dietary need. Let’s dive into the sweet world of s’mores bars and satisfy your cravings!

Ingredients

Essential Ingredients for S’mores Bars

To make these tasty S’mores Bars, you need simple staples. Here’s what you will need:

– 1 ½ cups graham cracker crumbs

– ½ cup unsalted butter, melted

– ½ cup brown sugar, packed

– 1 cup mini marshmallows

– 1 cup semi-sweet chocolate chips

– ½ cup creamy peanut butter

– ½ teaspoon vanilla extract

– A pinch of salt

These ingredients blend together to create that classic S’mores flavor we all love. The graham crackers give a crunchy base, while the chocolate and marshmallows add sweetness and gooeyness.

Optional Add-ins for Extra Flavor

Want to kick your S’mores Bars up a notch? Consider these tasty add-ins:

– A handful of crushed nuts, like walnuts or pecans, for crunch

– A sprinkle of sea salt on top for a sweet-salty twist

– Drizzle some caramel sauce for extra sweetness

– Swap in dark chocolate chips for a richer flavor

These options can help you personalize your bars and make them even more fun.

Ingredient Substitutions for Dietary Needs

Have dietary restrictions? Don’t worry! You can still enjoy these bars. Here are some swaps:

– Use gluten-free graham crackers to make it gluten-free

– Replace butter with coconut oil for a dairy-free option

– Choose vegan chocolate chips to keep it plant-based

– Use almond or sunflower seed butter instead of peanut butter if you have nut allergies

These substitutions ensure everyone can enjoy the delight of S’mores Bars. For the full recipe, check out the earlier section!

Step-by-Step Instructions

Preparing the Baking Pan

Start by preheating your oven to 350°F (175°C). This step warms your oven for even baking. Next, grab a 9×9 inch baking pan. You can grease it with butter or line it with parchment paper. Lining the pan makes it easier to remove the bars later.

Making the Graham Cracker Base

In a medium bowl, mix 1 ½ cups of graham cracker crumbs, ½ cup of melted unsalted butter, and ½ cup of packed brown sugar. Stir well until it forms a crumbly mixture. This is the base of your s’mores bars. Now, press this mixture firmly into the bottom of your prepared pan. Make sure it is even and compact. Bake this crust for 8 to 10 minutes. You want it to be lightly golden. After baking, let it cool a bit before moving to the next step.

Layering the Filling

Next, melt ½ cup of creamy peanut butter in a microwave-safe bowl for about 30 seconds. Once melted, stir in ½ teaspoon of vanilla extract and a pinch of salt. Drizzle this peanut butter mixture over the cooled graham cracker crust. Spread it out evenly. Now, sprinkle 1 cup of mini marshmallows and 1 cup of semi-sweet chocolate chips on top. Gently press them into the peanut butter layer. Bake the bars for another 10 to 12 minutes. Look for golden marshmallows and melted chocolate. Once they are ready, let the bars cool completely before slicing them into squares.

For the full recipe, refer to the earlier section. Enjoy your homemade s’mores bars!

Tips & Tricks

How to Perfectly Melt Chocolate and Marshmallows

To melt chocolate, use a microwave or a double boiler. If using a microwave, place chocolate chips in a bowl. Heat for 30 seconds, then stir. Repeat until smooth. Be careful not to overheat, or it will seize. For marshmallows, you can melt them on the stovetop. Heat them slowly in a pot over low heat. Stir often until they are gooey but not burnt.

Tips for Achieving the Right Texture

The crust should be firm but not hard. Press the graham cracker mix evenly into the pan. Bake it just until golden brown. This step keeps the bars from being soggy. When adding mini marshmallows, press them down gently. This helps them stick to the crust and not float away during baking.

Common Mistakes to Avoid

One common mistake is using cold chocolate. Always let it reach room temperature before melting. Another mistake is not cooling the crust enough. If the crust is too hot, it can melt the chocolate and marshmallows. Lastly, don’t skip the salt. A pinch enhances the flavors of chocolate and peanut butter.

For the full recipe, check the details above and start your s’mores adventure!

Variations

Gluten-Free S’mores Bars Recipe

You can make gluten-free s’mores bars easily. Use gluten-free graham crackers instead of regular ones. Make sure to check the brand for gluten-free labels. The rest of the recipe stays the same. The taste will still be sweet and delicious, even without gluten.

Vegan S’mores Bars Options

Want a vegan twist? Swap out the butter for coconut oil. Use dairy-free chocolate chips and vegan marshmallows. These simple changes make a tasty treat for everyone. You can still enjoy gooey chocolate and marshmallow flavors without any animal products.

Creative Flavor Variations

Let’s get creative! You can add flavors to your s’mores bars. Try mixing in crushed cookies, like Oreos, for a fun crunch. You can also add nuts for a little bite. Want a twist? Use flavored chocolate, like mint or orange, for a new taste. The options are endless! If you want the full recipe, check it out in the ingredients section.

Storage Info

Best Practices for Storing S’mores Bars

To keep your s’mores bars fresh, store them in an airtight container. This helps prevent them from drying out. You can place parchment paper between layers to avoid sticking. Make sure to store them in a cool, dry place. Avoid heat sources that can melt the chocolate or marshmallows.

How Long Do They Last?

When stored correctly, s’mores bars last about a week. If you keep them in the fridge, they can stay fresh for up to two weeks. Just remember that chilling can change the texture. The chocolate may become firmer, and the marshmallows might get a bit chewy.

Freezing Instructions

You can freeze s’mores bars for longer storage. First, cut them into squares. Wrap each piece tightly in plastic wrap. Then, place them in a freezer-safe bag or container. They can last up to three months in the freezer. When you’re ready to eat them, let them thaw in the fridge or at room temperature. You can also warm them in the microwave for a few seconds for that fresh-baked taste. For the full recipe, check out the earlier section.

FAQs

Can I use homemade graham crackers?

Yes, you can use homemade graham crackers in your S’mores Bars. They add a fresh, tasty twist. Just make sure they are finely crushed. This will help them mix well with the butter and sugar. Homemade crackers can also let you control the flavors and sweetness.

What is the best chocolate to use for S’mores Bars?

The best chocolate for S’mores Bars is semi-sweet chocolate. It balances the sweetness of the marshmallows and graham crackers. Dark chocolate is another great option if you want a richer taste. Milk chocolate is sweeter and works well too. Use what you like best!

How do I make S’mores Bars without peanut butter?

To make S’mores Bars without peanut butter, simply skip that step. You can replace it with an extra layer of chocolate. Melt more chocolate chips and drizzle them on the crust before adding marshmallows. This keeps the bars creamy and delicious. Use the Full Recipe for more guidance!

You now have all the tools to make delicious s’mores bars. We covered key ingredients, recipes for various diets, and practical tips for success. Remember, perfecting this treat involves careful melting and texture management. Whether you go classic or try a unique variation, don’t fear mistakes. Keep practicing! Store your bars well to enjoy them longer. Now, gather your ingredients and start baking. You’ll impress yourself and others with these treats!

To make these tasty S'mores Bars, you need simple staples. Here’s what you will need: - 1 ½ cups graham cracker crumbs - ½ cup unsalted butter, melted - ½ cup brown sugar, packed - 1 cup mini marshmallows - 1 cup semi-sweet chocolate chips - ½ cup creamy peanut butter - ½ teaspoon vanilla extract - A pinch of salt These ingredients blend together to create that classic S'mores flavor we all love. The graham crackers give a crunchy base, while the chocolate and marshmallows add sweetness and gooeyness. Want to kick your S'mores Bars up a notch? Consider these tasty add-ins: - A handful of crushed nuts, like walnuts or pecans, for crunch - A sprinkle of sea salt on top for a sweet-salty twist - Drizzle some caramel sauce for extra sweetness - Swap in dark chocolate chips for a richer flavor These options can help you personalize your bars and make them even more fun. Have dietary restrictions? Don’t worry! You can still enjoy these bars. Here are some swaps: - Use gluten-free graham crackers to make it gluten-free - Replace butter with coconut oil for a dairy-free option - Choose vegan chocolate chips to keep it plant-based - Use almond or sunflower seed butter instead of peanut butter if you have nut allergies These substitutions ensure everyone can enjoy the delight of S'mores Bars. For the full recipe, check out the earlier section! Start by preheating your oven to 350°F (175°C). This step warms your oven for even baking. Next, grab a 9x9 inch baking pan. You can grease it with butter or line it with parchment paper. Lining the pan makes it easier to remove the bars later. In a medium bowl, mix 1 ½ cups of graham cracker crumbs, ½ cup of melted unsalted butter, and ½ cup of packed brown sugar. Stir well until it forms a crumbly mixture. This is the base of your s'mores bars. Now, press this mixture firmly into the bottom of your prepared pan. Make sure it is even and compact. Bake this crust for 8 to 10 minutes. You want it to be lightly golden. After baking, let it cool a bit before moving to the next step. Next, melt ½ cup of creamy peanut butter in a microwave-safe bowl for about 30 seconds. Once melted, stir in ½ teaspoon of vanilla extract and a pinch of salt. Drizzle this peanut butter mixture over the cooled graham cracker crust. Spread it out evenly. Now, sprinkle 1 cup of mini marshmallows and 1 cup of semi-sweet chocolate chips on top. Gently press them into the peanut butter layer. Bake the bars for another 10 to 12 minutes. Look for golden marshmallows and melted chocolate. Once they are ready, let the bars cool completely before slicing them into squares. For the full recipe, refer to the earlier section. Enjoy your homemade s'mores bars! To melt chocolate, use a microwave or a double boiler. If using a microwave, place chocolate chips in a bowl. Heat for 30 seconds, then stir. Repeat until smooth. Be careful not to overheat, or it will seize. For marshmallows, you can melt them on the stovetop. Heat them slowly in a pot over low heat. Stir often until they are gooey but not burnt. The crust should be firm but not hard. Press the graham cracker mix evenly into the pan. Bake it just until golden brown. This step keeps the bars from being soggy. When adding mini marshmallows, press them down gently. This helps them stick to the crust and not float away during baking. One common mistake is using cold chocolate. Always let it reach room temperature before melting. Another mistake is not cooling the crust enough. If the crust is too hot, it can melt the chocolate and marshmallows. Lastly, don’t skip the salt. A pinch enhances the flavors of chocolate and peanut butter. For the full recipe, check the details above and start your s'mores adventure! {{image_2}} You can make gluten-free s'mores bars easily. Use gluten-free graham crackers instead of regular ones. Make sure to check the brand for gluten-free labels. The rest of the recipe stays the same. The taste will still be sweet and delicious, even without gluten. Want a vegan twist? Swap out the butter for coconut oil. Use dairy-free chocolate chips and vegan marshmallows. These simple changes make a tasty treat for everyone. You can still enjoy gooey chocolate and marshmallow flavors without any animal products. Let’s get creative! You can add flavors to your s'mores bars. Try mixing in crushed cookies, like Oreos, for a fun crunch. You can also add nuts for a little bite. Want a twist? Use flavored chocolate, like mint or orange, for a new taste. The options are endless! If you want the full recipe, check it out in the ingredients section. To keep your s'mores bars fresh, store them in an airtight container. This helps prevent them from drying out. You can place parchment paper between layers to avoid sticking. Make sure to store them in a cool, dry place. Avoid heat sources that can melt the chocolate or marshmallows. When stored correctly, s'mores bars last about a week. If you keep them in the fridge, they can stay fresh for up to two weeks. Just remember that chilling can change the texture. The chocolate may become firmer, and the marshmallows might get a bit chewy. You can freeze s'mores bars for longer storage. First, cut them into squares. Wrap each piece tightly in plastic wrap. Then, place them in a freezer-safe bag or container. They can last up to three months in the freezer. When you’re ready to eat them, let them thaw in the fridge or at room temperature. You can also warm them in the microwave for a few seconds for that fresh-baked taste. For the full recipe, check out the earlier section. Yes, you can use homemade graham crackers in your S'mores Bars. They add a fresh, tasty twist. Just make sure they are finely crushed. This will help them mix well with the butter and sugar. Homemade crackers can also let you control the flavors and sweetness. The best chocolate for S'mores Bars is semi-sweet chocolate. It balances the sweetness of the marshmallows and graham crackers. Dark chocolate is another great option if you want a richer taste. Milk chocolate is sweeter and works well too. Use what you like best! To make S'mores Bars without peanut butter, simply skip that step. You can replace it with an extra layer of chocolate. Melt more chocolate chips and drizzle them on the crust before adding marshmallows. This keeps the bars creamy and delicious. Use the Full Recipe for more guidance! You now have all the tools to make delicious s'mores bars. We covered key ingredients, recipes for various diets, and practical tips for success. Remember, perfecting this treat involves careful melting and texture management. Whether you go classic or try a unique variation, don't fear mistakes. Keep practicing! Store your bars well to enjoy them longer. Now, gather your ingredients and start baking. You’ll impress yourself and others with these treats!

S'mores Bars

Indulge in the deliciousness of S'mores Bars Delight! With graham cracker crumbs, creamy peanut butter, mini marshmallows, and rich chocolate chips, this easy recipe will satisfy your sweet tooth in no time. Perfect for sharing at parties or cozy nights in, these bars are a delightful treat. Click through to discover the simple steps to create these mouthwatering S'mores Bars and impress your friends and family today!

Ingredients
  

1 ½ cups graham cracker crumbs

½ cup unsalted butter, melted

½ cup brown sugar, packed

1 cup mini marshmallows

1 cup semi-sweet chocolate chips

½ cup creamy peanut butter

½ teaspoon vanilla extract

A pinch of salt

Instructions
 

Preheat the oven to 350°F (175°C). Grease a 9x9 inch baking pan or line it with parchment paper for easy removal.

    In a medium bowl, combine graham cracker crumbs, melted butter, and brown sugar. Mix until well combined and crumbly.

      Press the graham cracker mixture firmly into the bottom of the prepared baking pan to form an even base.

        Bake the crust in the preheated oven for 8-10 minutes, or until lightly golden. Remove from the oven and let it cool slightly.

          In a microwave-safe bowl, melt the peanut butter until smooth (about 30 seconds), and stir in vanilla extract and a pinch of salt.

            Drizzle the melted peanut butter mixture over the crust, spreading it evenly.

              Sprinkle the mini marshmallows and chocolate chips on top of the peanut butter layer, pressing them down gently into the mixture.

                Bake for an additional 10-12 minutes, or until the marshmallows are golden and the chocolate is melted.

                  Allow the bars to cool completely in the pan before slicing into squares.

                    Prep Time: 15 min | Total Time: 35 min | Servings: 12

                      - Presentation Tips: Serve the bars on a wooden cutting board and garnish with extra mini marshmallows or a drizzle of melted chocolate for an extra indulgent touch. Enjoy!

                        Leave a Comment

                        Recipe Rating