WANT TO SAVE THIS RECIPE?
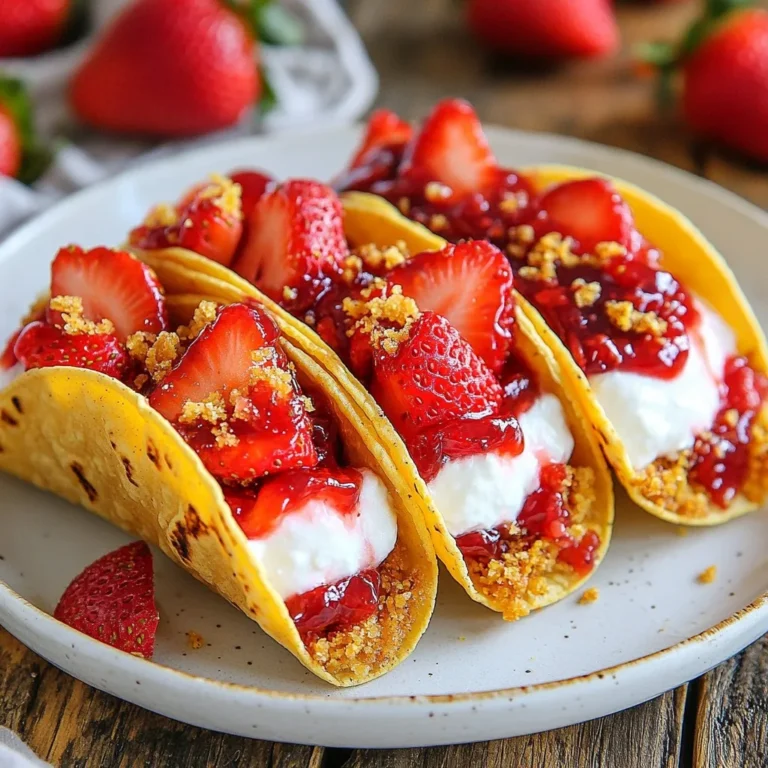
Looking for a fun and tasty twist on dessert? You’ve come to the right place! Strawberry Crunch Cheesecake Tacos are both easy to make and deliciously unique. In this guide, I’ll walk you through the simple steps to create these delightful treats. Whether you want to impress guests or simply treat yourself, these tacos are sure to satisfy. Let’s dive into the ingredients and get started on this sweet adventure!
Why I Love This Recipe
- Fun and Unique Presentation: These cheesecake tacos are not your everyday dessert, making them a delightful surprise for guests at any gathering.
- Delicious Flavor Combination: The creamy cheesecake filling paired with fresh strawberries and crunchy freeze-dried strawberries creates a perfect balance of textures and flavors.
- Easy to Make: This recipe is simple and quick, allowing you to whip up a delicious dessert in no time with minimal fuss.
- Customizable: Feel free to experiment with different fruits or toppings, making this recipe versatile for any occasion or personal preference.
Ingredients
Key Ingredients for Strawberry Crunch Cheesecake Tacos
To make these tasty tacos, you need some key ingredients:
– 1 cup graham cracker crumbs
– 1/2 cup unsalted butter, melted
– 1 cup cream cheese, softened
– 1/2 cup powdered sugar
– 1 teaspoon vanilla extract
– 1 cup heavy whipping cream
– 1 cup fresh strawberries, chopped
– 1/4 cup strawberry jam
– 1/4 cup crushed freeze-dried strawberries (for crunch)
– Mini taco shells (store-bought)
These ingredients create a creamy filling and a crunchy topping. The graham cracker crumbs give a nice base flavor. The fresh strawberries add real fruit taste, while the freeze-dried strawberries provide texture.
Optional Garnishes
You can make your tacos even more special with some fun garnishes:
– Whole strawberries
– Mint sprigs
– Extra crushed freeze-dried strawberries
Garnishes add a fresh look and taste. Whole strawberries look pretty and can be eaten too. A sprig of mint adds a pop of green and fresh flavor.
Tools and Equipment Needed
To prepare these tacos, you’ll need some basic tools:
– Mixing bowls
– Electric mixer
– Baking sheet
– Spoon for filling tacos
– Refrigerator for chilling
These tools help you make the process smooth and easy. Having everything ready makes cooking fun and stress-free.

Step-by-Step Instructions
Preparing the Taco Shells
To start, preheat your oven to 350°F (175°C). Place the mini taco shells on a baking sheet. Bake them for about 5-7 minutes until they are slightly toasted. This step makes them crisp and tasty. Once done, take them out of the oven and let them cool. This cooling time helps them hold their shape when filled.
Making the Cheesecake Filling
In a large mixing bowl, add the softened cream cheese. Beat it with an electric mixer until it is smooth. This might take a minute or two. Next, gradually add in the powdered sugar and the vanilla extract. Keep mixing until everything is well combined. This will create a sweet and creamy base for your cheesecake.
In another clean bowl, pour in your heavy whipping cream. Use a clean electric mixer to whip the cream until stiff peaks form. This means the cream should stand tall when you lift the beaters. Now, gently fold the whipped cream into the cream cheese mixture. This folding adds air, making the cheesecake light and fluffy.
Assembling the Tacos
In a separate bowl, mix the chopped strawberries with the strawberry jam. Make sure every piece is coated well with the jam. This step adds a sweet, fruity burst to your tacos.
Now, it’s time to fill the taco shells. Spoon the cheesecake filling into each baked shell, filling them about halfway. Then, add a spoonful of the strawberry mixture on top of the cheesecake filling. Fill the tacos to the brim to make them look tempting.
For that extra crunch, sprinkle crushed freeze-dried strawberries on top of each taco. This adds a fun texture and bright flavor. Finally, place the assembled tacos in the refrigerator for at least 30 minutes. This chilling time helps the flavors mix and makes them easier to eat.
Tips & Tricks
Achieving the Perfect Cheesecake Consistency
To get a smooth and creamy cheesecake, use softened cream cheese. You can let it sit out for 30 minutes before mixing. Beat it well with an electric mixer. This makes it fluffy and easy to blend. When adding the powdered sugar, do this slowly. Mix until it is fully smooth. Then, whip the heavy cream until it forms stiff peaks. Gently fold this into the cream cheese mix. This adds air, making it light.
Storing Leftover Tacos
If you have leftover tacos, store them in the fridge. Use an airtight container to keep them fresh. Make sure to separate the filling and shells if you can. The shells stay crunchy longer this way. They last about two to three days in the fridge. When ready to eat, you can assemble them again for the best taste.
Serving Suggestions for Maximum Appeal
To impress your guests, serve the tacos on a colorful platter. Add whole strawberries or mint leaves for a pop of color. You can also drizzle some extra strawberry jam on top for added sweetness. For an extra crunch, place some crushed freeze-dried strawberries around the tacos. This makes the dish look nice and taste even better.
Pro Tips
- Use Fresh Strawberries: The flavor and texture of fresh strawberries are unmatched. Look for ripe, sweet strawberries for the best results.
- Chill the Tacos: Allow the assembled tacos to chill for at least 30 minutes. This helps the filling set and enhances the flavors.
- Make Ahead: You can prepare the cheesecake filling a day in advance. Just fill the taco shells right before serving to keep them crispy.
- Experiment with Toppings: Feel free to add other toppings like chocolate drizzle or whipped cream for an extra touch of indulgence.

Variations
Flavor Variations: Other Fruit Options
You can switch up the fruit in these tacos. Think about using blueberries, raspberries, or peaches. Each fruit brings a new taste. For example, blueberries add a sweet and slightly tart flavor. Raspberries offer a bright and fresh note. Peaches give a juicy, summer vibe. Just chop the fruit and mix it with a bit of jam, just like with strawberries. You can create fun flavor combos, too!
Gluten-Free Options
If you need a gluten-free option, look for gluten-free mini taco shells. Many stores offer them now. You can also make your own taco shells using gluten-free flour. For the cheesecake filling, ensure your cream cheese and powdered sugar are gluten-free. This way, everyone can enjoy these tasty tacos without worry.
Alternative Crunch Elements
The crunch adds a fun texture to the tacos. While crushed freeze-dried strawberries are great, you have other choices. Try crushed nuts like almonds or pecans for a nutty flavor. You could also use granola for a chewy crunch. Even chocolate shavings can add a sweet touch. Mix and match these elements to find your favorite crunch!
Storage Info
Recommended Storage Methods
To keep your Strawberry Crunch Cheesecake Tacos fresh, store them in the fridge. Use an airtight container to avoid drying out. If you have extra filling, store it in a separate container. This helps keep the crunch of the taco shells.
Freezing Instructions
You can freeze these tacos if you want to save some for later. However, I recommend freezing just the filling. The taco shells might get soggy when thawed. To freeze, place the filling in a freezer-safe bag. Remove as much air as you can before sealing. You can freeze the filling for up to three months.
Shelf Life of Cheesecake Tacos
These tacos are best enjoyed fresh. They can last about 3-4 days in the fridge when stored properly. After that, the shells might get soft. If you notice any changes in smell or appearance, it’s best to toss them.
FAQs
Can I make the cheesecake filling ahead of time?
Yes, you can make the cheesecake filling ahead of time. Mix the cream cheese, sugar, and vanilla. Then, whip the cream separately. Fold it in just before serving. This keeps the filling light and fluffy. Store it in the fridge in an airtight container for up to two days.
How do I make the tacos crispy?
To make the tacos crispy, preheat your oven to 350°F (175°C). Place the mini taco shells on a baking sheet. Bake them for 5-7 minutes. Watch them closely to avoid burning. This process gives them a nice crunch and helps hold the filling well.
What can I substitute for heavy whipping cream?
You can use several substitutes for heavy whipping cream. A good option is coconut cream. It whips well and adds a nice flavor. You can also use half-and-half or whole milk mixed with butter. For a dairy-free option, use whipped coconut milk.
To wrap up, we covered the key ingredients for Strawberry Crunch Cheesecake Tacos. You learned how to prepare tasty taco shells and a smooth filling. We explored tips for the perfect texture and ways to store leftovers. Feel free to try different fruit flavors or gluten-free options to customize. With these steps and tricks, you’ll create a fun treat everyone will love. Enjoy making and sharing these delightful taco
Strawberry Crunch Cheesecake Tacos
Delicious mini tacos filled with creamy cheesecake and fresh strawberries, topped with a crunchy finish.
Prep Time 30 minutes mins
Cook Time 7 minutes mins
Total Time 1 hour hr 7 minutes mins
Course Dessert
Cuisine American
Servings 12
Calories 250 kcal
- 1 cup graham cracker crumbs
- 0.5 cup unsalted butter, melted
- 1 cup cream cheese, softened
- 0.5 cup powdered sugar
- 1 teaspoon vanilla extract
- 1 cup heavy whipping cream
- 1 cup fresh strawberries, chopped
- 0.25 cup strawberry jam
- 0.25 cup crushed freeze-dried strawberries
- as needed none Mini taco shells (store-bought)
Preheat your oven to 350°F (175°C). Arrange the mini taco shells on a baking sheet and bake them for about 5-7 minutes until they are slightly toasted. Remove from the oven and let them cool.
In a large mixing bowl, beat the softened cream cheese with an electric mixer until smooth and creamy. Gradually add in the powdered sugar and vanilla extract, continuing to mix until fully combined.
In another bowl, use a clean electric mixer to whip the heavy whipping cream until stiff peaks form. Gently fold the whipped cream into the cream cheese mixture until well combined to create a fluffy cheesecake filling.
In a separate bowl, mix the chopped strawberries with the strawberry jam until the pieces are well coated.
Spoon in the cheesecake filling into each baked taco shell, filling each about halfway. Next, add a spoonful of the strawberry jammed strawberries on top of the cheesecake filling, filling the taco shells to the brim.
Sprinkle crushed freeze-dried strawberries on top of each filled taco to add a delightful crunch.
Place the assembled tacos in the refrigerator for at least 30 minutes to set and chill.
Serve on a colorful platter and garnish with whole strawberries or a sprig of mint for an extra pop of color.
Keyword cheesecake, dessert, strawberry, tacos
WANT TO SAVE THIS RECIPE?


